Practical Pediatric Gastrointestinal Endoscopy - part 4 potx
Bạn đang xem bản rút gọn của tài liệu. Xem và tải ngay bản đầy đủ của tài liệu tại đây (454.05 KB, 22 trang )
58 CHAPTER 4
Committee on Drugs, Section on Anesthesiology, American Academy
of Pediatrics. Guidelines for the elective use of conscious sedation,
deep sedation, and general anesthesia in pediatric patients. Pediatrics
1985;76:317–21.
Cot
´
e CJ. Sedation for the pediatric patient: a review. Pediatr Clin North
Am 1994;41:31–58.
Cot
´
e CJ. Sedation protocols: why so many variations? Pediatrics
1994;94:281–3.
Cot
´
e CJ. Monitoring guidelines: do they make a difference? AJR Am J
Roentgenol 1995;165:910–12.
Cot
´
e CJ, Notterman DA, Karl HW, et al. Adverse sedation events
in pediatrics: a critical analysis of contributory factors. Pediatrics
2000;105:805–14.
Cotsen MR, Donaldsen JS, Uejima T, et al. Efficacy of ketamine hydrochlo-
ride sedation in children for interventional radiologic procedures. AJR
Am J Roentgenol 1997;169:1019–22.
Crane M. The medication errors that get that doctors sued. Med Econ
Nov 22,1993;70:36–41.
Dachs RJ, Innes GM. Intravenous ketamine sedation of pediatric patients
in the emergency department. Ann Emerg Med 1997;29:146–50.
Drummond GB. Comparison of sedation with midazolam and ketamine:
effects on airway muscle activity. Br J Anaesth 1996;76:663–7.
Gilger MA, Jeiven SD, Barrish JO, et al. Oxygen desaturation and cardiac
arrythmias in children during esophagogastroduodenoscopy using
conscious sedation. Gastrointest Endosc 1993;39:392–5.
Hanna JP, Ramundo ML. Rhabdomyolysis and hypoxia associated with
prolonged propofol infusion in children. Neurology 1998;50:301–3.
Kauffman RE. Fentanyl, fads, and folly: who will adopt the therapeutic
orphans? J Pediatr 1991;119:588–9.
Kazak AE, Penati B, Brophy P, et al. Pharmacologic and psychologic
interventions for procedural pain. Pediatrics 1998;102:59–66.
Lowrie L, Weiss AH, Lacombe C. The pediatric sedation unit: a mecha-
nism for pediatric sedation. Pediatrics 1998;102:E30.
Lund N, Papadakos PJ. Barbituates, neuroleptics, and propofol for seda-
tion. Crit Care Clin 1995;11:875–86.
Nedihart P, Burgener MC, Schwieger I, et al. Chest wall rigidity during
fentanyl- and midazolam–fentanyl induction: ventilatory and haemo-
dynamic effects. Acta Anaesthesiol Scand 1989;33:1–5.
Parke TJ, Stevens JE, Rice AS, et al. Metabolic acidosis and fatal my-
ocardial failure after propofol infusion in children: five case reports.
Br Med J 1992;305:613–16.
Parker RI, Mahan RA, Giugliano D, et al. Efficacy and safety of intra-
venous midazolam and ketamine as sedation for therapeutic and di-
agnostic procedures in children. Pediatrics 1997;99:427–31.
Payne KA, Coetzee AR, Mattheyse FJ. Midazolam and amnesia in pedi-
atric premedication. Acta Anaesthesiol Belg 1991;42:101–5.
Pepperman ML, Macrae D. A comparison of propofol and other seda-
tive use in paediatric intensive care in the United Kingdom. Paediatr
Anaesth 1997;7:143–53.
Schechter NL. Pain and pain control in children. Curr Probl Pediatr
1985;15:1
–67.
Sugarman JM, Paul RI. Flumazenil: a review. Pediatr Emerg Care
1994;10:37–43.
Swanson ER, Seaberg DC, Mathias S. The use of propofol for sedation in
the emergency department. Acad Emerg Med 1996;3:234–8.
PATIENT PREPARATION 59
Twersky RS, Hartung J, Berger BJ, et al. Midazolam enhances antero-
grade but note retrograde amnesia in pediatric patients. Anesthesiol-
ogy 1993;78:51–5.
Vade A, Sukhani R. Ketamine hydrochloride for interventional radiology
in children: is it sedation or anesthesia by the radiologist? AJR AM J
Roentgenol 1998;171:265–6.
Wolf SI, Shier JM, Lampl KL, et al. EMLA cream for painless skin
testing: a preliminary report. Ann Allergy 1994;73:40–2.
Yaster M, Nichols DG, Deshpande JK, et al. Midazolam–fentanyl intra-
venous sedation in children: case report of respiratory arrest. Pedi-
atrics 1990;86:463–7.
60
5
Diagnostic Upper
Endoscopy Technique
PREPARATION FOR ESOPHAGEAL
INTUBATION
Once sedated, the patient is placed in the left lateral decubitus
position with his or herhead resting ona small pillow in a neutral
position, with the back supported by a folded pillow inserted
between the patient and the sidebars of the gurney.
The height of the gurney is adjusted to a level comfortable
for the endoscopist and assisting nurse (optimal height corre-
sponds to the endoscopist’s elbows). At the beginning of the
procedure, the nurse should be standing behind the patient, with
her left arm supporting the patient’s head in the occipital area
and her right palm beneath the chin. This technique will help en-
sure the constant position of the patient’s head during insertion
of the endoscope.
The endoscopist should stand approximately 1 ft away from
the gurney. This should correspond to the distance of the en-
doscopist’s slightly flexed left arm from the patient’s mouth.
The position is optimal for aligning the endoscope with the
pharyngeal and esophageal axis and for providing good visu-
alization of the tongue. Placement of a bite-guard is manda-
tory for all children before the procedure, except infants without
teeth.
The bite-guard serves three important functions:
1 Protection of the endsocope
2 Facilitation of proper positioning of the endoscope between
the palate and the tongue
3 Anchoring of the suction catheter
A modern bite-guard consists of a plastic cylinder with a front
hollow bumper and side clips with an attached strip of ribbon,
which helps to keep it centrally located between teeth during the
procedure.
Despite clever design, close attention should be paid to the
position of the bite-guard to avoid mechanical damage to the
endoscope when the child becomes more awake or agitated.
In younger children, insertion of a bite-guard is simplified
by adequate sedation. Appropriate position of the bite-guard
should be verified by pulling the lips gently along the outside
bumper to protect them from accidental entrapment between the
teeth and the bite-guard.
Practical Pediatric Gastrointestinal Endoscopy
George Gershman, Marvin Ament
Copyright © 2007 by Blackwell Publishing Ltd
DIAGNOSTIC UPPER ENDOSCOPY TECHNIQUE 61
ASSEMBLING THE EQUIPMENT
AND PREPROCEDURE CHECKUP
1
Insert the connection plug into a light source tightly. A faulty
connection may result in a disrupted or absent image on the
monitor and malfunction of the air/water delivery system.
2 If using a videoendoscope, connect the endoscope and video-
processor with the special cable.
3 A fiberscope can be connected to the videoprocessor with a
special adapter to transmit an endoscopic picture to the monitor.
4 Some of the older “Olympus Co’’ light sources require an ad-
ditional connection through a small cable (part of the scope to
videoprocessor connector) for selection of OES (Olympus en-
doscopy system) mode for fiberscopes and 100–200 mode for
videoendoscopes.
False connection or wrong mode selection will result in im-
proper white balance, excessive brightness, or a “whiteout’’
screen, which results in loss of the endoscopic image.
5 Push the ignition button to activate the light source.
6 Check the white balance.
7 Fill the water container up to three-fourths of its capacity with
sterile water.
8 Fill the water channel by pressing and holding down the
air/water valve and confirming vigorous water spurting from
the nostril. If water is not running out at a decent pressure or is
just barely dripping out, check the status ofthe air pump,connec-
tion of the light source and the water container to the endoscope,
and integrity of the “O’’ ring. If the problem persists, tighten
the cap of the water container and determine if the air/water
valve is properly mounted. Consider sequential replacement of
an air/water valve, water container, and the endoscope if all
other options have been exhausted.
9 Adjust the air pump to medium intensity to prevent excessive
insufflation of the stomach, which provokes patient irritability
and retching secondary to increased intra-abdominal pressure,
elevation of the diaphragm, and decreased tidal volume espe-
cially in infants and toddlers. Excessive use of air increases the
risk of vomiting and aspiration. In our opinion, the use of the
high air pressure setting is limited to percutaneous endoscopic
placement of gastrostomy tubes.
10 Check and adjust suction intensity. If it is inadequate, check
the suction system in a stepwise plan. First, make sure that the
suction switch is in “On’’ position; the suction cable is tightly
connected to the endoscope and the suction canister. If suction is
still inadequate, reassemble the suction canister properly. Then,
concentrate on the suction valve: pull it out for visual inspec-
tion, dip it in water, and reinsert it back by pressing down into
62 CHAPTER 5
the suction nostril of the control panel until a soft click occurs.
Replace the endoscope if all previous steps have failed.
11 Wipe the lens of the endoscope with alcohol swab if the
image is blurred.
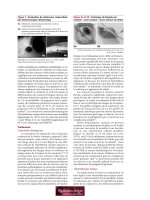
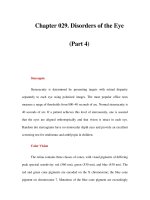
Fig. 5.1 Control panel handling.
The control panel is in the left
palm between the fourth and fifth
fingers. Slight extension of the
arm and the connecting tube
hanging behind the thumb
balances the weight of the control
panel and further secures the
correct grip.
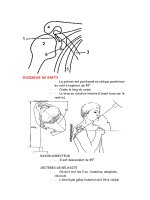
ENDOSCOPE HANDLING
The endoscopist holds the control panel of the endoscope in the
left, slightly extended palm using the fourth and fifth fingers,
with the connecting tube hanging behind the thumb (Fig. 5.1).
The index and the middle fingers are positioned comfortably
above the suction and air/water valves, respectively (Fig. 5.2).
This allows the endoscopist to use the thumb for rotation of the
large up/down (U/D) knob in a clockwise or counterclockwise
direction (Fig. 5.3). The middle finger can assist with extensive
rotation, by locking the knob from above and leaving the thumb
free for continuous movement from below (think about ratchet-
wheel) (Fig. 5.4).
An experienced endoscopist can also use the thumb for simul-
taneous adjustment of the small right/left (R/L) knob. Lateral
deflection of the bending portion of the endoscope can be pro-
duced by twisting the left hand and/or forearm in clockwise or
counterclockwise direction. Generated force is transmitted from
the control panel to the shaft of the endoscope.
The effectiveness of torque technique is directly related to the
degree of straightening of the working part of the endoscope
between the control panel and the bite-guard. Moving the right
shoulder forward for counterclockwise rotation and the left
shoulder for clockwise rotation reinforces it. Thus, appropri-
ate manipulation with the U/D knob and positioning of the
endoscope and the left arm are sufficient for precise orientation
without frequent movement of the R/L knob.
Fig. 5.2 Approach to the
air/water and suction buttons.
The index and the ring fingers are
free to work with the air/water
and suction buttons.
Fig. 5.3 Manipulations with the
R/L and U/D knobs. The thumb
is the main tool for rotation of the
U/D and R/L knobs.
Fig. 5.4 Technique of the
extensive rotation of the control
knobs. The middle finger can
serve the function of the locker
during extensive rotation of the
knobs: ratchet-wheel technique.
DIAGNOSTIC UPPER ENDOSCOPY TECHNIQUE 63
The R/L knob is useful for targeting the biopsy, U-turn ma-
neuver, and intubation of the second portion of the duodenum.
The index and the middle fingers of the left hand operate the
suction and air/water valves, respectively. The endoscopist uses
the right hand to advance, withdraw, and rotate the shaft of
the endoscope. In addition, the right hand is used for handling
biopsy forceps or other accessories.
TECHNIQUE OF ESOPHAGEAL INTUBATION
There are three types of esophageal intubations: direct obser-
vation, blind, and finger assisted. Direct observation technique
is the best and safest for pediatric upper gastrointestinal (GI)
endoscopy with the forward view endoscopes. After all prepa-
rations have been made and the endoscope has been found to be
properly functioning, it is lubricated to the 15-cm mark and held
by the endoscopist as described above. The endoscopist holds
the control panel in the left hand and the shaft in the right hand
between the thumb, index and middle finger at the 20-cm mark.
The bending portion of the endoscope should be straightened
to achieve vertical movement when the U/D knob is used. Just
before the insertion of the scope into the mouth, the tip of the
endoscope should be bent downward (in general, the smaller the
child, the smaller the radius of bending). It will mark the plane
of the endoscope, which should be aligned with the longitudinal
axis of the pharynx by clockwise or counterclockwise rotation.
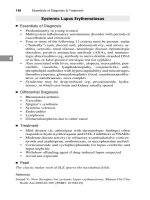
At the beginning, full attention should be paid to the proper
placement of the endoscope into the mouth (Fig. 5.5). It is es-
pecially important in infants and toddlers due to the relatively
small space to work with and easy displacement of the tongue
posteriorly and superiorly by the bite-guard.
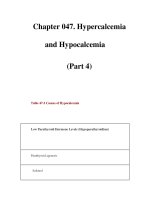
The rule of thumb is to concentrate on the child (not on the
screen) until the endoscope is placed properly along the midline
Soft palate
Tongue
Bite-guard
Median raphae
of the soft palate
Fig. 5.5 The initial phase of the esophageal intubation. The
endoscopist should concentrate of the proper positioning of the scope
in the oral cavity: the view of the tongue and the soft palate through the
bite-guard.
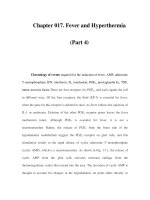
64 CHAPTER 5
Median raphae of
the soft palate
Fig. 5.6 The correct approach of the pharynx. The midline of the
tongue and the palate shows the correct direction of the insertion.
of the tongue and thetip of the scope is no longer visible(Fig. 5.6).
If the tongue is flipped up or sticking out, attempts to insert
the endoscope lead to further displacement of the tongue pos-
teriorly, increasing the risk of apnea and accidental trauma of
the buckle or pharyngeal mucosa due to lateral displacement
of the instrument. In this specific instance, it is useful to remove
the bite-guard, fit it over the shaft, slide it back, and transfer
the endoscope to the assistant, who has to keep it parallel to the
longitudinal pharyngeal axis.
Meanwhile, the endoscopist inserts the left index finger into
the child’s mouth and using it as a tongue blade pushes the
tongue inferiorly and anteriorly, while placing the endoscope
over the tongue with the right hand. Then, the bite-guard is
fitted back into the mouth. Finally, the endoscopist takes over
the control panel and adjusts the position of the endoscope as
described above. At this point, all further manipulations with
the scope should be carried on under direct observation of the
picture on the monitor. Remember that the endoscopic image
is reversed due to bending of the instrument. In other words,
relatively pale tongue with its rough texture occupies the upper
part of the screen, while the bright-pink and smooth palate ap-
pears at the bottom of the monitor (Fig. 5.7). Move the endoscope
slowly forward along the midline and gently angle it down by
rotating the U/D knob counterclockwise. It will facilitate sliding
into the pharynx over the root of the tongue, which may be seen
transiently as a papilla structure (Fig. 5.8).
The lumen of the oropharynx could be lost momentarily just
before the pharynx is revealed. If adequately angled, the endo-
scope is slowly inserted forward. In some instances the posterior
wall of the pharynx will be viewed, but oftentimes the first struc-
ture to emerge will be the epiglottis. It will occupy the upper part
of the screen as a crescent-shaped object in a horizontal direction
(Fig. 5.9). Failure to find the epiglottis indicates that the endo-
scope was advanced too far anteriorly (above the epiglottis) or
DIAGNOSTIC UPPER ENDOSCOPY TECHNIQUE 65
Tongue
Soft palate
Fig. 5.7 The reverse image of the tongue and the palate. The tongue is
in the upper part of the screen while the soft palate occupies the lower
part of the monitor. The beginners should use to the reversed images
created by the endoscopes.
Root of the tongue
Tonsil
Posterior wall of
the pharynx
Epiglottis
Fig. 5.8 The root of the tongue. The root of the tongue appears as the
rough texture, papilla structure. It may be seen briefly or not at all
during routine procedure. However, careful examination of this area
and tonsils should be attempted in children with suspected
posttransplantation lymphoproliferative disorder.
Epiglottis
Pharyn x
Fig. 5.9 The initial view of the epiglottis. The epiglottis should be
found and seen clearly before esophageal intubation is attempted.
66 CHAPTER 5
Cricoarytenoid
cartilage
Pharynx
Tracheae
Posterior
wall
Fig. 5.10 The endoscopic anatomy of the larynx: the panoramic view.
too close to the cricoarytenoid cartilages, or was angled laterally.
In any circumstances when the orientation is lost, follow the rule
of thumb: pull the endoscope back until the orientation is fully
restored. In this particular case, pull the endoscope back to the
first recognizable structure, for example, the uvula pointed up
from the low portion of the screen, laterally located tonsils, or
“median raphae’’ of the tongue from above. Reposition the shaft
of the endoscope along the midline, push it forward slowly, and
rotate the U/D knob counterclockwise simultaneously. Stay on
the same track until the larynx is clearly viewed. Stop advancing
if resistance is felt or if the picture becomes diffusely pink and
blurry.
The larynx has a triangular shape, with the epiglottis above,
two small spherical structures (i.e., the arytenoid cartilages at the
bottom) and an aryepiglottic fold on a side (Fig. 5.10). True vocal
cords can be occasionally seen as a white/silverupside downlet-
ter “V’’(Fig. 5.11). Close view of the vocal cords is a warning sign
of excessive deviation of the endoscope anteriorly. Remember
that the esophageal orifice is hiding behind the cricoarytenoid
cartilages (i.e., at the very bottom of the screen). In order to reach
True vocal cords
Tracheae
Fig. 5.11 The endoscopic appearance of the vocal cords. A close
capture of the vocal cords indicates that the tip of the scope is advanced
too far anteriorly. The shaft must be pulled back a few centimeters
immediately and the tip should be deviated down toward the posterior
wall.
DIAGNOSTIC UPPER ENDOSCOPY TECHNIQUE 67
Posterior wall
Direction to the
esophagus
Direction to the
esophagus
Fig. 5.12 The close-up view of the cricoarytenoid cartilages. The
esophageal orifice is hiding behind/posteriorly to this structure: below
the cliff of the cartilage.
this point, the tip of the endoscope should be angled downward
toward the posterior wall of the pharynx by rotation of the U/D
knob in clockwise direction. The opened cricopharyngeal por-
tion of the esophagus can be seen briefly during swallowing as
a dark ring slightly lateral from the larynx.
Direct midline intubation of the esophagus is practically im-
possible due to significant pressure generated by the larynx to-
ward the posterior pharyngeal wall. This resistance will push
the endoscope either to the right or to the left of the larynx
(Fig. 5.12). In the first case, rotate the shaft clockwise to about
one-fourth turn. In the second case, adjust the shaft to the same
degree counterclockwise (Fig. 5.13). In either case, advance it for-
ward slightly until you see the mucosal fold crossing the upper
part of the screen in a diagonal fashion (Fig. 5.14). If the direc-
tion of insertion is unchanged at this point, the endoscope will
enter the “periform recess.’’ Rotate the shaft in the opposite di-
rection and angle the tip of the endoscope up, by rotating the
U/D knob counterclockwise (Fig. 5.15). If the resistance is di-
minishing, keep advancing the endoscope along the sliding-by
mucosa. Spontaneous opening of the esophagus helps to adjust
the position of the endoscope and simplifies the intubation pro-
cess. In case of persistent resistance or loss of orientation, pull
the endoscope back to the level of the arytenoids cartilage and
repeat the intubation from the opposite side of the larynx.
Esophageal
orifice
Larynx
Fig. 5.13 Side-view of the groove between the lateral wall of the
larynx and pharynx. The shaft was rotated counterclockwise to
approach the esophageal orifice. Direct intubation of the esophagus
along the midline is impossible due to extensive pressure between the
posterior wall of the larynx and anterior wall of the pharynx.
68 CHAPTER 5
Pharyngoepiglottic
fold
Esophagus
Fig. 5.14 The pharyngoepiglottic fold. It signals to switch rotation
and deviate the tip of the scope upward.
In neonates and small infants, additional rotation of the endo-
scope once it has been already inserted into the cervical esopha-
gus is necessary to overcome the resistance and reduce the force
pushing the endoscope forward into the esophagus.
During swallow, the larynx moves superiorly to protect the
airway. It is useful to pull the endoscope back with the swal-
low and advance it quickly forward through the briefly opened
pharyngeal portion of the esophagus. When the tip of the endo-
scope is submerged between the cricoid cartilage and posterior
wall of the pharynx longer than 10–15 seconds, it may induce
irritability and agitation even in well-sedated patients. Apnea
and/or bradycardia, especially in infants and toddlers, may also
occur due to constant pressure on the larynx and irritation of the
nearby superior laryngeal nerve. If intubation of the esophagus
lasts more than 20 seconds, it is wise to pull the endoscope out
until the child regains normal breathing.
In addition, resistance to passage of the endoscope, the pres-
ence of light in the lateral neck, or loss of clear picture warrants
the withdrawal of the endoscope.
To facilitate subsequent esophageal intubations, an endo-
scopist should wait for spontaneous opening of the esophageal
orifice or use air insufflations and/or brief (1 or 2 s) water irri-
gation. To avoid aspiration, this technique should be used only
when the tip of the endoscope has been inserted behind the lar-
ynx and deviated from the midline.
More open
esophageal orifice
Larynx
Fig. 5.15 Close-up view of the esophageal orifice. Rotation in the
opposite direction allows positioning the tip of the scope toward the
esophagus and away from the “periform recess”.
DIAGNOSTIC UPPER ENDOSCOPY TECHNIQUE 69
After successful intubation of the upper esophageal sphinc-
ter, the endoscope should be advanced strictly along the lumen.
The cervical esophagus is closed by tonic contractions of the
cricopharyngeal muscle. It is only partially seen during ante-
grade insertion of the endoscope. Therefore, air insufflation is
necessary to keep the tip of the endoscope on a safe distance
from the esophageal wall. More detailed examination of the cer-
vical esophagus is feasible with muscle relaxants, e.g., during
foreign body removal. Advancement of the endoscope toward
the thoracic inlet is facilitated by light clockwise rotation.
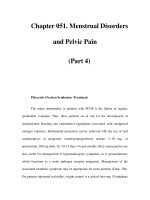
Fig. 5.16 The second
physiological narrowing of the
esophagus. It does not have sharp
borders and is always unilateral.
Fig. 5.17 The distal esophagus.
It tapers down toward the hiatal
notch.
The thoracic portion of the esophagus is constantly opened
except during brief peristaltic closures. It makes detailed exam-
ination of the entire tubular esophagus quite easy without air
insufflation. The distention of the esophagus with air is needed
only in few occasions such as extraluminal compression, foreign
bodies, esophageal varices, and severe esophagitis. Intermittent
clockwise or counterclockwise rotations of the endoscope are
necessary to keep the instrument in the middle of the esophageal
lumen. This position of the endoscope is optimal for a panoramic
view of the esophagus.
The lumen of the thoracic esophagus is narrowed down at the
area of the so-called second physiological narrowing created by
the left main bronchus. It is always unilateral (Fig. 5.16). Bilateral
narrowing of the thoracic esophagus is pathological, and further
workup should be considered to rule out double aortic arch or
aberrant subclavian artery.
The useful landmark of the distal esophagus is a pulsation of
the left atrium. Near the level of the diaphragm the distal esoph-
agus is tapering down in a funnel shape (Fig. 5.17). It deviates
to the left, passing through the diaphragmatic notch. The bor-
der between the relatively pale esophageal and brighter gastric
mucosa, the so-called Z-line, is slightly irregular (Fig. 5.18). The
location of the Z-line in relation to the hiatal notch has normal
variations. In general, elevation of the Z-line by 2 cm or more
Z-line
Fig. 5.18 Z-line. The junction between the pale esophageal and richer
colored gastric mucosa is slightly irregular. It is located at the level or
within 2 cm above the hiatal notch.
70 CHAPTER 5
above the diaphragm is abnormal. For correct estimation of the
location of the diaphragmatic hiatus,the endoscopist shouldfind
the area where esophageal lumen closes during inspiration and
opens with expiration. This is not always easy to do during ante-
grade endoscopy in a deeply sedated child with shallow breath-
ing. The location of the diaphragm in relation to the Z-line be-
comes more obvious with retrograde observation. To follow the
natural course of the abdominal portion of the esophagus, the
endoscope has to be slowly advanced and rotated counterclock-
wise with simultaneous elevation of the tip of the instrument.
Straightforward approach to enter the stomach will result in loss
of orientation due to close proximity of the posterior wall of the
cardia or upper body. The stomach is recognized by the folds
of the greater curvature between 5 and 7 o’clock directions as
well as by a pool of mucus (Fig. 5.19). At this point, the en-
doscope should be rotated clockwise and bent downward until
appearance of a panoramic view of the gastric body is achieved
(Fig. 5.20). Four slightly outlined folds between 1 and 3 o’clock
directions highlight the lesser curvature. These folds disappear
quickly during insufflation.
Fig. 5.19 Prominent fold of the
greater curvature of the stomach.
Appearance of these folds is the
sign of a successful intubation of
the stomach.
Fig. 5.20 Panoramic view of the
gastric body. It can be achieved
by clockwise rotation of the shaft
and by elevation of the tip of the
scope.
To assure good patient tolerance of the procedure, it is impor-
tant to minimize the amount of air pumped into the stomach.
It is especially important in neonates and infants, who are quite
sensitive to gastric distention and may become irritable, retch,
and develop respiratory distress or bradycardia.
Further rotation and bowing of the tip of the endoscope up-
ward will facilitate the advancement of the instrument toward
the gastric angularis. The junctionof the gastricbody and antrum
is marked by a prominent gastric angle from above and loss of
folds of the greater curvature from below (Fig. 5.21). At this point
it is useful to elevate the tip and advance the endoscope further
toward the antrum.
Resistance or lossof orientation warrants pullingback. In cases
of a so-called cascade stomach, it is difficult to reach pylorus
just by pushing the endoscope forward. Instead, move the tip
of the endoscope upward, advance it forward, rotate the shaft
clockwise, and pull it back. Repeat this maneuver and push the
endoscope slightly deeper each time until the pylorus appears
on the screen.
A normal pylorus looks like a spiral ring, which disappears
during peristalsis. The length of the normal pylorus channel dur-
ing relaxation is approximately 3–5 mm.
For successful intubation of the pylorus, the endoscope should
be advanced along the prepyloric folds. The tip has to be bent
slightly downward to avoid flipping into a retroflexed position
(Fig. 5.22).
If the pylorus is lost during peristalsis, it is useful either to wait
until it opens up spontaneously or to pull the endoscope 3–4 cm
backward to regain a panoramic view of the prepyloric antrum.
DIAGNOSTIC UPPER ENDOSCOPY TECHNIQUE 71
Gentle advancement is enough to pass the endoscope through
the pylorus. In rare cases, attempts to bypass the pylorus will
move the endoscope away from the target.
In suchinstances it is useful to pull the endoscope back into the
gastric body, decompress the stomach, and approach thepylorus
as close as possible.
Fig. 5.21 Gastric angularis. The
detail image of the angularis can
be easily obtained during
withdrawal phase of the
procedure: (i) position the tip of
the scope at the level of the distal
body and (ii) rotate the scope
counterclockwise and advance
forward.
Keep pressure on the pylorus and turn the side knob to angle
the endoscope toward the visible portion of the pylorus until the
endoscope begins moving toward the center of the pyloric ring.
Sometimes it is useful to pull the endoscope back slightly when
it is almost embraced by the pylorus.
Passage of the pylorus is manifest by disappearance of resis-
tance. The endoscopist must be careful to avoid blind trauma of
the duodenal bulb due to rapid advancement of the endoscope.
The duodenal bulbshould be examinedcarefully before explo-
ration of the secondportionofthe duodenum. The endoscope has
to be pulledback toward pylorus slowlyand deviated to theright
to achieve a panoramic view of the duodenal bulb (Fig. 5.23).
Fig. 5.23 Panoramic view of the
duodenal bulb. It is useful for
correct engagement of the
endoscope beyond the superior
duodenal angle.
There is a “blind’’ zone in the proximal part of the duodenal
bulb between the 3 and 6 o’clock position. Rotating the patient
into the prone position facilitates exploration of this area.
The walls of the duodenal bulb are labeled traditionally as
anterior, posterior, lesser, and greater curvatures (Fig. 5.24).
Certain corrections in the orientation inside the duodenal bulb
should be made with respectto the stage of theupper endoscopy:
advancement of the endoscope toward the duodenum is asso-
ciated with varied degree of loop formation. Alternatively, the
endoscope is more or less straightened on the way back to the
stomach (Fig. 5.25).
An accurate location of lesions in the duodenal bulb is impor-
tant for patients with bleeding duodenal ulcer. Bleeding ulcers
on the posterior wall of the distal portion of the duodenal bulb
or the superior duodenal angle are associated with a high risk
Prepyloric fold
Fig. 5.22 Panoramic view of the antrum. At this stage of the
procedure the tip of the scope should be deviated down to prevent
flipping of the shaft into U-turn position. The prepyloric folds are
pointed toward the pylorus.
72 CHAPTER 5
9
8
7
6
10
11
12
1
2
3
4
5
Fig. 5.24 Endoscopic mapping
of the duodenal bulb during
insertion phase of the procedure:
anterior wall is located between
6 and 9 o’clock; posterior wall is
located between 12 and 3 o’clock;
lesser curvature or medial wall
is located between 9 and
12 o’clock; greater curvature or
lateral wall is located between
3 and 6 o’clock.
8
7
9
10
6
11
12
1
2
3
4
5
Fig. 5.25 Mapping of the walls
of the duodenal bulb after
reduction of the gastric loop:
anterior wall is now located
between 5 and 8 o’clock; posterior
wall is now located between 2
and 11 o’clock; lesser curvature or
medial wall is now located
between 8 and 11 o’clock; greater
curvature or lateral wall is now
located between 2 and 5 o’clock.
of recurrence due to intense blood supply to the area and close
proximity of the pancreas.
“Pull-and-twist” technique
Intubation of the second portion of the duodenum requires
r
straightening of the endoscope and
r
clockwise rotation.
The goal of the first maneuver is restoration of the normal
anatomy of the stomach, which is always inadvertently dis-
turbed by the endoscope pushed forward and looped on its way
to the duodenum. The second element of the technique is clock-
wise rotation of the shaft. This is necessary to achieve an axial
alignment between the stomach andthe duodenum and to “open
up’’ the twisted superior duodenal angle.
Upon entering the duodenal bulb, a lumen of the transitional
zone between the distal duodenal bulb and the superior duode-
nal angle appears as a slot, which lies quite often in a plane of
“AC’’ line (Fig. 5.26).
A
C
Fig. 5.26 Appearance of the
transitional zone between the
duodenal bulb and the superior
duodenal angle. AC line reflects
the usual configuration of this
transitional zone.
In this scenario, exploration of the second portion of the duo-
denum begins with the advancement of the endoscope forward
and positioning of the endoscope just below the AC line. The
next step involves bending the tip of the endoscope up and to
the right in the 5 o’clock direction. This will anchor the endo-
scope to the superior duodenal angle. Finally, rotate the shaft
roughly 90
◦
clockwise and pull it back simultaneously until the
duodenal lumen is clearly visible.
DIAGNOSTIC UPPER ENDOSCOPY TECHNIQUE 73
If duodenal folds are sharply demarcated but the duodenal lu-
men is still obscure,rotatethe endoscope counterclockwise about
a quarter turn and orient the tip in the 10–11 o’clock directions.
Intubation of the second portion of the duodenum can be chal-
lenging if the transitional zone between the distal duodenal bulb
and superior duodenal angle is almost horizontal (Fig. 5.27). In
this case, attempt the standard pull-and-twist technique first. If
unsuccessful, pull the endoscope back to the upper portion of
the gastric body, decompress the stomach, and repeat duodenal
intubation. The keys to success are minimal insufflation and
avoidance of pushing the endoscope straightforward against in-
creasing resistance. If the technique is not working, position the
tip of the endoscope in the middle of the duodenal bulb and
rotate the endoscope counterclockwise. It might straighten the
axis of the proximal duodenum and “unlock’’ the superior duo-
denal angle. While the duodenal lumen becomes wider, continue
counterclockwise rotation and pull the endoscope back simulta-
neously until the second portion of the duodenum is reached.
Fig. 5.27 Horizontal
configuration of the transitional
zone between the duodenal bulb
and the superior duodenal angle.
Decompression of the stomach
and reduction of the gastric loop
should precede an exploration of
the second portion of the
duodenum. Counterclockwise
rotation may facilitate intubation
of the duodenum beyond the
duodenal bulb.
Intubation of the second portion of the duodenum in neonates
and infants is quite simple with a thin 5-mm endoscope: it re-
quires only gentle advancement. The 7- and 8-mm pediatric en-
doscopes are more rigid and difficult to straighten during duo-
denoscopy in neonates or infants. An attempt to perform the
pull-and-twist maneuver in this instance usually results in dis-
placement of the endoscope back into the stomach. Instead, push
the endoscope gently toward the superior duodenal angle and
move the tip to the right.
Fig. 5.28 Major duodenal
papilla of Vater. It is the hallmark
of the second portion of the
duodenum. It is seen more clearly
during withdrawal phase at 11–12
o’clock location.
If resistance is minimal, continue advancement. As soon as
“crescent’’ of the duodenal lumen appears on the screen, rotate
the endoscope counterclockwise slightly (about 15–20
◦
) and ad-
just the position usingtheU/D knob to achieve apanoramicview
of the second portion of the duodenum. Advance the endoscope
forward until the duodenal lumen begins unfolding or moving
away due to increased resistance and looping of the endoscope
in the stomach.
The hallmark of the second portion of the duodenum is the
papilla of Vater (Fig. 5.28). Although its anatomical position is
obviously constantin an individual patient, the endoscopic map-
ping may vary between the intubation, when the duodenum is
more stretched and twisted, and the withdrawal phase of the
procedure, when it is straighter.
During insertion, the major papilla is usually found between
the 9 and 10 o’clock directions on the medial wall of the second
portion of the duodenum. During withdrawal of the endoscope
from the distal duodenum, the location is shifted toward the
12 o’clock direction.
It is not alwayseasytofind the major papilla ortoobtainthe de-
tailed images with the forward view endoscopes. This limitation
74 CHAPTER 5
is derived from the technical design of the objective lens of these
instruments, which create a tangential and quite narrow view of
the convex medial wall of the descending duodenum.
To overcome this limitation, the tip of the endoscope should
be placed almost above and perpendicular to the major papilla,
i.e., in retroflexion (Fig. 5.29).
Fig. 5.29 Retroflexion of the
scope in the duodenum. This
technique allows a detail
examination of the major
duodenal papilla.
It is more practical and easy to perform this maneuver after
exploration of the distal duodenum. In many cases, it can be
achieved by pulling back the endoscope in order to straighten
the shaft in the stomach along the lesser curvature. As a result,
this will create force to push the tip of the endoscope forward.
The hallmark of the third portion of the duodenum is the su-
perior mesenteric artery responsible for a prominent pulsation
of the right part of the duodenal wall.
The lumen of the fourth portion of the duodenum is narrowed
at the level of ligament of Treitz (Fig. 5.30).
Fig. 5.30 The endoscopic
appearance of the duodenum at
the level of the ligament of Treitz.
Maximal straightening of the endoscope in the stomach limits
the depth of the duodenal intubation. In majority of children, the
third portion of the duodenum can be reached with the above-
described technique.
After examination of the distal duodenum is completed, pull
the endoscope back and angle it up slowly in the 12 o’clock
direction until the longitudinal fold is revealed (Fig. 5.31). At
this point, the major papilla can be reached either by careful
withdrawal by an additional 3–4 cm and slight rotation in the
counterclockwise direction, or by gently pushing the endoscope
forward with upward and right side deflection, using the both
control knobs with simultaneous counterclockwise twisting.
Longitudinal
fold
Fig. 5.31 The longitudinal fold.
It is the best guide to the major
duodenal papilla.
More detailed images of the papilla of Vater can be obtained
with a side view duodenoscope (Fig. 5.32).
The small duodenal papilla is located 3–4 cm proximal to the
major one. It can be found in the right upper corner of the lumen
between the 1 and 2 o’clock position. It is a smooth, 4–5-mm
structure, which resembles a sessile polyp.
Withdrawal phase of upper GI endoscopy is the best for de-
tailed observation of the entire duodenum, stomach, and the
esophagus.
Bulging
papilla
due to
impacted
stone
Sphincterotomy
Stone
Sphincterotome
Fig. 5.32 The major duodenal papilla. The side-view duodenoscope
allows obtaining the detail image of the major duodenal papilla and
performing endoscopic retrograde cholangiopan-creatography (ERCP)
and sphincterotomy.
DIAGNOSTIC UPPER ENDOSCOPY TECHNIQUE 75
Fig. 5.33 The view of the
gastric body during initial phase
of the retroflexion maneuver.
Fig. 5.34 Appearance of the
cardia after partial withdrawal of
the shaft during retroflexion
maneuver.
Fig. 5.35 More detail view of
the cardia with additional
withdrawal of the scope.
Retroflexion in the stomach or the so-called J-maneuver is the
best technique for careful exploration of the gastric cardia and
fundus. It is reasonable to perform retroflexion after examina-
tion of the duodenum to avoid overinflation of the stomach. In
patients with acute GI bleeding the stomach may contain a large
amount of blood and clots. In this circumstance, it is more prac-
tical to attempt retroflexion in the beginning of the procedure,
while the stomach is not filled with extra fluid added during
irrigation and for cleaning away the blood from the lenses.
Z-line
Fig. 5.36 Close up-view of the
cardia. This helps to examine the
area and to delineate the spatial
relationship of the Z-line and the
hiatal notch.
The retroflexion technique consists of a few steps:
First, the tip of the endoscope should be positioned in the middle
of the gastric body and oriented toward the anterior wall in a
10 o’clock direction. Next,bendthetip of the endoscope further
up and advance the shaft forward until the angularis emerges
diagonally, separating the gastric body on the left from the
antrum on the right part of the screen (Fig. 5.33).
Pull the endoscope back and rotate it clockwise to achieve a
close-up view of the fundus (Figs. 5.34 and 5.35).
For detailed image of the cardia, target biopsy, or hemostasis
of the region, find the grooves between the shallow folds of
the lesser curvature during counterclockwise rotation and pull
the endoscope back slowly. Recognition of Z-line indicates the
end of withdrawal (Fig. 5.36). This part of retroflexion maneu-
ver should be performed with caution to avoid an accidental
impaction of the sharply bended tip of the endoscope in the
distal esophagus.
To get away from the cardia, safely push the endoscope forward,
rotate it clockwise, and return the control knobs in neutral po-
sition. Check and unlock the control knobs if they lock acci-
dentally, to avoid a blind trauma of the gastric mucosa. De-
compress the stomach as much as possible before extubation.
It is very important to straighten the shaft between the control
panel and bite-guard to facilitate orientation and transmis-
sion of the rotating force to the tip of the instrument. Careful
76 CHAPTER 5
examination of the esophagus should be carried out until the
endoscope is withdrawn completely.
Biopsy technique
Histological verification ofmanydiseases involving the upperGI
tract (e.g., esophagitis, gastritis, and celiac disease) is crucial for
a definitive diagnosis. In this respect, sufficient tissue samples
and proper orientation are key to correct interpretation of the
biopsy.
It is always possible to obtain an adequate tissue sample (even
with small forceps) if an endoscopist is familiar with the appro-
priate technique.
There are three universal rules:
1 Endoscopic biopsy is not a blind procedure.
2 The forceps should not be advanced more than 2 cm beyond
the tip of the scope.
3 Forceful pushing of the forceps up against a wall is a danger-
ous and ineffective way to obtain more tissue.
Technically, esophageal biopsy is more difficult than either
gastric or duodenal biopsy.
The most common indication for esophageal biopsy in pedi-
atrics is suspected esophagitis. For correct interpretation, each
biopsy site should be located using the Z-line as the reference
point. To avoid confusing results, at least two biopsies have to
be taken from 2 cm above the gastroesophageal junction.
The number and the site of the gastric and duodenal biopsies
are determined according to suspected GI pathology. For ex-
ample, biopsy from four different sites is recommended to con-
firm Helicobacter pylori (HP) infection: two samples have to be
taken from the prepyloric antrum including a sample for CLO
(Campylobacter-like organisms) test, one from the lesser curva-
ture of the antrum, and one from the greater curvature of the
distal body.
In case of an ulcers or erosions, biopsies should be taken from
their margins. Special attention should be paid to the first biopsy
performed. It is important because the lesion may be covered
with blood and subsequent target biopsies could be difficult to
perform.
The best site for a duodenal biopsy is the edge of the valvulae
conniventes. A perpendicular orientation of the forceps to the
mucosal folds eliminates excessive pressure on the tissue, pre-
vents mucosal trauma and artifacts of the biopsy, and augments
the size of the sample.
Comparison of endoscopic and blind duodenal biopsies
showed that the former could substitute for blind capsule
biopsy for diagnosis of celiac sprue and other mucosal dis-
eases. If celiac sprue is suspected, at least four samples of tissue
DIAGNOSTIC UPPER ENDOSCOPY TECHNIQUE 77
must be obtained from the second or the third portion of the
duodenum.
A proper orientation and mounting of GI biopsy specimens
are crucial for correct histological diagnosis, especially of celiac
sprue, inflammatory bowel disease, and surveillance for dys-
plasia in patients with long-standing ulcerative colitis, Barrett’s
esophagus (BE), and polyps. This does not prolong an endo-
scopic procedure for more than 5–7 minutes. A well-trained en-
doscopic nurse spends an additional minute per specimen. Al-
though a naked-eye orientation is possible in majority of the
specimens obtained by the regular forceps, a simple magnifying
glass lamp may be useful. Several steps are involved in proper
mounting technique:
r
Wearing of tight-fitting gloves free of talcum
r
Gentle transferring of a specimen from the open forceps to the
index finger with or without the help of dissecting needle
r
Uncurling of a specimen with a light touch of the side of the
dissecting needle until the cleavage surface is exposed
r
Recognition of the surface area: mucosal site of the specimen
is more hemorrhagic–appearing and glistening
r
Complete uncurling of thespecimen facingsubmucosal siteup
r
Transferring the specimen from the index finger to the mesh
resting on the thumb of the same hand:
– Touching the supporting mesh with half of the specimen
– Sweeping the visible part of the specimen to the mesh by
placing a side of the dissecting needle between the biopsy
specimen and the index finger
– Moistening of the needle with water
– Pushing of the remaining part of the specimen away from
the index finger by the side of the needle
– Placing the mesh with mounted specimen upside down
into the fixative solution to prevent it from floating off the
supporting mesh.
The labeled bottle with fixative solution should contain not
more than two to three biopsy specimens from each site of GI
tract, e.g., two specimens from the gastric body, antrum, etc.
Plastic mesh is a suitable supporting material for different fix-
ative techniques. The choice of supporting material for formalin
fixation is the prerogative of the particular pathology laboratory.
INDICATIONS FOR UPPER ENDOSCOPY
There are three general categories of indications for GI en-
doscopy:
1 Urgent endoscopy
2 Elective/diagnostic endoscopy
3 Therapeutic endoscopy
78 CHAPTER 5
Urgent endoscopy Elective diagnostic endoscopy Therapeutic endoscopy
GI bleeding Recurrent upper abdominal pain Foreign body removal
Caustic ingestion Dysphagia/odynophagia Sclerotherapy
Foreign body ingestion Vomiting Placement of gastrostomy tube
Weight loss Electrophotocoagulation
Anemia/occult blood loss Polypectomy
Malabsorptive chronic diarrhea Dilatation of esophageal stricture
Radiographic evidence of mucosal lesions Pneumodilatation of achalasia
Evidence of mass lesion by upper GI series Botox injection
Familial polyposis or Peutz–Jeghers
syndrome
Table 5.1 Indications for pediatric upper GI endoscopy.
Specific indications for pediatric esophagogastroduodenos-
copy (EGD) are listed in Table 5.1.
The spectrum of common indications for EGD varies be-
tween the different age-groups (Table 5.2). The difference in age-
related indications simply reflects the age-related variations of
GI pathology.
Bleeding
Upper GI bleeding in children is probably the most seri-
ous condition requiring endoscopy. The goal of upper GI en-
doscopy in children with melena or hematemesis is to define
the source of bleeding and to perform therapeutic procedures
such as sclerotherapy, electro/photocoagulation, and injection
Neonates and Crawling infants School-age children
noncrawling infants and toddlers and teenagers
Hematemesis Recurrent vomiting Recurrent epigastric pain
Melena Hemoccult-positive stool Weight loss
Obstructive apnea Foreign bodies Symptoms of gastroesophageal reflux
disease
Recurrent vomiting Caustic ingestion Iron deficiency anemia
Chronic diarrhea Chronic diarrhea Chronic diarrhea
Hematemesis Hematemesis
Recurrent abdominal pain Caustic ingestion
Foreign bodies
Table 5.2 Age-related indications for upper GI endoscopy.
DIAGNOSTIC UPPER ENDOSCOPY TECHNIQUE 79
of vasoconstrictive agents or constrictive devices, if necessary.
The same questions are always raised in such circumstances. Is
the patient stable? Does the child have upper GI bleeding or epis-
taxis? What is the cause of bleeding? What is the optimal time
for endoscopy?
A good history, quick assessment of skin, tissue perfusion,
pulse, blood pressure, presence of old or fresh blood at the nos-
trils or oropharynx, and level of consciousness provide enough
information to answer the first two questions.
Good venous access has to be established simultaneously for
adequate volume resuscitation with normal saline alone or 5%
albumin solution until blood is available. Blood for type and
screen has to be sent to the blood bank. Repeated measurements
of pulse and blood pressure are rough but useful signs of appro-
priate fluid resuscitation.
The patient with recurrent hematemesis is at risk for aspira-
tion, and protection of the airways is an important component
of the therapy. This may be achieved by elevation of the head,
repeated aspiration of oropharyngeal contents, and/or intuba-
tion in case the patient is unconscious or has significant blood
gas disturbances.
Gastric lavage is a routine procedure, which may help in as-
sessment of ongoing bleeding, but it can be misleading if the
source of bleeding is within the duodenum or the proximal small
bowel. It should be performed with room-temperature saline
through a large-diameter orogastric tube until the returned fluid
is clear or bleeding significantly diminishes. It usually takes
about 10 minutes to assess the effectiveness of the gastric lavage.
Most of the time, the bleeding will stop spontaneously. In this
case, endoscopy provides the best diagnostic yield if it is per-
formed as soon as the patient is stable.
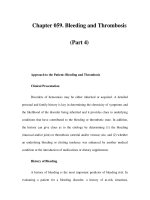
Pigmented
spot
Fig. 5.37 Pigmented spot. This
is the sign of the recent bleeding
with low probability of recurrent
bleeding.
Fig. 5.38 An adherent clot. The
discovery of this stigmata of
recent bleeding warrant the
higher risk of recurrent bleeding
and required endoscopic
hemostasis and close observation.
If gastric lavage is ineffective or the patient’s blood volume
has been replaced in less than 1 hour, the role of emergency
endoscopy is questionable. Sometimes it is impossible to find
the source of severe bleeding precisely, but if, for example, fresh
blood is seen coming back into the stomach through the pylorus,
it provides important information about the possible source of
bleeding.
In case of bleeding from an ulcer, endoscopy may predict the
risk of recurrence based upon location and appearance: pig-
mented spots (Fig. 5.37), an adherent clot (Fig. 5.38), a visible
vessel or blood spurting, and location of ulcer on the posterior
wall of the duodenum are important prognostic factors.
It also helps to make the best choice of treatment regarding the
detected source of bleeding (e.g., hemorrhagic gastritis versus
secondary or primary/peptic ulcer or portal hypertension).
The causes of bleeding vary depending upon the age of the
patient (Table 5.3).