ASP.NET 2.0 Instant Results phần 8 potx
Bạn đang xem bản rút gọn của tài liệu. Xem và tải ngay bản đầy đủ của tài liệu tại đây (1.21 MB, 54 trang )
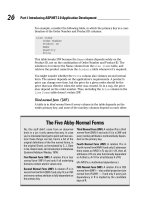
Figure 11-6
All of the other methods are listed in the following table. Because most of these methods have long argu-
ment lists, the table lists only the name of the method and not its arguments and their types. Refer to the
section “Code and Code Explanation” later in this chapter for a description of these parameters, or look
in the code for the
Imaging class at the XML comments that are placed in front of each of the methods.
These comments describe the purpose of each method and its parameters.
Method Return Type Description
AddTextToImage n/a This method is capable of adding text on top of an
image at a specified location and in a specific font
and color. This method has one additional overload.
CropImage n/a Crops an image passed to this method to a specified
region. This method has one additional overload.
DrawRectangle n/a Draws a rectangle on top of an image. This method
has one additional overload.
GetColors Color() Returns an array of Color objects. This method can
return either all known colors, or return a list with-
out the system colors such as
ActiveBorder or
WindowText.
GetFontFamilies FontFamily() Returns an array of FontFamily objects for the
machine where this method is called.
GetImageFormat ImageFormat Returns the format of the image passed to
this method, such as
ImageFormat.Jpeg,
ImageFormat.Png, and so on.
GetImageHash String Calculates the hash of an image. This method is
useful for comparing two images. Because
generating a hash always returns the same value for
identical data, you can compare two images through
code without looking at them.
Table continued on following page
357
Greeting Cards
14_749516 ch11.qxp 2/10/06 9:20 PM Page 357
Method Return Type Description
GetImageSize Size Returns the size of an image in pixels as a Size
object.
GetRotateTypes String() Returns a list with the available rotating types as a
String array. The array includes types like
Rotate90FlipNone to indicate a rotation of 90
degrees clockwise.
ResizeImage n/a Resizes an image to the specified size or to a maxi-
mum height or width. This method has five addi-
tional overloads.
RotateImage n/a Rotates and flips an image in the specified direction.
This method has one additional overload.
Not all of these methods are used in the Greeting Cards application.
GetImageHash and GetImageFormat
are not used at all, but because they could be very useful in other applications, they have been included in
the Toolkit anyway. Refer to the accompanying code for more details on these methods.
Most of the overloads that work with an image expect the names of the source and target files as a
string. For example, the signature for the
CropImage looks like this:
Public Shared Sub CropImage(ByVal fileNameIn As String, ByVal fileNameOut As
String, ByVal theRectangle As Rectangle)
The parameter fileNameIn determines the source file, and fileNameOut defines the file the cropped
image should be saved to. To make it easier for you to overwrite an existing file without specifying the
same name of the file twice in your code, these methods have an overload that has almost the same sig-
nature but without the
fileNameOut parameter. Internally they call the overloaded version, passing it
the same name for both the parameters. The following code snippet shows the implementation of the
CropImage method that calls an overload:
Public Shared Sub CropImage(ByVal fileNameIn As String,
ByVal theRectangle As Rectangle)
CropImage(fileNameIn, fileNameIn, theRectangle)
End Sub
With this method, external code needs to pass the filename only once and the method ensures that the
source file is overwritten automatically with the new and cropped image.
The UploadHandler Class
The UploadHandler class is a simple yet very powerful class used to make uploading files in an
ASP.NET application a lot easier.
Usually, when you upload a file, you perform all kinds of checks on the uploaded file. For example,
you may try to find out if the user uploaded a file at all, and whether it has the required extension. The
UploadHandler class can handle this for you. All you need to do in the code-behind of a page is create a
new instance of the
UploadHandler, set a few properties (most of them have sensible defaults), and call
358
Chapter 11
14_749516 ch11.qxp 2/10/06 9:20 PM Page 358
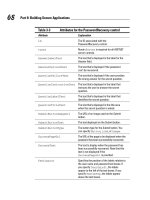
UploadFile and pass it an instance of an <asp:FileUpload> control. Figure 11-7 lists all the methods
and properties of this class.
Figure 11-7
Before you can work with the
UploadHandler class, you need to create an instance of it. That’s why it
has a public default constructor. Once you have an instance of the class you have to set at least the
VirtualSavePath property; all the other properties are optional. The following table describes the
seven properties of the
UploadHandler class:
Property Name Type Default Value Description
AllowedExtensions String String.Empty Gets or sets a regular
expression to use when
checking file extensions.
For example,
^.jpg|.gif$ allows
only JPG or GIF files. If
this property is not set,
all extensions are
allowed.
Extension String String.Empty This read-only property
returns the extension of
the uploaded file.
FileName String String.Empty Gets or sets the name
of the file (without
extension) as it should
be saved.
Table continued on following page
359
Greeting Cards
14_749516 ch11.qxp 2/10/06 9:20 PM Page 359
Property Name Type Default Value Description
GenerateDateFolder Boolean False Determines whether
subfolders are created for
the current year and
month to store the file in.
This is useful when you
have a lot of uploaded
files and want to store
them in logical folders.
GenerateUniqueFileName Boolean False Determines whether the
file gets a unique name.
When set to
True, the
property
FileName is
ignored and the file is
saved with a GUID as
its name.
OverwriteExistingFile Boolean False Determines whether
existing files should be
overwritten when they
already exist.
VirtualSavePath String n/a Gets or sets the virtual
path to the folder where
the uploaded files should
be saved. This property
is updated when
GenerateDateFolder is
True.
Once these properties have been set, your code should call the class’s only public method
UploadFile
and pass it an instance of an <asp:FileUpload> control. This method carries out some checks using the
private
FileExists and IsExtensionAllowed methods and then either saves the uploaded file to disk
or throws an exception. The following table describes the three methods (other than its constructor) of
the
UploadHandler class:
Method Return Type Description
FileExists Boolean Returns True when a file with the same name
already exists.
IsExtensionAllowed Boolean Returns True when the extension of the
uploaded file meets the criteria set in the
AllowedExtensions property.
UploadFile n/a This method is the workhorse of the
UploadHandler class. It performs a number
of checks on extensions, paths, and so on,
and then saves the file to disk or throws an
exception.
360
Chapter 11
14_749516 ch11.qxp 2/10/06 9:20 PM Page 360
You see a lot more of the inner workings of this class in the section “Code and Code Explanation.”
In addition to the Toolkit folder, the App_Code folder contains two helper classes, which are discussed
next.
Helper Classes
The two helper classes for the Greeting Cards application, called FileHandlingEventArgs and
AppConfiguration, have been put in the App_Code folder directly. The reason for this is that they are
used by the web application, and not by the code in the Toolkit. The design of these classes is discussed
next. You see how and where they are used in the section “Code and Code Explanation.”
The FileHandlingEventArgs Class
The four user controls that make up the largest part of the user interface of the application are all capable
of firing an event called
ImageFinalized to signal to the application that they’re done with their work.
When they fire this event, they pass up an instance of the
FileHandlingEventArgs class that inherits
from the standard
System.EventArgs class. The FileHandlingEventArgs has the same behavior as
this
EventArgs class, but adds an additional property called FileName, as you can see in Figure 11-8.
Figure 11-8
This
FileName property holds the name of the image that the user control has been working with. The
constructor for this class accepts this filename and stores it in a private backing variable that is made
accessible through the public
FileName property. You see how this works later when the code for the
user controls is discussed.
The final class in the App_Code folder is
AppConfiguration, the configuration class you also saw in
previous chapters.
AppConfiguration
The AppConfiguration class is a simple wrapper with five public properties around application set-
tings keys in the Web.config file. This class is used in some of the user controls in the site to determine
the maximum height or width of an image, the path where the uploaded images should be saved, and
the name and e-mail address used to send out e-mails. Figure 11-9 shows these five properties.
The two
Email properties hold the e-mail address and name of the sender of the e-mails that are sent by
the application.
361
Greeting Cards
14_749516 ch11.qxp 2/10/06 9:20 PM Page 361
Figure 11-9
The
MaxImageHeight and MaxImageWidth properties work together and determine the new maximum
height or width of the image that is uploaded. The user control that uploads and saves the image in the
first step of the Greeting Card generator automatically resizes the image so its dimensions fit between
these two maximum properties. You see how the image is resized later.
The
TempImagesFolder property holds the virtual path to a folder in your site where temporary images
are stored. The Web.config file for the application sets this value to
~/Images/Temp, but you can change
that so it points to a different folder.
Now that you have seen the design of the classes in the Toolkit and their methods, it’s time to look at the
actual implementation of these classes and the user interface of the web site. The next section explains
how the web site is set up using a single web page and four user controls and how these controls and the
page interact.
Code and Code Explanation
Although the code in the Toolkit is already very reusable, the entire application has been made even
more generic and reusable by implementing the various actions on the image inside four user controls.
Each of these controls can be used separately in a different application and has no dependencies on the
host page or any of the other user controls.
In the case of the Greeting Cards application, these four controls have been added to a host page located
in the root of the site. This page serves as a controller to orchestrate the actions of the various user con-
trols. In the next section, you see how this host page is able to communicate with the four user controls.
After that, each of the four controls is discussed in more detail separately.
The Host Page
The host page, called Default.aspx, contains a reference to each of these four controls in an
<asp:MultiView> control. The host page is responsible for displaying the right user control at the right
time, allowing the user to sequentially progress through the Greeting Cards application. The code in the
code-behind file takes the user through the following five steps:
362
Chapter 11
14_749516 ch11.qxp 2/10/06 9:20 PM Page 362
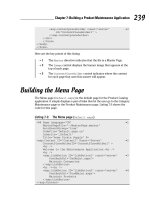
1. Select an image and upload it to the server.
2. Optionally rotate or flip the image.
3. Optionally crop the image to a user-defined region of the image.
4. Add text to the image at a user-defined location.
5. Send an e-mail with the image as an embedded object.
The first four steps are carried out by user controls, whereas step 5 takes place in the code-behind of the
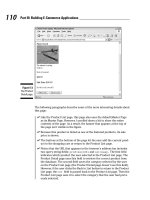
host page itself. Figure 11-10 shows these five steps. The outer rectangle represents the host page, and
the smaller inner rectangles represent the four user controls.
Figure 11-10
SelectImage.ascx
1
RotateFlipImage.ascx
AddText.ascx
Send Email
Default.aspx
4
5
CropImage.ascx
2
3
363
Greeting Cards
14_749516 ch11.qxp 2/10/06 9:20 PM Page 363
Inside the Controls folder in the root of the web site you find the four user controls mentioned in Figure
11-10. The following table lists each of these controls and describes their purpose:
Control Name Description
SelectImage.ascx Allows a user to select an image from the local hard drive and upload it
to the server where it is stored on disk. The uploaded image is resized
automatically to meet the maximum height and width rules set in the
Web.config file.
RotateFlipImage.ascx This control allows a user to rotate or flip an image. Rotating and
flipping is optional.
PictureCropper.ascx With this control a user can select a portion of an image by cropping the
original image. Cropping is optional.
AddText.ascx This control allows a user to add text to the image at an arbitrary
location. The user is free to choose from a list of font families and sizes
and specify the color of the text.
Inside the host page, these four controls have been added to a
View control inside a MultiView like this:
<asp:MultiView ID=”MultiView1” runat=”server” ActiveViewIndex=”0”>
<! Other views go here >
<asp:View ID=”View2” runat=”server”>
<! View specific markup goes here >
<Wrox:SelectImage ID=”SelectImage1” runat=”server” />
</asp:View>
<asp:View ID=”View3” runat=”server”>
<! View specific markup goes here >
<Wrox:RotateFlipImage ID=”RotateFlipImage1” runat=”server” />
</asp:View>
<! Other views go here >
</asp:MultiView>
This code snippet shows two of the user controls in the highlighted lines; the one used to select and upload
an image and the one to rotate or flip the image. Because with a
MultiView control only one view can be
active and thus visible at any given time, the host page shows only one user control at a time.
Because the host page is responsible for displaying the user controls in the right order, it has to know
when to load which user control at which time. Because there are no dependencies between the user
controls or between a user control and the host page, the Greeting Cards application uses an event-
driven mechanism to determine when a specific control is done with its work. Each of the controls
defines an event called
ImageFinalized of type ImageFinalizedEventHandler:
Public Delegate Sub ImageFinalizedEventHandler(ByVal sender As System.Object, _
ByVal e As FileHandlingEventArgs)
Public Event ImageFinalized As ImageFinalizedEventHandler
364
Chapter 11
14_749516 ch11.qxp 2/10/06 9:20 PM Page 364
Whenever a control is ready, it raises the event by calling RaiseEvent and passing it an instance of
the
FileHandlingEventArgs class you saw earlier. This EventArgs class exposes a property called
FileName that holds the location of the image that has been processed by the control.
To see how this works, look in the code-behind for the
SelectImage control that you find in the
Controls folder in the root of the site. Near the end of the file, you’ll see the following code, which gets
triggered when the user clicks the Finish button on the control:
Protected Sub btnFinish_Click(ByVal sender As Object, _
ByVal e As System.EventArgs) Handles btnFinish.Click
RaiseEvent ImageFinalized(Me, New FileHandlingEventArgs(FileName))
End Sub
This raises the event ImageFinalized and passes it a reference to itself using the Me keyword. It also
passes the name of the file that has been uploaded using the public
FileName property. Inside the code-
behind for the host page, this event is caught and handled with the following code:
Protected Sub SelectImage1_ImageFinalized(ByVal sender As Object, _
ByVal e As FileHandlingEventArgs) Handles SelectImage1.ImageFinalized
MultiView1.ActiveViewIndex = 2
RotateFlipImage1.FinishButtonText = “Next”
RotateFlipImage1.FileName = e.FileName
End Sub
The first thing this code does is change the ActiveViewIndex of the MultiView control so it displays
the next user control—
RotateFlipImage1 in this example. It then sets the FinishButtonText
property of that control to Next. This determines the text that is displayed on the Finish button of the
RotateFlip user control. This is useful if you want to reuse only a few of the user controls in your
application or want to reorder them. All but the last control can then be set up to display Next, and the
last control could have the text Finish on the button. If you only reuse a single user control, you could
set the button text to the action it’s performing, such as Crop or Rotate Image.
The final step in this code is to set the
FileName property of the RotateFlipImage1 control equal to the
FileName property of the e argument. As stated earlier, when a control is finished with its work (the user
clicked the Finish button) it raises an event and passes an instance of the
FileHandlingEventArgs class
with it. This
EventArgs class holds the filename of the finalized image. In the case of the SelectImage
control, the filename is the virtual path to the image that has just been uploaded. This image will then be
the source of the next control so it has an image to work with. By setting the
FileName property of the
RotateFlipImage control, that control knows with which image it should start working.
Although this example shows the code for the
SelectImage1_ImageFinalized only, all four controls
implement the same mechanism. The code-behind for Default.aspx has handlers for the
ImageFinalized event, which run similar code to pass the filename from control to control and display
the next step in the process.
In addition to the
ImageFinalized event, all four user controls have the following properties and
method in common:
365
Greeting Cards
14_749516 ch11.qxp 2/10/06 9:20 PM Page 365
Method or Property Name Type Data Type Purpose
FileName Property String Determines the name and
location of the source file
that each control works with.
The source file of a control is
usually retrieved from the
previous control.
TempFileName Property String A filename to store tempo-
rary versions of the images.
Because the
SelectImage
control doesn’t need a
temporary image to work
with, it doesn’t have this
property.
FinishButtonText Property String The text displayed on the
Finish button for each
control. To create a wizard-
style application, the text for
most buttons is set to Next.
btnFinish_Click Method n/a Fires when the Finish button
gets clicked. Inside this
event handler, the final
image is updated and an
ImageFinalized event is
raised.
You see how these properties and the method operate when each of the four individual controls are
discussed.
In addition to the
ImageFinalized handlers, you’ll find two more methods in the code-behind of
Default.aspx. The first is
btnStart_Click, which fires when the user clicks the Start button on the home-
page. The code for this method sets the
ActiveViewIndex property of the MultiView to 1 to display the
SelectImage control so a user can select and upload a file.
The second method is fired when the user clicks the
btnSendEmail button. The code for this method
sends an e-mail with the image as an embedded object in the message. You see how this works near the
end of this chapter, after the four user controls have been discussed.
Uploading and Resizing Images
In the Greeting Card application, the user control SelectImage.ascx is the first step in the whole pro-
cess, because it allows a user to select an image from the local hard drive and upload it to the web server.
In addition to a number of
Label controls that display various error messages and two placeholders that
determine what part of the control is visible, it contains a few important controls that are listed in the fol-
lowing table:
366
Chapter 11
14_749516 ch11.qxp 2/10/06 9:20 PM Page 366
Control Name Control Type Purpose
FileUpload1 FileUpload Allows a user to select a
local image.
btnUpload Button Uploads the selected image
to the server.
RequiredFieldValidator1 RequiredFieldValidator Checks whether a file has
been selected when the
Upload button is clicked.
litFinishButtonText Literal A placeholder in the
instructive text that is
updated with the same text
the Finish button has.
imgUploaded Image Displays the image that the
user uploaded.
btnNewImage Button Allows a user to select a
new image and ignore the
previously uploaded file.
btnFinish Button Moves the user to the next
step of the Greeting Card
application.
You saw earlier that the control has a
FinishButtonText property that determines the text on
the Finish button. In the
Page_Load event of the user control, this text is also applied to the Literal
litFinishButtonText
to synchronize the user instructions (click Next to continue) with the button’s text.
When a file has been selected and the Upload button has been clicked, the code in
btnUpload_Click
fires. This method is responsible for handling the uploaded file and displaying an error message in case
of an exception. The method consists of two parts; the first half of the code uploads the file and saves it
to disk. The other half resizes the image to the maximum dimensions specified by the
MaxImageHeight
and MaxImageWidth in the AppConfiguration class. Both of these parts are now discussed.
Uploading Files
The following code snippet shows the code that uploads and saves the file:
myUploadHandler = New Toolkit.UploadHandler()
myUploadHandler.GenerateUniqueFileName = True
myUploadHandler.AllowedExtensions = “^.jpg|.gif|.png|.jpeg$”
myUploadHandler.VirtualSavePath = AppConfiguration.TempImagesFolder
Try
myUploadHandler.UploadFile(FileUpload1)
Catch aex As ArgumentException
Select Case aex.ParamName.ToLower()
Case “extension”
lblIllegalExtension.Visible = True
Case “filename”
367
Greeting Cards
14_749516 ch11.qxp 2/10/06 9:20 PM Page 367
lblFileName.Visible = True
Case “myfileupload”
lblNoFile.Visible = True
End Select
Catch Ex As Exception
lblErrorMessageUnknownError.Visible = False
End Try
The first thing this code does is create an instance of the UploadHandler class. Notice how the class
name is prefixed with
Toolkit — the namespace that the UploadHandler class lives in. As you recall
from earlier in this chapter, this class is responsible for saving an uploaded file to disk. Next, three prop-
erties are set on the
UploadHandler object. The first dictates that the uploaded file should get a unique
filename in the form of a GUID. This ensures that the uploaded file isn’t accidentally overwritten by
another file with the same name. Then the
AllowedExtensions property is set. This property can con-
tain a regular expression that dictates the allowed extensions for the uploaded file. In the preceding
example, only JPG and GIF files are allowed. The final property determines the path where the uploaded
images are saved, which is retrieved from the
AppConfiguration class again.
Next,
UploadFile is called, which gets a reference to the FileUpload control defined in the markup of
the
SelectImage control. The UploadFile method throws ArgumentException objects when one or
more of the criteria aren’t met, so the code in the
Catch block handles these errors and displays a label
with an error message that describes the problem. The
UploadFile method is the workhorse of the
UploadHandler class, because it carries out a number of checks, builds up the path and filename where
the file must be saved, and finally saves the uploaded file to disk. It’s a bit too much code to repeat here
completely, but the following code block shows the first part of the method that determines the filename,
extension, and the path where the uploaded file is saved:
If myFileUpload.HasFile Then
If _GenerateUniqueFileName Then
_FileName = Guid.NewGuid().ToString()
Else
If _FileName IsNot String.Empty Then
_FileName = Path.GetFileNameWithoutExtension(myFileUpload.FileName)
End If
End If
_Extension = System.IO.Path.GetExtension(myFileUpload.PostedFile.FileName)
If _VirtualSavePath = String.Empty Then
Throw New ArgumentException(“Cannot save the file without a “ & _
“VirtualSavePath.”, “VirtualSavePath”)
End If
If _GenerateDateFolder Then
_VirtualSavePath &= DateTime.Now.Year.ToString() & _
“/” & DateTime.Now.Month.ToString().PadLeft(2, “0”c)
End If
‘ Other checks go here
‘ File is saved here
End If
368
Chapter 11
14_749516 ch11.qxp 2/10/06 9:20 PM Page 368
It starts off with checking whether a unique ID must be generated for the uploaded filename. The calling
code set this property to
True, so in the Greeting Card example the code in the first If block runs and
then
_FileName is filled with a GUID. In situations where no external filename has been set and the
class doesn’t need to create a unique filename, the filename is retrieved from the file the user has
uploaded. Then the extension is retrieved from the uploaded filename. The last part of this code block
builds up the virtual path to the upload folder. When no folder has been specified, the code throws an
exception and ends. Otherwise, the path is extended with the current year and month as separate folders
when
_GenerateDateFolder is True. This creates a path like 2006\03 under the _VirtualSavePath
folder. This can be useful to segment the uploaded files by year and month.
The
UploadFile method repeats similar checks to see if the image can be overwritten and if the exten-
sion of the file is valid. It does the latter with the private function
IsExtensionAllowed, which uses a
regular expression to validate the extension:
Private Function IsExtensionAllowed() As Boolean
Dim tempResult As Boolean = True
If _AllowedExtensions IsNot String.Empty Then
Try
tempResult = Regex.IsMatch(_Extension.ToLower, _AllowedExtensions, _
RegexOptions.IgnoreCase)
Catch
tempResult = False
End Try
End If
Return tempResult
End Function
Only when the AllowedExtensions property has been set does the code validate the extension. It uses
the
Regex.IsMatch method to check whether the uploaded file matches the extension pattern stored in
_
AllowedExtensions.
The remainder of the
UploadFile method (not shown here) creates the requested folder and finally
saves the file using the
SaveAs method of the ASP.NET FileUpload control. Because these operations
can result in exceptions, the code is wrapped in a
Try Catch block. In case an exception occurs, it’s
caught and handled by the code in the
SelectImage control that you saw earlier.
Once the file has been uploaded and saved successfully, the second half of the code in
btnUpload_
Click
inside the SelectImage control fires. This code resizes the image to the maximum size defined in
the Web.confg file.
Resizing Images
Because the Toolkit shields you from the complexity of the code to resize an image, the code in the
SelectImage control is really simple:
FileName = Path.Combine(myUploadHandler.VirtualSavePath, _
myUploadHandler.FileName) & myUploadHandler.Extension
Toolkit.Imaging.ResizeImage(Server.MapPath(FileName), _
AppConfiguration.MaxImageWidth, AppConfiguration.MaxImageHeight)
imgUploaded.ImageUrl = FileName
plcUpload.Visible = False
plcImage.Visible = True
369
Greeting Cards
14_749516 ch11.qxp 2/10/06 9:20 PM Page 369
The first line of the code block builds up the full filename by combining the path, the filename, and the
file extension. The second line calls the
ResizeImage method of the Imaging class in the Toolkit
namespace. This overloaded version of ResizeImage expects a physical path to the image (that’s why
Server.MapPath is used) and the maximum width and height of the image. After the image has been
resized successfully, the last few lines update the
Image control with the new image and switch the visi-
bility of the
plcUpload and plcImage placeholder controls. This effectively displays the uploaded and
resized image on the page, and hides the
FileUpload control.
To understand how the
ResizeImage method works, you need to open the Imaging.vb file from the
Toolkit folder and locate the method with the following signature:
Public Shared Sub ResizeImage(ByVal fileNameIn As String, _
ByVal maxWidth As Integer, ByVal maxHeight As Integer)
This method does nothing more than call another overload that has almost the same signature but
accepts additional
fileNameOut and ImageFormat parameters. If you locate that method (to navigate
to it, right-click the method’s name and choose Go To Definition), you’ll find the following code:
Public Shared Sub ResizeImage(ByVal fileNameIn As String, _
ByVal fileNameOut As String, ByVal maxWidth As Integer, _
ByVal maxHeight As Integer, ByVal theImageFormat As ImageFormat)
Dim originalSize As Size = GetImageSize(fileNameIn)
Dim newSize As Size = New Size(0, 0)
Dim resizeFactor As Decimal = System.Math.Max( _
Convert.ToDecimal(Decimal.Divide(originalSize.Height, maxWidth)), _
Convert.ToDecimal(Decimal.Divide(originalSize.Width, maxWidth)))
newSize.Height = Convert.ToInt32(originalSize.Height / resizeFactor)
newSize.Width = Convert.ToInt32(originalSize.Width / resizeFactor)
ResizeImage(fileNameIn, fileNameOut, newSize, theImageFormat)
End Sub
The first thing you may notice is that this method doesn’t actually resize the image; all it does is calcu-
late the new dimensions of the image. First it gets the dimensions of the original image by calling the
helper method
GetImageSize. With these dimensions, the resizeFactor is calculated. This is done by
taking the maximum value of the required resize factor for the height and for the width. To understand
how this works, consider the following example. Imagine you upload a file that’s 1000 pixels wide and
600 pixels high. Also imagine that the maximum dimensions for the image in the Web.config file have
been set to 640×480. With these numbers, the factor by which this image should be resized is 1.5625
(1000 divided by 640) for the width and 1.25 (600 divided by 480) for the height. The highest value of
these two factors is 1.562, which means the image should be resized by that factor. To calculate the new
dimensions of the image (stored in the variable
newSize) both the height and the width are divided by
resizeFactor. In the end, the newSize will have a width of 640 and a height of 384 pixels.
Once the dimensions are known, the code calls yet another overloaded version of
ResizeImage and
passes it the source and target filenames, the
newSize variable, and an image type. This version of the
ResizeImage does all the hard work by resizing the image:
370
Chapter 11
14_749516 ch11.qxp 2/10/06 9:20 PM Page 370
Public Shared Sub ResizeImage(ByVal fileNameIn As String, _
ByVal fileNameOut As String, ByVal theSize As Size, _
ByVal theImageFormat As ImageFormat)
Dim mySourceBitmap As Bitmap = Nothing
Dim myTargetBitmap As Bitmap = Nothing
Dim myGraphics As Graphics = Nothing
Try
mySourceBitmap = New Bitmap(fileNameIn)
Dim newWidth As Integer = theSize.Width
Dim newHeight As Integer = theSize.Height
myTargetBitmap = New Bitmap(newWidth, newHeight)
myGraphics = Graphics.FromImage(myTargetBitmap)
myGraphics.InterpolationMode = _
System.Drawing.Drawing2D.InterpolationMode.HighQualityBicubic
myGraphics.DrawImage(mySourceBitmap, New Rectangle(0, 0, newWidth, newHeight))
mySourceBitmap.Dispose()
myTargetBitmap.Save(fileNameOut, theImageFormat)
Catch
Throw
Finally
‘ Clean up objects. Not shown here.
End Try
End Sub
After the variable declaration, the code creates a new bitmap object based on the source image. Then a new
bitmap called
myTargetBitmap is created, which gets the dimensions of the Size object that was passed
to this method. On this target bitmap the resized version of the original image will be drawn. Then a new
Graphics object is created. You can see the Graphics object as a virtual canvas and a virtual painter at
the same time. The new
Graphics object is created with the FromImage method and is passed the new
and empty bitmap. This bitmap serves as the canvas to paint on. Then the
InterpolationMode of the
Graphics object is set. This enumeration defines the algorithm that is used when images are scaled or
rotated. This enumeration has quite a few members, each resulting in a different image quality. In the pre-
ceding code,
HighQualityBicubic is chosen because it ensures the best quality of the image.
Then
DrawImage is called to paint the original image (stored in mySourceBitmap) at the specified loca-
tion and size on the target bitmap. For this location and size it expects a
Rectangle object, which is cre-
ated on the fly in the method call. The
Top and Left of the rectangle are set to 0, and the Height and
the
Width come from the Size object passed to the ResizeImage method. When DrawImage draws the
bitmap from
mySourceBitmap onto its internal bitmap object (myTargetBitmap) it resizes and posi-
tions the source bitmap. In this code example, it places the new bitmap at 0, 0 (the upper-left corner) but
when you have other drawing needs you can choose a different location. For example, when you want
to draw a border around an image, you could specify 10, 10 as the upper-left location. If you also specify
the target bitmap to be 20 pixels higher and wider than the original, you get a nice border of 10 pixels on
all four sides of the image.
371
Greeting Cards
14_749516 ch11.qxp 2/10/06 9:20 PM Page 371
The final step is to save the new bitmap using its Save method. However, before that is done, the origi-
nal bitmap is disposed first. When .NET creates a new bitmap based on a file location, it holds on a lock
to that file. So, until you release that lock by calling
Dispose, the original file cannot be overwritten. To
ensure that calling code can resize an image that is saved under the original name (effectively overwrit-
ing the original) the source bitmap is disposed before
Save is called.
The
Finally block eventually cleans up any object that has been created in the Try block.
Back in the SelectImage.ascx control, there is one event you need to look at; the
Click event for the
Finalize button:
Protected Sub btnFinish_Click(ByVal sender As Object, _
ByVal e As System.EventArgs) Handles btnFinish.Click
RaiseEvent ImageFinalized(Me, New FileHandlingEventArgs(FileName))
End Sub
This code raises the event called ImageFinalized and passes the FileName of the image that has just
been uploaded and resized. As soon as the event is raised, the code in Default.aspx catches it with the
following code:
Protected Sub SelectImage1_ImageFinalized(ByVal sender As Object, _
ByVal e As FileHandlingEventArgs) Handles SelectImage1.ImageFinalized
MultiView1.ActiveViewIndex = 2
RotateFlipImage1.FinishButtonText = “Next”
RotateFlipImage1.FileName = e.FileName
End Sub
This code sets up the next user control called RotateFlipImage1, which allows a user to rotate and flip
an image. It sets the
FinishButtonText of that control to Next, and it sets the FileName property to
the filename retrieved from the
e argument. The FileName property of the RotateFlipImage1 is the
source file this control will work with.
Rotating and Flipping Images
When the FileName property is set by the host page, the RotateFlipImage control (called
RotateFlipImage.ascx in the Controls folder) calls a private method called
InitializeControl
(in bold text in the following code), but only the very first time this property is set. This is done to
avoid calling
InitializeControl more than once:
Public Property FileName() As String
‘ Get accessor goes here (not shown)
If ViewState(“FileName”) Is Nothing Then
ViewState(“FileName”) = value
InitializeControl()
Else
ViewState(“FileName”) = value
End If
End Property
372
Chapter 11
14_749516 ch11.qxp 2/10/06 9:20 PM Page 372
InitializeControl in turn calls a helper method called GetRotateTypes in the Imaging class of the
Toolkit to get a string array of all the available rotation types:
Public Shared Function GetRotateTypes() As String()
Dim tempResult As String() = [Enum].GetNames(GetType(RotateFlipType))
Array.Sort(tempResult)
Return (tempResult)
End Function
It does this by calling GetNames on the Enum class and passing it the type of RotateFlipType, which is
defined in the .NET
System.Drawing namespace. The RotateFlipType enumeration defines rotating
and flip types like
Rotate180FlipNone, which rotates an image 180 degrees; RotateNoneFlipX, which
mirrors the image horizontally; and so on. The array that
GetNames returns is sorted and then used as
the
DataSource for the DropDownList control called lstRotateFlipTypes. When the user chooses
one of the types from the drop-down list and clicks the Rotate button, the code in the code-behind fires:
Dim myRotateFlipType As RotateFlipType = [Enum].Parse(GetType(RotateFlipType), _
lstRotateFlipTypes.SelectedValue)
Imaging.RotateImage(Server.MapPath(FileName), Server.MapPath(TempFileName), _
myRotateFlipType)
HasBeenRotated = True
plcRotate.Visible = False
btnUndo.Visible = True
UpdateImageControl(TempFileName)
This code first parses the chosen RotateFlipType from the SelectedValue of the DropDownList. It
then uses
Server.MapPath to translate the virtual path of the FileName property (retrieved from the
SelectImage control and set by Default.aspx) and of the TempFileName property, which is generated
by the code automatically:
Private ReadOnly Property TempFileName() As String
Get
If ViewState(“TempFileName”) Is Nothing Then
ViewState(“TempFileName”) = AppConfiguration.TempImagesFolder & “/” & _
Guid.NewGuid.ToString() & “.jpg”
End If
Return ViewState(“TempFileName”).ToString()
End Get
End Property
Only the very first time this property is accessed, a filename is built up by combining the temp path for
the images, a GUID, and the extension .jpg. On subsequent calls to this property, its value is retrieved
from
ViewState. This ensures that the control has the same unique filename available during the con-
trol’s lifetime.
When the paths have been translated to physical paths correctly, they are passed into
RotateImage,
which is defined in the
Imaging class in the Toolkit and looks like this:
Using myBitmap As New Bitmap(fileNameIn)
myBitmap.RotateFlip(theRotateFlipType)
myBitmap.Save(fileNameOut, ImageFormat.Jpeg)
End Using
373
Greeting Cards
14_749516 ch11.qxp 2/10/06 9:20 PM Page 373
This method simply calls the RotateFlip method of the Bitmap class and passes it the specified
RotateFlipType. It then calls Save on the same object to save the changes to disk.
Once the user is done with rotating and flipping the image, she can click the Finish button. When that
button is clicked, the control updates the
FileName property with the value from TempFileName
(that now holds the rotated image) but only when the image has actually been rotated. Otherwise, the
FileName property is left as is and passed to the event handler in the calling code. The final line of code
in the method raises the event
ImageFinalized:
If HasBeenRotated Then
FileName = TempFileName
End If
RaiseEvent ImageFinalized(Me, New FileHandlingEventArgs(FileName))
The host page has an event handler for this event. Inside this handler, called
RotateFlipImage1_ImageFinalized, the host page now passes the filename up from the
RotateFlip control to the CropImage control, which is discussed next.
Cropping Images
Recall from the introduction of this chapter that the cropping page displays a rectangle that the user can
move around and resize. When the correct portion of the image is selected, the image is cropped with
the click of a button. The rectangle that is drawn on top of the image is a visual cue to the user. When the
actual crop operation is performed, the image is cropped to the area that is visible inside the selection
rectangle.
The entire cropping is handled by the
CropImage control, saved as CropImage.ascx in the Controls
folder. The left side of the control displays the image that has been set by the previous
RotateFlip con-
trol. At the right side, you see a drop-down list that allows you to change the color of the selection area.
It’s useful to change the color when you have uploaded a dark image, which makes the default color
of black hard to spot. The items in the drop-down list are set in the
InitializeControl method
that is called when the
FileName property is set for the first time, similar to the code you saw for the
RotateFlip control. Just as with the RotateFlip types, the Imaging class has a useful method that
returns an array of
Color objects:
Public Shared Function GetColors(ByVal includeSystemColors As Boolean) As Color()
Dim tempColors As KnownColor() = _
CType([Enum].GetValues(GetType(KnownColor)), KnownColor())
Dim colors As New ArrayList
For loopCount As Integer = 0 To tempColors.Length - 1
If (Not Color.FromKnownColor(tempColors(loopCount)).IsSystemColor _
Or includeSystemColors) And Not _
Color.FromKnownColor(tempColors(loopCount)).Name = “Transparent” Then
colors.Add(Color.FromKnownColor(tempColors(loopCount)))
End If
Next
Return CType(colors.ToArray(GetType(Color)), Color())
End Function
374
Chapter 11
14_749516 ch11.qxp 2/10/06 9:20 PM Page 374
This method uses Enum.GetValues to get an array of KnownColor objects. This array also includes
system colors like ActiveBorder and ButtonFace. Because these colors are defined by the system settings
of the server and the end user has no way to find out what color they represent, they are removed
from the list when the Boolean parameter
includeSystemColors is False. This is done by looping
though the array with colors, and adding each valid color to a new ArrayList. At the end of the method,
the ArrayList is converted to an array of
Color objects and returned to the calling code where it is used
as the DataSource for the color drop-down.
Below the color drop-down, you see two sets with four button controls each. The first set, displayed in
Figure 11-11, is used to change the location of the cropping area on the image.
Figure 11-11
With the pixels drop-down control you can determine how many pixels the selection area is moved
when one of the buttons is clicked. When you click one of the buttons, the code in the code-behind for
the control recalculates the location of the selection area and then draws a new rectangle on top of the
image. This is done with the following code, which is fired when you click the upward-facing arrow:
Protected Sub btnLocationUp_Click(ByVal sender As Object, _
ByVal e As System.EventArgs) Handles btnLocationUp.Click
Top -= MoveIncrease
If Top < 0 Then
Top = 0
End If
DrawRectangle()
End Sub
The MoveIncrease property is a simple wrapper around the SelectedValue of the pixel drop-down
list you saw in Figure 11-11. The code then subtracts this increase size from the
Top location of the con-
trol. This property is stored in ViewState, just like its counterparts
Left, Width, and Height. The code
also checks if the
Top property doesn’t exceed the image’s boundaries. In this case, when Top is less than
0, it is set to zero, so the rectangle is displayed at the very top of the image.
The code for the three other buttons for navigation work pretty much the same way in that they increase
or decrease the values for the
Top or Left properties.
At the end of the code,
DrawRectangle is called. This method is discussed in full detail after the Resize
buttons for the selection area have been discussed.
Figure 11-12 displays the four buttons that are used to control the size of the selection area. The code in
the code-behind is almost identical to that for the navigation buttons, but the size buttons operate on
Width and Height, rather than on the Top and Left properties.
375
Greeting Cards
14_749516 ch11.qxp 2/10/06 9:20 PM Page 375
Figure 11-12
Each of the eight event handlers for the navigation and size buttons calls
DrawRectangle. This method
creates a new rectangle based on the
Top, Left, Height, and Width properties and creates a new
color based on the
SelectedValue of the lstPenColor control. These values are then passed to
DrawRectangle in the Imaging class of the Toolkit, which draws a rectangle on top of the image:
Public Shared Sub DrawRectangle(ByVal fileNameIn As String, _
ByVal fileNameOut As String, ByVal theRectangle As Rectangle, _
ByVal myColor As Color)
Dim myGraphics As Graphics = Nothing
Dim myBitmap As Bitmap = Nothing
Try
myBitmap = new Bitmap(fileNameIn)
myGraphics = Graphics.FromImage(myBitmap)
Dim myPen As New Pen(myColor, 1)
myGraphics.SmoothingMode = Drawing2D.SmoothingMode.None
myGraphics.DrawRectangle(myPen, theRectangle)
myPen.Dispose()
myBitmap.Save(fileNameOut, ImageFormat.Jpeg)
Catch ex As Exception
Throw
Finally
If myBitmap IsNot Nothing Then
myBitmap.Dispose()
End If
If myGraphics IsNot Nothing Then
myGraphics.Dispose()
End If
End Try
End Sub
Similar to the resize code you saw earlier, this code creates a new Bitmap and a new Graphics instance.
This
Graphics instance stores the Bitmap as its drawing canvas. Then .NET’s DrawRectangle draws
the actual rectangle on top of the image. The size and color of the rectangle are determined by the
Pen
object that is passed to DrawRectangle. To keep the rectangle from getting blurred, the SmoothingMode
of the Graphics object is set to SmoothingMode.None, which ensures that the line isn’t anti-aliased.
After the rectangle has been drawn, the
Pen object is disposed and the image is saved.
376
Chapter 11
14_749516 ch11.qxp 2/10/06 9:20 PM Page 376
As you can see, the DrawRectangle isn’t performing the cropping. All it does is draw a rectangle on top
of the image. However, the same location and size used to draw the rectangle are used when the user
clicks the Preview button to do the actual cropping:
Protected Sub btnPreview_Click(ByVal sender As Object, _
ByVal e As System.EventArgs) Handles btnPreview.Click
Toolkit.Imaging.CropImage(Server.MapPath(FileName), _
Server.MapPath(TempFileName), New Rectangle(Left, Top, Width, Height))
‘ Rest of the code is shown later
End Sub
This code calls CropImage, another method defined in the Imaging class. As parameters it gets the
filename of the original image, the filename of the target image (
TempFileName), and a Rectangle
object that is constructed on the fly using the Left, Top, Width, and Height properties. The code for
CropImage in the Toolkit looks like this:
Public Shared Sub CropImage(ByVal fileNameIn As String, _
ByVal fileNameOut As String, ByVal theRectangle As Rectangle)
Dim myBitmap As Bitmap = Nothing
Dim myBitmapCropped As Bitmap = Nothing
Dim myGraphics As Graphics = Nothing
Try
myBitmap = New Bitmap(fileNameIn)
myBitmapCropped = New Bitmap(theRectangle.Width, theRectangle.Height)
myGraphics = Graphics.FromImage(myBitmapCropped)
myGraphics.DrawImage(myBitmap, New Rectangle(0, 0, myBitmapCropped.Width, _
myBitmapCropped.Height), theRectangle.Left, theRectangle.Top, _
theRectangle.Width, theRectangle.Height, GraphicsUnit.Pixel)
myBitmap.Dispose()
myBitmapCropped.Save(fileNameOut, ImageFormat.Jpeg)
Catch ex As Exception
Throw
Finally
If myBitmap IsNot Nothing Then
myBitmap.Dispose()
End If
If myBitmapCropped IsNot Nothing Then
myBitmapCropped.Dispose()
End If
If myGraphics IsNot Nothing Then
myGraphics.Dispose()
End If
End Try
End Sub
This code uses the Graphics object to draw the image from the source onto the target. It does this with
.NET’s
DrawImage method, which accepts the following parameters:
377
Greeting Cards
14_749516 ch11.qxp 2/10/06 9:20 PM Page 377
Parameter Name Parameter Type Description
image Image This parameter contains the source bitmap that holds
the original image. The
Bitmap class used in the code
example inherits from
Image, so this method happily
accepts it for its image parameter.
destRect Rectangle The rectangle determines where the cropped source
image should be drawn on the new bitmap that was
created. Since the entire new image should be filled,
the
Rectangle control is set to be as large as the
target image.
srcX Integer This parameter determines the X coordinate of the
original image from where the image should be
copied to the target image.
srcY Integer This parameter determines the Y coordinate of the
original image from where the image should be
copied to the target image.
srcWidth Integer This parameter determines the width of the area of
the original image that should be copied to the target
image.
srcHeight Integer This parameter determines the height of the area of
the original image that should be copied to the target
image.
srcUnit GraphicsUnit Determines the units of measurement that DrawImage
takes into account. Because the image’s width and
height are specified in pixels,
GraphicsUnit.Pixel
is passed.
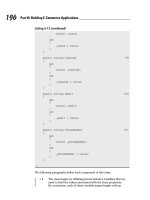
Because of the large number of parameters, you may have trouble understanding how this all works. To
clarify things, consider Figure 11-13.
Imagine that the source image is 1000 pixels wide and has a height of 700. The outer rectangle in Figure
11-13 depicts that image. The inner rectangle represents the crop area the user has chosen. As you can
see, the crop area is 600×400 pixels, while it has a
Left of 180 pixels and a Top of 150. When CropImage
is called, this is what gets passed:
myGraphics.DrawImage(SourceBitmap, New Rectangle(0, 0, 600,400), 180, 150, _
600, 400, GraphicsUnit.Pixel)
What this does is copy a part of the bitmap held in SourceBitmap onto its internal Bitmap (created
off the
myBitmapCropped object). With this paint operation, the copied part is placed at 0, 0 and has a
width of 600 and a height of 400 pixels (the dimensions of the target image). The four integer parameters
determine the location and dimensions of the part of the source image that should be copied, which is
the cropping area that the user has selected. The final parameter instructs the
DrawImage method to use
pixels for all dimensions and location calculations.
378
Chapter 11
14_749516 ch11.qxp 2/10/06 9:20 PM Page 378
Figure 11-13
When
CropImage has completed successfully, control is returned to the CropImage user control where
the
<asp:Image> control that displays the cropped image is updated and the visibility of two panels is
switched:
Toolkit.Imaging.CropImage(Server.MapPath(FileName), _
Server.MapPath(TempFileName), New Rectangle(Left, Top, Width, Height))
UpdateImageControl(TempFileName)
plcPreviewImage.Visible = False
plcFinalizeImage.Visible = True
End Sub
This then shows the Finish button for the control (with the text Next) that allows users to continue, and
an Undo button that enables them to restore the original image. The Undo button simply switches back
the visibility of the two placeholders, so the original image with the selection area is shown again.
The Finish button fires the same code as the
RotateFlip control does. It assigns FileName the value of
TempFileName (which holds the cropped image) and then uses RaiseEvent again to signal the host
page that it is done with its work. The host page then changes the
ActiveViewIndex of the MultiView,
which causes the
AddText control to become visible. This control is discussed next.
Adding Text to Images
The AddText.ascx control is responsible for adding the text that the user typed on top of the image. The
user can select a font family and size and a color to style the text that is displayed on the control.
600px
1000px
180px
400px
150px
700px
379
Greeting Cards
14_749516 ch11.qxp 2/10/06 9:20 PM Page 379
As you probably guessed by now, this control follows the same pattern as the other controls. It has the
same properties and method— such as
FileName and FinishButtonText — as the controls used for
cropping, rotating, and uploading. Because the implementation for these properties and method is
almost identical to that of the other controls, it isn’t discussed here.
However, a number of significant methods and properties are worth looking at. First of all, there’s the
InitializeControl method that fills two DropDownList controls with font families and colors. You
already saw the code that lists the colors in the code for the
CropImage control, so the following code
block lists the code for the
GetFontFamilies method in the Imaging class in the Toolkit only:
Public Shared Function GetFontFamilies() As FontFamily()
Dim fonts As New ArrayList
For loopCount As Integer = 0 To FontFamily.Families.Length - 1
fonts.Add(FontFamily.Families(loopCount))
Next
Return CType(fonts.ToArray(GetType(FontFamily)), FontFamily())
End Function
The .NET Framework has a very convenient FontFamily class, hosted in the System.Drawing names-
pace that exposes a shared (and read-only) property called
Families. This Families property returns
an array of all the
FontFamily objects that are present on the computer where the code runs. It’s impor-
tant to understand this code depends on the machine where it is run, because it could mean a big differ-
ence between your local development machine and the final production server. On your local machine
you may have a lot of fonts that are installed by Microsoft Office or by drawing packages such as Adobe
PhotoShop or Corel Draw. However, on a production server, you often find only the default fonts
installed by Windows, which is somewhere around 20 to 30 fonts.
The code loops through this array and adds each
FontFamily to an ArrayList because this class has a
very convenient
Add method that allows you to add objects to it. At the end, the ArrayList is casted
back to an array of
FontFamily objects. Without the ArrayList, you’d need to define a new array of
type
FontFamily, and then manually resize and add the elements to it. The ArrayList class shields
you from this hassle so it’s a lot easier to use. It’s a bit slower than working with regular arrays, but its
added usefulness is well worth the performance hit.
The array of
FontFamily objects is returned from the method and then set as the DataSource for the
font drop-down list:
lstFontNames.DataSource = Toolkit.Imaging.GetFontFamilies()
lstFontNames.DataTextField = “Name”
lstFontNames.DataValueField = “Name”
lstFontNames.DataBind()
The FontFamily object has a Name property that is used for both DataTextField and
DataValueField.
When the user selects a new font from the
lstFontNames control, it fires its SelectedIndexChanged
event. Inside the event handler for that event, a drop-down list with font styles is created. The code that
builds up the list looks like this:
380
Chapter 11
14_749516 ch11.qxp 2/10/06 9:20 PM Page 380
lstFontStyles.Items.Clear()
lstFontStyles.Visible = True
Dim styles As FontStyle() = New FontStyle(3) {FontStyle.Regular, _
FontStyle.Bold, FontStyle.Italic, FontStyle.Bold Or FontStyle.Italic}
Dim family As FontFamily = New FontFamily(lstFontNames.SelectedValue)
For Each style As FontStyle In styles
If family.IsStyleAvailable(style) Then
lstFontStyles.Items.Add(style.ToString())
End If
Next
This code creates a new array of FontStyle objects and adds four new Style items to it in its initializer
code. Notice the use of
FontStyle.Bold Or FontStyle.Italic to indicate a font style that has both
a bold and an italic typeface at the same time. The code then checks if the selected font supports each of
the four font styles by calling
IsStyleAvailable. If the style is available it’s added to the drop-down
list. Otherwise, it’s simply ignored.
The next important thing to look at is how the control keeps track of where the user has clicked so it
knows where to place the text. This consists of two parts. First, two private properties called
X and Y
store their value in ViewState so it’s persisted across postbacks. These properties get a value when the
user clicks the image with the following code:
Protected Sub ImageButton1_Click(ByVal sender As Object, ByVal e As _
System.Web.UI.ImageClickEventArgs) Handles ImageButton1.Click
X = e.X
Y = e.Y
AddText()
cellControls.Visible = True
plcAddText.Visible = True
End Sub
The ImageClickEventArgs instance exposes an X and a Y property that hold the location where the
user clicked the image at the client. This is standard behavior implemented in the
ImageButton class.
When these properties have been set,
AddText is called (discussed next) and the visibility of the place-
holder and the table cell with the server controls is switched. This then displays the drop-downs with
the font-style, size, and color.
The first time the user clicks the image no text is added to the image, because the text box doesn’t con-
tain any text yet. However, on subsequent clicks on the image, the page reloads and the text is moved to
the location where the user clicked last. To see how the text is added to the image, look at the
AddText
method in the user control first:
Private Sub AddText()
If txtTextToAdd.Text.Length > 0 AndAlso lstFontNames.SelectedIndex > 0 Then
Dim aFont As Font = New Font(lstFontNames.SelectedValue, _
Convert.ToSingle(lstFontSizes.SelectedValue), _
CType(FontStyle.Parse(GetType(FontStyle), _
lstFontStyles.SelectedValue), FontStyle))
Dim myColor As Color = Color.FromName(lstKnownColors.SelectedValue)
Dim textLocation As Point = New Point(X, Y)
Toolkit.Imaging.AddTextToImage(Server.MapPath(FileName), _
381
Greeting Cards
14_749516 ch11.qxp 2/10/06 9:20 PM Page 381