ASP.NET AJAX in Action phần 8 docx
Bạn đang xem bản rút gọn của tài liệu. Xem và tải ngay bản đầy đủ của tài liệu tại đây (1002.07 KB, 57 trang )
366 CHAPTER 10
Developing with the Ajax Control Toolkit
the animation classes. The following example will give you the opportunity to
experiment directly with the
JSON syntax for creating animations.
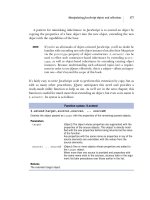
In this section, we’ll return on the PhotoGallery control built in section 8.4.5.
So far, you’ve created a client control to browse a set of images stored in the web-
site. Your next goal is to enhance the control by adding an animated transition
between the images. The transition you’ll build isn’t complex, but it’s effective, as
shown in figure 10.18. While the next image is being loaded, you partially fade-out
the current image; then, you resize it until it reaches the width and height of the
next image to display. Finally, the new image fades in and replaces the old image.
Let’s start by opening the PhotoGallery.js file that contains the code for the Pho-
toGallery control. You have to modify the code so that when the next image is
loaded, a new method named
_playTransition
is called. This method is respon-
sible for playing the animated transition and then calling the
_displayImage
method as soon as the transition is completed. First, you must rewrite the
_onImage-
ElementLoaded
method, declared in the PhotoGallery’s prototype, as follows:
_onImageElementLoaded : function() {
this._playTransition();
}
Figure 10.18 Example of an animated transition applied to the PhotoGallery control.
The animations that make up the transition are defined through JSON objects.
Animations 367
Then, you must add a method called
_playTransition
to the constructor’s proto-
type. The code for the
_playTransition
method is shown in listing 10.14.
_playTransition : function() {
var currentImageSize = {height: this._imageElement.height,
width: this._imageElement.width};
var nextImageSize = {height: this._imgPreload.height, width:
this._imgPreload.width};
var fadeIn = AjaxControlToolkit.Animation.createAnimation(
{
"AnimationName": "FadeIn",
"AnimationTarget": this._imageElement.id,
"Duration": 0.3,
"MinimumOpacity": 0.2,
"MaximumOpacity": 1
}
);
var sequence = AjaxControlToolkit.Animation.createAnimation(
{
"AnimationName": "Sequence",
"AnimationTarget": this._imageElement.id,
"AnimationChildren":
[
{
"AnimationName": "FadeOut",
"Duration": 0.3,
"MaximumOpacity": 1,
"MinimumOpacity": 0.2
},
{
"AnimationName": "Resize",
"Height": nextImageSize.height,
"Width": currentImageSize.width
},
{
"AnimationName": "Resize",
"Height": nextImageSize.height,
"Width": nextImageSize.width
}
]
}
);
Listing 10.14 Code for the _playTransition method
Fade-in
animation
B
Sequence animation
C
368 CHAPTER 10
Developing with the Ajax Control Toolkit
sequence.add_ended(Function.createDelegate(this,
onSequenceEnded));
sequence.play();
function onSequenceEnded() {
this._displayImage();
fadeIn.play();
}
}
The first thing you do in the body of the method is save the height and width of
the currently displayed image and the next one in the list. You need these dimen-
sions in order to set up the animation that resizes the current image to the size of
the next one.
The first animation you create is a fade-in
B
, stored in the
fadeIn
variable. The
animation is created with a call to the
AjaxControlToolkit.Animation.create-
Animation
method. This method accepts an object literal (a JSON object) and
instantiates the animations defined in the object. In the
JSON object, the value of
the
AnimationName
attribute is the
FadeIn
string, which corresponds to a fade-in
animation. You follow the same rule used in the
XML description. The name of an
animation is obtained by removing the
Animation
suffix from the name of the class.
The second attribute,
AnimationTarget
, specifies which element to animate.
In this case, it’s the
img
element that displays the current image. The third
attribute,
Duration
, is the duration of the animation; the last two attributes define
the values of the maximum and minimum opacity. The fade-in effect is obtained
by animating the opacity value from
0.2
to
1
.
You use the same technique to create the sequence animation
C
that com-
pletes the transition. In this case, the
AnimationChildren
attribute holds an array
with the child animations. When the
_playTransition
method is called, the tran-
sition is played in two parts. First, the sequence animation is played. To detect its
end, you subscribe to its
ended
event. The event is handled by a function called
onSequenceEnded
, declared in the
_playTransition
method. When the sequence
animation ends, the
_displayImage
method is called to replace the old photo
with the new one. Finally, the fade-in animation is played to complete the transi-
tion between the two images.
The
JSON description is compact and leads to highly readable code. The only
drawback of this approach is that it’s slower than the imperative syntax because an
additional step is required to translate the
JSON description into an instance of
Subscribe to
ended event
Play
transition
Handle
ended event
Summary 369
the
FadeInAnimation
class. For this reason, the imperative syntax is preferable
when you need maximum performance. In most cases, though, you’ll be able to
use the shortest and most readable code.
10.4 Summary
In this chapter, we’ve explored the Ajax Control Toolkit, an open-source project
started by Microsoft in the early days of
ASP.NET AJAX. The Toolkit, which is open
to contributions from the community, aims at becoming the biggest free collec-
tion of Ajax-enabled controls available.
The Toolkit controls are built on top of a custom
API that enhances the base
functionality provided by the
ASP.NET AJAX extensions. The Toolkit API is a meta-
data-driven
API: Ajax-enabled controls can be authored using attribute-based pro-
gramming. All controls created with the Toolkit
API provide support for the
ASP.NET 2.0 callbacks framework and the Visual Studio Designer.
The Ajax Control Toolkit offers also a powerful framework for creating visual
effects and animations. We explored the animation classes and explained how to
create them in a web page using the AnimationExtender control. You can create
animations using
XML or JSON syntax, as we demonstrated by adding transition
effects to the PhotoGallery control developed in chapter 8.
In the next chapter, we’ll look at the
XML Script declarative language, which is
used to instantiate client components in a page using a declarative syntax.
Part 3
ASP.NET AJAX Futures
It’s been almost a year since the first official release of ASP.NET AJAX, and
plans for the next release are well under way. Currently, features for the next
release are available in a separate package called the
ASP.NET Futures. In this
part of the book, we’ll cover some of these features. Chapter 11 is dedicated
to
XML Script: a declarative language similar to the ASP.NET markup, which
is used to instantiate client components in the page. Chapter 12 covers the
drag-and-drop engine, which you can use to drag and drop
DOM elements in
the page. By the end of these chapters, you’ll be ready to use the main fea-
tures that will be included in future releases of
ASP.NET AJAX.
373
XML Script
In this chapter:
■
XML Script basics
■
Actions
■
Bindings
■
Transformers
374 CHAPTER 11
XML Script
XML Script is a declarative language for creating instances of JavaScript objects at
runtime, setting their properties, and specifying their behavior, using an
XML-like
syntax similar to the
ASP.NET markup code.
In an
HTML page, you can separate content (the markup code) from style by
embedding the style information in a
CSS file. Similarly, in an ASP.NET page, you
usually define the page layout using declarative markup code in an
ASPX page.
Then, you can use a separate code-behind file to specify the behavior of server
controls and how they’re wired together, using the classic imperative syntax.
XML
Script lets you achieve this kind of separation and instantiate JavaScript compo-
nents using a declarative script language embedded in a web page.
XML Script, like declarative languages, has a number of advantages over the
imperative syntax. Building designers for markup is easier than building them for
code. Great visual tools, like the Visual Studio Designer, take care of generating
markup code for you. If a client can parse declarative markup, you can make
server controls render the markup more easily than rendering imperative code.
In addition, declarative markup carries semantics. For example, an application
that parses a TextBox tag knows that it has to instantiate a text field, but it’s up to
the application to decide to instantiate a simple text field rather than a more com-
plex auto-complete text box—for example, based on browser capabilities. Finally,
declarative code can be more expressive and less verbose than imperative code.
Features like bindings help keep the values exposed by object properties synchro-
nized, without the need to deal with multiple event handlers.
This chapter illustrates these aspects of
XML Script, beginning with the basics
of the language and moving to advanced features like actions, bindings, and trans-
formers. Keep in mind that because they’re part of the
ASP.NET Futures package,
the features illustrated in this chapter aren’t currently documented or supported
by Microsoft.
11.1 XML Script basics
Your first goal is learning how to write XML Script code and understanding how
it’s turned into instances of client objects at runtime. As we’ll explain in a
moment, writing
XML Script code is similar to writing ASP.NET declarative code.
The main difference is that whereas you use
ASP.NET markup to create instances
of server-side classes, you use
XML Script code to create JavaScript objects.
Before you begin using
XML Script, you need to enable it in a web page. This
turns out to be an easy job, because you have to reference the PreviewScript.js file
in the ScriptManager control, as shown in listing 11.1. This file is embedded as a
XML Script basics 375
web resource in the Microsoft.Web.Preview assembly, which is shipped with the
ASP.NET Futures package. You can find more information on how to install this
package in appendix A.
<asp:ScriptManager ID="TheScriptManager" runat="server">
<Scripts>
<asp:ScriptReference Assembly="Microsoft.Web.Preview"
Name="PreviewScript.js" />
</Scripts>
</asp:ScriptManager>
XML Script code is embedded in
script
tags with the
type
attribute set to
text/
xml-script
. This custom type was defined to distinguish blocks of XML Script
code from other script code such as JavaScript. This is what the typical container
of an
XML Script code block looks like:
<script type="text/xml-script">
<! Insert xml-script here >
</script>
As you can see, XML Script comments have the same syntax as XML comments.
You can have multiple blocks of
XML Script code in the same page, and they can
appear in any order and position. Unlike JavaScript code, though, at the moment
XML Script can only appear inline in the page and can’t be saved to separate files.
As with any programming language, a “Hello, World!” example is the ideal
ice-breaker for introducing basic
XML Script features. It’s also a good starting
point for learning how
XML Script code is structured and to give you confidence
with its syntax.
11.1.1 Hello XML Script!
This example shows how a block of XML Script code is structured and how you
can deal with client objects using declarative code. You’ll see how to handle an
event raised by a client component using
XML Script code. Normally, you’d
accomplish this task by retrieving a reference to the component and writing the
necessary JavaScript code to add an event handler. Listing 11.2 shows how to
declaratively hook up the
init
event raised by
Sys.Application
, the Application
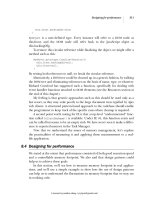
object introduced in chapter 2. As promised, the event handler is a JavaScript
function that displays a “Hello
XML Script!” message onscreen.
Listing 11.1 Enabling XML Script in an ASP.NET page
376 CHAPTER 11
XML Script
<%@ Page %>
<!DOCTYPE html PUBLIC "-//W3C//DTD XHTML 1.0 Transitional//EN"
" /><html xmlns=" >
<head runat="server">
<title>Hello XML-script</title>
</head>
<body>
<form id="form1" runat="server">
<asp:ScriptManager ID="TheScriptManager" runat="server">
<Scripts>
<asp:ScriptReference Assembly="Microsoft.Web.Preview"
Name="PreviewScript.js" />
</Scripts>
</asp:ScriptManager>
<script type="text/xml-script">
<page xmlns="
<components>
<application init="pageInit" />
</components>
</page>
</script>
<script type="text/javascript">
<!
function pageInit() {
alert("Hello XML Script!");
}
// >
</script>
</form>
</body>
</html>
Let’s have a closer look at the block of XML Script code
B
contained in the page.
It has a root element called
page
and a single child element called
components
.
The
page
element defines a global XML namespace associated with the following
Uniform Resource Identifier (
URI):
/>The
page
/
components
structure is the basic form of an XML Script code block. All
the blocks of
XML Script code in the page must have this structure in order to be
Listing 11.2 Code for the “Hello XML Script!” example
Block of XML
Script code
B
XML Script basics 377
parsed correctly. In section 11.1.5 we’ll return to the use of XML namespaces with
XML Script.
NOTE An XML namespace is a collection of names, identified by a URI reference,
used in
XML documents as element types and attribute names. For more
information on
XML namespaces, check http://www.w3schools .com/
xml/xml_namespaces.asp.
The
components
tag always contains the list of client objects declared in the page.
These objects are represented by
XML elements and are instances of classes cre-
ated with the Microsoft Ajax Library. In this chapter, we’ll focus on client compo-
nents, which are classes that derive from
Sys.Component
. The reason is that the
XML Script engine already knows how to properly parse and instantiate such
classes. If you recall, the creation process for a client component is rather elabo-
rate, as we discussed in chapter 8.
In listing 11.2,
application
is the unique child node of
components
. In XML
Script—as in the ASP.NET markup, for example—a tag is mapped to a class, and the
element represents an instance of that class. The
application
tag is always mapped
to the Application object, stored in the global
Sys.Application
variable. When the
XML Script parser processes the
application
tag, it retrieves a reference to the
Application object. Then, it recognizes the
init
attribute as the name of an event
raised by the Application object. As a consequence, its value—
pageInit
—is treated
as the name of the event handler.
The
pageInit
function declared in the JavaScript code block at the bottom of
the page is invoked when the Application object raises the
init
event. This causes
the greeting message to be displayed in a message box onscreen, as shown in fig-
ure 11.1.
Figure 11.1
The message displayed by a JavaScript
function that handles the
init event
raised by
Sys.Application. The
init event is hooked up declaratively
using XML Script code.
378 CHAPTER 11
XML Script
The page still includes some JavaScript code, but you were able to perform the
logic for attaching the event handler using only declarative code. Later, you’ll see
how to make the JavaScript code disappear.
So far, you know how to access the Application object using
XML Script. Usu-
ally, a rich web application hosts multiple components and even controls associ-
ated with
DOM elements. Can you access them in declarative code and hook up
their events? The answer is that all the kinds of client components can be instanti-
ated and accessed using
XML Script.
NOTE As you may have noticed while typing the first listing in Visual Studio,
code completion isn’t available at the moment for
XML Script. In addi-
tion, no support is provided for debugging
XML Script code and for the
Visual Studio Designer. As we said in the introduction,
XML Script is part
of the
ASP.NET Futures package and is still under development.
11.1.2 Controls and XML Script
In chapter 8, we introduced client controls and promised that they would be useful
when dealing with
XML Script. Client controls, when created as element wrappers, are
the way to reach
DOM elements using XML Script. An element wrapper is a control
associated with a
DOM element. As a wrapper, the client control exposes properties,
methods, and events to deal with the associated element and enhance its function-
ality. As a client component, a control can be used in
XML Script with little effort.
The Microsoft Ajax Library ships with a collection of ready-to-use controls associ-
ated with the most-used
DOM elements, such as labels and input elements.
Listing 11.3 is a slight variation on listing 11.2. It uses a button and a label to
display the greeting message, instead of accessing the Application object.
<div>
<input type="button" id="greetButton" value="Click Me" />
</div>
<div>
<h1><span id="msgLabel"></span></h1>
</div>
<script type="text/xml-script">
<page xmlns=" /> <components>
<label id="msgLabel" />
<button id="greetButton" click="onGreetButtonClick" />
</components>
</page>
</script>
Listing 11.3 Using the Label and Button controls in XML Script
Button
element
B
Label
element
C
Label
component
D
Button
component
E
XML Script basics 379
<script type="text/javascript">
<!
function onGreetButtonClick(sender, e) {
$find('msgLabel').set_text('Hello XML-script!');
}
// >
</script>
The page’s HTML contains an
input
B
and a
span
C
element. The goal is to dis-
play a message in the label when the button is clicked. To accomplish this task,
you don’t access the
DOM elements directly. Instead, you deal with the corre-
sponding controls, represented by the
label
D
and
button
E
elements in the
XML Script code. Note that the value of their
id
attributes is set to the IDs of the
DOM elements; this way, you associate the DOM elements with the client controls.
We say that the
DOM elements have been upgraded to client controls.
At runtime, the
XML Script engine creates an instance of the
Sys.Pre-
view.UI.Label
control and passes the
span
element as the associated element.
Similarly, it creates an instance of the
Sys.Preview.UI.Button
control and passes
the
input
element as the associated element. The value of the
id
attribute
becomes the value of the
id
property exposed by the controls. This allows them to
be referenced in
XML Script code.
The
click
attribute of the
button
tag
E
is mapped to the
click
event raised
by the Button control. Its value is the name of the JavaScript function that handles
the event. The function
onGreetButtonClick
uses the
$find
method to access
the Label control and set the text of the associated
span
element through the
set_text
method.
Table 11.1 lists the element wrappers defined in the
Sys.Preview.UI
namespace. Note that you obtain the name of the associated tag—which is case
insensitive—by removing the namespace prefix from the class name.
Table 11.1 Element wrappers defined in the Sys.Preview.UI namespace
Class name Description Tag name
Sys.Preview.UI.Button Wraps an input element of type button button
Sys.Preview.UI.Label
Wraps a span element label
Sys.Preview.UI.CheckBox
Wraps an input element of type checkbox checkbox
Sys.Preview.UI.HyperLink
Wraps an anchor element hyperlink
380 CHAPTER 11
XML Script
What if you need to target an element like
div
, which doesn’t have an associated
wrapper control? You have to write an
XML Script-enabled custom control that
wraps it. But if you only need to wrap an element and access the base functionality
provided by the
Sys.UI.Control
class, the easiest way is to use a
control
element.
The
control
tag wraps a DOM element with a given
id
, with an instance of the
Sys.UI.Control
class, like so:
<control id="elementID" />
In XML Script, the markup code is always mapped to the properties of controls,
not to the properties of the associated
DOM elements. You need client compo-
nents to interact with
DOM elements using declarative code.
So far, we’ve talked about the components shipped with the Microsoft Ajax
Library. You’ll probably want to use custom components in
XML Script. In the fol-
lowing section, you’ll see how
XML namespaces help the XML Script engine locate
custom client classes.
XML namespaces
An XML namespace declaration tells XML Script where to find the client class corre-
sponding to an element declared in the markup code. In
XML Script, you usually
declare a global namespace in the
page
element, with the following code:
<page xmlns=" />
When you declare the global namespace, the XML Script parser tries to map a tag
name to a client class contained in one of the following namespaces:
■
Sys
■
Sys.Net
■
Sys.Preview.UI
■
Sys.Preview.Data
■
Sys.Preview.Services.Components
■
Sys.UI
Sys.Preview.UI.Image Wraps an img element image
Sys.Preview.UI.Selector
Wraps a select element selector
Sys.Preview.UI.TextBox
Wraps an input element of type text textbox
Table 11.1 Element wrappers defined in the Sys.Preview.UI namespace (continued)
Class name Description Tag name
XML Script basics 381
■
Sys.Preview
■
Sys.Preview.Net
■
Sys.Preview.UI.Data
■
Sys.Preview.UI.Effects
If you want to use, in XML Script, a component defined in a different namespace,
you have to declare an
XML namespace that tells where to find it.
In general, you declare an
XML namespace by associating a URI with a prefix.
The URI identifies the location of a certain resource, which isn’t necessarily asso-
ciated with a browsable address: It acts as a unique identifier. The prefix is used as
a shortcut that refers to the
URI. For example, suppose you have a custom compo-
nent declared as
SomeSpace.SomeComponent
. Because
SomeSpace
is a custom
namespace, you have to declare an
XML namespace if you want to use the compo-
nent in
XML Script. To do that, you have to act on the
page
element as follows:
<page xmlns=" /> xmlns:cc="javascript:SomeSpace" />
You declare an XML namespace with an
xmlns
attribute followed by a colon and
the prefix that you’ll use in the
XML Script code. The value of the
xmlns
attribute
is the
URI (javascript:SomeSpace in the example). The string javascript: at the
beginning of the
URI is called the scheme, which is required in order to obtain a
valid
URI. In this case, the scheme suggests that what follows is a list of one or
more client namespaces, separated by commas. You can associate multiple client
namespaces with a single prefix, like so:
<page xmlns=" /> xmlns:cc="javascript:SomeSpace, SomeSpace.ChildSpace">
This code tells the XML Script parser which namespaces to search for the class
corresponding to an element declared with the
cc
prefix. The prefix should be a
short and, if possible, meaningful string. In this case,
cc
stands for custom control.
Assuming it exposes a proper type descriptor, you can use the custom component
in
XML Script as follows:
<cc:SomeComponent />
As explained in the previous section, the type descriptor maps an element’s
attributes to properties of the component. The rules for writing
XML Script code
apply to custom components.
You may have noticed that the global namespace doesn’t have a prefix. Elements
without a prefix belong to the global namespace. Under the hood, the global
XML
382 CHAPTER 11
XML Script
namespace is associated with the
script
prefix; so, this prefix refers to the
namespaces listed earlier.
Before you learn how to use the custom classes in
XML Script, you should
understand how
XML Script code is parsed and turned into JavaScript code. This
will give you some insight into how things work under the hood of the
XML Script
engine. Then, you’ll be ready to explore some of the powerful features of the
declarative language.
11.1.3 From XML Script to JavaScript
The process of converting the XML Script declarative code into JavaScript impera-
tive code starts when a web page is loaded in the browser. If
XML Script is enabled
in the page, the Microsoft Ajax runtime instructs the
XML Script parser to filter all
the
script
tags with the
type
attribute set to
text/xml-script
. The XML Script
parser is a JavaScript object stored in the
Sys.Preview.MarkupParser
variable. It
exposes a group of methods for extracting and processing the
XML Script code.
As the
XML Script blocks are extracted, they’re collected in an array and pro-
cessed sequentially. For each block, a sanity check is performed on its structure,
to ensure that a root element called
page
exists. Also, the
page
element must
have a child node called
components
. The parser ignores all the other tags in the
page
element.
NOTE The parser performs an additional check to see if a
references
element
is declared in the page node. The
references
element was used in previ-
ous
CTPs to provide a list of paths to script files to load in the page, but
it’s not supported in the latest
CTP. If a
references
tag is found, the
XML Script parser throws an error.
As the current XML Script block is processed, all the child elements of the compo-
nents tag are extracted and stored in an array. These are all the client objects that
need to be instantiated. The instantiation process is performed by the
parseNode
method, which is called by the parser on each tag to parse the markup code and
create an instance of the object.
First, the
parseNode
method needs to determine the fully qualified name of the
class to instantiate. To locate the class, it extracts the tag name and the namespace
prefix from the markup code. The tag name is the case-insensitive name of the class;
it’s turned to uppercase. The information on the namespace is retrieved from the
XML namespace prefix used in the tag. Finally, the fully qualified name of the class
is obtained by appending the class name to its containing namespace.
XML Script basics 383
If the class exists, the parser checks whether it exposes a static method called
parseFromMarkup
. This method must be defined in a class in order to be used in
XML Script. It receives the markup code and is responsible for parsing it and cre-
ating a new instance of the class. This process is repeated for each
XML Script
block and for each tag extracted from the components node. When all the
markup has been processed, all the client objects have been instantiated and can
be safely accessed in the application code. This process is illustrated in figure 11.2.
Luckily, you can avoid writing the logic needed to parse the markup code and
create an instance of a client class. The
Sys.Component
class exposes and imple-
ments the
parseFromMarkup
method; it’s a good choice to derive the custom
classes from the base
Sys.Component
class. This way, you can take advantage of the
features offered by the client component model and also use the custom class in
XML Script with little effort. The only requirement is that every component must
expose a type descriptor in order to be used in
XML Script.
11.1.4 Type descriptors
A type descriptor is an object that provides information about a particular type. In
the .
NET framework, you can perform reflection on objects to learn about their
structure. For example, you can extract every sort of information about the fields,
properties, methods, and events exposed by a class. On the server side, type
descriptors can be used to provide additional reflection capabilities. On the client
side, type descriptors have been introduced to achieve the same goal.
text/xml-script
text/xml-script
<button />
<label />
<textbox />
<control />
new Button();
new Label();
new TextBox();
new Control();
Figure 11.2 The XML Script parser extracts component declarations from XML
Script code blocks. Then, it parses the declarative code and creates instances of
the corresponding JavaScript objects.
384 CHAPTER 11
XML Script
In chapter 3, we introduced the enhanced type system provided by the
Microsoft Ajax Library, together with the methods used to reflect on client classes.
Reflection on client objects is less powerful because many object-oriented con-
structs are simulated by extending function objects. You can use client type descrip-
tors to partially fill this gap and provide information about the properties,
methods, and events defined in a client class.
NOTE In the .NET framework, type descriptors are used to enhance reflection
capabilities, especially for components that take advantage of the Visual
Studio Designer. For more information on .
NET type descriptors, browse
to
A client class can expose a type descriptor by storing it in a static
descriptor
property added directly to the constructor. For example, you would store and
retrieve the type descriptor of a class called
SomeSpace.SomeClass
with the follow-
ing statements:
SomeSpace.SomeClass.descriptor = {};
var descriptor = SomeSpace.SomeClass.descriptor;
Another way to expose a type descriptor is by implementing the
Sys.Preview.ITy-
peDescriptorProvider
interface. This interface defines a single method called
getDescriptor
, which must be implemented as an instance method of the client
class. The implementation of the method should return the type descriptor associ-
ated with the client class, as in the following code:
SomeSpace.SomeClass.prototype.getDescriptor = function() {
return {};
}
Client type descriptors aren’t strictly tied to XML Script and can be leveraged by
every client class. But the
XML Script engine needs a type descriptor in order to
parse the markup code into an instance of a client component, so only client com-
ponents that provide a type descriptor can be used in
XML Script code.
Structure of a type descriptor
In the previous code snippets, you returned
{}
—an empty object—as the type
descriptor. The information should be packaged following specific rules that we’ll
explain in a moment. In general, a client type descriptor is a JavaScript object that
can provide custom information about the client type. The
XML Script engine
recognizes the following properties:
XML Script basics 385
■
properties
—Holds an array of property descriptors
■
methods
—Holds an array of method descriptors
■
events
—Holds an array of event descriptors
Each array, in turn, holds objects, each of which describes a property, a method,
or an event exposed by the client class. To help you understand what a type
descriptor looks like, listing 11.4 shows the one exposed by the
Sys.Pre-
view.UI.Button
class.
Sys.Preview.UI.Button.descriptor = {
properties: [ { name: 'command', type: String },
{ name: 'argument', type: String } ],
events: [ { name: 'click' } ]
}
The type descriptor of the
Button
class exposes two property descriptors and one
event descriptor. The first property is called
command
, and the corresponding
property descriptor is an object with two properties:
name
and
type
. The
name
property returns a string with the name of the property you’re describing. The
type
property returns the type of the value exposed by the property. Here’s the
property descriptor extracted from the type descriptor:
{ name: 'command', type: String }
Similarly, the second property descriptor tells you that the
Button
class exposes a
property called
argument
, of type
String
. We’re talking about client properties as
defined by the Microsoft Ajax Library, which we discussed in chapter 3. The
unique event descriptor in listing 11.4 is relative to a
click
event. It’s an object
with a
name
property that returns a string with the name of the event:
{ name: 'click' }
The
Button
class doesn’t provide any method descriptors. Describing a method
requires additional work because you also have to describe its parameters. Fig-
ure 11.3 shows a method descriptor extracted from the type descriptor exposed
by the
Sys.Preview.InvokeMethodAction
class. The method is called
invoke
,
and it accepts a single parameter called
userContext
, of type
Object
. You’ll
encounter this method again when we talk about actions in section 11.2.
Listing 11.4 Type descriptor exposed by the Sys.Preview.UI.Button class
386 CHAPTER 11
XML Script
In general, a method descriptor is an object with two properties,
name
and
params
.
The
name
property returns a string with the name of the method. The
params
property returns an array of parameter descriptors. A list of the properties that
can be used in a parameter descriptor can be found in chapter 13, where we
explain the parameter-validation mechanism. Method parameters are described
in the same way in type descriptors and in validation routines.
Thanks to type descriptors, the
XML Script engine can discover which mem-
bers are exposed by a client class and map them to attributes declared in the
markup code. For example, by querying the type descriptor of the
Button
class,
the
XML Script parser knows that the value of the
click
attribute of a
button
tag
should be treated as an event handler for the
click
event exposed by the class. By
iterating the same processing to all the elements, the
XML Script code can easily
be converted into JavaScript code.
So far, we have presented the syntax and the main rules to write
XML Script
code. You also possess the skills to enable
XML Script usage in the custom compo-
nents. This is the right moment to examine the main features of the language.
You must understand concepts like actions, bindings, and transformers to run
complex client code without writing a single line of JavaScript.
11.2 Actions
In the previous examples, you saw how to hook up an event raised by a client com-
ponent using
XML Script code. Things went smoothly, and you didn’t have to
write any client code to attach the handler to the event. But you did have to
methods:
[
{name: 'invoke', params: [ {name: 'userContext', type: Object} ] }
]
Array of parameter descriptors
invoke() descriptor
Array of
method descriptors
userContext descriptor
Figure 11.3 A type descriptor can have a methods property that returns an array of method
descriptors. Each descriptor provides information about a particular method exposed by a class.
The diagram illustrates the method descriptor relative to a method named
invoke. The method
accepts a single
userContext argument, which is described with a parameter descriptor.
Actions 387
declare the function that handles the event, so some JavaScript code is still
present in the page. Our main goal was to demonstrate that
XML Script can effec-
tively replace JavaScript code in many situations. Now we’re ready to introduce
actions, which are classes that encapsulate portions of JavaScript code. This code
can be executed in response to events raised by client components. Actions are
perfectly suited for handling events declaratively.
As usual, examples will help to clarify this concept. Let’s start with an overview
of the built-in actions in the Microsoft Ajax Library. Later, you’ll create custom
actions and use them in
XML Script.
11.2.1 SetPropertyAction
A typical task performed when handling an event is to set one or more properties
of an object. For example, you can intercept the
click
event of a button object and
display some text in a label. To do the same thing using declarative code, you need
the help of the
SetProperty
action. The
SetPropertyAction
class encapsulates the
client code needed to set the value of a property exposed by a client object. Like all
actions, this class can be used in
XML Script. The code in listing 11.5 handles the
click
event of a button with the
SetProperty
action, in order to display a greeting
message in a label.
<div><input type="button" id="greetButton" value="Click Me" /></div>
<div><h1><span id="msgLabel"></span></h1></div>
<script type="text/xml-script">
<page xmlns=" /> <components>
<label id="msgLabel" />
<button id="greetButton">
<click>
<setPropertyAction target="msgLabel"
property="text"
value="Hello XML-script!"
/>
</click>
</button>
</components>
</page>
</script>
Listing 11.5 Using the SetProperty action to handle an event
388 CHAPTER 11
XML Script
To handle an event with XML Script, you have to do two things: First you turn the
name of the event into an
XML element; then, you declare one or more actions in
the event element. The code encapsulated by each action is executed in response
to the event.
The code has a
click
element in the
button
tag. This element represents the
click
event raised by the
Button
control. In the
click
element, you declare a
setPropertyAction
element, which represents a
SetProperty
action. The
tar-
get
attribute specifies the ID of the client component that exposes the property
you want to set. The
property
attribute holds the name of the property you’re
interested in. The
value
attribute is set to the value you want to assign to the
property. As a consequence, the text “Hello
XML-script!” is displayed in the label.
With the
SetProperty
action, you can also access the properties of the DOM
element associated with a control. Add the following markup in the
click
node in
listing 11.5, just after the first
setPropertyAction
tag:
<setPropertyAction target="msgLabel"
property="element"
propertyKey="style.backgroundColor"
value="#FFFF00" />
In this case, you have an additiona
propertyKey
attribute that contains the path
to the
backgroundColor
property of the
span
element associated with the
msgLa-
bel
control. Let’s compare the markup code with the equivalent imperative code:
$find('msgLabel').get_element().style.backgroundColor = '#FFFF00';
The
property
attribute, in this case,
refers to the
get_element
method, which
returns the associated
DOM element. The
value of the
propertyKey
attribute is
appended to the object returned by
get_element
, and the result is the prop-
erty to set. This causes the background
color of the
span
element to become yel-
low. Figure 11.4 shows the example in list-
ing 11.5 running in Firefox.
Did you see any JavaScript code in list-
ing 11.5? With actions, you can wrap any
kind of JavaScript code and execute it
Figure 11.4 The SetProperty action
lets you set properties of client components
without writing a single line of JavaScript code.
Actions 389
declaratively. The next built-in action we’ll examine is
PostBack
; it’s used to trig-
ger a postback of the page.
11.2.2 PostBackAction
ASP.NET pages use a JavaScript function called
__doPostBack
to post form data
back to the server. The
PostBack
action wraps the call to
__doPostBack
to trigger
the postback of the page from
XML Script code. Let’s change the behavior of the
button declared in listing 11.5. If you replace the
button
tag with the following
code, you can make it trigger a postback when it’s clicked:
<button id="greetButton">
<click>
<postBackAction target="myButton" eventArgument="" />
</click>
</button>
The
target
and
eventArgument
attributes set the corresponding arguments in
the
__doPostBack
function. The previous markup code executes the following
JavaScript code:
__doPostBack('greetButton', '');
Another typical task performed by event handlers is invoking an object method.
The Microsoft Ajax Library provides the
InvokeMethod
action to invoke a method
declaratively in
XML Script.
11.2.3 InvokeMethodAction
The
InvokeMethod
action is powerful because it invokes a method exposed by a
client component and makes it possible to process the results using only declara-
tive code. To demonstrate the
InvokeMethod
action, we’ll introduce a built-in cli-
ent component called
Sys.Preview.Net.ServiceMethodRequest
. You can use
this class to invoke a web method and process the results in a callback function.
To add some spice, you do so using only
XML Script code. In listing 11.6, you
declare the Web Service used in the example. The only web method,
GetTimeAs-
String
, returns the current date and time on the web server. In the example, you
retrieve this information and display it in a label.
<%@ WebService Language="C#" Class="DateTimeService" %>
using System;
using System.Web;
using System.Web.Services;
Listing 11.6 Code for the DateTimeService class
390 CHAPTER 11
XML Script
using System.Web.Services.Protocols;
using Microsoft.Web.Script.Services;
[WebService(Namespace = " />[WebServiceBinding(ConformsTo = WsiProfiles.BasicProfile1_1)]
[ScriptService]
public class DateTimeService : System.Web.Services.WebService {
[WebMethod]
[ScriptMethod(UseHttpGet=true)]
public string GetTimeAsString() {
return DateTime.Now.ToShortTimeString();
}
}
The
DateTimeService
class represents an ASP.NET web service configured for
ASP.NET AJAX. As usual, the class is decorated with the
ScriptService
attribute,
which instructs
ASP.NET AJAX to generate a JavaScript proxy for the web service.
The
GetTimeAsString
web method returns a string with the current date and
time. The
ScriptMethod
attribute that decorates the web method is used to
change the way it’s invoked. Because the
ServiceMethodRequest
class uses GET as
the default
HTTP verb for making the request, you set the
UseHttpGet
parameter
to
true
in the
ScriptMethod
attribute. You can find all the information needed
to access Web Services with
ASP.NET AJAX in chapter 5.
The Web Service is configured, so we can move on to the
XML Script code.
Listing 11.7 shows how to make a declarative call to the web method defined in
the Web Service and access the returned string.
<h2>
<span>Time on Web Server: </span>
<asp:Label ID="DateTime" runat="server"></asp:Label>
</h2>
<script type="text/xml-script">
<page xmlns:script=" /> <components>
<label id="DateTime" />
<serviceMethodRequest id="timeServiceMethod"
url="DateTimeService.asmx"
methodName="GetTimeAsString">
Listing 11.7 Making a declarative Web Service call
Label
control
B
ServiceMethod-
Request component
C