Beginning Web Development, Silverlight, and ASP.NET AJAX From Novice to Professional phần 6 docx
Bạn đang xem bản rút gọn của tài liệu. Xem và tải ngay bản đầy đủ của tài liệu tại đây (1.44 MB, 44 trang )
8. Select Address (Array) and click Finish. This sets the DataContext for the Grid (and
thus all its child controls) to the set of addresses that are found in the XML file.
9. Next, add a TextBox, a Button, and a ListBox to the window. You are going to set up
the data binding for the ListBox. Select it and look at its common properties. You
will see that its DataContext property has already been initialized because the
control is on the Grid that had its DataContext set, and the ListBox inherited this.
You can of course override it and point to a different data source to get the context
for this control, but for now, this is perfectly OK.
10. To bind the ListBox to the data source, you use the ItemsSource property. Click it
and select Data Binding in the ensuing dialog.
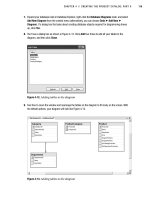
11. The Create Data Binding dialog will appear. This time, you want to bind to the
context that is already present, so select the Explicit Data Context tab and pick
your data source from there. If you don’t see all the fields, change the Show drop-
down to All Properties (see Figure 8-22).
Figure 8-22. Binding to the current DataContext
CHAPTER 8 ■ .NET 3.0: WINDOWS PRESENTATION FOUNDATION200
9594CH08.qxd 1/22/08 12:11 PM Page 200
12. Select Address (Array) and click Define Data Template. This allows you to define
which fields you want to appear in the list. If you only want one field, you don’t
have to go this route—just select it in the Create Data Binding dialog—however,
data templates allow you more flexibility.
13. The Create Data Template dialog appears and gives you three options for how you
want your data to appear: Default ListBox Styling, which gives you all the fields
stuck together into a single text line, with each entry having one line; Current or
Predefined Data Template, which allows you to pick an existing data template and
apply it to this ListBox; and New Data Template and Display Fields, which allows
you to design a simple data template based on the fields that are currently avail-
able (see Figure 8-23).
Figure 8-23. Creating a new data template
14. Select the fields that you want in the data template, and click OK. The dialog will
close, and you’ll be taken back to the Designer, where the list box will be popu-
lated with the data as expected (see Figure 8-24).
CHAPTER 8 ■ .NET 3.0: WINDOWS PRESENTATION FOUNDATION 201
9594CH08.qxd 1/22/08 12:11 PM Page 201
Figure 8-24. Binding the ListBox to data with a template
15. Because the definition of the ListBox and its binding is in XAML, you can easily
edit it to customize the template. Open the XAML view of this window, and you
can add a new node to separate the list items from each other.
For example, here is a data template that was designed to just render the Address1
and ZIP code fields:
<Window.Resources>
<XmlDataProvider d:IsDataSource="True"
Source="C:\ \addressexample.xml"
x:Key="Addresses"/>
<DataTemplate x:Key="AddressTemplate1">
<StackPanel>
<TextBlock Text="{Binding Mode=OneWay, XPath=AddressLine1}"/>
<TextBlock Text="{Binding Mode=OneWay, XPath=PostalCode}"/>
</StackPanel>
</DataTemplate>
</Window.Resources>
16. You see that it uses two TextBlock controls: one is bound to the AddressLine1 field,
and the other to the PostalCode field. You can add a new XAML node underneath,
for example, for an empty label that will create spacing between the elements.
Here’s an example:
CHAPTER 8 ■ .NET 3.0: WINDOWS PRESENTATION FOUNDATION202
9594CH08.qxd 1/22/08 12:11 PM Page 202
<Window.Resources>
<XmlDataProvider d:IsDataSource="True"
Source="C:\ \addressexample.xml"
x:Key="Addresses"/>
<DataTemplate x:Key="AddressTemplate1">
<StackPanel>
<TextBlock Text="{Binding Mode=OneWay, XPath=AddressLine1}"/>
<TextBlock Text="{Binding Mode=OneWay, XPath=PostalCode}"/>
<Label Content=" " Height="8" />
</StackPanel>
</DataTemplate>
</Window.Resources>
17. Running the application will now give you the data neatly separated within the list
(see Figure 8-25).
Figure 8-25. Binding the data with an enhanced template
Adding a Simple Timeline Animation
N
o
w
, the
designer is likely to want to have some kind of UI glitz happening. For this
example
, w
e will make the list bo
x fade in from invisible as it slides in from the left-hand
side
.
This is achiev
ed using animation timelines.
F
irst y
ou will want to cr
eate the trigger that fires when the button is clicked. You do
this b
y selecting the button in the Objects and
T
imeline pane, and then the + Event Trig-
ger button in the
T
r
iggers pane. The IDE will create the default trigger, which is
W
indo
w
.Loaded. Don’t worry!
U
nder
neath the
Window.Loaded entry in the Triggers window, you will see the trigger
definition section—it r
eads
“When Window Loaded is raised,” with “Window” and “Loaded”
as dr
op-do
wns (see Figure 8-26).
CHAPTER 8 ■ .NET 3.0: WINDOWS PRESENTATION FOUNDATION 203
9594CH08.qxd 1/22/08 12:11 PM Page 203
Figure 8-26. Creating the button click trigger
Select the drop-down to the r
ight of When (which should read “Window” right now)
and change its setting to read “Button.” Change the dialog that reads “Loaded” to “Click.”
The Triggers pane should now read “When button Click is raised” (see Figure 8-27).
Figure 8-27. S
etting the button click trigger
CHAPTER 8 ■ .NET 3.0: WINDOWS PRESENTATION FOUNDATION204
9594CH08.qxd 1/22/08 12:11 PM Page 204
A pop-up box will appear, pointing out that no timeline for this event trigger is pres-
ent, and asking if you want a new one. Click OK to create it (see Figure 8-28).
Figure 8-28. Creating a new timeline
The timeline will be created, and a new timeline will start recording. This is a neat
feature that allows you to define your animations and how they will run by setting the
various properties that you want to animate visually. We want the list box to fly in from
the left as it fades in from invisible to visible, so you should drag it off the left-hand side
of the screen now and set its opacity to 0.
On the timeline, you will see that a key marker is set on the list box at time 0 (see
Figure 8-29).
Figure 8-29. Setting the first key frame on the timeline
Drag the yellow line that indicates the time position to the 3 second mark. Go back to
the D
esigner and dr
ag the list from its position off the left-hand side of the screen to the
final position that y
ou want it to appear, and set its opacity to 100%. You’ll see a few
things happen: a new key mar
ker will appear at the 3 second mark, the area between the
two mar
kers will be filled in, and a guide line showing the path of the animation will
appear on the D
esigner (see Figure 8-30).
CHAPTER 8 ■ .NET 3.0: WINDOWS PRESENTATION FOUNDATION 205
9594CH08.qxd 1/22/08 12:11 PM Page 205
Figure 8-30. Finishing off the timeline animation
Now when you run your application, clicking the button will cause the list to fly in
from the left as it slowly fades in.
This is a very simple example of an animation and an interaction that have been
designed with Blend. No designer in his right mind would do something like this, but it
shows the technology and how it works. With a little experimentation, you can build on
this to produce the perfect interface for your needs. In the next section, you’ll see how a
programmer can take this work and add “real” data to the interaction using Visual Studio.
Using the Blend Artifacts in Visual Studio
Blend uses the same project file system as Visual Studio, so you can take your Blend proj-
ects and use them in Visual Studio to make them the front end in a multitier application.
In this case, the procedure is very simple. You first want to add a web reference to the
address data service that y
ou created in Chapter 5. Call it AddressService. This gives you a
proxy out to the web service. Remember that you used the results of the web service call
earlier when you templated the application, so it should be relatively easy to change the
application to accept the live results.
You’ll need to add a handler to the click event on the Button. You do this by adding a
Click= attribute to the Button. Then you fill the attribute content with the name of the
function y
ou want to call upon the button being clicked.
Your XAML for the Button will look like this:
<Button Click="Handle_Click" HorizontalAlignment="Left"
Margin="200,18,0,0" VerticalAlignment="Top"
Width="67" Height="23" Content="Button"
x:Name="button"/>
N
o
w
, all y
ou need to do to implement this in y
our code-behind page is to wr
ite a
function with the follo
wing syntax:
CHAPTER 8 ■ .NET 3.0: WINDOWS PRESENTATION FOUNDATION206
9594CH08.qxd 1/22/08 12:11 PM Page 206
public void Handle_Click(Object obj, RoutedEventArgs e)
{
}
This is the typical function layout for a WPF event handler, where it accepts an object
and an argument (usually
RoutedEventArgs). When you click the button, the WPF runtime
knows to invoke the code in this function. So let’s fill it in. What you need to do is pretty
simple.
Pull the ZIP code out of the text box, which is called
tZIP:
string strZIP = tZIP.Text;
Create an instance of the proxy and call it with this ZIP code:
AddressService.Service d = new AddressService.Service();
XmlNode xNode = d.GetAddresses(strZIP);
Use the returned XML as the new DataContext for the layout root:
LayoutRoot.DataContext = xNode.InnerXml;
Your finished function will look like this:
public void Handle_Click(Object obj, RoutedEventArgs e)
{
string strZIP = tZIP.Text;
AddressService.Service d = new AddressService.Service();
XmlNode xNode = d.GetAddresses(strZIP);
LayoutRoot.DataContext = xNode.InnerXml;
}
Now when you run your application, you can enter text in the text box, click the
button, and presto—you’ll have live data in the interaction that the designer handed
off to you.
Summary
I
n this chapter
, you took a first look at WPF and how it all hangs together. You spent a lot
of time with the new E
xpr
ession Blend tool for designing WPF applications. However,
y
ou
’ve barely scratched the surface of what is possible with WPF—there’s a whole world
of possibilities with do
zens of controls, sophisticated timeline- and key frame–based
CHAPTER 8 ■ .NET 3.0: WINDOWS PRESENTATION FOUNDATION 207
9594CH08.qxd 1/22/08 12:11 PM Page 207
animations, 3D, graphics APIs, multimedia, and more. If you want to look more into WPF,
it’s a good idea to check out
Foundations of WPF: An Introduction to Windows Presenta-
tion Foundation
(Apress, 2006), which takes you through a primer in this development
API, and
Applications = Code + Markup (Microsoft Press, 2006), which gives a very
detailed look at the XAML API, going into depth on each of the tags, from controls to
timelines and from layouts to multimedia.
CHAPTER 8 ■ .NET 3.0: WINDOWS PRESENTATION FOUNDATION208
9594CH08.qxd 1/22/08 12:11 PM Page 208
.NET 3.0: Windows Workflow
Foundation
Workflow is what happens when an item is moved through various stages or people
through a fixed business process. This process contains a number of steps or activities
that can be acted on by machines, people, or a combination of both, and can involve var-
ious rules. For example, when you first join a new company, a set of business processes
gets invoked. You need to be added to payroll, you need an office to be assigned, equip-
ment and furniture need to be set up, and so on. Behind the scenes, a business process
kicks in for the new hire. Or, when a company sells something, it typically begins with
receipt of a purchase order. The purchase order has to be entered into the business sys-
tem. This sets up a requisition for the product from stock. If not enough of the product is
available, more needs to be ordered. When enough of the product is available, it is moved
to shipping. Shipping boxes them up and sends them to the customer. Billing then gener-
ates an invoice to send to the customer. Billing also tracks payment, and if the customer
pays, the order is flagged as such. If they don’t pay by the time of the terms of the invoice,
a new process for collections is kicked in.
Throughout this entire scenario, an “item,” the purchase requisition, flows through-
out the system. The item morphs and changes throughout, but as you can see from this
example, it changes into what makes sense for the current stage in the process. The entire
scenario is termed a
workflow, and each of the actionable elements in it (entering the
purchase order, building the order, etc.) is termed an
activity.
A workflow isn’t always linear. In fact, it is
rarely linear. In the preceding scenario, the
workflow could have gone in different directions based on different scenarios. For exam-
ple, if the company has enough stock of whatever was ordered, the next step is to go to
shipping and billing. If it doesn’t, the next step is to order new product and wait for the
order to be fulfilled before it can go to shipping and billing. In this case, it is likely that a
customer service workflow, informing the customer of the delay, would also kick in. This
is what is called
branching in workflow terminology.
There are a number of different types of possible workflows. The preceding example
is what is known as a
sequential workflow, where the item flows from a known beginning
point (r
eceipt of the or
der) to a known endpoint (shipping, billing, and collecting).
209
CHAPTER 9
9594CH09.qxd 1/22/08 12:11 PM Page 209
Another type of workflow is called a state workflow, where the item moves between
different states when certain criteria are met. An example of this is when an item is con-
structed in response to a purchase request (as opposed to just being sold from stock).
Many computer manufacturers create a computer to order nowadays, and this process
can be seen as a stateful workflow.
When the order is first received, the computer hasn’t been created yet, and this is its
initial state. Its next state could be Ready to Assemble, but before it can transition to this
state, all of the components need to be available and assignable to this order. Once those
criteria are met and the components assigned, the computer transitions to the Ready to
Assemble state. In this state, it still isn’t a computer, just a bunch of parts. It could remain
in this state for some time, until the assembler has time to complete it. When the assem-
bler has put together the computer, he may find that some of the components are
br
oken, and he cannot complete assembly, so he returns it to the previous state; or if
assembly has been completed, he could transition it to the new Assembled: Ready to
Test state.
At this point, the test process kicks in, and should it pass, the computer will be transi-
tioned to a Working state. Now we have a working computer, but the order likely includes
a mouse, software add-ons such as manuals and discs, a monitor, and so forth. When
these components are available and assigned to the order, the state then transitions into
a Ready to Ship state. Once it reaches this state, the product is sent to shipping, and once
it goes out the door it transitions to the Shipped state. Finally, when the order is received
and acknowledged, the state machine transitions to the Completed state and is effec-
tively destroyed.
Now consider the difficulties involved in developing business process scenarios
using a programming language. The sheer complexity of even simple systems like those
just described can make for some real spaghetti code, and because multiple departments
and individuals are concerned, each with their own priorities and requirements, the
overall scenario becomes a very complex one.
It is with this in mind that Microsoft has added Windows Workflow Foundation (WF)
to .NET 3.0, providing a runtime environment for sequential and state-based workflows
that are (mostly) visually designed, and compiled into code that will execute on the WF
host that is present in the framework, and soon to be available to other applications such
as Office.
This chapter gives you an introduction to this framework, and takes you through
some of the tools that are available to you. It will focus on the web-oriented aspects of
building WF applications, namely how they can be exposed as web services (you can
compile your sequential or state-based workflow into a web service that the rest of your
application can use); and also how they can compose web services—where your existing
w
eb ser
vices can be integr
ated into a wor
kflo
w
, giving y
ou the ability to tie depar
tments
together into a coher
ent, centr
aliz
ed wor
kflo
w
.
CHAPTER 9 ■ .NET 3.0: WINDOWS WORKFLOW FOUNDATION210
9594CH09.qxd 1/22/08 12:11 PM Page 210
Using WF
WF is at its heart a programming model along with the runtime engine and the tools to
create workflow applications. The programming APIs are encapsulated in the .NET 3.0
namespace
S
ystem.Workflow
. The best place to get started is with the tools themselves.
They are available already with Visual Studio 2008, or as an add-on to Visual Studio 2005.
Please note that if you have downloaded and installed the Orcas add-ons for Visual
Studio 2005, WF is
not included. It is a separate download that can be obtained from the
Windows Vista downloads section of MSDN, at
/>windowsvista. You’ll look at the workflow templates in Visual Studio in the next section.
Just as a real business process is composed of a number of activities connected by rules
and flow, a WF process application also uses activities, of which the template provides
many out-of-the-box activities dealing with branching, input/output, managing external
services and activities, and so on. You can also compile your own activities into an activ-
ity library that can be reused by other workflow applications. In addition, a workflow can
of course contain another workflow as an activity within it.
The next component in the WF ar
chitecture is the WF runtime engine. This executes
the workflow, handling scheduling, rules, and everything necessary to make the workflow
run as intended and designed. When long-running stateful transactions are needed, the
workflow will often need to be persisted to save on resources when it isn’t being used.
Finally comes the host process. The WF runtime engine is not an executable environ-
ment.
You have to host it within an application, be it a console, Windows, or web
application, in order for it to work. Thus, you can, for example, “embed” a workflow
application in your web site that gets executed upon filling in a form on a web page, or
you can host it to an external web service that gets called from your web applications, but
the WF activity runs on the ASP.NET server that manages the web service. Any applica-
tion can host a WF process as long as it is capable of invoking the .NET 3.0 runtime.
Using Visual Studio to Build Workflows
To build a workflow application using Visual Studio, select File ➤ New Project. In the New
Project dialog, select Workflow as the project type (available to C# and Visual Basic), and
you’ll see the available project templates (see Figure 9-1).
CHAPTER 9 ■ .NET 3.0: WINDOWS WORKFLOW FOUNDATION 211
9594CH09.qxd 1/22/08 12:11 PM Page 211
Figure 9-1. Creating a new WF application
The available templates are as follows:
Sequential Workflow Console Application: This contains a simple sequential workflow
and the code for a Windows console application that can host it.
Sequential Workflow Library: This contains a simple sequential workflow that can be
published as an activity or a web service.
Workflow Activity Library: This allows you to create a new activity for the WF Toolbox.
State Machine Workflow Console Application: This contains a state machine workflow
and the code for a Windows console application that can host it.
S
tate M
achine
W
or
kflo
w L
ibr
ary
:
This
contains a simple state machine wor
kflo
w that
can be published as an activity or a w
eb ser
vice
.
Empty Workflow Project: This provides a simple workspace that allows you to add
your own workflow application types.
You can experiment with these to find the template that best suits you. For this
example, you will step through building a simple sequential workflow console
CHAPTER 9 ■ .NET 3.0: WINDOWS WORKFLOW FOUNDATION212
9594CH09.qxd 1/22/08 12:11 PM Page 212
application called FirstWorkFlowApp (see Figure 9-1). And, yes, if you were wondering—
this will be a Hello World application!
When you create this application using the template, you’ll be taken to the Visual
Studio IDE with the Workflow Designer open, and the set of available activities open in
the Toolbox (see Figure 9-2).
Figure 9-2. The Visual Studio Workflow Designer
CHAPTER 9 ■ .NET 3.0: WINDOWS WORKFLOW FOUNDATION 213
9594CH09.qxd 1/22/08 12:11 PM Page 213
The available activities can be seen on the left side of the screen. In the next section,
you’ll be taken on a tour of the major ones, but for now you’ll use the Code activity. Drag
it from the Toolbox to the Workflow Designer onto the sequential line where it indicates
that it should be dropped. Alternatively, you can double-click the activity in the Toolbox.
You should see something like Figure 9-3 when you complete this.
Figure 9-3. Adding a Code activity
Note that the activity has a r
ed alert icon in its top-right-hand corner. This is feed-
back fr
om the Designer notifying you that the activity isn’t fully configured or has an
error of some sort. It’s useful feedback allowing you to visually inspect your workflow for
errors before you try to compile or run it. Click the exclamation mark and you’ll get
details of the error (see F
igure 9-4).
As y
ou can see, the Code activity needs the property
ExecuteCode to be set or it will
not work. The tool also gives you a nice shortcut as it is selectable. Select the message
(Property ‘ExecuteCode’ is not set), and the focus will be moved to the Properties window
with the
ExecuteCode property highlighted. You’ll also notice the red exclamation mark
informing you that the activity is not yet correctly configured (see Figure 9-5).
CHAPTER 9 ■ .NET 3.0: WINDOWS WORKFLOW FOUNDATION214
9594CH09.qxd 1/22/08 12:11 PM Page 214
Figure 9-4. Using the error tooltips on an activity
Figure 9-5. U
sing the Properties window in WF
The ExecuteCode property defines a code procedure that gets executed when the
CodeActivity node is encountered in the workflow. You can code up a procedure yourself
and add its name to this property, or you can have the IDE generate one for you. To do
this, make sure that the
ExecuteCode property is highlighted (as in Figure 9-5) and select
the Generate Handlers link (which can also be seen in Figure 9-5). Pick a name for the
function and place the name of this function in the
ExecuteCode property. The IDE will
then generate the code for you. If you select the name
codeActivity1_ExecuteCode as the
event handler, the code will look like this:
CHAPTER 9 ■ .NET 3.0: WINDOWS WORKFLOW FOUNDATION 215
9594CH09.qxd 1/22/08 12:11 PM Page 215
private void codeActivity1_ExecuteCode(object sender, EventArgs e)
{
}
This is now the code that will execute when this code block is reached. To turn this
application into a Hello World application, you just need to add a couple of lines of code
to it to get it to write out the message, and read in a new line before exiting. When you’re
done, the
ExecuteCode function will look like this:
private void codeActivity1_ExecuteCode(object sender, EventArgs e)
{
Console.WriteLine("Hello, World!");
Console.ReadLine();
}
You can now execute the application to get the wonderfully sophisticated Hello
World application running as a workflow hosted in a Windows console application (see
Figure 9-6).
Figure 9-6. Running the Hello World application
The simplicity of the application belies the complexity of what is going on under the
hood, wher
e the sequential design has been compiled into a wor
kflow that is executed by
the WF runtime hosted in the console application.
You can see the code for the console application here (it is in
Program.cs in your
workspace):
namespace FirstWorkflowApp
{
class Program
{
static void Main(string[] args)
{
using(WorkflowRuntime workflowRuntime = new WorkflowRuntime())
{
CHAPTER 9 ■ .NET 3.0: WINDOWS WORKFLOW FOUNDATION216
9594CH09.qxd 1/22/08 12:11 PM Page 216
AutoResetEvent waitHandle = new AutoResetEvent(false);
workflowRuntime.WorkflowCompleted +=
delegate(object sender, WorkflowCompletedEventArgs e)
{waitHandle.Set();};
workflowRuntime.WorkflowTerminated +=
delegate(object sender, WorkflowTerminatedEventArgs e)
{
Console.WriteLine(e.Exception.Message);
waitHandle.Set();
};
WorkflowInstance instance =
workflowRuntime.CreateWorkflow(typeof
(FirstWorkflowApp.Workflow1));
instance.Start();
waitHandle.WaitOne();
}
}
}
}
This code creates the new instance of the WorkflowRuntime called workflowRuntime.
With this, it creates a
waitHandle that exits the workflow when set. It adds a couple of
event handlers to execute when the workflow completes or is terminated. When the
workflow completes, you simply set the
waitHandle. When it terminates, you dump out
the error message and then set the
waitHandle.
Next, it uses the
workflowRuntime to create a WorkflowInstance. This instance is initial-
ized with the workflow that you want to run, which in this case is called Workflow1 and is
in the
FirstWorkflowApp namespace.
It will then start the instance, calling the
waitOne method on the waitHandle. This
locks activity until the
waitHandle is set.
Thus, when your application is run, the line
instance.Start() kicks off the workflow
sequence. This hits the CodeActivity node, which causes its
ExecuteCode function to run.
This function writes the text out to the console window and waits for a key to be pressed.
When the key is pressed, the sequence moves to the next node, which is the end of the
workflow. This causes the
WorkflowCompleted event to fire, which sets the waitHandle,
which in turn completes the
waitOne method on the instance. At this point, the flow
passes to the next line, which is the end of the application, so the application terminates.
CHAPTER 9 ■ .NET 3.0: WINDOWS WORKFLOW FOUNDATION 217
9594CH09.qxd 1/22/08 12:11 PM Page 217
Adding Input Parameters to an Application
In most cases, a workflow will require some form of input stimulus, like the details of a
purchase order in our earlier scenarios. In this example, we’ll expand on the Hello World
application to allow the user to enter their age as a parameter to it. Then, depending on
their age, different things may happen!
Create a new sequential workflow console application, but this time go directly to
Program.cs before you design the workflow.
When you create an instance of the workflow, an overload exists that allows you to
specify the parameters. You define the parameters as a dictionary with code like this
(you’ll see where they go in the next listing):
Dictionary<string,object> parameters= new Dictionary<string,object>();
parameters["age"] = 125; // Could replace with args[0] if you like :)
Now, when you instantiate the workflow instance, you pass this parameters diction-
ary to it. The call looks like this:
WorkflowInstance instance = workflowRuntime.CreateWorkflow(
typeof(SecondWorkflowApp.Workflow1),parameters);
And her
e is the entire
Main pr
ocedure from
Program.cs:
static void Main(string[] args)
{
using(WorkflowRuntime workflowRuntime = new WorkflowRuntime())
{
AutoResetEvent waitHandle = new AutoResetEvent(false);
workflowRuntime.WorkflowCompleted +=
delegate(object sender, WorkflowCompletedEventArgs e) {waitHandle.Set();};
workflowRuntime.WorkflowTerminated +=
delegate(object sender, WorkflowTerminatedEventArgs e)
{
Console.WriteLine(e.Exception.Message);
waitHandle.Set();
};
Dictionary<string,object> parameters= new Dictionary<string,object>();
parameters["age"] = 125; // Could replace with args[0] if you like :)
CHAPTER 9 ■ .NET 3.0: WINDOWS WORKFLOW FOUNDATION218
9594CH09.qxd 1/22/08 12:11 PM Page 218
WorkflowInstance instance =
workflowRuntime.CreateWorkflow(typeof(SecondWorkflowApp.Workflow1),parameters);
instance.Start();
waitHandle.WaitOne();
}
}
Now that you’re passing parameters to the workflow, the workflow has to know how
to accept them—and it does this using the .NET property model. If you look at the pre-
ceding listing, you’ll see that a parameter called
age is used. Thus, you’ll need to have a
settable age property in your workflow. You can do this by adding some simple code to
Workflow1.designer.cs:
partial class Workflow1
{
private int ageVal=0;
public int age
{
set { ageVal = value; }
}
private CodeActivity codeActivity2;
private IfElseBranchActivity ifElseBranchActivity2;
private IfElseBranchActivity ifElseBranchActivity1;
private IfElseActivity ifElseActivity1;
private CodeActivity codeActivity1;
}
This code has a private variable that is used to store the age, and a public settable
one that maps whatever comes into the private variable.
The next step is to add the wor
kflow activities. For this application, you are going to
implement an
IfElse activity driven off a simple rule. If the entered age is over 100, you
will go do
wn one activity r
oute; other
wise y
ou will go down another.
D
r
ag an I
fE
lse activity onto the design surface. The Designer should look like
F
igur
e 9-7.
CHAPTER 9 ■ .NET 3.0: WINDOWS WORKFLOW FOUNDATION 219
9594CH09.qxd 1/22/08 12:11 PM Page 219
Figure 9-7. Adding an IfElse activity
You will see that the left branch of the IfElse activity is flagging an error. This is
because the conditions of the IfElse have not yet been set up. Selecting it will take you to
the Properties dialog. It will show you that the condition hasn’t been set, and give you the
option of adding a code condition or a rule condition (see Figure 9-8).
Figure 9-8. Setting a new condition
CHAPTER 9 ■ .NET 3.0: WINDOWS WORKFLOW FOUNDATION220
9594CH09.qxd 1/22/08 12:11 PM Page 220
Adding a code condition allows you to specify a function that will fire off to evaluate
the condition, and a declarative rule allows you to specify a simple rule. In our case, we’re
just using a very simple rule, so choose this option. Next, notice that the ConditionName
is given a red alert because it isn’t yet set. Change this field to a good name for the rule,
such as ageOver100.
Once you’ve done this, notice that the alert moves to the ConditionExpression field,
as you haven’t yet defined it. Click the ellipsis button (. . .) and the Rule Condition Editor
will open (see Figure 9-9).
Figure 9-9. Adding the rule condition with the editor
Enter the rule this.ageVal > 100, as shown in Figure 9-9. You’ll notice that you have
full IntelliSense, which is a nice touch.
Click OK and the Rule Condition Editor will close, entering the rule into the
Expression property. You’ll also notice that the IfElse node on the Designer now has
no alerts, so it is configured correctly.
Drag a Code activity to the left branch of the IfElse. This is the path that the sequence
will follow if the rule is met (i.e., if the age is over 100). Use the procedures you followed
earlier to add an
ExecuteCode function to it, and put this code in that function:
private void codeActivity1_ExecuteCode(object sender, EventArgs e)
{
Console.WriteLine("You say you are " + this.ageVal
+ " years old? I don't believe you!");
Console.ReadLine();
}
Repeat this process for the right-hand branch of the IfElse activity. When you get to
the Properties dialog, wire up the
ExecuteCode function as before and then add the follow-
ing code to it:
CHAPTER 9 ■ .NET 3.0: WINDOWS WORKFLOW FOUNDATION 221
9594CH09.qxd 1/22/08 12:11 PM Page 221
private void codeActivity2_ExecuteCode(object sender, EventArgs e)
{
Console.WriteLine("Hello World to you who is " + this.ageVal + " years old!");
Console.ReadLine();
}
When you are done, the Designer should look like Figure 9-10. No errors, no red
alerts.
Figure 9-10. Y
our completed wor
kflow
Now when you run the application, take a look at what happens. Remember you
hard-coded the age to be 125 in
Program.cs? The output that is rendered as a result is
shown in Figure 9-11. Change the age parameter to a value less that 100, and you’ll see
the output in Figure 9-12.
CHAPTER 9 ■ .NET 3.0: WINDOWS WORKFLOW FOUNDATION222
9594CH09.qxd 1/22/08 12:11 PM Page 222
Figure 9-11. Running the parameterized workflow with age greater than 100
Figure 9-12. Running the parameterized workflow with age less than 100
Out-of-the-Box Activities
If you followed along in the previous examples, you will have noticed that a variety of
out-of-the-box activities were available to you. You used two of them—the Code activity
and the IfElse activity. In addition to these, WF offers a few more:
Compensate: This is an activity that you can use in case of an error, and is used with
the FaultHandler activity. You use the Compensate activity to undo actions that have
already been performed, in a similar manner to a rollback in database transactions.
ConditionedActivityGroup (CAG):You use a CAG to specify a group of activities where
each one has its own criteria. When a condition for the group as a whole is met, exe-
cution passes out of the group.
Delay: This activity allows you to put pauses of a specified duration into your
workflow.
EventDriven: This contains other activities to execute in response to an event firing.
FaultHandler: This allows you to handle errors. When an error occurs, you can direct
to a fault handler (like a
Catch statement in code) and specify the actions to follow.
InvokeWebService: This is used to communicate with a web service via its proxy class.
A proxy class can be generated by the IDE when you make a reference to a web
service.
Parallel: This allows you to specify multiple parallel routes of execution, and will not
complete until all routes are complete.
CHAPTER 9 ■ .NET 3.0: WINDOWS WORKFLOW FOUNDATION 223
9594CH09.qxd 1/22/08 12:11 PM Page 223
Replicator: This is a conditional looping activity that creates a number of instances of
a single activity. When they are all complete, the activity will be complete.
Sequence: This is used to link activities together in sequence. Once all have been
completed, it will complete.
Terminate: This activity ends the current workflow.
Throw: This is used to raise an exception from within a workflow or other activity.
While: This works like a While loop in programming parlance, executing an activity
repeatedly until a condition is met.
Workflow and the Web
These simple examples of workflow applications were hosted within a console applica-
tion. When it comes to the Web, you may want to consider using workflow for your
middleware and back-end transactions. As such, you will either want to host it in an
ASP.NET web page or web service, or ideally, publish it as a web service that your other
applications can use. Fortunately,WF supports the latter—you can publish your work-
flows as web services and reuse them, calling them with SOAP standards from other
applications or web sites.
The best way to learn how to do this is by example, so let’s create a new project, but
this time make it a sequential workflow library and call it CToFService.
Once it is done, you’ll get the design surface for the workflow. The first thing you’ll
need to do is to expand the
Workflow1.cs node in the Solution Explorer, select
Workflow1.designer.cs, and add the following interface declaration to it:
public interface CToF
{
double doCToF(double nC);
}
This sets up the inter
face to descr
ibe the w
eb ser
vice method(s) that the activities
will r
ecogniz
e and inv
oke
.
N
ext, y
ou should dr
ag a
W
ebServiceInput activity to the design surface. You’ll see an
aler
t on it as it isn
’
t an activ
ating input.
The first WebServiceInput in a sequence must be
an activ
ating input (see F
igur
e 9-13).
CHAPTER 9 ■ .NET 3.0: WINDOWS WORKFLOW FOUNDATION224
9594CH09.qxd 1/22/08 12:11 PM Page 224