Building Secure ASP.NET Applications phần 4 doc
Bạn đang xem bản rút gọn của tài liệu. Xem và tải ngay bản đầy đủ của tài liệu tại đây (559.7 KB, 60 trang )
Building Secure ASP.NET Applications142
Table 8.1: Windows authentication and impersonation requirements
Authorization Option Requires Windows Requires Impersonation
Authentication
FileAuthorizationModule Yes No
UrlAuthorizationModule No No
Principal Permission Demands No No
.NET Roles No No
Enterprise Services Roles Yes Yes (within the ASP.NET Web
application)
NTFS Permissions (for directly N/A – These files are not No (IIS performs the access
requested static files types; not handled by ASP.NET. check.)
mapped to an ISAPI extension) With any (non-Anonymous)
IIS authentication mecha-
nism, permissions should be
configured for individual
authenticated users.
With Anonymous authenti-
cation, permissions should
be configured for
IUSR_MACHINE.
NTFS Permissions (for files No No
accessed by Web application If impersonating, configure
code) ACLs against the imperson-
ated Windows identity, which
is either the original caller or
the identity specified on the
<identity> element in
Web.config*.
* The impersonated identity may be the original caller or the identity specified on
the <identity> element in Web.config. Consider the following two <identity>
elements.
<identity impersonate="true" />
<identity impersonate="true" userName="Bob" password="pwd" />
The first configuration results in the impersonation of the original caller (as authen-
ticated by IIS), while the second results in the identity Bob. The second configura-
tion is not recommended for two reasons:
●
It requires that you grant the ASP.NET process identity the “Act as part of the
operating system” privilege on the Microsoft Windows® 2000 operating system.
●
It also requires you to include a plain text password in Web.config.
Both of these restrictions will be lifted in the next release of the .NET Framework.
Chapter 8: ASP.NET Security 143
Windows Authentication with Impersonation
The following configuration elements show you how to enable Windows (IIS)
authentication and impersonation declaratively in Web.config or Machine.config.
Note: You should configure authentication on a per-application basis in each application’s
Web.config file.
<authentication mode="Windows" />
<identity impersonate="true" />
With this configuration, your ASP.NET application code impersonates the IIS-
authenticated caller.
Configurable Security
When you use Windows authentication together with impersonation, the following
authorization options are available to you:
●
Windows ACLs
●
Client Requested Resources. The ASP.NET FileAuthorizationModule
performs access checks for requested file types that are mapped to the
ASP.NET ISAPI. It uses the original caller’s access token and ACL attached
to requested resources in order to perform access checks.
For static files types (not mapped to an ISAPI extension), IIS performs access
checks using the caller’s access token and ACL attached to the file.
●
Resources Accessed by Your Application. You can configure Windows ACLs
on resources accessed by your application (files, folders, registry keys, Active
Directory objects, and so on) against the original caller.
●
URL Authorization. Configure URL authorization in Web.config. With Windows
authentication, user names take the form DomainName\UserName and roles
map one-to-one with Windows groups.
<authorization>
<deny user="DomainName\UserName" />
<allow roles="DomainName\WindowsGroup" />
</authorization>
●
Enterprise Services (COM+) Roles. Roles are maintained in the COM+ catalog.
You can configure roles with the Component Services administration tool or
script.
Building Secure ASP.NET Applications144
Programmatic Security
Programmatic security refers to security checks located within your Web applica-
tion code. The following programmatic security options are available when you use
Windows authentication and impersonation:
●
PrincipalPermission Demands
●
Imperative (in-line within a method’s code)
PrincipalPermission permCheck = new PrincipalPermission(
null, @"DomainName\WindowsGroup");
permCheck.Demand();
●
Declarative (attributes preceding interfaces, classes and methods)
[PrincipalPermission(SecurityAction.Demand,
Role=@"DomainName\WindowsGroup)]
●
Explicit Role Checks. You can perform role checking using the IPrincipal
interface.
IPrincipal.IsInRole(@"DomainName\WindowsGroup");
●
Enterprise Services (COM+) Roles. You can perform role checking program-
matically using the ContextUtil class.
ContextUtil.IsCallerInRole("Manager")
When to Use
Use Windows authentication and impersonation when:
●
Your application’s users have Windows accounts that can be authenticated by
the server.
●
You need to flow the original caller’s security context to the middle tier and/or
data tier of your Web application to support fine-grained (per-user) authoriza-
tion.
●
You need to flow the original caller’s security context to the downstream tiers to
support operating system level auditing.
Before using impersonation within your application, make sure you understand the
relative trade-offs of this approach in comparison to using the trusted subsystem
model. These were elaborated upon in “Choosing a Resource Access Model” in
Chapter 3, “Authentication and Authorization.”
Chapter 8: ASP.NET Security 145
The disadvantages of impersonation include:
●
Reduced application scalability due to the inability to effectively pool database
connections.
●
Increased administration effort as ACLs on back-end resources need to be config-
ured for individual users.
●
Delegation requires Kerberos authentication and a suitably configured environ-
ment.
More Information
●
For more information about Windows authentication, see “Windows Authentica-
tion” later in this chapter.
●
For more information about impersonation, see “Impersonation” later in this
chapter.
●
For more information about URL authorization, see “URL Authorization Notes”
later in this chapter.
●
For more information about Enterprise Services (COM+) roles, see Chapter 9,
“Enterprise Services Security.”
●
For more information about PrincipalPermission demands, see “Identities and
Principals” in Chapter 2, “Security Model for ASP.NET Application.”
Windows Authentication without Impersonation
The following configuration elements show how you enable Windows (IIS) authen-
tication with no impersonation declaratively in Web.config.
<authentication mode="Windows" />
<! The following setting is equivalent to having no identity element >
<identity impersonate="false" />
Configurable Security
When you use Windows authentication without impersonation, the following
authorization options are available to you:
●
Windows ACLs
●
Client Requested Resources. The ASP.NET FileAuthorizationModule
performs access checks for requested file types that are mapped to the
ASP.NET ISAPI. It uses the original caller’s access token and ACL attached to
requested resources in order to perform access checks. Impersonation is not
required.
For static files types (not mapped to an ISAPI extension) IIS performs access
checks using the caller’s access token and ACL attached to the file.
Building Secure ASP.NET Applications146
●
Resources accessed by your application. Configure Windows ACLs on
resources accessed by your application (files, folders, registry keys, Active
Directory objects) against the ASP.NET process identity.
●
URL Authorization. Configure URL Authorization in Web.config. With Windows
authentication, user names take the form DomainName\UserName and roles
map one-to-one with Windows groups.
<authorization>
<deny user="DomainName\UserName" />
<allow roles="DomainName\WindowsGroup" />
</authorization>
Programmatic Security
The following programmatic security options are available:
●
Principal Permission Demands
●
Imperative
PrincipalPermission permCheck = new PrincipalPermission(
null, @"DomainName\WindowsGroup");
permCheck.Demand();
●
Declarative
[PrincipalPermission(SecurityAction.Demand,
Role=@"DomainName\WindowsGroup")]
●
Explicit Role Checks. You can perform role checking using the IPrincipal
interface.
IPrincipal.IsInRole(@"DomainName\WindowsGroup");
When to Use
Use Windows authentication without impersonation when:
●
Your application’s users have Windows accounts that can be authenticated by
the server.
●
You want to use a fixed identity to access downstream resources (for example,
databases) in order to support connection pooling.
Chapter 8: ASP.NET Security 147
More Information
●
For more information about Windows authentication, see “Windows Authentica-
tion” later in this chapter.
●
For more information about URL authorization, see “URL Authorization Notes”,
later in this chapter.
●
For more information about PrincipalPermission demands, see “Principals”
within the “Getting Started” section of this guide.
Windows Authentication Using a Fixed Identity
The <identity> element in Web.config supports optional user name and password
attributes, which allows you to configure a specific fixed identity for your applica-
tion to impersonate. This is shown in the following configuration file fragment.
<identity impersonate="true" userName="DomainName\UserName"
password="ClearTextPassword" />
When to Use
This approach is not recommended for the current version (version 1) of the .NET
Framework in secure environments for two reasons:
●
User names and passwords should not be stored in plain text in configuration
files, particularly configuration files stored in virtual directories.
●
On Windows 2000, this approach forces you to grant the ASP.NET process
account the “Act as part of the operating system” privilege. This reduces the
security of your Web application and increases the threat should an attacker
compromise the Web application process.
The .NET Framework version 1.1 will provide an enhancement for this scenario on
Windows 2000:
●
The credentials will be encrypted.
●
The log on will be performed by the IIS process, so that ASP.NET does not
required the “Act as part of the operating system” privilege.
Forms Authentication
The following configuration elements show how you enable Forms authentication
declaratively in Web.config.
<authentication mode="Forms">
<forms loginUrl="logon.aspx" name="AuthCookie" timeout="60" path="/">
</forms>
</authentication>
Building Secure ASP.NET Applications148
Configurable Security
When you use Forms authentication, the following authorization options are avail-
able to you:
●
Windows ACLs
●
Client Requested Resources. Requested resources require ACLs that allow
read access to the anonymous Internet user account. (IIS should be configured
to allow anonymous access when you use Forms authentication).
ASP.NET File authorization is not available because it requires Windows
authentication.
●
Resources Accessed by Your Application. Configure Windows ACLs on
resources accessed by your application (files, folders, registry keys, and
Active Directory objects) against the ASP.NET process identity.
●
URL Authorization
Configure URL Authorization in Web.config. With Forms authentication, the
format of user names is determined by your custom data store; a SQL Server
database, or Active Directory.
●
If you are using a SQL Server data store:
<authorization>
<deny users="?" />
<allow users="Mary,Bob,Joe" roles="Manager,Sales" />
</authorization>
●
If you are using Active Directory as your data store, user names, and group
names appear in X.500 format:
<authorization>
<deny users="" />
<allow roles ="CN=Smith James,CN=FTE_northamerica,CN=Users,
DC=domain,DC=corp,DC=yourCompany,DC=com" />
</authorization>
Programmatic Security
The following programmatic security options are available:
●
Principal Permission Demands
●
Imperative
PrincipalPermission permCheck = new PrincipalPermission(
null, "Manager");
permCheck.Demand();
Chapter 8: ASP.NET Security 149
●
Declarative
[PrincipalPermission(SecurityAction.Demand,
Role="Manager")]
●
Explicit Role Checks. You can perform role checking using the IPrincipal
interface.
IPrincipal.IsInRole("Manager");
When to Use
Forms authentication is most ideally suited to Internet applications. Use Forms
authentication when:
●
Your application’s users do not have Windows accounts.
●
You want users to log on to your application by entering credentials using an
HTML form.
More Information
●
For more information about Forms authentication, see “Forms Authentication”
later in this chapter.
●
For more information about URL authorization, see “URL Authorization Notes”
later in this chapter.
Passport Authentication
The following configuration elements show how you enable Passport authentication
declaratively in Web.config.
<authentication mode="Passport" />
When to Use
Passport authentication is used on the Internet when application users do not have
Windows accounts and you want to implement a single-sign-on solution. Users who
have previously logged on with a Passport account at a participating Passport site
will not have to log on to your site configured with Passport authentication.
Building Secure ASP.NET Applications150
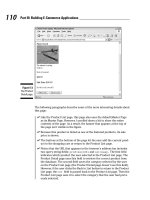
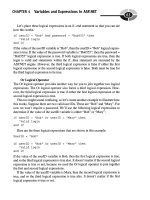
Configuring Security
This section shows you the practical steps required to configure security for an
ASP.NET Web application. These are summarized in Figure 8.3.
1. Configure IIS
(IIS Metabase)
Install server certificate (SSL)
Set ISS Authentication
Configure client certificate mapping
(Optional)
2. Configure ASP.NET
(web.config, machine.config)
Set authentication mode
Set impersonation
Configure URL authorization
3. Secure Resources
(wWindows ACLs)
Secure files, folders, registry keys
Secure web and machine.config
Log web.config settings
4. Secure Communication
(IPSec/SSL)
Secure communication links using a
combination of IPSec and SSL
Internet Services Manager
XML Editor (or Notepad)
Windows Explorer + Regedt32
Security Policy and Configuration Tools
Figure 8.3
Configuring ASP.NET application security
Chapter 8: ASP.NET Security 151
Configure IIS Settings
To configure IIS security, you must perform the following steps:
1. Optionally install a Web server certificate (if you need SSL).
For more information, see “How To: Set Up SSL on a Web Server” in the Refer-
ence section of this guide.
2. Configure IIS authentication.
3. Optionally configure client certificate mapping (if using certificate authentica-
tion).
For more information about client certificate mapping, see article Q313070,
“How to Configure Client Certificate Mappings in Internet Information Services
(IIS) 5.0” in the Microsoft Knowledge Base.
4. Set NTFS permissions on files and folders. Between them, IIS and the ASP.NET
FileAuthorizationModule check that the authenticated user (or the anonymous
Internet user account) has the necessary access rights (based on ACL settings) to
access the requested file.
Configure ASP.NET Settings
Application level configuration settings are maintained in Web.config files, which
are located in your application’s virtual root directory and optionally within addi-
tional subfolders (these settings can sometimes override the parent folder settings).
1. Configure authentication. This should be set on a per-application basis (not in
Machine.config) in the Web.config file located in the application’s virtual root
directory.
<authentication mode="Windows|Forms|Passport|None" />
2. Configure Impersonation. By default, ASP.NET applications do not imperson-
ate. The applications runs using the configured ASP.NET process identity (usu-
ally ASPNET) and all resource access performed by your application uses this
identity. You only need impersonation in the following circumstances:
●
You are using Enterprise Services and you want to use Enterprise Services
(COM+) roles to authorize access to functionality provided by serviced
components.
●
IIS is configured for Anonymous authentication and you want to use the
anonymous Internet user account for resource access. For details about this
approach, see “Accessing Network Resources” later in this chapter.
●
You need to flow the authenticated user’s security context to the next tier (for
example, the database).
●
You have ported a classic ASP application to ASP.NET and want the same
impersonation behavior. Classic ASP impersonates the caller by default.
Building Secure ASP.NET Applications152
To configure ASP.NET impersonation use the following <identity> element in
your application’s Web.config.
<identity impersonate="true" />
3. Configure Authorization. URL authorization determines whether a user or role
can issue specific HTTP verbs (for example, GET, HEAD, and POST) to a specific
file. To implement URL authorization, you perform the following tasks.
a. Add an <authorization> element to the Web.config file located in your
application’s virtual root directory.
b. Restrict access to users and roles by using allow and deny attributes. The
following example from Web.config uses Windows authentication and allows
Bob and Mary access but denies everyone else.
<authorization>
<allow users="DomainName\Bob, DomainName\Mary" />
<deny users="*" />
</authorization>
Important: You need to add either <deny users=”?”/> or <deny users=”*”/> at the
end of the <authorization> element, otherwise access is granted to all authenticated
identities.
URL Authorization Notes
Take note of the following when you configure URL authorization:
●
“*” refers to all identities.
●
“?” refers to unauthenticated identities (that is, the anonymous identity).
●
You don’t need to impersonate for URL authorization to work.
●
Authorization settings in Web.config usually refer to all of the files in the current
directory and all subdirectories (unless a subdirectory contains its own
Web.config with an <authorization> element. In this case the settings in the
subdirectory override the parent directory settings).
Note: URL authorization only applies to file types that are mapped by IIS to the ASP.NET
ISAPI extension, aspnet_isapi.dll.
Chapter 8: ASP.NET Security 153
You can use the <location> tag to apply authorization settings to an individual
file or directory. The following example shows how you can apply authorization
to a specific file (Page.aspx).
<location path="page.aspx" />
<authorization>
<allow users="DomainName\Bob, DomainName\Mary" />
<deny users="*" />
</authorization>
</location>
●
Users and roles for URL authorization are determined by your authentication
settings:
●
When you have <authentication mode=”Windows” /> you are authorizing
access to Windows user and group accounts.
User names take the form “DomainName\WindowsUserName”
Role names take the form “DomainName\WindowsGroupName”
Note: The local administrators group is referred to as “BUILTIN\Administrators”. The
local users group is referred to as “BUILTIN\Users”.
●
When you have <authentication mode=”Forms” /> you are authorizing
against the user and roles for the IPrincipal object that was stored in the
current HTTP context. For example, if you used Forms to authenticate users
against a database, you will be authorizing against the roles retrieved from
the database.
●
When you have <authentication mode=”Passport” /> you authorize against
the Passport User ID (PUID) or roles retrieved from a store. For example, you
can map a PUID to a particular account and set of roles stored in a SQL Server
database or Active Directory.
Note: This functionality will be built into the Microsoft Windows .NET Server 2003
operating system.
●
When you have <authentication mode=”None” /> you may not be perform-
ing authorization. “None” specifies that you don’t want to perform any
authentication or that you don’t want to use any of the .NET authentication
modules and want to use your own custom mechanism.
However, if you use custom authentication, you should create an IPrincipal
object with roles and store it into the HttpContext.User. When you subse-
quently perform URL authorization, it is performed against the user and roles
(no matter how they were retrieved) maintained in the IPrincipal object.
Building Secure ASP.NET Applications154
URL Authorization Examples
The following list shows the syntax for some typical URL authorization examples:
●
Deny access to the anonymous account
<deny users="?" />
●
Deny access to all users
<deny users="*"/>
●
Deny access to Manager role
<deny roles="Manager"/>
●
Forms authentication example
<configuration>
<system.web>
<authentication mode="Forms">
<forms name=".ASPXUSERDEMO"
loginUrl="login.aspx"
protection="All" timeout="60" />
</authentication>
<authorization>
<deny users="" />
<deny users="?" />
</authorization>
</system.web>
</configuration>
More Information
The <authorization> element works against the current IPrincipal object stored in
HttpContext.User and also the HttpContext.Request.RequestType.
Secure Resources
1. Use Windows ACLs to secure resources that include files, folders, and registry
keys.
If you are not impersonating, any resource your application is required to access
must have an ACL that grants at least read access to the ASP.NET process ac-
count.
If you are impersonating, files and registry keys must have an ACL that grants at
least read access to the authenticated user (or the anonymous Internet user
account, if anonymous authentication is in effect).
Chapter 8: ASP.NET Security 155
2. Secure Web.config and Machine.config:
●
Use the Correct ACLs. If ASP.NET is impersonating, the impersonated iden-
tity requires read access. Otherwise, the ASP.NET process identity requires
read access. Use the following ACL on Web.config and Machine.config.
System: Full Control
Administrators: Full Control
Process Identity or Impersonated Identity : Read
If you are not impersonating the anonymous Internet user account
(IUSR_MACHINE), you should deny access to this account.
Note: If your application is mapped to a UNC share then the UNC identity requires read
access to the configuration files as well.
●
Remove Unwanted HTTP Modules. Machine.config contains a set of default
HTTP modules (within the <httpModules> element. These include:
●
WindowsAuthenticationModule
●
FormsAuthenticationModule
●
PassportAuthenticationModule
●
UrlAuthorizationModule
●
FileAuthorizationModule
●
OutputCacheModule
●
SessionStateModule
If your application doesn’t use a specific module, remove it to prevent any
potential future security issues associated with a particular module from
being exploited within your application.
3. Optionally, lock configuration settings by using the <location> element together
with the allowOverride=”false” attribute as described below.
Locking Configuration Settings
Configuration settings are hierarchical. Web.config file settings in subdirectories
override Web.config settings in parent directories. Also, Web.config settings over-
ride Machine.config settings.
You can lock configuration settings to prevent them being overridden at lower
levels, by using the <location> element coupled with the allowOverride attribute.
For example:
<location path="somepath" allowOverride="false" />
. . . arbitrary configuration settings . . .
</location>
Building Secure ASP.NET Applications156
Note that the path may refer to a Web site or virtual directory and it applies to the
nominated directory and all subdirectories. If you set allowOverride to false, you
prevent any lower level configuration file from overriding the settings specified in
the <location> element. The ability to lock down configuration settings applies to
all types of setting and not just security settings such as authentication modes.
Preventing Files from Being Downloaded
You can use the HttpForbiddenHandler class to prevent certain file types from
being downloaded over the Web. This class is used internally by ASP.NET to pre-
vent the download of certain system level files (for example, configuration files
including web.config). For a complete list of file types restricted in this way, see the
<httpHandlers> section in machine.config.
You should consider using the HttpForbiddenHandler for files that your applica-
tion uses internally, but are not intended for download.
Note: You must also secure the files with Windows ACLs to control which users can access the
files, when logged on to the Web server.
To use the HttpForbiddenHandler to prevent a particular file type from being downloaded
1. Create an application mapping in IIS for the specified file type to map it to
Aspnet_isapi.dll.
a. On the taskbar, click the Start button, click Programs, click Administrative
Tools, and then select Internet Information Services.
b. Select your application’s virtual directory, right-click, and then click Proper-
ties.
c. Select Application Settings, click Configuration
d. Click Add to create a new application mapping.
e. Click Browse, and select
c:\winnt\Microsoft.NET\Framework\v1.0.3705\aspnet_isapi.dll.
f. Enter the file extension for the file type you want to prevent being down-
loaded (for example, .abc) in the Extension field.
g. Ensure All Verbs and Script engine is selected and Check that file exists is
not selected.
h. Click OK to close the Add/Edit Application Extension Mapping dialog box.
i. Click OK to close the Application Configuration dialog box, and then click
OK again to close the Properties dialog box.
Chapter 8: ASP.NET Security 157
2. Add an <HttpHandler> mapping in Web.config for the specified file type.
An example for the .abc file type is shown below.
<httpHandlers>
<add verb="*" path="*.abc"
type="System.Web.HttpForbiddenHandler"/>
</httpHandlers>
Secure Communication
Use a combination of SSL and Internet Protocol Security (IPSec) to secure communi-
cation links.
More information
●
For information about using SSL to secure the link to the database server, see
“How To: Use SSL to Secure Communication with SQL Server 2000.”
●
For information about using IPSec between two computers, see “How To: Use
IPSec to Provide Secure Communication Between Two Servers.”
Programming Security
After you establish your Web application’s configurable security settings, you need
to further enhance and fine-tune your application’s authorization policy program-
matically. This includes using declarative .NET attributes within your assemblies
and performing imperative authorizing checks within code.
This section highlights the key programming steps required to perform authoriza-
tion within an ASP.NET Web application.
An Authorization Pattern
The following summarizes the basic pattern for authorizing users within your Web
application:
1. Retrieve credentials
2. Validate credentials
3. Put users in roles
4. Create an IPrincipal object
5. Put the IPrincipal object into the current HTTP context
6. Authorize based on the user identity / role membership
Building Secure ASP.NET Applications158
Important: Steps 1 to 5 are performed automatically by ASP.NET if you have configured
Windows authentication. For other authentication mechanisms (Forms, Passport and custom
approaches), you must write code to perform these steps, as discussed below.
Retrieve Credentials
You must start by retrieving a set of credentials (user name and password) from the
user. If your application does not use Windows authentication, you need to ensure
that clear text credentials are properly secured on the network by using SSL.
Validate Credentials
If you have configured Windows authentication, credentials are validated automati-
cally using the underlying services of the operating system.
If you use an alternate authentication mechanism, you must write code to validate
credentials against a data store such as a SQL Server database or Active Directory.
For more information about how to securely store user credentials in a SQL Server
database, see “Authenticating Users Against a Database” within Chapter 12, “Data
Access Security.”
Put Users in Roles
Your user data store should also contain a list of roles for each user. You must write
code to retrieve the role list for the validated user.
Create an IPrincipal Object
Authorization occurs against the authenticated user, whose identity and role list is
maintained within an IPrincipal object (which flows in the context of the current
Web request).
If you have configured Windows authentication, ASP.NET automatically constructs
a WindowsPrincipal object. This contains the authenticated user’s identity together
with a role list, which equates to the list of Windows groups to which the user
belongs.
If you are using Forms, Passport, or custom authentication, you must write code
within the Application_AuthenticateRequest event handler in Global.asax to create
an IPrincipal object. The GenericPrincipal class is provided by the .NET Frame-
work, and should be used in most scenarios.
Put the IPrincipal Object into the Current HTTP Context
Attach the IPrincipal object to the current HTTP context (using the
HttpContext.User variable). ASP.NET does this automatically when you use
Windows authentication. Otherwise, you must attach the object manually.
Chapter 8: ASP.NET Security 159
Authorize Based on the User Identity and/or Role Membership
Use .NET roles either declaratively (to obtain class or method level authorization),
or imperatively within code if your application requires more fine-grained authori-
zation logic.
You can use declarative or imperative principal permission demands (using the
PrincipalPermission class), or you can perform explicit role checks by calling the
IPrincipal.IsInRole() method.
The following example assumes Windows authentication and shows a declarative
principal permission demand. The method that follows the attribute will only be
executed if the authenticated user is a member of the Manager Windows group. If
the caller is not a member of this group, a SecurityException is thrown.
[PrincipalPermission(SecurityAction.Demand,
Role=@"DomainName\Manager")]
public void SomeMethod()
{
}
The following example shows an explicit role check within code. This example
assumes Windows authentication. If a non-Windows authentication mechanism is
used, the code remains very similar. Instead of casting the User object to a
WindowsPrincipal object, it should be cast to a GenericPrincipal object.
// Extract the authenticated user from the current HTTP context.
// The User variable is equivalent to HttpContext.Current.User if you are
using // an .aspx or .asmx page
WindowsPrincipal authenticatedUser = User as WindowsPrincipal;
if (null != authenticatedUser)
{
// Note: To retrieve the authenticated user's username, use the
// following line of code
// string username = authenticatedUser.Identity.Name;
// Perform a role check
if (authenticatedUser.IsInRole(@"DomainName\Manager") )
{
// User is authorized to perform manager functionality
}
}
else
{
// User is not authorized to perform manager functionality
}
More Information
For a practical implementation of the above pattern for Forms authentication, see
the “Forms Authentication” section later in this chapter.
Building Secure ASP.NET Applications160
Creating a Custom IPrincipal class
The GenericPrincipal class provided by the .NET Framework should be used in
most circumstances when you are using a non-Windows authentication mechanism.
This provides role checks using the IPrincipal.IsInRole method.
On occasion, you may need to implement your own IPrincipal class. Reasons for
implementing your own IPrincipal class include:
●
You want extended role checking functionality. You might want methods that
allow you to check whether a particular user is a member of multiple roles. For
example:
CustomPrincipal.IsInAllRoles( "Role", "Role2", "Role3" )
CustomPrincipal.IsInAnyRole( "Role1", "Role2", "Role3" )
●
You may want to implement an extra method or property that returns a list of
roles in an array. For example:
string[] roles = CustomPrincipal.Roles;
●
You want your application to enforce role hierarchy logic. For example, a Senior
Manager may be considered higher up in the hierarchy than a Manager. This
could be tested using methods like the ones shown below.
CustomPrincipal.IsInHigherRole("Manager");
CustomPrincipal.IsInLowerRole("Manager");
●
You may want to implement lazy initialization of the role lists. For example, you
could dynamically load the role list only when a role check is requested.
●
You may want to implement the IIdentity interface to have the user identified by
an X509ClientCertificate. For example:
CustomIdentity id = CustomPrincipal.Identity;
X509ClientCertificate cert = id.ClientCertificate;
More Information
For more information about creating your own IPrincipal class, see “How To:
Implement IPrincipal” in the Reference section of this guide.
Chapter 8: ASP.NET Security 161
Windows Authentication
Use Windows authentication when the users of your application have Windows
accounts that can be authenticated by the server (for example, in intranet scenarios).
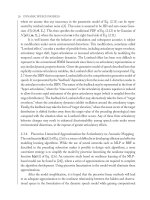
If you configure ASP.NET for Windows authentication, IIS performs user authenti-
cation by using the configured IIS authentication mechanism. This is shown in
Figure 8.4.
HTTP
Requests
IIS
(inetinfo.exe)
ASP.NET
(aspnet_wp.exe)
Authenticated
caller’s access
token (or
IUSR_MACHINE
access token)
IIS Authentication
Basic
Digest
Integrated
Certificate
<authentication mode="Windows" />
Web Server
aspnet_isapi.dll
Figure 8.4
ASP.NET Windows authentication uses IIS to authenticate callers
The access token of the authenticated caller (which may be the Anonymous Internet
user account if IIS is configured for Anonymous authentication) is made available to
the ASP.NET application. Note the following:
●
This allows the ASP.NET FileAuthorizationModule to perform access checks
against requested ASP.NET files using the original caller’s access token.
Important: ASP.NET File authorization only performs access checks against file types that
are mapped to Aspnet_isapi.dll.
●
File authorization does not require impersonation. With impersonation enabled
any resource access performed by your application uses the impersonated
caller’s identity. In this event, ensure that the ACLs attached to resources contain
an Access Control Entry (ACE) that grants at least read access to the original
caller’s identity.
Identifying the Authenticated User
ASP.NET associates a WindowsPrincipal object with the current Web request. This
contains the identity of the authenticated Windows user together with a list of roles
that the user belongs to. With Windows authentication, the role list consists of the
set of Windows groups to which the user belongs.
Building Secure ASP.NET Applications162
The following code shows how to obtain the identity of the authenticated Windows
user and to perform a simple role test for authorization.
WindowsPrincipal user = User as WindowsPrincipal;
if (null != user)
{
string username = user.Identity.Name;
// Perform a role check
if ( user.IsInRole(@"DomainName\Manager") )
{
// User is authorized to perform manager functionality
}
}
else
{
// Throw security exception as we don't have a WindowsPrincipal
}
Forms Authentication
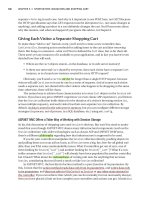
When you are using Forms authentication, the sequence of events triggered by an
unauthenticated user who attempts to access a secured file or resource (where URL
authorization denies the user access), is shown in Figure 8.5.
1
3
6
2
5
4
7
Web Browser IIS/ASP.NET Custom Data Store
(SQL Server / Active Directory)
Get default.aspx
302 Redirect
Location: Login.aspx
Post login.aspx
(Credentials)
200 OK Set Cookie
(inc auth ticket)
Get default.aspx
Cookie: auth ticket
Application authentication
(Validate credentials)
(Retrieve roles)
Global.asax
Application_AuthenticateRequest()
Create Principal
Retrieve identity + roles from ticket
Attach Principal to HTTP Context
Figure 8.5
Forms authentication sequence of events
Chapter 8: ASP.NET Security 163
The following describes the sequence of events shown in Figure 8.5:
1. The user issues a Web request for Default.aspx.
IIS allows the request because Anonymous access is enabled. ASP.NET checks the
<authorization> elements and finds a <deny users=?” /> element.
2. The user is redirected to the login page (Login.aspx) as specified by the LoginUrl
attribute of the <forms> element.
3. The user supplies credentials and submits the login form.
4. The credentials are validated against a store (SQL Server or Active Directory)
and roles are optionally retrieved. You must retrieve a role list if you want to use
role-based authorization.
5. A cookie is created with a FormsAuthenticationTicket and sent back to the
client. Roles are optionally stored in the ticket. By storing the role list in the
ticket, you avoid having to access the database to re-retrieve the list for each
successive Web request from the same user.
6. The user is redirected with client-side redirection to the originally requested
page (Default.aspx).
7. In the Application_AuthenticateRequest event handler (in Global.asax), the
ticket is used to create an IPrincipal object and it is stored in HttpContext.User.
ASP.NET checks the <authorization> elements and finds a <deny users=?” />
element. However, this time the user is authenticated.
ASP.NET checks the <authorization> elements to ensure the user is in the
<allow> element.
The user is granted access to Default.aspx.
Development Steps for Forms Authentication
The following list highlights the key steps that you must perform to implement
Forms authentication:
1. Configure IIS for anonymous access.
2. Configure ASP.NET for Forms authentication.
3. Create a logon Web form and validate the supplied credentials.
4. Retrieve a role list from the custom data store.
5. Create a Forms authentication ticket (store roles in the ticket).
6. Create an IPrincipal object.
7. Put the IPrincipal object into the current HTTP context.
8. Authorize the user based on user name/role membership.
Building Secure ASP.NET Applications164
Configure IIS for Anonymous Access
Your application’s virtual directory must be configured in IIS for anonymous access.
To configure IIS for anonymous access
1. Start the Internet Information Services administration tool.
2. Select your application’s virtual directory, right-click, and then click Properties.
3. Click Directory Security.
4. In the Anonymous access and authentication control group, click Edit.
5. Select Anonymous access.
Configure ASP.NET for Forms Authentication
A sample configuration is shown below.
<authentication mode="Forms">
<forms name="MyAppFormsAuth"
loginUrl="login.aspx"
protection="Encryption"
timeout="20"
path="/" >
</forms>
</authentication>
Create a Logon Web Form and Validate the Supplied Credentials
Validate credentials against a SQL Server database, or Active Directory.
More Information
●
See “How To: Use Forms Authentication with SQL Server 2000” in the Reference
section of this guide.
●
See “How To: Use Forms Authentication with Active Directory” in the Reference
section of this guide.
Retrieve a Role List from the Custom Data Store
Obtain roles from a table within a SQL Server database, or groups/distribution lists
configured within Active Directory. Refer to the preceding resources for details.
Create a Forms Authentication Ticket
Store the retrieved roles in the ticket. This is illustrated in the following code.
// This event handler executes when the user clicks the Logon button
// having supplied a set of credentials
private void Logon_Click(object sender, System.EventArgs e)
{
Chapter 8: ASP.NET Security 165
// Validate credentials against either a SQL Server database
// or Active Directory
bool isAuthenticated = IsAuthenticated( txtUserName.Text,
txtPassword.Text );
if (isAuthenticated == true )
{
// Retrieve the set of roles for this user from the SQL Server
// database or Active Directory. The roles are returned as a
// string that contains pipe separated role names
// for example "Manager|Employee|Sales|"
// This makes it easy to store them in the authentication ticket
string roles = RetrieveRoles( txtUserName.Text, txtPassword.Text );
// Create the authentication ticket and store the roles in the
// custom UserData property of the authentication ticket
FormsAuthenticationTicket authTicket = new
FormsAuthenticationTicket(
1, // version
txtUserName.Text, // user name
DateTime.Now, // creation
DateTime.Now.AddMinutes(20),// Expiration
false, // Persistent
roles ); // User data
// Encrypt the ticket.
string encryptedTicket = FormsAuthentication.Encrypt(authTicket);
// Create a cookie and add the encrypted ticket to the
// cookie as data.
HttpCookie authCookie =
new HttpCookie(FormsAuthentication.FormsCookieName,
encryptedTicket);
// Add the cookie to the outgoing cookies collection.
Response.Cookies.Add(authCookie);
// Redirect the user to the originally requested page
Response.Redirect( FormsAuthentication.GetRedirectUrl(
txtUserName.Text,
false ));
}
}
Create an IPrincipal Object
Create the IPrincipal object in the Application_AuthenticationRequest event
handler in Global.asax. Use the GenericPrincipal class, unless you need extended
role-based functionality. In this case create a custom class that implements
IPrincipal.
Building Secure ASP.NET Applications166
Put the IPrincipal Object into the Current HTTP Context
The creation of a GenericPrincipal object is shown below.
protected void Application_AuthenticateRequest(Object sender, EventArgs e)
{
// Extract the forms authentication cookie
string cookieName = FormsAuthentication.FormsCookieName;
HttpCookie authCookie = Context.Request.Cookies[cookieName];
if(null == authCookie)
{
// There is no authentication cookie.
return;
}
FormsAuthenticationTicket authTicket = null;
try
{
authTicket = FormsAuthentication.Decrypt(authCookie.Value);
}
catch(Exception ex)
{
// Log exception details (omitted for simplicity)
return;
}
if (null == authTicket)
{
// Cookie failed to decrypt.
return;
}
// When the ticket was created, the UserData property was assigned a
// pipe delimited string of role names.
string[] roles = authTicket.UserData.Split(new char[]{'|'});
// Create an Identity object
FormsIdentity id = new FormsIdentity( authTicket );
// This principal will flow throughout the request.
GenericPrincipal principal = new GenericPrincipal(id, roles);
// Attach the new principal object to the current HttpContext object
Context.User = principal;
}
Authorize the User Based on User Name or Role Membership
Use declarative principal permission demands to restrict access to methods. Use
imperative principal permission demands and/or explicit role checks
(IPrincipal.IsInRole) to perform fine-grained authorization within methods.