Building SOA-Based Composite Applications Using NetBeans IDE 6 phần 10 docx
Bạn đang xem bản rút gọn của tài liệu. Xem và tải ngay bản đầy đủ của tài liệu tại đây (1.32 MB, 36 trang )
Building a Sample Application
[ 252 ]
All this is achieved through JMS BC. In case of outbound message ow, where the
JMS BC is being invoked by our business process, the JMS BC acts as an external
JMS service provider. In this role, the JMS BC converts a normalized message that it
receives as part of the message exchange from our process, to a JMS message. After
the JMS message is created as a result of the message conversion, the JMS message is
sent to JMS destination.
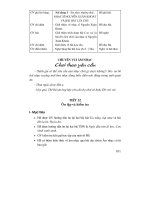
The above screenshot shows the NetBeans output when the BPEL process is
executed. The NMR message is converted into a valid JMS to send to the queue.
Part E – Conditions and Sequence
This part introduces the sequencing and branching properties of BPEL. When a
request for a reservation is made, the BPEL process checks the destination sector.
If the destination is set to 'SFO', then the itinerary is routed to NorthAirWS,
otherwise the itinerary is sent to WestAir Web Service. Since WestAir Web Service
is new, we create an identical web service using NorthAir Web Service and name it
WestAir Web Service. They do not do any actual itinerary processing but they send
a conrmation message back to the client so we can nd out which airlines' web
service was invoked.
So far through the earlier parts of this example, we have created a sequential process
to invoke NorthAir Web Service. This process consists of storing and sending
itineraries to a JMS physical destination. Ideally, updating the partner airlines
repository is independent of itinerary processing. Despite of failed reservations, we
update the data store for the purpose of a waiting list (Of course without a conrmed
reservation ID).
UpdateItinerary sequence is introduced as a ow branch to process itinerary
branch, so both the sequences work in parallel. This part also shows how as part of
the UpdateAirlines sequence, we send the itinerary information to a travel agent's
FTP Server. Uploading itinerary information to an FTP server is done through an
FTP binding component.
Chapter 10
[ 253 ]
Whenever a request for reservation is made, the NorthAir Web Service is invoked
and the itinerary data is updated in the SouthAir database. Also, the itinerary
information is updated in the le system using the JBI le binding component. This
le can be constantly monitored by an external process. Now the itinerary data is
sent to EastAir's JMS Queue. EastAir's JMS Queue Listener can get the itinerary
information for further processing. The BPEL process also uploads the guest itinerary
to a remote FTP server of a travel agent or any AirAlliance partner.
Let us create another web service WestAir_WS just like we created NorthAir_WS.
Create an EJB module and create a web service from that module. Drag-and-drop
WestAir_WS on the BPEL diagram to create the partner link.
Building a Sample Application
[ 254 ]
To make our example simple, let us have the same web service operation as
NorthAir Web Service.
Chapter 10
[ 255 ]
Add an If activity to the BPEL diagram and set a condition as shown in the following
screenshot. In our case, the condition returns true if the destination sector matches
'SFO'. If you are comfortable using the BPEL mapper add Equal operator as shown.
For information on using BPEL Mapper, refer to Chapter 5 on BPEL Designer.
Or you can manually set the condition as shown in the following screenshot:
Building a Sample Application
[ 256 ]
Drag-and-drop Invoke calls of both NorthAir Web Service and WestAir Web Service
into the appropriate branches as shown in the following gure.
Chapter 10
[ 257 ]
So, whenever the guest itinerary has its destination sector as 'SFO', NorthAir WS
is invoked. Otherwise WestAir WS is invoked. Now, updating the SouthAir DB,
storing the itinerary and sending a JMS message can happen in ow with the sector
check. So, add a BPEL ow activity and drag-and-drop InvokeSA, StoreInFile, and
SendItinerary invoke blocks to the secondary branch of the ow. Drag-and-drop
the check sector block to the primary branch of the ow. Now, irrespective of who
processes the request, all partner systems are updated.
Building a Sample Application
[ 258 ]
In the secondary ow branch, let us add one more invoke call that uploads the guest
itinerary to a partner FTP server for further processing. For this you need to create
one more WSDL le of name UploadItinerary.wsdl. Follow the same steps you
have learnt for creating SendItinerary.wsdl but select FTP binding as the binding
type. Now let us take a look at UploadItinerary.wsdl:
<?xml version="1.0" encoding="UTF-8"?>
<definitions name="UploadItinerary" targetNamespace=
" /> xmlns=" /> xmlns:wsdl=" /> xmlns:xsd="
xmlns:tns="
xmlns:ns="
xmlns:plnk="
xmlns:ftp=" /> <types>
<xsd:schema targetNamespace=
" /> <xsd:import namespace=
"
schemaLocation="ITINERARY.xsd"/>
</xsd:schema>
</types>
<message name="UploadItineraryOperationRequest">
<part name="inputItinerary" element="ns:ITINERARY"/>
</message>
<portType name="UploadItineraryPortType">
<operation name="UploadItineraryOperation">
<input name="input1" message=
"tns:UploadItineraryOperationRequest"/>
</operation>
</portType>
<binding name="UploadItineraryBinding" type=
"tns:UploadItineraryPortType">
<ftp:binding/>
<operation name="UploadItineraryOperation">
<ftp:operation/>
<input name="input1">
<ftp:message messageName="" messageNamePrefixIB=""
messageNamePrefixOB=
"" pollIntervalMillis="5000" archive="true"
protect="true" stage="true" use="literal"
encodingStyle="" messageCorrelate="true"
messageRepository="itinerary"/>
</input>
</operation>
</binding>
<service name="UploadItineraryService">
Chapter 10
[ 259 ]
<port name="UploadItineraryPort" binding=
"tns:UploadItineraryBinding">
<ftp:address url=
"ftp://userftp:userftp@localhost:21" dirListStyle="UNIX"
useUserDefinedHeuristics="false" userDefDirListStyle=""
userDefDirListHeuristics="" cmdChannelTimeout="45000"
dataChannelTimeout="45000"/>
</port>
</service>
<plnk:partnerLinkType name="UploadItinerary1">
<plnk:role name="UploadItineraryPortTypeRole"
portType="tns:UploadItineraryPortType"/>
</plnk:partnerLinkType>
</definitions>
As usual make changes to the binding and service parts of the WSDL document to
provide your FTP server information. If you want to run this sample, set up an FTP
server or provide a URL to an existing FTP server.
Now, drag-and-drop UploadItinerary.wsdl on BPEL diagram to create a partner
link. Just as explained in the previous sections, swap roles if necessary.
Now our BPEL process diagram looks like this:
Building a Sample Application
[ 260 ]
Now our composite application looks like the following gure. Note that the FTP
WSDL port is highlighted.
Chapter 10
[ 261 ]
From the Source Code – Part E folder
Open NorthAirEJB, WestAirEJB, ReservationBPEL and AirAlliance_CA
NetBeans project les and go through the code. When you open them
for the rst time, you will get a 'Resolve References' warning. You may
need to set the correct target server for the EJB module and set the correct
path to the ReservationBPEL jar le for the composite application. Also
note ProcessReservation.wsdl. This WSDL is the web service
that initiates the BPEL process. If you are making changes to the
ReservationBP.bpel le in ReservationBPEL project, then you need
to update the JBI module again in this project. Right-click this project and
choose Edit Application Conguration.
You can see seven WSDL ports are congured. Three ports use SOAP
bindings, one port uses JDBC binding, one port uses File binding, one
port uses JMS binding and one port uses FTP binding.
In NetBeans, drill down to Services | Servers | Glasssh V[x] | JBI |Binding
Components. If you do not see sun-ftp-binding, download the jar from:
/>nightly/latest/ojc/
Then right-click on Services | Servers | Glasssh V[x] | JBI |Binding Components
and choose Install New Binding Components and select the binding component jar
that you downloaded from the above link.
Testing Part E Source
Deploy the project AirAlliance_CA. In the AirAlliance_CA project, under
Test | TestReservation, edit input.xml with some values. In the AirAlliance_CA
project, execute the TestReservation test case under the Test folder
Building a Sample Application
[ 262 ]
Now, check the Itinerary table of SouthAirDB. Look how the DB is updated. Also,
check the output.xml le for the conrmation message from NorthAir web service.
Check if the guest information is written to the le specied in StoreItinerary.
wsdl le. Now, go to the Admin Console of GlassFish Application Server and drill
down to Conguration | Java Message Service | Physical Destinations. Check
if EastAirQueue Destination is added. Additionally, check if the guest itinerary is
uploaded to the FTP server.
Part F – Sending Mails
The reservation process is updated to perform pre-processing before invoking the
partner services. This will be useful later to build your own validation rules before
invoking the partner services. AAPreProcessor Web Service performs a check on
the sectors and sends a reply back to the process stating if the reservation could be
processed. For this example, all reservation requests from 'BLR' to "SFO' are rejected
and auto responder is sent to a predened e-mail address.
The pre-processing also includes checking if the source and destination sectors are
same before invoking the expensive partner services query operations. You should
have more of these checks in your real applications.
Chapter 10
[ 263 ]
For this purpose, we create another web service AAPreProcessor Web Service that
performs the check. Create an EJB module AAPreProcessor_EJB and create a web
service with just one operation. See the following code:
@WebMethod(operationName = "areSectorsAvailable")
public boolean areSectorsAvailable(@WebParam(name = "source")
String source, @WebParam(name = "destination")
String destination)
{
if(source.equals("BLR") && destination.equals("SFO")){
return false;
}
return true;
}
It returns true if a particular source-destination condition is met.
The pre-processor sets a variable AreSectorsAvailableOut if the sectors are not
available. Add an If activity with the following condition:
( $AreSectorsAvailableOut.parameters/return = false() )
Based on the above condition, we send auto notication mail. For this you need to
install SMTP binding component.
Create MailResponder.wsdl le just like you created StoreItinerary.wsdl but
select the binding type as SMTP. Now, make changes to StoreItinerary.wsdl to
add SMTP server related information shown as follows:
<?xml version="1.0" encoding="UTF-8"?>
<definitions name="MailResponder" targetNamespace=
" /> xmlns=" /> xmlns:wsdl=" /> xmlns:xsd="
xmlns:tns="
xmlns:plnk="
xmlns:smtp=" /> <types/>
<message name="MailResponderOperationRequest">
<part name="bodyPart" type="xsd:string"/>
<part name="fromPart" type="xsd:string"/>
<part name="subjectPart" type="xsd:string"/>
</message>
<portType name="MailResponderPortType">
<operation name="MailResponderOperation">
<input name="input1" message=
"tns:MailResponderOperationRequest"/>
</operation>
</portType>
Building a Sample Application
[ 264 ]
<binding name="MailResponderBinding" type=
"tns:MailResponderPortType">
<smtp:binding/>
<operation name="MailResponderOperation">
<smtp:operation/>
<input name="input1">
<smtp:input message="bodyPart" subject="subjectPart"
from="fromPart"/>
</input>
</operation>
</binding>
<service name="MailResponderService">
<port name="MailResponderPort" binding="tns:MailResponderBinding">
<smtp:address location="mailto:"
smtpserver="jennings.in" useSSL="false"
username=""
password="************"/>
</port>
</service>
<plnk:partnerLinkType name="MailResponder1">
<plnk:role name="MailResponderPortTypeRole"
portType="tns:MailResponderPortType"/>
</plnk:partnerLinkType>
</definitions>
After creating the WSDL document, drag-and-drop MailResponder.wsdl on
your BPEL diagram to create the partner link. This is how your BPEL diagram will
look now:
Chapter 10
[ 265 ]
Now, if you check our sample composite application, it will look like the
following gure:
Building a Sample Application
[ 266 ]
From the Source Code – Part F folder
Open NorthAirEJB, WestAirEJB, AAPreProcessorEJB, ReservationBPEL
and AirAlliance_CA NetBeans project les and go through the code.
When you open them for the rst time, you will get a 'Resolve References'
warning. You may need to set the correct target server for the EJB module
and set the correct path to the ReservationBPEL jar le for the composite
application. Also note ProcessReservation.wsdl. This WSDL is the
web service that initiates the BPEL process. If you are making changes
to the ReservationBP.bpel le in ReservationBPEL project, then
you need to update the JBI module again in this project. Right-click this
project and choose Edit Application Conguration.
You can see nine WSDL ports are congured. four ports use SOAP
bindings, one port uses JDBC binding, one port uses File binding, one
port uses JMS binding, one port uses FTP binding and one port uses
SMTP binding.
In NetBeans, drill down to Services | Servers | Glasssh V[x] | JBI |Binding
Components. If you do not see sun-smtp-binding, download the jar from:
/>nightly/latest/ojc/
Then right-click on Services | Servers | Glasssh V[x] | JBI |Binding Components
and choose Install New Binding Components and select the binding jar that you
downloaded from the above link.
Testing Part F Source
Deploy project the AirAlliance_CA. In the AirAlliance_CA project, under Test |
TestReservation, edit input.xml with some values. In the AirAlliance_CA project,
execute the TestReservation test case under the Test folder
Now check the Itinerary table of SouthAirDB. Look how the DB is updated. Also
check the output.xml le for the conrmation message from NorthAir Web Service.
Check if the guest information is written to the le specied in StoreItinerary.
wsdl. Now go to the Admin Console of GlassFish Application Server and drill
down to Conguration | Java Message Service | Physical Destinations. Check
if EastAirQueue Destination is added. Additionally check if the guest itinerary is
uploaded to the FTP server.
Chapter 10
[ 267 ]
If you enter the source as 'BLR' in input.xml and destination as 'SFO',
then the process fails to proceed and mail will be sent to a congured
Email address. Also if you have the same values for source and
destination, the process stops processing the itinerary. Check if you get
the reservation conrmation from NorthAir WS and if the destination is
'SFO'. If the destination is not 'SFO' the reservation conrmation comes
from WestAir WS.
The above example shows how notication messages can be sent to partners
through SMTP BC.
Part G – Event Processing
This part shows you how you can process your data stream to do some intelligent
pre-processing before performing any meaningful action on the data. In the previous
parts, you used a File BC to create an XML le that contained the itinerary data.
This itinerary data can be converted into a stream and can be passed through
Intelligent Event Processors to project or lter the stream or to restrict the itinerary
count. This part contains one intelligent event processor that does the following:
1. Processes all itineraries obtained from the stream for the last 3 seconds.
2. Uses the stream lter to remove itinerary preferences data to make the
itinerary data set smaller.
3. Contiguous ordering of itinerary data.
4. Stores the ltered itinerary record in database.
Building a Sample Application
[ 268 ]
Make sure that you have started the IEP service engine. Refer to the chapter on IEP
for more information.
For this example, we will be creating an IEP NetBeans module and a single
event processor.
From the Source Code – Part E folder
ItineraryIEP - Intelligent Event Processor NetBeans Project that contains 1
event processor by name ItineraryProcessorIEP.iep.
AirAlliance_CA – Composite application that deploys the IEP module.
TestItineraryIEP – NetBeans standalone Java application to test the
event processor.
On your IEP workspace, drag-and-drop the following operators and connect
them sequentially.
1. Stream Input (Input Operator)
2. Time Based Window (Stream Converter)
3. Insert Stream (Relation Converter)
4. Stream Projection and Filter (Correlation and Filter)
5. Contiguous Order (Sequence Operator)
6. Partitioned Window (Stream Converter)
7. Table Output (Table Operator)
Chapter 10
[ 269 ]
The following gure shows how they are connected sequentially.
Congure the IEP to read guest itinerary information from the input stream. Specify
the itinerary elds as attributes in the Stream Input Property Editor.
Building a Sample Application
[ 270 ]
Now, we will let the IEP process only the itineraries received for the last three
seconds in the stream. Double-click the Time Based Window Property Editor and
specify the Size as 3 and select second from the drop-down box. Note that since you
have already connected the operators, the Attributes are automatically populated
from the input stream.
Now, if you notice the stream that we are processing also includes guest preferences
like Food and Seat preference. If for some reason we want to ignore the preferences
and process only the core itinerary attributes, we need to ignore these preferences.
For this, we will be using the Stream Projection and Filter operator. Double-click
the Stream Projection and Filter Property Editor and add all the attributes except
FoodPreference and SeatPreference.
Chapter 10
[ 271 ]
Now, we pass the stream to the Contiguous order operator to sort the stream based
on the SeqID.
Building a Sample Application
[ 272 ]
Open the Contiguous Order Property Editor and select SeqID as the Sort by id.
Despite of the time based ltering we did earlier, there could be several itinerary
records that you may need to control processing. We can set it to process only the last
four records of the itinerary using a Partitioned Window. Double-click Partitioned
Window Property Editor and set the Size to 4. Note that the preferences attributes
will be missing from the list.
Chapter 10
[ 273 ]
Now that our IEP is ready, we use the Table Output operator to write to a table.
Double-click the Table Output Property Editor and select Is Global and give a
Global ID name as CurrentItinerary.
When you deploy this IEP, the IEP service engine will create a table by name
CURRENTITINERARY as specied by the Global ID.
Building a Sample Application
[ 274 ]
Create a composite application and add the IEP project as a JBI module and
deploy the project to the GlassFish Server. At the time of deployment, the
CURRENTITINERARY table will be created. Now to test the IEP, you need to
generate a stream and pass it to the IEP. For this purpose use the TestItineraryIEP
standalone java project. It reads the itinerary information stored in the le by the BPEL
process and creates a stream and sends it to the IEP. After running the test application
check the CURRENTITINERARY table to check the ltered itinerary output.
The idea of this part of the example is to show how you can create a very simple
event processor that could be deployed as a composite application and works along
with a BPEL process into intelligently process a stream of data.
Summary
This chapter showed you how you can use the NetBeans SOA tools and OpenESB
components to create simple and powerful BPEL processes, all visually through
wizards and property editors. Various parts of this sample showed you how to work
each of the binding components and introduced branching and ow in business
processes. The last part of the example showed the usage of intelligent event
processors to lter and process the stream based on application preferences.
You can use these techniques and tools to build a scalable business using BPEL as the
orchestration point.
Composite Applications
Whenever you need to deploy your BPEL process or IEP module, you have to deploy
them through a service assembly or a composite application.
A composite application is a service congregation consisting of business functionality
and information from disparate information sources. Composite applications are
both a form of integration, as well as application development. Typically, they are
created to support a company's business processes and map them to underlying
information resources.
If you have done any business integration, you will be well aware that integration is
a longtime messy issue for IT organizations and is the potential candidate for Web
services and SOA. Composite applications are conceived as the end product for SOA.
The majority of the benets of SOA are realized when you assemble existing services
into composite applications.
Role of Composite Applications
Web services uphold syntax and protocol-level communications but do not provide
a way to ensure semantic interoperability. Consider, for example, how a passenger
entity is dened in a system based on SAP and how a passenger entity is dened
in a system based on Siebel. It could be very different. So who resolves the data
disparities between these two different systems to make a meaningful business
process? A composite application does that.
How does a composite application extend SOA? SOA recommends building loosely
coupled applications and treating each one of them as independent 'service units'.
Well-designed composite applications implement this architectural approach by
providing an easy way to build business applications. They also provide integration
of existing applications with other existing, as well as new applications. This SOA
concept of linking together business processes is the hub of composite applications.
Composite Applications
[ 276 ]
What essentially is a composite application?
1. A composite application is typically an application built by combining
multiple services.
2. Functionality of a composite application varies based on the
individual components.
In essence, a composite application is just an exposing platform for various
web services.
There are many tools available today that let you create composite applications. Out
of these, NetBeans SOA tools and OpenESB runtime offer an elegant and intuitive
way of creating and editing composite applications.
NetBeans Project Types
NetBeans supports creating composite applications through the Composite
Application project type. The composite application project is an Ant-based
NetBeans project system. It allows users to create instances of composite application
projects within the NetBeans IDE. Each composite application project instance is a
container holding the deployment conguration for a collection of JBI component
subprojects like BPEL, XSLT, and Java EE projects. The project system allows the
user to create a Service Assembly (SA) artifact that contains all subprojects as Service
Units (SUs). The SA can then be deployed to the JBI runtime on an Application
Server like GlassFish Application Server or Sun Java System Application Server.
The following gure shows how you can use NetBeans' tools to create and edit
composite applications:
First, you create a composite application and then add JBI modules to the
composite application. When you build the project, Composite Application Service
Assembly (CASA) le will be created. You can use the CASA Editor tool to edit the
composite application conguration by adding WSDL ports, adding connections,
and editing properties.