Beginning PythonFrom Novice to Professional, Second Edition 2008 phần 6 pdf
Bạn đang xem bản rút gọn của tài liệu. Xem và tải ngay bản đầy đủ của tài liệu tại đây (384.89 KB, 67 trang )
316
CHAPTER 14
■ NETWORK PROGRAMMING
host = socket.gethostname()
port = 1234
s.bind((host, port))
fdmap = {s.fileno(): s}
s.listen(5)
p = select.poll()
p.register(s)
while True:
events = p.poll()
for fd, event in events:
if fd in fdmap:
c, addr = s.accept()
print 'Got connection from', addr
p.register(c)
fdmap[c.fileno()] = c
elif event & select.POLLIN:
data = fdmap[fd].recv(1024)
if not data: # No data connection closed
print fdmap[fd].getpeername(), 'disconnected'
p.unregister(fd)
del fdmap[fd]
else:
print data
You can find more information about select and poll in the Python Library Reference
( Also, reading the source code of the stan-
dard library modules asyncore and asynchat (found in the asyncore.py and asynchat.py files in
your Python installation) can be enlightening.
Twisted
Twisted, from Twisted Matrix Laboratories (), is an event-driven
networking framework for Python, originally developed for network games but now used by all
kinds of network software. In Twisted, you implement event handlers, much like you would in
a GUI toolkit (see Chapter 12). In fact, Twisted works quite nicely together with several com-
mon GUI toolkits (Tk, GTK, Qt, and wxWidgets). In this section, I’ll cover some of the basic
concepts and show you how to do some relatively simple network programming using
Twisted. Once you grasp the basic concepts, you can check out the Twisted documentation
(available on the Twisted web site, along with quite a bit of other information) to do some more
serious network programming. Twisted is a very rich framework and supports, among other
things, web servers and clients, SSH2, SMTP, POP3, IMAP4, AIM, ICQ, IRC, MSN, Jabber,
NNTP, DNS, and more!
CHAPTER 14 ■ NETWORK PROGRAMMING
317
Downloading and Installing Twisted
Installing Twisted is quite easy. First, go to the Twisted Matrix web site ()
and, from there, follow one of the download links. If you’re using Windows, download the Windows
installer for your version of Python. If you’re using some other system, download a source archive.
(If you’re using a package manager such as Portage, RPM, APT, Fink, or MacPorts, you can probably
get it to download and install Twisted directly.) The Windows installer is a self-explanatory step-by-
step wizard. It may take some time compiling and unpacking things, but all you have to do is wait.
To install the source archive, you first unpack it (using tar and then either gunzip or bunzip2,
depending on which type of archive you downloaded), and then run the Distutils script:
python setup.py install
You should then be able to use Twisted.
Writing a Twisted Server
The basic socket servers written earlier in this chapter are very explicit. Some of them have an
explicit event loop, looking for new connections and new data. SocketServer-based servers
have an implicit loop where the server looks for connections and creates a handler for each
connection, but the handlers still must be explicit about trying to read data. Twisted (like the
asyncore/asynchat framework, discussed in Chapter 24) uses an even more event-based
approach. To write a basic server, you implement event handlers that deal with situations such
as a new client connecting, new data arriving, and a client disconnecting (as well as many other
events). Specialized classes can build more refined events from the basic ones, such as wrap-
ping “data arrived” events, collecting the data until a newline is found, and then dispatching a
“line of data arrived” event.
■Note One thing I have not dealt with in this section, but which is somewhat characteristic of Twisted, is
the concept of deferreds and deferred execution. See the Twisted documentation for more information (see,
for example, the tutorial called “Deferreds are beautiful,” available from the HOWTO page of the Twisted
documentation).
Your event handlers are defined in a protocol. You also need a factory that can construct
such protocol objects when a new connection arrives. If you just want to create instances of a
custom protocol class, you can use the factory that comes with Twisted, the Factory class in the
module twisted.internet.protocol. When you write your protocol, use the Protocol from the
same module as your superclass. When you get a connection, the event handler connectionMade
is called. When you lose a connection, connectionLost is called. Data is received from the client
through the handler dataReceived. Of course, you can’t use the event-handling strategy to send
data back to the client—for that you use the object self.transport, which has a write method. It
also has a client attribute, which contains the client address (host name and port).
Listing 14-8 contains a Twisted version of the server from Listings 14-6 and 14-7. I hope
you agree that the Twisted version is quite a bit simpler and more readable. There is a little bit
of setup involved; you need to instantiate Factory and set its protocol attribute so it knows
318
CHAPTER 14
■ NETWORK PROGRAMMING
which protocol to use when communicating with clients (that is, your custom protocol).
Then you start listening at a given port with that factory standing by to handle connections by
instantiating protocol objects. You do this using the listenTCP function from the reactor mod-
ule. Finally, you start the server by calling the run function from the same module.
Listing 14-8. A Simple Server Using Twisted
from twisted.internet import reactor
from twisted.internet.protocol import Protocol, Factory
class SimpleLogger(Protocol):
def connectionMade(self):
print 'Got connection from', self.transport.client
def connectionLost(self, reason):
print self.transport.client, 'disconnected'
def dataReceived(self, data):
print data
factory = Factory()
factory.protocol = SimpleLogger
reactor.listenTCP(1234, factory)
reactor.run()
If you connected to this server using telnet to test it, you may have gotten a single character on
each line of output, depending on buffering and the like. You could simply use sys.sout.write
instead of print, but in many cases, you might like to get a single line at a time, rather than just arbi-
trary data. Writing a custom protocol that handles this for you would be quite easy, but there is, in
fact, such a class available already. The module twisted.protocols.basic contains a couple of use-
ful predefined protocols, among them LineReceiver. It implements dataReceived and calls the
event handler lineReceived whenever a full line is received.
■Tip If you need to do something when you receive data in addition to using lineReceived, which
depends on the
LineReceiver implementation of dataReceived, you can use the new event handler
defined by LineReceiver called rawDataReceived.
Switching the protocol requires only a minimum of work. Listing 14-9 shows the result.
If you look at the resulting output when running this server, you’ll see that the newlines are
stripped; in other words, using print won’t give you double newlines anymore.
CHAPTER 14 ■ NETWORK PROGRAMMING
319
Listing 14-9. An Improved Logging Server, Using the LineReceiver Protocol
from twisted.internet import reactor
from twisted.internet.protocol import Factory
from twisted.protocols.basic import LineReceiver
class SimpleLogger(LineReceiver):
def connectionMade(self):
print 'Got connection from', self.transport.client
def connectionLost(self, reason):
print self.transport.client, 'disconnected'
def lineReceived(self, line):
print line
factory = Factory()
factory.protocol = SimpleLogger
reactor.listenTCP(1234, factory)
reactor.run()
As noted earlier, there is a lot more to the Twisted framework than what I’ve shown you
here. If you’re interested in learning more, you should check out the online documentation,
available at the Twisted web site ().
A Quick Summary
This chapter has given you a taste of several approaches to network programming in Python.
Which approach you choose will depend on your specific needs and preferences. Once you’ve
chosen, you will, most likely, need to learn more about the specific method. Here are some of
the topics this chapter touched upon:
Sockets and the socket module: Sockets are information channels that let programs (pro-
cesses) communicate, possibly across a network. The socket module gives you low-level
access to both client and server sockets. Server sockets listen at a given address for client
connections, while clients simply connect directly.
urllib and urllib2: These modules let you read and download data from various servers,
given a URL to the data source. The urllib module is a simpler implementation, while
urllib2 is very extensible and quite powerful. Both work through straightforward func-
tions such as urlopen.
The SocketServer framework: This is a network of synchronous server base classes, found
in the standard library, which lets you write servers quite easily. There is even support for
simple web (HTTP) servers with CGI. If you want to handle several connections simulta-
neously, you need to use a forking or threading mix-in class.
320
CHAPTER 14
■ NETWORK PROGRAMMING
select and poll: These two functions let you consider a set of connections and find out
which ones are ready for reading and writing. This means that you can serve several con-
nections piecemeal, in a round-robin fashion. This gives the illusion of handling several
connections at the same time, and, although superficially a bit more complicated to code,
is a much more scalable and efficient solution than threading or forking.
Twisted: This framework, from Twisted Matrix Laboratories, is very rich and complex,
with support for most major network protocols. Even though it is large, and some of the
idioms used may seem a bit foreign, basic usage is very simple and intuitive. The Twisted
framework is also asynchronous, so it’s very efficient and scalable. If you have Twisted
available, it may very well be the best choice for many custom network applications.
New Functions in This Chapter
What Now?
You thought we were finished with network stuff now, huh? Not a chance. The next chapter
deals with a quite specialized and much publicized entity in the world of networking: the Web.
Function Description
urllib.urlopen(url[, data[, proxies]]) Opens a file-like object from a URL
urllib.urlretrieve(url[, fname[, hook[, data]]]) Downloads a file from a URL
urllib.quote(string[, safe]) Quotes special URL characters
urllib.quote_plus(string[, safe]) The same as quote, but quotes spaces as +
urllib.unquote(string) The reverse of quote
urllib.unquote_plus(string) The reverse of quote_plus
urllib.urlencode(query[, doseq]) Encodes mapping for use in CGI queries
select.select(iseq, oseq, eseq[, timeout]) Finds sockets ready for reading/writing
select.poll() Creates a poll object, for polling sockets
reactor.listenTCP(port, factory) Twisted function; listens for
connections
reactor.run() Twisted function; main server loop
321
■ ■ ■
CHAPTER 15
Python and the Web
This chapter tackles some aspects of web programming with Python. This is a really vast area,
but I’ve selected three main topics for your amusement: screen scraping, CGI, and mod_python.
In addition, I give you some pointers for finding the proper toolkits for more advanced web appli-
cation and web service development. For extended examples using CGI, see Chapters 25 and 26.
For an example of using the specific web service protocol XML-RPC, see Chapter 27.
Screen Scraping
Screen scraping is a process whereby your program downloads web pages and extracts infor-
mation from them. This is a useful technique that pops up every time there is a page online that
has information you want to use in your program. It is especially useful, of course, if the web
page in question is dynamic; that is, if it changes over time. Otherwise, you could just down-
load it once and extract the information manually. (The ideal situation is, of course, one where
the information is available through web services, as discussed later in this chapter.)
Conceptually, the technique is very simple. You download the data and analyze it. You
could, for example, simply use urllib, get the web page’s HTML source, and then use regular
expressions (see Chapter 10) or another technique to extract the information. Let’s say, for exam-
ple, that you wanted to extract the various employer names and web sites from the Python Job
Board, at You browse the source and see that the names and
URLs can be found as links in h3 elements, like this (except on one, unbroken line):
<h3><a name="google-mountain-view-ca-usa"><a class="reference"
href="">Google</a>
Listing 15-1 shows a sample program that uses urllib and re to extract the required
information.
Listing 15-1. A Simple Screen-Scraping Program
from urllib import urlopen
import re
p = re.compile('<h3><a .*?><a .*? href="(.*?)">(.*?)</a>')
text = urlopen(' />for url, name in p.findall(text):
print '%s (%s)' % (name, url)
322
CHAPTER 15
■ PYTHON AND THE WEB
The code could certainly be improved (for example, by filtering out duplicates), but it does
its job pretty well. There are, however, at least three weaknesses with this approach:
• The regular expression isn’t exactly readable. For more complex HTML code and more
complex queries, the expressions can become even more hairy and unmaintainable.
• It doesn’t deal with HTML peculiarities like CDATA sections and character entities (such
as &). If you encounter such beasts, the program will, most likely, fail.
• The regular expression is tied to details in the HTML source code, rather than some
more abstract structure. This means that small changes in how the web page is struc-
tured can break the program. (By the time you’re reading this, it may already be broken.)
The following sections deal with two possible solutions for the problems posed by the reg-
ular expression-based approach. The first is to use a program called Tidy (as a Python library)
together with XHTML parsing. The second is to use a library called Beautiful Soup, specifically
designed for screen scraping.
■Note There are other tools for screen scraping with Python. You might, for example, want to check out
Ka-Ping Yee’s scrape.py (found at />Tidy and XHTML Parsing
The Python standard library has plenty of support for parsing structured formats such as
HTML and XML (see the Python Library Reference, Section 8, “Structured Markup Processing
Tools,” at I discuss XML and XML parsing in more
depth in Chapter 22. In this section, I just give you the tools needed to deal with XHTML, the
most up-to-date dialect of HTML, which just happens to be a form of XML.
If every web page consisted of correct and valid XHTML, the job of parsing it would be
quite simple. The problem is that older HTML dialects are a bit more sloppy, and some people
don’t even care about the strictures of those sloppier dialects. The reason for this is, probably,
that most web browsers are quite forgiving, and will try to render even the most jumbled and
meaningless HTML as best they can. If this happens to look acceptable to the page authors,
they may be satisfied. This does make the job of screen scraping quite a bit harder, though.
The general approach for parsing HTML in the standard library is event-based; you write
event handlers that are called as the parser moves along the data. The standard library modules
sgmllib and htmllib will let you parse really sloppy HTML in this manner, but if you want to
extract data based on document structure (such as the first item after the second level-two
heading), you’ll need to do some heavy guessing if there are missing tags, for example. You are
certainly welcome to do this, if you like, but there is another way: Tidy.
What’s Tidy?
Tidy () is a tool for fixing ill-formed and sloppy HTML. It can fix a range of
common errors in a rather intelligent manner, doing a lot of work that you would probably rather
not do yourself. It’s also quite configurable, letting you turn various corrections on or off.
CHAPTER 15 ■ PYTHON AND THE WEB
323
Here is an example of an HTML file filled with errors, some of them just Old Skool HTML,
and some of them plain wrong (can you spot all the problems?):
<h1>Pet Shop
<h2>Complaints</h3>
<p>There is <b>no <i>way</b> at all</i> we can accept returned
parrots.
<h1><i>Dead Pets</h1>
<p>Our pets may tend to rest at times, but rarely die within the
warranty period.
<i><h2>News</h2></i>
<p>We have just received <b>a really nice parrot.
<p>It's really nice.</b>
<h3><hr>The Norwegian Blue</h3>
<h4>Plumage and <hr>pining behavior</h4>
<a href="#norwegian-blue">More information<a>
<p>Features:
<body>
<li>Beautiful plumage
Here is the version that is fixed by Tidy:
<!DOCTYPE html PUBLIC "-//W3C//DTD HTML 4.01 Transitional//EN">
<html>
<head>
<title></title>
</head>
<body>
<h1>Pet Shop</h1>
<h2>Complaints</h2>
<p>There is <b>no <i>way</i> at all</b> we can accept returned
parrots.</p>
<h1><i>Dead Pets</i></h1>
<p>Our pets may tend to rest at times, but rarely die within the
warranty period.</p>
<h2><i>News</i></h2>
<p>We have just received <b>a really nice parrot.</b></p>
<p><b>It's really nice.</b></p>
<hr>
324
CHAPTER 15
■ PYTHON AND THE WEB
<h3>The Norwegian Blue</h3>
<h4>Plumage and</h4>
<hr>
<h4>pining behavior</h4>
<a href="#norwegian-blue">More information</a>
<p>Features:</p>
<ul class="noindent">
<li>Beautiful plumage</li>
</ul>
</body>
</html>
Of course, Tidy can’t fix all problems with an HTML file, but it does make sure it’s well-
formed (that is, all elements nest properly), which makes it much easier for you to parse it.
Getting a Tidy Library
You can get Tidy and the library version of Tidy, Tidylib, from . You should
also get a Python wrapper. You can get PTidyLib from , or mxTidy
from />At the time of writing, PTidyLib seems to be the most up-to-date of the two, but mxTidy is
a bit easier to install. In Windows, simply download the installer for mxTidy, run it, and you
have the module mx.Tidy at your fingertips. There are also RPM packages available. If you want
to install the source package (presumably in a UNIX or Linux environment), you can simply
run the Distutils script, using python setup.py install.
Using Command-Line Tidy in Python
You don’t have to install either of the libraries, though. If you’re running a UNIX or Linux
machine of some sort, it’s quite possible that you have the command-line version of Tidy avail-
able. And no matter what operating system you’re using, you can probably get an executable
binary from the TidyLib web site ().
Once you have the binary version, you can use the subprocess module (or some of the
popen functions) to run the Tidy program. Assuming, for example, that you have a messy HTML
file called messy.html, the following program will run Tidy on it and print the result.
from subprocess import Popen, PIPE
text = open('messy.html').read()
tidy = Popen('tidy', stdin=PIPE, stdout=PIPE, stderr=PIPE)
tidy.stdin.write(text)
tidy.stdin.close()
print tidy.stdout.read()
In practice, instead of printing the result, you would, most likely, extract some useful infor-
mation from it, as demonstrated in the following sections.
CHAPTER 15 ■ PYTHON AND THE WEB
325
But Why XHTML?
The main difference between XHTML and older forms of HTML (at least for our current pur-
poses) is that XHTML is quite strict about closing all elements explicitly. So in HTML you might
end one paragraph simply by beginning another (with a <p> tag), but in XHTML, you first need
to close the paragraph explicitly (with a </p> tag). This makes XHTML much easier to parse,
because you can tell directly when you enter or leave the various elements. Another advantage
of XHTML (which I won’t really capitalize on in this chapter) is that it is an XML dialect, so
you can use all kinds of nifty XML tools on it, such as XPath. For example, the links to the forms
extracted by the program in Listing 15-1 could also be extracted by the XPath expression
//h3/a/@href. (For more about XML, see Chapter 22; for more about the uses of XPath, see, for
example, />A very simple way of parsing the kind of well-behaved XHTML you get from Tidy is using
the standard library module (and class) HTMLParser.
1
Using HTMLParser
Using HTMLParser simply means subclassing it and overriding various event-handling methods
such as handle_starttag and handle_data. Table 15-1 summarizes the relevant methods and
when they’re called (automatically) by the parser.
Table 15-1. The HTMLParser Callback Methods
For screen-scraping purposes, you usually won’t need to implement all the parser callbacks
(the event handlers), and you probably won’t need to construct some abstract representation
of the entire document (such as a document tree) to find what you want. If you just keep track of
the minimum of information needed to find what you’re looking for, you’re in business. (See
Chapter 22 for more about this topic, in the context of XML parsing with SAX.) Listing 15-2 shows
a program that solves the same problem as Listing 15-1, but this time using HTMLParser.
1. This is not to be confused with the class HTMLParser from the htmllib module, which you can also use,
of course, if you’re so inclined. It’s more liberal in accepting ill-formed input.
Callback Method When Is It Called?
handle_starttag(tag, attrs) When a start tag is found, attrs is a sequence of (name,
value) pairs.
handle_startendtag(tag, attrs) For empty tags; default handles start and end separately.
handle_endtag(tag) When an end tag is found.
handle_data(data) For textual data.
handle_charref(ref) For character references of the form &#ref;.
handle_entityref(name) For entity references of the form &name;.
handle_comment(data) For comments; called with only the comment contents.
handle_decl(decl) For declarations of the form <!…>.
handle_pi(data) For processing instructions.
326
CHAPTER 15
■ PYTHON AND THE WEB
Listing 15-2. A Screen-Scraping Program Using the HTMLParser Module
from urllib import urlopen
from HTMLParser import HTMLParser
class Scraper(HTMLParser):
in_h3 = False
in_link = False
def handle_starttag(self, tag, attrs):
attrs = dict(attrs)
if tag == 'h3':
self.in_h3 = True
if tag == 'a' and 'href' in attrs:
self.in_link = True
self.chunks = []
self.url = attrs['href']
def handle_data(self, data):
if self.in_link:
self.chunks.append(data)
def handle_endtag(self, tag):
if tag == 'h3':
self.in_h3 = False
if tag == 'a':
if self.in_h3 and self.in_link:
print '%s (%s)' % (''.join(self.chunks), self.url)
self.in_link = False
text = urlopen(' />parser = Scraper()
parser.feed(text)
parser.close()
A few things are worth noting. First of all, I’ve dropped the use of Tidy here, because the
HTML in the web page is well behaved enough. If you’re lucky, you may find that you don’t
need to use Tidy either. Also note that I’ve used a couple of Boolean state variables (attributes)
to keep track of whether I’m inside h3 elements and links. I check and update these in the event
handlers. The attrs argument to handle_starttag is a list of (key, value) tuples, so I’ve used
dict to turn them into a dictionary, which I find to be more manageable.
The handle_data method (and the chunks attribute) may need some explanation. It uses a
technique that is quite common in event-based parsing of structured markup such as HTML and
XML. Instead of assuming that I’ll get all the text I need in a single call to handle_data, I assume
that I may get several chunks of it, spread over more than one call. This may happen for several
reasons—buffering, character entities, markup that I’ve ignored, and so on—and I just need to
CHAPTER 15 ■ PYTHON AND THE WEB
327
make sure I get all the text. Then, when I’m ready to present my result (in the handle_endtag
method), I simply join all the chunks together. To actually run the parser, I call its feed method
with the text, and then call its close method.
This solution is, most likely, more robust to any changes in the input data than the version
using regular expressions (Listing 15-1). Still, you may object that it is too verbose (it’s certainly
more verbose than the XPath expression, for example) and perhaps almost as hard to under-
stand as the regular expression. For a more complex extraction task, the arguments in favor of
this sort of parsing might seem more convincing, but one is still left with the feeling that there
must be a better way. And, if you don’t mind installing another module, there is . . .
Beautiful Soup
Beautiful Soup is a spiffy little module for parsing and dissecting the kind of HTML you often
find on the Web—the sloppy and ill-formed kind. To quote the Beautiful Soup web site
( />You didn’t write that awful page. You’re just trying to get some data out of it. Right now,
you don’t really care what HTML is supposed to look like.
Neither does this parser.
Downloading and installing Beautiful Soup is a breeze. Download the file BeautifulSoup.py
and put it in your Python path (for example, in the site-packages directory of your Python installa-
tion). If you want, you can instead download a tar archive with installer scripts and tests. With
Beautiful Soup installed, the running example of extracting Python jobs from the Python Job Board
becomes really, really simple and readable, as shown in Listing 15-3.
Listing 15-3. A Screen-Scraping Program Using Beautiful Soup
from urllib import urlopen
from BeautifulSoup import BeautifulSoup
text = urlopen(' />soup = BeautifulSoup(text)
jobs = set()
for header in soup('h3'):
links = header('a', 'reference')
if not links: continue
link = links[0]
jobs.add('%s (%s)' % (link.string, link['href']))
print '\n'.join(sorted(jobs, key=lambda s: s.lower()))
I simply instantiate the BeautifulSoup class with the HTML text I want to scrape, and
then use various mechanisms to extract parts of the resulting parse tree. For example, I call
soup('h3') to get a list of all h3 elements. I iterate over these, binding the header variable to
each one in turn, and call header('a', 'reference') to get a list of a child elements of the
328
CHAPTER 15
■ PYTHON AND THE WEB
reference class (I’m talking CSS classes here). I could also have followed the strategy from pre-
vious examples, of retrieving the a elements that have href attributes; in Beautiful Soup, using
class attributes like this is easier.
As I’m sure you noticed, I added the use of set and sorted (with a key function set to ignore
case differences) in Listing 15-3. This has nothing to do with Beautiful Soup; it was just to make
the program more useful, by eliminating duplicates and printing the names in sorted order.
If you want to use your scrapings for an RSS feed (discussed later in this chapter), you
can use another tool related to Beautiful Soup, called Scrape ‘N’ Feed (at />software/ScrapeNFeed).
Dynamic Web Pages with CGI
While the first part of this chapter dealt with client-side technology, now we switch gears and
tackle the server side. This section deals with a basic web programming technology: the
Common Gateway Interface (CGI). CGI is a standard mechanism by which a web server can
pass your queries (typically supplied through a web form) to a dedicated program (for exam-
ple, your Python program) and display the result as a web page. It is a simple way of creating
web applications without writing your own special-purpose application server. For more infor-
mation about CGI programming in Python, see the Web Programming topic guide on the
Python web site ( />The key tool in Python CGI programming is the cgi module. You can find a thorough
description of it in the Python Library Reference (
Another module that can be very useful during the development of CGI scripts is cgitb—more
about that later, in the section “Debugging with cgitb.”
Before you can make your CGI scripts accessible (and runnable) through the Web, you
need to put them where a web server can access them, add a pound bang line, and set the
proper file permissions. These three steps are explained in the following sections.
Step 1. Preparing the Web Server
I’m assuming that you have access to a web server—in other words, that you can put stuff on
the Web. Usually, that is a matter of putting your web pages, images, and so on in a particular
directory (in UNIX, typically called public_html). If you don’t know how to do this, you should
ask your Internet service provider (ISP) or system administrator.
■Tip If you are running Mac OS X, you have the Apache web server as part of your operating system instal-
lation. It can be switched on through the Sharing preference pane of System Preferences, by checking the
Web Sharing option.
CHAPTER 15 ■ PYTHON AND THE WEB
329
Your CGI programs must also be put in a directory where they can be accessed via the
Web. In addition, they must somehow be identified as CGI scripts, so the web server doesn’t
just serve the plain source code as a web page. There are two typical ways of doing this:
• Put the script in a subdirectory called cgi-bin.
• Give your script the file name extension .cgi.
Exactly how this works varies from server to server—again, check with your ISP or system
administrator if you’re in doubt. (For example, if you’re using Apache, you may need to turn on
the ExecCGI option for the directory in question.)
Step 2. Adding the Pound Bang Line
When you’ve put the script in the right place (and possibly given it a specific file name exten-
sion), you must add a pound bang line to the beginning of the script. I mentioned this in
Chapter 1 as a way of executing your scripts without needing to explicitly execute the Python
interpreter. Usually, this is just convenient, but for CGI scripts, it’s crucial—without it, the web
server won’t know how to execute your script. (For all it knows, the script could be written in
some other programming language such as Perl or Ruby.) In general, simply adding the follow-
ing line to the beginning of your script will do:
#!/usr/bin/env python
Note that it must be the very first line. (No empty lines before it.) If that doesn’t work, you
need to find out exactly where the Python executable is and use the full path in the pound bang
line, as in the following:
#!/usr/bin/python
If this doesn’t work, it may be that there is something wrong that you cannot see, namely
that the line ends in \r\n instead of simply \n, and your web server gets confused. Make sure
you’re saving the file as a plain UNIX-style text file.
In Windows, you use the full path to your Python binary, as in this example:
#!C:\Python22\python.exe
Step 3. Setting the File Permissions
The final thing you need to do (at least if your web server is running on a UNIX or Linux
machine) is to set the proper file permissions. You must make sure that everyone is allowed
to read and execute your script file (otherwise the web server wouldn’t be able to run it), but
also make sure that only you are allowed to write to it (so no one can change your script).
330
CHAPTER 15
■ PYTHON AND THE WEB
■Tip Sometimes, if you edit a script in Windows and it’s stored on a UNIX disk server (you may be accessing
it through Samba or FTP, for example), the file permissions may be fouled up after you’ve made a change to
your script. So if your script won’t run, make sure that the permissions are still correct.
The UNIX command for changing file permissions (or file mode) is chmod. Simply run the
following command (if your script is called somescript.cgi), using your normal user account,
or perhaps one set up specifically for such web tasks:
chmod 755 somescript.cgi
After having performed all these preparations, you should be able to open the script as if it
were a web page and have it executed.
■Note You shouldn’t open the script in your browser as a local file. You must open it with a full http URL
so that you actually fetch it via the Web (through your web server).
Your CGI script won’t normally be allowed to modify any files on your computer. If you
want to allow it to change a file, you must explicitly give it permission to do so. You have two
options. If you have root (system administrator) privileges, you may create a specific user
account for your script and change ownership of the files that need to be modified. If you don’t
have root access, you can set the file permissions for the file so all users on the system (includ-
ing that used by the web server to run your CGI scripts) are allowed to write to the file. You can
set the file permissions with this command:
chmod 666 editable_file.txt
■Caution Using file mode 666 is a potential security risk. Unless you know what you’re doing, it’s best
avoided.
CGI Security Risks
Some security issues are associated with using CGI programs. If you allow your CGI script to
write to files on your server, that ability may be used to destroy data unless you code your
program carefully. Similarly, if you evaluate data supplied by a user as if it were Python code
(for example, with exec or eval) or as a shell command (for example, with os.system or using
the subprocess module), you risk performing arbitrary commands, which is a huge (as in
humongous) risk.
CHAPTER 15 ■ PYTHON AND THE WEB
331
For a relatively comprehensive source of information about web security, see the World Wide
Web Consortium’s security FAQ ( See also the security note on
the subject in the Python Library Reference ( />A Simple CGI Script
The simplest possible CGI script looks something like Listing 15-4.
Listing 15-4. A Simple CGI Script
#!/usr/bin/env python
print 'Content-type: text/plain'
print # Prints an empty line, to end the headers
print 'Hello, world!'
If you save this in a file called simple1.cgi and open it through your web server, you should
see a web page containing only the words “Hello, world!” in plain text. To be able to open this
file through a web server, you must put it where the web server can access it. In a typical UNIX
environment, putting it in a directory called public_html in your home directory would enable
you to open it with the URL http://localhost/~username/simple1.cgi (substitute your user
name for username). Ask your ISP or system administrator for details.
As you can see, everything the program writes to standard output (for example, with print)
ends up in the resulting web page—at least almost everything. The fact is that the first things
you print are HTTP headers, which are lines of information about the page. The only header I
concern myself with here is Content-type. As you can see, the phrase Content-type is followed
by a colon, a space, and the type name text/plain. This indicates that the page is plain text. To
indicate HTML, this line should instead be as follows:
print 'Content-type: text/html'
After all the headers have been printed, a single empty line is printed to signal that the
document itself is about to begin. And, as you can see, in this case the document is simply
the string 'Hello, world!'.
Debugging with cgitb
Sometimes a programming error makes your program terminate with a stack trace due to an
uncaught exception. When running the program through CGI, this will most likely result in an
unhelpful error message from the web server. In Python 2.2, a module called cgitb (for CGI tra-
ceback) was added to the standard library. By importing it and calling its enable function, you
can get a quite helpful web page with information about what went wrong. Listing 15-5 gives
an example of how you might use the cgitb module.
332
CHAPTER 15
■ PYTHON AND THE WEB
Listing 15-5. A CGI Script That Invokes a Traceback (faulty.cgi)
#!/usr/bin/env python
import cgitb; cgitb.enable()
print 'Content-type: text/html'
print 1/0
print 'Hello, world!'
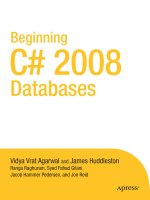
The result of accessing this script in a browser (through a web server) is shown in
Figure 15-1.
Figure 15-1. A CGI traceback from the cgitb module
Note that you might want to turn off the cgitb functionality after developing the program,
since the traceback page isn’t meant for the casual user of your program.
2
2. An alternative is to turn off the display and log the errors to files instead. See the Python Library Refer-
ence for more information.
CHAPTER 15 ■ PYTHON AND THE WEB
333
Using the cgi Module
So far, the programs have only produced output; they haven’t used any form of input. Input is
supplied to the CGI script from an HTML form (described in the next section) as key-value
pairs, or fields. You can retrieve these fields in your CGI script using the FieldStorage class
from the cgi module. When you create your FieldStorage instance (you should create only
one), it fetches the input variables (or fields) from the request and presents them to your pro-
gram through a dictionary-like interface. The values of the FieldStorage can be accessed
through ordinary key lookup, but due to some technicalities (related to file uploads, which we
won’t be dealing with here), the elements of the FieldStorage aren’t really the values you’re
after. For example, if you knew the request contained a value named name, you couldn’t simply
do this:
form = cgi.FieldStorage()
name = form['name']
You would need to do this:
form = cgi.FieldStorage()
name = form['name'].value
A simpler way of fetching the values is the getvalue method, which is similar to the dictio-
nary method get, except that it returns the value of the value attribute of the item. Here is an
example:
form = cgi.FieldStorage()
name = form.getvalue('name', 'Unknown')
In the preceding example, I supplied a default value ('Unknown'). If you don’t supply one,
None will be the default. The default is used if the field is not filled in.
Listing 15-6 contains a simple example that uses cgi.FieldStorage.
Listing 15-6. A CGI Script That Retrieves a Single Value from a FieldStorage (simple2.cgi)
#!/usr/bin/env python
import cgi
form = cgi.FieldStorage()
name = form.getvalue('name', 'world')
print 'Content-type: text/plain'
print 'Hello, %s!' % name
334
CHAPTER 15
■ PYTHON AND THE WEB
A Simple Form
Now you have the tools for handling a user request; it’s time to create a form that the user can
submit. That form can be a separate page, but I’ll just put it all in the same script.
To find out more about writing HTML forms (or HTML in general), you should perhaps get
a good book on HTML (your local bookstore probably has several). You can also find plenty of
information on the subject online. Here are some resources:
• />• />• />• />• />Also, if you find some page that you think looks like a good example for what you would
like to do, you can inspect its source in your browser by choosing View Source or something
similar (depending on which browser you have) from one of the menus.
INVOKING CGI SCRIPTS WITHOUT FORMS
Input to CGI scripts generally comes from web forms that have been submitted, but it is also possible to call
the CGI program with parameters directly. You do this by adding a question mark after the URL to your script,
and then adding key-value pairs separated by ampersands (&). For example, if the URL to the script in
Listing 15-6 were you could call it with name=Gumby
and age=42 with the URL If you
try that, you should get the message “Hello, Gumby!” instead of “Hello, world!” from your CGI script. (Note that
the age parameter isn’t used.) You can use the urlencode method of the urllib module to create this kind
of URL query:
>>> urllib.urlencode({'name': 'Gumby', 'age': '42'})
'age=42&name=Gumby'
You can use this strategy in your own programs, together with urllib, to create a screen-scraping pro-
gram that can actually interact with a CGI script. However, if you’re writing both ends (that is, both server and
client side) of such a contraption, you would, most likely, be better off using some form of web service (as
described in the section “Web Services: Scraping Done Right” in this chapter).
CHAPTER 15 ■ PYTHON AND THE WEB
335
■Note There are two main ways of getting information from a CGI script: the GET method and the POST
method. For the purposes of this chapter, the difference between the two isn’t really important. Basically,
GET is
for retrieving things, and encodes its query in the URL;
POST can be used for any kind of query, but encodes the
query a bit differently. For more information about GET and POST, see the forms tutorials in the preceding list.
Let’s return to our script. An extended version can be found in Listing 15-7.
Listing 15-7. A Greeting Script with an HTML Form (simple3.cgi)
#!/usr/bin/env python
import cgi
form = cgi.FieldStorage()
name = form.getvalue('name', 'world')
print """Content-type: text/html
<html>
<head>
<title>Greeting Page</title>
</head>
<body>
<h1>Hello, %s!</h1>
<form action='simple3.cgi'>
Change name <input type='text' name='name' />
<input type='submit' />
</form>
</body>
</html>
""" % name
In the beginning of this script, the CGI parameter name is retrieved, as before, with the
default 'world'. If you just open the script in your browser without submitting anything,
the default is used.
336
CHAPTER 15
■ PYTHON AND THE WEB
Then a simple HTML page is printed, containing name as a part of the headline. In addition,
this page contains an HTML form whose action attribute is set to the name of the script itself
(simple3.cgi). That means that if the form is submitted, you are taken back to the same script.
The only input element in the form is a text field called name. Thus, if you submit the field with
a new name, the headline should change because the name parameter now has a value.
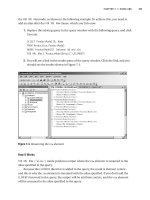
Figure 15-2 shows the result of accessing the script in Listing 15-7 through a web server.
Figure 15-2. The result of executing the CGI script in Listing 15-7
One Step Up: mod_python
If you like CGI, you will probably love mod_python. It’s an extension (module) for the Apache
web server, and you can get it from the mod_python web site (). It makes
the Python interpreter directly available as a part of Apache, which makes a whole host of dif-
ferent cool stuff possible. At the core, it gives you the ability to write Apache handlers in Python,
as opposed to in C, which is the norm. The mod_python handler framework gives you access to
a rich API, uncovering Apache internals and more.
In addition to the basic functionality, mod_python comes with several handlers that can
make web development a more pleasant task:
• The CGI handler, which lets you run CGI scripts using the mod_python interpreter,
considerably speeding up their execution
• The PSP handler, which lets you mix HTML and Python code to create executable web
pages, or Python Server Pages
• The publisher handler, which lets you call Python functions using URLs
In this section, I will focus on these three standard handlers; if you want to write your own
custom handlers, you should check out the mod_python documentation.
CHAPTER 15 ■ PYTHON AND THE WEB
337
Installing mod_python
Installing mod_python and getting it to work is, perhaps, a bit more difficult than doing so for
many of the other packages I’ve discussed so far. If nothing else, you need to make it cooperate
with Apache. So, if you plan to install mod_python yourself, you should either use some form
of package manager system (which will install it automatically) or make sure you know a bit
about running and maintaining the Apache web server. (You can find more information
about Apache at .) If you’re lucky, you may already have access to
a machine where mod_python is installed; if you’re uncertain, just try to use it, as described
here, and see if your code runs properly. (Of course, you could also bug your ISP or administra-
tor to install it for you.)
If you do want to install it yourself, you can get the information you need in the
mod_python documentation, available online or for download at the mod_python web
site (). You can probably also get some assistance on the mod_python
mailing list (with subscription available from the same web site). The process is slightly dif-
ferent depending on whether you use UNIX or Windows.
Installing on UNIX
Assuming you have already compiled your Apache web server and you have the Apache source
code available, here are the highlights of compiling and installing mod_python.
First, download the mod_python source code. Unpack the archive and enter the directory.
Then, run the configure script of mod_python:
$ ./configure with-apxs=/usr/local/apache/bin/apxs
Modify the path to the apxs program if this is not where it is found. On my Gentoo system,
for example, I would use /usr/sbin/apxs2. (Or, rather, I would install mod_python automati-
cally with the Portage package system, but that’s beside the point.)
Make a note of any useful messages, such as any messages about LoadModule.
Once this configuration is done, compile everything:
$ make
Once everything has been compiled, install mod_python:
$ make install
You may need to run this with root privileges (or give a prefix option to configure).
■Note On a Mac OS X system, you can use MacPorts to install mod_python.
Installing on Windows
You can download the mod_python installer from />modpython/win/ (get the newest version) and double-click it. The installation is straight-
forward and will take you through the steps of finding your Python and Apache installations.
338
CHAPTER 15
■ PYTHON AND THE WEB
You may get an error at the end of the process if you did not install Tcl/Tk with Python,
though the installer tells you how to finish the installation manually. To do this, copy
mod_python_so.pyd from Python’s Lib\site-packages folder to the modules directory under
your Apache root folder.
Configuring Apache
Assuming everything went well (if not, check out the sources of information given earlier),
you now must configure Apache to use mod_python. Find the Apache configuration file that
is used for specifying modules. This file it is usually called httpd.conf or apache.conf, although
it may have a different name in your distribution (consult the relevant documentation, if
needed). Add the line that corresponds to your operating system:
# UNIX
LoadModule python_module libexec/mod_python.so
# Windows
LoadModule python_module modules/mod_python.so
There may be slight variations in how to write this (for example, the exact path to
mod_python.so), though the correct version for UNIX should have been reported as a result
of running configure, earlier.
Now Apache knows where to find mod_python, but it has no reason to use it—you need to
tell it when to do so. To do that, you must add some lines to your Apache configuration, either
in some main configuration file (possibly commonapache2.conf, depending on your installation)
or in a file called .htaccess in the directory where you place your scripts for web access. (The
latter option is only available if it has been allowed in the main configuration of the server
using the AllowOverride directive.) In the following, I assume that you’re using the .htaccess
method; otherwise, you need to wrap the directives like this (remember to use quotes around
the path if you are a Windows user):
<Directory /path/to/your/directory>
(Add the directives here)
</Directory>
The specific directives to use are described in the following sections.
■Note If the procedure described here fails for you, see the Apache and mod_python web sites for more
detailed information about installation.
CGI Handler
The CGI handler simulates the environment your program runs in when you actually use CGI.
This means that you’re really using mod_python to run your program, but you can still (mostly)
CHAPTER 15 ■ PYTHON AND THE WEB
339
write it as if it were a CGI script, using the cgi and cgitb modules, for example. (There are some
limitations; see the documentation for details.)
The main reason for using the CGI handler as opposed to plain CGI is performance.
According to a simple test in the mod_python documentation, you can increase your perfor-
mance by about one order of magnitude (a factor of about 10) or even more. The publisher
(described later) is faster than this, and writing your own handler is even faster, possibly
tripling the speed of the CGI handler. If you want only speed, the CGI handler may be an easy
option. If you’re writing new code, though, and want some extra functionality and flexibility,
using one of the other solutions (described in the following sections) is probably a better idea.
The CGI handler doesn’t really tap into the great potential of mod_python and is best used with
legacy code.
To use the CGI handler, put the following in an .htaccess file in the directory where you
keep your CGI scripts:
SetHandler mod_python
PythonHandler mod_python.cgihandler
■Note Make sure you don’t have conflicting definitions in your global Apache configuration, as the
.htaccess file won’t override it.
For debugging information (which can be useful when something goes wrong, as it usually
will), you can add the following:
PythonDebug On
You should remove this directive when you’re finished developing; there’s no point in
exposing the innards of your program to the (potentially malevolent) public.
Once you’ve set things up properly, you should be able to run your CGI scripts just as
before.
■Note In order to run your CGI script, you might need to give your script a .py ending, even if you access
it with a URL ending in
.cgi. mod_python converts the .cgi to a .py when it looks for a file to fulfill the
request.
PSP
If you’ve used PHP (the PHP: Hypertext Preprocessor, originally known as Personal Home Page
Tools, or PHP Tools), Microsoft Active Server Pages (ASP), JavaServer Pages (JSP), or something
similar, the concepts underlying Python Server Pages (PSP), should be familiar. PSP docu-
ments are a mix of HTML (or, for that matter, some other form of document) and Python code,
340
CHAPTER 15
■ PYTHON AND THE WEB
with the Python code enclosed in special-purpose tags. Any HTML (or other plain data) will be
converted to calls to an output function.
Setting up Apache to serve your PSP pages is as simple as putting the following in your
.htaccess file:
AddHandler mod_python .psp
PythonHandler mod_python.psp
This will treat files with the .psp file extension as PSP files.
■Caution While developing your PSP pages, using the directive PythonDebug On can be useful. You
should not, though, keep it on when the system is used for real, because any error in the PSP page will result
in an exception traceback including the source code being served to the user. Letting a potentially hostile user
see the source code of your program is something that should not be done lightly. If you publish the code
deliberately, others may help you find security flaws, and this can definitely be one of the strong sides to open
source software development. However, simply letting users glimpse your code through error messages is
probably not useful, and it’s potentially a security risk.
There are two main sets of PSP tags: one for statements and another for expressions. The
values of expressions in expression tags are put directly into the output document. Listing 15-8
is a simple PSP example, which first performs some setup code (statements) and then outputs
some random data as part of the web page, using an expression tag.
Listing 15-8. A Slightly Stochastic PSP Example
<%
from random import choice
adjectives = ['beautiful', 'cruel']
%>
<html>
<head>
<title>Hello</title>
</head>
<body>
<p>Hello, <%=choice(adjectives)%> world. My name is Mr. Gumby.</p>
</body>
</html>
You can mix plain output, statements, and expressions in any way you like. You can write
comments (which will not be part of the output) <%- like this -%>.
There is really very little to PSP programming beyond these basics. You need to be aware
of one issue, though: if code in a statement tag starts an indented block, the block will persist,