Beginning PythonFrom Novice to Professional, Second Edition 2008 phần 9 ppsx
Bạn đang xem bản rút gọn của tài liệu. Xem và tải ngay bản đầy đủ của tài liệu tại đây (329.54 KB, 67 trang )
522
CHAPTER 27
■ PROJECT 8: FILE SHARING WITH XML-RPC
XML-RPC. (This is part of the behavior of SimpleXMLRPCServer, not a part of XML-RPC itself.)
That is useful because these methods aren’t meant to provide separate functionality to an out-
side party, but are there to structure the code.
For now, let’s just assume that _handle takes care of the internal handling of a query
(checks whether the file exists at this specific Node, fetches the data, and so forth) and that it
returns a code and some data, just as query itself is supposed to. As you can see from the listing,
if code == OK, then code, data is returned immediately—the file was found. However, what
should query do if the code returned from _handle is FAIL? Then it must ask all other known
Nodes for help. The first step in this process is to add self.url to history.
■Note Neither the += operator nor the append list method has been used when updating the history
because both of these modify lists in place, and you don’t want to modify the default value itself.
If the new history is too long, query returns FAIL (along with an empty string). The maxi-
mum length is arbitrarily set to 6 and kept in the global constant MAX_HISTORY_LENGTH.
If history isn’t too long, the next step is to broadcast the query to all known peers, which
is done with the _broadcast method. The _broadcast method isn’t very complicated (see
Listing 27-1). It iterates over a copy of self.known. If a peer is found in history, the loop contin-
ues to the next peer (using the continue statement). Otherwise, a ServerProxy is constructed,
and the query method is called on it. If the query succeeds, its return value is used as the return
value from _broadcast. Exceptions may occur, due to network problems, a faulty URL, or the
fact that the peer doesn’t support the query method. If such an exception occurs, the peer’s
URL is removed from self.known (in the except clause of the try statement enclosing the
query). Finally, if control reaches the end of the function (nothing has been returned yet), FAIL
is returned, along with an empty string.
WHY IS MAX_HISTORY_LENGTH SET TO 6?
The idea is that any peer in the network should be able to reach another in, at most, six steps. This, of course,
depends on the structure of the network (which peers know which), but is supported by the hypothesis of
“six degrees of separation,” which applies to people and who they know. For a description of this hypothesis,
see, for example, Wikipedia’s article on six degrees of separation ( />Six_degrees_of_separation).
Using this number in your program may not be very scientific, but at least it seems like a good guess.
On the other hand, in a large network with many nodes, the sequential nature of your program may lead to bad
performance for large values of MAX_HISTORY_LENGTH, so you might want to reduce it if things get slow.
CHAPTER 27 ■ PROJECT 8: FILE SHARING WITH XML-RPC
523
■Note You shouldn’t simply iterate over self.known because the set may be modified during the iteration.
Using a copy is safer.
The _start method creates a SimpleXMLRPCServer (using the little utility function getPort,
which extracts the port number from a URL), with logRequests set to false (you don’t want to
keep a log). It then registers self with register_instance and calls the server’s serve_forever
method.
Finally, the main method of the module extracts a URL, a directory, and a secret (password)
from the command line; creates a Node; and calls its _start method.
For the full code of the prototype, see Listing 27-1.
Listing 27-1. A Simple Node Implementation (simple_node.py)
from xmlrpclib import ServerProxy
from os.path import join, isfile
from SimpleXMLRPCServer import SimpleXMLRPCServer
from urlparse import urlparse
import sys
MAX_HISTORY_LENGTH = 6
OK = 1
FAIL = 2
EMPTY = ''
def getPort(url):
'Extracts the port from a URL'
name = urlparse(url)[1]
parts = name.split(':')
return int(parts[-1])
class Node:
"""
A node in a peer-to-peer network.
"""
def __init__(self, url, dirname, secret):
self.url = url
self.dirname = dirname
self.secret = secret
self.known = set()
524
CHAPTER 27
■ PROJECT 8: FILE SHARING WITH XML-RPC
def query(self, query, history=[]):
"""
Performs a query for a file, possibly asking other known Nodes for
help. Returns the file as a string.
"""
code, data = self._handle(query)
if code == OK:
return code, data
else:
history = history + [self.url]
if len(history) >= MAX_HISTORY_LENGTH:
return FAIL, EMPTY
return self._broadcast(query, history)
def hello(self, other):
"""
Used to introduce the Node to other Nodes.
"""
self.known.add(other)
return OK
def fetch(self, query, secret):
"""
Used to make the Node find a file and download it.
"""
if secret != self.secret: return FAIL
code, data = self.query(query)
if code == OK:
f = open(join(self.dirname, query), 'w')
f.write(data)
f.close()
return OK
else:
return FAIL
def _start(self):
"""
Used internally to start the XML-RPC server.
"""
s = SimpleXMLRPCServer(("", getPort(self.url)), logRequests=False)
s.register_instance(self)
s.serve_forever()
CHAPTER 27 ■ PROJECT 8: FILE SHARING WITH XML-RPC
525
def _handle(self, query):
"""
Used internally to handle queries.
"""
dir = self.dirname
name = join(dir, query)
if not isfile(name): return FAIL, EMPTY
return OK, open(name).read()
def _broadcast(self, query, history):
"""
Used internally to broadcast a query to all known Nodes.
"""
for other in self.known.copy():
if other in history: continue
try:
s = ServerProxy(other)
code, data = s.query(query, history)
if code == OK:
return code, data
except:
self.known.remove(other)
return FAIL, EMPTY
def main():
url, directory, secret = sys.argv[1:]
n = Node(url, directory, secret)
n._start()
if __name__ == '__main__': main()
Now let’s take a look at a simple example of how this program may be used.
Trying Out the First Implementation
Make sure you have several terminals (xterm, DOS window, or equivalent) open. Let’s say you
want to run two peers (both on the same machine). Create a directory for each of them, such as
files1 and files2. Put a file (for example, test.txt) into the files2 directory. Then, in one ter-
minal, run the following command:
python simple_node.py http://localhost:4242 files1 secret1
In a real application, you would use the full machine name instead of localhost, and you
would probably use a secret that is a bit more cryptic than secret1.
This is your first peer. Now create another one. In a different terminal, run the following
command:
python simple_node.py http://localhost:4243 files2 secret2
526
CHAPTER 27
■ PROJECT 8: FILE SHARING WITH XML-RPC
As you can see, this peer serves files from a different directory, uses another port number
(4243), and has another secret. If you have followed these instructions, you should have two
peers running (each in a separate terminal window). Let’s start up an interactive Python inter-
preter and try to connect to one of them:
>>> from xmlrpclib import *
>>> mypeer = ServerProxy('http://localhost:4242') # The first peer
>>> code, data = mypeer.query('test.txt')
>>> code
2
As you can see, the first peer fails when asked for the file test.txt. (The return code 2
represents failure, remember?) Let’s try the same thing with the second peer:
>>> otherpeer = ServerProxy('http://localhost:4243') # The second peer
>>> code, data = otherpeer.query('test.txt')
>>> code
1
This time, the query succeeds because the file test.txt is found in the second peer’s file
directory. If your test file doesn’t contain too much text, you can display the contents of the
data variable to make sure that the contents of the file have been transferred properly:
>>> data
'This is a test\n'
So far, so good. How about introducing the first peer to the second one?
>>> mypeer.hello('http://localhost:4243') # Introducing mypeer to otherpeer
Now the first peer knows the URL of the second, and thus may ask it for help. Let’s try
querying the first peer again. This time, the query should succeed:
>>> mypeer.query('test.txt')
[1, 'This is a test\n']
Bingo!
Now there is only one thing left to test: can you make the first node actually download and
store the file from the second one?
>>> mypeer.fetch('test.txt', 'secret1')
1
Well, the return value (1) indicates success. And if you look in the files1 directory, you
should see that the file test.txt has miraculously appeared. Cool, eh? Feel free to start several
peers (on different machines, if you want to), and introduce them to each other. When you
grow tired of playing, proceed to the next implementation.
CHAPTER 27 ■ PROJECT 8: FILE SHARING WITH XML-RPC
527
Second Implementation
The first implementation has plenty of flaws and shortcomings. I won’t address all of them
(some possible improvements are discussed in the section “Further Exploration,” at the end of
this chapter), but here are some of the more important ones:
• If you try to stop a Node and then restart it, you will probably get some error message
about the port being in use already.
• You should have a more user-friendly interface than xmlrpclib in an interactive Python
interpreter.
• The return codes are inconvenient. A more natural and Pythonic solution would be to
use a custom exception if the file can’t be found.
• The Node doesn’t check whether the file it returns is actually inside the file directory. By
using paths such as ' /somesecretfile.txt', a sneaky cracker may get unlawful access
to any of your other files.
The first problem is easy to solve. You simply set the allow_reuse_address attribute of the
SimpleXMLRPCServer to true:
SimpleXMLRPCServer.allow_reuse_address = 1
If you don’t want to modify this class directly, you can create your own subclass. The other
changes are a bit more involved, and are discussed in the following sections. The source code
is shown in Listings 27-2 and 27-3 later in this chapter. (You might want to take a quick look at
these listings before reading on.)
Creating the Client Interface
The client interface uses the Cmd class from the cmd module. For details about how this works,
see the Python Library Reference. Simply put, you subclass Cmd to create a command-line inter-
face, and implement a method called do_foo for each command foo you want it to be able to
handle. This method will receive the rest of the command line as its only argument (as a string).
For example, if you type this in the command-line interface:
say hello
the method do_say is called with the string 'hello' as its only argument. The prompt of the
Cmd subclass is determined by the prompt attribute.
The only commands implemented in your interface will be fetch (to download a file) and
exit (to exit the program). The fetch command simply calls the fetch method of the server,
printing an error message if the file could not be found. The exit commands prints an empty
line (for aesthetic reasons only) and calls sys.exit. (The EOF command corresponds to “end of
file,” which occurs when the user presses Ctrl+D in UNIX.)
528
CHAPTER 27
■ PROJECT 8: FILE SHARING WITH XML-RPC
But what is all the stuff going on in the constructor? Well, you want each client to be asso-
ciated with a peer of its own. You could simply create a Node object and call its _start method,
but then your Client couldn’t do anything until the _start method returned, which makes the
Client completely useless. To fix this, the Node is started in a separate thread. Normally, using
threads involves a lot of safeguarding and synchronization with locks and the like. However,
because a Client interacts with its Node only through XML-RPC, you don’t need any of this. To
run the _start method in a separate thread, you just need to put the following code into your
program at some suitable place:
from threading import Thread
n = Node(url, dirname, self.secret)
t = Thread(target=n._start)
t.start()
■Caution You should be careful when rewriting the code of this project. The minute your Client
starts interacting directly with the
Node object or vice versa, you may easily run into trouble, because of
the threading. Make sure you fully understand threading before you do this.
To make sure that the server is fully started before you start connecting to it with XML-
RPC, you’ll give it a head start, and wait for a moment with time.sleep.
Afterward, you’ll go through all the lines in a file of URLs and introduce your server to them
with the hello method.
You don’t really want to be bothered with coming up with a clever secret password.
Instead, you can use the utility function randomString (in Listing 27-3, shown later in this chap-
ter), which generates a random secret string that is shared between the Client and the Node.
Raising Exceptions
Instead of returning a code indicating success or failure, you’ll just assume success and raise an
exception in the case of failure. In XML-RPC, exceptions (or faults) are identified by numbers.
For this project, I have (arbitrarily) chosen the numbers 100 and 200 for ordinary failure (an
unhandled request) and a request refusal (access denied), respectively.
UNHANDLED = 100
ACCESS_DENIED = 200
class UnhandledQuery(Fault):
"""
An exception that represents an unhandled query.
"""
def __init__(self, message="Couldn't handle the query"):
Fault.__init__(self, UNHANDLED, message)
CHAPTER 27 ■ PROJECT 8: FILE SHARING WITH XML-RPC
529
class AccessDenied(Fault):
"""
An exception that is raised if a user tries to access a
resource for which he or she is not authorized.
"""
def __init__(self, message="Access denied"):
Fault.__init__(self, ACCESS_DENIED, message)
The exceptions are subclasses of xmlrpclib.Fault. When they are raised in the server, they are
passed on to the client with the same faultCode. If an ordinary exception (such as IOException)
is raised in the server, an instance of the Fault class is still created, so you can’t simply use
arbitrary exceptions here. (Make sure you have a recent version of SimpleXMLRPCServer, so it
handles exceptions properly.)
As you can see from the source code, the logic is still basically the same, but instead of
using if statements for checking returned codes, the program now uses exceptions. (Because
you can use only Fault objects, you need to check the faultCodes. If you weren’t using XML-
RPC, you would have used different exception classes instead, of course.)
Validating File Names
The last issue to deal with is to check whether a given file name is found within a given direc-
tory. There are several ways to do this, but to keep things platform-independent (so it works in
Windows, in UNIX, and in Mac OS, for example), you should use the module os.path.
The simple approach taken here is to create an absolute path from the directory name and
the file name (so that, for example, '/foo/bar/ /baz' is converted to '/foo/baz'), the direc-
tory name is joined with an empty file name (using os.path.join) to ensure that it ends with a
file separator (such as '/'), and then you check that the absolute file name begins with the
absolute directory name. If it does, the file is actually inside the directory.
The full source code for the second implementation is shown Listings 27-2 and 27-3.
Listing 27-2. A New Node Implementation (server.py)
from xmlrpclib import ServerProxy, Fault
from os.path import join, abspath, isfile
from SimpleXMLRPCServer import SimpleXMLRPCServer
from urlparse import urlparse
import sys
SimpleXMLRPCServer.allow_reuse_address = 1
MAX_HISTORY_LENGTH = 6
UNHANDLED = 100
ACCESS_DENIED = 200
530
CHAPTER 27
■ PROJECT 8: FILE SHARING WITH XML-RPC
class UnhandledQuery(Fault):
"""
An exception that represents an unhandled query.
"""
def __init__(self, message="Couldn't handle the query"):
Fault.__init__(self, UNHANDLED, message)
class AccessDenied(Fault):
"""
An exception that is raised if a user tries to access a
resource for which he or she is not authorized.
"""
def __init__(self, message="Access denied"):
Fault.__init__(self, ACCESS_DENIED, message)
def inside(dir, name):
"""
Checks whether a given file name lies within a given directory.
"""
dir = abspath(dir)
name = abspath(name)
return name.startswith(join(dir, ''))
def getPort(url):
"""
Extracts the port number from a URL.
"""
name = urlparse(url)[1]
parts = name.split(':')
return int(parts[-1])
class Node:
"""
A node in a peer-to-peer network.
"""
def __init__(self, url, dirname, secret):
self.url = url
self.dirname = dirname
self.secret = secret
self.known = set()
def query(self, query, history=[]):
"""
Performs a query for a file, possibly asking other known Nodes for
help. Returns the file as a string.
CHAPTER 27 ■ PROJECT 8: FILE SHARING WITH XML-RPC
531
"""
try:
return self._handle(query)
except UnhandledQuery:
history = history + [self.url]
if len(history) >= MAX_HISTORY_LENGTH: raise
return self._broadcast(query, history)
def hello(self, other):
"""
Used to introduce the Node to other Nodes.
"""
self.known.add(other)
return 0
def fetch(self, query, secret):
"""
Used to make the Node find a file and download it.
"""
if secret != self.secret: raise AccessDenied
result = self.query(query)
f = open(join(self.dirname, query), 'w')
f.write(result)
f.close()
return 0
def _start(self):
"""
Used internally to start the XML-RPC server.
"""
s = SimpleXMLRPCServer(("", getPort(self.url)), logRequests=False)
s.register_instance(self)
s.serve_forever()
def _handle(self, query):
"""
Used internally to handle queries.
"""
dir = self.dirname
name = join(dir, query)
if not isfile(name): raise UnhandledQuery
if not inside(dir, name): raise AccessDenied
return open(name).read()
532
CHAPTER 27
■ PROJECT 8: FILE SHARING WITH XML-RPC
def _broadcast(self, query, history):
"""
Used internally to broadcast a query to all known Nodes.
"""
for other in self.known.copy():
if other in history: continue
try:
s = ServerProxy(other)
return s.query(query, history)
except Fault, f:
if f.faultCode == UNHANDLED: pass
else: self.known.remove(other)
except:
self.known.remove(other)
raise UnhandledQuery
def main():
url, directory, secret = sys.argv[1:]
n = Node(url, directory, secret)
n._start()
if __name__ == '__main__': main()
Listing 27-3. A Node Controller Interface (client.py)
from xmlrpclib import ServerProxy, Fault
from cmd import Cmd
from random import choice
from string import lowercase
from server import Node, UNHANDLED
from threading import Thread
from time import sleep
import sys
HEAD_START = 0.1 # Seconds
SECRET_LENGTH = 100
def randomString(length):
"""
Returns a random string of letters with the given length.
"""
chars = []
letters = lowercase[:26]
CHAPTER 27 ■ PROJECT 8: FILE SHARING WITH XML-RPC
533
while length > 0:
length -= 1
chars.append(choice(letters))
return ''.join(chars)
class Client(Cmd):
"""
A simple text-based interface to the Node class.
"""
prompt = '> '
def __init__(self, url, dirname, urlfile):
"""
Sets the url, dirname, and urlfile, and starts the Node
Server in a separate thread.
"""
Cmd.__init__(self)
self.secret = randomString(SECRET_LENGTH)
n = Node(url, dirname, self.secret)
t = Thread(target=n._start)
t.setDaemon(1)
t.start()
# Give the server a head start:
sleep(HEAD_START)
self.server = ServerProxy(url)
for line in open(urlfile):
line = line.strip()
self.server.hello(line)
def do_fetch(self, arg):
"Call the fetch method of the Server."
try:
self.server.fetch(arg, self.secret)
except Fault, f:
if f.faultCode != UNHANDLED: raise
print "Couldn't find the file", arg
def do_exit(self, arg):
"Exit the program."
sys.exit()
do_EOF = do_exit # End-Of-File is synonymous with 'exit'
534
CHAPTER 27
■ PROJECT 8: FILE SHARING WITH XML-RPC
def main():
urlfile, directory, url = sys.argv[1:]
client = Client(url, directory, urlfile)
client.cmdloop()
if __name__ == '__main__': main()
Trying Out the Second Implementation
Let’s see how the program is used. Start it like this:
python client.py urls.txt directory :4242
The file urls.txt should contain one URL per line—the URLs of all the other peers you
know. The directory given as the second argument should contain the files you want to share
(and will be the location where new files are downloaded). The last argument is the URL to the
peer. When you run this command, you should get a prompt like this:
>
Try fetching a nonexistent file:
> fetch fooo
Couldn't find the file fooo
By starting several nodes (either on the same machine using different ports or on different
machines) that know about each other (just put all the URLs in the URL files), you can try these
out as you did with the first prototype. When you get bored with this, move on to the next
section.
Further Exploration
You can probably think of several ways to improve and extend the system described in this
chapter. Here are some ideas:
• Add caching. If your node relays a file through a call to query, why not store the file at the
same time? That way, you can respond more quickly the next time someone asks for
the same file. You could perhaps set a maximum size for the cache, remove old files, and
so on.
• Use a threaded or asynchronous server (a bit difficult). That way, you can ask several
other nodes for help without waiting for their replies, and they can later give you the
reply by calling a reply method.
• Allow more advanced queries, such as querying on the contents of text files.
•Use the hello method more extensively. When you discover a new peer (through a call
to hello), why not introduce it to all the peers you know? Perhaps you can think of more
clever ways of discovering new peers?
CHAPTER 27 ■ PROJECT 8: FILE SHARING WITH XML-RPC
535
• Read up on the representational state transfer (REST) philosophy of distributed systems.
REST is an emerging alternative to web service technologies such as XML-RPC. (See, for
example, />•Use xmlrpclib.Binary to wrap the files, to make the transfer safer for nontext files.
• Read the SimpleXMLRPCServer code. Check out the DocXMLRPCServer class and the multi-
call extension in libxmlrpc.
What Now?
Now that you have a peer-to-peer file sharing system working, how about making it more user
friendly? In the next chapter, you learn how to add a GUI as an alternative to the current cmd-
based interface.
537
■ ■ ■
CHAPTER 28
Project 9: File Sharing II—Now
with GUI!
This is a relatively short project because much of the functionality you need has already been
written—in Chapter 27. In this chapter, you see how easy it can be to add a GUI to an existing
Python program.
What’s the Problem?
In this project, you expand the file sharing system developed in Chapter 27, with a GUI client.
This will make the program much easier to use, which means that more people might choose
to use it (and, of course, multiple users sharing files is the whole point of the program). A sec-
ondary goal of this project is to show that a program that has a sufficiently modular design can
be quite easy to extend (one of the arguments for using object-oriented programming).
The GUI client should satisfy the following requirements:
• It should allow you to enter a file name and submit it to the server’s fetch method.
• It should list the files currently available in the server’s file directory.
That’s it. Because you already have much of the system working, the GUI part is a relatively
simple extension.
Useful Tools
In addition to the tools used in Chapter 27, you will need the wxPython toolkit. For more infor-
mation about (and installation instructions for) wxPython, see Chapter 12. The code in this
chapter was developed using wxPython version 2.6, but will work with the latest version.
If you want to use another GUI toolkit, feel free to do so. The example in this chapter will
give you the general idea of how you can build your own implementation, with your favorite
tools. (Chapter 12 describes several GUI toolkits.)
538
CHAPTER 28
■ PROJECT 9: FILE SHARING II—NOW WITH GUI!
Preparations
Before you begin this project, you should have Project 8 (from Chapter 27) in place, and a
usable GUI toolkit installed, as mentioned in the previous section. Beyond that, no significant
preparations are necessary for this project.
First Implementation
If you want to take a peek at the full source code for the first implementation, it can be found in
Listing 28-1 later in this section. Much of the functionality is quite similar to that of the project
in the preceding chapter. The client presents an interface (the fetch method) through which the
user may access the functionality of the server. Let’s review the GUI-specific parts of the code.
The client in Chapter 27 was a subclass of cmd.Cmd; the Client described in this chapter
subclasses wx.App. While you’re not required to subclass wx.App (you could create a completely
separate Client class), it can be a natural way of organizing your code. The GUI-related setup
is placed in a separate method, called OnInit, which is called automatically after the App object
has been created. It performs the following steps:
1. It creates a window with the title “File Sharing Client.”
2. It creates a text field and assigns that text field to the attribute self.input (and, for con-
venience, to the local variable input). It also creates a button with the text “Fetch.” It
sets the size of the button and binds an event handler to it. Both the text field and the
button have the panel bkg as their parent.
3. It adds the text field and button to the window, laying them out using box sizers. (Feel
free to use another layout mechanism.)
4. It shows the window, and returns True, to indicate that OnInit was successful.
The event handler is quite similar to the handler do_fetch from Chapter 27. It retrieves the
query from self.input (the text field). It then calls self.server.fetch inside a try/except
statement. Note that the event handler receives an event object as its only argument.
The source code for the first implementation is shown in Listing 28-1.
Listing 28-1. A Simple GUI Client (simple_guiclient.py)
from xmlrpclib import ServerProxy, Fault
from server import Node, UNHANDLED
from client import randomString
from threading import Thread
from time import sleep
from os import listdir
import sys
import wx
CHAPTER 28 ■ PROJECT 9: FILE SHARING II—NOW WITH GUI!
539
HEAD_START = 0.1 # Seconds
SECRET_LENGTH = 100
class Client(wx.App):
"""
The main client class, which takes care of setting up the GUI and
starts a Node for serving files.
"""
def __init__(self, url, dirname, urlfile):
"""
Creates a random secret, instantiates a Node with that secret,
starts a Thread with the Node's _start method (making sure the
Thread is a daemon so it will quit when the application quits),
reads all the URLs from the URL file and introduces the Node to
them.
"""
super(Client, self).__init__()
self.secret = randomString(SECRET_LENGTH)
n = Node(url, dirname, self.secret)
t = Thread(target=n._start)
t.setDaemon(1)
t.start()
# Give the server a head start:
sleep(HEAD_START)
self.server = ServerProxy(url)
for line in open(urlfile):
line = line.strip()
self.server.hello(line)
def OnInit(self):
"""
Sets up the GUI. Creates a window, a text field, and a button, and
lays them out. Binds the submit button to self.fetchHandler.
"""
win = wx.Frame(None, title="File Sharing Client", size=(400, 45))
bkg = wx.Panel(win)
self.input = input = wx.TextCtrl(bkg);
submit = wx.Button(bkg, label="Fetch", size=(80, 25))
submit.Bind(wx.EVT_BUTTON, self.fetchHandler)
hbox = wx.BoxSizer()
540
CHAPTER 28
■ PROJECT 9: FILE SHARING II—NOW WITH GUI!
hbox.Add(input, proportion=1, flag=wx.ALL | wx.EXPAND, border=10)
hbox.Add(submit, flag=wx.TOP | wx.BOTTOM | wx.RIGHT, border=10)
vbox = wx.BoxSizer(wx.VERTICAL)
vbox.Add(hbox, proportion=0, flag=wx.EXPAND)
bkg.SetSizer(vbox)
win.Show()
return True
def fetchHandler(self, event):
"""
Called when the user clicks the 'Fetch' button. Reads the
query from the text field, and calls the fetch method of the
server Node. If the query is not handled, an error message is
printed.
"""
query = self.input.GetValue()
try:
self.server.fetch(query, self.secret)
except Fault, f:
if f.faultCode != UNHANDLED: raise
print "Couldn't find the file", query
def main():
urlfile, directory, url = sys.argv[1:]
client = Client(url, directory, urlfile)
client.MainLoop()
if __name__ == "__main__": main()
Except for the relatively simple code explained previously, the GUI client works just like the
text-based client in Chapter 27. You can run it in the same manner, too. To run this program, you
need a URL file, a directory of files to share, and a URL for your Node. Here is a sample run:
$ python simple_guiclient.py urlfile.txt files/ http://localhost:8080
Note that the file urlfile.txt must contain the URLs of some other Nodes for the program
to be of any use. You can either start several programs on the same machine (with different
port numbers) for testing purposes, or run them on different machines. Figure 28-1 shows the
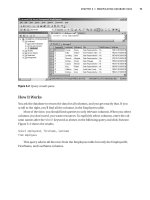
GUI of the client.
CHAPTER 28 ■ PROJECT 9: FILE SHARING II—NOW WITH GUI!
541
Figure 28-1. The simple GUI client
This implementation works, but it performs only part of its job. It should also list the files
available in the server’s file directory. To do that, the server (Node) itself must be extended.
Second Implementation
The first prototype was very simple. It did its job as a file sharing system, but wasn’t very user
friendly. It would help a lot if users could see which files they had available (either located in
the file directory when the program starts or subsequently downloaded from another Node).
The second implementation will address this file listing issue. The full source code can be
found in Listing 28-2.
To get a listing from a Node, you must add a method. You could protect it with a password
as you have done with fetch, but making it publicly available may be useful, and it doesn’t
represent any real security risk. Extending an object is really easy: you can do it through sub-
classing. You simply construct a subclass of Node called ListableNode, with a single additional
method, list, which uses the method os.listdir, which returns a list of all the files in a
directory:
class ListableNode(Node):
def list(self):
return listdir(self.dirname)
To access this server method, the method updateList is added to the client:
def updateList(self):
self.files.Set(self.server.list())
The attribute self.files refers to a list box, which has been added in the OnInit method.
The updateList method is called in OnInit at the point where the list box is created, and again
each time fetchHandler is called (because calling fetchHandler may potentially alter the list
of files).
Listing 28-2. The Finished GUI Client (guiclient.py)
from xmlrpclib import ServerProxy, Fault
from server import Node, UNHANDLED
from client import randomString
from threading import Thread
542
CHAPTER 28
■ PROJECT 9: FILE SHARING II—NOW WITH GUI!
from time import sleep
from os import listdir
import sys
import wx
HEAD_START = 0.1 # Seconds
SECRET_LENGTH = 100
class ListableNode(Node):
"""
An extended version of Node, which can list the files
in its file directory.
"""
def list(self):
return listdir(self.dirname)
class Client(wx.App):
"""
The main client class, which takes care of setting up the GUI and
starts a Node for serving files.
"""
def __init__(self, url, dirname, urlfile):
"""
Creates a random secret, instantiates a ListableNode with that secret,
starts a Thread with the ListableNode's _start method (making sure the
Thread is a daemon so it will quit when the application quits),
reads all the URLs from the URL file and introduces the Node to
them. Finally, sets up the GUI.
"""
self.secret = randomString(SECRET_LENGTH)
n = ListableNode(url, dirname, self.secret)
t = Thread(target=n._start)
t.setDaemon(1)
t.start()
# Give the server a head start:
sleep(HEAD_START)
self.server = ServerProxy(url)
for line in open(urlfile):
line = line.strip()
self.server.hello(line)
# Get the GUI going:
super(Client, self).__init__()
CHAPTER 28 ■ PROJECT 9: FILE SHARING II—NOW WITH GUI!
543
def updateList(self):
"""
Updates the list box with the names of the files available
from the server Node.
"""
self.files.Set(self.server.list())
def OnInit(self):
"""
Sets up the GUI. Creates a window, a text field, a button, and
a list box, and lays them out. Binds the submit button to
self.fetchHandler.
"""
win = wx.Frame(None, title="File Sharing Client", size=(400, 300))
bkg = wx.Panel(win)
self.input = input = wx.TextCtrl(bkg);
submit = wx.Button(bkg, label="Fetch", size=(80, 25))
submit.Bind(wx.EVT_BUTTON, self.fetchHandler)
hbox = wx.BoxSizer()
hbox.Add(input, proportion=1, flag=wx.ALL | wx.EXPAND, border=10)
hbox.Add(submit, flag=wx.TOP | wx.BOTTOM | wx.RIGHT, border=10)
self.files = files = wx.ListBox(bkg)
self.updateList()
vbox = wx.BoxSizer(wx.VERTICAL)
vbox.Add(hbox, proportion=0, flag=wx.EXPAND)
vbox.Add(files, proportion=1,
flag=wx.EXPAND | wx.LEFT | wx.RIGHT | wx.BOTTOM, border=10)
bkg.SetSizer(vbox)
win.Show()
return True
544
CHAPTER 28
■ PROJECT 9: FILE SHARING II—NOW WITH GUI!
def fetchHandler(self, event):
"""
Called when the user clicks the 'Fetch' button. Reads the
query from the text field, and calls the fetch method of the
server Node. After handling the query, updateList is called.
If the query is not handled, an error message is printed.
"""
query = self.input.GetValue()
try:
self.server.fetch(query, self.secret)
self.updateList()
except Fault, f:
if f.faultCode != UNHANDLED: raise
print "Couldn't find the file", query
def main():
urlfile, directory, url = sys.argv[1:]
client = Client(url, directory, urlfile)
client.MainLoop()
if __name__ == '__main__': main()
And that’s it. You now have a GUI-enabled peer-to-peer file sharing program, which can
be run with this command:
$ python guiclient.py urlfile.txt files/ http://localhost:8080
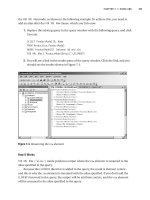
Figure 28-2 shows the finished GUI client.
Figure 28-2. The finished GUI client
CHAPTER 28 ■ PROJECT 9: FILE SHARING II—NOW WITH GUI!
545
Of course, there are plenty of ways to expand the program. For some ideas, see the next
section. Beyond that, just let your imagination go wild.
Further Exploration
Some ideas for extending the file sharing system are given in Chapter 27. Here are some more:
• Add a status bar that displays such messages as “Downloading” or “Couldn’t find file
foo.txt.”
• Figure out ways for Nodes to share their “friends.” For example, when one Node is
introduced to another, each of them could introduce the other to the Nodes it already
knows. Also, before a Node shuts down, it might tell all its current neighbors about all
the Nodes it knows.
• Add a list of known Nodes (URLs) to the GUI. Make it possible to add new URLs and save
them in a URL file.
What Now?
You’ve written a full-fledged GUI-enabled peer-to-peer file sharing system. Although that
sounds pretty challenging, it wasn’t all that hard, was it? Now it’s time to face the last and
greatest challenge: writing your own arcade game.
547
■ ■ ■
CHAPTER 29
Project 10: Do-It-Yourself
Arcade Game
Welcome to the final project. Now that you’ve sampled several of Python’s many capabili-
ties, it’s time to go out with a bang. In this chapter, you learn how to use Pygame, an extension
that enables you to write full-fledged, full-screen arcade games in Python. Although easy to
use, Pygame is quite powerful and consists of several components that are thoroughly docu-
mented in the Pygame documentation (available on the Pygame web site, ).
This project introduces you to some of the main Pygame concepts, but because this chapter
is only meant as a starting point, I’ve skipped several interesting features, such as sound
and video handling. I recommend that you investigate the other features yourself, once you’ve
familiarized yourself with the basics. You might also want to take a look at Beginning Game
Development with Python and Pygame by Will McGugan (Apress, 2007).
What’s the Problem?
So, how do you write a computer game? The basic design process is similar to the one you use
when writing any other program, but before you can develop an object model, you need to
design the game itself. What are its characters, its setting, and its objectives?
I’ll keep things reasonably simple here, so as not to clutter the presentation of the basic
Pygame concepts. Feel free to create a much more elaborate game if you like.
The game you’ll create will be based on the well-known Monty Python sketch “Self-
Defense Against Fresh Fruit.” In this sketch, a Sergeant Major (John Cleese) is instructing his
soldiers in self-defense techniques against attackers, wielding fresh fruit such as pomegran-
ates, mangoes in syrup, greengages, and bananas. The defense techniques include using a gun,
unleashing a tiger, and dropping a 16-ton weight on top of the attacker. In this game, you’ll
turn things around—the player controls a banana that desperately tries to survive a course in
self-defense, avoiding a barrage of 16-ton weights dropping from above. I guess a fitting name
for the game might be Squish.
■Note If you would like to try your hand at a game of your own as you follow this chapter, feel free to do
so. If you just want to change the look and feel of the game, simply replace the graphics (a couple of GIF or
PNG images) and some of the descriptive text.
548
CHAPTER 29
■ PROJECT 10: DO-IT-YOURSELF ARCADE GAME
The specific goals of this project revolve around the game design. The game should behave
as it was designed (the banana should be movable, and the 16-ton weight should drop from
above). In addition, the code should be modular and easily extensible (as always). A useful
requirement might be that game states (such as the game introduction, the various game
levels, and the “game over” state) should be part of the design, and that new states should be
easy to add.
Useful Tools
The only new tool you need in this project is Pygame, which you can download from the
Pygame web site (). To get Pygame to work in UNIX, you may need to install
some extra software, but it’s all documented in the Pygame installation instructions (also avail-
able from the Pygame web site). The Windows binary installer is very easy to use—simply
execute the installer and follow the instructions.
■Note The Pygame distribution does not include NumPy (), which may be use-
ful for manipulating sounds and images. Although it’s not needed for this project, you might want to check it
out. The Pygame documentation thoroughly describes how to use NumPy with Pygame.
The Pygame distribution consists of several modules, most of which you won’t need in this
project. The following sections describe the modules you do need. (Only the specific functions
or classes you’ll need are discussed here.) In addition to the functions described in the follow-
ing sections, the various objects used (such as surfaces, groups, and sprites) have several useful
methods, which I’ll discuss as they are used in the implementation sections.
■Tip You can find a nice introduction to Pygame in the “Line-by-Line Chimp” tutorial on the Pygame web
site (
It addresses a few issues not dis-
cussed here, such as playing sound clips.
pygame
The pygame module automatically imports all the other Pygame modules, so if you place import
pygame at the top of your program, you can automatically access the other modules, such
as pygame.display and pygame.font.
The pygame module contains (among other things) the Surface function, which returns a
new surface object. Surface objects are simply blank images of a given size that you can use for