Beginning Visual Basic 2005 Databases phần 9 docx
Bạn đang xem bản rút gọn của tài liệu. Xem và tải ngay bản đầy đủ của tài liệu tại đây (929 KB, 75 trang )
objTimeSheetDS.Tables(“TimeSheets”).Rows.Count - 1
blnEvenRow = Not blnEvenRow
If blnEvenRow Then
Response.Write(“<tr class=””EvenRow””>”)
Else
Response.Write(“<tr class=””OddRow””>”)
End If
If strReport = “TimesheetsDue” Then
Response.Write(“<td class=””ReportText””><a href=””mailto:” & _
objTimeSheetDS.Tables(“TimeSheets”).Rows(intIndex).Item( _
“Email”) & “?subject=Timesheet Due&body=Your timesheet “ & _
“for week ending date “ & dteWeekEndingDate.ToString & _
“ is due. Please submit your timesheet for approval.””>” & _
objTimeSheetDS.Tables(“TimeSheets”).Rows(intIndex).Item( _
“UserName”) & “</a></td>”)
Else
Response.Write(“<td class=””ReportText””>” & _
objTimeSheetDS.Tables(“TimeSheets”).Rows(intIndex).Item( _
“UserName”) & “</td>”)
End If
Response.Write(“<td class=””ReportText”” align=””right””>” & _
objTimeSheetDS.Tables( _
“TimeSheets”).Rows(intIndex).Item(“TotalHours”) & “</td>”)
Response.Write(“<td> </td>”)
Response.Write(“</tr>”)
Next
Response.Write(“</table>”)
End Sub
11. The last procedure that you need to add is the ProcessLongReport procedure. This procedure
will be called to process the report data for the Timesheets Month-to-Date, Timesheets Quarter-
to-Date, and Timesheets Year-to-Date reports. Add the following code to create this procedure:
Private Sub ProcessLongReport()
Response.Write(“<table cellspacing=””0”” cellpadding=””3””” & _
“border=””0””>”)
Response.Write(“<tr class=””ReportHeader””>”)
Response.Write(“<td nowrap width=””200px””>Employee</td>”)
Response.Write(“<td nowrap>Total Hours</td>”)
Response.Write(“<td width=””5px””> </td>”)
Response.Write(“<td nowrap>Week Ending Date</td>”)
Response.Write(“<td width=””5px””> </td>”)
Response.Write(“<td nowrap>Approval Date</td>”)
Response.Write(“<td width=””100%””> </td>”)
Response.Write(“</tr>”)
For intIndex As Integer = 0 To _
objTimeSheetDS.Tables(“TimeSheets”).Rows.Count - 1
blnEvenRow = Not blnEvenRow
588
Chapter 16
19_58894x ch16.qxd 10/13/05 5:59 PM Page 588
If blnEvenRow Then
Response.Write(“<tr class=””EvenRow””>”)
Else
Response.Write(“<tr class=””OddRow””>”)
End If
Response.Write(“<td class=””ReportText””>” & objTimeSheetDS.Tables( _
“TimeSheets”).Rows(intIndex).Item(“UserName”) & “</td>”)
Response.Write(“<td class=””ReportText”” align=””right””>” & _
objTimeSheetDS.Tables(“TimeSheets”).Rows(intIndex).Item( _
“TotalHours”) & “</td>”)
Response.Write(“<td> </td>”)
Response.Write(“<td class=””ReportText”” align=””right””>” & _
objTimeSheetDS.Tables( _
“TimeSheets”).Rows(intIndex).Item(“WeekEndingDate”) & “</td>”)
Response.Write(“<td> </td>”)
Response.Write(“<td class=””ReportText”” align=””right””>”)
If IsDBNull(objTimeSheetDS.Tables( _
“TimeSheets”).Rows(intIndex).Item(“ApprovalDate”)) Then
Response.Write(“</td>”)
Else
Response.Write(Format(objTimeSheetDS.Tables( _
“TimeSheets”).Rows(intIndex).Item( _
“ApprovalDate”), “Short Date”) & “</td>”)
End If
Response.Write(“<td> </td>”)
Response.Write(“</tr>”)
Next
Response.Write(“</table>”)
End Sub
12. Now view the Form Designer for the TimeSheetReport Web page. To display the report, you
need to call the
Main procedure, so add the following code:
<asp:Content ID=”Content1” ContentPlaceHolderID=”ContentPlaceHolder1”
Runat=”Server”>
<%
Call Main()
%>
</asp:Content>
That’s all the code that you need to implement to generate and process report data from your Web
Service. Start your project by clicking the Start button on the toolbar or by clicking the Debug menu and
selecting the Start menu item. When the Login form is displayed, log in as a manager so that you are
redirected to the Reports Web page.
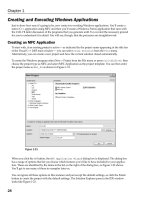
When the Reports Web page is displayed, click any report to see the report data in a new browser win-
dow. The Timesheets Due and Timesheets Submitted reports produce a report with only two columns:
the employee name and total hours. The Timesheets Due report will display the employee name as a
hyperlink, and clicking an employee opens a new e-mail message, as shown in Figure 16-5. You can
see that the To line, the Subject line, and the body of the message are already filled in with the appropri-
ate data.
589
Accessing a Web Service
19_58894x ch16.qxd 10/13/05 5:59 PM Page 589
Figure 16-5
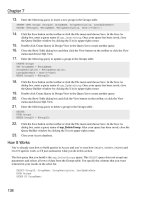
The Timesheets MTD, Timesheets QTD, and Timesheets YTD reports display four columns of data as
shown in the Timesheets YTD report shown in Figure 16-6. These reports not only display the employee
name and total hours, but also the week ending date for which a timesheet was submitted and the date
that the timesheet was approved.
Figure 16-6
How It Works
You start this exercise by modifying the Login Web page to redirect users logging to the Reports Web
page if they are managers. This is very similar to the code that you added to the
Main module in your
Time Tracker application to redirect users with the admin role to the Admin form.
Here you check the
RoleName column in the DataSet to determine whether it contains text that is like
the word
manager. If it does, you redirect the user to the Reports Web page, passing it the UserID of the
590
Chapter 16
19_58894x ch16.qxd 10/13/05 5:59 PM Page 590
manager logging in. If the RoleName column doesn’t contain text that is like the word manager, then
you execute the previous code that you had in this Web page whereby you redirected the user to the
TimeSheet Web page.
If objDataSet.Tables(“User”).Rows(0).Item( _
“RoleName”).ToString.ToLower Like “manager” Then
Response.Redirect(“Reports.aspx?UserID=” & _
objDataSet.Tables(“User”).Rows(0).Item(“UserID”).ToString)
Else
You create the Reports Web page next, and add a JavaScript function that accepts the report type to be
processed and opens a new browser window so the report can be processed and displayed. The
window
object represents an open window in a browser and the open method of the window object will cause a
new browser window to be opened and to navigate to the URL passed as an input parameter to this
method.
The
open method accepts four optional parameters: URL, window name, window features, and replace.
The
URL parameter specifies the document to be displayed in the new window. In the code that follows,
you are building the URL by specifying string constants, the input parameter to this function, and the
UserID from the query string passed to the Reports Web page. You concatenate the values using a plus
(
+) sign.
Because the date value that you are passing as a query string value in the URL contains forward slashes,
you must properly escape the date so that the forward slashes are not interpreted as part of the URL.
This is done using the
escape function, which encodes values so that they can be read on all computers.
Basically, the
escape function replaces special characters, such as a forward slash, using a %xx format.
The percent (
%) sign is a signifier that a two-digit hexadecimal value follows and that this constitutes a
complete value.
The
window name parameter of the open method has been specified as TimeSheetReport. This is a
name that can be used by the
TARGET attribute in a Web form. Whether or not this attribute is used, it is
a good idea to specify the window name when opening new browser windows. This enables you to call
this method again with a different report while the new window is open and the window will automati-
cally display the new report; a new window will not be opened as long as a window with that name is
already open.
When a new browser window is opened using the
open method of the window object, all the features
and the size of the browser are used when the window is opened. For example, if you have multiple
toolbars displayed in your current browser window, they will be displayed when this new window is
opened. You can control which features are displayed when the new window is opened by specifying
the
window features parameter. This is a comma-separated list of window features, as shown in the
following code. Here you are specifying that the new window be opened with a specified width and
height and that the scrollbars and toolbars be visible. Note that when the
window features parameter
is specified, any features not specified in this parameter are considered to be turned off, meaning that
they will not be displayed. This was evident in the window displayed in Figure 16-5.
The
replace parameter is not specified in the code, but if it were present it would be a Boolean value
indicating whether the URL parameter that was specified should replace the existing entry in the history
list or if a new entry should be created in the history list.
591
Accessing a Web Service
19_58894x ch16.qxd 10/13/05 5:59 PM Page 591
<script language=javascript>
function TimeSheetReport(ReportType)
{
window.open(“TimeSheetReport.aspx?Report=” + ReportType +
“&ManagerID=” + “<%=Request.QueryString(“UserID”)%>” +
“&WeekEndingDate=” +
escape(document.all.ctl00$ContentPlaceHolder1$cboWeekEndingDate.options[
document.all.ctl00$ContentPlaceHolder1$cboWeekEndingDate.options.selectedIndex]
.value),
“TimeSheetReport”,
“width=800,height=600,scrollbars=yes,resizable=yes,toolbar=yes”);
}
</script>
The next table that you create contains all of your controls for this Web page, as shown in Figure 16-4.
You basically create an empty table with text in only one column. The controls are added to the table
when you switch to Design view.
<table border=”0” cellpadding=”1” cellspacing=”2”>
<tr>
<td>Week Ending Date</td>
<td colspan=”4”></td>
</tr>
<tr>
<td></td>
<td></td>
<td></td>
<td></td>
<td></td>
</tr>
</table>
In this exercise, you add mostly HTML controls, rather than Web Form controls, which were added to
your Web forms in Chapter 14. Because there is no major implementation of code in the code-behind file,
there is no need to implement server-side controls in the Reports Web page except for the combo box,
which holds the week ending dates. Most of the processing done in this page is done via client-side
script, so HTML controls suited your purpose very well. You drag the appropriate HTML controls from
the toolbox, drop them into the appropriate cells in the table, and then set some basic properties for
these controls to change their appearance.
When you switch back to the Source view for your Web form, you modify the code for these HTML
controls to add code for the
onclick event for each of the buttons. The following code causes the
TimeSheetReport function to be executed when a user clicks this button on the Web form. Here you
are passing the
TimeSheetReport function an input parameter of TimesheetsDue. This value will be
used in the
TimeSheetReport function as part of the query string for the URL that is used to display
a timesheet report.
You repeat this same process for each of the
<INPUT> elements, passing the appropriate value to the
TimeSheetReport function. Therefore, the code for each of these elements is not listed again here.
<input class=”FlatButton” id=”Button1” type=”button” value=”Timesheets Due”
onclick=”JavaScript:TimeSheetReport(‘TimesheetsDue’);”/>
592
Chapter 16
19_58894x ch16.qxd 10/13/05 5:59 PM Page 592
The only code you add in the code-behind file is the code to get the week ending dates and load them in
the combo box on the Web form. Here you add the code to the
Load event for the page and use the Dates
class that you created in Chapter 14. You call the
GetPreviousWeekEndingDate procedure to get and
load the previous week ending date and the
GetCurrentWeekEndingDate procedure to get and load
the current week ending date. Then you set the current week ending date as the default date selected by
setting the
SelectedIndex property to 1.
Protected Sub Page_Load(ByVal sender As Object, ByVal e As System.EventArgs) _
Handles Me.Load
If Not IsPostBack Then
‘Load the week ending dates in the form
Dim objDates As New Dates
cboWeekEndingDate.Items.Add(objDates.GetPreviousWeekEndingDate)
cboWeekEndingDate.Items.Add(objDates.GetCurrentWeekEndingDate)
cboWeekEndingDate.SelectedIndex = 1
End If
End Sub
Before testing your code, you add the TimeSheetReport Web page. Then you are able to run your Web
application and log in as a manager, and you are redirected to the Reports Web page (refer to Figure 16-4).
When you click each of the buttons, the TimeSheetReport Web page opens in a new window.
The next step in this exercise is to add a Web reference to your Web Service. The exact same steps were
used in this exercise as the steps that were performed in the first exercise. You right-click the project in
Solution Explorer, choose Add Web Reference from the context menu, and then paste the URL for your
Web Service in the Add Web Reference dialog box. Then you enter a name for your Web Service that will
be used to reference the Web service in your project.
You then add some new user defined styles, which are used when building your timesheet reports, to
your style sheet. You have a style for the report title, styles for subtitles, a style for your report header,
and a style for your report text.
.ReportTitle
{
COLOR: black;
FONT-SIZE: 12pt;
FONT-WEIGHT: bold;
}
.SubTitleBold
{
COLOR: black;
FONT-SIZE: 9pt;
FONT-WEIGHT: bold;
}
.SubTitleNormal
{
COLOR: black;
FONT-SIZE: 9pt;
593
Accessing a Web Service
19_58894x ch16.qxd 10/13/05 5:59 PM Page 593
}
.ReportHeader
{
BACKGROUND-COLOR: #4682B4;
FONT-SIZE: 8pt;
COLOR: White;
FONT-WEIGHT: bold;
}
.ReportText
{
COLOR: black;
FONT-SIZE: 8pt;
}
In your code-behind file for the TimeSheetReport Web page, you first import the System.Data names-
pace (code not shown here) and then declare some variables that will be accessible to all functions in
this page. The
blnEvenRow variable will be used to toggle the style used between even and odd rows
in your TimeSheet report. The
strReport variable will contain the report to be generated and the
strManagerID variable will hold the GUID of the manager. The dteWeekEndingDate variable will be
used to contain the date for the report and the
objTimeSheetDS variable should be pretty obvious as
you’ve used this one before; it will contain the timesheet report data.
‘Private variables and objects
Private blnEvenRow As Boolean = True
Private strReport As String
Private strManagerID As String
Private dteWeekEndingDate As Date
Private objTimeSheetDS As New DataSet
When the TimeSheetReport Web page is processed, the first event that is executed is the Load event for
the page. This is where you want to capture and save the query string values passed to this page. In the
Page_Load procedure that follows, you save the type of report being processed in the strReport vari-
able, the week ending date requested in the
dteWeekEndingDate variable, and the manager ID in the
strManagerID variable:
Protected Sub Page_Load(ByVal sender As Object, ByVal e As System.EventArgs) _
Handles Me.Load
If Not IsPostBack Then
‘Save the QueryString values
strReport = Request.QueryString(“Report”)
dteWeekEndingDate = CType(Request.QueryString(“WeekEndingDate”), Date)
strManagerID = Request.QueryString(“ManagerID”)
End If
End Sub
The Main procedure is called from server-side code in the HTML code in your Web form. This procedure
determines which report to process based on the value contained in the
strReport variable. The first
594
Chapter 16
19_58894x ch16.qxd 10/13/05 5:59 PM Page 594
thing that you do in this procedure is initialize a new instance of the TimeSheetsWS Web Service
and then set the Credentials property of the Web Service using the default credentials of your Web
application.
Then, using a
Select Case statement, you determine which report was requested and then call the
appropriate Web method in your Web Service to have the report data generated and returned in a
DataSet. There are two basic report types: a short report containing two columns and a long report
containing four columns. The first two
Case statements process the short report, while the last three
Case statements process the long report.
Public Sub Main()
Using objReports As New TimeSheetsWS.Reports
objReports.Credentials = _
System.Net.CredentialCache.DefaultCredentials
Select Case strReport
Case “TimesheetsDue”
objTimeSheetDS = objReports.TimeSheetsDue( _
guidManagerID, dteWeekEndingDate)
Call WriteReportHeader()
Call ProcessShortReport()
Case “TimesheetsSubmitted”
objTimeSheetDS = objReports.TimeSheetsSubmitted( _
guidManagerID, dteWeekEndingDate)
Call WriteReportHeader()
Call ProcessShortReport()
Case “TimesheetsMTD”
objTimeSheetDS = objReports.TimeSheetsMTD( _
guidManagerID)
Call WriteReportHeader()
Call ProcessLongReport()
Case “TimesheetsQTD”
objTimeSheetDS = objReports.TimeSheetsQTD( _
guidManagerID)
Call WriteReportHeader()
Call ProcessLongReport()
Case “TimesheetsYTD”
objTimeSheetDS = objReports.TimeSheetsYTD( _
guidManagerID)
Call WriteReportHeader()
Call ProcessLongReport()
End Select
End Using
End Sub
The WriteReportHeader procedure is responsible for writing the report header in the Web page for
all reports. The first line of code here calls the
Write method of the Response object to begin writing a
<TABLE> element in the HTML of your Web page. You set some basic attributes for the <TABLE> ele-
ment, which controls how the table will look.
Private Sub WriteReportHeader()
Response.Write(“<table cellspacing=””0”” cellpadding=””3””” & _
“border=””0””>”)
595
Accessing a Web Service
19_58894x ch16.qxd 10/13/05 5:59 PM Page 595
The first row in the table contains the report title. There is only one table cell in this row and it spans
three cells, as indicated by the
colspan attribute. The text in this cell should be centered on the page, as
specified by the
align attribute. The data for the report title is retrieved from the Title column of the
objTimeSheetDS DataSet.
Response.Write(“<tr>”)
Response.Write(“<td colspan=””3”” align=””center””” & _
“class=””ReportTitle””>” & _
objTimeSheetDS.Tables(“ReportHeader”).Rows(0).Item(“Title”) & _
“</td>”)
Response.Write(“</tr>”)
The next row in the table contains three cells. The first cell contains the manager’s name for which this
report is produced, a filler cell, and the date for this report. You do not want the data in the first cell to
wrap to the next line, so you specify the
nowrap attribute. The text Manager: should be bold, so you
have specified the
<FONT> element and tell it to use the SubTitleBold class in your style sheet. The
manager’s name is retrieved from the
ManagerName column in the objTimeSheetDS DataSet.
The next cell here is just a filler cell. The report that is displayed on this page contains the manager’s
name in the left side of the report and is aligned to the left. The date for this report is contained in the
right side and is aligned to the right. To have the manager’s name aligned to the left and the date
aligned to the right, you need to specify a filler cell in between that takes up all the extra room in the
row. To accomplish this, you specify the
width attribute for this cell and set its value to 100%. You must
also specify the text
, which causes a blank space to be written in this cell, effectively creating
white space in this cell.
Response.Write(“<tr>”)
Response.Write(“<td nowrap><font class=””SubTitleBold””>” & _
“Manager:</font><font class=””SubTitleNormal””>” & _
objTimeSheetDS.Tables(“ReportHeader”).Rows(0).Item(“ManagerName”) & _
“</font></td>”)
Response.Write(“<td width=””100%””> </td>”)
The third cell in this row contains the report date, and a Select Case statement is used to determine
what text to write in the cell. For the short reports, the text
Week Ending Date: is written, followed by
the date specified in the
Date column of the objTimeSheetDS DataSet. For the long reports, the text
Report Date: is written, followed by the date in the Date column of the DataSet.
Notice that there are only two
Case statements here and that each Case statement contains multiple test
expressions, with each one separated by a comma. Because the same action is to be performed for the
short reports and the long reports, it only makes sense to combine the test expressions for the
Case state-
ment in one line. This prevents you from duplicating code for each test expression.
The
align attribute specified for this cell aligns the data to the right. The nowrap attribute has also been
specified and prevents the text in this cell from wrapping to the next line. Finally, the date displayed
from the
Date column of the DataSet is formatted using the Format function.
The
Format function accepts two parameters: the expression to be formatted and the format style to
use to format the expression. There are many defined styles, and the one being used here formats a date
using the short date format, as shown in Figure 16-6.
596
Chapter 16
19_58894x ch16.qxd 10/13/05 5:59 PM Page 596
Select Case strReport
Case “TimesheetsDue”, “TimesheetsSubmitted”
Response.Write(“<td align=””right”” nowrap>” & _
“<font class=””SubTitleBold””>Week Ending Date:</font>” & _
“<font class=””SubTitleNormal””> “ & _
Format(objTimeSheetDS.Tables(“ReportHeader”).Rows(0).Item( _
“Date”), “Short Date”) & “</font></td>”)
Case “TimesheetsMTD”, “TimesheetsQTD”, “TimesheetsYTD”
Response.Write(“<td align=””right”” nowrap>” & _
“<font class=””SubTitleBold””>Report Date:</font>” & _
“<font class=””SubTitleNormal””> “ & _
Format(objTimeSheetDS.Tables(“ReportHeader”).Rows(0).Item( _
“Date”), “Short Date”) & “</font></td>”)
End Select
Response.Write(“</tr>”)
The final row in the header table is just a filler row to take up space between the header of the report and
the actual report data.
Response.Write(“<tr>”)
Response.Write(“<td colspan=””3”” width=””100%””> </td>”)
Response.Write(“</tr>”)
Response.Write(“</table>”)
End Sub
The ProcessShortReport procedure processes the report data for the Timesheets Due and Time-
sheets Submitted reports. The first thing that you do in this procedure is start a new table for the actual
report data.
The first row in the table is the header row, which contains a steel-blue background with the header text
in white, as specified in the
ReportStyle style in your style sheet. The first column in this table has the
width attribute specified so that this column will always be the same width. The second column does
not need a width specified as it contains the total hours. However, the
nowrap attribute has been speci-
fied to prevent the data in this column from wrapping.
Finally, the third column in this table is used as a filler column to keep the data in the first two columns
aligned to the left of the report. This ensures that the data is displayed in a consistent manner when the
browser window is resized.
Private Sub ProcessShortReport()
Response.Write(“<table cellspacing=””0”” cellpadding=””3””” & _
“border=””0””>”)
Response.Write(“<tr class=””ReportHeader””>”)
Response.Write(“<td nowrap width=””200px””>Employee</td>”)
Response.Write(“<td nowrap>Total Hours</td>”)
Response.Write(“<td width=””100%””> </td>”)
Response.Write(“</tr>”)
After the header row of the report data has been written, it’s time to process the data in the DataSet and
write the report data. Using a
For Next loop, you process all rows of data in the DataSet. The first
597
Accessing a Web Service
19_58894x ch16.qxd 10/13/05 5:59 PM Page 597
thing that you do inside this loop is toggle the blnEvenRow variable so that each row of data is written
using an alternating style.
Next, you query the
blnEvenRow variable to determine whether it is True or False. When the variable
is set to
True, you write the <TR> element and specify the EvenRow style to set the background color of
the row to White Smoke. When the variable is
False, you simply write the <TR> element and specify the
OddRow style, which causes the background color of the row to be white.
For intIndex As Integer = 0 To _
objTimeSheetDS.Tables(“TimeSheets”).Rows.Count - 1
blnEvenRow = Not blnEvenRow
If blnEvenRow Then
Response.Write(“<tr class=””EvenRow””>”)
Else
Response.Write(“<tr class=””OddRow””>”)
End If
Now you determine whether the report being processed is the Timesheets Due report, in which case
you want to write the employee’s name in the report using a hyperlink. This enables you to click the
employee’s name in the report and have a mail message pop up with the details of the message filled in,
as shown in Figure 16-5.
The
<A> element provides a hyperlink in your Web page and the href attribute can be used to specify a
link to another Web page or a link to a mail message. Because you want a new mail message to be gener-
ated, you have specified a value of
mailto in the href attribute and have provided the details of the
mail message.
Notice that the value specified in the
href attribute looks similar to a normal URL in that it contains a
query string, with each query string name and value pair separated by an ampersand (
&) character. The
first parameter for the
mailto protocol is the recipient’s e-mail address, which is set using the Email
column from the DataSet. Then you specify a question mark (?) indicating the query string part of the
address, and specify the text of
subject as the first query string name. The value for subject is set to
the static text of
Timesheet Due. The body of the message is specified next and consists of static text and
the date from the
Date column of your DataSet. Finally, the text for the <A> element is written using the
UserName column from the DataSet.
If strReport = “TimesheetsDue” Then
Response.Write(“<td class=””ReportText””><a href=””mailto:” & _
objTimeSheetDS.Tables(“TimeSheets”).Rows(intIndex).Item( _
“Email”) & “?subject=Timesheet Due&body=Your timesheet “ & _
“for week ending date “ & dteWeekEndingDate.ToString & _
“ is due. Please submit your timesheet for approval.””>” & _
objTimeSheetDS.Tables(“TimeSheets”).Rows(intIndex).Item( _
“UserName”) & “</a></td>”)
If the report being generated is the Timesheet Submitted report, the code for the Else statement is pro-
cessed, and here you simply write the user’s name in the cell as plaintext using the
UserName column in
the
DataSet.
After the username has been written in the first cell, you want to write out the total number of hours on
the user’s timesheet, which is done in the next line of code. Notice that you specify the
align attribute
598
Chapter 16
19_58894x ch16.qxd 10/13/05 5:59 PM Page 598
for this cell so that all hours are aligned to the right of the cell. You typically want to right-align numbers
in a column, which is what is being done here. The hours are retrieved from the
TotalHours column in
your
DataSet and written to the cell.
The final cell in this row simply contains the text
which causes a blank space to be written in this
cell. The final line of code in this procedure closes the table by writing the closing element for the table.
Else
Response.Write(“<td class=””ReportText””>” & _
objTimeSheetDS.Tables(“TimeSheets”).Rows(intIndex).Item( _
“UserName”) & “</td>”)
End If
Response.Write(“<td class=””ReportText”” align=””right””>” & _
objTimeSheetDS.Tables( _
“TimeSheets”).Rows(intIndex).Item(“TotalHours”) & “</td>”)
Response.Write(“<td> </td>”)
Response.Write(“</tr>”)
Next
Response.Write(“</table>”)
End Sub
The ProcessLongReport report procedure is called to produce the Timesheets Month-to-Date,
Timesheets Quarter-to-Date, and Timesheets Year-to-Date reports. Remember that these reports have
four columns each that list the employee name, the total hours submitted, the timesheet week ending
date, and the date the timesheet was approved by a manager.
Like the
ProcessShortReport procedure, you start this procedure by creating a table for the report
header row that will contain the column headers for the report. Then you create the header row and
write the data to each cell in this row. A filler cell is specified between each cell in the header row to pro-
vide some extra space between each column in the report. This is just a normal cell that has the
width
attribute specified and the text in the cell. When the report is produced, this cell will take up
white space in the report and help to keep the data in the report columns from looking crowded.
Private Sub ProcessLongReport()
Response.Write(“<table cellspacing=””0”” cellpadding=””3””” & _
“border=””0””>”)
Response.Write(“<tr class=””ReportHeader””>”)
Response.Write(“<td nowrap width=””200px””>Employee</td>”)
Response.Write(“<td nowrap>Total Hours</td>”)
Response.Write(“<td width=””5px””> </td>”)
Response.Write(“<td nowrap>Week Ending Date</td>”)
Response.Write(“<td width=””5px””> </td>”)
Response.Write(“<td nowrap>Approval Date</td>”)
Response.Write(“<td width=””100%””> </td>”)
Response.Write(“</tr>”)
Now you set up a For Next loop to process each row of data in the objTimeSheetDS DataSet. The
first thing that you do in this loop is toggle the
blnEvenRow variable so that the even rows written in the
table are written using the background color of White Smoke.
599
Accessing a Web Service
19_58894x ch16.qxd 10/13/05 5:59 PM Page 599
For intIndex As Integer = 0 To _
objTimeSheetDS.Tables(“TimeSheets”).Rows.Count - 1
blnEvenRow = Not blnEvenRow
If blnEvenRow Then
Response.Write(“<tr class=””EvenRow””>”)
Else
Response.Write(“<tr class=””OddRow””>”)
End If
Next, you start writing the data in each cell. You write the username in the first cell using the data from
the
UserName column in the DataSet. The text in the cell is left-aligned by default when no align
attribute has been specified. Then you write the total hours submitted on the user’s timesheet in the next
cell, and this data is right-aligned in the cell because the
align attribute has been specified with a value
of
right.
The filler cell is specified next, and the text
is specified in this cell to create a blank space in the
cell. The week ending date for the timesheet is written next using data from the
WeekEndingDate col-
umn of the
DataSet. Dates look better when they are right-aligned in a column so you also specify the
align attribute for this cell.
Another filler cell is written and again you have specified the text
to take up space in that cell.
Finally, you write the last column of data, which is the date that the timesheet was approved. Again, the
data in this column is right-aligned, as is evident by the
align attribute with a value of right.
Because a timesheet may not have been approved when this report is generated, you first check to see
whether the value returned in the
ApprovalDate column of the DataSet contains a Null value by using
the
IsDBNull function. Remember that this function checks the value of an object to determine whether it
contains a
DBNull value and returns a value of True if it does. If the value in the ApprovalDate column is
Null, you simply write the ending element for the cell. If it is not Null, you write the date in this cell using
the date in the
ApprovalDate column of the DataSet and then write the ending element for the cell.
The last few lines of code here simply write the last filler cell in this table, the ending table row element,
and the ending table element:
Response.Write(“<td class=””ReportText””>” & objTimeSheetDS.Tables( _
“TimeSheets”).Rows(intIndex).Item(“UserName”) & “</td>”)
Response.Write(“<td class=””ReportText”” align=””right””>” & _
objTimeSheetDS.Tables(“TimeSheets”).Rows(intIndex).Item( _
“TotalHours”) & “</td>”)
Response.Write(“<td> </td>”)
Response.Write(“<td class=””ReportText”” align=””right””>” & _
objTimeSheetDS.Tables( _
“TimeSheets”).Rows(intIndex).Item(“WeekEndingDate”) & “</td>”)
Response.Write(“<td> </td>”)
Response.Write(“<td class=””ReportText”” align=””right””>”)
If IsDBNull(objTimeSheetDS.Tables( _
“TimeSheets”).Rows(intIndex).Item(“ApprovalDate”)) Then
Response.Write(“</td>”)
Else
Response.Write(Format(objTimeSheetDS.Tables( _
“TimeSheets”).Rows(intIndex).Item( _
600
Chapter 16
19_58894x ch16.qxd 10/13/05 5:59 PM Page 600
“ApprovalDate”), “Short Date”) & “</td>”)
End If
Response.Write(“<td> </td>”)
Response.Write(“</tr>”)
Next
Response.Write(“</table>”)
End Sub
The final step is to add some server-side VBScript in your Web page. This code just calls the Main proce-
dure in your code-behind file to process the report. You may be wondering why this code is here and not
in the
Page_Load procedure in your code-behind file. You have to take into account the order in which
the events are fired for a Web page and when the Web page is actually rendered. The
Page_Load event
is fired when the Web page is requested and is also fired before any HTML in the Web page is actually
rendered.
Therefore, you want the HTML to start being rendered before calling your procedures to produce and
write the report data, as you are using the
Write method of the Response object to write HTML to your
Web page. Calling the
Main procedure here ensures that the HTML in your Web form has been rendered
up until this point, which means that the headers for the Web page have already been processed, which
also means that your style sheet has already been linked in, giving you access to the styles in the style
sheet.
<body>
<%
Call Main()
%>
</body>
When you tested your reports, you saw that the Timesheets Due report displayed the username as a
hyperlink. This enables you to provide the code in the HTML to display a new mail message with all the
details already filled in, which in turn enables a manager to run this report, click the hyperlink, and then
e-mail the message to the user, requesting that he or she submit the timesheet for approval.
All of the reports were displayed in a browser window with only the toolbar displayed. This provides
the manager running the report with a quick way to print it. Yes, you could omit the toolbar and simply
right-click the Web page and choose Print from the context menu. However, many users will be con-
fused if they do not see a menu item or toolbar button to print the report. Therefore, including the tool-
bar in the browser window just provides a good user experience and reduces the support calls on how
to print a report.
Summary
This chapter has shown you how easy it is to reference and access a Web Service in both your Windows
applications and your Web applications. You have seen how once a reference is set to a Web Service, call-
ing the Web methods in the Web Service is just as easy as calling the methods in your business logic
component. Visual Studio 2005 takes care of all of the details of communicating with the Web Service
behind the scenes, in particular the SOAP interfaces.
601
Accessing a Web Service
19_58894x ch16.qxd 10/13/05 5:59 PM Page 601
You also had a chance to work more with DataSets by working with one that contained multiple tables.
In the last chapter you saw how easy it is to create a
DataSet that contained multiple tables, and in this
chapter you saw how easy it is to process data from each table in the
DataSet and to also bind a specific
table in a
DataSet to a DataGrid control in a Windows form.
Finally, you learned a little more about HTML and JavaScript, and had the opportunity to create a report
Web page that was displayed in a new browser window. This provides an alternative way of creating
Web-based reports without using the Crystal Reports components included with Visual Studio 2005. You
saw how easy it is to use the
Write method of the Response object in your code-behind file to write the
report data to the Web page, eliminating the need for Crystal Reports components.
To summarize, you should know:
❑ How to set a reference to a Web Service in both a Windows application and a Web application
❑ How to call the Web methods in a Web Service
❑ How to bind a
DataSet with multiple tables to a DataGrid control
❑ How to open a new browser window using JavaScript
This wraps up your learning experience with this book. However, this is by no means the end of your
learning experience with VB 2005, ADO.NET, or database programming in general. While you have
learned a lot and have covered a lot of ground, there are still volumes of information to learn. As you
progress in your career and sharpen your database programming skills with VB 2005, you’ll want to
network with your peers to share experiences and information. This can be an invaluable source of
information for you.
I hope you have enjoyed this book and have found it to be very useful and informative. I have enjoyed
writing it and sharing my knowledge with you and I hope that you find it to be an invaluable reference
not only for database programming with VB 2005 but also for VB 2005 in general. The Wrox team of edi-
tors and I wish you much success in your ventures.
602
Chapter 16
19_58894x ch16.qxd 10/13/05 5:59 PM Page 602
A
Data Type Cross-Reference
This appendix provides a general data type cross-reference between Microsoft Access, Microsoft
SQL Server, and Oracle. Table A-1 lists the most common data types in each database and their
capacities. These are the data types that you are most likely to use in your everyday programming
tasks; the table does not contain every data type supported by each of the databases. In Table A-1,
characters refer to character data, and bytes refer to binary data.
Table A-1: Data Type Cross-Reference
Access SQL Server Oracle
BIGINT
–9,223,372,036,854,775,808 to
–9,223,372,036,854,775,807
BINARY
Fixed-length up to
8,000 bytes
YES/NO
BIT
Yes/No, True/False or 0 or 1
On/Off
CHAR CHAR
Fixed-length up to 8,000 bytes Fixed-length up to 2,000
bytes
DATE/TIME
DATETIME DATE
January 1, 100 through January 1, 1753 through January 1, 4712 BC to
December 31, 9999 December 31, 9999 December 31, 4712 AD
NUMBER: DECIMAL
DECIMAL NUMBER
–10^28 –1 through 10^28 –1 –10^38 +1 through 10^38 –1 –10^38 +1 through
10^38 –1
Table continued on following page
20_58894x appa.qxd 10/13/05 5:57 PM Page 603
Table A-1: Data Type Cross-Reference (continued)
Access SQL Server Oracle
NUMBER: DOUBLE
FLOAT NUMBER
-1.79769313486231E308 -1.79E + 308 through -2.23E -10^38 +1 through 10^38 -1
to -4.94065645841247E-324 - 308, 0 and 2.23E + 308
for negative values and through 1.79E + 308
from 1.79769313486231E308
to 4.94065645841247E-324
for positive values
OLE OBJECT
Image LONGRAW
Variable-length up to Variable-length up to Variable-length up to
1,073,741,823 bytes 2,147,483,647 bytes 2,147,483,648 bytes
BLOB
Variable-length up to
4,294,967,296 bytes
NUMBER: LONG INTEGER
INTEGER NUMBER
-2,147,483,648 to -2,147,483,648 to -10^38 +1 through 10^38 -1
2,147,483,647 2,147,483,647
AUTONUMBER: LONG
INTEGER
1 to 2,147,483,647
NCHAR
Fixed-length up to 4,000 NCHAR
Unicode characters Fixed-length up to 2,000
Unicode characters
NTEXT
Variable-length up to
1,073,741,823 Unicode
characters
NCLOB
Variable-length up to
4,294,967,296 Unicode
characters
NVARCHAR NVARCHAR2
Variable-length up to 4,000 Variable-length up to 4,000
Unicode characters Unicode characters
NUMBER: SINGLE
REAL NUMBER
-3.402823E38 to -3.40E + 38 through -10^38 +1 through 10^38 -1
-1.401298E-45 for negative -1.18E - 38, 0 and 1.18E - 38
values and from through 3.40E + 38
1.401298E-45 to
3.402823E38 for positive
values
604
Appendix A
20_58894x appa.qxd 10/13/05 5:57 PM Page 604
Access SQL Server Oracle
SMALLDATETIME
January 1, 1900 through
June 6, 2079
NUMBER: INTEGER
SMALLINT NUMBER
-32,768 to 32,767 -32,768 to 32,767 -10^38 +1 through 10^38 -1
SMALLMONEY
-214,748.3648 through
+214,748.3647
MEMO
TEXT LONG
Variable-length up to Variable-length up to Variable-length up to
65,535 characters 2,147,483,647 characters 2,147,483,648 characters
CLOB
Variable-length up to
4,294,967,296 characters
NUMBER: BYTE
TINYINT NUMBER
0 to 255 0 to 255 -10^38 +1 through 10^38 -1
NUMBER: REPLICATION
UNIQUEIDENTIFIER RAW: defined as RAW(16)
ID Globally unique identifier Globally unique identifier
Globally unique identifier (Guid) without dashes
(Guid)
AUTONUMBER:
REPLICATION ID
Globally unique identifier
(Guid)
VARBINARY RAW
Variable-length up to 8,000 Variable-length up to 2,000
bytes bytes
TEXT
VARCHAR VARCHAR2
Variable-length up to Variable-length up to 8,000 Variable-length up to 4,000
255 characters characters characters
605
Data Type Cross-Reference
20_58894x appa.qxd 10/13/05 5:57 PM Page 605
20_58894x appa.qxd 10/13/05 5:57 PM Page 606
B
Time Tracker Project UI
This appendix guides you through the steps required to build the user interface for the Time
Tracker project. It’s a long process with multiple steps, so you have the option of following the
steps outlined here or downloading the complete UI along with the rest of the code for this book
from the Wrox Web site at
www.wrox.com/dynamic/books/download.aspx.
The steps outlined here are broken into sections. Each section guides you through the steps of
adding controls to a form or adding code to a class or module. Certain icons and images are used
in building the UI, so it is suggested that you download the code for this appendix to have access
to those icons and images.
This appendix does not provide a detailed explanation of the steps performed here to build the
interface or of the code added. When the code built here is used in your exercises, it is thoroughly
explained as part of the exercise’s How It Works section.
Building an Outlook Style Interface
The Time Tracker application has a functional Outlook 2003–style interface that is familiar to most
users. The feature set for this application will be kept to a minimum, as you want to focus your
attention on interacting with the database and not on all the bells and whistles of an application.
The major components of the interface are a menu, a toolbar, a status bar, an Outlook 2003–style
navigation bar, and navigation panels for each of the screens.
Admin form
The Admin form provides the administrative features of your application. This form is used to
view, insert, update, and delete data in your database tables.
To create this form:
1. Start Visual Studio 2005 and start a new project by clicking the New Project button on the
Projects tab of the Start page or by selecting File ➪New ➪ Project.
21_58894x appb.qxd 10/13/05 5:58 PM Page 607
2. In the New Project dialog box, select a Windows Application template and enter a project name
of
Time Tracker. Click OK to create this project.
3. Right-click Form1 in Solution Explorer and choose Delete from the context menu.
4. Right-click the Time Tracker project in the Solution Explorer window, choose Add from the
context menu, and then choose the Add ➪ Windows Form submenu item. In the Add New
Item – Time Tracker dialog box, give the new form a name of Admin.vb and then click the
Add button.
5. Right-click the Time Tracker project in Solution Explorer and choose Properties from the context
menu. In the Time Tracker Properties window, choose Admin in the combo box for Startup
Object and then close this window.
6. Set the following properties for form Admin:
❑ Set
Size to 760, 510.
❑ Set
StartPosition to CenterScreen.
❑ Set
Text to Time Tracker Administration.
7. Drag a MenuStrip control from the Toolbox and drop it on your form. At the bottom of the IDE,
right click on the MenuStrip1 control and select the
Insert Standard Items context menu
item to have the standard menus and menu items inserted.
8. You do not need the Tools menu so right-click the Tools menu and choose Delete.
9. In the Type Here box next to the Help menu enter the text &View.
10. In the Type Here box next to the View menu enter the text &Action.
11. Now click the View menu and drag it to the left so it is positioned after the Edit menu.
12. You need images that can represent Projects, Groups, Group Projects, Roles, and Users. Either
create these images or find some icons or bitmaps that will represent these categories. Visual
Studio 2005 contains a collection of bitmaps and icons that can be used in your menus and
toolbars. In a default installation, these bitmaps and icons are located at
C:\Program Files\
Microsoft Visual Studio 8\Common7\ VS2005ImageLibrary
. You’ll find that using icons,
with their transparent backgrounds, in your menus and toolbars provides a better look. If you
have a graphics tool, you can edit bitmaps and save them as icons for use in your application. If
not, you can just use the bitmaps.
13. In the Type Here box under the View menu enter &Projects. In the Properties window, click the
Image property and click the ellipse button to invoke the Select Resource dialog box. Click
the Import button in the Select Resource dialog box and browse for and select a suitable icon or
bitmap file for Projects. This should be a 16 × 16 pixel icon or bitmap. Click the Open button in
the Open dialog box to have the image imported into the Select Resource dialog box. Then click
OK to close the Select Resource dialog box.
14. In the Type Here box under the Projects menu item, enter the text &Groups. In the Properties
window click the
Image property and then click the ellipse button to invoke the Select Resource
dialog box. Select an appropriate image to represent Groups and then click OK to assign the
image to this menu item.
15. Repeat the previous step adding the menu items Group Project&s, &Roles, and &Users.
16. Click the Action menu and drag it to the left of the Help menu.
608
Appendix B
21_58894x appb.qxd 10/13/05 5:58 PM Page 608
17. In the Type Here box under the Action menu, enter the text &Add. In the Properties window
click the
Image property and then click the ellipse button to invoke the Select Resource dialog
box. Select an appropriate image to represent Add and then click OK to assign this image to the
menu item.
18. Repeat the previous step adding menu items for &Update and &Delete.
19. You need only three menu items on the File menu: New, Menu Separator, and Exit. Right-click all
the other menu items on the File menu and choose Delete from the context menu to delete them.
20. On the Edit menu you do not need the Redo menu item so you can delete it by right-clicking it
and choosing Delete from the context menu. You can also assign an image for the Undo menu
item if desired.
21. The only menu item you need on the Help menu is the About menu item. Delete the other
menu items.
22. Now drag a ToolStrip control from the Toolbox and drop it on your form. Right click the
ToolStrip1 control at the bottom of the IDE and select
Insert Standard Items from the context
menu to have the standard buttons inserted on the toolbar.
23. You’ll need to get rid of the toolbar buttons that you do not need so right-click the following
buttons and choose Delete from the context menu.
❑ Open
❑ Save
❑ Help
24. Now click the Add ToolStripButton icon on the toolbar to add a new button. The button is added
to the left of this icon. Click the button and set the
Name property to UndoToolStripButton. Now
click the ellipse button on the
Image property to invoke the Select Resource dialog box and then
click the ellipse button. Locate an image for Undo, and then select Open in the Open dialog box
and then OK in the Select Resource dialog box. Set the
ToolTipText property to Undo.
25. Add another Separator bar on the toolbar by clicking the down arrow on the Add
ToolStripButton icon on the toolbar and selecting Separator.
26. Add another button to the toolbar and set its Name property to AddToolStripButton, its Image
property to the add image you used on the menu and its ToolTipText property to Add.
27. Add another button to the toolbar and set its Name property to UpdateToolStripButton, its Image
property to the update image you used on the menu and its ToolTipText property to Update.
28. Add a final button to the toolbar and set its Name property to DeleteToolStripButton, its Image
property to the delete image you used on the menu, and its ToolTipText property to Delete.
29. Drag a StatusStrip control from the Toolbox and drop it on your form. Now click the Add
ToolStripStatusLabel icon on the StatusStrip to add a label to it. Click the label just added and
set the following properties in the Properties window:
❑ Set
Name to ToolStripStatus.
❑ Set
Spring to True.
❑ Set
Text to Ready.
❑ Set
TextAlign to MiddleLeft.
609
Time Tracker Project UI
21_58894x appb.qxd 10/13/05 5:58 PM Page 609
30. Add another ToolStripStatusLabel to the StatusStrip and set the following properties:
❑ Set
Name to ToolStripDate.
❑ Set
Text to date.
31. At this point it would be a good idea to save your form. Click the Save All button on the toolbar.
32. You need some images for the Outlook style navigation pane. You can provide your own or use
the ones that are available for download for this book from the Wrox Web site at
www.wrox.com/
dynamic/books/download.aspx
. Drag an ImageList control from the Toolbox and drop it onto
your form. Set the following properties of the ImageList control:
❑ Set
Name to imlNavigation.
❑ Set
ColorDepth to Depth32Bit.
❑ Ensure that
ImageSize is set to 1, 32.
33. Click the Images property and then click the ellipse button to invoke the Image Collection
Editor dialog box. Add the following images from the images folder that you downloaded for
this appendix or your own images:
❑
Selection Bar Selected.bmp
❑ Selection Bar Unselected.bmp
❑ Selection Bar Highlighted.bmp
34. Drag a Panel control from the Toolbox and drop it onto your form. Set the following properties
for this control:
❑ Set
Name to pnlBackground.
❑ Set
BackColor to White.
❑ Set
Dock to Fill.
❑ Set
Padding.All to 3.
35. Drag a SplitContainer control onto the pnlBackground panel and set the following properties:
❑ Set
BorderStyle to FixedSingle.
❑ Set
SplitterDistance to 167.
36. Drag a Panel control onto Panel1 of the SplitContainer1 control and set the following properties:
❑ Set
Name to pnlNavigationBackground.
❑ Set
Dock to Fill.
37. Drag a Panel control onto the pnlNavigationBackground panel and set the following properties:
❑ Set
Name to pnlCurrentScreen.
❑ Set
BackColor to ControlDark.
❑ Set
Dock to Top.
❑ Set
Size to 165, 22.
610
Appendix B
21_58894x appb.qxd 10/13/05 5:58 PM Page 610
38. Now drag a Label control onto the pnlCurrentScreen panel and set the following properties:
❑ Set
Name to lblCurrentScreen.
❑ Set
Dock to Fill.
❑ Set
Font to Arial, 12pt, Bold.
❑ Set
ForeColor to White.
❑ Set
Text to Projects.
❑ Set
TextAlign to MiddleLeft.
39. Drag another Panel control from the Toolbox and drop it onto the pnlNavigationBackground
panel. Set the following properties for this control:
❑ Set
Name to pnlNavigationTitle.
❑ Set
BackgroundImage to images\Titlebar.bmp.
❑ Set
Dock to Top.
❑ Set
Size to 165, 19.
40. Drag a Label control from the Toolbox and drop it onto the pnlNavigationTitle panel. Set the
following properties for this control:
❑ Set
Name to lblAllScreens.
❑ Set
BackColor to Transparent.
❑ Set
Font to Tahoma, 8pt.
❑ Set
Location to 4, 2.
❑ Set
Text to All Projects.
❑ Set
TextAlign to MiddleLeft.
41. Drag a Panel control from the Toolbox and drop it onto the pnlNavigationBackground panel. Set
the following properties for this control:
❑ Set
Name to pnlNavigationCurrentScreen.
❑ Set
Dock to Top.
❑ Set
Size to 165, 26.
42. Drag a PictureBox control from the Toolbox and drop it onto the pnlNavigationCurrentScreen
panel. Set the following properties for this control:
❑ Set
Name to imgScreen.
❑ Set
BackColor to Transparent.
❑ Set
Image to your Projects icon.
❑ Set
Location to 16, 5.
❑ Set
Size to 16, 16.
611
Time Tracker Project UI
21_58894x appb.qxd 10/13/05 5:58 PM Page 611
43. Drag a Label control from the Toolbox and drop it onto the pnlNavigationCurrentScreen panel.
Set the following properties for this control:
❑ Set
Name to lblScreen.
❑ Set
Font to Tahoma, 8pt.
❑ Set
Location to 40, 6.
❑ Set
Text to Projects.
❑ Set
TextAlign to MiddleLeft.
44. Drag a Panel control from the Toolbox and drop it onto the pnlNavigationBackground panel. Set
the following properties for this control:
❑ Set
Name to pnlNavigationCurrentView.
❑ Set
BackgroundImage to images\Titlebar.bmp.
❑ Set
Dock to Top.
❑ Set
Size to 165, 19.
45. Drag a Label control from the Toolbox and drop it onto the pnlNavigationCurrentView panel.
Set the following properties for this control:
❑ Set
Name to lblCurrentView.
❑ Set
BackColor to Transparent.
❑ Set
Font to Tahoma, 8pt.
❑ Set
Location to 4, 3.
❑ Set
Text to Current View.
❑ Set
TextAlign to MiddleLeft.
46. Drag a Panel control from the Toolbox and drop it onto the pnlNavigationBackground panel. Set
the following properties for this control:
❑ Set
Name to pnlNavigationCurrentViewOptions.
❑ Set
Dock to Top.
❑ Set
Size to 165, 105.
47. Drag a RadioButton control from the Toolbox and drop it onto the pnlNavigationCurrent-
ViewOptions panel. Set the following properties for this control:
❑ Set
Name to optOption1.
❑ Set
FlatStyle to Flat.
❑ Set
Location to 16, 8.
❑ Set
Text to Name.
48. Drag another RadioButton control from the Toolbox and drop it onto the pnlNavigationCurrent-
ViewOptions panel. Set the following properties for this control:
❑ Set
Name to optOption2.
❑ Set
FlatStyle to Flat.
612
Appendix B
21_58894x appb.qxd 10/13/05 5:58 PM Page 612