Practical Web 2.0 Applications with PHP phần 3 potx
Bạn đang xem bản rút gọn của tài liệu. Xem và tải ngay bản đầy đủ của tài liệu tại đây (1.25 MB, 60 trang )
of DatabaseObject_User, and the new initialization of the $_newPassword property. This property
must be public so the template can access its value.
Listing 4-21. Creating a Pronounceable Password with Text_Password (User.php)
<?php
class DatabaseObject_User extends DatabaseObject
{
// other code
public $_newPassword = null;
// other code
protected function preInsert()
{
$this->_newPassword = Text_Password::create(8);
$this->password = $this->_newPassword;
return true;
}
// other code
}
?>
Finally, we can create the user-register.tpl template. As mentioned previously, the first
line of this file will be used as the e-mail subject. This is useful, as it allows us to include tem-
plate logic in the e-mail subject as well as in the body. We will include the user’s first name in
the e-mail subject.
Listing 4-22 shows the contents of user-register.tpl, which is stored in ./templates/
email. You may want to customize this template to suit your own requirements.
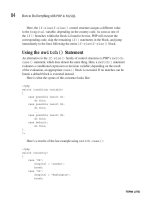
Listing 4-22. The E-mail Template Used when New Users Register (user-register.tpl)
{$user->profile->first_name}, Thank You For Your Registration
Dear {$user->profile->first_name},
Thank you for your registration. Your login details are as follows:
Login URL: http://phpweb20/account/login
Username: {$user->username}
Password: {$user->_newPassword}
Sincerely,
Web Site Administrator
CHAPTER 4 ■ USER REGISTRATION, LOGIN, AND LOGOUT 99
9063CH04CMP4 11/20/07 9:20 PM Page 99
Simpo PDF Merge and Split Unregistered Version -
Figure 4-4 shows how the e-mail will look when received by the user. Hopefully the user’s
e-mail client will make the login URL clickable. You could choose to use an HTML e-mail
instead, but if the e-mail client can’t automatically highlight links in a text e-mail, it probably
can’t render HTML e-mails either.
Figure 4-4. An example of the e-mail sent to a user when they register
Implementing Account Login and Logout
Now that users have a way of registering on the system, we must allow them to log in to their
account. We do that by adding a new action to the account controller, which we will call login.
In Chapter 3 we looked at how to authenticate using Zend_Auth (see Listing 3-5). We will now
implement this functionality.
The basic algorithm for the login action is as follows:
1. Display the login form.
2. If the user submits the form, try to authenticate them with Zend_Auth.
3. If they successfully authenticate, write their identity to the session and redirect them
to their account home page (or to the protected page they originally requested).
4. If their authentication attempt was unsuccessful, display the login form again, indicat-
ing that an error occurred.
In addition to this, we also want to make use of our logging capabilities. We will make a
log entry for both successful and unsuccessful login attempts.
CHAPTER 4 ■ USER REGISTRATION, LOGIN, AND LOGOUT100
9063CH04CMP4 11/20/07 9:20 PM Page 100
Simpo PDF Merge and Split Unregistered Version -
Creating the Login Template
Before we implement the login action in our account controller, we’ll quickly take a look at
the login form. Listing 4-23 shows the login.tpl template, which we will store in./templates/
account.
Listing 4-23. The Account Login Form (login.tpl)
{include file='header.tpl'}
<form method="post" action="/account/login">
<fieldset>
<input type="hidden" name="redirect" value="{$redirect|escape}" />
<legend>Log In to Your Account</legend>
<div class="row" id="form_username_container">
<label for="form_username">Username:</label>
<input type="text" id="form_username"
name="username" value="{$username|escape}" />
{include file='lib/error.tpl' error=$errors.username}
</div>
<div class="row" id="form_password_container">
<label for="form_password">Password:</label>
<input type="password" id="form_password"
name="password" value="" />
{include file='lib/error.tpl' error=$errors.password}
</div>
<div class="submit">
<input type="submit" value="Login" />
</div>
</fieldset>
</form>
{include file='footer.tpl'}
This form is very similar in structure to the registration form, except it only contains input
fields for username and password. Additionally, we use the password type for the password
field, instead of the text type. This template also relies on the presence of an array called
$errors, which is generated by the login action.
This form also includes a hidden form variable called redirect. The value of this field
indicates the relative page URL where the user will end up once they successfully log in. This is
necessary because sometimes a user will go directly to a page that requires authentication, but
they will not yet be authenticated. If users were automatically redirected to their account
CHAPTER 4 ■ USER REGISTRATION, LOGIN, AND LOGOUT 101
9063CH04CMP4 11/20/07 9:20 PM Page 101
Simpo PDF Merge and Split Unregistered Version -
home, they would then have to navigate back to the page they originally wanted, which they
would find annoying. We will set the value for $redirect in the login action.
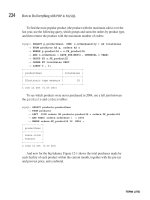
Figure 4-5 shows the login form. Again, it is bland, but we will improve on it in Chapter 6.
Figure 4-5. The user login form
Adding the Account Controller Login Action
Now we need to add the loginAction() method to the account controller. This is the most
complex action handler we’ve created so far, although all it does is perform the four points
listed at the start of the “Implementing Account Login and Logout” section.
Listing 4-24 shows the code for loginAction(), which belongs in the AccountController.php
file.
Listing 4-24. Processing User Login Attempts (AccountController.php)
<?php
class AccountController extends CustomControllerAction
{
// other code
public function loginAction()
{
// if a user's already logged in, send them to their account home page
$auth = Zend_Auth::getInstance();
CHAPTER 4 ■ USER REGISTRATION, LOGIN, AND LOGOUT102
9063CH04CMP4 11/20/07 9:20 PM Page 102
Simpo PDF Merge and Split Unregistered Version -
if ($auth->hasIdentity())
$this->_redirect('/account');
$request = $this->getRequest();
// determine the page the user was originally trying to request
$redirect = $request->getPost('redirect');
if (strlen($redirect) == 0)
$redirect = $request->getServer('REQUEST_URI');
if (strlen($redirect) == 0)
$redirect = '/account';
// initialize errors
$errors = array();
// process login if request method is post
if ($request->isPost()) {
// fetch login details from form and validate them
$username = $request->getPost('username');
$password = $request->getPost('password');
if (strlen($username) == 0)
$errors['username'] = 'Required field must not be blank';
if (strlen($password) == 0)
$errors['password'] = 'Required field must not be blank';
if (count($errors) == 0) {
// setup the authentication adapter
$adapter = new Zend_Auth_Adapter_DbTable($this->db,
'users',
'username',
'password',
'md5(?)');
$adapter->setIdentity($username);
$adapter->setCredential($password);
// try and authenticate the user
$result = $auth->authenticate($adapter);
if ($result->isValid()) {
$user = new DatabaseObject_User($this->db);
$user->load($adapter->getResultRowObject()->user_id);
CHAPTER 4 ■ USER REGISTRATION, LOGIN, AND LOGOUT 103
9063CH04CMP4 11/20/07 9:20 PM Page 103
Simpo PDF Merge and Split Unregistered Version -
// record login attempt
$user->loginSuccess();
// create identity data and write it to session
$identity = $user->createAuthIdentity();
$auth->getStorage()->write($identity);
// send user to page they originally request
$this->_redirect($redirect);
}
// record failed login attempt
DatabaseObject_User::LoginFailure($username,
$result->getCode());
$errors['username'] = 'Your login details were invalid';
}
}
$this->view->errors = $errors;
$this->view->redirect = $redirect;
}
}
?>
The first thing this function does is check whether or not the user has already been
authenticated. If they have, they are redirected back to their account home page.
Next we try to determine the page they were originally trying to access. If they have sub-
mitted the login form, this value will be in the redirect form value. If not, we simply use the
$_SERVER['REQUEST_URI'] value to determine where they came from. If we still can’t determine
where they came from, we just use their account home page as the default destination. We
haven’t yet created the action to display their account home page; we will do that in the
“Implementing Account Management” section later in this chapter.
■Note Because the ACL manager forwarded the request to the login handler (as opposed to using an HTTP
redirect), the server variable
REQUEST_URI will contain the location originally requested. If a redirect was
used to display the login form, you could use the HTTP_REFERER value instead.
We then define an empty array to hold error messages. This is done here so it can be
assigned to the template whether a login attempt has occurred or not.
Next we check whether or not the login form has been submitted by checking the
$request object’s isPost() method (we also did this earlier when processing user registra-
tions). If it has been submitted, we retrieve the submitted username and password values from
the request data. If either of these is empty, we set corresponding error messages and proceed
to display the login template again.
CHAPTER 4 ■ USER REGISTRATION, LOGIN, AND LOGOUT104
9063CH04CMP4 11/20/07 9:20 PM Page 104
Simpo PDF Merge and Split Unregistered Version -
Once we have determined that both a username and password have been submitted, we
try to authenticate the user. This code is very similar to that of Listing 3-4.
If we determine that the login attempt was successful, we perform three actions:
1. Record the successful login attempt. When a user successfully logs in, we want to
make a note of this in the application log file. To do so, we will add a utility function
to DatabaseObject_User called loginSuccess(). This function will also update the
ts_last_login field in the user table to record the timestamp of the user’s most recent
login. We will look at the loginSuccess() function shortly. This function must be called
after a user record has been loaded in DatabaseObject_User.
2. Update the identity data stored in session to include all of the values in the corre-
sponding database row for this user. By default, only the supplied username will be
stored as the identity; however, since we want to display other user details (such as
their name or e-mail address) we need to update the stored identity to include those
other details:
•We can retrieve the data we want to save as the identity by using the
createAuthIdentity() method in DatabaseObject_User. This function returns
a generic PHP object holding the user’s details.
• The storage object returned from Zend_Auth’s getStorage() method has a method
called write(), which we can use to overwrite the existing identity with the data
returned from createAuthIdentity().
3. Redirect the user to their previously requested page. This is achieved simply by call-
ing the _redirect() method with the $redirect variable as its only argument.
Alternatively, if the login attempt failed, the code will continue on. At this point, we call
the LoginFailure() method from the DatabaseObject_User class to write this failed attempt to
the log file. We will look at this method shortly.
We then write a message to the $errors array and continue on to display the template.
As mentioned in Chapter 3, we can determine the exact reason why the login attempt failed,
and we will record this reason in the log file. However, this isn’t information that should be
provided to the user.
■Note Until you add the functions in the next section, a PHP error will occur if you try to log in.
Logging Successful and Failed Login Attempts
To log both successful and unsuccessful login attempts, we will implement two utility func-
tions in DatabaseObject_User: loginSuccess() and LoginFailure().
Listing 4-25 shows these functions as they appear within the DatabaseObject_User class
(User.php). Note that LoginFailure() is a static method, while loginSuccess() must be called
after a user record has been loaded. I’ve also included the createAuthIdentity() method as
described in the previous section.
CHAPTER 4 ■ USER REGISTRATION, LOGIN, AND LOGOUT 105
9063CH04CMP4 11/20/07 9:20 PM Page 105
Simpo PDF Merge and Split Unregistered Version -
Listing 4-25. Auditing Login Attempts by Writing Them to the Application Log (User.php)
<?php
class DatabaseObject_User extends DatabaseObject
{
// other code
public function createAuthIdentity()
{
$identity = new stdClass;
$identity->user_id = $this->getId();
$identity->username = $this->username;
$identity->user_type = $this->user_type;
$identity->first_name = $this->profile->first_name;
$identity->last_name = $this->profile->last_name;
$identity->email = $this->profile->email;
return $identity;
}
public function loginSuccess()
{
$this->ts_last_login = time();
$this->save();
$message = sprintf('Successful login attempt from %s user %s',
$_SERVER['REMOTE_ADDR'],
$this->username);
$logger = Zend_Registry::get('logger');
$logger->notice($message);
}
static public function LoginFailure($username, $code = '')
{
switch ($code) {
case Zend_Auth_Result::FAILURE_IDENTITY_NOT_FOUND:
$reason = 'Unknown username';
break;
case Zend_Auth_Result::FAILURE_IDENTITY_AMBIGUOUS:
$reason = 'Multiple users found with this username';
break;
case Zend_Auth_Result::FAILURE_CREDENTIAL_INVALID:
$reason = 'Invalid password';
break;
default:
$reason = '';
}
CHAPTER 4 ■ USER REGISTRATION, LOGIN, AND LOGOUT106
9063CH04CMP4 11/20/07 9:20 PM Page 106
Simpo PDF Merge and Split Unregistered Version -
$message = sprintf('Failed login attempt from %s user %s',
$_SERVER['REMOTE_ADDR'],
$username);
if (strlen($reason) > 0)
$message .= sprintf(' (%s)', $reason);
$logger = Zend_Registry::get('logger');
$logger->warn($message);
}
// other code
}
?>
The first thing we do in LoginSuccess() is update the users table to set the ts_last_login
field to the current date and time for the user that has just logged in. It is for this reason
(updating the database) that we pass in the database connection as the first argument.
We then fetch the $logger object from the application registry so we can write a message
indicating that the given user just logged in. We also include the IP address of the user.
LoginFailure() is essentially the same as loginSuccess(), except we do not make any data-
base updates. Also, the function accepts the error code generated during the login attempt
(retrieved with the getCode() method on the authentication result object in Listing 4-24), which
we use to generate extra information to write to the log. We log this message as a warning, since
it’s of greater importance than a successful login.
Please be aware that if you try to log in now you will be redirected to the account home
page (http://phpweb20/account) which we will be creating shortly.
■Tip The reason you want to track failed logins separately from successful logins (using different priority
levels) is that a successful login typically indicates “normal operation,” while a failed login may indicate that
somebody is trying to gain unauthorized access to an account. Being able to filter the log easily by the mes-
sage type helps you easily identify potential problems that have occurred or are occurring. In Chapter 14 we
will look at how to make use of this log file.
Logging Users Out of Their Accounts
It is important to give users the option of logging out of their accounts, as they may want to
ensure that nobody can use their account (maliciously or otherwise) after they are finished
with their session.
It is very straightforward to log a user out when using Zend_Auth. Because the presence of
an identity in the session is what determines whether or not a user is logged in, all we need to
do is clear that identity to log them out.
To do this, we simply use the clearIdentity() method of the instance of Zend_Auth. We
can then redirect the user somewhere else, so they can continue to use the site if they please.
I simply chose to redirect them back to the login page.
CHAPTER 4 ■ USER REGISTRATION, LOGIN, AND LOGOUT 107
9063CH04CMP4 11/20/07 9:20 PM Page 107
Simpo PDF Merge and Split Unregistered Version -
Listing 4-26 shows the logoutAction() method which is used to clear user identity data.
Users can log out by visiting http://phpweb20/account/logout.
Listing 4-26. Logging Out a User and Redirecting Them Back to the Login Page
(AccountController.php)
<?php
class AccountController extends CustomControllerAction
{
// other code
public function logoutAction()
{
Zend_Auth::getInstance()->clearIdentity();
$this->_redirect('/account/login');
}
}
?>
■Note You could use _forward('login') in Listing 4-26 instead of _redirect('/account/login')
if you wanted to. However, if you forwarded the request to the login page, the $redirect variable in
loginAction() would be set to load the logout page (/account/logout) as soon as a user logged in—
they would never be able to log in to their account unless they manually typed in a different URL first!
Dealing with Forgotten Passwords
Now that we have added login functionality, we must also allow users who have forgotten their
passwords to access their accounts. Because we store the user password as an MD5 hash of
the actual password, we cannot send them the old password. Instead, when they complete the
fetch-password form, we will generate a new password and send that to them.
We can’t automatically assume that the person who filled out the fetch-password form is
the account holder, so we won’t update the actual account password until their identity has
been verified. We do this by providing a link in the sent e-mail that will confirm the password
change. This has the added advantage of allowing them to remember their old password after
filling out the form and before clicking the confirmation link.
The basic algorithm for implementing fetch-password functionality is as follows:
1. Display a form to the user asking for their username.
2. If the supplied username is found, generate a new password and write it to their pro-
file, and then send an e-mail to the address associated with the account informing
them of their new password.
3. If the supplied username is not found, display an error message to the user.
CHAPTER 4 ■ USER REGISTRATION, LOGIN, AND LOGOUT108
9063CH04CMP4 11/20/07 9:20 PM Page 108
Simpo PDF Merge and Split Unregistered Version -
So that we don’t have to mess around with application permissions, we will handle three
different actions in the new fetch-password controller action:
1. Display and process the user form.
2. Display the confirmation message.
3. Update the user account when the password-update confirmation link is clicked and
indicate to the user that this has occurred.
Resetting a User’s Password
Before we implement the required application logic for fetch password, let’s create the web
page template we will use. Listing 4-27 shows the contents of fetchpassword.tpl, which we
will store in the account template directory. This template handles each of the three cases out-
lined previously.
Listing 4-27. The Template Used for the Fetch-Password Tool (fetchpassword.tpl)
{include file='header.tpl'}
{if $action == 'confirm'}
{if $errors|@count == 0}
<p>
Your new password has now been activated.
</p>
<ul>
<li><a href="/account/login">Log in to your account</a></li>
</ul>
{else}
<p>
Your new password was not confirmed. Please double-check the link
sent to you by e-mail, or try using the
<a href="/account/fetchpassword">Fetch Password</a> tool again.
</p>
{/if}
{elseif $action == 'complete'}
<p>
A password has been sent to your account e-mail address containing
your new password. You must click the link in this e-mail to activate
the new password.
</p>
{else}
<form method="post" action="/account/fetchpassword">
<fieldset>
<legend>Fetch Your Password</legend>
<div class="row" id="form_username_container">
CHAPTER 4 ■ USER REGISTRATION, LOGIN, AND LOGOUT 109
9063CH04CMP4 11/20/07 9:20 PM Page 109
Simpo PDF Merge and Split Unregistered Version -
<label for="form_username">Username:</label>
<input type="text" id="form_username" name="username" />
{include file='lib/error.tpl' error=$errors.username}
</div>
<div class="submit">
<input type="submit" value="Fetch Password" />
</div>
</fieldset>
</form>
{/if}
{include file='footer.tpl'}
This template is divided into three parts. The first is used when a user tries to confirm
their new password. Within this section is a section for successful confirmation, and another
to display a message if the confirmation URL is invalid.
The next section (for the complete action) is used after the user submits the fetch-pass-
word form with a valid username. The final section is the default part of the template, which is
shown when the user initially visits the fetch-password tool, or if they enter an invalid user-
name.
Now let’s take a look at the new controller action. I called this action handler
fetchpasswordAction(), as you can see in Listing 4-28. This code is to be added to the
AccountController.php file in ./include/Controllers.
Listing 4-28. Handling the Fetch-Password Request (AccountController.php)
<?php
class AccountController extends CustomControllerAction
{
// other code
public function fetchpasswordAction()
{
// if a user's already logged in, send them to their account home page
if (Zend_Auth::getInstance()->hasIdentity())
$this->_redirect('/account');
$errors = array();
$action = $this->getRequest()->getQuery('action');
if ($this->getRequest()->isPost())
$action = 'submit';
switch ($action) {
CHAPTER 4 ■ USER REGISTRATION, LOGIN, AND LOGOUT110
9063CH04CMP4 11/20/07 9:20 PM Page 110
Simpo PDF Merge and Split Unregistered Version -
case 'submit':
$username = trim($this->getRequest()->getPost('username'));
if (strlen($username) == 0) {
$errors['username'] = 'Required field must not be blank';
}
else {
$user = new DatabaseObject_User($this->db);
if ($user->load($username, 'username')) {
$user->fetchPassword();
$url = '/account/fetchpassword?action=complete';
$this->_redirect($url);
}
else
$errors['username'] = 'Specified user not found';
}
break;
case 'complete':
// nothing to do
break;
case 'confirm':
$id = $this->getRequest()->getQuery('id');
$key = $this->getRequest()->getQuery('key');
$user = new DatabaseObject_User($this->db);
if (!$user->load($id))
$errors['confirm'] = 'Error confirming new password';
else if (!$user->confirmNewPassword($key))
$errors['confirm'] = 'Error confirming new password';
break;
}
$this->view->errors = $errors;
$this->view->action = $action;
}
}
?>
In this code, we first redirect the user back to the account home page if they are authenti-
cated. Next we try to determine the action the user is trying to perform. When a user initially
visits the fetch-password page (http://phpweb20/account/fetchpassword), no action will be
set. As such, the entire switch statement will be skipped.
If the request method for the current request is POST, we assume the user submitted the
fetch-password form, so we update the $action variable accordingly. If the form has been
filled out correctly and a valid username has been specified, the DatabaseObject_User::
CHAPTER 4 ■ USER REGISTRATION, LOGIN, AND LOGOUT 111
9063CH04CMP4 11/20/07 9:20 PM Page 111
Simpo PDF Merge and Split Unregistered Version -
fetchPassword() method is called. This is a utility function we will define shortly (along with
confirmNewPassword()). Once this has been called, we redirect back to the fetch-password
page, indicating that the action has completed by putting action=complete in the URL. As
you can see in the switch statement, there is nothing to actually do for this action; it is just
included there for completeness.
The other action is the confirm action. This code is executed when the user clicks on the
link we send them in the fetch-password e-mail (which we will look at shortly). We then try to
confirm their new password using the submitted key value.
Functions for Resetting Passwords
There are two functions we need to add to DatabaseObject_User to implement the password
resetting. The first is called fetchPassword(), which does the following:
1. Generates a new password using Text_Password.
2. Writes the new password to the user profile.
3. Writes the current date and time to the user profile, so we can ensure the new pass-
word can only be confirmed within one day.
4. Generates a key that must be supplied by the user to confirm their new password. We
also write this to the user profile.
5. Saves the profile.
6. Sends an e-mail to the user using the fetch-password.tpl e-mail template (separate
from the fetchpassword.tpl page template created previously).
The second function we will add is called confirmNewPassword(), which confirms the
user’s new password after they click the link in the e-mail sent to them. This function works as
follows:
1. Checks that the new password, timestamp, and confirmation key exist in the profile.
2. Checks that the confirmation is taking place within a day of the stored timestamp.
3. Checks that the supplied key matches the key stored in the user profile.
4. Updates the user record to use the new password.
5. Removes the values from the profile.
6. Saves the user (which will also save the profile).
Listing 4-29 shows these two new functions, which belong in the DatabaseObject_User
class (User.php).
Listing 4-29. Utility Functions Used for Resetting a User’s Password (User.php)
<?php
class DatabaseObject_User extends DatabaseObject
{
// other code
CHAPTER 4 ■ USER REGISTRATION, LOGIN, AND LOGOUT112
9063CH04CMP4 11/20/07 9:20 PM Page 112
Simpo PDF Merge and Split Unregistered Version -
public function fetchPassword()
{
if (!$this->isSaved())
return false;
// generate new password properties
$this->_newPassword = Text_Password::create(8);
$this->profile->new_password = md5($this->_newPassword);
$this->profile->new_password_ts = time();
$this->profile->new_password_key = md5(uniqid() .
$this->getId() .
$this->_newPassword);
// save new password to profile and send e-mail
$this->profile->save();
$this->sendEmail('user-fetch-password.tpl');
return true;
}
public function confirmNewPassword($key)
{
// check that valid password reset data is set
if (!isset($this->profile->new_password)
|| !isset($this->profile->new_password_ts)
|| !isset($this->profile->new_password_key)) {
return false;
}
// check if the password is being confirm within a day
if (time() - $this->profile->new_password_ts > 86400)
return false;
// check that the key is correct
if ($this->profile->new_password_key != $key)
return false;
// everything is valid, now update the account to use the new password
// bypass the local setter as new_password is already an md5
parent::__set('password', $this->profile->new_password);
unset($this->profile->new_password);
unset($this->profile->new_password_ts);
unset($this->profile->new_password_key);
// finally, save the updated user record and the updated profile
CHAPTER 4 ■ USER REGISTRATION, LOGIN, AND LOGOUT 113
9063CH04CMP4 11/20/07 9:20 PM Page 113
Simpo PDF Merge and Split Unregistered Version -
return $this->save();
}
// other code
}
?>
Now we just need to create the e-mail template. In this e-mail, we will generate the
URL that the user needs to click on in order to reset their password. If you refer back to the
fetchpasswordAction() function in AccountController.php (Listing 4-28), you will see that
the arguments required are the action parameter (set to confirm), the id parameter (which
corresponds to the user_id column in the users table), and the key parameter (which is the
new_password_key value we generated in DatabaseObject::fetchPassword()).
Listing 4-30 shows the e-mail template, which we will store in user-fetch-password.tpl in
the ./templates/email directory. Remember that the first line is the e-mail subject.
Listing 4-30. The E-mail Template Used to Send a User Their New Password
(user-fetch-password.tpl)
{$user->profile->first_name}, Your Account Password
Dear {$user->profile->first_name},
You recently requested a password reset as you had forgotten your password.
Your new password is listed below. To activate this password, click this link:
Activate Password: http://phpweb20/account/fetchpassword?
➥
action=confirm&id={$user->getId()}&key={$user->profile->new_password_key}
Username: {$user->username}
New Password: {$user->_newPassword}
If you didn't request a password reset, please ignore this message and your password
will remain unchanged.
Sincerely,
Web Site Administrator
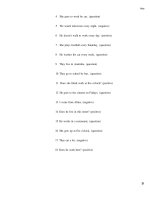
Figure 4-6 shows a sample of the e-mail that is sent when a new password is requested.
Take special note of the URL that is generated, and the different parts in the URL that we use
in fetchpasswordAction().
■Note One small potential problem is the length of the URL in the e-mail. Some e-mail clients may wrap
this URL across two lines, resulting in it not being highlighted properly (or if the user manually copies and
pastes the URL, they may miss part of it). You may prefer to generate a shorter key or action name to reduce
its length.
CHAPTER 4 ■ USER REGISTRATION, LOGIN, AND LOGOUT114
9063CH04CMP4 11/20/07 9:20 PM Page 114
Simpo PDF Merge and Split Unregistered Version -
Figure 4-6. The fetch password e-mail sent to a user
There’s one more small issue we must now address: if a user requests a new password,
and then logs in with their old password without using the new password, we want to remove
the new password details from their profile. To do this, we update the loginSuccess() method
in DatabaseObject_User to clear this data. Listing 4-31 shows the updated version of this
method as it appears in the User.php file. We place the three calls to unset() before calling the
save() method, so the user record only needs saving once.
Listing 4-31. Clearing the Password Reset Fields if They Are Set (User.php)
<?php
class DatabaseObject_User extends DatabaseObject
{
// other code
public function loginSuccess()
{
$this->ts_last_login = time();
unset($this->profile->new_password);
unset($this->profile->new_password_ts);
unset($this->profile->new_password_key);
$this->save();
$message = sprintf('Successful login attempt from %s user %s',
CHAPTER 4 ■ USER REGISTRATION, LOGIN, AND LOGOUT 115
9063CH04CMP4 11/20/07 9:20 PM Page 115
Simpo PDF Merge and Split Unregistered Version -
$_SERVER['REMOTE_ADDR'],
$this->username);
$logger = Zend_Registry::get('logger');
$logger->notice($message);
}
// other code
}
?>
Finally, as shown in Listing 4-32, we must add a link to the original login form (login.tpl
in ./templates/account) so the user can access the fetch-password tool if required.
Listing 4-32. Linking to the Fetch-Password Tool from the Account Login Page (login.tpl)
<! // other code >
<fieldset>
<legend>Log In to Your Account</legend>
<! // other code >
<div>
<a href="/account/fetchpassword">Forgotten your password?</a>
</div>
</fieldset>
<! // other code >
Implementing Account Management
Earlier in this chapter we implemented the login and logout system for user accounts. When a
user successfully logged in, the code would redirect them to the page they initially requested. In
many cases, this will be their account home page (which has the URL http://phpweb20/account).
So far, however, we haven’t actually implemented this action in the AccountController class.
In this section, we will first create this action (indexAction()), although there isn’t terribly
much that this will do right now. Next, we will update the site header template so it has more
useful navigation (even if it is still unstyled). This will include additional menu options for
logged-in users only. Finally, we will allow users to update their account details.
Creating the Account Home Page
After a user logs in, they are allowed to access their account home page by using the
index action in the account controller. Listing 4-33 shows the code for indexAction() in
AccountController.php, which at this stage doesn’t do anything of great interest, other than
display the index.tpl template in ./templates/account.
CHAPTER 4 ■ USER REGISTRATION, LOGIN, AND LOGOUT116
9063CH04CMP4 11/20/07 9:20 PM Page 116
Simpo PDF Merge and Split Unregistered Version -
Listing 4-33. The Account Home Page Action Controller (AccountController.php)
<?php
class AccountController extends CustomControllerAction
{
public function indexAction()
{
// nothing to do here, index.tpl will be displayed
}
// other code
}
?>
Before we look at index.tpl, we will make a small but important change to the
CustomControllerAction.php file. We are going to change it so the logged-in user’s identity
data is automatically assigned to the template, thereby making it available within all site tem-
plates. This is the data we generated in the createAuthIdentity() method in Listing 4-25.
Additionally, we will assign a variable called $authenticated, which is true if identity data
exists. We could use {if isset($identity)} in our templates instead of this variable, but we
would then be making an assumption that the presence of the $identity means the user is
logged in (and vice versa).
To make this change, we need to implement the preDispatch() method, as shown in
Listing 4-34. This method is automatically called by Zend_Controller_Front at the start of dis-
patching any action. We can make this change to CustomControllerAction, since all controllers
in our application extend from this class.
Listing 4-34. Assigning Identity Data Automatically to Templates (CustomControllerAction.php)
<?php
class CustomControllerAction extends Zend_Controller_Action
{
function init()
{
$this->db = Zend_Registry::get('db');
}
public function preDispatch()
{
$auth = Zend_Auth::getInstance();
if ($auth->hasIdentity()) {
$this->view->authenticated = true;
$this->view->identity = $auth->getIdentity();
}
else
$this->view->authenticated = false;
}
}
?>
CHAPTER 4 ■ USER REGISTRATION, LOGIN, AND LOGOUT 117
9063CH04CMP4 11/20/07 9:20 PM Page 117
Simpo PDF Merge and Split Unregistered Version -
Now let’s look at the index.tpl file, which currently displays a simple welcome message.
We can use the first_name property from the identity to personalize the message. Listing 4-35
shows this template, which is stored in ./templates/account.
Listing 4-35. Displaying a Welcome Message After a User Logs In to Their Account Home Page
(index.tpl)
{include file='header.tpl'}
Welcome {$identity->first_name}.
{include file='footer.tpl'}
At this point, you can try to log in by visiting http://phpweb20/account and entering your
account details (remember that thanks to the permissions, trying to access this URL will dis-
play the page at http://phpweb20/account/login).
Updating the Web Site Navigation
When we last looked at the navigation in header.tpl, all we had was a home link and a register
link. We are now going to improve this navigation to include a few new items:
• Log in to account link
•Information about the currently logged in user (if any)
•A member’s-only submenu, including a logout link
To implement the second and third points, we need to check the $authenticated variable
we are now assigning to the template. Additionally, once a user has logged in, the login and
register links are no longer relevant, so we can hide them.
Listing 4-36 shows the updated version of header.tpl, which now includes some basic
template logic for the HTML header. For now we are just using vertical pipes to separate menu
items, but we will use CSS to improve this in Chapter 6.
Listing 4-36. Making the Site Navigation Member-Aware (header.tpl)
<!DOCTYPE html
PUBLIC "-//W3C//DTD XHTML 1.0 Strict//EN"
" /><html xmlns=" lang="en" xml:lang="en">
<head>
<title>Title</title>
<meta http-equiv="Content-Type" content="text/html; charset=iso-8859-1" />
</head>
<body>
<div>
<a href="/">Home</a>
CHAPTER 4 ■ USER REGISTRATION, LOGIN, AND LOGOUT118
9063CH04CMP4 11/20/07 9:20 PM Page 118
Simpo PDF Merge and Split Unregistered Version -
{if $authenticated}
| <a href="/account">Your Account</a>
| <a href="/account/details">Update Your Details</a>
| <a href="/account/logout">Logout</a>
{else}
| <a href="/account/register">Register</a>
| <a href="/account">Log In</a>
{/if}
{if $authenticated}
<hr />
<div>
Logged in as
{$identity->first_name|escape} {$identity->last_name|escape}
(<a href="/account/logout">logout</a>)
</div>
{/if}
<hr />
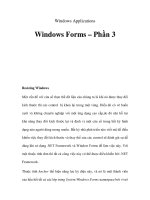
Figure 4-7 shows the account home page that users are directed to after logging in. Note
the new navigation elements, as well as the information about the currently logged-in user.
Figure 4-7. The account home page with updated navigation and identity display
CHAPTER 4 ■ USER REGISTRATION, LOGIN, AND LOGOUT 119
9063CH04CMP4 11/20/07 9:20 PM Page 119
Simpo PDF Merge and Split Unregistered Version -
Allowing Users to Update Their Details
The final thing we need to add to the user account section for now is the ability for users to
update their details. In the new header.tpl shown in Figure 4-7, there is a link labeled Update
Your Details, which will allow users to do this.
Because this code is largely similar to the user registration system, I have not included all
of the repetitive details. The key differences between user registration and updating details are
as follows:
•We are updating an existing user record rather than creating a new one.
•We do not allow the user to update their username.
•We allow the user to set a new password.
•We do not need the CAPTCHA test.
•Because the user is already logged in, we must update their Zend_Auth identity
accordingly.
■Note While there isn’t anything inherently bad about allowing users to change their own usernames, it is
my own preference to generally not allow users to do so (an exception might be if their e-mail address is used
as their login username). One reason why it is bad to allow the changing of usernames is that other users get
to know a user by their username; in the case of this application, we will be using the username to generate a
unique user home page URL. Changing their username would result in a new URL for their home page.
When allowing users to change their password, we will show them a password field and
a password confirmation field, requiring them to enter the new password twice in order to
change it. Additionally, we will include a note telling them to leave the password field blank if
they do not want to change their password. This is because we cannot prepopulate the pass-
word field with their existing password, since we only store an MD5 hash of it.
To implement the update details function, we must do the following:
• Create a new form processor class called FormProcessor_UserDetails, which is similar
to FormProcessor_UserRegistration. This class will read the submitted form values and
process them to ensure they are valid. If no errors occur when validating the data, the
existing user record is updated.
• Create a new action called detailsAction() in AccountController that instantiates
FormProcessor_UserDetails, and passes to it the ID of the logged-in user. This function
also updates the Zend_Auth identity by calling the createAuthIdentity() function in
DatabaseObject_User that we created earlier.
• Create a confirmation page to confirm to the user that their details have been
updated. To do this, we will create a new action handler called detailscompleteAction(),
which simply tells the user that their details have been saved.
Figure 4-8 shows what the form looks like when initially displayed to users. Note the pre-
populated fields, as well as the lack of a username field and the addition of a password field.
CHAPTER 4 ■ USER REGISTRATION, LOGIN, AND LOGOUT120
9063CH04CMP4 11/20/07 9:20 PM Page 120
Simpo PDF Merge and Split Unregistered Version -
You may want to display the username as a read-only field, but that is a personal preference. If
the user tries to remove a value and then submit the form, a corresponding error message will
be shown, just as in the registration form.
Figure 4-8. The update details form as it is initially shown to users
All the code for this section is included with the downloadable application source code.
Summary
In this chapter we implemented a user registration system, which allows users to create a new
account by filling out a web form. This form requires users to enter a CAPTCHA phrase to
prove that they are people (and not computer programs). Once the user’s registration is com-
plete, their details are saved to the database using DatabaseObject_User and Profile_User,
and the users are then sent an e-mail containing their account details.
We then added code to the application to allow users to log in to their accounts. We
saved their identity to the current session using Zend_Auth so it would be accessible on all
pages they visit.
Additionally, we added logging capabilities to the login system, so both successful and
unsuccessful login attempts would be recorded.
Finally, we created a basic account home page, to which users will be redirected after log-
ging in. We also added code to let them update their account details.
In the next chapter we will move slightly away from the development of the web applica-
tion while we take a look at two JavaScript libraries: Prototype and Scriptaculous. We will be
using these libraries to help give our application a funky interface and make it “Web 2.0.”
CHAPTER 4 ■ USER REGISTRATION, LOGIN, AND LOGOUT 121
9063CH04CMP4 11/20/07 9:20 PM Page 121
Simpo PDF Merge and Split Unregistered Version -
9063CH04CMP4 11/20/07 9:20 PM Page 122
Simpo PDF Merge and Split Unregistered Version -
Introduction to Prototype
and Scriptaculous
In this chapter we will be looking at two JavaScript libraries that are designed to help with
Web 2.0 and Ajax application development.
First, we will look at Prototype, a JavaScript framework developed by Sam Stephenson. Pro-
totype simplifies JavaScript development by providing the means to easily write for different
platforms (browsers). For example, implementing an Ajax subrequest using XMLHttpRequest can
be achieved with the same code in Internet Explorer, Firefox, and Safari.
Next, we will look at Scriptaculous, a JavaScript library used to add special effects and
improve a web site’s user interface. Scriptaculous is built upon Prototype, so knowing how to
use Scriptaculous requires knowledge of how Prototype works. Scriptaculous was created by
Thomas Fuchs.
We will cover the basic functions of Prototype and look at how it can be used in your web
applications. Then we will look at some of the effects that can be achieved with Scriptaculous.
Finally, we will look at an example that makes use of Prototype, Scriptaculous, Ajax, and PHP.
The code covered in this chapter will not form part of our final web application, but in
forthcoming chapters we will use the techniques from this chapter to add various effects and
to help with coding clean and maintainable JavaScript.
Downloading and Installing Prototype
The Prototype JavaScript framework can be downloaded from .
At time of writing, the latest release version of Prototype is 1.5.1.1, and it is a single JavaScript
file that you include in your HTML files. For example, if you store your JavaScript code in the /js
directory on your web site, you would use the following HTML code to include Prototype:
<html>
<head>
<title>Loading the Prototype library</title>
<script type="text/javascript" src="/js/prototype.js"></script>
</head>
<body>
</body>
</html>
123
CHAPTER 5
9063CH05CMP2 10/29/07 8:39 PM Page 123
Simpo PDF Merge and Split Unregistered Version -