HOW TO DESIGN AND WRITE WEB PAGES TODAY phần 5 ppsx
Bạn đang xem bản rút gọn của tài liệu. Xem và tải ngay bản đầy đủ của tài liệu tại đây (2.33 MB, 33 trang )
110 HOW TO DESIGN AND WRITE WEB PAGES TODAY
CSS; but there are always other solutions. To style that heading two, it
might just be better to add a class to it in your XHTML when it appears
before paragraphs (if there is something structurally special about the
heading two in that situation).
Universal Selector
One fi nal selector worth mentioning is the universal selector, * , some-
times called the wildcard selector. Used by itself, it will style all ele-
ments on the page; for example,
* { color: green; }
will style all text on the page to make it appear green. (However, be-
cause
color is inherited, it is generally better to set it using the body
element selector.) For both class and ID selectors, the wildcard selector
is implied. That is, there is no difference between
.warning { color: red; }
and
*.warning { color: red; }
Figure 10.4. Using the child selector, only the fi rst children of this list appear
without bullets; more deeply nested lists still have their bullets.
PRESENTATION AND DESIGN 111
The wildcard selector is at its most useful in relationship selectors.
For example, if a page contained the following XHTML:
<p>
This is <strong>an example</strong> of
<a href="example.htm">styling the text in
<strong>this strong tag</strong></a> <em>as well
as <strong>this strong tag</strong></em>.
</p>
only the fi rst <strong> tag (marking “an example”) is a child of <p> .
The other two are children of other tags (
<a> and <em> ). To style the
strong tags that aren’t children of
<p> , use the wildcard selector:
p * strong { /*Style information*/ }
That would style all strong tags that are grandchildren of paragraphs:
meaning, there must be one or more descendant elements between
p
and
strong for this style to be applied. We could also use the child
selector, rather than the descendant selector, for more specifi c parent-
child relationships (e.g., that only one element appears between
p and
strong ):
p > * > strong { /*Style information*/ }
However, in those two cases, both selectors would apply the same styles
to the XHTML above.
Combining Selectors
You can write selectors as descriptively and specifi cally as you like, so
long as they match actual familial relationships and structural com-
ponents in your XHTML. A match is what triggers a Web browser to
apply the style. For example, to style a paragraph that is an adjacent
sibling of a heading-two tag that is a child of
<div id="content"> ,
provided that
div#content is not a child of the body tag, the CSS
selector would look like:
body * div#content > h2 + p { /*Style information*/ }
However, you’ll probably be relieved to know that it’s rare to have to
write such complicated selectors. Rare, but possible. (See the “Selectors
112 HOW TO DESIGN AND WRITE WEB PAGES TODAY
and Specifi city” sidebar above, which will be useful knowledge if you
have to write complex selectors.)
Grouping Selectors
There are times when you might want multiple structural features in
your XHTML to be styled the same way; for example, both the
<b>
(bold) and
<strong> tag might be styled as bold by your CSS. The
long way to do that would be to write two separate style declarations:
b { font-weight: bold; }
strong { font-weight: bold; }
But by using the comma, both selectors can be styled together. The
comma enables designers to style many additional elements to appear
in bold, such as all of the headings:
b, strong, h1, h2, h3, h4, h5, h6 {
font-weight: bold;
}
Then, any distinct styles for a given selector could be handled by ad-
ditional selectors in the same style sheet; for example,
h1 has already
been styled bold, but to make it purple (as well as bold) requires only
another style declaration that contains only the
color property:
h1 { color: purple; } /*Already made bold above.*/
Pseudo-Class Selectors
CSS provides fi ve special pseudo-class selectors, which are most often
used for styling link text appearing inside the
<a> tag:
•
:link styles a link in its unvisited state
•
:visited styles a link that has been visited
•
:hover styles a link that is being moused over, and should usu-
ally be combined with
•
:focus , which styles a link that has been, for example, tabbed
to by a keyboard
•
:active styles a link during the brief moment that it has been
activated by a mouse click or pressing the Return key on the
keyboard
PRESENTATION AND DESIGN 113
So to make links green and no underline, hovered/active links under-
lined and green, and visited links red, a style sheet might have a cluster
of styles like:
a,a:link { color: green; text-decoration: none; }
a:visited { color: red; }
a:hover,a:active { text-decoration: underline; }
:hover and :focus also work on XHTML elements in forms for en-
tering user information.
COMMON CSS PROPERTIES AND VALUES
There are hundreds of properties in CSS for designing the look of
XHTML pages. References at HTML Dog
1
or Sitepoint
2
are essential to
have on hand as you write CSS; but here are some of the more common
properties to get you started, once you’ve begun to design your site.
Fonts and Text
A basic capability of CSS is styling text. CSS properties enable you to
change fonts and font sizes, as well as setting styles such as bold, italic,
and color. You can also set the amount of space between lines of text.
•
font-family : The font-family property takes a list of fonts;
the Web browser will keep moving through the list until it
fi nds a match on the user’s system. If no match is found, it will
use whatever it has to match the generic font style mentioned
at the end of the list. For example, if the style is
font-family: "Times New Roman", Times, serif;
the Web browser will display Times New Roman (which is
placed in quotation marks because of the spaces in the font’s
name, but place the comma outside the quotation marks); if the
computer the browser is running on does not have Times New
Roman but does have Times, it will use Times; if it doesn’t have
Times either, it will display whatever serif font is available on
the system. For accessibility purposes, always be sure to specify
a generic font alternative at the end of all lists of fonts:
serif ,
114 HOW TO DESIGN AND WRITE WEB PAGES TODAY
sans-serif , or monospace . You can fi nd a current list of
commonly available fonts at this book’s companion Web site,
.
•
font-size : Font sizes can be set in a number of different
units; points (
pt ) are used for print style sheets. Screen style
sheets can use keywords, such as
small , medium , and large ;
pixels (
px ); percentages ( % ); or ems ( em ).
•
font-weight : Font weight can be specifi ed as a number in
multiples of 100, but is more often specifi ed as
bold , which
makes the font appear bold, or
normal , which makes the font
appear normal (not bold). Normal is often used to reset a bold
style inherited from another selector; if the strong tag, by itself,
is set to bold,
strong { font-weight: bold; } , but you
don’t want bold on strong inside of an anchor tag, you’d write:
a strong { font-weight: normal; }
• font-style : Font style is usually either set to italic , for
italics, or
normal for nonitalic text.
•
color : The color property specifi es text color. You can write
color keywords like those found in small boxes of crayons (e.g.,
red , blue , or green ). To gain better control over color, write
the hexadecimal number for a color (e.g.,
#FFFFFF for white)
or the RGB value using
rgb(255,255,255) , which would
also produce white.
•
line-height : Line height can be expressed as numbers
without a unit; for example,
line-height: 1.5; makes
text one-and-a-half-spaced,
line-height: 2; makes text
double-spaced. You can also use pixel units, although that may
cause problems if a user tries to resize the text on your site.
•
text-indent : To indent the fi rst line of text, use the text-
indent property and a value in pixels or ems. To mimic a
hanging indent (see Figure 10.5), run a negative number
for
text- indent and then the same but positive value for
padding-left . For example,
ul.citation li {
text-indent: -50px;
padding-left: 50px;
}
PRESENTATION AND DESIGN 115
Figure 10.5. Example of a hanging indent on a paragraph at the bottom of the
screen; ordinarily, references or works cited should be in list items in ordered or
unordered lists.
Boxes: Borders, Padding, and Margin
Block level elements—such as headings, paragraphs, lists, list items,
and divisions—are by default displayed as boxes; that is, they are as tall
as the content they contain, but block-level elements always take up
the entire width of the screen regardless of their content. Although we
will look more closely at the CSS box model in Chapter 17, for now
it’s important to know that
border and padding will add to the size
of a box whose width or height you specify, while
margin will move
the box away from other elements on the page, or from the edge of the
browser window.
•
border : Border is a shorthand property for specifying the
width, style, and color of a border. To set only the borders
of one edge, use
border-top , border-right , border-
bottom , or border-left .
•
padding : Padding increases the distance between the content
in an element and the edge of the element. Padding can take a
single value to add the same amount of padding to all sides of
116 HOW TO DESIGN AND WRITE WEB PAGES TODAY
the content, or it can take four values in “trouble” order: Top
Right Bottom Left (TRBL).
•
margin : Margin increases the distance between the element
and other elements on your page, or from the edge of the
browser viewport. Without a background color or background
image, margin and padding appear to do the same thing (in-
creased space), but margins are transparent.
•
height : It is possible to set the height on an element. This is
usually done in image replacement situations (see Chapters 14
and 17). The problem with
height is that some browsers will
maintain the height you specify, even if the content is longer/
taller, whereas other browsers will expand the height to fi t the
content.
•
width : By contrast, width is specifi ed quite often, especially to
help build page layouts. It is usually best practice to set widths
on a containing division or ordered or unordered list, rather
COLOR AND CSS
There are three common methods to specify colors in CSS, whether you are col-
oring text, a background, or a border.
The fi rst method is to use color keywords, which give you very limited con-
trol of color; they are like small boxes of crayons, allowing you to specify
red,
blue, yellow, green, and other basic colors in your CSS.
The second method is to use hexadecimal numbers for red, green, and blue
(RGB) color values. This method works very well across operating systems and
Web browsers; a hexadecimal value is made up of six hexadecimal, or hex, num-
bers. (Hex numbers run 0–9 and continue A–F.) The fi rst two numbers are the
red value, the second two the green value, and the third two are the blue value.
So to set a color to the brightest purple (red and blue), a hex value of
#FF00FF
would be required. A Google search for hexadecimal color palette will turn up
dozens of pages that show the hex values for colors; you will also see a 216-color
“Web-safe” palette. Designers used to be restricted to those 216 colors, but can
now use any of the millions of color combinations enabled by hex colors.
The third method, which is supported in all contemporary browsers, is to
specify RGB color in decimal numbers (0 to 255); instead of using the hash (#)
as on hex numbers, RGB requires this form:
rgb(255,0,255);
PRESENTATION AND DESIGN 117
than individual elements. As with height, elements that have
their width specifi ed will add any padding to the total width.
So for example,
ul#navigation {
width: 200px;
padding: 20px;
}
will result in the navigation appearing 240 pixels wide (200
width + 20 left padding + 20 right padding = 240).
Layout and Positioning
The most advanced use of CSS is to create entire page layouts, which
were once created with HTML tables. CSS layouts are much more fl ex-
ible than tables, because they are layered over a page’s structure—not
part of it, as tables were. Chapter 17 looks at building CSS layouts
using these properties:
•
position : There are three common values for positioning
elements:
static , which is the default position of elements as
they appear in source order and therefore the document fl ow;
absolute , which removes an item from the document
fl ow; and
relative , which is usually specifi ed for setting a
positioning context other than the whole browser window for
absolutely positioned items.
•
top , right , bottom , left : Each of these four values can
place an absolute- or relative-positioned element a certain
distance from the top, right, bottom, or left of either the
browser window or its positioning context. Negative values
can also be used, sometimes to the effect of moving things
off screen (such as a navigation intended for users of screen
readers).
•
fl oat : Some Web sites use fl oats to create their layouts; how-
ever, positioning is a much better alternative. But fl oats do
come in handy for some forms of horizontal navigation bars,
or when you have images or other media that you want other
content to fl ow around.
118 HOW TO DESIGN AND WRITE WEB PAGES TODAY
• display : Display is a versatile property for setting how and
whether an item displays.
display: none; causes the item
to disappear from view (potentially also to assistive technolo-
gies, which may be an accessibility issue).
display: block;
causes an item to appear as a block element, while
display:
inline; will make an item appear like an inline element,
such as
<strong> or <em> usually appear.
Design Images and Textures
Background colors help you to add visual interest to your pages. Design
images let you put the fi nishing touches on a design. But unlike images
loaded in the XHTML
<img /> tag, CSS background images keep de-
sign images independent of your page content; redesigning your site,
even its design images, is just a matter of changing your CSS.
•
background-color : Like color , background-color can
be specifi ed using color keywords, hexadecimal numbers, or the
RGB numbers. You can specify a background color on any ele-
ment, as well as
<body> and even <html> to set a background
color for your entire page. Just be sure you have high enough
contrast between your text and background to keep your pages
readable (see Chapter 6).
•
background-image : You can also specify a background image
on any element; for background images that are textures suit-
able for appearing behind text, it’s also a good idea to specify a
similar background color to the image, so as to keep text read-
able in the absence of images, or while the image loads.
•
background-repeat : By default, background images tile hor-
izontally and vertically to fi ll an entire element. However, you
can set
background-repeat: no-repeat; for an image to
appear only once, or to
background-repeat: repeat-x;
to tile horizontally, or
background-repeat: repeat-y; to
tile only vertically.
•
background : You can also use the shorthand background
property; to set only a color, specify the color:
background:
green; . To specify a background image (and a color for im-
ageless devices), the shorthand is
background: green url
PRESENTATION AND DESIGN 119
('tiled-leaves.jpg');
. Again, be sure to have a CSS
reference nearby, especially for shorthand properties like
background and border .
NEXT STEPS
Now that you’ve had an introduction to CSS and have a list of some
(but certainly not all) of CSS’s properties, it will be easier to see how
both XHTML and CSS can be used to build different parts of your
pages: the branding, navigation, content, and so on. To get started,
we will get to work with the Rapid Prototyping Kit (RPK) and, in
Chapter 12, explore writing with source in a text editor.
NOTES
1 . HTML Dog, "CSS Properties," />cssproperties/
2 . SitePoint, “SitePoint CSS Reference,” epoint
.com/css
CHAPTER 11
Rapid Prototyping
One of the better ways to stay motivated to complete your Web site is
to make visible progress on it quickly. The Rapid Prototyping Kit (RPK),
available as a free download at
http://sustainablewebdesign
.com/book/
, will aid you in building a site with solid, standards-
compliant pages.
This chapter looks at the benefi ts of rapid prototyping and the basic
steps of building a Web page using the RPK: gathering content, sketch-
ing out a rough layout, structuring content in XHTML, and adding de-
sign features in CSS. Those steps will be explored further in subsequent
chapters. But consider this chapter part road map, part crash course.
BENEFITS OF RAPID PROTOTYPING
Some books advise you to spend long stretches of time developing wire-
frames, sketches, mockups, and other kinds of throwaway prototypes
that aren’t part of the fi nal project. While those types of development
tools have their place and their benefi ts, my preference is to get to the
work of actually building a site as quickly as possible. It’s better to avoid
throwing away work, and better still to be doing things that directly
reveal the possibilities (and limitations) of Web design with XHTML
and CSS.
Keep in mind that a Web site is never really fi nished; there are just
periods of time when it may not change as much. Rather than trying
to draft the perfect site before going live with it, it’s better to get some-
thing together that works basically the way you want it to. Then you
122 HOW TO DESIGN AND WRITE WEB PAGES TODAY
can devote yourself to the site’s ongoing improvement and expansion
over time.
As Chapter 3 urged, have some content on hand and ideas in mind
as you begin to rapidly prototype your Web site. The best preparation
for building a Web site is to gather and create as much of the site’s con-
tent as possible (knowing, of course, that content will change over time
and based on your design). It is actual content that drives the design
of your site.
THE COMPONENTS OF RAPID PROTOTYPING
One of the reasons that WYSIWYG Web editors are so popular is that
they enable people to build pages quickly, and serve as all-in-one de-
velopment environments. The pages that WYSIWYGs spit out may
not be standards-compliant, lightweight, or easily revised, but they are
pages.
But handwritten, standards-compliant pages can be written quickly,
too, and edited and revised even more quickly, which is why I have cre-
ated the RPK: a collection of fi les and folders to help you build rapid
prototypes for your Web site. These fi les and folders will help you tran-
sition from the sketching and planning aspects of your site develop-
ment to full-on site creation. I call it prototyping , but this activity builds
more than a throwaway prototype like you would get from wireframing
or mockups. This is the real work of building your site. What makes it
prototype-like is your attitude: if something doesn’t work, modify it.
Otherwise, throw it away and start anew.
Put another way, when I am building a new site, I often keep in mind
the words of Eric Raymond: “You often don’t really understand the
problem until after the fi rst time you implement a solution.” For this
reason, “be ready to start over at least once.”
1
Rapid prototyping requires three things:
• The RPK, which is a fl exible, skeletal shell for putting together
almost any type of Web site; I have released the RPK under a
permissive open-source license, so you are free to use it for any
kind of site, including commercial sites.
RAPID PROTOTYPING 123
• A development environment, which should be comfortable
for you to use but experimented with as part of learning (see
Chapter 5).
• A long-term attitude toward writing and designing for the
Web, which expects only steady progress and learning (and
lots of mistakes), not perfection or instant mastery.
THE RAPID PROTOTYPING KIT
The Rapid Prototyping Kit is nothing but a small collection of fi les and
folders for quickly building a Web site (see Figure 11.1). You can open,
manipulate, and customize the kit on any operating system (Windows,
Mac OS, Linux) using any good text editor. You can download it from
the Web site as a ZIP fi le (
.zip ); most operating systems have a built-in
utility for unzipping fi les. But if you’re looking for an open-source pro-
gram for creating and extracting ZIPs and other compressed/archived
fi les, you might consider 7-Zip.
2
Although 7-Zip is a Windows program
in origin, there are versions available for Linux and Mac, too.
(Because I use the RPK in my own Web design work, I frequently
make subtle improvements to it. The companion site at
http://sus
tainablewebdesign.com/book/ notes any changes, although the
EATING MY OWN DOG FOOD
Many open-source projects try to live by a phrase that I have come to love:
“Eat your own dog food.” The idea behind this phrase is that people who create
digital materials (software, templates, plugins, etc.) for others should use the
materials themselves.
That is actually how the RPK came to be: instead of reinventing the wheel for
each of my Web projects, I started working to build a kit that would put a lot of
things in place that I would otherwise be writing from scratch.
So in all of my XHTML sites, including the site that supports this book, I have
eaten my own dog food: they are all based on the RPK, with modifi cations as
necessary (which is exactly the point of the RPK: it’s a start, but you will still
have to modify it to suit your own needs).
124 HOW TO DESIGN AND WRITE WEB PAGES TODAY
version of the RPK used in this book will always be available. Below is
a rough outline of the RPK as of the writing of this book.)
The Rapid Prototyping Kit Folders
Once you extract the RPK’s ZIP fi le, you will fi nd a folder called
htdocs/ (named for easy use with the XAMPP Web server, which is
discussed in Chapter 20).
The
htdocs/ folder is a root Web folder , which contains all of
the fi les and folders that make up a Web site. Depending on your Web
host, you might need to transfer the contents of this folder to
www/ ,
httpdocs/ , or even html/ once you get to the point of uploading
your site (see Chapter 23). But for development and experimenting
purposes,
htdocs/ will be fi ne, especially if you build and test your
site using the XAMPP Web server (see Chapter 20).
In addition to two XHTML fi les, which are described below,
htdocs/ contains several folders as listed in the “Essential Folders”
sidebar in Chapter 5. In short, the Rapid Prototyping Kit includes
folders for every kind of site content that you might wish to post.
Figure 11.1. You can browse the RPK’s fi les on the Web; this is a view of the
contents of the
htdocs/ folder.
RAPID PROTOTYPING 125
(Chapter 20 provides guidance for adding your own folders to struc-
ture and organize your site architecture.) The RPK’s folder structure
can be changed as needed; but if you are new to Web design, it pro-
vides workable solutions to keep the contents of your site organized.
The Rapid Prototyping XHTML Files
In addition to a folder structure intended to help you organize your
site’s content, the RPK includes an XHTML fi le containing a global
structure for all site pages. This fi le is named
prototype.htm . (There
is also a fi le,
prototype-with-comments.htm , that has the same
structure but that explains in detail all of the prototyping features.)
Composed mostly of
<div> tags and some accessibility features,
prototype.htm is what will help you begin to structure your site’s
page content immediately, and enable you to build CSS over the top
of that structure for a standards-compliant page design.
Most Web pages, regardless of their purpose, share a few common
areas:
• A header with the site name and branding
• A content area that may consist of one or more subdivisions of
content
• A navigation bar or menu to help users fi nd their way to other
pages on the site
• A footer area with copyright and licensing information and
other information about the page or site
The next several chapters are devoted to breaking down and consid-
ering the purpose and potential design approaches to those structures,
which are shared across all pages in your site.
The
prototype.htm fi le also refl ects a sensible source order ,
meaning its ordering of content divisions—header, content, naviga-
tion, footer—would make sense and be useful even if there were no
design elements on the page, or if the page were being read aloud to a
low-vision user (see Figure 11.2).
For example, it may surprise you that the navigation appears so far
down in the source order of the page. After all, most Web sites feature
their navigation areas near the top of the page. With CSS positioning,
126 HOW TO DESIGN AND WRITE WEB PAGES TODAY
however, it is possible to place the navigation wherever you would like
it to appear on the page—while keeping the source order friendly to
search engines and low-vision, text-only users (who can jump down
the page to the navigation using special accessibility links discussed in
Chapter 14).
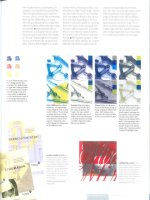
The Rapid Prototyping CSS Files
One of the reasons I’ve found that beginners struggle with CSS de-
sign is that it’s often a toxic mix of designing for a page, but against
the browser. When you view a plain XHTML fi le, without any of your
own CSS styles, the Web browser itself is actually styling the page with
its own built-in set of CSS styles (see Figure 11.3). And as luck would
have it, every browser is a little different in its default styles. And that
makes cross-browser CSS design unnecessarily frustrating, even for
simple things like styling text.
That is why the RPK contains the Yahoo! Reset Min CSS fi le
(
reset.css ),
3
which has the effect of removing any styles that might
be added by a Web browser (Figure 11.4). It gets rid of all the margin
Figure 11.2. A part of prototype.htm visible in the Notepad++ editor,
revealing the fi le’s source order.
Figure 11.3. This is what prototype.htm looks like without any styles of its
own, and therefore styled by the Firefox’s default CSS styles.
Figure 11.4. The same page as Figure 11.3, but with the Reset CSS in place.
128 HOW TO DESIGN AND WRITE WEB PAGES TODAY
and padding around elements, removes all of the font sizes on the dif-
ferent headings, and even removes bold and italic styling from tags that
would otherwise be bold and italic in most browsers.
To account for that, the RPK also includes CSS at the top of
screen.css that adds back some of the common styles that the Reset
CSS removes (see Figure 11.5). Specifi cally, it puts bold back on the
headings and the bold and strong tags; italics back on the italic, em-
phasis, and cite tags; and puts a dotted border back on the acronym
and abbreviation tags. If you do not wish to use the base styles, remove
or adjust them. The basic lesson from the Reset CSS is that you have
to specify everything about your design—even things like bold on tags
where you would expect bold.
Everything else is completely unstyled: there is no space around any
of the headings, paragraphs, or lists, which also lack even bullets. The
idea behind this is that you are now free to style your page exactly as
you want it to appear. If you need bullets next to your unordered lists,
for example, you have to specify them in your CSS. It’s potentially
Figure 11.5. The same page as Figures 11.3 and 11.4, but with some base CSS
styles added back in after applying the Reset CSS. This is how
prototype.
htm will look when you fi rst open your own copy.
RAPID PROTOTYPING 129
extra work to add bullets, yes, but only if you want those and other
design features to appear. If, for example, you want no bullets next to
your navigation list, no problem. They’re not there anyway. But if you
do want bullets, you can be more confi dent that they will appear as you
intend across standards-compliant Web browsers.
For adding those and other custom styles, there is a
screen.css fi l e
that is empty except for the base styles mentioned above and some use-
ful selectors (see Chapter 10) for styling particular content areas and
structural features found in
prototype.htm .
Rapid Prototyping JavaScript Files
There are two JavaScript fi les in the RPK: the jQuery JavaScript
library,
4
which has its own folder, jquery/ , inside of the js/ folder
and a JavaScript fi le,
site.js , where you can write the JavaScript for
your own site. I have included some functions in
site.js that are use-
ful for all kinds of sites and that are explained in Chapter 19.
WRITING AND DESIGNING WITH THE RPK
Chapters 12 through 18 cover the specifi cs of working with different
parts of your pages, but here is a rough outline of how to proceed in your
Web writing and design using the RPK. Note that this is rarely a linear
process; for example, your content may force you to rethink your page
design, and vice versa. Still, every writer should address each of these
tasks as part of Web writing and design, with or without the RPK:
• Generate and gather your text and image content. You will
need to have structured XHTML available before you can test
your design work in CSS; so drafting your page content, and
preparing some images and media (see Chapter 3), will allow
you to accurately describe the structure of your page content as
discussed in Chapters 16 and 18.
• Set up your basic metadata, branding and rough navigation.
Edit the
prototype.htm fi le according to the guidance in the
metadata, branding, and navigation chapters (Chapters 13, 14,
and 15) and save it as
my-prototype.htm so that you can
130 HOW TO DESIGN AND WRITE WEB PAGES TODAY
create pages based on your own starter page that has most of
your shared page features in place. (See Chapter 21 for build-
ing a more dynamic, reusable set of shared content features.)
• Develop a representative page from your site. The urge that
most designers have is to start with the home page, but it is
often very different from the content pages of a site. I recom-
mend starting with an “About Me”–type page; not only will
that likely be representative of your site’s other pages, but its
contents will also help you to fi gure out what other pages to
include in your site.
• Mark up your text and image content in XHTML. Once
you have a rough draft of your content, start tagging it with
XHTML, particularly its headings, paragraphs, and lists (see
Chapter 16).
• Begin to develop site typography. Choosing fonts and font
sizes, as well as line heights, will help you to get your page into
a shape that makes it readable and lead you to creating a site
style guide for text (see Chapter 16). A current list of fonts
that are safe to use on the Web is available at
http://sus
tainablewebdesign.com/book/ ; just because a font is on
your computer does not mean it will be available on others. Be
prepared to adjust your typography later on to maximize read-
ability according to your page layout.
• Sketch out a rough layout for your site. This is mostly about
geography, not the site’s actual look: Where will the header and
footer appear? The navigation? Your content and subcontent
areas? Your rough sketch will guide your work in Chapter 17
on page layout.
• Use CSS to position your page elements. As Chapter 17 dem-
onstrates, CSS layouts are basically illusions, sort of like the
little slider puzzles you may have had as a child, where there
were nine spots for eight pieces of an image to go, and you had
to slide things around in order to get the picture to look the
way it’s supposed to.
• Use an image editor to build in textures and background im-
ages, and fi nalize dimensions, particularly widths, for the dif-
ferent elements on your page. This is where you work to really
RAPID PROTOTYPING 131
build the look and feel of your pages. Once you know you are
able to get your page elements to roughly where you want them,
you can use your image editor to create a striking design.
Cultivating a Long-Term Attitude toward
Site Development
A Web site is, to some extent, always in draft form. You will want to
make changes to your content as your career progresses, or as your busi-
ness or organization develops over time. Your design might start to look
dated, and you will want to update it, too. Here are some basic habits
to cultivating a long-term attitude toward site development (see also
Chapter 8 on sustainability):
• Write as little source as possible. Beginners in my Web design
classes tend to write way more XHTML markup and CSS styles
than are necessary. I think this happens because they are ner-
vous about working in these new languages, and expect that
interesting pages will have lots of markup and CSS styles. That
is not true. The guidance in the chapters that follow will show
you how to write lean source, which makes a site much easier
to revise and maintain.
• Think about relationships between your page elements. One
of the strengths of both CSS and JavaScript is their leverage
of relationships between page elements. For example, perhaps
there is a paragraph you want to display entirely in bold, so you
write something like this:
<p><strong>This paragraph’s text is all in
bold.</strong></p>
But when you see that kind of markup, where two or more tags
mark the same content, it’s time to rethink your strategy. One
alternative to that use of the
<strong> tag is to add a class to
the paragraph, like
<p class="important"> and then in
the CSS specify
p.important { font-weight: bold; } .
Don’t forget to remove the unnecessary
<strong> tags from
your markup, though.
132 HOW TO DESIGN AND WRITE WEB PAGES TODAY
• Think about the general, then move to the specifi c. The
advice above suggests to begin site design by working with
a representative content page from your site; this helps you
think about what most pages will include structurally and how
they will be designed. From that, you can design pages that are
slightly different, such as the home page. Chapter 13 suggests
using a class on the body tag to give you a hook to style differ-
ent types of pages, while maintaining lean source and a single
CSS fi le.
• Devote a little time every week or so to improve something
on your site. Like any other skills, your Web writing and design
skills depend on your exercising them every so often. Coming
back to your site regularly, as your schedule allows, will keep
your current skills fresh—and help you to learn new ones (see
the “Resources for the Future” section for material that will
advance your abilities beyond this book and keep you current
on the latest and best approaches to Web design).
NEXT STEPS
To build and edit your pages with the RPK requires only a simple text
editor, which the next chapter discusses. If you’re comfortable working
with a text editor, you may want to skip ahead to Chapter 13.
NOTES
1. Eric S. Raymond, The Cathedral and the Bazaar: Musings on Linux and
Open Source by an Accidental Revolutionary , revised and expanded ed. (Sebas-
topol, CA: O’Reilly Media, 2001), 25.
2. 7-Zip, “Download,”
3. Yahoo! Developer Network, “YUI 2: Reset CSS,” http://developer
.yahoo.com/yui/reset/
4. jQuery.com, jQuery: The Write Less, Do More JavaScript Library , http://
jquery.com/
CHAPTER 12
Writing with Source in
a Text Editor
If you’re used to writing in a word processor or a WYSIWYG Web edi-
tor, one of the fi rst things that may strike you about writing in a simple
text editor like TextWrangler or Notepad++ is the relative lack of but-
tons and other screen clutter (see Figure 12.1). At fi rst, this lack of
buttons can be disorienting, even alarming: word processors and even
email programs have conditioned us to write with a lot of machine as-
sistance, particularly for formatting.
But the text editor’s simplicity is actually a good thing. In a text edi-
tor, what matters most is what you write yourself. And that’s what you
do in an editor: you write.
The important thing about a text editor, like the Web pages that you
create with it, is that there are no hidden mysteries. The WYSIWYG
acronym’s popular usage aside, in an editor, what you see really is what
you get—at least in terms of the sets of instructions that browsers turn
into Web pages.
If you’ve ever used a word processor, you know that sometimes, weird
things happen. For no apparent reason. A paragraph gets a bullet point
next to it, and nothing you do to appease and reassure the software
seems to remove the bullet point. A paragraph changes font right in
the middle, but again with no apparent or apparently fi xable reason.
Most people confronted with such a situation will just start a new docu-
ment from scratch—or live with the weirdness.
In the text editor, nothing you write and nothing about your Web
pages is hidden from view. And that means that, with even a little bit
134 HOW TO DESIGN AND WRITE WEB PAGES TODAY
of source literacy, you have maximum control over your pages. More
important, when something is wrong with one of your pages, you can
be certain that it’s something you can fi x.
ONE PAGE, MANY VIEWS
To understand why someone would want to roll back to a piece of
software as primitive as a text editor, it’s important to understand that
there are many different views of the same Web page. The text editor
is very good at managing its particular view of the page’s source. But
there are three views to monitor as you write your pages and build your
site:
• File View: The listing of fi les and folders provided by your
computer’s operating system, or on your Web server via an
FTP program, is the fi le view; that is, the list of fi les that
make up your Web page or Web site (see Figure 12.2). It is
best practice, in most situations, to separate the languages
that make up your pages into individual fi les: CSS in
.css
Figure 12.1. The Notepad++ editor, open and empty.