Microsoft Excel VBA Programming for the Absolute Beginner Second Edition phần 4 docx
Bạn đang xem bản rút gọn của tài liệu. Xem và tải ngay bản đầy đủ của tài liệu tại đây (1.44 MB, 50 trang )
The GetOperatorType() procedure tests the Value property of the Option Button controls to
see which operator has been selected by the user. If the user selects the option “Any,” then
the
GetRandomOperator() procedure is called to generate a random number between 1 and 4.
This procedure writes the operator to the merged cells I defined with the name
Operator,
and is only used when the operator is randomly chosen by the program. You should recall
that when a user selects a specific operator, the
Click() event procedure of the Option Button
control writes that operator to the
Operator range.
Private Sub GetOperatorType()
‘Gets the operator selected by the user.
If optAdd.Value = True Then opType = 1
If optSubtract.Value = True Then opType = 2
If optMultiply.Value = True Then opType = 3
If optDivide.Value = True Then opType = 4
If optAny.Value = True Then GetRandomOperator
End Sub
Private Sub GetRandomOperator()
‘Randomly selects the type of operator for the question.
Randomize
opType = Int(4 * Rnd) + 1
Select Case opType
Case Is = 1
Range(“Operator”).Value = “+”
Case Is = 2
Range(“Operator”).Value = “-”
Case Is = 3
Range(“Operator”).Value = “x”
Case Is = 4
Range(“Operator”).Value = “/”
Case Else
Range(“Operator”).Value = “+”
End Select
End Sub
A question’s operands are written to the appropriate cell locations (F8:G9, defined name Left-
Operand
and I8:I9, defined name RightOperand) with the GetOperands() sub procedure that calls
the
GetRandomNumber() function procedure in order to generate and return the operands ran-
domly. If the mathematical operation is division, the
GetRandomNumber() function uses a loop
that will continue to iterate until a second operand is found that results in a non-fractional
answer. The VBA operator
Mod is used to test the two random numbers for a remainder of zero.
139
Chapter 4 • Loops and Arrays
140
The GetOperands() sub procedure is called from the Click() event of the Command Button
control
cmdBegin and the Change() event of the worksheet (listed later).
Private Sub GetOperands()
‘Adds randomly choosen operands to the worksheet.
Dim rightOperand As Integer
rightOperand = GetRandomNumber(1)
Range(“RightOperand”).Value = rightOperand
Range(“LeftOperand”).Value = GetRandomNumber(rightOperand)
End Sub
Private Function GetRandomNumber(divisibleBy As Integer) As Integer
‘Generates the random numbers for the operands.
Dim ranNum As Integer
Const upperLimit = 10
Randomize
‘———————————————————————————-
‘Generate the random integer. If operation is division,
‘then make sure the two operands are evenly divisible.
‘———————————————————————————-
Do
ranNum = Int(upperLimit * Rnd) + 1
Loop Until ((opType <> 4) Or (ranNum Mod divisibleBy = 0))
GetRandomNumber = ranNum
End Function
The game is now ready for the user to enter his or her answer, so the timer must start count-
ing down.
Starting the Timer
The essence of the Math Game program is contained within the sub procedure appropriately
named
MathGame(). This procedure controls the game’s clock and calls the sub procedures
that score the user’s answers when the clock reaches zero. The clock is controlled with a
very special method of the
Application object—the OnTime() method. You can use the OnTime()
method to set up repetitive calls to the same procedure based on a given time increment; in
this case, one second.
Microsoft Excel VBA Programming for the Absolute Beginner, Second Edition
141
Chapter 4 • Loops and Arrays
To begin, the MathGame() procedure uses the integer variable numSeconds to hold the amount
of time left in the game. The length of the game is held in the constant
TIMEALLOWED. The
number of seconds left in the game is calculated by the VBA function
DateDiff() using the
current time and the time the program was initiated with the click of the Command Button
control
cmdBegin (stored in the module level variable curDate). This value is written to cell I3
on the worksheet with a defined name of
Clock.
In order to count down in one second intervals, a date one second later than the current time
is calculated by adding the two dates returned from VBA’s
Now() and TimeValue() functions.
This date is then assigned to the variable
nextTime. The Now() function returns the current
date and time and the
TimeValue() function returns a date converted from a string (formatted
using hours:minutes:seconds). I passed the
TimeValue() function a string specifying one
second (
“00:00:01”). As you are about to see, the nextTime variable is used to specify the next
time the
MathGame() procedure executes.
The most interesting statement in the
MathGame() procedure comes next. The OnTime()
method that belongs to the Application object is set up to repeatedly call the MathGame() sub
procedure. The
OnTime() method takes up to four parameters for input, two of which are
required. Because I only need to pass the
OnTime() method three parameters, I am using
named arguments. The
EarliestTime parameter represents the next time the system will call
the procedure specified by the
Procedure parameter, in this case the MathGame() procedure.
The
EarliestTime and Procedure parameters are required. The other two parameters, both of
which are optional are
LatestTime and Schedule. The LatestTime parameter represents the
latest time the procedure specified by the
Procedure parameter can be called; however it is
not required here. The
Schedule parameter is used to schedule a new call to the procedure
specified by the
Procedure parameter. In this case, Schedule must be used and set to true in
order to ensure the next call to the
MathGame() procedure occurs. It is important to point out
that between calls to the
MathGame() procedure, the system is allowed to process other
events; thus, the system is not locked up processing code as it would be if we used a looping
structure to handle the timer. This allows the user to enter answers into the appropriate
worksheet cell. The
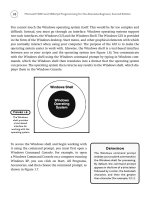
MathGame() procedure is now set up to execute every second. Figure 4.16
shows the Math Game program worksheet during a game. The timer started at 60 seconds.
Following the initial use of the
OnTime() method, an If/Then decision structure is used to
check the value of the timer. If the timer is less than or equal to zero, then the
OnTime()
method is used to disable the timer by setting the Schedule parameter to false; thus, the
MathGame() procedure will no longer be called. Without this statement, the MathGame() pro-
cedure will be called every second and drastic action (ctrl+alt+break) will have to be taken
to stop the program.
142
After the timer reaches zero, calls to the procedures EnableControls(), ClearBoard(), and
ScoreAnswers() are made to enable the ActiveX controls, clear the values in the spreadsheet
cells containing the question and answer, and score the results of the game.
Private Sub MathGame()
‘Manages the clock while testing. Calls scoring procedures when test is over.
Dim numSeconds As Integer
Dim nextTime As Date
Const TIMEALLOWED = 60
numSeconds = DateDiff(“s”, curDate, Now)
‘————————-
‘Start the clock.
‘————————-
Range(“Clock”).Value = TIMEALLOWED - numSeconds
nextTime = Now + TimeValue(“00:00:01”)
Application.OnTime EarliestTime:=nextTime, Procedure:=”MathGameSheet.MathGame”,
Schedule:=True
Microsoft Excel VBA Programming for the Absolute Beginner, Second Edition
Figure 4.16
The Math Game
worksheet as
the program
is running.
‘————————————————————————————————-
‘Disable timer when it reaches zero, score results, and clean up
‘worksheet controls/cells.
‘————————————————————————————————-
If (TIMEALLOWED - numSeconds <= 0) Then
gameRunning = False
Application.OnTime EarliestTime:=nextTime, Procedure:=”MathGameSheet.MathGame”,
Schedule:=True
EnableControls True
ClearBoard
ScoreAnswers
Application.MoveAfterReturn = True
End If
End Sub
The MathGame() procedure handles the timer and scoring when the game is over, but it does
not collect the questions or user’s answers. Instead, these values are captured in the
Change() event of the worksheet.
Collecting Answers
The Change() event of a worksheet triggers when the content of cells on the worksheet are
changed by the user. In the Math Game program, this event will trigger every time the user
enters an answer. Excel passes the altered cell’s range to the
Change() event via the Target
parameter. The user’s answers are entered into the merged range L8:M9 defined with the
name
Answer; therefore, the value of the Target parameter will be $L$8.
If the user has entered the answer in the correct cell, a series of statements are executed. A
modicum of input validation is included in the conditional for the
If/Then decision struc-
ture. If the user presses Enter without typing in an answer, then no code inside the
If/Then
decision structure is executed. This forces the user to enter an answer for each question. Fur-
thermore, the
gameRunning variable must be true or the code in the decision structure will
not execute. (This prevents the program from displaying a question when the game is over.)
If the user does answer a question, then the
numQuestions variable is incremented by one,
the
StoreQuestions() sub procedure is called, and a new question is obtained from calls to
the
GetRandomOperator() (if required) and GetOperands() procedures and displayed.
Private Sub Worksheet_Change(ByVal Target As Range)
‘Stores answer entered by the user and gets next question.
143
Chapter 4 • Loops and Arrays
144
If (Target.Address = “$L$8”) And (Range(“Answer”).Value <> “”) And gameRunning Then
numQuestions = numQuestions + 1
StoreQuestions
If optAny.Value = True Then
GetRandomOperator
End If
GetOperands
Range(“Answer”).Select
Selection.Value = “”
End If
End Sub
The StoreQuestions() sub procedure is called from the Change() event of the worksheet, so
the code within is executed every time the user enters an answer to a question. The dynamic
variable arrays declared at module level are re-dimensioned to increase their size by one
with each call to this procedure. The
Preserve keyword is used to ensure that previously
stored values are not lost.
The two-dimensional array
mathQuestions maintains the same number of dimensions, and
only the upper bound of the last dimension changes, as required when using the
Preserve
keyword. Thus, the mathQuestions array can be thought of as containing two rows (indexed
by 0 and 1) and n columns where n is equal to the number of questions asked during the game.
The operands (cells F8 and I8 defined as
LeftOperand and RightOperand, respectively) for each
question are stored in rows 0 and 1 of the
mathQuestions array. The mathematical operator
used and the user’s answers are stored in the arrays
mathOperators and userAnswers, respec-
tively. The index value in the arrays used to store the mathematical operators and the user’s
answers is identical to the index value in the array used to store the corresponding question.
This is critical for outputting these values to the correct worksheet cells later in the program.
The user’s answer is passed to the
Val() function before storing in the array. This serves as
more input validation. If the user enters a non-numerical string, then the answer will usu-
ally be set to zero depending on the string, as discussed earlier in this chapter.
Private Sub StoreQuestions()
‘Stores the questions and answers in dynamic arrays.
ReDim Preserve mathQuestions(1, numQuestions) As Integer
ReDim Preserve mathOperators(numQuestions) As String
ReDim Preserve userAnswers(numQuestions) As Integer
Microsoft Excel VBA Programming for the Absolute Beginner, Second Edition
mathQuestions(0, numQuestions - 1) = Range(“LeftOperand”).Value
mathQuestions(1, numQuestions - 1) = Range(“RightOperand”).Value
mathOperators(numQuestions - 1) = Range(“Operator”).Value
userAnswers(numQuestions - 1) = Val(Range(“Answer”).Value)
End Sub
After the timer has reached zero, the game is over and the last question is cleared with the
ClearBoard() sub procedure before the user’s results are scored and tabulated.
Private Sub ClearBoard()
‘Clears the operands and the answer from the worksheet cells.
Range(“LeftOperand”).Value = “”
Range(“RightOperand”).Value = “”
Range(“Answer”).Value = “”
End Sub
Scoring the Answers
The ScoreAnswers() sub procedure called at the end of the game from the MathGame() proce-
dure reads the questions asked during the game from variable arrays and displays them on
the worksheet. This procedure also checks the user’s answers and outputs the score as a per-
centage of questions answered correctly.
I use a
For/Next loop to iterate through the arrays holding the questions and answers, because
I know the number of questions that were asked during the game is stored in the module
level variable
numQuestions. The lower bound on the arrays are zero, so the looping variable
ranges from zero to the number of questions less one.
String concatenation is used to output the questions asked during the game to column A on
the worksheet. The user’s answers are output to column B on the worksheet. Using the loop-
ing variable as the indices for the arrays guarantees that the questions match their corre-
sponding answer.
To display the correct answer in column C of the worksheet, a formula string is created and
copied to the appropriate cell using the
Formula property of the cell range. Because a _ was
used to display multiplication in column A, an
If/Then decision structure replaces it with
Excel’s required multiplication operator (*) in the formula for column C. If the user entered
a wrong answer, the answer is displayed in red and the integer variable
numWrong is incre-
mented by one. Finally, the user’s score is calculated and output to the end of column B on
the worksheet as a formula.
145
Chapter 4 • Loops and Arrays
146
Private Sub ScoreAnswers()
‘After the test is over, the user’s answers are scored and the
‘results written to the worksheet.
Dim I As Integer
Dim numWrong As Integer
‘————————————————————————————————————-
‘Loop through the arrays and score answers. Mark wrong answers in red.
‘Write the questions, user answers, and correct answers to the worksheet.
‘————————————————————————————————————-
For I = 0 To numQuestions - 1
Cells(I + 2, “A”).Value = mathQuestions(0, I) & mathOperators(I) &
mathQuestions(1, I)
Cells(I + 2, “B”).Value = userAnswers(I)
If mathOperators(I) = “x” Then ‘Excel requires asterisk (*) for multiplication.
Cells(I + 2, “C”).Formula = “=” & mathQuestions(0, I) & “*” &
mathQuestions(1, I)
Cells(I + 2, “B”).Font.Color = RGB(0, 0, 0)
Else
Cells(I + 2, “C”).Formula = “=” & mathQuestions(0, I) &
mathOperators(I) & mathQuestions(1, I)
Cells(I + 2, “B”).Font.Color = RGB(0, 0, 0)
End If
If Cells(I + 2, “B”).Value <> Cells(I + 2, “C”).Value Then
Cells(I + 2, “B”).Font.Color = RGB(255, 0, 0)
numWrong = numWrong + 1
End If
Next I
‘———————————————————————
‘Compute % correct and write to the worksheet.
‘———————————————————————
Cells(I + 2, “A”).Value = “Score (%)”
Cells(I + 2, “B”).Font.Color = RGB(0, 0, 0)
Cells(I + 2, “B”).Formula = “=” & (numQuestions - numWrong) / numQuestions & “*100”
End Sub
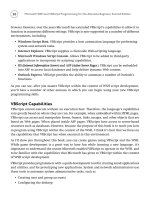
Figure 4.17 shows the Math Game program worksheet immediately after a game is played.
Microsoft Excel VBA Programming for the Absolute Beginner, Second Edition
This concludes the Math Game program. I wrote the program following the algorithm
described earlier. I added small details usually related to formatting the spreadsheet to the
appropriate procedures after the program was working to satisfaction.
I wrote the Math Game program using a single code module. To add a small amount of com-
plexity to the program, you could separate the procedures listed earlier into two or more
code modules. For example, some programmers prefer to leave only event procedures in
object modules and locate all of their custom procedures in standard modules. Splitting the
code for the Math Game program into an object and standard module is left and an exercise
for the reader. As a hint, be aware of variable scope for those variables required in both modules.
Chapter Summary
You covered a significant number of topics concerning VBA programs in this chapter. The
looping code structures (
Do-Loop and For/Next) and variable arrays provide enormous power
by allowing us to write more efficiently and significantly shorten the code.
You also examined a number of methods used for interaction with an Excel worksheet
including input validation, entering formulas in spreadsheet cells, and using the
Change()
event procedure of a worksheet.
147
Chapter 4 • Loops and Arrays
Figure 4.17
The Math Game
program.
148
Microsoft Excel VBA Programming for the Absolute Beginner, Second Edition
The Math Game used all of these tools plus a special method (OnTime()) of the application
object to repeatedly call a procedure at a specified time interval.
You also examined the macro recorder and Forms toolbar controls.
The next chapter introduces the Excel object model concentrating on the objects at the top of the
hierarchy. You have seen many examples of Excel objects in the first four chapters of this book.
Now it is time to take an in depth look at these objects, their properties, and their methods.
C HALLENGES
1. Write a procedure that outputs a random number to the first 100 cells in column
A of an Excel worksheet.
2. Add a statement to the procedure from the previous question that inserts a
formula into cell A101 and that calculates the sum of the first 100 cells. If you
can’t get it on your own, record a macro and examine the code.
3. Write a VBA procedure that uses a For/Next loop to store the contents of the first
10 cells in row 1 of an Excel worksheet to a variable array.
4. Write a VBA procedure that uses nested For/Next loops to store the contents of
the range A1:E5 in an Excel worksheet to a two-dimensional array.
5. Write a VBA procedure that uses nested For/Next loops to store the contents of
the range A1:E5 in each of three Excel worksheets to a three-dimensional array.
6. Change the procedures above using an input box to ask the user for the number
of rows and/or columns and/or worksheets in which to retrieve values for storage
in the same arrays. Use Do-loops and dynamic arrays. Add validation to the input
box.
7. Record a macro that formats a worksheet to look like the worksheet in the Math
Game, less the ActiveX controls.
8. Modify the Math Game program so that its timer starts at the specified number
of seconds entered by the user in cell I3.
9. Modify the Math Game program so that the questions and answers are written to
the spreadsheet as the user enters each answer.
10. Change the Math Game program such that it uses two code modules. The same
object module for the worksheet and a standard module. Leave only the event
procedures in the object module for the worksheet. Hint: You will have to
increase the scope of those variables and procedures referenced in both modules
to public.
Basic Excel
Objects
5
CHAPTER
T
he preceding chapters concentrated on fundamental programming
constructs common to all languages. Now it is time to introduce some
VBA- and Excel-specific programming concepts and capabilities. You will
be using programming tools referred to as objects, specifically some of the objects
available in VBA and Excel.
In this chapter you will learn about:
• Objects
• VBA Collection Objects
• The Object Browser
• The Application Object
• Workbook and Window Objects
• The Worksheet Object
• The Range Object
• With/End With and For/Each
• Adding sound to your VBA program
Project: Battlecell
The Battlecell program will familiarize you with many of Excel’s top level and
most common objects, as well as reinforce code and data structures previously
CHAPTER
150
Microsoft Excel VBA Programming for the Absolute Beginner, Second Edition
discussed. You will also become familiar with the Object Browser, in order to access all of
the objects in the available libraries, not just in the Excel library. The Battlecell program
relies heavily on Excel’s
Application, Workbook, Worksheet, and Range objects. The program is
a computer simulation of the classic Battleship game you may have played as a kid, and a
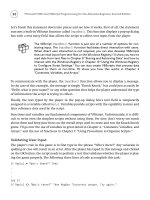
natural choice for a spreadsheet application. Figure 5.1 shows the Battlecell game board
designed from an Excel worksheet with a game in progress.
VBA and Object-Oriented Programming
If VBA is your first programming language, then chances are you have not heard of object-
oriented programming. Don’t worry if you haven’t heard of it; VBA does not qualify as an
object-oriented language. There are some technicalities that disqualify VBA from calling
itself “object-oriented,” but VBA still shares many of the same concepts as genuine object-
oriented languages. Mainly, object-oriented languages and VBA commonly share the exis-
tence of objects and some of the tools used to manipulate these objects. These tools include
properties, events, and methods. (Other languages may call these tools something different,
but they are really the same thing.) You have already seen several VBA objects in action. For
example, in Chapter 1, the project code contained many references to Excel objects and
some of their properties. Objects must be discussed in VBA at a relatively early stage. Objects
show up early, often, and everywhere in your VBA code. This is a good thing, because your
programs can’t really do much without them.
Figure 5.1
The Battleship
game sheet.
Objects Defined
There is no need to get too abstract here with the definition of an object. It really is a pretty
simple thing to understand. You can think of objects as separate computer programs with
specific (and often common) functions that are available for repeated use in your programs.
Objects are dynamic in that they can be easily manipulated in code with the various parameters
used to define them.
In one common analogy, objects are equated as nouns in the English language. A program-
ming object can be described with adjectives (properties), be capable of performing different
actions with verbs (methods), and be built out of other objects. As an example, consider a
bicycle. A bicycle can be described by its size, color, and type (among other things). For example,
it might be a 26" blue ten-speed. The color, size, and type are all adjectives that describe the
151
Chapter 5 • Basic Excel Objects
In the Real World
Although C++ has been around for a few years, most object-oriented languages are relatively
new. Java is an object-oriented language that gained a strong following with the rise in popu-
larity of the World Wide Web. Other languages such as VBA, and some web-based languages
(e.g., JavaScript, Perl) do not satisfy all the definitions required for the object-oriented label;
however, all of these languages use objects extensively and thus serve as a good introduction
to object-based programming, if they aren’t totally object-oriented.
Program objects, such as ActiveX controls in VBA, allow greater flexibility and power in soft-
ware development because they can be developed by one group of programmers and used by
other groups in virtually any application. It is this ability to re-use program objects and the
time savings it creates that make objects so popular among programmers.
The requirements for a language to be designated as object-oriented are really quite strict.
One requirement is that object-oriented languages must allow programmers to build new
classes (object definitions). Furthermore, the objects created from a new class must support
inheritance. Inheritance refers to the ability of one class to inherit from another. This simply
means that the new class (also known as the derived class) will have all the members of the
inherited class (also known as the parent class). Although VBA allows programmers to define
new classes, it does not support inheritance and for this reason (and others not beyond the
scope of this text), VBA is not considered object-oriented.
The latest version of Visual Basic (VB .net) and the relatively new development language C#
satisfy object-oriented requirements. The popularity of object-oriented languages is likely to
continue and the migration of object-based languages to true object-oriented status is also
probable (if they survive). However, it appears that for the time being, VBA will remain object-
based, and not object-oriented.
152
bicycle. Thus, they are all properties of the bicycle. A bicycle can also perform various actions;
it can move straight or turn when ridden. Moving and turning are action verbs that tell you
what tasks the bicycle can perform. Moving and turning are methods of the bicycle. Finally,
the bicycle is built out of other objects such as a frame, wheels, handlebars, and pedals.
These objects, in turn, have their own properties and methods. For example, a bicycle wheel
is of a certain diameter, is built out of aluminum or titanium alloys, and it turns or rolls.
The diameter and type of material are properties of the wheel object, and to turn or roll
would be two of its methods. So you see, there is sort of a hierarchy to the objects in your
bicycle and the bicycle object itself sits at the top of the hierarchy.
I could take it further. For example, a wheel is built from a tire, rim, and spoke objects. The
tires are built from organic polymers, and so on, and so on. The description continues until
eventually you will get to the objects at the very bottom of the hierarchy. These objects may
have properties and methods, but they are not built out of any other objects. It may take you
awhile to get to this level if you really think about your bicycle. Eventually you could break
the bicycle down to its subatomic components. Of course, then you would have to stop
because you would reach the limit of human knowledge. Fortunately, in any program, the
object hierarchy does not extend that far and is well defined by the programmer. In this
case, you get help from Excel and VBA in defining the objects, but it is still up to you to
choose which objects you want or need to use in your program.
Now there is one more attribute of an object that has not yet been mentioned (at least not
here; but it was discussed in Chapter 3). Consider what happens when a tire on your bicycle
goes flat; or when the rider pedals the bicycle; or when the rider turns the handlebars on
the bicycle. These are all events that occur when some action is carried out. Don’t be confused
with the method of the bicycle turning and the event of the rider turning the handlebars.
They are not the same—one depends on the other. In this particular case, the bicycle turns
when the rider turns the handlebars. Events are actions triggered by an external stimulus
of the object. You write code to use the
turn_bicycle() method when the rider triggers the
handlebar_turn() event. The code that is executed (invoking the turn_bicycle() method) is a
coded response to the user’s stimulus (
handlebar_turn() event).
Object events are very powerful programming tools, as they allow for a much more interac-
tive experience between the program and the user. Think about what a program would be
like without events. Once you started the program running, you would not do anything else
except maybe type in some information when prompted by the program. That is, the pro-
grammer would completely dictate the flow of the program. If you remember computers
prior to GUI’s then you may remember this kind of programming. You have already seen
some of the events associated with a couple of Excel’s objects in previous chapters. Now, you
should have a little better understanding as to why events exist.
Microsoft Excel VBA Programming for the Absolute Beginner, Second Edition
Now let’s consider some of the objects in Excel. If you are a regular user of Excel or any
spreadsheet program, then you are already familiar with many of its objects. For example,
there are
Workbook objects, Worksheet objects, Range objects, Chart objects, and many more.
The rest of this chapter is devoted to showing you how to use a few of Excel’s objects, and in
particular, some of its top-level objects.
VBA Collection Objects
Collection objects in VBA are fairly straightforward—they are exactly what the name
implies: a group or collection of the same object types. Referring to the bicycle example
again, consider a collection of bicycles. The bicycle objects in your bicycle collection can be
different sizes, colors, and types, but they are all bicycles.
Collection objects allow you to work with objects as a group rather than just working with
a single object. In VBA, collection objects are typically denoted with the plural form of the
object types that can belong to a collection (not all can). For example, any
Workbook object
belongs to a
Workbooks collection object. The Workbooks collection object contains all open
Workbook objects. The Excel window shown in Figure 5.2 contains three open Workbook
objects (Book1, Book2, and Book3).
To select a
Workbook object from the Workbooks collection object, the code would look like this:
Workbooks(2).Activate
153
Chapter 5 • Basic Excel Objects
Figure 5.2
Excel Workbook
objects.
Workbook objects
Worksheet objects
154
This line of code uses the Workbooks property of the Application object (more on this later)
to return a single
Workbook object from the Workbooks collection object and then uses the
Activate() method of the Workbook object to select the desired object.
The required syntax when addressing objects in VBA is object.property or
object.method. You may also specify multiple properties in order to reach the
desired property or method. For example, Application.ActiveSheet
.Range(“A1”).Font.Bold = True
is of the form object.property.property.property
.property
because ActiveSheet, Range(“A1”), and Font all represent properties
that return objects. Bold is a Boolean property of the Font object and its value is
set to true. As you may have guessed, this line of code turns on bold formatting
in cell A1 of the current worksheet.
So, from the collection of Workbook objects shown in Figure 5.2, which Workbook object does
the previously mentioned line of code return? If you answered
Book2, you’d be wrong,
although that is the intuitive answer. The number in parentheses refers to a relative index
number for each
Workbook object as it was created. (In this case, Book1 was created first, Book2
second, and Book3 third.) The confusing part is that an index value of 1 is reserved for the
currently selected
Workbook object, regardless of when that Workbook object was created. So
to select
Book2 you would actually have to use an index value of 3 in the above line of code.
An index value of
2 would return Book1 and an index value of 1 or 4 would return Book3.
There will always be two choices of an index for the currently selected
Workbook object, the
value
1 because it is reserved for the currently selected object, and the value corresponding
to its sequence in being created. The behavior of the
Workbooks collection object can be con-
fusing, but with practice, patience, and above all, testing, I’m sure you can figure it out.
To avoid confusion, you can select a workbook unambiguously—if you know the name of the
desired
Workbook object—using the following line of code.
Workbooks(“Book2”).Activate
Here you simply include the name of the object as a string in place of the index number.
Obviously, this is much less confusing and makes your code easier to read, so I recommend
doing it this way whenever possible.
When you need to step through several objects in a collection, use a loop and a
looping variable to represent the index of the object to be returned.
For I=1 To 3
If Workbooks(I).Saved Then Workbooks(I).Close
Next I
TRICK
HINT
Microsoft Excel VBA Programming for the Absolute Beginner, Second Edition
Other examples of collection objects include Worksheets, Windows, and Charts. For example,
each of the
Workbook objects in Figure 5.2 contains three Worksheet objects that belong to sep-
arate
Worksheets collection objects. There are three Worksheets collection objects in this
example because they are lower in the object hierarchy than the
Workbook object.
The Object Browser
The VBA IDE includes a convenient and very useful tool for browsing through all available
objects for a project and viewing their properties, methods, and events. It is called the
Object Browser, and you’ll use it to view Excel’s object model and learn about what objects
are available for you to use in your programs. You can also view all procedures and constants
from your current project.
To open the Object Browser, select View, Object Browser, as shown in Figure 5.3, or simply
hit F2. Figure 5.4 shows the Object Browser.
155
Chapter 5 • Basic Excel Objects
Figure 5.3
Selecting the
Object Browser
from the VBA IDE.
Figure 5.4
The Object
Browser.
Object libraries
Object definitions
(Classes)
Object members
(properties,
methods, and
events)
156
To use the object browser, first select the library from which you need to view the desired
object, or select All Libraries (see Figure 5.5).
An object library is a collection of objects provided by a specific application. You may notice
libraries for
Excel, Office, VBA, and VBAProject. You may see others as well, but it is these spe-
cific libraries that are of the most interest to you now. As you might have guessed, the
Excel
library contains objects specific to Excel and the Office library contains objects common to
all MS Office applications (Word, PowerPoint, Excel, etc.). The
VBA library adds a few objects
specific to the VBA programming language, and the
VBAProject library represents objects in
the project currently open in Excel (that is, a workbook). In this chapter, it is the
Excel
library that is of the most interest to you because it’s the library that contains specific
objects that will allow you to interact with and extend Excel’s capabilities.
After selecting the
Excel library you’ll see a list of all available objects within Excel in the bot-
tom left window of the Object Browser (see Figure 5.4 or 5.5). The window is labeled Classes
but don’t let that confuse you. A class is just an object definition. A class definition is used to
create an instance of the object it defines. This is all just technical jargon that you don’t need
to worry about right now—just remember that when you see the word class, you should imme-
diately think “object.” Also, remember that the class/object list represents all objects available
for you to use in your program. After selecting an object from the list, the available properties,
methods, and events of the selected object will be displayed in the window on the bottom right
side of the Object Browser (refer to Figure 5.4). This window is labeled Members, because these
items belong to, or are members of the selected object. When you select an item in the mem-
bers list, information about that member—the member type, required syntax, and data type—
will be displayed at the very bottom of the Object Browser. Once you become more familiar
with the Object Browser, and VBA in general, you should find this information more helpful.
Microsoft Excel VBA Programming for the Absolute Beginner, Second Edition
Figure 5.5
Selecting an
object library.
To learn more about a specific object or one of its members, simply select an
item in the Object Browser and press F1. The Help window will appear, display-
ing the result for the selected item in much more detail than what you see in the
Object Browser.
If you prefer a more graphical representation of the Excel object model, look for the Object
Model chart in the Help window under Microsoft Excel Objects. The chart, shown in Figure
5.6, displays the object hierarchy and provides links to documentation on the entire Excel
Object Model.
Whatever tool you prefer to use (the Object Browser or Object Model chart), keep in mind
that there is a hierarchy of objects that must be followed. You should think of the object
hierarchy as a path to the object of interest much like a file path in a computer’s operating
system. It is a good idea to use these tools to set a specific object property or invoke an
object’s method when you’re having difficulty navigating through the object hierarchy.
Consider a simple example. How do we insert the string
“VBA is fun!” into cell A4 of Sheet2
in Book2 from the project shown in Figure 5.2? From examples in previous chapters, you
know that you can use the
Range property of the Application object.
Range(“A4”).Value = “VBA is fun!”
TRICK
157
Chapter 5 • Basic Excel Objects
Figure 5.6
The Excel Object
Model.
158
However, the line of code above will insert the string into the current or active worksheet,
and this may not be your target worksheet. To ensure the string finds the correct target, first
select the desired workbook.
Workbooks(“Book2”).Activate
To find the next object in the desired path to cell A4 of Sheet2 of Book2, look at the Object
Browser. Since the above line of code gets you to the
Workbook object, start by selecting the
Excel object library and
Workbook from the list of objects. Immediately, the members of the
Workbook object are displayed on the right. If you scroll through this list you will eventually
come to a property called
Worksheets, as shown in Figure 5.7.
To select
Sheet2, use the following code.
Workbooks(“Book2”).Worksheets(“Sheet2”).Activate
The second part of this statement (Worksheets(“Sheet2”)) is really the same code as written
for selecting the
Workbook object from the Workbooks collection object. The Worksheet object
Sheet2 is selected from the Worksheets collection object. This code uses the Worksheets prop-
erty of the
Workbook object to return a Worksheet object from the Worksheets collection
object. Since the
Worksheet object is lower in the object hierarchy than the Workbook object,
it follows it in the line of code above. Finally, the
Activate() method of the Worksheet object
selects
Sheet2 within the workbook Book2. That was a mouthful, but if you work through
the hierarchy slowly, and view each of these components through the Object Browser, it
will make sense.
To add the string
“VBA is fun!” to cell A4, use the following code:
Workbooks(“Book2”).Sheets(“Sheet2”).Range(“A4”).Value = “VBA is fun!”
Microsoft Excel VBA Programming for the Absolute Beginner, Second Edition
Figure 5.7
Viewing the
Worksheets
property of the
Workbook object.
The Range property is found in the list of members for the Worksheet object, as shown in
Figure 5.8. Note that the
Cells property could have also been used.
Workbooks(“Book2”).Sheets(“Sheet2”).Cells(4, “A”).Value = “VBA is fun!”
The Range property returns a Range object that represents one or more cells in a continuous
block on a worksheet. In this case, the
Range property returns the Range object that repre-
sents cell
A4. Next, the Value property of the Range object is used to set the contents of cell
A4 to the desired string “VBA is fun!”, as shown in Figure 5.9.
159
Chapter 5 • Basic Excel Objects
Figure 5.8
Viewing the
Range property
of the Worksheet
object.
Figure 5.9
Inserting a string
in a worksheet
cell.
160
You may be wondering if you really need to work your way through the entire object hierarchy
to set one property? The answer is yes, but only if each object referenced in the code needs to be
identified out of a collection of objects. For example, if there is only one
Workbook object open, then
Sheets(“Sheet2”).Range(“A4”).Value = “VBA is fun!”
works just as well as the previous code. Actually, this code will execute regardless of how
many
Workbook objects are open, but it will put the string in the currently selected or active
workbook. Likewise,
Range(“A4”).Value = “VBA is fun!”
executes, but it will put the string in the active worksheet; thus, each object qualifier is nec-
essary only as long as it is needed to identify one specific object out of several possibilities.
Top-Level Excel Objects
I will start at the top of the hierarchy in the Excel object model and work my way through
the first few objects. There are too many objects in the model to cover them all, but the goal
of this chapter is to get you comfortable navigating through the object model and learning
how to use new objects on your own.
The Application Object
The Application object is the top-level object in Excel’s object model. It represents the entirety
of the Excel application (see Figure 5.6). As the top-level object it is unique and thus, seldom
needs to be addressed in code; however, there are a few occasions when you must use the
Application object’s qualifier in code. One example is the OnTime() method used in the Math
Game program in Chapter 4. Other examples where the
Application object must be explicitly
referenced in code include the
Width and Height properties used to set the size of the applica-
tion window, and the
DisplayFormulaBar property used to show or hide the formula bar.
Application.Width = 600
Application.Height = 450
Application.DisplayFormulaBar = True
For the most part, you need to use the Application object qualifier to set properties pertain-
ing to the appearance of the Excel window, such as shown above, or the overall behavior of
Excel as shown below.
Application.Calculation = xlManual
Application.EditDirectlyInCell = False
Application.DefaultFilePath = “C:\My Documents”
Microsoft Excel VBA Programming for the Absolute Beginner, Second Edition
161
Chapter 5 • Basic Excel Objects
The Application object qualifier must also be used with the very helpful ScreenUpdating and
WorksheetFunction properties.
Application.ScreenUpdating = False
Range(“A11”) = Application.WorksheetFunction.Sum(Range(“A1:A10”))
However if you just need to set properties of lower-level objects, then the Application object
qualifier is not needed.
ActiveCell.Formula = “=SUM(A1:A10)”
The line of code above uses the ActiveCell property of the Application object to return a
Range object. The Range object returned by this line of code is the currently selected spread-
sheet cell. The
Formula property of the Range object is then set with the given string. The for-
mula is then entered into the cell and the result calculated as normal by Excel. To view all
the
Application object’s properties, methods, and events, select it from the Classes list in the
Object Browser, as shown in Figure 5.10.
The events associated with the Application object are not enabled by default so
they will not work like other Excel object event procedures. Enabling events for
the Application object involves the use of a class module and other advanced
methods that are beyond the scope of this book and will not be discussed.
The Workbook and Window Objects
You have already seen in action, in some of the examples in this chapter, the Workbooks, and
Worksheets collection objects, as well as the Workbook and Worksheet objects. The difference
HINT
Figure 5.10
The Application
object as viewed
through the
Object Browser.
162
between collection objects and regular objects was discussed earlier. When working with
these objects, keep in mind that the
Workbook object is higher in the hierarchy than the
Worksheet object. If you are familiar with Excel, this makes sense to you because a single
workbook can hold multiple worksheets.
However, the
Window object may be unfamiliar and/or a bit confusing. Window objects refer to
instances of windows within either the same workbook, or the application. Within the Excel
application, the
Windows collection object contains all Window objects currently opened; this
includes all
Workbook objects and copies of any Workbook objects. The Window objects are
indexed according to their layering. For example, in Figure 5.2, you could retrieve
Book2 with
the following code:
Application.Windows(2).Activate
because Book2 is the center window in a total of three Window objects. After Book2 is retrieved
and thus brought to the top layer its index would change to
1 when using the Windows col-
lection object. This is different from accessing
Book2 using the Workbooks collection object.
As stated previously,
Workbook objects are indexed according to the order of their creation
after the value of
1, which is reserved for the selected, or top-level Workbook object.
You may be thinking that the
Windows collection object within the Application object is
essentially the same as the
Workbooks collection object. This may or may not be true depend-
ing whether or not the user creates a new window by selecting New Window from the Win-
dow menu in the Excel application. This effectively makes a copy of the currently selected
workbook. You may also use the
NewWindow() method of either the Window or Workbook object
in your code to accomplish the same task.
Application.Windows(1).NewWindow
When a new window is created, the caption in the title bar from the original window is con-
catenated with a colon and an index number. For example,
Book1 becomes Book1:1 and
Book1:2 when a new window is created (see Figure 5.11). These captions can be changed in
code by manipulating the
Caption property of the Window object.
Do not confuse the creation of a new window from the Window menu with that of a new
workbook. New workbooks are created when the user selects New from the File menu, or by
using the
Add() method of the Workbooks collection object. Of course, creating a new work-
book also creates a new window, but the reverse is not true. If a new
Window object is created
through the use of the Window menu in Excel (or
NewWindow() method in VBA), then this
window does not belong to the
Workbooks collection object and thus, cannot be accessed in
code by using the following:
Application.Workbooks(“Book1:2”).Activate
Microsoft Excel VBA Programming for the Absolute Beginner, Second Edition
This code fails because Book1:2 does not belong to the Workbooks collection object but to the
Windows collection object of either the Application object or the Workbook object named
Book1. It could be accessed with either of the following lines of code:
Workbooks(“Book1”).Windows(“Book1:2”).Activate
Or,
Application.Windows(“Book1:2”).Activate
These examples and the above descriptions demonstrate that there may be more than one path
to retrieving an object of interest in your code, and that differences between some objects may
be quite subtle. I recommend that you play with these examples and create instances of new
windows and new workbooks in your code. Then access these objects through as many paths
as you can think of. You will find that it doesn’t take long to get comfortable working with the
Workbooks collection, Windows collection, Workbook, and Window objects.
All properties, methods, and events for these objects can be viewed in the Object Browser.
Let’s take a closer look at a few of them via an example, starting with the
Workbooks collection
object, shown in Figure 5.4.
There are only a few properties and methods of the
Workbooks collection object and their func-
tions are straightforward. Add the following procedure to a standard module in a workbook.
163
Chapter 5 • Basic Excel Objects
Figure 5.11
Creating a new
window in Excel.