Microsoft Excel VBA Programming for the Absolute Beginner Second Edition phần 8 doc
Bạn đang xem bản rút gọn của tài liệu. Xem và tải ngay bản đầy đủ của tài liệu tại đây (1.37 MB, 50 trang )
will be asked if you want to open the file as an XML list, read-only workbook, or to use the
XML Source Task Pane (see Figure 8.3). Typically, you load the data into a worksheet as an
Excel list in order to take advantage of the data management features a list provides.
If the XML file does not reference an existing schema document (.xsd file extension), Excel
will automatically create one (you may be notified of this fact as shown in Figure 8.4) and
store it internally with the workbook. You don’t have to see the schema, or know how it
describes your XML document, but you should know that it’s there working in the back-
ground defining your data elements for Excel.
When you open an XML file as a list, Excel adds the data to a worksheet and creates a list
(normally created from the Data menu). An Excel list provides additional features and for-
matting that makes it easy to identify and modify the list. Figure 8.5 shows data from an
XML document that describes a list of words and topics (something you might use in the
project for Chapter 7). The list is highlighted with a blue border, and a filter (normally
selected from the Data menu) is automatically applied. In addition, an asterisk marks the
next available row for inserting data into the list. The following XML code defines the basic
structure of the XML file opened in Figure 8.5—the data was omitted for brevity.
<?xml version=”1.0” encoding=”UTF-8”?>
<word_find>
<topic_word_pair>
<topic></topic>
<word></word>
</topic_word_pair>
<!—repeat topic_word_pair element—>
</word_find>
339
Chapter 8 • Using XML with Excel-VBA Projects
Figure 8.3
Selecting the
data format
when opening
an XML file.
Figure 8.4
Opening an XML
file with no
referenced
schema.
340
Microsoft Excel VBA Programming for the Absolute Beginner, Second Edition
Figure 8.5
Opening an XML
file as a list.
You can manage the list and the data it contains from the XML selection on the Data menu
and/or the Source Task Pane (see Figures 8.6 and 8.7). For example, you can export changes
to the list to the XML file, refresh the data in the list, edit the properties of the XML map,
and more. As you will see shortly, Excel provides several objects that allow your VBA pro-
grams to accomplish these same tasks.
AutoFilter
List border
Insert row
Figure 8.6
The XML menu
selection in Excel.
Excel also uses the provided (or created) XML schema to create an XML map that serves to
map the elements in the XML file to specific ranges in the worksheet. The map, shown in
the Source Task Pane in Figure 8.7, was created automatically when I opened the XML file.
The
topicID element is mapped to the range A1:A23 in the worksheet and word is mapped to
B1:B23. The map tells Excel how changes to the list must be saved in the XML file such that
it preserves its original structure.
You can also import data from an XML file into any existing worksheet by selecting Data,
XML, Import (see Figure 8.6) from the application window. Again, a schema will be auto-
matically created (if one is not referenced) and you will be prompted to select a range in the
worksheet telling where you want the data inserted.
Saving Worksheets to XML Files
Saving existing data from a worksheet to an XML file is easy. Select File, Save As from the
application window and choose one of two possibilities for XML file types from the Save As
dialog box as shown in Figure 8.8.
341
Chapter 8 • Using XML with Excel-VBA Projects
Figure 8.7
The XML Source
Task Pane.
342
Saving Data as an XML Spreadsheet
If you choose to save the data as an XML spreadsheet, Excel will use its own schema to define
the document. As you might expect, the XML required to define a spreadsheet is quite long, but
you don’t have to worry about that because Excel creates it for you. The root tag is
<Workbook>
and it will contain nested <Worksheet> tags for every worksheet in a workbook. In addition
to the
<Worksheet> tags, there are several other tags that describe the formatting and objects
in the workbook. The following code shows the basic format of a document saved using the
Excel-XML structure (data and attributes have been deleted for brevity and clarity).
<Workbook>
<DocumentProperties/>
<OfficeDocumentSettings/>
<ExcelWorkbook/>
<Styles>
<Style/>
</Styles>
<Names>
<NamedRange”/>
</Names>
<Worksheet>
<Table>
<Column>
<Row>
<Cell>
<Data/>
Microsoft Excel VBA Programming for the Absolute Beginner, Second Edition
Figure 8.8
Excel’s Save As
dialog.
Save as an XML
spreadsheet
Save as XML data
</Cell>
</Row>
</Table>
<WorksheetOptions/>
</Worksheet>
</Workbook>
The document resulting from saving a workbook with the Excel-XML structure is just a text
file; however, it is also an XML file defined using the Excel-XML schema. As a well-formed
and schema-defined XML document, it can be opened by other applications that support
XML such that the formatting and other elements of the spreadsheet (for example, formu-
las) are preserved. Unfortunately, Excel cannot save objects such as autoshapes and charts in
an Excel workbook to an XML document.
Saving a Worksheet as XML Data
Saving data in a worksheet to an XML document without following the Excel-XML schema is
a bit more complicated. In fact, you can’t save worksheet data to a new XML file using the
file type XML Data (see Figure 8.8) unless it has first been mapped to an existing schema. The
easiest way to save data to a new XML file without using the Excel-XML format is to first open
or import an existing XML file with the desired structure as a list into a worksheet. The XML
file doesn’t even need data, just the required tags. After opening the XML file and editing
the data in Excel, you can simply save it as a new XML file using the map created by Excel
when you first opened or imported the file.
XML and VBA
The XML object model may still be evolving, but the Excel 2003 object model is reasonably
robust with regard to XML support. There are several methods of the
Workbook object that
can be used to import and export XML data. Furthermore, the
XmlMaps object has been added
to the object hierarchy to provide more methods for data management.
Saving and Opening XML Documents
To save a workbook as an XML document use the SaveAs() method of the Workbook object.
The following example saves the workbook as an XML document with the name
myFile.xml
using two named arguments (Filename and FileFormat) with the SaveAs() method.
ActiveWorkbook.SaveAs Filename:= “myFile.xml”, FileFormat:=xlXMLSpreadsheet
The constant xlXMLSpreadsheet assigned to the FileFormat argument specifies the Excel-XML
format.
343
Chapter 8 • Using XML with Excel-VBA Projects
344
Microsoft Excel VBA Programming for the Absolute Beginner, Second Edition
To open an XML document previously saved with the Excel-XML structure use either the
Open() or OpenXML() methods of the Workbooks collection object.
Workbooks.Open Filename:= “myFile.xml”
If the structure of the XML document is Excel-XML, then the opened file will conform to that
of a normal Excel spreadsheet; however, if the file is just a well-formed XML document (not
structured as Excel-XML), then Excel will open it as tabular data. Figure 8.9 shows the result
of opening the
words.xml file with the Open() method of the Workbooks collection object. The
words.xml file had not been previously saved using the Excel-XML structure.
The
OpenXML() method of the Workbooks collection object includes an optional argument
(
LoadOption) that allows you to choose how to open the XML file. VBA-defined constants you
can use with the
LoadOption argument include: xlXmlLoadImportToList, xlXmlLoadOpenXml,
xlXmlLoadMapXml, and xlXmlLoadPromptUser. To import the document as a list, use xlXml-
LoadImportToList
; otherwise xlXmlLoadOpenXml will open the document in tabular form.
Using the constant
xlXmlLoadMapXml will display the schema-map of the XML document file
in the XML Source Task Pane, but will not import any data into the worksheet. Finally, the
constant
xlXmlLoadPromptUser displays a prompt (see Figure 8.3) to the user so he or she can
choose how to open the file.
Workbooks.OpenXML Filename:= “myFile.xml”, LoadOption:=xlXmlLoadImportToList
Figure 8.9
An XML file
opened in tabular
form.
The XmlMap Object
When you open an XML file, either programmatically or through the application interface,
Excel automatically creates an XML map. An XML map is represented in VBA by the
XmlMap
object. An XML map serves to map the elements and attributes of an XML file to worksheet
ranges. For example, the XML map named
word_find_Map in Figure 8.7 maps the range A1:A23
to the <topic> element in the words.xml document and the range B1:B23 to the <word> element.
Each
XmlMap object is contained in an XmlMaps collection object which is returned from the
Workbook object via the XmlMaps property. The following code loops through the XmlMaps col-
lection in the active workbook and prints the names of all
XmlMap objects in the active work-
book to the Immediate window.
Dim maps As XmlMaps
Dim myMap As xmlMap
Set maps = ActiveWorkbook.XmlMaps
For Each myMap In maps
Debug.Print myMap.Name
Next
The XmlMap object includes four methods for importing and exporting data between an XML
file or string variable, and worksheet ranges mapped to the object. Use the
Import() and Export()
methods of the XmlMap object to import and export data between an XML file and mapped
ranges on a worksheet. The following example first imports data from the XML file called
words.xml using an existing XmlMap object in the active workbook and then exports the same
data to the file
words2.xml. The file words2.xml is created if it doesn’t already exist.
Dim filePath As String, filePath2 As String
filePath = ActiveWorkbook.Path & “\words.xml”
filePath2 = ActiveWorkbook.Path & “\words2.xml”
ActiveWorkbook.XmlMaps(1).Import URL:=filePath, Overwrite:=True
ActiveWorkbook.XmlMaps(1).Export URL:=filePath2, Overwrite:=True
The URL argument of the Import() and Export() methods is a string that specifies a file’s
path. When the
Overwrite argument is true, the data is overwritten in the worksheet cells
or the file, depending if you are importing or exporting data, respectively. At least one
XmlMap object (note the index value used with the XmlMaps property) must already exist in the
active workbook, or the previous code listing will fail to execute. Furthermore, the
XmlMap
object should be compatible with the structure of the XML file words.xml, or the data will
not be properly mapped to the appropriate ranges in the worksheet. Presumably, you can
345
Chapter 8 • Using XML with Excel-VBA Projects
346
create the XmlMap object from a compatible file by opening it in the Excel application prior
to invoking these methods, so this shouldn’t present a problem.
To copy data between a string variable and a mapped range on a worksheet, use the
ImportXml() and ExportXml() methods of the XmlMap object. The following example exports
data mapped with the
XmlMap object named word_find_Map to the string variable xmlStr.
The
ExportXml() method returns an XlXmlExportResult constant (xlXmlExportSuccess or
xlXmlExportValidationFailed) indicating the result of the data export. The names of the con-
stants are self-explanatory.
Dim xmlStr As String
If ActiveWorkbook.XmlMaps(“word_find_Map”).ExportXml(Data:=xmlStr) <>
xlXmlExportSuccess Then
MsgBox “Export failed”
End If
Similarly, to copy data from the string variable xmlStr to the cells mapped by the XmlMap
object named word_find_Map, I use the ImportXml() method of the XmlMap object. The content
of the variable
xmlStr must be structured as a well-formed XML document.
If ActiveWorkbook.XmlMaps(“word_find_Map”).ImportXml(xmlData:=xmlStr) <>
xlXmlImportSuccess Then
MsgBox “Import failed”
End If
The ImportXML() method returns an XlXmlImportResult constant that I have used to test for
a successful import (the remaining two constants are
xlXmlImportElementsTruncated and
xlXmlImportValidationFailed).
There are several properties associated with the
XmlMap object. Most notable are the Name,
DataBinding, IsExportable, RootElementName, and Schemas properties. The DataBinding prop-
erty returns an
XmlDataBinding object. The XmlDataBinding object represents the connection
between the data source (XML file) and the
XmlMap object. The Refresh() method of the
XmlDataBinding object quickly refreshes the mapped cells with the data from the XML file.
ActiveWorkbook.XmlMaps(“word_find_Map”).DataBinding.Refresh
The IsExportable property of the XmlMap object returns a Boolean value indicating whether
or not Excel can export the mapped data. Potential reasons that an export would fail
include: file path error, improper mappings, or incompatibilities with the schema.
The
Schemas property returns an XMLSchemas collection object contained by an XmlMap object.
Typically, there is only one
XmlSchema object per XmlMap object; so specifying an index value
Microsoft Excel VBA Programming for the Absolute Beginner, Second Edition
of 1 with the Schemas property returns the desired XmlSchema object. The XmlSchema object rep-
resents the schema that defines the mapped XML document.
The following code listing first exports mapped data to a file called
words3.xml before out-
putting the value of a few properties of an
XmlMap object to the Immediate window. The
XmlMap object was created from the words.xml file whose structure was listed earlier in this
chapter.
Dim myMap As XmlMap
Dim filePath As String
filePath = ActiveWorkbook.Path & “\ words3.xml”
Set myMap = ActiveWorkbook.XmlMaps(“word_find_Map”)
With myMap
If .IsExportable Then
.Export URL:=filePath, Overwrite:=True
Else
MsgBox “Not exportable”
End If
Debug.Print .Name
Debug.Print .RootElementName
Debug.Print .Schemas(1).XML
End With
The XML property of the XmlSchema object (returned by the Schemas property of the XmlMap
object) returns a string representing the schema used in the mapping; thus, it is an excel-
lent method for collecting a schema for an existing XML file. Unfortunately, the
XML prop-
erty returns the string without white space so you have to add the line feeds and
indentation to make the text well-formed.
Other methods of the
Workbook object you can use to save or import XML data include:
SaveAsXmlData(), XmlImport(), and XmlImportXml(). The SaveAsXmlData() method exports
mapped data to an XML document file. It requires two arguments—
Filename and Map—that
are used to specify a name for the XML file and the
XmlMap object representing the mapped
data.
Dim myMap As XmlMap
Dim filePath As String
Set myMap = ActiveWorkbook.XmlMaps(1)
filePath = ActiveWorkbook.Path & “\test.xml”
ActiveWorkbook.SaveAsXMLData Filename:=filePath, Map:=myMap
347
Chapter 8 • Using XML with Excel-VBA Projects
348
The XmlImport() and XmlImportXml() methods import data from an XML file and data stream
(string variable), respectively. Both methods require a data source (XML file or string variable)
and an
XmlMap object. The arguments Overwrite and Destination are optional, but Destination
must be omitted if the XmlMap object has already been loaded into the workbook. This makes
sense because once an
XmlMap object has been created, the data is mapped to specific ranges
in the worksheet and cannot be changed. The following code imports XML data from the
file
sample.xml to a mapped range on the active worksheet using an existing XmlMap object
(
sample_Map).
Dim myMap As XmlMap
Dim filePath As String
filePath = ActiveWorkbook.Path & “\sample.xml”
Set myMap = ActiveWorkbook.XmlMaps(“sample_Map”)
ActiveWorkbook.XmlImport URL:=filePath, ImportMap:=myMap, Overwrite:=True
The XmlImport() method imports data from an XML file whereas the XmlImportXml() method
imports XML data from a string variable. The data stored in the string variable (
xmlStr in the
following example) must be that of a well-formed XML document and is assigned to the
Data
argument of the XmlImportXml() method.
ActiveWorkbook.XmlImportXml Data:=xmlStr, ImportMap:=myMap2, Overwrite:=True
The ListObject Object
As discussed earlier, when you import XML data into a worksheet you have the choice to
insert the data as an Excel list. When adding XML data to a list, Excel creates a
ListObject
object to represent the list. The ListObject object is subordinate to the Worksheet object;
therefore, all
ListObject objects added to a worksheet are returned as a collection via the
ListObjects properties of the Worksheet object. Individual ListObject objects can be accessed
from the
ListObjects collection.
Dim lstObjects as ListObjects
Dim lstObject As ListObject
Set lstObjects = ActiveSheet.ListObjects
Set lstObject = lstObjects(1)
Each XML data set that has been mapped to a list is represented by a ListObject object. The
ListObject object provides an easy path to the range of cells mapped to an XML document.
Use the
Range property of the ListObject object to return the Range object representing these
mapped cells. To return the range representing the insert row for a list (that’s the row with
Microsoft Excel VBA Programming for the Absolute Beginner, Second Edition
the asterisk, see Figure 8.5), use the InsertRowRange property. Please note that the active
cell(s) must be within the
ListObject object’s range or the InsertRowRange property will fail.
Dim lstObject As ListObject
Dim insertRow As Range
Set lstObject = ActiveSheet.ListObjects(1)
‘——————————————————————
‘If list is not active then activate its range.
‘——————————————————————
If Not lstObject.Active Then
lstObject.Range.Activate
End If
Set insertRow = lstObject.InsertRowRange
To ensure the ListObject object’s range is active, the Boolean value returned by the Active
property of the ListObject object is tested in a conditional statement. The ListObject
object’s range is activated with the Activate() method of the Range object. This allows you
to set the
Range object returned by the InsertRowRange property of the ListObject object. It
is now a simple matter to add new data to the list. For example, if the data is mapped to two
columns that include a name and number, you can add new data as follows:
insertRow.Cells(1, 1).Value = “Duane Birnbaum”
insertRow.Cells(1, 2).Value = 5
Here I use the Cells property of the Range object to return the first cell in the first two
columns of the range represented by the variable
insertRow.
If the data in an Excel list has been mapped to XML data, you can access the resulting
XmlMap
object via the XmlMap property of the ListObject object.
Dim myMap As XmlMap
Set myMap = ActiveSheet.ListObjects(1).XmlMap
Now you can invoke all the properties and methods of the XmlMap object that were discussed
earlier.
Chapter Project: The Math Game
The Math Game program from Chapter 4 was fairly simple with randomly generated prob-
lems that were stored in memory, and then written to a worksheet at the end of the game—
potentially the only data saved by the program (but only if the user so desired). The new
349
Chapter 8 • Using XML with Excel-VBA Projects
350
version of the Math Game automatically stores the program’s data (tests, student names, and
test results) in XML files. I added worksheet interfaces for writing tests, maintaining student
lists, and viewing test results. The program illustrates the use of basic XML files as a data-
base for an application and how these files are accessed using Excel-VBA.
Requirements for the Math Game Program
The original interface to the Math Game program required a single worksheet that presented
randomly generated math problems, timed the game, and scored the results when the time
allotted reached zero. The student taking the test was allowed to choose the mathematical
operation. I’ve kept that interface pretty much intact; removing the Option Button controls
that allowed the student to choose the mathematical operator for the problems, and adding
one Combo Box control that displays the list of students stored in an XML file. The only
other requirements for the
Math Game worksheet interface are that the student must sign in
via a Combo Box control before starting a test, and the student may print the results of his
or her test by clicking on a Command Button control placed on the worksheet. The remaining
requirements for the
Math Game worksheet interface are listed in Chapter 4 so I will not
repeat them here.
The new features to the Math Game program require two additional worksheets; one for writ-
ing exams, and the other for maintaining the list of students and viewing test results. The
following lists the requirements of the part of the program interface involving these two
worksheets.
1. The user shall be allowed to write a new test by entering the problems in a worksheet
and then save the test to an XML file.
2. The difficulty level and length of time allowed to complete a test (test properties)
shall also be stored in an XML file.
3. The user shall be allowed to edit existing tests from the same worksheet interface.
This means that the program must be able to import data from an XML file represent-
ing a test.
4. The worksheet interface used to create or edit tests shall be previously formatted
with two XML maps and Excel lists that map the problems and properties of a test
to the appropriate XML files.
5. Test files shall be named by concatenating a filename and difficulty level input by
the user.
6. When a student signs in to take a test, the XML test file of the appropriate level shall
be loaded into the test worksheet.
Microsoft Excel VBA Programming for the Absolute Beginner, Second Edition
7. While taking a test, problems shall be read from the test worksheet and displayed on
the
Math Game worksheet.
8. When a student finishes a test, the test is scored and the result recorded. When a stu-
dent fails to finish a test within the allotted time, unanswered problems shall be
included in the result as incorrect answers.
9. Students and their current testing level shall be entered in an Excel list whose ranges
are mapped to an XML file.
10. Updates to the list of students shall be allowed; that is, the program must be able to
export the data mapped to the student’s XML file.
11. The list of students shall provide the data source for the Combo Box control on the
Math Game worksheet.
12. The user shall be allowed to view the test results for all students.
13. The results worksheet shall be formatted with an XML map and Excel list to link the
data in the worksheet to the file containing the results.
14. The results worksheet and the XML file containing the results shall be updated at the
completion of each test.
15. The user shall be able to clear the worksheet and XML file of all test results.
Designing the Math Game
As far as a student is concerned, the program interface doesn’t change much from the one
in the Chapter 4 program. The
Math Game worksheet still contains the test problems, the timer,
and the scored results. The number and type of ActiveX controls is the part that’s different.
Additional worksheets contained in the project are not meant to be viewed by a student, so
hiding them would be a good idea.
The other two worksheets must contain lists of test problems, students, and results. I will use
a single worksheet for creating the list of problems that make up a test (
Create_Edit_Tests)
and another worksheet will contain the list of students and their test results (
Students). I will
create each XML map and corresponding data list prior to writing any code, but after I have
designed and written the XML files. This must be the case because I can’t create an XML map
in a worksheet without an XML file.
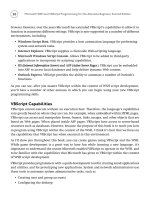
Taking a Test
The interface used to take a test is shown in Figure 8.10. I removed the Option Button con-
trols from the Chapter 4 program and added a Combo Box and a Command Button control;
otherwise, the interface is the same. I set the
Style property of the ComboBox control to
351
Chapter 8 • Using XML with Excel-VBA Projects
352
fmStyleDropDownList so the student cannot enter a new name but only choose existing
names from the list. As usual, I also edited the
Name property and a few appearance proper-
ties of the ActiveX controls at design time.
The process of taking a test is uncomplicated and nearly identical to the Chapter 4 program.
After a student selects his or her name from the Combo Box control, the Command Button
control labeled
Begin is enabled and must be used to start the test. The appropriate test is
loaded into the
Create_Edit_Tests worksheet to provide the source for the test questions.
Problems are presented one at a time and the student must enter an answer to each prob-
lem before continuing. The answer cell remains selected at all times during a test. When the
student finishes the test, or the allotted time runs out, the test is scored and written to the
worksheet. The length of time allotted for a test is also read from the
Create_Edit_Tests
worksheet. After completing a test, a student can print the range of cells containing the
problems, answers, and score (columns A through C) with a click of the Command Button
control labeled
Print.
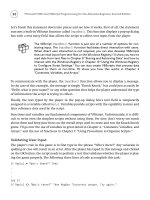
Creating Tests
Tests are written from a separate worksheet interface. Figure 8.11 shows the Create_Edit_Tests
worksheet with problems from an existing test imported into its data list.
Microsoft Excel VBA Programming for the Absolute Beginner, Second Edition
Figure 8.10
The Math Game
worksheet
interface.
Command
Button
control
The problem
Test results
The timer
Student’s
answer
Command
Button
control
Combo Box
control
The data in the worksheet is formatted as an Excel list and is mapped to two XML files. The
range
A2:C2 is mapped to an XML file with the following structure:
<?xml version=”1.0” encoding=”UTF-8”?>
<test_properties fileID=””>
<level></level>
<time></time>
</test_properties>
The elements <level> and <time> are mapped to cells B2 and C2 respectively, and the fileID
attribute of the <test_properties> element is mapped to cell A2. I initially created the map
by importing the file as an XML list when it was void of data; although, it doesn’t matter if
there is data in the XML file because it’s the document structure that’s important. The name
of the map is
test_properties_Map. Excel creates the initial value for a map’s name by con-
catenating the root element name with the word
Map. You can change it by selecting Data,
XML, XML Map Properties in the Excel application window.
The
<level> and <time> elements are non-repeating child elements of <test_properties> so
each test will have an associated test properties file. These files are named by concatenating
the
fileID attribute in cell A2 with the character p followed by the xml file extension.
353
Chapter 8 • Using XML with Excel-VBA Projects
Figure 8.11
The
Create_Edit_
Tests worksheet
used to write or
edit tests.
Excel Lists mapped
to XML files
Command Buttons
XML Map
Name
XML Source
Task Pane
Element Type
Icons
354
Microsoft Excel VBA Programming for the Absolute Beginner, Second Edition
When opening an XML file in Excel that does not reference a schema, Excel
automatically creates a schema based on the XML source data. If you resave the
data from Excel and examine the resulting XML source code in a text editor, you
will notice two new declarations. The first new declaration is referred to as the
standalone document declaration and can be found in the XML declaration at
the beginning of the document.
<?xml version=”1.0” encoding=”UTF-8” standalone=”yes”?>
Excel adds the standalone document declaration so that it knows the XML doc-
ument has external markup declarations (the schema created by Excel), but
these external declarations do not affect the document’s content.
In addition to the
standalone document declaration, Excel adds a reference to
the location of the schema reserved for an Excel workbook. The reference is
added as an attribute to the root element of the XML document.
<root_element_name xmlns:xsi=” />The <level> and <time> elements are non-repeating child elements of <test_properties> so
each test will have an associated test properties file. These files are named by concatenating
the
fileID attribute in cell A2 with the character p followed by the xml file extension.
To create a test, the user simply enters values for the number, operands, operator, and answer
into the corresponding columns in the worksheet. In order to save time, the user may use
formulas (if desired) to calculate answers or generate operands. The problems contained in
the data list (cells
D2:H22 in Figure 8.11) are mapped to a second XML file. The data list can be
extended to any number of rows. The name of the XML map is
test_Map (see Figure 8.11) and
the XML document structure is listed again in the following:
<?xml version=”1.0” encoding=”UTF-8”?>
<test>
<problem>
<number></number>
<left_operand></left_operand>
<operator></operator>
<right_operand></right_operand>
<answer></answer>
</problem>
<!—repeating <problem> elements—>
</test>
The structure of the XML test file contains the root element <test> with a series of child elements
(
<problem>) that represent the test problems. Each <problem> element contains the child elements
that define a problem (
<number>, <left_operand>, <operator>, <right_operand>, and <answer>).
TRICK
When this file is opened as an XML list, the data elements are loaded into adjacent columns
in the worksheet. Element types (child, parent, attribute, and so on) can be identified from
the icon displayed in the XML Source Task Pane. In order for Excel to recognize a repeating
parent element such as
<problem>, I had to include at least two of these elements in the orig-
inal file that I opened with Excel when creating the XML list and map.
I will use the
fileID attribute of the <test_properties> element to specify the file name of
a test file; therefore, each test is associated with two XML files (for example,
test7p.xml and
test7.xml). The program only needs one of these files to open an existing test because a test
file’s name is stored in the
fileID attribute of the test properties file; thus, when the user
chooses to open a test file, they must be shown a selection of test property files and not the
test files themselves.
You may be wondering why I used two XML files to describe a single test. An
easier approach might combine the two structures into a single XML document
similar to the following:
<?xml version=”1.0” encoding=”UTF-8”?>
<test fileID=””>
<level></level>
<time></time>
<problem>
<number></number>
<left_operand></left_operand>
<operator></operator>
<right_operand></right_operand>
<answer></answer>
</problem>
<!—repeating <problem> elements—>
</test>
The problem with this structure is that the <level> and <time> elements, and
the fileID attribute are associated with every <problem> element in the file; so
when Excel imports the data into a worksheet, it will repeat the values for the
fileID attribute, and <level> and <time> elements. This causes a data redun-
dancy and the resulting map is said to be denormalized. Excel cannot export data
from a denormalized map to an XML file.
HINT
355
Chapter 8 • Using XML with Excel-VBA Projects
356
Maintaining Student Lists and Viewing Test Results
The last part of the Math Game program is the worksheet used to edit the student list and
view their test results. The worksheet interface is shown in Figure 8.12.
Because these are relatively small lists, I included both of them in one worksheet. The XML
document structure describing the students is as follows:
<?xml version=”1.0” encoding=”UTF-8”?>
<students>
<student>
<name> </name>
<level></level>
</student>
<!—repeating <student> elements—>
</students>
The file’s data consists of the student’s name and current testing level. The data in the
<level> element will have to be updated whenever a student passes a test. A single file called
students.xml stores all data describing the students. The data in the file is mapped to the
first two columns in the worksheet using the XML map named
students_Map.
Test results are also stored in a single XML file called
results.xml (listed next) mapped to the data
in columns I through K via the XML map named
results_Map. Because the file stores all test
Microsoft Excel VBA Programming for the Absolute Beginner, Second Edition
Figure 8.12
The Students
worksheet used
for maintaining
the student list
and viewing test
results.
Command
Button controls
Student list
Data Filter
Test Results list
results, the program will have to add one more <student> element with each completed test.
The
<name> element is the name of the student; the <test> element, the name of the test; and
the
<score> element, the test result expressed as percent correct.
<?xml version=”1.0” encoding=”UTF-8”?>
<results>
<student>
<name> </name>
<test> </test>
<score></score>
</student>
<!—repeating <student> elements—>
</results>
One of the advantages to using an Excel list to view the results is the applied filter can be
used to quickly view individual students or all student results (or a custom filter if desired).
Coding the Math Game Program
Much of the code for the Math Game involves objects and methods discussed in previous
chapters. At this point you are familiar with many of the structures and common objects
used in Excel-VBA programs. New topics will usually come in the form of a new object and
its associated methods and subordinate objects. Now, the greatest challenge for you is
designing programs and developing algorithms.
Since I am using three worksheets for the program interface, I will try to isolate the code
that serves each interface to their respective code modules; however, there are occasions
when it is easier to add procedures to a standard module so they can be shared by multiple
interfaces.
Writing Tests
The code module for the worksheet used to create or edit tests must contain procedures that
import and export data between the mapped ranges in the worksheet and the two XML files
that describe a test document’s properties and its problems.
The first procedure listed is the
Click() event of the Command Button control labeled Save
File
(see Figure 8.11). This procedure exports the data entered in the lists to two separate
XML files (the test and test properties files). Both file names are obtained from cell
A2 in the
worksheet. The test properties file name is appended with a
p just before the xml file extension.
357
Chapter 8 • Using XML with Excel-VBA Projects
358
When a worksheet already contains an Excel list mapped to an XML document file, you can
use the
XmlMap object to export the current data from the list to the file. This is exactly what
I’ve done here. I set the
XmlMap object variable to its corresponding XML map in the worksheet
using the name defined when the XML document was first imported into the worksheet. The
names of the XML maps can be found in the XML Source Task Pane (select Data, XML, XML
Source). After testing to see if the map is exportable (
IsExportable property), I invoked the
Export() method of the XmlMap object to export the data from the list to the file specified in
the
URL argument. With the Overwrite argument set to true, an existing file is replaced with
the current data; however, if the file doesn’t exist, then a new one is created. This means
this event procedure can be used to save new test files or save edits to existing test files.
Finally, because the event procedure involves file I/O, I have added a basic error handler to
output the nature of the error to the user via a message box before ending the program.
Option Explicit
Private Sub cmdFileSave_Click()
Dim mapProperties As XmlMap, mapTests As XmlMap
Dim pathProperties As String, pathTests As String
On Error GoTo ExportError
‘——————————————————————————————
‘Save the new exam as an xml file (one for test properties
‘and one for test).
‘——————————————————————————————
pathProperties = ActiveWorkbook.Path & “\TestProperties\” & Range(“A2”).Value & “p.xml”
pathTests = ActiveWorkbook.Path & “\Tests\” & Range(“A2”).Value & “.xml”
Set mapProperties = ActiveWorkbook.XmlMaps(“test_properties_Map”)
Set mapTests = ActiveWorkbook.XmlMaps(“test_Map”)
If mapProperties.IsExportable Then
mapProperties.Export URL:=pathProperties, Overwrite:=True
Else
MsgBox “XML map is not exportable!”, vbOKOnly, “XML Map”
End If
If mapTests.IsExportable Then
mapTests.Export URL:=pathTests, Overwrite:=True
Else
MsgBox “XML map is not exportable!”, vbOKOnly, “XML Map”
End If
Exit Sub
Microsoft Excel VBA Programming for the Absolute Beginner, Second Edition
ExportError:
MsgBox “Test file not saved.” & Err.Description, vbOKOnly, _
“File Save Error: “ & Err.Number
End
End Sub
When the user decides to edit an existing test file, a click of the Command Button labeled
Open File sends program execution to its Click() event procedure. I have used this procedure
to display a file open dialog containing a list of test property files from which the user must
choose one. The data in the selected file, along with the data in its test file counterpart, are
then imported into the worksheet. For example, if the user selects the file
test1p.xml, its data
is imported into the mapped range
A2:C2 and the value of its fileID attribute specifies the
test file to import into the
test_Map range. I have written two custom procedures (GetXMLFile()
and OpenXMLFile()) to handle these tasks.
Private Sub cmdFileOpen_Click()
Dim fileName As String
‘———————————————-
‘Import xml files to worksheet.
‘———————————————-
fileName = GetXmlFile
If fileName <> “” Then
OpenXMLFile fileName
End If
End Sub
The GetXMLFile() function procedure uses a FileDialog object (refer to Chapter 7) to display
an Open dialog box. I set the file path to the
TestProperties directory that contains the test
property XML files and added a
FileDialogFilters object to ensure the dialog box lists only
XML files. The selected file is returned to the calling procedure as a string where it is passed
to the
OpenXMLFile() procedure. The Open dialog is shown in Figure 8.13.
Private Function GetXmlFile() As String
Dim fileDiag As FileDialog
Dim fPath As String
fPath = ActiveWorkbook.path & “\TestProperties\”
359
Chapter 8 • Using XML with Excel-VBA Projects
360
‘——————————————————-
‘Configure and show the open dialog.
‘Open the file selected by the user.
‘——————————————————-
Set fileDiag = Application.FileDialog(msoFileDialogOpen)
With fileDiag ‘Configure dialog box
.Filters.Clear
.Filters.Add Description:=”XML”, Extensions:=”*.xml”, Position:=1
.FilterIndex = 1
.AllowMultiSelect = False
.Title = “Select XMl Test File”
.InitialFileName = fPath
If .Show = -1 Then ‘User clicked Open
GetXmlFile = .SelectedItems.Item(1)
End If
End With
End Function
I added the OpenXMLFile() procedure to a standard code module and gave it public scope
because it has to be called from other object code modules in the program. The procedure
first uses the string from the
fileName argument to import the test properties data from the
XML file to the cells in the list. The
XmlImport() method of the Workbook object imports the data
from the XML document file. It is worth reiterating that the XML document file structure
must match the existing XML map structure in the workbook. If the two structures do not
match, Excel ignores the command.
Microsoft Excel VBA Programming for the Absolute Beginner, Second Edition
Figure 8.13
The Open dialog
for selecting
existing test files.
Public Sub OpenXMLFile(fileName As String)
Dim ws As Worksheet
On Error GoTo ImportError
‘———————————————————————
‘Open the test properties and test XML files.
‘———————————————————————
Set ws = Worksheets(“Create_Edit_Tests”)
ActiveWorkbook.XmlImport URL:=fileName, _
ImportMap:=ActiveWorkbook.XmlMaps(“test_properties_Map”), _
Overwrite:=True
ws.Columns(“A:C”).ColumnWidth = 7
ActiveWorkbook.XmlImport URL:=ActiveWorkbook.path & _
“\Tests\” & ws.Range(“A2”).Value & _
“.xml”, ImportMap:=ActiveWorkbook.XmlMaps(“test_Map”), _
Overwrite:=True
Exit Sub
ImportError:
MsgBox “Could not import XML file.” & Err.Description, _
vbOKOnly, “File Import Error: “ & Err.Number
End
End Sub
Maintaining the Student List and Viewing Results
After a test is completed and scored, the results are added to the Students worksheet and the
XML file is automatically updated (discussed later). Results can be viewed from the
Students
worksheet, where the XML list that holds all test results has been created in columns I
through K. Although there is no need to allow the user to export the results, they are
allowed to clear the data from the XML file.
Users may clear the list in the worksheet manually or by clicking the Command Button con-
trol labeled
Reset. This triggers the Click() event procedure that follows. To clear the list, I
first activate its range of cells before using the
InsertRowRange property of the ListObject
object to determine the next available row in the list. The list’s range must be active or the
InsertRowRange property fails—generating a runtime error. Data in the list is deleted using
the
Delete() method of the Range object and shifting cells up. Note that I do not update the
XML document file after clearing the range. It’s not necessary since it will be updated with
the next completed test.
361
Chapter 8 • Using XML with Excel-VBA Projects
362
Option Explicit
Private Sub cmdResetResults_Click()
Dim insertRow As Integer
Dim lsObj As ListObject
‘————————
‘Clear the list.
‘————————
Set lsObj = ActiveSheet.ListObjects(“Results”)
If Not lsObj.Active Then
lsObj.Range.Activate
End If
insertRow = lsObj.InsertRowRange.Row
Range(“I1”).Select
If insertRow <= 2 Then Exit Sub
Range(“I2:K” & insertRow - 1).Delete xlShiftUp
End Sub
Students are added to or removed from the data base by editing the corresponding XML doc-
ument (
students.xml) via the Students worksheet. When the Click() event procedure of the
Command Button control labeled
Update is triggered, the data in the list overwrites the data
in the XML document file. Again, I have used the
Export() method of the XmlMap object to
update an XML file. The
UpdateStudentXml() sub procedure was also entered into a standard
code module because it is called from more than one object module.
Private Sub cmdUpdate_Click()
UpdateStudentXml True
End Sub
Public Sub UpdateStudentXml(Optional UpdateCmbList As Boolean)
Dim mapStudents As xmlMap
Dim pathStudents As String
On Error GoTo UpdateError
‘————————————-
‘Update student XML file.
‘————————————-
pathStudents = ActiveWorkbook.path & “\Students\students.xml”
Set mapStudents = ActiveWorkbook.XmlMaps(“students_Map”)
If mapStudents.IsExportable Then
Microsoft Excel VBA Programming for the Absolute Beginner, Second Edition
mapStudents.Export URL:=pathStudents, Overwrite:=True
Else
MsgBox “XML map is not exportable!”, vbOKOnly, “XML Map”
End If
‘——————————————————————————
‘Update combo box if this procedure was called from
‘Update button on sheet 3.
‘——————————————————————————
If UpdateCmbList Then ListStudents
Exit Sub
UpdateError:
MsgBox “Student list not updated.” & Err.Description, _
vbOKOnly, “File Save Error: “ & Err.Number
End
End Sub
The ListStudents() sub procedure is called from UpdateStudentXml() and the Open() event
procedure of the
Workbook object. The procedure serves to update the list of students listed
in the Combo Box control on the
Math Game worksheet. Notice that I use the ListObject object
to retrieve the student names. This is another advantage of Excel lists—the
Range property of
the
ListObject object makes it easy to access the content of the list, so you don’t have to
search through the rows to find the last item. It is also worth noting that in order to access
the Combo Box control, I had to qualify the worksheet name in the object path because the
ListStudents() sub procedure is not in the same code module as the control.
Public Sub ListStudents()
Dim studList As ListObject
Dim student As Range
Dim I As Integer
‘———————————————-
‘Add student list to combo box.
‘———————————————-
MathGameSheet.cmbStudents.Clear
Set studList = Worksheets(“Students”).ListObjects(“Students”)
For I = 2 To studList.Range.Rows.Count
MathGameSheet.cmbStudents.AddItem studList.Range.Cells(I, 1).Value
Next I
End Sub
363
Chapter 8 • Using XML with Excel-VBA Projects