Effective GUI Test Automation Developing an Automated GUI Testing Tool phần 6 ppt
Bạn đang xem bản rút gọn của tài liệu. Xem và tải ngay bản đầy đủ của tài liệu tại đây (842.73 KB, 46 trang )
213
Starting the AutomatedGUITest Project
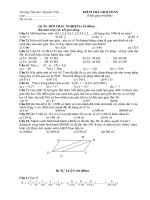
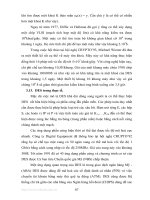
FIGURE 7.1
A GUI testing process
and data flow with
minimum human
interaction for the
automatic GUI
testing tool
Starting the AutomatedGUITest Project
In Chapters 4 and 5, you developed a functional GUI test library. In Chapter 6, you reused only
a few of the methods of the GUI test library and obtained a fully automated test script with lim-
ited verification functions. Until now, there is still no evidence that a workable test script has
been generated by any tool automatically. From here, you can follow the steps to start a new
project. There will be five subsections representing five classes to be developed in this chapter
for the new project.
The Startup Form of the AutomatedGUITest Tool
In Chapter 6, you simply used the GUI test library and the HandCraftedGUITest project ref-
erenced to the
GUITestLibrary.dll
assembly. Since the development of the GUITestLibrary
will be parallel to the development of your tool, I recommend that you make a new folder,
\Chapter07
, under the
C:\GUISourceCode
folder. Then copy the GUITestLibrary project
folder from
C:\GUISourceCode\Chapter05
to the new
C:\GUISourceCode\Chapter07
folder.
NOTE
If you are using version control software to complete the tool project, you can easily check
in, check out the source code and go back to the older version. That way, you don’t have
to copy the GUITestLibrary project from chapter to chapter.
Reviewing
test reports
for fixing bugs
Interface of
the GUI testing
tool
Generating test
script based on
the collected GUI
information
Collecting GUI
information and
showing how to
test them
Specifying an
application for
the tools to test
4351Book.fm Page 213 Tuesday, September 28, 2004 11:21 AM
214
Chapter 7 • Architecture and Implementation of the Automatic GUI Test Tool
Start the Microsoft Visual Studio .NET IDE and complete these steps:
1.
From the main window of the IDE, choose File
New
Project to bring up the New
Project dialog box.
2.
Select Visual C# Projects from the left pane, and select Windows Application from the
right pane. In the Name field, type
AutomatedGUITest
, and for the Location field, click
the Browse button to invoke a project location navigator and select the
C:\GUISourceCode\
Chapter07
folder. Click the Open button and then the OK button.
3.
When the automatically generated Windows form appears, you can resize it by choosing
View
Properties Window and changing the Size property with a pair of values such as
552 and 400, indicating the pixel numbers of the width and height of the form (or you can
resize it by dragging the lower-right corner of the form). You can also change the value of
the
Text
property of this form by typing in
Automated GUI Test Form
to replace the
IDE-generated value Form1.
4.
Choose File
Add Project
Existing Project in the main window. Navigate to
C:\GUISource-
Code\Chapter07\GUITestLibrary
. You’ll see the
GUITestLibrary.csproj
file. Select it and
click the Open button to add this project to the current solution, AutomatedGUITest.
5.
Activate the AutomatedGUITest project in the Solution Explorer. Choose Project
Add
Reference. When the Add Reference dialog box appears, click the Projects tab. Select
GUITestLibrary in the list box, click the Select button and then the OK button to complete
the reference addition.
6.
Add GUI controls of five Buttons, one Label, one DataGrid, one SaveFileDialog and one
OpenFileDialog onto the form. Assign new values to the selected properties of the controls
as in the following list:
Control Property Value
Button Name btnStartGUITest
Text Start GUI Test
Button Name btnGUISurvey
Text GUI Survey
Button Name btnRunTest
Text Run Test
Button Name btnRerun
Text Rerun Test
Button Name btnExit
Text Exit
4351Book.fm Page 214 Tuesday, September 28, 2004 11:21 AM
215
Starting the AutomatedGUITest Project
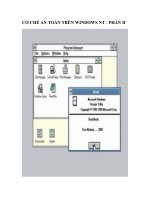
This is the start form of the AutomatedGUITest project. This form has a class name
Form1
at
this moment. After you complete the GUI control plantation, the AutomatedGUITest startup
form looks similar to Figure 7.2.
FIGURE 7.2
The startup form of
the AutomatedGUI-
Test tool
A startup form is the highest level of this architecture. It requires the instances and methods
of the other four helper classes. For now, I suggest you leave this form and come back to it
when the other classes are implemented.
An Interface to Specify the Form of the Application under Test
Just as the AutomatedGUITest tool has a startup form, all the other Windows applications
have their own startup form. When an application starts, the startup form is the first functional
graphical user interface for the users to work with. We have designed a Start GUI Test button
and an OpenFileDialog control on the AutomatedGUITest form. When the Start GUI Test
button is clicked, the open file dialog box appears. The tester can specify the path and filename
Control Property Value
Label Name lblAvailabelGUI
Text Available GUI components:
DataGrid Name dgAvailableGUIs
OpenFileDialog Name opnAUT
SaveFileDialog Name sveDataStore
4351Book.fm Page 215 Tuesday, September 28, 2004 11:21 AM
216
Chapter 7 • Architecture and Implementation of the Automatic GUI Test Tool
of an application that needs to be tested. But an application could have more than one form,
class, and other data types. The tester needs to tell the tool which form in the application to
test. To help the tester identify the form of interest, the AutomatedGUITest form is able to
extract all of the classes with and without GUI implementation from the application under test.
Then it lists them in a checklist from which the tester choose with a simple mouse click.
To create this form, follow these steps:
1.
From the Solution Explorer, right-click on the AutomatedGUITest project name and
choose Add
Add Windows Form to make a new Windows dialog form. The Add New
Item dialog box appears.
2.
In the Name field, type
TypeUnderTest
as a new class name.
TypeUnderTest
is also the
filename for the source code of the new class by default. Because the class name and the file-
name do not have to be the same, you can rename them if you want. Click the Open button.
An empty form appears in the design area.
3.
Change the value of the Text property of this form to Types under Test. This text appears
on the title bar. Accept all the other IDE-generated code.
4.
Add the following GUI controls onto the new form:
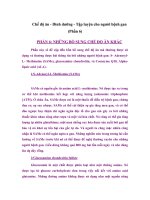
After you populate these GUI controls, the TypeUnderTest form should look like Figure 7.3.
This form will use the CheckedListBox to list the available classes within the application
under test. The tester can choose the selected startup form from the list to request the tool to
perform a GUI survey. Virtually, you don’t need to add any more properties or methods for
this form, and you need to add only two lines of code responsible for the OK and Cancel button
click events in the generated
InitializeComponent()
method.
Before adding these two lines of code, I will briefly introduce a
DialogResult
enumeration of
the .NET platform. The definition of the
DialogResult
is directly related to the OK and Cancel
Control Property Value
Label Name lblTypeAvailable
Text Select data types to test from the
available list:
Modifier public
CheckedListBox Name chckListType
Button Name btnOK
Text OK
Button Name btnCancel
Text Cancel
4351Book.fm Page 216 Tuesday, September 28, 2004 11:21 AM
217
Starting the AutomatedGUITest Project
button clicks from a custom dialog box. When a button has been assigned to
DialogResult.OK
or
DialogResult.Cancel
, the custom dialog box automatically closes. In the client program, you
can query this property to see which button the user clicks by invoking a
ShowDialog()
method
of the form within an
if
statement. You should have experienced this when you programmed
an OpenFileDialog box. If your OK or Cancel button event needs to accomplish more than
closing a form, you can double-click it to create a delegate and add the needed code. But at this
point, you don’t need to do anything else except close the form.
In order to successfully add the
DialogResult.OK
and the
DialogResult.Cancel
to the
appropriate spots, you can perform the following steps:
1.
Right click the populated TypeUnderTest form. When the code editor appears, some code
is buried inside a
#region Windows Form Designer generated code
directive.
2.
Click the + sign to expand this region. The
InitializeComponent()
method appears.
3.
Locate the code section for the
btnOK
object initialization. Insert a line of code for the OK
button click like this:
this.btnOK.DialogResult = System.Windows.Forms.DialogResult.OK;
4.
Locate the code section for the
btnCancel
object initialization. Insert a line of code for the
Cancel button similarly:
this.btnCancel.DialogResult = System.Windows.Forms.DialogResult.Cancel;
Make sure the values of
DialogResult.OK
and
DialogResult.Cancel
are specified with their
full qualifiers as they are listed in this section. If the partial qualifiers are used, they will disappear
from the code page after any changes are made on the form. After these steps are performed,
leave the rest of the code intact. The snippets for the btnOK and btnCancel initialization in the
InitializeComponent() method of the TypeUnderTest.cs file is in Listing 7.1; the added two
lines are bold and the other IDE-generated code is omitted.
FIGURE 7.3
A TypeUnderTest
form for listing the
available forms of an
application under test,
one of which is the
startup form
4351Book.fm Page 217 Tuesday, September 28, 2004 11:21 AM
218
Chapter 7 • Architecture and Implementation of the Automatic GUI Test Tool
➲
Listing 7.1 Code Snippets for the btnOK and btnCancel Initialization in the
InitializeComponent() Method
//
// btnOK
//
this.btnOK.DialogResult = System.Windows.Forms.DialogResult.OK;
this.btnOK.Location = new System.Drawing.Point(280, 242);
this.btnOK.Name = "btnOK";
this.btnOK.Size = new System.Drawing.Size(56, 24);
this.btnOK.TabIndex = 2;
this.btnOK.Text = "OK";
//
// btnCancel
//
this.btnCancel.DialogResult = System.Windows.Forms.DialogResult.Cancel;
this.btnCancel.Location = new System.Drawing.Point(352, 242);
this.btnCancel.Name = "btnCancel";
this.btnCancel.Size = new System.Drawing.Size(56, 24);
this.btnCancel.TabIndex = 3;
this.btnCancel.Text = "Cancel";
//
// TypeUnderTest
//
This concludes the implementation of the TypeUnderTest form. The startup class of the
AutomatedGUITest tool will initialize it. Some code in the AutomatedGUITest startup class
will also populate the TypeUnderTest form with custom types of the application under test.
Users can specify the startup form to test the application.
The Implementation of a GUISurveyClass
GUISurveyClass is the class that replaces the capture/playback approach of the commercial tools.
It uses an active approach to spontaneously conduct a GUI survey within a Windows form under
test. The process of the survey begins with object initialization of the GUISurveyClass. The
initialization accepts the handle of a Windows form under test. Passing the handle to a custom
function, GetWindowSize(), it finds the size of the form. Any GUI component is regarded as a rect-
angle by the AutomatedGUITest tool. The size of the rectangle is limited by the size of the display
screen. In order to find all child GUI components within an application, a StartGUISurvey()
method of the GUISurveyClass divides the entire screen into a grid system. The size of the cells in
the grid system is arbitrarily decided by the testing tool developer. This method also assumes that
each of the child GUI components must be visible in at least one of the cells and it drives the mouse
pointer to visit each cell systematically. The pointer starts from the cell in upper-left corner and
4351Book.fm Page 218 Tuesday, September 28, 2004 11:21 AM
219
Starting the AutomatedGUITest Project
moves downward to the cell in the lower-left corner; then it moves back to the top of the grid and
one cell toward right until all the cells in the entire grid are visited. The last cell is in the lower-
right corner. Throughout the process, when a GUI child is recognized, it is recruited into a list.
Thus, an exhaustive search for child GUI components is accomplished in order for the tool to
conduct a thorough GUI testing. Such a systematic approach is an analogy of a Monte Carlo
simulation mathematically.
Now, you are aware of the automatic survey approach. You can create the GUISurveyClass
using the Microsoft Visual Studio .NET IDE with the AutomatedGUITest activated. From
the main window, choose Project Add Class to open an Add New Item dialog box. In the
Name field, type GUISurveyClass and click the Open button. A GUISurveyClass template is
created with the namespace AutomatedGUITest and the class name GUISurveyClass. To code
this class, you can accept all the generated code, add some using directives, overload a con-
structor, and declare two fields and one method, as discussed in the following paragraphs.
The first code addition is a few needed
using directives as shown in Listing 7.2.
➲
Listing 7.2 The Needed using Directives for the GUISurveyClass
using System;
using System.Collections;
using System.Text;
using GUITestLibrary;
In fact, the first line, using System, is already generated by the IDE. The second using
statement allows this class to use collection types for collecting GUI testing information. The
System.Text namespace is required by some Win32 custom functions in the GUITestLibrary
project to investigate the GUI components of an application. The GUITestLibrary namespace
allows the GUISurveyClass to take advantages of your implementation in Chapters 4 and 5.
Second, the generated class template has already coded a default constructor. You can leave
it intact but overload another constructor by passing a GUI handle to initialize an object of the
GUISurveyClass as a parameter. Listing 7.3 shows the code of the needed fields and the over-
loaded constructor.
➲
Listing 7.3 The Code to Overload a Constructor for the GUISurveyClass
private int HandleUnderSurvey;
public SortedList GUISortedList;
public GUISurveyClass(int _hndlUnderSurvey)
{
HandleUnderSurvey = _hndlUnderSurvey;
}
4351Book.fm Page 219 Tuesday, September 28, 2004 11:21 AM
220
Chapter 7 • Architecture and Implementation of the Automatic GUI Test Tool
The first field declares an integer to grab the handle of the form under survey. The survey
will find all the children and grandchildren with regard to GUI controls descended from the
current form that is the ancestor of the child and grandchild GUI objects. The second field is
a SortedList object, GUISortedList, which holds the whole family of the GUI components
and populates them in the DataGrid object of the AutomatedGUITest form.
Then the constructor simply accepts a Windows form handle of the application under test
and uses it to initialize the first field, HandleUnderSurvey.
Finally, only one public method, StartGUISurvey(), is needed for this class, as coded in
Listing 7.4.
➲
Listing 7.4 Code of the StartGUISurvey() Method
public void StartGUISurvey()
{
GUISortedList = new SortedList();
int width = 0;
int height = 0;
int surveyStep = 18;
int maxLen = 128;
GUITestActions.GetWindowSize(HandleUnderSurvey, ref width, ref height);
for (int xPos = 0; xPos < width; xPos += surveyStep)
{
for (int yPos = 0; yPos < width; yPos += surveyStep)
{
GUITestActions.MoveMouseInsideHwnd(HandleUnderSurvey,
➥xPos, yPos, RectPosition.AnySpot);
GUITestUtility.GUIInfo GUISurvey = new GUITestUtility.GUIInfo();
StringBuilder winText = new StringBuilder(GUISurvey.GUIText, maxLen);
StringBuilder clsName = new
➥StringBuilder(GUISurvey.GUIClassName, maxLen);
StringBuilder pText = new StringBuilder(GUISurvey.GUIParentText, maxLen);
GUITestActions.GetWindowFromPoint(ref GUISurvey.GUIHandle,
➥ref winText, ref clsName, ref pText);
GUISurvey.GUIText = winText.ToString();
GUISurvey.GUIClassName = clsName.ToString();
GUISurvey.GUIParentText = pText.ToString();
try
{
GUISortedList.Add(GUISurvey.GUIHandle, GUISurvey);
}
4351Book.fm Page 220 Tuesday, September 28, 2004 11:21 AM
221
Starting the AutomatedGUITest Project
catch
{
}
}
}
return;
}
The StartGUISurvey() method first initializes the GUISortedList object. Then it declares
two integer variables to remember the width and height of the form under test. The third inte-
ger variable declaration is the size of the grid cell, or the number of pixels the mouse pointer
moves in one step to complete the GUI survey. The number of 18 pixels here is an arbitrarily
chosen number to allow the mouse to move 18 pixels each step. The four-integer variable dec-
laration is also arbitrarily chosen to extract the GUI properties.
After the variables are declared and assigned, the GetWindowSize() method grabs the passed
handle to find the width and height of the rectangle form. Then the StartGUISurvey() method
uses two for loops to visit the grid. The outer for loop assigns coordinate position for the
mouse pointer in the x-axis, and the inner for loop assigns the position in the y-axis. The incre-
ments of the x- and y-axis are bound by the width and height of the form.
Within the inner for loop, the StartGUISurvey() method first invokes the MoveMouseInside-
Hwnd()
method to move the mouse pointer inside the form. Then the StartGUISurvey() method
initializes a GUITestUtility.GUIInfo object and three StringBuilder objects to hold the respec-
tive GUI information to the GUITestUtility.GUIInfo object. After the invocation of the Get-
WindowFromPoint()
method, the GUISurveyClass assures that a child GUI component is found
with the current move of the mouse pointer. Last, it assigns values of the GUI properties to
the GUITestUtility.GUIInfo object and adds the object as a value item into the GUISortedList
object. The handle is also added to the GUISortedList as a key. The handle added as a key and the
GUITestUtility.GUIInfo object will be used to help the tester confirm the testing case generation.
Many times the arbitrary surveyStep is defined small enough to guarantee that each of the
child GUI components in the form will be visited by the mouse pointer at least once. Other-
wise, some of the child GUI components will be skipped. If the step is too small, one of the side
effects is that it needs a longer time to move to all the cells. Another one is that one GUI com-
ponent will occupy many small cells and be visited many times. However, the SortedList class
is developed in the .NET Framework as a unique key list. If the mouse pointer visited the same
child GUI component more than one time, adding the GUI component with the same handle
as a key to the SortedList object will produce an error message such as this:
An unhandled exception of type 'System.ArgumentException'
➥occurred in mscorlib.dll
4351Book.fm Page 221 Tuesday, September 28, 2004 11:21 AM
222
Chapter 7 • Architecture and Implementation of the Automatic GUI Test Tool
To continue the survey without adding the already recruited child GUI component, the
GUISortedList.Add() invocation occurs within a try-catch statement. Therefore, a survey
is completed. The code for the GUISurveyClass seems so easy because it reuses the method
implemented in the GUITestLibrary project. Thanks to the GUI Test Library, the upcoming
sections will continue to reuse its methods, and the code of the tool project becomes simplified
by reusing these methods.
Adding an Interface for Testing Data Confirmation
The third class to be implemented is also a GUI-rich Windows form, the GUITestDataCollector
class. Starting from main window of the Microsoft Visual Studio .NET IDE, choose Project
Add Windows Form. In the name field, type GUITestDataCollector, and click the Open but-
ton to create an empty GUITestDataCollector form. As usual, when you add a Windows form
to a project, you need to populate it with some GUI controls. First, change the Text property of
this form to GUI Test Data Collector for instruction and appearance. Next, you can use the
following list to add some Label, ComboBox, TextBox, and Button controls, modify the men-
tioned property values, and accept the automatically assigned values that are not mentioned:
Control Property Value
Label Name lblControlName
Text Control Name
Label Name lblControlType
Text Control Type
Label Name lblWindowText
Text Window Text
Label Name lblClassName
Text Class Name
Label Name lablParentText
Text Parent Text
ComboBox Name cmbControlName
ComboBox Name cmbControlType
TextBox Name txtWindowText
TextBox Name txtClassName
TextBox Name txtParentText
4351Book.fm Page 222 Tuesday, September 28, 2004 11:21 AM
223
Starting the AutomatedGUITest Project
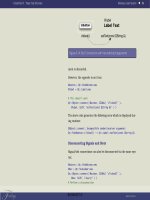
After the GUI control population, the GUITestDataCollector form looks similar to Figure 7.4.
The coding task of this form includes the addition of two using directives, four private or
public fields, one public method, and two private events. Right-click the form, and choose
View Code to go to the code editor of this class. Move the cursor to the beginning of the
GUITestDataCollector.cs file editor and add the following below the exiting using statement:
using System.Text;
using GUITestLibrary;
Then, navigate the cursor to the spot immediately below the GUITestDataCollector class
declaration. Add the following field declaration statements before the IDE-generated fields,
which are the GUI controls you just placed:
public GUITestUtility.GUIInfo guiInfo;
public ArrayList ControlNameList;
public ArrayList controlTypeList;
These are public fields and will be used by other classes to execute testing tasks later. The
guiInfo object holds the properties of individual GUI components, the ControlNameList
traces the names of the GUI components, and controlTypeList collects the data types of the
GUI components.
FIGURE 7.4
Final appearance
of the GUITestData-
Collector form
Control Property Value
Button Name btnOK
Text OK
Button Name btnCancel
Text Cancel
4351Book.fm Page 223 Tuesday, September 28, 2004 11:21 AM
224
Chapter 7 • Architecture and Implementation of the Automatic GUI Test Tool
The proposed public method is named PopulateGUIInfo(). Its mission is to accept the assigned
guiInfo field and populate the property values of a selected GUI to the ComboBox and the
TextBox controls. It also connects the assigned ControlNameList and the ControlTypeList to
the picking lists of the two ComboBox objects. The code of the PopulateGUIInfo() method is in
Listing 7.5.
➲
Listing 7.5 Code for the PopulateGUIInfo() Method
public void PopulateGUIInfo()
{
cmbControlName.DataSource = ControlNameList;
cmbControlType.DataSource = controlTypeList;
cmbControlName.Text = guiInfo.GUIControlName;
cmbControlType.Text = guiInfo.GUIControlType;
txtWindowText.Text = guiInfo.GUIText.ToString();
txtClassName.Text = guiInfo.GUIClassName.ToString();
txtParentText.Text = guiInfo.GUIParentText.ToString();
}
Because you can be confident that the GUI text, GUI class, and its parent text found by the
custom functions will be assigned correctly after a GUI component is selected to test by the
user, TextBox objects are created to display these properties. The control type and name are
detected by methods of .NET Reflection namespace or Win32 API methods. The outcome
could be inconsistent with the findings of the custom functions in some cases. However, such
a chance will be very rare. In case this happens, the ComboBox controls provide lists for the
users to correct the confusion with ease.
After you completely code the property and the method, you are going to use the easy double-
click approach to code the remaining events from the form design editor. First, click the form
design tab from the Microsoft Visual Studio .NET IDE, and then, double-click the OK button.
Your cursor is back to the code editor between a pair of curly brackets of the btnOK_Click()
event. Insert code as shown in Listing 7.6.
➲
Listing 7.6 Code for the btnOK_Click() Event
private void btnOK_Click(object sender, System.EventArgs e)
{
guiInfo.GUIControlName = cmbControlName.Text;
guiInfo.GUIControlType = cmbControlType.Text;
guiInfo.GUIText = txtWindowText.Text;
guiInfo.GUIClassName = txtClassName.Text;
guiInfo.GUIParentText = txtParentText.Text;
}
4351Book.fm Page 224 Tuesday, September 28, 2004 11:21 AM
225
Starting the AutomatedGUITest Project
When this OK button is clicked, it looks for the contents in the ComboBox and TextBox
controls and assigns them to the guiInfo field. The guiInfo field bears the information to
inform the tool to look for a GUI component with the specified property values and test it.
This cluster of code is similar to the PopulateGUIInfo() method. But the direction of the data
flow is reversed.
In order to indicate that the OK button is clicked from the GUITestDataCollector which is
a custom dialog box, you need to perform one more step to complete the OK button click
event. Go to the IDE-generated #region Windows Form Designer generated code section of
the GUITestDataCollector.cs editor. If this section is hidden, click the + sign to expand it and
reveal the InitializeComponent() method. From this method, locate the code snippet for the
btnOK object initialization by looking for the //btnOK comment. Then insert a line of code:
this.btnOK.DialogResult = System.Windows.Forms.DialogResult.OK;
After the insertion, this section of code looks similar to Listing 7.7 with the inserted code bold.
TIP
Microsoft Visual Studio .NET IDE allows developers to use a #region directive to hide a por-
tion of the code in a code file. You can press the Ctrl+M+L combination to expand/collapse
these regions.
➲
Listing 7.7 Inserting a Line of Code to Catch the OK Button Click DialogResult
//
// btnOK
//
this.btnOK.DialogResult = System.Windows.Forms.DialogResult.OK;
this.btnOK.Location = new System.Drawing.Point(136, 296);
this.btnOK.Name = "btnOK";
this.btnOK.TabIndex = 10;
this.btnOK.Text = "OK";
this.btnOK.Click += new System.EventHandler(this.btnOK_Click);
Since clicking a Cancel button often means doing nothing, you need no code for a Cancel
button event. However, you need a line of code to catch that the Cancel button is clicked. To
accomplish this, you insert a line of code in the InitializeComponent() method by locating
the code section for the btnCancel object initialization as you did for the tbnOK object. Then,
add a line of code like this:
this.btnCancel.DialogResult = DialogResult.Cancel;
The entire section of the btnCancel initialization should look similar to Listing 7.8 (the
inserted code is bold).
4351Book.fm Page 225 Tuesday, September 28, 2004 11:21 AM
226
Chapter 7 • Architecture and Implementation of the Automatic GUI Test Tool
➲
➲
Listing 7.8 Code to Catch the Cancel Button Click DialogResult
//
// btnCancel
//
this.btnCancel.DialogResult = System.Windows.Forms.DialogResult.Cancel;
this.btnCancel.Location = new System.Drawing.Point(240, 296);
this.btnCancel.Name = "btnCancel";
this.btnCancel.TabIndex = 9;
this.btnCancel.Text = "Cancel";
This event simply informs the tool that the Cancel button was clicked. Then it disposes of the
GUITestDataCollector form. Thus nothing else happens after clicking the Cancel button.
You can compile the project to check whether there are coding errors for the newly added
class. Listing 7.9 is the full list of the GUITestDataCollector class with the IDE-generated code
omitted.
Listing 7.9 The Complete List of Code for the GUITestDataCollector Class with IDE-
Generated Code Omitted
using System;
using System.Drawing;
using System.Collections;
using System.ComponentModel;
using System.Windows.Forms;
using System.Text;
using GUITestLibrary;
namespace AutomatedGUITest
{
/// <summary>
/// Summary description for GUITestDataCollector.
/// </summary>
public class GUITestDataCollector : System.Windows.Forms.Form
{
public GUITestUtility.GUIInfo guiInfo;
public ArrayList ControlNameList;
public ArrayList controlTypeList;
//Microsoft Visual Studio .NET IDE generated code
private void InitializeComponent()
{
4351Book.fm Page 226 Tuesday, September 28, 2004 11:21 AM
227
Starting the AutomatedGUITest Project
//Microsoft Visual Studio .NET IDE generated code
//
// btnCancel
//
this.btnCancel.Location = new System.Drawing.Point(240, 296);
this.btnCancel.Name = "btnCancel";
this.btnCancel.TabIndex = 9;
this.btnCancel.Text = "Cancel";
this.btnCancel.DialogResult = DialogResult.Cancel;
//
// btnOK
//
this.btnOK.Location = new System.Drawing.Point(136, 296);
this.btnOK.Name = "btnOK";
this.btnOK.TabIndex = 10;
this.btnOK.Text = "OK";
this.btnOK.DialogResult = DialogResult.OK;
this.btnOK.Click += new System.EventHandler(this.btnOK_Click);
//Microsoft Visual Studio .NET IDE generated code
}
public void PopulateGUIInfo()
{
cmbControlName.DataSource = ControlNameList;
cmbControlType.DataSource = controlTypeList;
cmbControlName.Text = guiInfo.GUIControlName;
cmbControlType.Text = guiInfo.GUIControlType;
txtWindowText.Text = guiInfo.GUIText.ToString();
txtClassName.Text = guiInfo.GUIClassName.ToString();
txtParentText.Text = guiInfo.GUIParentText.ToString();
}
private void btnOK_Click(object sender, System.EventArgs e)
{
guiInfo.GUIControlName = cmbControlName.Text;
guiInfo.GUIControlType = cmbControlType.Text;
guiInfo.GUIText = txtWindowText.Text;
guiInfo.GUIClassName = txtClassName.Text;
guiInfo.GUIParentText = txtParentText.Text;
}
}
}
4351Book.fm Page 227 Tuesday, September 28, 2004 11:21 AM
228
Chapter 7 • Architecture and Implementation of the Automatic GUI Test Tool
At this point, the data is collected for testing one GUI component. Restarting the GUI-
TestDataCollector form will allow the users to specify other GUI components to test.
Developing a General-Purpose GUI Test Script
GUI test automation has faced two challenges technically in the past years. The first one is how
to locate the correct GUI components for testing. Different approaches have used hard-coded
x- and y-coordinates and object-based and keyword-based techniques to increase the GUI
search efficiency. From the experiences of exercising the sample project in Chapter 6, the tool
in this book uses a certain pattern of the GUI text, the GUI class name, and its parent text to
correctly locate a GUI component to test. Thus, a general test script will be the idea solution
to a fully automated GUI testing tool. When you develop your own tool based on the ideas in
this book, you can alter the GUI search pattern to make it suit your testing projects and your
organization.
The other challenge is automatic verification. It seems easy to use the capture/playback
method to record a test script. But it is not easy for testers to insert verification points. Some
available tools allow the testers to insert verification code during the script recording process,
perhaps because they might forget to do this later. Other tools ask the testers to insert verifi-
cation methods after the script recording. However, the automated test scripts are not auto-
matically generated by any tools. A tool user is still required to have in-depth knowledge of
programming and be skillful at using the tools. Especially when a tool comes with a unique
script language, it isolates the testers from the developers.
In order to address the automatic verification approach effectively, this section will guide you
through developing a general test script for different GUI components and preparing the data
objects for verification. Chapter 8 will elaborate on the prepared data and discuss how to auto-
matically complete the verification in depth.
To conduct effective GUI testing, this tool will heavily reuse the functions of the GUI test
library implemented. In order to catch up with new testing tasks, this GUI test library will be
under continuous development. However, the general test script to be developed in this section
will remain relatively stable. The users of this tool will not be required to see and edit this
script.
Traditional testing methods and tools need a script for each single test case. As the number
of test cases increases, the test scripts and testing data become difficult to track and maintain.
This tool uses a general test script to address the following issues:
● One test script is for all test cases. The test execution is totally driven by XML testing data
stores. Increased testing capabilities will be implemented in the GUI test library.
● Users will not be required to learn programming. But a good understanding of XML is the key
to effectively creating and maintaining testing cases.
4351Book.fm Page 228 Tuesday, September 28, 2004 11:21 AM
229
Starting the AutomatedGUITest Project
● Each new method to expand the GUI test library has only one purpose. As you have implemented
the methods to handle the ListBox, TextBox and Button controls, each method has only a
few lines of code. The test script becomes aware of and reuses the methods in the GUI test
library by reading an XML document.
● An XML data store is easy to create, read, and understand. This will allow the users to edit the data
store with ease. In addition, a well-formatted test plan can be translated into a testing
data store automatically. The test is completely driven by the collected data thereafter.
For developing the AutomatedGUITest tool, you have added three Windows forms. Now
you need to add one more for the GUITestScript class. As usual, after you choose Project Add
Windows Form, type a class name such as GUITestScript in the Name field. Then click the
Open button. The IDE automatically generates the form. On this form, you don’t need to add
any GUI controls because you don’t want the testers to watch a form when the tool is conduct-
ing a fully automated GUI test. The only thing you need to do when the form is active is to add
four Timer controls by dragging them from the Toolbox and dropping them on the form. Then
use the values in the following list to modify the default values of the Timer properties:
Control Property Value
Timer Name tmrAutomatedTest
Enabled true
Interval 100
Modifier private
Timer Name tmrRunScript
Enabled false
Interval 100
Modifier private
Timer Name tmrStopScript
Enabled false
Interval 100
Modifier private
Timer Name tmrVerifyTest
Enabled false
Interval 100
Modifier private
4351Book.fm Page 229 Tuesday, September 28, 2004 11:21 AM
230
Chapter 7 • Architecture and Implementation of the Automatic GUI Test Tool
➲
The first Timer control is for starting the application under test. The second and third
Timer controls are for running and stopping the script execution. The last Timer control starts
to save the test results and terminates the test execution. The form of the GUI test script is
empty.
Now, right-click the mouse button on the empty form and select View Code from the pop-up
menu. When the cursor is in the code editor, move it to the beginning of the using statement sec-
tion to add the following namespace beside the already generated using directives:
using System.Reflection;
using System.IO;
using GUITestLibrary;
using System.Text;
The purpose of the System.Reflection namespace is for loading the application to test. The
System.IO namespace provides a method for the tool to find the correct path for the testing
data. The GUITestLibrary and System.Text namespaces are for the purpose discussed earlier.
Next, add the private field declarations and overload the constructor immediately after the
GUITestScript class declaration, as shown in Listing 7.10. (Microsoft Visual Studio .NET
IDE–generated declarations are omitted here.)
Listing 7.10 Code for the Field Declarations and the Overloaded Constructor of the
GUITestDataScript Class
private string guiTestDataStore;
private string progDir;
private Form AUT;
private GUITestUtility.GUIInfoSerializable seqGUIUT;
private string guiTestActionLib;
private int clickNum;
private ArrayList resultList;
public GUITestScript(string _testDataStore, string _progDir)
{
InitializeComponent();
GuiTestDataStore = _testDataStore;
progDir = _progDir;
}
The first string field, GuiTestDataStore, is prepared to accept a pathname of the data store
originated from the GUITestDataColloector class. The progDir field refers to the root directory
of the GUI testing tool. The two fields are assigned with values by the overloaded constructor.
4351Book.fm Page 230 Tuesday, September 28, 2004 11:21 AM
231
Starting the AutomatedGUITest Project
➲
The next two fields work together. The AUT is an object of the System.Windows.Forms.Form
class. At this point, we can assume the targets of GUI testing are all derived from Windows
forms to simplify the discussion. Later, we will enhance this tool to test various GUI compo-
nents, such as, for example, custom controls and ActiveX controls. The seqGUIUT object holds
the collected data store after deserialization and then passes the startup information and test
script information to execute the test.
The last three fields complete the real test and verifications. The string variable, GuiTest-
ActionLib
, refers to the GUITestActionLib.xml document prepared in Listing 5.2 of Chapter 5.
Before you proceed with the code, I recommend that you copy this file from the C:\GUISource-
Code\Chapter05\XMLCreator\bin\Debug
folder to the C:\GUISourceCode\Chapter07\Automated-
GUITest\bin\Debug
folder to avoid overlooking it later. This document contains a list of different
GUI types and their respective GUI handling methods from the GUI test library. The clickNum
variable is for counting how many GUI test actions have been performed with regard to the count
of the
seqGUIUT.GUIList object. The resultList field collects the status of the application after
each GUI test action.
After the field declaration, you need to overload the constructor of the GUITestScript class
to accept where the testing data and the testing tool are located. The last three lines of code in
Listing 7.10 initialize the test script first and then assign the data store and the program direc-
tory to the respective fields.
The major tasking of coding the GUITestScript class is for the Tick() events of the four
Timer controls. Similar to the implementation of the button click events, you can double-click
a Timer control from the GUITestScript form and auto-generate the respective Timer tick
delegates and event handler. Then you can add the needed code. Now, let’s double-click the
tmrAutomatedTest on the form. The IDE brings the cursor between a pair of curly brackets of
the tmrAutomatedTest_Tick() event. Since this event calls a StartAUT() helper method, the
code for the event and the helper method are shown in Listing 7.11.
Listing 7.11 Code for the tmrAutomatedTest_Tick() Event and the StartAUT() Helper
Method
private void tmrAutomatedTest_Tick(object sender, System.EventArgs e)
{
StartAUT();
tmrAutomatedTest.Enabled = false;
resultList = new ArrayList();
tmrRunScript.Enabled = true;
}
private void StartAUT()
4351Book.fm Page 231 Tuesday, September 28, 2004 11:21 AM
232
Chapter 7 • Architecture and Implementation of the Automatic GUI Test Tool
{
seqGUIUT = new GUITestUtility.GUIInfoSerializable();
object obj = (object)seqGUIUT;
GUITestUtility.DeSerializeInfo(guiTestDataStore, ref obj);
seqGUIUT = (GUITestUtility.GUIInfoSerializable)obj;
string AUTPath = seqGUIUT.AUTPath;
string startupType = seqGUIUT.AUTStartupForm;
if (AUT == null)
AUT = (Form)GUITestUtility.StartAUT(AUTPath, startupType);
int hwnd = (int)AUT.Handle;
StringBuilder sbClsName = new StringBuilder(128);
GUITestActions.GetClassName(hwnd, sbClsName, 128);
string clsName = sbClsName.ToString();
string winText = AUT.Text;
string pText = "";
GUITestActions.SynchronizeWindow(ref hwnd, ref winText,
➥ref clsName, ref pText);
}
The tmrAutomatedTest_Tick() event simply invokes the helper method, disables itself, ini-
tializes the resultList, and enables the second Timer control to execute the test script. Most
of the actions happen in the StartAUT() helper method.
The StartAUT() method first initializes the GUIInfoSerializable object, seqGUIUT. Then
it uses the boxing techniques to convert the seqGUIUT of an object, obj. This obj object is
required by the DeSerializeInfo() method of the GUITestLibrary. After the invocation of
the DeSerializeInfo() method, the obj is assigned with the data store of the testing infor-
mation and is converted back to the seqGUIUT object by unboxing.
Next, it extracts the path and name of the startup form of the application under test from the
seqGUIUT object. Using an if statement to check that the same application is not currently run
by the script, it invokes the method from GUITestLibrary and returns the application under
test as a Form object to AUT by another unboxing.
After a command is issued, a Windows application with GUI components usually doesn’t
appear on the display instantly. Under a normal operation condition, the user usually waits
for a few milliseconds, even nanoseconds unnoticeable to a human. But to a high-speed com-
puter system, this much time will be enough to execute many lines of the code that follows
the command. In order to make sure the GUI application is visible for the following code, a syn-
chronization method is needed for an automatic GUI testing tool. In Chapter 4, such a method
was implemented in the GUITestLibrary. Thus, the last cluster of the code is to retrieve the
needed information of the application under test. The
SynchronizeWindow() method of the
4351Book.fm Page 232 Tuesday, September 28, 2004 11:21 AM
233
Starting the AutomatedGUITest Project
GUITestLibrary uses the retrieved information and makes sure this application is visible on
the screen.
The second Timer control event is the tmrRunScript_Tick() event. From the form design
editor, double-click the tmrRunScript control and add code for it. This event also calls another
helper method, RunScript(). The code for the event and the helper method is in Listing 7.12.
➲
Listing 7.12 Code for the tmrRunScript_Tick() Event and the RunScript() Helper Method
private void tmrRunScript_Tick(object sender, System.EventArgs e)
{
RunsScript();
tmrRunScript.Enabled = false;
}
private void RunsScript()
{
guiTestActionLib = Path.Combine(progDir, "GUITestActionLib.xml");
GUITestUtility.GUIInfo guiUnit =
➥(GUITestUtility.GUIInfo)seqGUIUT.GUIList[clickNum];
string ctrlAction =
➥GUITestUtility.GetAGUIAction(guiTestActionLib, guiUnit.GUIControlType);
StringBuilder sb = new StringBuilder(10000);
Control ctrlTested =
➥(Control)GUITestUtility.VerifyField(AUT, guiUnit.GUIControlName);
GUITestActions.GetWindowText((int)ctrlTested.Handle, sb, 10000);
object[] paramArr = new object[4];
paramArr[0] = 0;
paramArr[1] = sb.ToString();
paramArr[2] = guiUnit.GUIClassName;
paramArr[3] = guiUnit.GUIParentText;
Type guiTestLibType = new GUITestActions().GetType();
object obj = Activator.CreateInstance(guiTestLibType);
MethodInfo mi = guiTestLibType.GetMethod(ctrlAction);
try
{
mi.Invoke(obj, paramArr);
}
catch (Exception ex)
{
MessageBox.Show(ex.Message);
4351Book.fm Page 233 Tuesday, September 28, 2004 11:21 AM
234
Chapter 7 • Architecture and Implementation of the Automatic GUI Test Tool
}
if (clickNum < seqGUIUT.GUIList.Count)
{
clickNum++;
tmrRunScript.Enabled = false;
tmrStopScript.Enabled = true;
}
}
The code for the tmrRunScript_Tick() event simply invokes the RunScript() helper
method and disables itself. The majority of the tasks of the testing actions are the burden
of the RunScript() method.
The first action of the RunScript() method is to grab the GUITestActionLib.xml document
from the tool program directory. Then, guided with the value of the clickNum variable, it
locates the property values of the next GUI target from the seqGUIUT.GUIList object. Based
on the data type of the targeted GUI control, the method looks for the handling method from
the GUITestActionLib.xml document.
NOTE
You need to copy the GUITestActionLib.xml document from the C:\GUISourceCode\
Chapter05\XMLCreator\bin\Debug folder to the C:\GUISourceCode\Chapter07\
AutomatedGUITest\bin\Debug folder, if you have not done so. This will enable you to
start the first fully automated GUI test at the end of this chapter without error.
The next cluster of the code is to prepare the values of parameters needed for execution of the
respective handling method with late binding. Each GUI action by late binding indicates the
moment when a method from the GUI test library performs a mouse or a keystroke action on
the GUI object under test until all the desired actions are performed. The Invoke() method
of the MethodInfo object to achieve the late binding is executed within a try-catch clause. A
try-catch clause will allow the test script to proceed to the next step if exception occurs with
one GUI action. Thus, it increases the robustness of the GUI script and the tool.
TIP
When I approached a group of software developers with the topic of late binding, some of
them asked me to explain the differences between early binding and late binding. I tried to
use the definitions I have learned from various books and articles to answer this question.
However, some of developers were not convinced of the benefits of late binding. Then I
compared early binding to the actions of a housekeeper who foresaw all needs in advance
and spent the money necessary to purchase and store them. Another housekeeper uses
late binding, but this one doesn’t purchase materials to store. Instead, whenever he needs
anything, he drives to the closest store to purchase it and uses it immediately. If the mate-
rial is not consumable, he may take the advantage of the return policy.
4351Book.fm Page 234 Tuesday, September 28, 2004 11:21 AM
235
Starting the AutomatedGUITest Project
After one GUI action is completed, an if statement inspects whether the late binding exe-
cutions reach the last GUI action in the data store. If not, the RunScript() method increases
the value of the clickNum by 1 in order to perform the next GUI action. Then it turns the
tmrRunScript off by setting its Enabled property to false and enables the tmrStopScript
object.
The third event is the tmrStopScript_Tick() event. After you double-click the tmrStopScript
control from the form design editor, add code to make the tmrStopScript_Tick() event, as
shown in Listing 7.13.
➲
Listing 7.13 Code for the tmrStopScript_Tick() Event
private void tmrStopScript_Tick(object sender, System.EventArgs e)
{
GUITestUtility.GUIInfo guiUnit =
➥(GUITestUtility.GUIInfo)seqGUIUT.GUIList[clickNum - 1];
Control ctrlTested;
ctrlTested = (Control)GUITestUtility.VerifyField(AUT, guiUnit.GUIControlName);
resultList.Add(ctrlTested);
if (clickNum >= seqGUIUT.GUIList.Count)
{
tmrRunScript.Enabled = false;
tmrStopScript.Enabled = false;
tmrVerifyTest.Enabled = true;
try
{
AUT.Dispose();
}
catch{}
}
else
{
tmrRunScript.Enabled = true;
tmrStopScript.Enabled = false;
}
}
The code of the tmrStopScript_Tick() event is similar to the code in Listing 6.13 in Chapter 6.
It first makes the effort to collect the current status of the application under test into the resultList
object. Then it turns the tmrRunScript object on and itself off if the test doesn’t reach the last GUI
action in the data store. After all GUI actions are performed, it turns off the Timer controls for the
test script and disposes of the application under test. The last action of this event turns on the
tmrVerifyTest.
4351Book.fm Page 235 Tuesday, September 28, 2004 11:21 AM
236
Chapter 7 • Architecture and Implementation of the Automatic GUI Test Tool
As usual, you can double-click the tmrVerifyTest control from the test script form and add
between the curly brackets the code in Listing 7.14.
➲
Listing 7.14 Code for the tmrVerifyTest_Tick() Event
private void tmrVerifyTest_Tick(object sender, System.EventArgs e)
{
tmrVerifyTest.Enabled = false;
string resultDataStore = guiTestDataStore.Replace(".xml", "_result.xml");
GUITestUtility.SerilizeInfo(resultDataStore, resultList);
this.Dispose();
}
The tmrVerifyTest_Tick() event first turns itself off. In order to achieve the automatic ver-
ification, the rest of the code saves the test outcome in an XML document. The process of sav-
ing the results assigns a filename first and then calls the GUITestUtility.SerilizeInfo().
Finally, it concludes this test by disposing the form of the test script itself.
At this point, the resultList only collects the status of the GUI component just tested. This
limits the verification capability of an automatic testing tool. However, it shows the possibility
of the fully automated GUI test process. The next chapter will be dedicated to broadening the
scope of the test verification automation.
Now you can compile the project to check whether the new code has errors. Listing 7.15 has
the full code for the GUITestSctipt class with the IDE-generated code omitted.
➲
Listing 7.15 Full Code Listing of the GUITestSctipt Class
using System;
using System.Drawing;
using System.Collections;
using System.ComponentModel;
using System.Windows.Forms;
using System.Data;
using System.Reflection;
using System.IO;
using GUITestLibrary;
using System.Text;
namespace AutomatedGUITest
{
public class GUITestScript : System.Windows.Forms.Form
4351Book.fm Page 236 Tuesday, September 28, 2004 11:21 AM
237
Starting the AutomatedGUITest Project
{
//generated by planting the GUI controls
private System.ComponentModel.IContainer components;
private System.Windows.Forms.Timer tmrStopScript;
private System.Windows.Forms.Timer tmrAutomatedTest;
private System.Windows.Forms.Timer tmrRunScript;
private System.Windows.Forms.Timer tmrVerifyTest;
//fields added
private string guiTestDataStore;
private string progDir;
private Form AUT;
private GUITestUtility.GUIInfoSerializable seqGUIUT;
private string guiTestActionLib;
private ArrayList resultList;
private int clickNum;
// default constructor
public GUITestScript()
{
InitializeComponent();
}
//overloaded constructor
public GUITestScript(string _testDataStore, string _progDir)
{
InitializeComponent();
guiTestDataStore = _testDataStore;
progDir = _progDir;
}
//Some Microsoft Visual Studio .NET IDE generated code
private void tmrAutomatedTest_Tick(object sender, System.EventArgs e)
{
StartAUT();
tmrAutomatedTest.Enabled = false;
tmrRunScript.Enabled = true;
resultList = new ArrayList();
}
private void StartAUT()
{
4351Book.fm Page 237 Tuesday, September 28, 2004 11:21 AM