Effective GUI Test Automation Developing an Automated GUI Testing Tool phần 7 pot
Bạn đang xem bản rút gọn của tài liệu. Xem và tải ngay bản đầy đủ của tài liệu tại đây (964.83 KB, 46 trang )
259
Putting Together the AutomatedGUITest Tool
{
GUITDC = new GUITestDataCollector();
GUITDC.guiInfo = new GUITestUtility.GUIInfo();
tempList = new ArrayList();
GUITDC.guiInfo.GUIControlName =
➥PopulateGUINameTypeLists(formUTBoxed, GUITDC.guiInfo.GUIHandle, true);
tempList.Sort();
GUITDC.ControlNameList = tempList;
tempList = new ArrayList();
GUITDC.guiInfo.GUIControlType =
➥PopulateGUINameTypeLists(formUTBoxed, GUITDC.guiInfo.GUIHandle, false);
tempList.Sort();
GUITDC.controlTypeList = tempList;
GUITDC.PopulateGUIInfo();
if (GUITDC.GUIInfoState == DialogResult.OK)
{
GUITDC.guiInfo.GUIMemberType =
➥GetMemberType(GUITDC.guiInfo.GUIControlName);
GUITestSeqList.GUIList.Add(GUITDC.guiInfo);
}
}
private string PopulateGUINameTypeLists(
➥Control formUT, int hwnd, bool enforceName)
{
if (formUT == null)
return "";
foreach( Control ctrl in formUT.Controls)
{
if (enforceName)
{
tempList.Add(ctrl.Name);
if ((int)ctrl.Handle == hwnd)
GuiProperty = ctrl.Name;
}
else
{
if (!tempList.Contains(ctrl.GetType().ToString()))
4351Book.fm Page 259 Tuesday, September 28, 2004 11:21 AM
260
Chapter 7 • Architecture and Implementation of the Automatic GUI Test Tool
tempList.Add(ctrl.GetType().ToString());
if ((int)ctrl.Handle == hwnd)
GuiProperty = ctrl.GetType().ToString();
}
PopulateGUINameTypeLists(ctrl, hwnd, enforceName);
}
return GuiProperty;
}
private string GetMemberType(string ctrlName)
{
if (formUT == null)
return "";
BindingFlags allFlags = BindingFlags.Public | BindingFlags.NonPublic |
BindingFlags.Static | BindingFlags.Instance;
Type StartupForm = formUT.GetType();
FieldInfo[] fis = StartupForm.GetFields(allFlags);
foreach (FieldInfo fi in fis)
{
if (fi.Name == ctrlName)
{
return "VerifyField";
}
}
PropertyInfo[] ppis = StartupForm.GetProperties(allFlags);
foreach (PropertyInfo ppi in ppis)
{
if (ppi.Name == ctrlName)
{
return "VerifyProperty";
}
}
return "";
}
private void btnRunTest_Click(object sender, System.EventArgs e)
{
sveDataStore.Title = "Location to save GUI test data";
sveDataStore.Filter = "XML Files (*.xml)|*.xml|All Files (*.*)|*.*";
if (sveDataStore.ShowDialog() == DialogResult.OK)
{
TestCaseStore = sveDataStore.FileName;
}
else
{
return;
}
GUITestSeqList.AUTStartupForm = startupForm;
4351Book.fm Page 260 Tuesday, September 28, 2004 11:21 AM
261
Conducting the First Automatic GUI Testing
GUITestUtility.SerilizeInfo(TestCaseStore, GUITestSeqList);
GUITestScript guiTS = new GUITestScript(TestCaseStore, currDir);
GUITestSeqList = null;
}
private void btnRerun_Click(object sender, System.EventArgs e)
{
opnAUT.Title = "Select an existing data store";
opnAUT.Filter = "XLM test cases (*.xml)|*.xml|All Files (*.*)|*.*";
if (opnAUT.ShowDialog() == DialogResult.OK)
{
GUITestScript guiTS = new GUITestScript(opnAUT.FileName, currDir);
}
}
private void btnExit_Click(object sender, System.EventArgs e)
{
Application.Exit();
}
private void Form1_Resize(object sender, System.EventArgs e)
{
dgAvailableGUIs.Width = this.Width - 48;
dgAvailableGUIs.Height = this.Height - 144;
}
}
}
After you successfully build this project, your tool is ready for software testing projects with
the implemented capabilities. Although more testing functions are on the way, the Automated-
GUITest tool has been enabled with a lot of automatic testing features for functions that
require tedious, time-consuming, and manual interactions in other tools. The next section will
walk you through the first automatic GUI test without writing and recording a test script.
Conducting the First Automatic GUI Testing
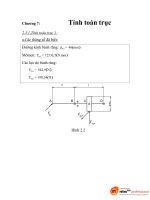
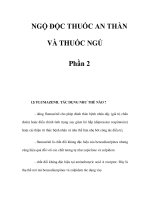
Now, you have pressed F5, the building is successful, and the AutomatedGUITest tool, which
looks similar to Figure 7.5, debuts on your desktop. This tool separates a GUI test process into
five big steps indicated by the five buttons implemented in the frmMain class:
1. Start the application under test, which makes the GUI components of the application
visible to the tool.
2. Conduct a GUI survey, which enables a thorough test.
4351Book.fm Page 261 Tuesday, September 28, 2004 11:21 AM
262
Chapter 7 • Architecture and Implementation of the Automatic GUI Test Tool
FIGURE 7.5
The GUI interface of
the AutomatedGUITest
for the first test run
3. Run the specified test from the GUI survey results.
4. Rerun the saved test scenario to accomplish an effective regression testing.
5. The test is completed. Click the Exit button to terminate the tool.
Based on the test script developed in Chapter 6 for testing the C# API Text Viewer, this
section uses the same scenario for exemplary purposes. A normal scenario is reiterated here:
1. When the C# API Text Viewer is running on the desktop, click the ListBox control to
advance the vertical scroll bar and select a name of a custom function.
2. Click the Add button to add the selected C# marshalling code into the RichTextBox control.
3. Click the Copy button set the selected function to the clipboard, from which it can be trans-
ferred to other word processors or code editors.
4. Click inside the RichTextBox control and it gets the focus.
5. Click the Remove button to remove the first line of code inside the RichTextBox.
6. Click the Clear button to empty the RichTextBox. Complete the test and close the appli-
cation under test.
To complete this scenario with the AutomatedGUITest tool, you can follow these steps:
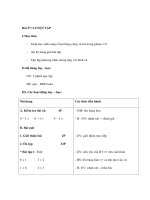
1. Click the Start GUI Test button. An open file dialog box pops up. From this dialog box,
navigate to the C:\GUISourceCode\Chapter03\CSharpAPITextViewer\bin\Debug folder,
select the CSharpAPITextViewer.exe file, and click the Open button. The Types under
Test form shows up with the possible class names in the check box list. Among them, one
is the startup form class, Form1 in this case. Figure 7.6 displays the Types under Test form
of this running session.
4351Book.fm Page 262 Tuesday, September 28, 2004 11:21 AM
263
Conducting the First Automatic GUI Testing
FIGURE 7.6
Selecting the startup
form class from the
possible class names
of the C# API Text
Viewer
2. Check the check box beside CSharpAPITextViewer.Form1 and click the OK button. The C#
API Text Viewer starts on the desktop. If it covers the AutomatedGUITest application,
you can rearrange the applications on your screen and make the AutomatedGUITest tool
visible. But make sure there is only one copy of the C# API Text Viewer is running on your
system.
3. Click the GUI Survey button on the AutomatedGUITest tool. The tool minimizes itself to
expose the application under test. You can visualize the mouse movement from the top down-
ward to the bottom, and from the left toward the right inside the application until every spot
of this window is visited. Then, the AutomatedGUITest tool appears normally on the screen
with DataGrid filled with the available GUI descriptions, as shown in Figure 7.7. The first
column lists the values of the child GUI components, which is for reference purposes so that
the tool can collect specific information, not for test data collection. The second, third, and
fourth columns list the values of the associated GUI text, class name, and parent text.
4. You first collect the GUI information for the ListBox of the C# API Text Viewer. The value
of the GUI text for this ListBox is empty at the initial stage when no item is selected from
the ListBox. You can read its class name as its identifier, WindowsForms10.LISTBOX.app3, to
locate the row index and double-click besides the row in the left edge. The GUI Test Data
Collector form appears on the screen with the ComboBox and TextBox controls populated
with correct values of the respective GUI properties (Figure 7.8). From the GUI Test Data
Collector form, you simply click the OK button.
NOTE
To select a GUI object from the DataGrid, you first place the cursor on the row containing
the GUI object, then double-click the gray or blue area on the left edge or on the top to
popup the GUI Test Data Collector.
4351Book.fm Page 263 Tuesday, September 28, 2004 11:21 AM
264
Chapter 7 • Architecture and Implementation of the Automatic GUI Test Tool
FIGURE 7.7
The AutomatedGUI-
Test tool with the
collection of the GUI
components after
surveying the C# API
Text Viewer
FIGURE 7.8
The first step is to
specify a GUI action on
the ListBox of the C#
API Text Viewer
5. Repeat step 4 for the Add, Copy, RichTextBox, Remove, and Clear controls in the available
GUI complonent list. These controls can be easily identified by reading their GUI texts.
However, the text for the RichTextBox is still empty.
6. After the designated six GUI events are selected from the available GUI list and confirmed
in the GUI Test Data Collector form, you need to terminate the C# API Text Viewer
because, when you click the Run button to execute the test, the test script of the tool will
start up another copy of the application under test. Two copies of the application running
4351Book.fm Page 264 Tuesday, September 28, 2004 11:21 AM
265
Conducting the First Automatic GUI Testing
➲
on the same system will confuse the tool at this point. However, when you develop a tool
for web page stress testing, you need to run multiple copies of the same application.
7. Simply click the Run Test button from the AutomatedGUITest tool. When the save file dia-
log box appears, type in a filename with an XML extension, such as C:\Temp\TestC#APIText-
Viewer.xml
. Then click the Save button. Sit and watch. The C# API Text Viewer shows up
again, the GUI actions of the mouse clicking occur in sequence, and the application closes
by itself after the execution. The first test is completed. At this point, you can view or edit
the saved XML document in any text editor or XML editor; the document is shown in
Listing 7.30. You can also use the XmlTreeViewer.exe developed in Chapter 5 to view this
XML document by expanding the child XML elements one by one.
Listing 7.30 The XML Data Store Containing the GUI Test Instruction to Drive the Execution
of the Test Script by Late Binding
<?xml version="1.0" encoding="utf-8"?>
<GUIInfoSerializable xmlns:xsd=
➥" xmlns:xsi=
➥" /> <AUTPath>C:\GUISourceCode\Chapter03\
➥CSharpAPITextViewer\bin\Debug\CSharpAPITextViewer.exe</AUTPath>
<AUTStartupForm>CSharpAPITextViewer.Form1</AUTStartupForm>
<GUIInfoSerializable>
<GUIInfo>
<GUIHandle>1246684</GUIHandle>
<GUIText />
<GUIClassName>WindowsForms10.LISTBOX.app3</GUIClassName>
<GUIParentText>C# API Text Viewer</GUIParentText>
<GUIControlName>lstAvailableFuncs</GUIControlName>
<GUIControlType>System.Windows.Forms.ListBox</GUIControlType>
<GUIMemberType>VerifyField</GUIMemberType>
</GUIInfo>
<GUIInfo>
<GUIHandle>2819536</GUIHandle>
<GUIText>Add</GUIText>
<GUIClassName>WindowsForms10.BUTTON.app3</GUIClassName>
<GUIParentText>C# API Text Viewer</GUIParentText>
<GUIControlName>btnAdd</GUIControlName>
<GUIControlType>System.Windows.Forms.Button</GUIControlType>
<GUIMemberType>VerifyField</GUIMemberType>
</GUIInfo>
<GUIInfo>
<GUIHandle>1639876</GUIHandle>
<GUIText>Copy</GUIText>
<GUIClassName>WindowsForms10.BUTTON.app3</GUIClassName>
<GUIParentText>C# API Text Viewer</GUIParentText>
<GUIControlName>btnCopy</GUIControlName>
<GUIControlType>System.Windows.Forms.Button</GUIControlType>
4351Book.fm Page 265 Tuesday, September 28, 2004 11:21 AM
266
Chapter 7 • Architecture and Implementation of the Automatic GUI Test Tool
<GUIMemberType>VerifyField</GUIMemberType>
</GUIInfo>
<GUIInfo>
<GUIHandle>1377762</GUIHandle>
<GUIText />
<GUIClassName>WindowsForms10.RichEdit20W.app3</GUIClassName>
<GUIParentText>C# API Text Viewer</GUIParentText>
<GUIControlName>txtSelected</GUIControlName>
<GUIControlType>System.Windows.Forms.RichTextBox</GUIControlType>
<GUIMemberType>VerifyField</GUIMemberType>
</GUIInfo>
<GUIInfo>
<GUIHandle>787840</GUIHandle>
<GUIText>Remove</GUIText>
<GUIClassName>WindowsForms10.BUTTON.app3</GUIClassName>
<GUIParentText>C# API Text Viewer</GUIParentText>
<GUIControlName>btnRemove</GUIControlName>
<GUIControlType>System.Windows.Forms.Button</GUIControlType>
<GUIMemberType>VerifyField</GUIMemberType>
</GUIInfo>
<GUIInfo>
<GUIHandle>722368</GUIHandle>
<GUIText>Clear</GUIText>
<GUIClassName>WindowsForms10.BUTTON.app3</GUIClassName>
<GUIParentText>C# API Text Viewer</GUIParentText>
<GUIControlName>btnClear</GUIControlName>
<GUIControlType>System.Windows.Forms.Button</GUIControlType>
<GUIMemberType>VerifyField</GUIMemberType>
</GUIInfo>
</GUIInfoSerializable>
</GUIInfoSerializable>
8. Click the Rerun Test button. When the open file dialog box pops up, navigate to the data
store you just saved, C:\Temp\TestC#APITextViewer.xml in this case. Click the Open but-
ton. The test is run again and the first regression testing is completed.
After steps 7 and 8, the test results are saved in the same folder where the test data store is saved,
but the filename is appended with _result.xml. You can open the C:\Temp\TestC#APIText-
Viewer_result.xml
in a text editor such as Notepad; the results are shown in Listing 7.31. The
XML document saves the value of the Text property of a GUI control only at the moment it
receives a test action in sequence.
➲
Listing 7.31 The Test Results at This Stage of the Tool Saved in an XML Document
<?xml version="1.0" encoding="utf-8"?>
<ArrayOfAnyType xmlns:xsd=" xmlns:xsi=
➥" /> <anyType xsi:type="xsd:string">AddAccessAllowedAce</anyType>
<anyType xsi:type="xsd:string">Add</anyType>
4351Book.fm Page 266 Tuesday, September 28, 2004 11:21 AM
267
Summary
<anyType xsi:type="xsd:string">Copy</anyType>
<anyType xsi:type="xsd:string">[DllImport("advapi32.dll")]
public static extern int AddAccessAllowedAce([MarshalAs(UnmanagedType.Struct)]
➥ref ACL pAcl, int dwAceRevision, int AccessMask, int pSid);
</anyType>
<anyType xsi:type="xsd:string">Remove</anyType>
<anyType xsi:type="xsd:string">Clear</anyType>
</ArrayOfAnyType>
Although this tool is still in an early stage at this point, you can use it to test a complex appli-
cation. It will find bugs in a product at its earlier development stage, which the other tools can’t
do. The available GUI test tools require the user to successfully and manually operate the appli-
cation under test in order to record a test script. If there is a bug, the recording has to be aban-
doned. The tool user reports this bug for the developers to fix. After the bug is fixed, the user
is able to resume the recording process and, possibly, encounter the next bug. The whole pro-
cess of recording a successful test script detects bugs one by one manually.
However, the AutomatedGUITest tool collects the descriptive properties of the GUI com-
ponents and runs the test. Once the GUI components are visible in the application, the opera-
tion can be entered into the test data store. There is no physical operation needed until the test
executes. Thus, it will automatically find the early stage bugs of a project under development by
verifying the behavior of the desired GUI event. Chapter 8 will discuss how to conduct effective
verifications and continue to develop the AutomatedGUITest tool with more functions.
Summary
This chapter discussed the requirements of a fully automated test tool. The improvements of
the current testing infrastructures are based on such requirements. A brief introduction pre-
sented the fundamentals of the AutomatedGUITest architecture. The rest of this chapter
completely implemented a workable GUI test tool and elaborated on its architecture in detail.
You can follow the discussion to understand the principles and the techniques for developing
such a tool with high degrees of automation.
The first time this tool was used, GUI test automation was easily achieved. Since defining a
sequence of operating an application, even a simple application, is a highly intellectual and
mental process, a machine can’t figure out a suitable order by itself. The traditional test tools
have used the capture/playback broadly to make this compensation. However, this tool com-
pletes a GUI survey and informs the user of all the GUI components in need of testing. The
specification of a GUI event sequence has reduced the need for human user interaction to a
minimum. The process is error proof, easy, and not time consuming.
4351Book.fm Page 267 Tuesday, September 28, 2004 11:21 AM
268
Chapter 7 • Architecture and Implementation of the Automatic GUI Test Tool
Based on your testing requirements, you may not need to have a dedicated form for the GUI
Test Data Collector if you are confident that the tool will assign all of the GUI property values
correctly. Using such a form in this book is mainly for instructive purpose and to make the dis-
cussion clearer. For some software projects, if the sequential triggering is not important, the
tool developers can enable this tool to make numerous combinations of the GUI events ran-
domly, thus the tool becomes totally automatic.
Usually, it is easier to modify a document by cutting, copying, and pasting than to build a
document by specification. Another effective approach for this tool, to avoid manipulating the
application manually, is to include all the GUI events from the survey in the XML test data
store. Then users scrutinize the GUI actions and make the following modifications:
● Remove the unneeded events
● Rearrange the order of events in a desired sequence
● Duplicate some events in a proper order if they are desired
In the next chapter, I will discuss some effective test verification and result presentation
methods. Thereafter, the rest of the chapters will be dedicated to developing methods for
specific testing requirements and presenting general ideas on how to extend these methods for
the test requirements of your organization.
4351Book.fm Page 268 Tuesday, September 28, 2004 11:21 AM
Chapter 8
Methods of GUI Test
Verification
4351Book.fm Page 269 Tuesday, September 28, 2004 11:21 AM
270
Chapter 8 • Methods of GUI Test Verification
U
sing traditional capture/playback methods to record test scripts is often a tedious, time-
consuming, and error-prone task. After all, the raw scripts recorded can only repeat the
input, or actions, of the tester. The output comparison and verification require either editing
the recorded scripts or visually observing the execution of the test scripts. Automation by such
tools and methods is limited.
Chapter 7 introduced a different approach to collect GUI information and conduct an active
GUI test. At this point, the AutomatedGUITest tool is developed and able to conduct a thor-
ough survey of the GUI components contained in an application. Users can choose the GUI
components to invoke actions from the survey list in a desired order. After the selected events
are saved in an XML test data store, the tool executes mouse actions on the selected GUI com-
ponents. Since an XML document is readable, users can easily edit the data store later by add-
ing more actions or changing the execution order.
Most of the available testing tools provide scripting languages. A tester must be proficient in
one of the scripting languages in order to use a tool to find bugs effectively. The Automated-
GUITest project is developed in a programming language (C#.NET). The test script is also a
built-in facility within the tool in the same programming language. This test script is designed
to accept the saved XML data stores and execute them dynamically. Users don’t need to see and
maintain the test script. Thus, the test automation becomes easier and quicker.
However, the verification capabilities of the tool at this point are still at the primitive stage.
This chapter will first discuss the basic methods for verifying the output of the test. The rest
of the chapter will guide you through the process of adding automatic verification to the
AutomatedGUITest tool.
Verification Requirements
Software test verification is the process of inspecting whether the outcome of executing an appli-
cation under test is correct. It can be accomplished either by manual checking or by automatic
comparisons. Manual checking is performed by a human tester who compares the outcome on
the screen with the result he expects. Sometimes, the result of the software execution is not dis-
played on the screen. For example, when the execution is expected to save a file on a disk drive,
the tester needs to check the existence of the saved file and read its content. When the execution
sends a message to another computer, the tester needs to have a way to intercept the message by
exploring with a third-party tool or to confirm with the receiver. Thus, a manual verification is
tedious, time consuming, boring, and error prone.
With a software testing tool, an automatic mechanism for test verification is expected. The
method of automatic verification should be the same as the method for manual testing, which
compares the actual results of executing the application against a predefined expected value. The
difference is that a manual tester has the flexibility to choose an aspect to verify and configure an
4351Book.fm Page 270 Tuesday, September 28, 2004 11:21 AM
271
Verification Requirements
expected result instantly. But automated software testing requires that the details of the verifica-
tion are carefully planned in advance so that the tool can pinpoint to the area and confirm the
results. Many of these verifications can be done programmatically. For example, you can pro-
gram to read a saved file into the computer memory and compare its content with a predefined
baseline file. If the application sends a message to another computer via message queue, you can
program to check the message queue. On the other hand, if the application sends the message via
an e-mail server, you can program to access to the mail root folder on the server.
Once the verification methods are implemented, the tool can compare extensive lists of num-
bers, screen outputs, databases, and other kinds of results that a human tester couldn’t easily
compare. The automatic verification is faster and reliable.
Front-end Actions and Back-end Business Functions
Today, software users interact with an application through a GUI-rich interface. The business
layer receives commands from the presentation layer, performs the tasks, and yields the result.
Thus, for a GUI test script, the mouse and keyboard actions performed on the GUI interface
are the testing inputs or testing cases. The tasks and results occur in the business layer, and the
presentation layer is usually not aware of them.
The multitiered software architecture is used to create and preserve reusable software compo-
nents. This architecture helps organize a project and allows construction and validation of each
layer. Software testing can be conducted on each layer independently. The presentation layer
consists of GUI components defined to receive user input and display some application output.
In a Windows environment, these GUI components are arranged in a hierarchical manner for an
application. Chapter 6 discussed the relative merits and proper uses of some of the GUI compo-
nents. Chapter 7 implemented the AutomatedGUITest tool to trigger some of the GUI events
in the presentation layer.
Test verification is used to confirm whether the output is consistent between the dynamic
status of the presentation layer and the business layer. Some of the actual output can be cap-
tured from the screen and some has to be obtained via different means. The GUI testing tool
should handle the business layer complexity independently from the presentation layer. In
other words, the tool uses a portion of the test script to manipulate the GUI components in the
front and another portion of the script to capture and compare the test results from the busi-
ness layer. To understand this process, you need to understand that the business layer serves
the following purposes:
●
It rigorously and unambiguously comprehends and processes knowledge in the business
layer of the application.
●
It provides a common and shared basis to enhance communication about solving particular
problems.
4351Book.fm Page 271 Tuesday, September 28, 2004 11:21 AM
272
Chapter 8 • Methods of GUI Test Verification
●
It provides a solid foundation to implement and maintain the application’s capability to
perform its intended functions.
The business layer is often subject to many different types of change due to commands from
the presentation layer. These changes affect the appearance of the presentation layer at a par-
ticular moment, how the data is accessed, and other nonfunctional characteristics. In order to
test the application, the tool needs to check whether the changes are desirable for each action
performed from the presentation layer. An automatic verification method will improve the
GUI testing infrastructure by checking more aspects of the changes within different layers of
the architecture.
Verifying Changes of an Application under Test
An application has a multitiered architecture. Each layer in the architecture could be nested
with one or more data types to perform functions for presentation, business, and data manip-
ulations. These functions are represented by fields, properties, and methods when the appli-
cation is being developed. The simplest GUI testing verification is to check that the expected
output is visible on the screen as each test case is performed. But this is not adequate enough
for an effective GUI testing job and for finding bugs.
In addition to the changes the users see, the content of the fields and properties are added,
deleted, and altered. One action can cause status changes of one or several fields or properties
of the application under test. Verifying the change of one member at a time is simple. But ver-
ifying changes of multiple members adds complexity to the software test and increases the
possibilities of finding more defects.
The fields and properties are different from application to application. That is the reason
testers have created one test script to test against each testing case. Testing a single application
may require several test scripts and testing data stores. However many test scripts there are, no
testing method can ensure that an application can be thoroughly tested because manual test
scripts created by humans can not cover all the aspects of an application under test.
On the other hand, it’s required to know the names and the functionality of the fields and
properties before manual test script and verification are implemented. A good understanding
of the purpose of the application under test is essential for a manual test and a test using the
available testing tools. However, the AutomatedGUITest tool developed in the preceding
chapter has provided a better foundation to understand the the application under test through
a thorough GUI component survey. It is possible for the tool to programmatically compre-
hend the fields and properties within the data types of the business layers and data layers. The
test script inside the tool can be implemented to make a simple change of one member or to
change all of the fields and properties. Verification of one member will result in many other
4351Book.fm Page 272 Tuesday, September 28, 2004 11:21 AM
273
Verification Requirements
aspects of the application execution being ignored. Checking the status of all the members
produces overwhelming information for the testers, most of it unnecessary. The best practice
is to focus on the critical areas and produce verification data to check whether the expected
results are obtained.
Verifications Based on the Users’ Interest
The final result of verification is usually indicated by a value that represents pass or fail. In a
programming language, a Boolean variable usually has the value true or false. If one or more
actual results of an execution match the expected results, the verification passes. Otherwise, it
fails. The GUI testing tool is able to compare the actual outcomes with the expected results.
In contrast to the fields and properties of the application that are unknown at the time the tool
is developed, there are some known aspects that require verification for each field or property
after each step of the application execution. Based on manual testing experiences, the following
types of verification are often conducted under certain circumstances:
Field and property verification
A data type within software architecture, such as a class,
has members called fields, properties, and methods. The methods are invoked through the
GUI events of the presentation layer and perform the business functions. The invocation of
a method changes the status of the field or property members. Although the users are not
supposed to access the contents of the fields and properties directly, a testing tool capable of
retrieving the values of these fields and properties will find bugs with high efficiency.
Verification of text and numbers
Some fields and properties of the application are defined
to hold string or numeric values. A testing tool can obtain the value of such an object and com-
pare it with the expected value. Sometimes a value of the field or property is supposed to display
on the GUI interface. The testing tool should be able to compare the value of the field obtained
by directly accessing the object to the interface display.
Clipboard verification
When a function copies the contents of a field, property, or GUI
control into the clipboard, a manual tester can run the
clipbrd.exe
utility to verify the result.
However, it is not practical for an automated testing tool to run a third-party tool. You can
implement the automated testing tool to look into the clipboard directly and complete the
verification.
GUI component existence
The GUI components in the presentation layer are functional
parts of the application. They are also designed for usability and cosmetic purposes. The GUI
test verification should include the capabilities to check the existence of a GUI component and
its proper location, size, text, font, color, and other properties. Sometimes, the verification of
GUI components can be conducted by comparing the actual snapshot of the window with a
presaved image file.
4351Book.fm Page 273 Tuesday, September 28, 2004 11:21 AM
274
Chapter 8 • Methods of GUI Test Verification
File verification
End users expect a software application to perform complex jobs upon exe-
cution. The results are usually saved into a physical file. These files could be plain-text files,
image files, and a binary database. A plain-text file can be easily compared to a predefined base-
line file by implementing a file comparator inside the tool. Image files are usually compared to
a bitmap baseline. However, data saved in a binary file is hard to compare. It is common for
testers to convert machine-readable binary files into text files and complete the verification.
Object data verification
Today, a software application takes every piece of data as an object.
An object has fields, properties, and methods. The objects reside in different layers and enable
the application to perform complex tasks. If the objects preserve their expected behaviors after
each step of the execution, the software has no defects. To test whether the status of objects is
correct, a tool can compare the actual status of an object with an expected status. For example,
when the object under test is serializable, you can enable the tool to save a copy of the expected
object. Later, the tool can compare the object with the saved object by deserialization and
reconstruction.
Communication Applications
Software products produce outcomes for communication
between applications or hardware devices and require testing tools to track the message. The
actual trace can happen on the local system or on the destination device.
Web test verification
Although web page test is beyond the scope of the discussion of this
book, you can turn this tool into a web testing tool. The web test verification can check the
existence of the web page in memory, the access statistics of the website, and a snapshot of
the web page and scan the web site.
As computer science has been advancing rapidly for the last decade, there are a lot of available
technologies that enable a tool to verify testing data effectively. Based on the testing require-
ments of your organization, you may have other areas to be verified. However, not all data types
or objects can be verified automatically. For example, multimedia applications produce sound
and video, which are not readily comparable by a machine. A computer can replay the sound and
video, but lacks the capability to appreciate a master piece.
This book discusses different aspects of verification and will implement the AutomatedGUITest
tool with a few of them as examples. You can use these examples to enhance the testing and veri-
fying capabilities of the tool later for your specific test projects.
Automated Verifications
Testing tools can easily achieve the automatic playback of the mouse and keyboard actions by
recording a test script. The AutomatedGUITest tool even can read instructions from an XML
document to perform the desired mouse clicks. However, that is only the first part of the GUI
4351Book.fm Page 274 Tuesday, September 28, 2004 11:21 AM
275
Automated Verifications
testing. Saving the testing output and automating the verification process are more important
and beneficial to a fully automated GUI test. The other testing methods focus more on gen-
erating testing inputs than automatically generating code for outcome verification. The veri-
fication result is the only means useful to fix the bugs and increase the reliability of the
application under test.
Test results are produced each time a test case is executed. A GUI testing case can be
executed many times reusing the various testing inputs. The testing outcome varies from
one execution to another. The discussion in the preceding section presented some possible
aspects in need of verification. The number of fields and properties of any application is
finite. A thorough verification can be conducted based on the GUI survey results. If each
member of the application needs to be verified from all the aspects discussed in the previous
section, the maximum times of verification for each testing step can be expressed by a linear
equation:
y = k·x
In this equation,
y
is the maximum number of verifications needed for each testing step,
k
is the
number of the possible aspects in need of verification, and
x
is the total number of fields and prop-
erties within an application. If GUI test consists of
n
steps, the overall number of verifications is
n·y
. The result might be a large number. But it is a finite number. The verification by automatic
comparison is fast. Working with an effective test presentation method, a thorough test and ver-
ification will increase the testing sensitivity to find bugs. However, a maximum verification is not
always desired. You can implement the AutomatedGUITest tool with the verification options
discussed in the following sections.
Simple Object Verification
A GUI test often starts by triggering the action of a GUI component by either a mouse event
or a keyboard event. The business layer knows which GUI component is triggered and per-
forms the desired functions. Simple object verification takes this GUI component as the object
to verify at this testing step. Such verification compares the status of the current GUI with an
expected status and presents the test result. For example, in Chapter 7 the AutomatedGUITest
tool was implemented with a primitive testing capability, which saved the text property of the
immediate GUI component receiving a mouse click.
This verification method is the simplest and can be automated with ease. However, the trig-
gered GUI is not always of interest to the tester. Its status may not change at all before and after
the GUI event. This kind of verification can be meaningless to the business functions of the
application.
4351Book.fm Page 275 Tuesday, September 28, 2004 11:21 AM
276
Chapter 8 • Methods of GUI Test Verification
Specific Object Verification
When we tested the C# API Text Viewer at the end of Chapter 6, we implemented six testing
steps. Each step of the test script focuses on the text status of the rich text box because the rich
text box is used to collect the desired C# code when the Add button is clicked. In this book, this
type of verification is called specific object verification. A certain object is specified for verifi-
cation at the beginning of the testing data collection and is verified after each step throughout
the testing. The verified object can be a GUI component or a non-GUI data member. This
kind of verification is more meaningful to find bugs.
But often a GUI event or a testing step changes the status of more than one member of the
application. Specific object verification may be focused on the most important member, but it
overlooks the other members and decreases the possibilities of finding more bugs.
Lump Sum Verification
The opposite of the simple and specific object verification is to collect all the members in an
application, extract the status after each testing step, and compare them with the respective
expected results. Lump sum verification is a very sensitive verification method. It produces the
most complex testing cases and can find most of the defects. However, if any mismatch between
the actual and expected results occurs, a testing failure will be reported and set off false alarms.
Presenting the preconditions and postconditions beside the verification results, the testers can
distinguish the false alarms from the real failures. This verification method takes the longest time.
Using this verification method requires the testers and developers to spend time on recognizing
the real bugs. If the test script and the thorough verification accounts for 80 to 90 percent of the
testing efforts, 10 to 20 percent of the manual reviewing of the test report is worthwhile.
The lump sum verification not only completes the most complex testing cases, it is also a simple
method to be automated when collecting testing data. The disadvantage of this method is that it
catches a lot of undesirable information. Some of it is redundant and has the same cause. The use-
less information is sometimes annoying and contributes to a confusing testing report. Testers
expect a more effective testing tool to verify only the members to find bugs.
Best Practice Verification
The simple and specific object verification methods are too simple; they waste testing resources
and miss real bugs. The lump sum verification method generates too much output, which can be
overwhelming to the tester and wastes time that could be used to find the real bugs. We can enable
the testing tool to make the right choice by verifying the appropriate members and comparing suf-
ficient outcomes. Then the amount of the redundant verification results will be reduced, and the
efficiency of finding software errors will be increased. This is the best practice verification and is
4351Book.fm Page 276 Tuesday, September 28, 2004 11:21 AM
277
Enhancing the AutomatedGUITest Tool
the most effective one. But the testers need to have knowledge of the application under test and
know the critical areas in need of verification. Testers will be required to carefully develop a test
plan. Because testers know where defects will and will not occur, they can specify the appropriate
members to be verified with each testing step.
The information presented thus far will help you in adding automatic verification capabilities
to the AutomatedGUITest project.
Enhancing the AutomatedGUITest Tool
You implemented the AutomatedGUITest tool in Chapter 7. This tool is fully capable of see-
ing and handling the GUI components by invoking methods from the GUI test library. But it
conducts the minimum verification at this point. Test script execution is driven by a collected
GUI data store in the format of an XML document. Each GUI component has a counterpart
handling method in the GUI test library. When other GUI controls need to be handled, you
will always be able to add new GUI handling methods into the library. In this chapter, you will
add code to the AutomatedGUITest tool and enhance its capability for test verification.
To resume coding the AutomatedGUITest tool, you can create a project folder for
this chapter,
C:\GUISourceCode\Chapter08
. Then, copy the AutomatedGUITest and the
GUITestLibrary projects from the
C:\GUISourceCode\Chapter07
folder to the new folder.
After the projects are copied, start the Microsoft Visual Studio .NET IDE and open the
AutomatedGUITest project from the new folder. At this point, you are ready to update the
existing classes and add new classes and code to the project.
Updating the
GUITestDataCollector
Interface
Similar to the GUI information collection process in Chapter 7, verification information can
also be collected from the
GUITestDataCollector
class, which has a GUI form. In order to add
some more GUI controls to this Windows form, you can go to the form design editor of the
GUITestDataCollector
class by navigating the AutomatedGUITest solution explorer. When
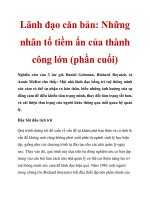
the GUITestDataCollector form appears, you need to increase its size by changing the values
of its Size property to 552 and 408 as its width and height, respectively. Then, add the GUI
controls and manipulate their property values as shown in the following list:
Control Property Value
GroupBox Name grpVerifyMethod
Text Verification Method
RadioButton Name rdSimple
4351Book.fm Page 277 Tuesday, September 28, 2004 11:21 AM
278
Chapter 8 • Methods of GUI Test Verification
The preceding list adds a GroupBox, one CheckBox, two Label, one CheckedListBox, one
RichTextBox, and three Button controls to the form. Then, the four RadioButton controls are
added inside the GroupBox. After the control population, the GUITestDataCollector form
should look like Figure 8.1.
The coding of this updated
GUITestDataCollector
class focuses on the verification methods
discussed in the preceding sections. There are four radio buttons in the group box and each one
corresponds to one of the verification methods the tester can choose from. First, double-click
the Specific radio button and add the code in Listing 8.1.
Control Property Value
Text Simple
RadioButton Name btnSpecific
Text Specific
RadioButton Name rdLumpsum
Text Lump Sum
RadioButton Name rdJustEnough
Text Just Enough
CheckBox Name chckCustomDiglog
Text Custom Dialog Box
Label Name lblAvailableMembers
Text Select Fields and Properties to Verify:
Label Name lblExpectedResult
Text Expected Results:
CheckedListBox Name chckLstMembersToVerify
RichTextBox Name txtExpectedResult
Button Name btnResetSpecificVerify
Text Reset Specific Member
Size 144, 23
Button Name btnOK
Text OK
Button Name btnCancel
Text Cancel
4351Book.fm Page 278 Tuesday, September 28, 2004 11:21 AM
279
Enhancing the AutomatedGUITest Tool
➲
FIGURE 8.1
The updated GUITest-
DataCollector form for
GUI testing and verifi-
cation data collection
Listing 8.1 Code for the Added Fields and the
rdSpecific_CheckedChanged()
Event of
the Updated
GUITestDataCollector
Class
private static string SpecificType;
private static string SpecificMember;
public string startupForm;
private void rdSpecific_CheckedChanged(object sender, System.EventArgs e)
{
if (rdSpecific.Checked)
{
try
{
GetSpecificVerifyMember(chckLstMembersToVerify);
AddExpectedContent();
}
catch (Exception ex)
{
Console.WriteLine(ex.Message);
}
}
}
Recall from the discussion of the specific verification method that at the beginning of the
session the user can specify a member to be verified throughout the GUI test data collection.
Before the event declaration, two static string fields are created to locate the specific member
4351Book.fm Page 279 Tuesday, September 28, 2004 11:21 AM
280
Chapter 8 • Methods of GUI Test Verification
inside the specific application. A static field will keep the value until the current testing session
is terminated. However, a button is placed at the bottom of the form, which enables the users
to change the specific verification member during the current testing session. The third field
is a public string variable. When a new
GUITestDataCollector
instance is initialized, this field
will receive a value for the name of the startup form .
The
rdSpecific_CheckedChanged()
declaration is generated by double-clicking the Specific
radio button on the form design editor of the IDE. The code between the curly brackets uses
an
if
statement to inspect whether the radio box is checked or not. If it is checked, it calls two
helper methods,
GetSpecificVerifyMember()
and
AddExpectedContent()
, within a
try-catch
clause.
The code for the
GetSpecificVerifyMember()
method is in Listing 8.2.
➲
Listing 8.2 Code for the
GetSpecificVerifyEvent()
Helper Method
private void GetSpecificVerifyMember(CheckedListBox chckLst)
{
if (SpecificType == null)
{
ArrayList selectedMems = new ArrayList();
for (int i = 0; i < chckLst.Items.Count; i ++)
{
if (chckLst.GetItemChecked(i))
{
selectedMems.Add(chckLst.GetItemText(chckLst.Items[i]));
}
}
if (selectedMems.Count == 2)
{
SpecificType = (string)selectedMems[0];
SpecificMember = (string)selectedMems[1];
SpecificMember = SpecificMember.Trim();
}
}
SetSimpleVerification(SpecificType, SpecificMember, chckLst);
}
The code uses an
if
statement to check whether the specific member for verification is already
defined. If it is not, the value of the
SpecificType
field is
null
. At this point, the method ini-
tializes a new
ArrayList
object,
selectedMems
. Then, it uses a
for
loop to search through the
CheckedListBox to add the selected items into the
selectedMems
object. After the
for
loop, the
method expects that only two items are checked in the CheckedListBox by the tester. One is the
name of the startup form and the other is the member in need of verification throughout the test
script. The values of these two items are assigned to the
SpecificType
and the
SpecificMember
4351Book.fm Page 280 Tuesday, September 28, 2004 11:21 AM
281
Enhancing the AutomatedGUITest Tool
fields. A
Trim()
method of the
String
class is used to get rid of the escape character (
\t
). Finally,
a
SetSimpleVerification()
helper method is called to recheck the items in the CheckedListBox.
The
SetSimpleVerification()
helper method is coded as shown in Listing 8.3. This method
will also be invoked by the Simple verification radio button.
➲
Listing 8.3 Code for the
SetSimpleVerification()
Helper Method
private void SetSimpleVerification(string typeName, string memName,
➥
CheckedListBox chckLst)
{
int index1 = 0;
int index2 = 0;
try
{
index1 = chckLst.FindString(typeName);
index2 = chckLst.FindString("\t" + memName, index1);
}
catch (Exception ex)
{
Console.WriteLine(ex.Message);
}
if (index2 > index1)
{
chckLst.SetItemChecked(index1, true);
chckLst.SetItemChecked(index2, true);
}
}
The
SetSimpleVerification()
helper method takes the name of the startup form, the name
of the verification member, and a CheckedListBox object as parameters. Then, it invokes a
FindString() method of the CheckedListBox class to locate the indices by the names of the
startup form and member. After the values of the indices are located, it sets the corresponding
items to be checked in the CheckedListBox control.
Listing 8.4 implements the AddExpectedContent() helper method required by Listing 8.1.
➲
Listing 8.4 Code for the AddExpectedContent() Helper Method
private void AddExpectedContent()
{
string expectedStr = "";
for (int i = 0; i<chckLstMembersToVerify.Items.Count; i++)
{
if (chckLstMembersToVerify.GetItemChecked(i))
{
4351Book.fm Page 281 Tuesday, September 28, 2004 11:21 AM
282
Chapter 8 • Methods of GUI Test Verification
string typeMember = chckLstMembersToVerify.GetItemText(
➥chckLstMembersToVerify.Items[i]);
if (typeMember.StartsWith("\t"))
{
expectedStr += "<" + typeMember.Trim() + ">\n|";
}
}
}
txtExpectedResult.Text = expectedStr;
}
The expected contents are expected to be entered in the rich text box by the tester. However,
the AddExpectedContent() helper method walks through the CheckedListBox control and
inspects the checked member with a for loop. If the member is checked for verification, it adds
the name of the member between a pair of < and > brackets to the rich text box. Each member
name occupies one line. This serves as a hint and a prompt for the users to know where to enter
the expected results. Furthermore, the AddExpectedContent() helper method will be invoked
by the rest of the verification radio buttons.
Now the specific verification can be conducted by the GUITestDataCollector class. You need
to double-click the Simple radio button for implementation of the simple verification method.
Listing 8.5 shows the code for the rdSimple_CheckedChanged() event.
➲
Listing 8.5 Code for the rdSimple_CheckedChanged() Event
private void rdSimple_CheckedChanged(object sender, System.EventArgs e)
{
MakeAllChecked(chckLstMembersToVerify, false);
if (rdSimple.Checked)
{
SetSimpleVerification(startupForm,
➥cmbControlName.Text, chckLstMembersToVerify);
AddExpectedContent();
}
}
The rdSimple_CheckedChanged() event first calls a MakeAllChecked() helper method to
clear all the checked items in the CheckedListBox control in order to reset the items. Then
it reads the value of the Checked property of the simple radio button. If the value is true, the
startup form and the current GUI item are checked inside the CheckedListBox control. It
also adds the GUI control name to the rich text box by calling the
AddExpectedContent()
method.
The
MakeAllChecked() helper method is coded as in Listing 8.6.
4351Book.fm Page 282 Tuesday, September 28, 2004 11:21 AM
283
Enhancing the AutomatedGUITest Tool
➲
➲
Listing 8.6 Code for the MakeAllChecked() Helper Method
private void MakeAllChecked(CheckedListBox chckLst, bool checkAll)
{
for (int i = 0; i < chckLst.Items.Count; i++)
{
chckLst.SetItemChecked(i, checkAll);
}
}
This method simply follows the for loop to check or uncheck all the items in the Checked-
ListBox control based on the Boolean value of the second parameter.
The code for the lump sum and the best practice verification methods is in Listing 8.7. Before
you add this code to the project, you should double-click the Lump Sum and finish coding, and
then double click the Just Enough radio button and finish coding.
Listing 8.7 Code for the rdLumpsum_CheckedChanged() and rdJustEnough_
CheckedChanged() Events
private void rdLumpsum_CheckedChanged(object sender, System.EventArgs e)
{
MakeAllChecked(chckLstMembersToVerify, rdLumpsum.Checked);
AddExpectedContent();
}
private void rdJustEnough_CheckedChanged(object sender, System.EventArgs e)
{
if (rdJustEnough.Checked)
{
MakeAllChecked(chckLstMembersToVerify, false);
}
}
The rdLumpsum_CheckedChanged() event enables the tool to verify all the available members
of the application by checking all the items in the CheckedListBox control when the lump sum
radio button is checked. It adds all the names of the members to the rich text box in order for
the testers to enter expected results for each of the members.
The rdJustEnough_CheckedChanged() event is prepared for the best practice verification
method. It calls the same MakeAllChecked() helper method the rdLumpsum_CheckedChanged()
event calls. But the rdJustEnough_CheckedChanged() event simply unchecks all of the items
in the CheckedListBox control. After the event completes, the tool is ready for the users to
specify the desired members to verify. The issue of entering the expected content will be han-
dled by an event of the CheckedListBox control.
4351Book.fm Page 283 Tuesday, September 28, 2004 11:21 AM