Game Programming All in One 2 nd Edition phần 2 pps
Bạn đang xem bản rút gọn của tài liệu. Xem và tải ngay bản đầy đủ của tài liệu tại đây (1.63 MB, 74 trang )
purchased works exactly the same way that the free compiler does. Even more surprising
is the fact that GCC is an optimizing compiler capable of compiling code with every bit
as much efficiency and speed as Visual C++ or Borland C++Builder. I think there is a false
impression (furthered by marketing forces) that open-source software is inferior to com-
mercial software and that proponents have simply gotten used to it. Although there is a
small margin of truth in that, the fact remains that Dev-C++ works just as well as Visual
C++ for constructing Windows programs. What you will not find is a dialog editor, a
resource editor, a toll-free customer support number, or case-sensitive help (depending
on the IDE).
Case-sensitive help is a very convenient feature if you are used to a commercial compiler
package, such as Visual C++. Being able to hit F1 with the cursor over a key word to bring
up syntax help is a difficult feature to do without. As an alternative, I like to keep a C ref-
erence book handy (such as C Programming Language (Prentice Hall PTR, 1988) by Brian
Kernighan and Dennis Ritchie or C: A Reference Manual (Prentice Hall, 2002) by Samuel
Harbison and Guy Steele) as well as an online Web site, such as />I also keep the Allegro reference Web site open; the site is located at ula.
demon.co.uk/allegro/onlinedocs/en. After you have programmed for a while without an
online help feature, your coding skill will improve dramatically. It is amazing how very lit-
tle some programmers really know about their choice programming language because they
rely so heavily upon case-sensitive help! I don’t suggest that you memorize the standard C
and C++ libraries (although that wouldn’t hurt). This might sound ridiculous at first, but
it makes sense: When you have to make a little extra effort to look up some information,
you are more likely to remember it and not need to look it up again.
In addition, open-source tools, such as Dev-C++, are not suited for .NET development—
which, I might add, is not relevant because .NET is a framework for building business
applications, not games, and it is not well suited for games. (In all fairness, Visual Basic
.NET and Visual C# .NET are very good languages that do work well with DirectX, but
they are not the ideal choice for game development.) You can treat my opinion on this
matter as unbiased and objective because I use these tools on a daily basis, both commer-
cial and open-source, and I appreciate the benefits that each tool brings with it. In general,
commercial software is just more convenient. To an expert programmer, items of conve-
nience usually only get in the way.
note
You might be using Visual C++ 7.0 in conjunction with this book. That is perfectly fine! Visual C++
is capable of compiling standard C/C++ code (this is called
unmanaged code
by Microsoft) as well
as code that is reliant upon the .NET Framework (this is called
managed code
). Many commercial
PC games are developed with Visual C++ 7.0 and DirectX, and this version will work with Allegro.
Taking Dev-C++ and Allegro for a Spin 45
Creating the Greetings Project
Now then, back to Dev-C++. Open the File menu and select New, Project, as shown in
Figure 2.9. This will bring up the New Project dialog box showing the types of projects
that are available (see Figure 2.10). If you look at the tabs at the top of the dialog box, you
will see Basic, Introduction, MultiMedia. These are the three different categories of project
templates built into Dev-C++. Click on the Introduction tab to see a Hello World
project (see Figure 2.11). The MultiMedia tab (shown in Figure 2.12) includes a sample project
template for an OpenGL program. Note that if you have already installed Allegro.DevPak,
you should see two Allegro project templates in the MultiMedia section.
Chapter 2
■
Getting Started with Dev-C++ and Allegro46
Figure 2.9 Creating a new project in Dev-C++
Figure 2.10 The New Project dialog
box in Dev-C++ includes numerous
project templates.
Feel free to create a new project using any of these project templates and run it to see what
the program looks like. After you are finished experimenting (which I highly recommend
you do to become more familiar with Dev-C++), bring up the New Project dialog box
again and select the Basic tab. At this point, allow me to provide you with a disclaimer, or
rather, a look ahead. Allegro abstracts the operating system from your source code.
Therefore, you need not create a Windows Application project (one of the options in the
New Project dialog box). Allegro includes the code needed to handle Windows messages
through WndProc, WinMain, and so on, just as the versions of Allegro for Linux, Mac OS X,
and so on include the specific functions needed for those operating systems.
tip
For more information about the specifics of Windows programming, please refer to Charles
Petzold’s book
Programming Windows
(listed in Appendix D).Any edition will do, including the fifth
edition or some of his newer books. I like the fifth edition because it covers Visual C++ 6.0, which
is very similar to Dev-C++ and is easily configurable.
Taking Dev-C++ and Allegro for a Spin 47
Figure 2.11 The Introduction tab includes a Hello World
project template.
Figure 2.12 The MultiMedia tab includes an OpenGL
project template.
Referring to Figure 2.13, you want to select the Empty Project icon, and for the language
choose C Project. For the project name, type Greetings, and then click on OK.
The Project Save dialog box will
then appear, allowing you to
select a folder for the project. The
default folder is inside the main
Dev-Cpp folder. I recommend
creating a folder off the root of
your drive for storing projects.
tip
For future reference, the sample programs in this book are being developed simultaneously under
Windows 2000 and Mandrake Linux, and the screenshots reflect this. If you are using another OS,
such as Mac OS X or FreeBSD, your user interface will obviously look different.
After you save the new project, Dev-C++ will show the new empty project (see Figure
2.14). Note that Dev-C++ didn’t even bother to create a default source file for you to use.
That is because you selected Empty Project. Had you chosen Windows Application or
another type of project, then a populated source code file would have been added for you.
To keep things simple and to fully explain what’s going on, I want to go over each step.
Now you need to add a new source code file to the project. Open the File menu and select
New, Source File, as shown in Figure 2.15. Alternatively (and this is my preference) you
can right-click on the project name to bring up a pop-up menu from which you can select
New File (see Figure 2.16). Either method will add a new empty file called Untitled1 to
your project.
Now right-click on the new file and select Rename File, and then type in main.c for the
filename. After you do that, your project should look like the one shown in Figure 2.17.
note
If you are an experienced developer with Visual C++, Borland C++, Dev-C++, or another tool, these
steps will be all too familiar to you. I am covering as much introductory information as possible now
so it is not necessary to do so in later chapters.
Chapter 2
■
Getting Started with Dev-C++ and Allegro48
Figure 2.13 Choosing Empty Project from the New Project
dialog box
Taking Dev-C++ and Allegro for a Spin 49
Figure 2.14 The new Greetings project has been created and is now ready to go.
Figure 2.15 Adding a new source code file to the project using the File menu.
Chapter 2
■
Getting Started with Dev-C++ and Allegro50
Figure 2.16 Adding a new source code file to the project using the right-click menu.
Figure 2.17 The Greetings project now has a source code file.
The Greetings Source Code
Now that you have a source code file, type in some source code to make sure Dev-C++ is
configured properly. Here is a short program that you can type in:
#include <conio.h>
#include <stdio.h>
int main()
{
printf(“Greetings Earthlings.\n”);
printf(“All your base are belong to us!\n”);
getch();
}
You can compile and run the program using several methods. Note that this program
doesn’t require Allegro to run at this point. (I’ll stick to basic C right now.) The easiest way
to compile and run the program is by pressing F9. You can also click on the Compile & Run
(F9) icon on the toolbar or you can open the Execute menu and select Compile & Run. While
you are browsing the toolbar and menus, note some of the other options available, such
as Compile, Run, and Rebuild All. These options are occasionally helpful, although the
compiler is so fast that I typically just hit F9. Because this is not an introductory book on
C programming and I assume you have some experience writing C programs, I won’t get
into the basics of debugging and correcting syntax errors.
However, there is one thing that might prevent this program from running. If you look at
the code listing, you’ll notice that it doesn’t include any header files and it is about as sim-
ple as things can get for a C program. This program assumes that it will be run on a con-
sole (such as a DOS prompt or shell prompt). Therefore, the project must be configured
as a console project. The terminology will differ based on your OS, but for Windows the
two most common project types are
Windows Application and Console
Application. Open the Project menu
and select Project Options. The
Project Options dialog box will
appear, as shown in Figure 2.18.
Taking Dev-C++ and Allegro for a Spin 51
Figure 2.18 The Project Options dialog box is where
you can change the project settings.
Pay special attention to the list of project types and make sure that Win32 Console is selected.
(This should have been the default when you created a new blank project; however, future
versions of Dev-C++ may change the default option or any other feature deemed necessary
to improve the IDE.) If Win32 Console is selected, then you are ready to run the program.
Close the dialog box, and then press F9 to compile and run the program.
note
Feel free to open multiple instances of Dev-C++ if you are working on several C or C++ projects at
the same time or if you would like to copy code from one source listing to another. Dev-C++ has a
small footprint of only around 12 MB of memory, and multiple instances of it run off the first memory
instance.
Running the Greetings Program
If all goes well you should see the program run as in Figure 2.19, which shows the console
window superimposed over Dev-C++. As the source code indicates (note the
getch()
function), press a key to end the program.
If the compile process failed, first check to make sure there are no typos in the source code
you entered. If the code looks good, you might want to refer back to the “Installing and
Configuring Dev-C++ and Allegro” section to see whether you might have missed a step
Chapter 2
■
Getting Started with Dev-C++ and Allegro52
Figure 2.19 The
Greetings
program is running in a console window.
that is preventing the compiler from running as it should. The install process is fairly simple
and straightforward (ignoring the update process, at any rate), so if you continue to have
problems, you might seek help at the Dev-C++ Web site at />devcpp.html. A program this simple should compile and run without any problem, so any
error at this point is an installation problem if anything.
Testing Allegro: The GetInfo Program
Now you should give Allegro a spin and make sure it was compiled and installed correctly.
The next program you’ll write will be similar to the last one because it will be a console
program. The difference is that this program will include the Allegro library. Go ahead
and open a new instance of Dev-C++ (or close the current project). Open the File menu
and select New, Project as before. This time, however, instead of creating an empty project,
select Console Application (see Figure 2.20). For the project name, type GetInfo.
When the new project is created,
Dev-C++ will add a main.c file
for you and fill it with some basic
code. Delete the template code
because you’ll be typing in your
own code.
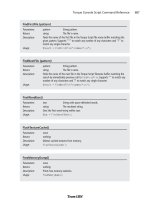
Introducing Some of Allegro’s Features
The first function that you need to know is
allegro_init
, which has this syntax:
int allegro_init();
This function is required because it initializes the Allegro library. If you do not call this
function, the program will probably crash (at worst) or simply not work (at best). In addi-
tion to initializing the library,
allegro_init
also fills a number of global string and num-
ber variables that you can use to display information about Allegro. One such variable is
a string called
allegro_id
; it is declared like this:
extern char allegro_id[];
Taking Dev-C++ and Allegro for a Spin 53
Figure 2.20 Creating a new console application in Dev-C++
Chapter 2
■
Getting Started with Dev-C++ and Allegro54
You can use
allegro_id
to display the version number for the Allegro library you have
installed. That is a good way to check whether Allegro has been installed correctly, so you
should write some code to display
allegro_id
. Referring to the GetInfo project you just cre-
ated, type in the following code:
#include <conio.h>
#include <stdlib.h>
#include “allegro.h”
int main()
{
allegro_init();
printf(“Allegro version = %s\n”, allegro_id);
printf(“\nPress any key \n”);
getch();
return 0;
}
END_OF_MAIN();
You are probably wondering what the heck that
END_OF_MAIN
function at the bottom of the
source listing is. This is actually a macro that is used by Allegro and helps with the multi-
platform nature of the library. This is odd, but the macro simply must follow the
main
function in every program that uses Allegro. You’ll get used to it (and quickly begin to
ignore it after a while).
Including the Allegro Library File
One more thing. Before you can run the program, you must add the Allegro library file to
the GetInfo project. The library file is called liballeg.a and can be found in the \allegro\lib
folder. (Depending on where you installed it, that might be C:\allegro\lib.) To add the
library file, open the Project menu and select Project Options. There are a number of tabs
in the Project Options dialog box. Locate the Parameters tab, which is shown in Figure 2.21.
You now want to add an entry into the third column (labeled Linker) so the Allegro
library file will be linked into the executable program. You can type in the path and file-
name directly or you can click on the Add Library or Object button to search for the file.
Navigate to your root Allegro folder and look inside a folder called lib.
If you installed Allegro using the Dev-C++ WebUpdate or by installing the DevPak off the
CD-ROM, then Allegro will be installed to C:\Dev-Cpp\Allegro by default. If you are at all
confused about this issue, then I recommend you visit Appendix F to get a better feel for
how Allegro and Dev-C++ work together.
You should see eight compiler-specific folders inside lib:
■
bcc32
■
beos
■
djgpp
■
mingw32
■
msvc
■
qnx
■
unix
■
watcom
As you might recall from the
“Installing and Configuring
Dev-C++ and Allegro” sec-
tion, the version you want to
use for Windows is mingw32,
so go ahead and open that
folder. If you have compiled
Allegro for mingw32 you
should see two files inside—
libaldat.a and liballeg.a (see
Figure 2.22).
Taking Dev-C++ and Allegro for a Spin 55
Figure 2.21 The Parameters tab in the Project
Options dialog box
Figure 2.22 Locating the liballeg.a library file for Allegro
Chapter 2
■
Getting Started with Dev-C++ and Allegro56
Select the liballeg.a file and click on Open to load the path name for the file into the Linker
list. If you look at the path name that was inserted, you’ll notice that it includes a lot of
folder redirection ( / / / /allegro/lib/mingw32/liballeg.a). This will probably look differ-
ent on your system due to where you saved the project file. (Mine is stored several folders
deep in the source code folder.) For future reference, note that you only need to refer to
the absolute path name for liballeg.a (or any other library file). Therefore, you can edit the
Linker text so it looks like this:
/allegro/lib/mingw32/liballeg.a
The result should look like Figure 2.23.
Before you get too comfortable with
this plan, let me give you a heads up
on an even easier way to include the
Allegro library! Regardless of whether
you installed Allegro.DevPak or com-
piled the Allegro source code, the
liballeg.a file will be installed at
\Dev-Cpp\lib. So you really don’t need
to reference the file in \allegro\lib
directly. Referring back to Figure
2.23, you can substitute the path to
liballeg.a with a simple linker com-
mand (-lalleg) and that will suffice!
I will remind you how to set up the
projects as we go along, using both
methods. This chapter is really thorough in these explanations because future chapters
will skim over these details. If you ever have trouble configuring a new project for Allegro,
this is the chapter you will want to refer back to as a reference.
tip
If you are using Visual C++, you will want to reference alleg.lib (and no other library files) in the
linker options field. See Appendix E for details.
Running the GetInfo Program
If you haven’t already, press F9 to compile and run the program. If all goes well, you should
be rewarded with a console window that looks like the one in Figure 2.24. If you have
problems running the program, aside from syntax errors due to typos you might want to
double-check that you have the correct path to the liballeg.a library file.
Figure 2.23 You can also type the path name to a
library file directly into the Linker list.
Adding to the GetInfo Program
Now you can add some more functionality to the GetInfo program to explore more of the
functions available with Allegro. First, let me introduce you to a variable called
os_type
,
which has this declaration:
extern int os_type;
This variable returns a value for the operating system that Allegro detected, and may be
one of the values listed in Table 2.1.
To display the operating system name, you’ll need to use the
switch
statement to determine
which OS it is. This would be easier using a string array, but unfortunately the list might
not be in consecutive order within Allegro, so it is safer to use a
switch
. Add the following
function above the
int main()
line:
Taking Dev-C++ and Allegro for a Spin 57
Figure 2.24 The
GetInfo
program displays information about the Allegro library.
char *OSName(int number)
{
switch (number)
{
case OSTYPE_UNKNOWN: return “Unknown or MS-DOS”;
case OSTYPE_WIN3: return “Windows”;
case OSTYPE_WIN95: return “Windows 95”;
case OSTYPE_WIN98: return “Windows 98”;
case OSTYPE_WINME: return “Windows ME”;
case OSTYPE_WINNT: return “Windows NT”;
case OSTYPE_WIN2000: return “Windows 2000”;
case OSTYPE_WINXP: return “Windows XP”;
case OSTYPE_OS2: return “OS/2”;
case OSTYPE_WARP: return “OS/2 Warp 3”;
case OSTYPE_DOSEMU: return “Linux DOSEMU”;
case OSTYPE_OPENDOS: return “Caldera OpenDOS”;
case OSTYPE_LINUX: return “Linux”;
case OSTYPE_FREEBSD: return “FreeBSD”;
Chapter 2
■
Getting Started with Dev-C++ and Allegro58
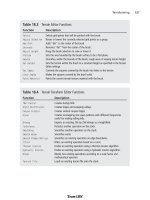
Table 2.1 Operating Systems Recognized by Allegro
Identifier Description
OSTYPE_UNKNOWN
Unknown (may be MS-DOS)
OSTYPE_WIN3
Windows 3.1 or earlier
OSTYPE_WIN95
Windows 95
OSTYPE_WIN98
Windows 98
OSTYPE_WINME
Windows Me
OSTYPE_WINNT
Windows NT
OSTYPE_WIN2000
Windows 2000
OSTYPE_WINXP
Windows XP
OSTYPE_OS2
OS/2
OSTYPE_WARP
OS/2 Warp 3
OSTYPE_DOSEMU
Linux DOSEMU
OSTYPE_OPENDOS
Caldera OpenDOS
OSTYPE_LINUX
Linux
OSTYPE_FREEBSD
FreeBSD
OSTYPE_QNX
QNX
OSTYPE_UNIX
UNIX variant
OSTYPE_BEOS
BeOS
OSTYPE_MACOS
Mac OS
Taking Dev-C++ and Allegro for a Spin 59
case OSTYPE_QNX: return “QNX”;
case OSTYPE_UNIX: return “Unix variant”;
case OSTYPE_BEOS: return “BeOS”;
case OSTYPE_MACOS: return “MacOS”;
}
}
Now you can modify the main routine to display the name of the operating system. Add
the following line of code following the first
printf
line:
printf(“Operating system = %s\n”, OSName(os_type));
When you run the program (F9), you should see a console window with output that looks
like the following lines. (Note that your operating system should be displayed if you are
not running Windows 2000.)
Allegro version = Allegro 4.0.3, MinGW32
Operating system = Windows 2000
Press any key
Now you can use a few more of Allegro’s very useful global variables to retrieve the operating
system version, desktop resolution, multitasking flag, color depth, and some details about the
processor. Since you are already raring to go, I’ll just list the definitions for these functions
and variables, and then you can add them to the GetInfo program. (Remember that none of
these variables and functions will work unless you have called
allegro_init()
first.)
extern int os_version;
extern int os_revision;
extern int os_multitasking;
int desktop_color_depth();
int get_desktop_resolution(int *width, int *height);
extern char cpu_vendor[];
extern int cpu_family;
extern int cpu_model;
extern int cpu_capabilities;
The first three variables provide information about the operating system version, revision,
and whether it is multitasking. The following lines of code will display those values:
printf(“OS version = %i.%i\n”, os_version, os_revision);
printf(“Multitasking = %s\n”, YesNo(os_multitasking));
I wrote a short function called
YesNo()
to display the appropriate word (yes = 1, no = 0);
this function should be typed in above
int main()
:
char *YesNo(int number)
{
if (number==0)
return “No”;
else
return “Yes”;
}
Next are the desktop resolution and color depth values, which you can add to the program
with the following lines:
int width, height;
get_desktop_resolution(&width, &height);
printf(“Desktop resolution = %i x %i\n”, width, height);
printf(“Color depth = %i bits\n”, desktop_color_depth());
Notice how you must pass the
width
and
height
variables to
get_desktop_resolution()
? The
variables are passed by reference to this function so you can then use the variables to dis-
play the desktop resolution. Color depth is a direct function call.
Next come the functions associated with the processor. I don’t know about you, but I per-
sonally find this information very interesting. You could use these values to directly affect
how a game runs by enabling or disabling certain features based on system specifications.
When it comes to a multi-platform library, this can be essential because there are many
older PCs running Linux and other OSs that perform well on older hardware (whereas
Windows typically puts a high demand on resources). Here are the processor-specific
variables and functions:
extern char cpu_vendor[];
extern int cpu_family;
extern int cpu_model;
extern int cpu_capabilities;
The first three variables are easy enough to read, although they are manufacturer-specific
values. For instance, a
cpu_family
value of 6 indicates a Pentium Pro for the Intel platform,
while it refers to an Athlon for the AMD platform. The
cpu_capabilities
variable is a little
more complicated because it contains packed values specifying the special features of the
processor. Table 2.2 presents a rundown of those capabilities.
I have always enjoyed system decoding programs like this one, so it is great that this is built
into Allegro. To decode the
cpu_capabilities
variable, you can
AND
one of the identifiers
with
cpu_capabilities
to see whether it is available. If the
AND
operation equals the identi-
fier value, then you know that identifier has been bit-packed into
cpu_capabilities
. Here is
the code to display these capabilities. (Note that spacing is not critical—I just wanted all
of the equal signs to line up.)
Chapter 2
■
Getting Started with Dev-C++ and Allegro60
int caps = cpu_capabilities;
printf(“Processor ID = %s\n”,
YesNo((caps & CPU_ID)==CPU_ID));
printf(“x87 FPU = %s\n”,
YesNo((caps & CPU_FPU)==CPU_FPU));
printf(“MMX = %s\n”,
YesNo((caps & CPU_MMX)==CPU_MMX));
printf(“MMX+ = %s\n”,
YesNo((caps & CPU_MMXPLUS)==CPU_MMXPLUS));
printf(“SSE = %s\n”,
YesNo((caps & CPU_SSE)==CPU_SSE));
printf(“SSE2 = %s\n”,
YesNo((caps & CPU_SSE2)==CPU_SSE2));
printf(“3DNOW = %s\n”,
YesNo((caps & CPU_3DNOW)==CPU_3DNOW));
printf(“Enhanced 3DNOW = %s\n”,
YesNo((caps & CPU_ENH3DNOW)==CPU_ENH3DNOW));
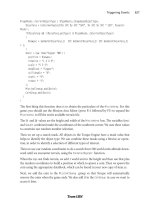
For reference, here is the complete listing for the
main
function of GetInfo, with some addi-
tional comments to clarify what each section of code is doing.
int main() {
//initialize Allegro
allegro_init();
//display version info
printf(“Allegro version = %s\n”, allegro_id);
printf(“Operating system = %s\n”, OSName(os_type));
Taking Dev-C++ and Allegro for a Spin 61
Table 2.2 Processor Features Identified by Allegro
Identifier Description
CPU_ID
cpuid is available.
CPU_FPU
x87 FPU is available.
CPU_MMX
MMX is available.
CPU_MMXPLUS
MMX+ is available.
CPU_SSE
SSE is available.
CPU_SSE2
SSE2 is available.
CPU_3DNOW
3DNow! is available.
CPU_ENH3DNOW
Enhanced 3DNow! is available.
printf(“OS version = %i.%i\n”, os_version, os_revision);
printf(“Multitasking = %s\n”, YesNo(os_multitasking));
//display system info
int width, height;
get_desktop_resolution(&width, &height);
printf(“Desktop resolution = %i x %i\n”, width, height);
printf(“Color depth = %i bits\n”, desktop_color_depth());
printf(“Processor vendor = %s\n”, cpu_vendor);
printf(“Processor family = %i\n”, cpu_family);
printf(“Processor model = %i\n”, cpu_model);
//display processor capabilities
int caps = cpu_capabilities;
printf(“Processor ID = %s\n”,
YesNo((caps & CPU_ID)==CPU_ID));
printf(“x87 FPU = %s\n”,
YesNo((caps & CPU_FPU)==CPU_FPU));
printf(“MMX = %s\n”,
YesNo((caps & CPU_MMX)==CPU_MMX));
printf(“MMX+ = %s\n”,
YesNo((caps & CPU_MMXPLUS)==CPU_MMXPLUS));
printf(“SSE = %s\n”,
YesNo((caps & CPU_SSE)==CPU_SSE));
printf(“SSE2 = %s\n”,
YesNo((caps & CPU_SSE2)==CPU_SSE2));
printf(“3DNOW = %s\n”,
YesNo((caps & CPU_3DNOW)==CPU_3DNOW));
printf(“Enhanced 3DNOW = %s\n”,
YesNo((caps & CPU_ENH3DNOW)==CPU_ENH3DNOW));
printf(“\nPress any key \n”);
getch();
return 0;
}
Running the program now produces the following results. (Note that it will reflect the
hardware in your own system.)
Allegro version = Allegro 4.0.3, MinGW32
Operating system = Windows 2000
OS version = 5.0
Chapter 2
■
Getting Started with Dev-C++ and Allegro62
Multitasking = Yes
Desktop resolution = 1280 x 1024
Color depth = 32 bits
Processor vendor = AuthenticAMD
Processor family = 6
Processor model = 4
Processor ID = Yes
x87 FPU = Yes
MMX = Yes
MMX+ = Yes
SSE = No
SSE2 = No
3DNOW = Yes
Enhanced 3DNOW = Yes
Press any key
Gaining More Experience with Allegro
Now that you have learned how to set up the compiler to use Allegro by manually adding
the library file to the project, I will show you the easy way to do it! I believe it’s always best
to know how to set up a project first, but the Allegro.DevPak includes two project tem-
plates you can use, so it’s a cinch to create a new Allegro project and get started writing
code without having to go into the Project Options at all.
I mention this after the fact because a default installation of Dev-C++ and Allegro does not
include these Allegro project templates. Only after you install Allegro via WebUpdate will
you find these templates installed (which is one good reason for using the WebUpdate
tool).
The only drawback to using these Allegro project templates is that they are specifically
limited to C++ code, not C (which is mainly what this book focuses on). That is not a lim-
itation really, because you can still write straight C code and it won’t make any difference
(due to the way C++ headers are handled in the project template). However, you can feel
free to write C or C++ code as you wish, so this might be a better solution than limiting
the project to C by default.
The Hello World Demo
Now let’s see how easy it is to create a new Allegro project. Fire up Dev-C++ and open the
File menu. Select New, Project and click on the MultiMedia tab, and you should see three
project types—Allegro (DLL), Allegro (Static), and OpenGL—as shown in Figure 2.25.
Gaining More Experience with Allegro 63
Select the Allegro (DLL) project
template, type a new name for the
project, and click on OK. A new
project will be created in Dev-
C++, and you will be asked to
choose a location for the project
file. After the project has been cre-
ated, you should see the sample
source code shown in Figure 2.26.
If you run the program by pressing F9, you should see the program run full-screen with
the message “Hello World” displayed (see Figure 2.27).
Chapter 2
■
Getting Started with Dev-C++ and Allegro64
Figure 2.25 Creating a new Allegro (DLL) project in Dev-C++
Figure 2.26 The new Allegro (DLL) project has been created from the template.
This is a fully-functional Allegro program that didn’t require any configuration. If you are
using a Windows system, Allegro automatically supports DirectX and takes advantage of
hardware acceleration with DirectDraw. On other platforms (such as Linux), Allegro will
use whatever library has been compiled with it to make the most out of that platform (in
other words, the DirectX equivalent on each system).
If for any reason you are not able to run the program as shown, go back to the “Installing
Allegro” section to make sure it is installed correctly.
Allegro Sample Programs
Allegro comes with a large number of sample programs that demonstrate all of the vari-
ous features of the library. If you installed Allegro as described in this chapter using the
DevPak, you will find these sample programs in the main Dev-Cpp folder on your hard
drive. Assuming you have installed it at C:\Dev-Cpp, the example programs are located in
C:\Dev-Cpp\Examples\Allegro.
Before you can run an individual C source program in Dev-C++, you need to copy it into
an existing project that has been configured with the Allegro library. Otherwise, the com-
piler will complain that one or more Allegro functions could not be found. The easiest
way to do this is to create a new Allegro (DLL) project, as you did with HelloWorld a few
minutes ago. Then you can open one of the sample programs in Dev-C++ and paste the
Gaining More Experience with Allegro 65
Figure 2.27 The
HelloWorld
program runs in full-screen 640×480 mode.
new code into main.c to run it. That way the project template is configured for Allegro
and you can repeatedly paste sample code into main.c to see the sample programs run.
The alternative is to create a separate project for each program or compile them all using
a make file or by running GCC from the command line (which is probably easier than
using Dev-C++, but not as convenient).
note
The Allegro sample programs are contributions from many Allegro developers and fans. They are
not all guaranteed to work, especially considering that new versions of Allegro are released fre-
quently and the examples are not always kept up to date.
For an example, take a look at the ex3buf.c example program. You can load this program
from \Dev-Cpp\Examples\Allegro (assuming you have installed Dev-C++ to this folder),
as shown in Figure 2.28. This program is a triple-buffer demonstration written by Shawn
Hargreaves. Although it was primarily written for MS-DOS (as evidenced by the 320×200
video resolution), you can still run the program in Windows or any other system in full-
screen mode.
This is actually a very inter-
esting program because it
uses an early polygon ren-
dering routine that was writ-
ten before the 3D features
were added to Allegro. You
could adapt this code to pro-
duce a shaded 3D game, but
that would be hard work—
better to wait until I cover
the 3D functionality built
into Allegro first! Figure 2.29
shows the program running.
Another interesting program is called exblend.c; it is also found in \Dev-Cpp\
Examples\Allegro. This was also written by Shawn Hargreaves, and it shows an interesting
alpha-blend effect that I will cover in the next chapter (see Figure 2.30).
There are many more sample programs just like these in \Dev-Cpp\Examples\Allegro that
I encourage you to load and run to see some of the things that Allegro is capable of doing.
Chapter 2
■
Getting Started with Dev-C++ and Allegro66
Figure 2.28 Opening one of the sample programs installed
with Allegro
These aren’t full programs or games per se, but they do a good job of demonstrating simple
concepts.
Gaining More Experience with Allegro 67
Figure 2.29 The ex3buf.c program (written by Shawn Hargreaves) is one
of the many sample programs included with Allegro.
Figure 2.30 The exblend.c program shows how two bitmaps can be
displayed with translucency.
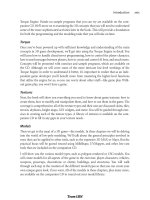
Summary
That sums up the introduction to Dev-C++ and Allegro. I hope that by this time you are
at least familiar with the IDE and have a good understanding of how the compiler works,
as well as what Allegro is capable of (with a little effort on your part). This chapter has
given you few tools for building a game as of yet, but it was necessary along that path.
Installing and configuring the dev tools is always a daunting task for those who are new
to programming, and even experienced programmers get lost when trying to get up and
running with a new IDE, compiler, and game library. Not only did you learn to configure
a new IDE and open-source compiler, you also got started writing programs using an
open-source game library. But now that the logistics are out of the way, you can focus on
learning Allegro and writing a few sample programs in the following chapters.
Chapter Quiz
You can find the answers to this chapter quiz in Appendix A, “Chapter Quiz Answers.”
1. What game features an Avatar and takes place in the land of Brittania?
A. Baldur’s Gate: Dark Alliance
B. Ultima VII: The Black Gate
C. The Elder Scrolls III: Morrowind
D. Wizardry 8
2. GNU is an acronym for which of the following phrases?
A. GNU is Not UNIX
B. Great Northern University
C. Central Processing Unit
D. None of the above
3. What is the primary Web site for Dev-C++?
A.
B.
C.
D.
4. What is the name of the compiler used by Dev-Pascal?
A. GNU Pascal
B. Turbo Pascal
C. Object Pascal
D. Microsoft Pascal
Chapter 2
■
Getting Started with Dev-C++ and Allegro68
5. What is the name of the powerful automated update utility for Dev-C++?
A. DevUpdate
B. AutoUpdate
C. Windows Update
D. WebUpdate
6. What are the Dev-C++ update packages called?
A. DevPacks
B. DevPaks
C. DevPackages
D. DevSpanks
7. What distinctive feature of Dev-C++ sets it apart from commercial development
tools?
A. Dev-C++ is open-source
B. Dev-C++ is free
C. Dev-C++ is multi-platform
D. All of the above
8. What is the name of the game programming library featured in this chapter?
A. DirectX
B. Gnome
C. GTK+
D. Allegro
9. What function must be called before you use the Allegro library?
A.
main()
B.
byte_me()
C.
allegro_init()
D.
lets_get_started()
10. What statement must be included at the end of
main()
in an Allegro program?
A.
END_OF_THE_WORLD()
B.
END_OF_MAIN()
C.
END_OF_FREEDOM()
D.
AH_DONUTS()
Chapter Quiz 69