3D Game Programming All in One- P22
Bạn đang xem bản rút gọn của tài liệu. Xem và tải ngay bản đầy đủ của tài liệu tại đây (543.67 KB, 30 trang )
Terraforming 537
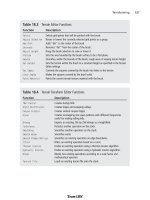
Table 18.3 Terrain Editor Functions
Function Description
Select
Selects grid points that will be painted with the brush.
Adjust Selection
Raises or lowers the currently selected grid points as a group.
Add Dirt
Adds "dirt" to the center of the brush.
Excavate
Removes "dirt" from the center of the brush.
Adjust Height
Drags the brush selection to raise or lower it.
Flatten
Sets the area bounded by the brush surface to be a flat plane.
Smooth
Smoothes, within the bounds of the brush, rough areas of varying terrain height.
Set Height
Sets the terrain within the brush to a constant height as specified in the Terrain
Editor settings.
Set Empty
Converts the squares covered by the brush into holes in the terrain.
Clear Empty
Makes the squares covered by the brush solid.
Paint Material
Paints the current terrain texture material with the brush.
Table 18.4 Terrain Terraform Editor Functions
Function Description
fBm Fractal
Creates bumpy hills.
Rigid Multifractal
Creates ridges and sweeping valleys.
Canyon Fractal
Creates vertical canyon ridges.
Sinus
Creates overlapping sine wave patterns with different frequencies
useful for making rolling hills.
Bitmap
Imports an existing 256 by 256 bitmap as a heightfield.
Turbulence
Perturbs another operation on the stack.
Smoothing
Smoothes another operation on the stack.
Smooth Water
Smoothes water.
Smooth Ridges/Valleys
Smoothes an existing operation on edge boundaries.
Filter
Filters an existing operation based on a curve.
Thermal Erosion
Erodes an existing operation using a thermal erosion algorithm.
Hydraulic Erosion
Erodes an existing operation using a hydraulic erosion algorithm.
Blend
Blends two existing operations according to a scale factor and
mathematical operator.
Terrain File
Loads an existing terrain file onto the stack.
Team LRN
Please purchase PDF Split-Merge on www.verypdf.com to remove this watermark.
Moving Right Along
So, you've now seen how you can create and modify your game environment. The three
main environmental elements are Sky, Clouds, and Water. We looked at the different ways
each of those three elements can be created using tools and techniques available in Torque.
In most cases, you will probably use some form of all of those techniques when you cre-
ate your game. For example, you would judiciously mix overhead cloud layers with sky-
box renderings of distant clouds on the horizon.
We've also looked at the combined weather effects involved in storms, and how you can
initiate an automated process to start and end storms over time using Torque Script.
In this chapter, we were introduced to sounds in the form of thunder for the lightning
strikes. In the next chapter we will more thoroughly explore how to incorporate sounds
in our game.
Chapter 18
■
Making the Game World Environment538
Team LRN
Please purchase PDF Split-Merge on www.verypdf.com to remove this watermark.
539
Creating and
Programming Sound
chapter 19
A
s I mentioned in Chapter 1, audio artists compose the music and sound in a
game. Good designers work with creative and inspired audio artists to create
musical compositions that intensify the game experience.
It also bears repeating that audio artists work closely with the game designers determining
where the sound effects are needed and what the character of the sounds should be. They
often spend quite a bit of time experimenting with sound-effect sources, looking for differ-
ent ways to generate the precise sound needed. Visit an audio artist at work and you might
catch him slapping rulers and dropping boxes in front of a microphone. After capturing the
basic sound, an audio artist will then massage the sound with sound-editing tools, varying
the pitch, speeding up the sound or slowing it down, removing unwanted noise, and so on.
It's often a tightrope walk balancing realistic sounds with the need sometimes to exaggerate
certain characteristics in order to make the right point in the game context.
When creating your game, you have a choice between two basic approaches: obtain a good
source of sound effects and music (like an audio library) or create your own sounds. Of
course, you also have the option to combine the two approaches. Audio libraries are avail-
able from a wide variety of sources, and the commercial ones are quite thorough and pro-
fessionally made. There are audio libraries available via the Internet for free, but the qual-
ity of these sources varies widely in breadth, depth, and recording fidelity.
In this book we are going to take the do-it-yourself approach. The main advantage of
going this way is the price; a secondary advantage is that you have total control over the
contents of your sound files.
Team LRN
Please purchase PDF Split-Merge on www.verypdf.com to remove this watermark.
Audacity
There are several tools available to use for recording and editing sound effects and music.
A very good open source program—it doesn't cost you anything to use and is made avail-
able under the GNU General Public License—is Audacity.
This chapter will show you how to use Audacity (see Figure 19.1) to make sounds for use
in your game.
Installing Audacity
To install Audacity, do the following:
1. Browse to your CD in the \Audacity directory.
2. Locate the audacity-win-1_0_0.exe file and double-click it to run it.
3. Click the Next button for the Welcome screen.
4. Follow the various screens, and take the default options for each one, unless you
know you have a specific reason to do otherwise.
Using Audacity
You need to ensure that you've got your microphone set up properly—connected to the
MIC or microphone input jack on your sound card. Of course, you don't need to obtain
your sounds directly from a microphone; you can record from a CD or another audio
source. In any event, you need to have that source connected to the correct input and
ensure that your audio mixer is set up to record from that source. You should refer to your
sound card documentation if you don't know how to do this.
The basic operation of Audacity
is quite straightforward for
recording, simple editing, play-
back, and saving your data.
Recording
Let's record some sound:
1. Launch Audacity by choos-
ing Start, Programs, Audac-
ity, Audacity. You will get
the main window, as you
saw earlier in Figure 19.1.
2. Click the Record button, as
shown in Figure 19.2.
Chapter 19
■
Creating and Programming Sound540
Figure 19.1 Audacity main window.
Team LRN
Please purchase PDF Split-Merge on www.verypdf.com to remove this watermark.
The program is now recording from the
microphone. You can see the progress of
the recording and the waveforms of the
sounds in the window as the recording
proceeds, as shown in Figure 19.3.
3. Speak into the microphone, or if you
don't want to hear your
own voice, make a noise,
like slapping a book
down on the desk or
something. You will see
the sound you made
appear in the waveform.
Figure 19.4 shows the
waveform created when I
tapped a pen on the desk
next to the microphone.
4. When you have your
sound recorded, click the
Stop button, as shown in
Figure 19.5.
5. Now you can play back your record-
ing, by clicking the Play button, as
shown in Figure 19.6.
We'll continue working with Audacity in a
moment, but first I want to point out that if
you have a waveform but don't hear any
sound, make sure that you have the volume
turned up high enough in your speakers.
Also be sure that it is turned up high
enough—and is not muted—in your
Windows Volume Control applet (in the Control Panel,
and usually on the Windows System Tray on the right
side of the taskbar).
Simple Editing
Now if you're like me you probably have a long period
of dead air before the sound effect you made and
another chunk afterward. That's fine, because it's easy to fix. So, picking up where we left
off in the previous section:
Audacity 541
Figure 19.2 The Record button.
Figure 19.3 Recording in progress.
Figure 19.4 Waveform in Audacity.
Figure 19.5 Stop recording.
Team LRN
Please purchase PDF Split-Merge on www.verypdf.com to remove this watermark.
6. Place your cursor to one side of the portion
of the waveform you want to eliminate, and
drag it across to the other side. This selects an
area to be worked on. See Figure 19.7.
7. Choose Edit, Delete. The selected portion will
be excised from the waveform.
8. Repeat the preceding two steps for the
unwanted portions of the waveform on the
other side of your sound effect. Eventually you
will end up with something like Figure 19.8.
We're not finished with our procedure yet; there's
still some exporting to do. But before we cover
that, I want to mention that above the waveform
panel is a series of numbers on a scale. This is the
elapsed time scale. The example in Figure 19.8
shows that my final waveform is just a little more
than three-quarters of a second in duration.
Exporting
Now, once again picking up where we left off, you need to save the
sound effect as a file before you can use it:
9. Choose File, Export as WAV. Name your file and save it some-
where convenient for the moment, such as on your desktop.
10. Browse to your desktop (or wherever you saved your file)
and double-click your newly created file. Whichever program
is set up to play sounds in Windows on your computer will
be launched and play your sound.
There are other export options available, but we'll stick with the WAV format for its sim-
plicity and wide availability on Windows platforms. For other platforms, Ogg Vorbis is
probably the format of choice on Linux, and AIFF for Macintosh.
Audacity Reference
This section contains some useful reference details to help you use Audacity.
The Main Screen
Figure 19.9 shows the Audacity main screen, with the major components labeled. This
section will provide some detail on those components.
Chapter 19
■
Creating and Programming Sound542
Figure 19.6 Playback.
Figure 19.7 Selecting a portion of the
waveform.
Figure 19.8 The
final waveform of the
sound effect.
Team LRN
Please purchase PDF Split-Merge on www.verypdf.com to remove this watermark.
The toolbar is where you will
find the tools that you will prob-
ably use more than any other
tools available with Audacity.
Use Figure 19.9 to locate the
tools in the toolbar, and Table
19.1 to review their functions.
The Track Panel contains tools
for managing specific tracks
and groups of tracks. See Table
19.2 for details.
Audacity 543
Envelope
Toolbar
Time Scale
Play Stop Record Master Gain
Selection
Time
Shift
Zoom
Track Delete
Track
Panel
Waveform
Panel
Track Menu
Track Mute
Track Solo
Sample Rate
Figure 19.9 The Audacity main screen.
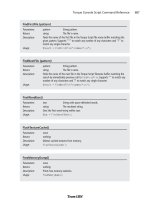
Table 19.1 Toolbar Tools
Tool Description
Selection Selects a portion of the audio track. You can set the position of the track cursor simply by
clicking at the right place in the track. Select a range of audio by clicking and dragging
over the desired portion. Select multiple tracks by dragging across the tracks. Playback
begins at the position of the track cursor and will play to the end of the track. If you
have selected a range of audio, only the selected range will be played.
Time Shift Changes the positioning of tracks relative to one another in time. Select this tool,
then click in a track and drag it to the left or right.
Envelope A handy audio processing tool. Its presence directly in the main window of the
program is an innovative move. You get detailed control over how tracks fade in and
out, right in the main track window with this tool. When you select the Envelope tool,
the amplitude envelope of each track is highlighted in a green line; there are control
points at the beginning and end of each track. To move a control point, click it and
drag it to its new position. To add a new point, click anywhere in the track where a
control point doesn't already exist. To remove a point, drag it outside of the track.
Zoom Zooms in or out of a specific part of the audio. Clicking anywhere in the audio will
zoom you in. Right-click or shift-click to zoom out. You can also zoom into a region by
dragging the mouse to highlight the region while you have the Zoom tool selected.
Play Enables you to listen to the audio file currently loaded or to a recording you have just
created. The spacebar can be used as a stop and start toggle. Playback always begins
at the current cursor position. If a region of audio is selected, only the selected region
will play. To play the entire project, choose Edit, Select All and then click the Play
button. All tracks on a given channel will be mixed automatically for playback.
Stop Halts playback.
Record Records a new track from your microphone or another input device. You can
configure recording options by choosing Edit, Preferences. Recording always happens
at the project's sample rate.
Master Gain Controls the volume of the audio output by Audacity to your hardware. Volume
increases as you move the slider from left to right.
Team LRN
Please purchase PDF Split-Merge on www.verypdf.com to remove this watermark.
Audacity supports three different track types that can be viewed simultaneously when they
exist in a single channel. These three track types let you view waveform, MIDI information,
and label information for a given audio file. Table 19.3 describes each of the three types.
note
Common values for audio sample rates are shown in Table 19.4.
Chapter 19
■
Creating and Programming Sound544
Table 19.2 Track Panel Tools
Tool Description
Track Menu Allows the user to display a track in different formats. This menu also provides the
Set Name option that allows the user to create a name for a given track.
Track Delete Immediately deletes a track, without the option to undo. Use this button carefully.
Solo Switches the current track to solo mode. You can change a track out of solo mode
by clicking it again. When in solo mode, the button for that track turns red. Only
tracks that have the Solo button enabled will be played when in solo mode.
Mute Switches off a track without deleting it. You can unmute a track just by clicking the
Mute button again. When muted, a track's Mute button will be green.
Table 19.3 Track Types
Tool Description
Audio Audio tracks contain digitally sampled sounds. Two stereo channels are
represented by two stereo tracks. Each audio track has a sample rate that is the
same as the project sample rate.
Note Note tracks display data loaded from a MIDI file. They cannot be changed or
played, only viewed.
Label Label tracks can be used to mark a document with annotations. Annotations can
be saved to a text file.
Table 19.4 Common Sample Rates
Frequency Usage
8000 Hertz Typical telephone
11025 Hertz Minimum "voice quality"
16000 Hertz Typical "voice quality"
22050 Hertz Common digital interactive media
44100 Hertz CD audio, DAT (digital audiotape)
48000 Hertz Digital studio quality
96000 Hertz Digital studio quality (newer)
Team LRN
Please purchase PDF Split-Merge on www.verypdf.com to remove this watermark.
Menus
The Audacity menus provide access to functions for managing files, editing, adjusting
views, managing Audacity projects, and finally, creating special effects. There is also a
standard Help menu.
The File Menu
Figure 19.10 shows the File menu, and Table 19.5 contains an itemized description of the
menu. Note that menu items that have names ending with three ellipsis points (three dots)
will bring up a dialog box where you can fill in some parameters.
The Edit Menu
Figure 19.11 shows the Edit menu, and Table 19.6 contains an
itemized description of the menu. Parts of this menu contain the
standard Cut, Copy, and Paste functions; the rest are related func-
tions that are specific to Audacity's capabilities.
The View Menu
The View menu provides functions that you
can use to control what you see in the
Audacity window and how you see it. Figure
19.12 shows the View menu, and Table 19.7
contains an itemized description of the menu.
The Project Menu
Audacity uses the concept of projects that
you've encountered elsewhere, such as with
UltraEdit earlier in this book. By using projects,
you can organize data files as well as configura-
tion and operational parameters in one collec-
tion that can be recalled at any time. This really
helps when dealing with complex tasks. Figure
19.13 shows the Project menu, and Table 19.8 con-
tains an itemized description of the menu.
The Effect Menu
Audacity includes many built-in effects and also
lets you use plug-in effects. To apply an effect, sim-
ply select part or all of the tracks you want to mod-
ify, and select the effect from the menu. Figure
19.14 shows the Effect menu, and Table 19.9 con-
tains an itemized description of the menu.
Audacity 545
Figure 19.10 File
menu.
Figure 19.11
Edit menu.
Figure 19.13 Project
menu.
Figure 19.12 View
menu.
Figure 19.14
Effect menu.
Team LRN
Please purchase PDF Split-Merge on www.verypdf.com to remove this watermark.
Chapter 19
■
Creating and Programming Sound546
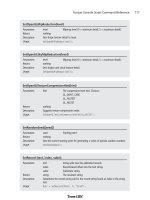
Table 19.5 File Menu
Menu Item Description
New Creates a new empty project window.
Open Presents you with a dialog box to choose a file to open. If a project window
is open and empty, the new file will appear in that window; otherwise a
new project window will open.
Close Closes the current project window.
Save Project Saves the current Audacity project file in AUP format. Audacity projects are
not usable by other programs. Audio data for an Audacity project is not
stored in the AUP file—instead, it is stored in a directory with the same
name as the project.
Save Project As Saves the current Audacity project file, with a different name or directory path.
Export as WAV Exports the current Audacity project as a standard audio file format, such as
WAV or AIFF. Change the format of the exported file in the Preferences
dialog box.
Export Selection as WAV The same as Export as WAV, but only exports the selected portion of the
project.
Export as MP3 Exports the current Audacity project as an MP3 file. Exporting MP3 files
requires that you install a separate MP3 encoder, not included with Audacity.
Export selection as MP3 The same as Export as MP3, but only exports the selected portion of the
project.
Export as OGG Exports the current Audacity project as an Ogg Vorbis file.
Export selection as OGG The same as Export as OGG, but only exports the selected portion of the
project.
Export Labels Exports label tracks to a text file.
Preferences Place where you configure Audacity.
Exit Closes all project windows and exits Audacity. It will ask if you want to save
changes to your project.
Team LRN
Please purchase PDF Split-Merge on www.verypdf.com to remove this watermark.
Audacity 547
Table 19.6 Edit Menu
Menu Item Description
Undo Undoes the last edits performed. Allows you to undo every operation going back to
the last time the document was saved.
Redo Redoes edits that were just undone. The redo history remains available until you do a
fresh edit.
Cut Removes the selected audio data and moves it to the Clipboard.
Copy Copies the selected audio data to the Clipboard.
Paste Inserts the Clipboard contents at the position of the selection cursor in the project,
replacing any selected data.
Delete Removes selected data without copying it to the Clipboard.
Silence Replaces selected audio data with silence.
Insert Silence Inserts the prompted amount of silence entered at the current track cursor position in
the project. Overwrites selections.
Split Moves the selected region into its own track or tracks, replacing the affected portion
of the original track with silence.
Duplicate Makes a copy of all or part of a track or set of tracks into new tracks.
Select All Selects all of the audio in all of the tracks.
Table 19.7 View Menu
Menu Item Description
Zoom In Zooms in on a portion of the audio data. Doing this allows you to view
more data detail for a smaller time period.
Zoom Normal Changes the zoom factor to one inch of data for one second of time; this is
the default zoom factor.
Zoom Out Zooms out so you can see a larger time base, at the cost of less detail.
Fit in Window Adjusts the zoom factor so that the entire project fits exactly in the window.
Plot Spectrum Plots a spectrum for a selected portion of a single track. First select a
portion of audio data from a single track, then select this menu item. A
window will open that will display the Power Spectrum of the audio for the
selected data. The Power Spectrum computation uses the
Fast Fourier
Transform
(FFT) algorithm to graph the proportional energy level for each
frequency.
Float or Unfloat Palette Allows you to switch between docking the Tool palette at the top of each
project window or in a separate floating window.
Team LRN
Please purchase PDF Split-Merge on www.verypdf.com to remove this watermark.
Chapter 19
■
Creating and Programming Sound548
Table 19.8 Project Menu
Menu Item Description
Import Audio Imports audio into your project. Use this function to add another track to a
project with at least one existing track. You can also mix the imported track
with an existing track.
Import Labels Imports a text file that contains time codes and labels, turning them
collectively into a label track.
Import MIDI Imports a MIDI file into a note track. MIDI files can be viewed but not
played, edited, or saved.
Import Raw Data Allows you to open a file in virtually any uncompressed format. Audacity
will examine the file contents to determine their format. You will need to
listen to the result in order to decide if the program made the right format
choice. You can use the dialog box the function displays to direct the
program in its attempts. Sometimes a successful operation has a bit of noise
at the beginning, caused by the unrecognized header format. The rest of the
data usually plays correctly. You can then edit out the noise.
Edit ID3 Tags Opens a dialog box allowing you to edit the ID3 tags associated with a
project. These are used for MP3 exporting.
Quick Mix Mixes selected tracks down to one or two tracks. Note that if you try to mix
two loud tracks together, you may get clipping that sounds like pops, clicks,
and noise. To avoid this, you should first adjust the gain (amplification) of
the tracks to a lower level.
Align Tracks Together Adjusts the time offset of selected multiple tracks to make them start at the
same time. The starting time is adjusted to the average of all tracks' original
starting times.
Align with Zero Resets the time offset of elected multiple tracks to zero.
New Audio Track Creates a new audio track with no data.
New Label Track Creates a new label track.
Remove Track(s) Removes the selected track or tracks from the project. You only need to
select a portion of a track for it to be removed.
Add Label At Selection Creates a new label at the current selection.
Team LRN
Please purchase PDF Split-Merge on www.verypdf.com to remove this watermark.