Game Programming All in One 2 nd Edition phần 7 pot
Bạn đang xem bản rút gọn của tài liệu. Xem và tải ngay bản đầy đủ của tài liệu tại đây (1.15 MB, 74 trang )
Modifying the Tank War Project
The complete new version of Tank War is available in \chapter11\tankwar on the CD-ROM;
you can load up the project or simply run the game from that location if you want. I
recommend you follow along and make the changes yourself because it is a valuable learn-
ing experience. To do so, you’ll want to open the Tank War project from Chapter 10 to
make the following changes. Be sure to copy the tank1.bmp and tank2.bmp files off the
CD-ROM so the new version of the game will work, because these bitmap files contain
the new animated tanks.
Updating tankwar.h
First, you need to make a few minor changes to the tankwar.h header file. Look for the sec-
tion of code that defines the sprites and add the new line of code shown in bold.
SPRITE mytanks[2];
SPRITE *tanks[2];
SPRITE mybullets[2];
SPRITE *bullets[2];
SPRITE *explosions[2];
Next, modify the
tank_bmp
array, which contains the bitmap images for the tanks. Scroll
down in tankwar.h a little further to find the sprite bitmap definitions and make the
change noted in bold. (It’s a small change to the
tank_bmp
array—just add another dimension
to the array as shown.)
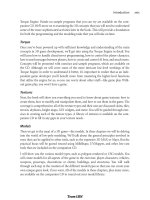
Enhancing Tank War 415
Figure 11.8
Tank War
now draws animated explosions in the
game loop without pausing the game.
//sprite bitmaps
BITMAP *tank_bmp[2][8][8];
BITMAP *bullet_bmp;
BITMAP *explode_bmp;
Now scroll down a little further in tankwar.h to the function prototypes and add the fol-
lowing three function definitions noted in bold:
//function prototypes
void animatetank(int num);
void updateexplosion(int num);
void loadsprites();
void drawtank(int num);
void erasetank(int num);
void movetank(int num);
Updating tank.c
Now you can make some changes to the tank.c source code file, which contains all the
code for loading, moving, and drawing the tanks. Add a new function to the top of tank.c
to accommodate the new animated tanks.
//new function added in chapter 11
void animatetank(int num)
{
if (++tanks[num]->framecount > tanks[num]->framedelay)
{
tanks[num]->framecount = 0;
tanks[num]->curframe += tanks[num]->animdir;
if (tanks[num]->curframe > tanks[num]->maxframe)
tanks[num]->curframe = 0;
else if (tanks[num]->curframe < 0)
tanks[num]->curframe = tanks[num]->maxframe;
}
}
Now you have to make some changes to
drawtank
, the most important function in tank.c,
because it is responsible for actually drawing the tanks. You need to add support for the
new animated frames in the
tank_bmp
array. Make the changes noted in bold. (You’ll notice
that the only changes are made to
draw_sprite
function calls.)
void drawtank(int num)
{
int dir = tanks[num]->dir;
int x = tanks[num]->x-15;
int y = tanks[num]->y-15;
Chapter 11
■
Timers, Interrupt Handlers, and Multi-Threading416
draw_sprite(buffer, tank_bmp[num][tanks[num]->curframe][dir], x, y);
//what about the enemy tank?
x = scrollx[!num] + SCROLLW/2;
y = scrolly[!num] + SCROLLH/2;
if (inside(x, y,
scrollx[num], scrolly[num],
scrollx[num] + SCROLLW, scrolly[num] + SCROLLH))
{
//draw enemy tank, adjust for scroll
draw_sprite(buffer, tank_bmp[!num][tanks[!num]->curframe][tanks[!num]->dir],
startx[num]+x-scrollx[num]-15, starty[num]+y-scrolly[num]-15);
}
}
Next, you need to make some changes to the
movetank
function to accommodate the new
animated tanks. The way this works now is that the tank is animated only when it is mov-
ing. You need to determine when the tank is moving by looking at the speed of the tank,
and then update the sprite frame accordingly. You also need to make some changes to the
code that keeps the tanks inside the bounds of the map so that when a tank reaches the
edge, it will stop animating. Make the changes noted in bold.
void movetank(int num)
{
int dir = tanks[num]->dir;
int speed = tanks[num]->xspeed;
//animate tank when moving
if (speed > 0)
{
tanks[num]->animdir = 1;
tanks[num]->framedelay = MAXSPEED - speed;
}
else if (speed < 0)
{
tanks[num]->animdir = -1;
tanks[num]->framedelay = MAXSPEED - abs(speed);
}
else
tanks[num]->animdir = 0;
//update tank position
switch(dir)
Enhancing Tank War 417
{
case 0:
scrolly[num] -= speed;
break;
case 1:
scrolly[num] -= speed;
scrollx[num] += speed;
break;
case 2:
scrollx[num] += speed;
break;
case 3:
scrollx[num] += speed;
scrolly[num] += speed;
break;
case 4:
scrolly[num] += speed;
break;
case 5:
scrolly[num] += speed;
scrollx[num] -= speed;
break;
case 6:
scrollx[num] -= speed;
break;
case 7:
scrollx[num] -= speed;
scrolly[num] -= speed;
break;
}
//keep tank inside bounds
if (scrollx[num] < 0)
{
scrollx[num] = 0;
tanks[num]->xspeed = 0;
}
else if (scrollx[num] > scroll->w - SCROLLW)
{
scrollx[num] = scroll->w - SCROLLW;
tanks[num]->xspeed = 0;
}
if (scrolly[num] < 0)
Chapter 11
■
Timers, Interrupt Handlers, and Multi-Threading418
{
scrolly[num] = 0;
tanks[num]->xspeed = 0;
}
else if (scrolly[num] > scroll->h - SCROLLH)
{
scrolly[num] = scroll->h - SCROLLH;
tanks[num]->xspeed = 0;
}
}
That is the last change to tank.c. Now you can move on to the setup.c file.
Updating setup.c
You must make extensive changes to setup.c to load the new animation frames for the tanks
and initialize the new explosion sprites. You’ll end up with a new
loadsprites
function and
a lot of changes to
setuptanks
. First, add the new
loadsprites
function to the top of the
setup.c file. I won’t use bold because you need to add the whole function to the program.
void loadsprites()
{
//load explosion image
if (explode_bmp == NULL)
{
explode_bmp = load_bitmap(“explode.bmp”, NULL);
}
//initialize explosion sprites
explosions[0] = malloc(sizeof(SPRITE));
explosions[1] = malloc(sizeof(SPRITE));
}
Next up, the changes to
setuptanks
. There are a lot of changes to be made in this function
to load the new tank1.bmp and tank2.bmp files, and then extract the individual anima-
tion frames. Make all changes noted in bold.
void setuptanks()
{
BITMAP *temp;
int anim;
int n;
//configure player 1’s tank
tanks[0] = &mytanks[0];
Enhancing Tank War 419
tanks[0]->x = 30;
tanks[0]->y = 40;
tanks[0]->xspeed = 0;
tanks[0]->dir = 3;
tanks[0]->curframe = 0;
tanks[0]->maxframe = 7;
tanks[0]->framecount = 0;
tanks[0]->framedelay = 10;
tanks[0]->animdir = 0;
scores[0] = 0;
//load first tank
temp = load_bitmap(“tank1.bmp”, NULL);
for (anim=0; anim<8; anim++)
{
//grab animation frame
tank_bmp[0][anim][0] = grabframe(temp, 32, 32, 0, 0, 8, anim);
//rotate image to generate all 8 directions
for (n=1; n<8; n++)
{
tank_bmp[0][anim][n] = create_bitmap(32, 32);
clear_to_color(tank_bmp[0][anim][n], makecol(255,0,255));
rotate_sprite(tank_bmp[0][anim][n], tank_bmp[0][anim][0],
0, 0, itofix(n*32));
}
}
destroy_bitmap(temp);
//configure player 2’s tank
tanks[1] = &mytanks[1];
tanks[1]->x = SCREEN_W-30;
tanks[1]->y = SCREEN_H-30;
tanks[1]->xspeed = 0;
tanks[1]->dir = 7;
tanks[1]->curframe = 0;
tanks[1]->maxframe = 7;
tanks[1]->framecount = 0;
tanks[1]->framedelay = 10;
tanks[1]->animdir = 0;
scores[1] = 0;
Chapter 11
■
Timers, Interrupt Handlers, and Multi-Threading420
//load second tank
temp = load_bitmap(“tank2.bmp”, NULL);
for (anim=0; anim<8; anim++)
{
//grab animation frame
tank_bmp[1][anim][0] = grabframe(temp, 32, 32, 0, 0, 8, anim);
//rotate image to generate all 8 directions
for (n=1; n<8; n++)
{
tank_bmp[1][anim][n] = create_bitmap(32, 32);
clear_to_color(tank_bmp[1][anim][n], makecol(255,0,255));
rotate_sprite(tank_bmp[1][anim][n], tank_bmp[1][anim][0],
0, 0, itofix(n*32));
}
}
destroy_bitmap(temp);
//load bullet image
if (bullet_bmp == NULL)
bullet_bmp = load_bitmap(“bullet.bmp”, NULL);
//initialize bullets
for (n=0; n<2; n++)
{
bullets[n] = &mybullets[n];
bullets[n]->x = 0;
bullets[n]->y = 0;
bullets[n]->width = bullet_bmp->w;
bullets[n]->height = bullet_bmp->h;
}
//center tanks inside scroll windows
tanks[0]->x = 5 + SCROLLW/2;
tanks[0]->y = 90 + SCROLLH/2;
tanks[1]->x = 325 + SCROLLW/2;
tanks[1]->y = 90 + SCROLLH/2;
}
That wasn’t so bad because the game was designed well and the new code added in
Chapter 10 was highly modifiable. It always pays to write clean, tight code right from the
start.
Enhancing Tank War 421
Updating bullet.c
Now you can make the necessary changes to the bullet.c source file to accommodate the
new friendly explosions. (How’s that for a contradiction of terms?) What I mean by
friendly is that the explosions will no longer use the
rest
function to draw. This is really
bad because it causes the whole game to hiccup every time there is an explosion to be
drawn. There weren’t many bullets flying around in this game, or I never would have got-
ten away with this quick solution. Now let’s correct the problem.
Open the bullet.c file. You’ll be adding a new function called
updateexplosion
and modify-
ing the existing
explode
function. Here is the new
updateexplosion
you should add to the
top of the bullet.c file.
//new function added in chapter 11
void updateexplosion(int num)
{
int x, y;
if (!explosions[num]->alive) return;
//draw explosion (maxframe) times
if (explosions[num]->curframe++ < explosions[num]->maxframe)
{
x = explosions[num]->x;
y = explosions[num]->y;
//draw explosion in enemy window
rotate_sprite(buffer, explode_bmp,
x + rand()%10 - 20, y + rand()%10 - 20,
itofix(rand()%255));
//draw explosion in “my” window if enemy is visible
x = scrollx[!num] + SCROLLW/2;
y = scrolly[!num] + SCROLLH/2;
if (inside(x, y,
scrollx[num], scrolly[num],
scrollx[num] + SCROLLW, scrolly[num] + SCROLLH))
{
//but only draw if explosion is active
if (explosions[num]->alive)
rotate_sprite(buffer, explode_bmp,
startx[num]+x-scrollx[num] + rand()%10 - 20,
starty[num]+y-scrolly[num] + rand()%10 - 20,
itofix(rand()%255));
Chapter 11
■
Timers, Interrupt Handlers, and Multi-Threading422
}
}
else
{
explosions[num]->alive = 0;
explosions[num]->curframe = 0;
}
}
Now modify
explode
so it will properly set up the explosion, which is actually drawn by
updateexplosion
later on in the animation process of the game loop. Make the changes
noted in bold. The entire function has been rewritten, so simply delete existing code and
add the new lines to
explode
.
void explode(int num, int x, int y)
{
//initialize the explosion sprite
explosions[num]->alive = 1;
explosions[num]->x = x;
explosions[num]->y = y;
explosions[num]->curframe = 0;
explosions[num]->maxframe = 20;
}
That’s the end of the changes to bullet.c. Now you can make the last few changes needed
to update the game. Next you’ll turn to the main.c file.
Updating main.c
The last changes will be made to main.c to call the new functions (such as
animatetank
and
updateexplosion
). The only changes to be made will be to the
main
function. You need to
add a line that creates a new variable and calls
loadsprites
and
animatetank
, and finally, you
need a call to
updateexplosion
. Be careful to catch the changes to
tank_bmp
and note the
cleanup code at the end. Make the changes noted in bold.
//main function
void main(void)
{
int anim;
//initialize the game
allegro_init();
install_keyboard();
install_timer();
srand(time(NULL));
Enhancing Tank War 423
setupscreen();
setuptanks();
loadsprites();
//game loop
while(!gameover)
{
//move the tanks and bullets
for (n=0; n<2; n++)
{
movetank(n);
animatetank(n);
movebullet(n);
}
//draw background bitmap
blit(back, buffer, 0, 0, 0, 0, back->w, back->h);
//draw scrolling windows
for (n=0; n<2; n++)
blit(scroll, buffer, scrollx[n], scrolly[n],
startx[n], starty[n], SCROLLW, SCROLLH);
//update the radar
rectfill(buffer,radarx+1,radary+1,radarx+99,radary+88,BLACK);
rect(buffer,radarx,radary,radarx+100,radary+89,WHITE);
//draw mini tanks on radar
for (n=0; n<2; n++)
stretch_sprite(buffer, tank_bmp[n][tanks[n]->curframe][tanks[n]->dir],
radarx + scrollx[n]/10 + (SCROLLW/10)/2-4,
radary + scrolly[n]/12 + (SCROLLH/12)/2-4,
8, 8);
//draw player viewport on radar
for (n=0; n<2; n++)
rect(buffer,radarx+scrollx[n]/10, radary+scrolly[n]/12,
radarx+scrollx[n]/10+SCROLLW/10,
radary+scrolly[n]/12+SCROLLH/12, GRAY);
//display score
for (n=0; n<2; n++)
Chapter 11
■
Timers, Interrupt Handlers, and Multi-Threading424
textprintf(buffer, font, startx[n], HEIGHT-10,
BURST, “Score: %d”, scores[n]);
//draw the tanks and bullets
for (n=0; n<2; n++)
{
drawtank(n);
drawbullet(n);
}
//explosions come last (so they draw over tanks)
for (n=0; n<2; n++)
updateexplosion(n);
//refresh the screen
acquire_screen();
blit(buffer, screen, 0, 0, 0, 0, WIDTH-1, HEIGHT-1);
release_screen();
//check for keypresses
if (keypressed())
getinput();
//slow the game down
rest(20);
}
//destroy bitmaps
destroy_bitmap(explode_bmp);
destroy_bitmap(back);
destroy_bitmap(scroll);
destroy_bitmap(buffer);
//free tank bitmaps
for (anim=0; anim<8; anim++)
for (n=0; n<8; n++)
{
destroy_bitmap(tank_bmp[0][anim][n]);
destroy_bitmap(tank_bmp[1][anim][n]);
}
Enhancing Tank War 425
//free explosion sprites
for (n=0; n<2; n++)
free(explosions[n]);
return;
}
END_OF_MAIN();
Future Changes to Tank War
I must admit that this game is really starting to become fun, not only as a very playable
game, but also as an Allegro game project. It is true that if you design and program a game
that you find interesting and fun, others will be attracted to the game as well. I did just
that, and I have enjoyed sharing the vision of this game with you. What do you think of
the result so far? It needs a little bit more work (such as sound effects), but otherwise it is
very playable. If you have any great ideas to make the game even better, by all means, go
ahead and try them!
You can use this example game as a basis for your own games. Are you interested in RPGs?
Go ahead and convert it to a single scrolling window and replace the tank with your own
character sprite, and you almost have an RPG framework right there. As for future
changes, the next chapter adds customizable levels to the game with a level-editing pro-
gram called Mappy.
Summary
This was an advanced chapter that dealt with the intriguing subjects of timers, interrupts,
and threads. I started with a TimerTest program that animated several sprites on the
screen to demonstrate how to calculate and display the frame rate. You then modified the
program to use an interrupt handler to keep track of the frame rate outside of the main
loop (InterruptTest). This was followed by another revision that demonstrated how to set
a specific frame rate for the program (TimedLoop). The last section of the chapter was
devoted to multi-threading, with a tutorial on the Posix Threads library and Red Hat’s
Pthreads-Win32 project. The result was an interesting program called MultiThread that
demonstrated how to use threads for sprite control. The potential for increased frame-rate
performance in a game is greatly encouraged with the use of threads to delegate func-
tionality from a single loop because this provides support for multiple-processor systems.
Chapter Quiz
You can find the answers to this chapter quiz in Appendix A, “Chapter Quiz Answers.”
Chapter 11
■
Timers, Interrupt Handlers, and Multi-Threading426
1. Why is it important to use a timer in a game?
A. To maintain a consistent frame rate
B. To include support for interrupts
C. To make the program thread-safe
D. To delegate code to multiple threads
2. Which Allegro timer function slows down the program using a callback function?
A.
callback_rest
B.
sleep_callback
C.
rest
D.
rest_callback
3. What is the name of the function used to initialize the Allegro timer?
A.
init_timer
B.
install_timer
C.
timer_reset
D.
start_timer
4. What is the name of the function that creates a new interrupt handler?
A.
create_handler
B.
create_interrupt
C.
int_callback
D.
install_int
5. What variable declaration keyword should be used with interrupt variables?
A.
danger
B.
cautious
C.
volatile
D.
corruptible
6. What is a process that runs within the memory space of a single program but is
executed separately from that program?
A. Mutex
B. Process
C. Thread
D. Interrupt
Chapter Quiz 427
7. What helps protect data by locking it inside a single thread, preventing that data
from being used by another thread until it is unlocked?
A. Mutex
B. Process
C. Thread
D. Interrupt
8. What does pthread stand for?
A. Protected Thread
B. Public Thread
C. Posix Thread
D. Purple Thread
9. What is the name of the function used to create a new thread?
A.
create_posix_thread
B.
pthread_create
C.
install_thread
D.
thread_callback
10. What is the name of the function that locks a mutex?
A.
lock_pthread_mutex
B.
lock_mutex
C.
pthread_lock_mutex
D.
pthread_mutex_lock
Chapter 11
■
Timers, Interrupt Handlers, and Multi-Threading428
429
Creating a Game
World: Editing
Tiles and Levels
chapter 12
T
he game world defines the rules of the game and presents the player with all of the
obstacles he must overcome to complete the game. Although the game world is the
most important aspect of a game, it is not always given proper attention when a
game is being designed. This chapter provides an introduction to world building—or
more specifically, map editing. Using the skills you learn in this chapter, you will be able
to enhance Tank War and learn to create levels for your own games. This chapter provides
the prerequisite information you’ll need in the next two chapters, which discuss horizon-
tal and vertical scrolling games.
Here is a breakdown of the major topics in this chapter:
■
Creating the game world
■
Loading and drawing Mappy level files
Creating the Game World
Mappy is an awesome map editing program, and it’s freeware so you can download and
use it to create maps for your games at no cost. If you find Mappy to be as useful as I have,
I encourage you to send the author a small donation to express your appreciation for his
hard work. The home page for Mappy is .
Why is Mappy so great, you might ask? First of all, it’s easy to use. In fact, it couldn’t be
any easier to use without sacrificing features. Mappy allows you to edit maps made up of
the standard rectangular tiles, as well as isometric and hexagonal tiles! Have you ever
played hexagonal games, such as Panzer General, or isometric games, such as Age of
Empires ? Mappy lets you create levels that are similar to the ones used in these games.
Mappy has been used to create many retail (commercial) games, some of which you might
have played. I personally know of several developers who have used Mappy to create lev-
els for retail games for Pocket PC, Game Boy Advance, Nokia N-Gage, and wireless (cell
phones). MonkeyStone’s Hyperspace Delivery Boy (created by Tom Hall, John Romero,
and Stevie Case) for Pocket PC and Game Boy Advance is one example.
Suffice it to say, Mappy is an unusually great map editor released as freeware, and I will
explain how to use it in this chapter. You’ll also have an opportunity to add Mappy sup-
port to Tank War at the end of the chapter.
Installing Mappy
Mappy is included in the \mappy folder on the CD-ROM that accompanies this book. You
can run Mappy directly without installing it, although I would recommend copying the
mapwin.exe file to your hard drive. Mappy is so small (514 KB) that it’s not unreasonable
to copy it to any folder where you might need it. If you want to check for a newer version
of Mappy, the home page is located at . In addition to Mappy,
there are sample games available for download and the Allegro support sources for
Mappy. (See the “Loading and Drawing Mappy Level Files” section later in this chapter for
more information.) If you do copy the executable without the subfolders, INI file, and so
on, you’ll miss out on the Lua scripts and settings, so you might want to copy the whole
folder containing the executable file.
Creating a New Map
Now it’s time to fire up Mappy and create a new map. Locate mapwin.exe and run it. The
first time it is run, Mappy displays two blank child windows (see Figure 12.1).
Now open the File menu and select New Map to bring up the New Map dialog box, shown
in Figure 12.2.
As the New Map dialog box shows, you must enter the size of each tile in your tile image
file. The tiles used in Tank War (and in most of the chapters of this book) are 32×32 pix-
els, so I have typed 32 in the width box and 32 in the height box. Next you must enter the
size of the map. The default 100×100 map probably is too large to be useful as a good
example at this point. If you recall from Chapter 10, the GameWorld program used a map
that had an area of 31×33 tiles. You should use that program as a basis for testing Mappy.
Of course, you can use any values you want, but be sure to modify the source code (in the
next section) to accommodate the dimensions of the map you have created.
tip
Mappy allows you to change the size of the map after it has been created, so if you need more tiles
in your map later, it’s easy to enlarge the map. Likewise, you can shrink the map; Mappy has an
option that lets you choose the part of the map you want to resize.
Chapter 12
■
Creating a Game World: Editing Tiles and Levels430
Figure 12.3 shows the dimensions that I
have chosen for this new map. Note also
the option for color depth. This refers to
the source image containing the tiles; in
most cases you will want to choose the
Truecolour option because most source
artwork will be 16-bit, 24-bit, or 32-bit.
(Any of these will work with Mappy if you
select this option.)
If you click on the Advanced button in the
New Map dialog box, you’ll see the addi-
tional options shown in Figure 12.4. These
additional options allow you to select the
exact color depth of the source tiles (8-bit
through 32-bit), the map file version to use,
and dimensions for non-rectangular map
tiles (such as hexagonal and isometric).
Creating the Game World 431
Figure 12.1 Mappy is a simple and unassuming map editor.
Figure 12.2 You can use the New Map dialog
box to configure a new game level.
Figure 12.3 Changing the size of the new map
When you click on the OK
button, a new map will be
created and filled with the
default black tile (tile #0). At
this point, you must import
the tile images to be used to
create this map. This is where
things really get interesting
because you can use multiple
image files containing source
artwork, and Mappy will
combine all the source tiles
into a new image source with correctly positioned tiles. (Saving the tile bitmap file is an
option in the Save As dialog box.)
Importing the Source Tiles
Now open the File menu and select Import. The Open File dialog box will appear, allow-
ing you to browse for an image file, which can be of type BMP, PCX, PNG, or MAR/P (map
array file—something that can be exported by Mappy). I have created a larger tile image
file containing numerous tiles from Ari Feldman’s SpriteLib ().
The maptiles.bmp file is located in the \chapter12\ArrayMapTest folder on the CD-ROM.
After you choose this file, Mappy will import the tiles into the tile palette, as shown in
Figure 12.5. Recall that you specified the tile size when you created the map file; Mappy
used the dimensions provided to automatically read in all of the tiles. You must make the
image resolution reasonably close to the edges of the tiles, but it doesn’t need to be perfect
—Mappy is smart enough to account for a few pixels off the right or bottom edges and
move to the next row.
Now I’d like to show you a convenient feature that I use often. I like to see most of the level
on the screen at once to get an overview of the game level. Mappy lets you change the
zoom level of the map editor display. Open the MapTools menu and select one of the
zoom levels to change the zoom. Then, select a tile from the tile palette and use the mouse
to draw that tile on the map edit window to see how the chosen zoom level appears. I fre-
quently use 0.5 (1/2 zoom). Until you have added some tiles to the map window, you
won’t see anything happen after you change the zoom.
Now let me show you a quick shortcut for filling the entire map with a certain tile. Select
a neutral tile that is good as a backdrop, such as the grass, dirt, or stone tile. Open the
Custom menu. This menu contains scripts that you can run to manipulate a map. (You
can write your own scripts if you learn the Lua language—visit for
more information.) Select the script called Solid Rectangle, which brings up the dialog
box shown in Figure 12.6.
Chapter 12
■
Creating a Game World: Editing Tiles and Levels432
Figure 12.4 The advanced options in the New Map dialog box
Modify the width and height parameters for the rectangle,
using one less than the value you entered for the map when it
was created (31–1 = 30 and 33–1 = 32). Click on OK, and the
map will be filled with the currently selected tile, as shown in
Figure 12.7.
Play around with Mappy to gain familiarity with it. You can
erase tiles using the right mouse button and select tiles in the
palette using the left button. You can use the keyboard arrow
keys to scroll the map in any direction, which is very handy
when you want to keep your other hand on the mouse for
quick editing. Try to create an interesting map, and then I’ll show you how to save the map
in two different formats you’ll use in the sample programs that follow.
Saving the Map File as FMP
Have you created an interesting map that can be saved? If not, go ahead and create a map,
even if it’s just a hodgepodge of tiles, because I want to show you how to save and use the
map file in an Allegro program. Are you ready yet? Good! As a reference for the figures
that follow in this chapter, the map I created is shown in Figure 12.8.
Creating the Game World 433
Figure 12.5 The SpriteLib tiles have been imported into Mappy’s tile palette
for use in creating game levels.
Figure 12.6 Mappy
includes scripts that can
manipulate a map, and you
can create new scripts.
Chapter 12
■
Creating a Game World: Editing Tiles and Levels434
Figure 12.7 The Solid Rectangle script fills a region of the map with a tile.
Figure 12.8 The sample map file used in this chapter
I’ll show you how to save the map file first, and then you’ll export the map to a text file
and try to use it in sample programs later. For now, open the File menu and select Save As
to bring up the Save As dialog box shown in Figure 12.9.
Type a map filename, such
as map1.fmp, and click on
Save. The interesting thing
about the FMP file format is
that the tile images are
stored along with the map
data, so you don’t need to
load the tiles and the map
file to create your game
world. You might not like
losing control over the tile
images, but in a way it’s a
blessing—one less thing to
worry about when you’d
rather focus your time on
gameplay.
Saving the Map File as Text
Now that you have saved the new level in the standard
Mappy file format, I’d like to show you how to export the
map to a simple text file that you can paste into a program.
The result will be similar to the GameWorld program from
Chapter 10, in which the map tile data was stored in an
array in the program’s source code.
Open the File menu and select Export. Do not select Export
As Text. That is an entirely different option used to export a
map to a binary array used for the Game Boy Advance and
other systems. Just select Export to bring up the Export dia-
log box shown in Figure 12.10.
You can explore the uses for the various formats in the
Export dialog box when you have an opportunity; I will
only explain the one option you need to export the map
data as text. You want to select the third check box from the
top, labeled Map Array as Comma Values Only (?.CSV).
435Creating the Game World
Figure 12.9 The Save As dialog box in Mappy is used to save a
map file.
Figure 12.10 The Export
dialog in Mappy lets you
choose options for exporting
the map.
If you want to build an image containing the tiles in the proper order, as they were in
Mappy, you can also select the check box labeled Graphics Blocks as Picture (?.BMP). I
strongly recommend exporting the image. For one thing, Mappy adds the blank tile that
you might have used in some parts of the map; it also numbers the tiles consecutively
starting with this blank tile unless you check the option Skip Block 0. Normally, you
should be able to leave the default of 20 in the Blocks a Row input field. Click on OK to
export the map.
Mappy outputs the map with the name provided in the Export dialog box as two files—
map1.BMP and map1.CSV. (Your map name might differ.) The CSV format is recognized
by Microsoft Excel, but there is no point loading it into Excel (even if you have Microsoft
Office installed). Instead, rename the file map1.txt and open it in Notepad or another text
editor. You can now copy the map data text and paste it into a source code file, and you
have the bitmap image handy as well.
Loading and Drawing Mappy Level Files
Mappy is far more powerful than you need for Tank War (or the rest of this book, for that
matter). Mappy supports eight-layer maps with animated tiles and has many helpful fea-
tures for creating game worlds. You can create a map, for instance, with a background
layer, a parallax scrolling layer with transparent tiles, and a surface layer that is drawn over
sprites (such as bridges and tunnels). I’m sure you will become proficient with Mappy in
a very short time after you use it to create a few games, and you will find some of these
features useful in your own games. For the purposes of this chapter and the needs of your
Tank War game, Mappy will be used to create a single-layer map.
There are two basic methods of using map files in your own games. The first method is to
export the map from Mappy as a text file. You can then paste the comma-separated map
tile numbers into an array in your game. (Recall the GameWorld program from Chapter
10, which used a hard-coded map array.) There are drawbacks to this method, of course.
Any time you need to make changes to a map file, you’ll need to export the map again and
paste the lines of numbers into the map array definition in your game’s source code.
However, storing game levels (once completed) inside an array means that you don’t need
to load the map files into your game—and further, this prevents players from editing your
map files. I’ll explain how to store game resources (such as map files) inside an encrypted/
compressed data file in Chapter 16, “Using Datafiles to Store Game Resources.”
The other method, of course, is to load a Mappy level file into your game. This is a more
versatile solution, which makes sense if your game has a lot of levels and/or is expandable.
(Will players be able to add their own levels to the game and make them available for
download, and will you release expansion packs for your game?)
Chapter 12
■
Creating a Game World: Editing Tiles and Levels436
The choice is obvious for large, complex games, such as StarCraft, but for smaller games
like Arkanoid, my personal preference is to store game levels inside the source code. Given
the advanced features in Mappy, it is really only practical to export map files if your game
is using a single layer with no animation. When your game needs multiple layers and ani-
mated tiles, it is better to load the Mappy level file. Why? Because source code is available
to load and draw complex Mappy files. (See the “Using a Mappy Level File” section later
in this chapter.). Another consideration you should keep in mind is that Mappy files
include both the map data and the artwork! That’s right; the Mappy file includes the tiles
as well as the data, so you don’t need to load the tiles separately when you’re using a
Mappy file directly. This is a great feature, particularly when you are dealing with huge,
complex game world maps.
Next, I’ll demonstrate how to load a map that has been exported to a text file, and then
I’ll follow that explanation with another sample program that demonstrates how to load
a Mappy file directly.
Using a Text Array Map
I want to write a short program to demonstrate how to load a Mappy level that has been
exported to a text file. You’ll recall from the previous section that you exported a map to
a text file with a bitmap file filled with the source tiles that correspond to the values in the
text data. I’m going to open the GameWorld program from Chapter 10 and modify it to
demonstrate the text map data that was exported. Create a new project and add a refer-
ence to the Allegro library as usual. Then, type the following code into the main.c file.
Figure 12.11 shows the program running.
437Loading and Drawing Mappy Level Files
Figure 12.11 The
ArrayMapTest
program demonstrates how to
use an exported Mappy level.
If you are using GameWorld as a basis, just take note of the differences. On the CD-ROM,
this project is called ArrayMapTest, and it is located in the \chapter12\ArrayMapTest folder.
#include “allegro.h”
//define some convenient constants
#define MODE GFX_AUTODETECT_FULLSCREEN
#define WIDTH 640
#define HEIGHT 480
#define STEP 8
//very important! double check these values!
#define TILEW 32
#define TILEH 32
//20 columns across is the default for a bitmap
//file exported by Mappy
#define COLS 20
//make sure this exactly describes your map data
#define MAP_ACROSS 31
#define MAP_DOWN 33
#define MAPW MAP_ACROSS * TILEW
#define MAPH MAP_DOWN * TILEH
int map[] = {
//
//PASTE MAPPY EXPORTED TEXT DATA HERE!!!
//
};
//temp bitmap
BITMAP *tiles;
//virtual background buffer
BITMAP *scroll;
//position variables
int x=0, y=0, n;
int tilex, tiley;
Chapter 12
■
Creating a Game World: Editing Tiles and Levels438
//reuse our friendly tile grabber from chapter 9
BITMAP *grabframe(BITMAP *source,
int width, int height,
int startx, int starty,
int columns, int frame)
{
BITMAP *temp = create_bitmap(width,height);
int x = startx + (frame % columns) * width;
int y = starty + (frame / columns) * height;
blit(source,temp,x,y,0,0,width,height);
return temp;
}
//main function
void main(void)
{
//initialize allegro
allegro_init();
install_keyboard();
install_timer();
srand(time(NULL));
set_color_depth(16);
//set video mode
if (set_gfx_mode(MODE, WIDTH, HEIGHT, 0, 0) != 0)
{
set_gfx_mode(GFX_TEXT, 0, 0, 0, 0);
allegro_message(allegro_error);
return;
}
//create the virtual background
scroll = create_bitmap(MAPW, MAPH);
if (scroll == NULL)
{
set_gfx_mode(GFX_TEXT, 0, 0, 0, 0);
allegro_message(“Error creating virtual background”);
return;
}
//load the tile bitmap
//note that it was renamed from chapter 10
Loading and Drawing Mappy Level Files 439