Game Programming All in One 2 nd Edition phần 8 doc
Bạn đang xem bản rút gọn của tài liệu. Xem và tải ngay bản đầy đủ của tài liệu tại đây (804.45 KB, 74 trang )
489
Horizontal Scrolling
Platform Games
chapter 14
E
veryone has his own opinion of the greatest games ever made. Many games are found
on bestseller lists or gamer polls, but there are only a few games that stand the test of
time, capable of drawing you in again from a mere glance. One such game is Super
Mario World, originally released as the launch title for the SNES and now available for the
Game Boy Advance. This game is considered by many to be the greatest platformer ever
made—if not the best game of all time in any genre. What is it about Super Mario World
that is so appealing? Aside from the beautiful 2D graphics, charming soundtrack, and lik-
able characters, this game features perhaps the best gameplay ever devised, with levels that
are strikingly creative and challenging. The blend of difficulty and reward along with boss
characters that go from tough to tougher only scratch the surface of this game’s appeal.
Super Mario World is a horizontal scrolling platform game that takes place entirely from
the side view (with the exception of the world view). That is the focus of this chapter; it is
an introduction to platform games with an emphasis on how to handle tile collisions.
Strictly speaking, platform games do not make up the entirety of the horizontal scroller
genre; there are perhaps more shoot-em-ups (such as R-Type and Gradius) in this orien-
tation than there are platformers. I am as big a fan of shooters as I am of platformers;
however, because the last chapter focused on a shooter, this chapter will take on the sub-
ject of platform game programming.
Using a special feature of Mappy, I’ll show you how to design a platform game level that
requires very little source code to implement. By the time you have finished this chapter,
you will know what it takes to create a platform game and you will have written a sample
game that you can tweak and modify to suit your own platform game creations. Here is a
list of the major topics in this chapter:
■
Understanding horizontal scrolling games
■
Developing a scrolling platform game
Chapter 14
■
Horizontal Scrolling Platform Games490
Understanding Horizontal Scrolling Games
I’m sure you have played many shoot-em-up and platform games in your life, but I will
provide you with a brief overview anyway. Although it’s tough to beat the gameplay of a
vertical scrolling shooter, there is an equal amount of fun to be had with a horizontal
scrolling game. The traditional shooters in this genre (R-Type, Gradius, and so on) have
had long and successful runs, with new versions of these classic games released regularly.
R-Type for Game Boy Color was followed a few years later by R-Type Advance, and this is
a regular occurrence for a popular game series such as this one.
The other sub-genre of the horizontal scrolling game is the platformer—games such as
Super Mario World and a vast number of other games of this type. Kien is a recent Game
Boy Advance platform game with RPG elements. Another old favorite is Ghosts ‘n Goblins.
Have you ever wondered how these games are developed? Such games differ greatly from
their horizontal shoot-em-up cousins because platformers by their very nature have the
simulated effect of gravity that draws the player down. The goal of the game is to navigate
a series of levels comprised of block tiles of various shapes and sizes, such as the game
shown in Figure 14.1.
Developing a Platform Scroller
Although it would seem logical to modify the vertical scroller engine from the last chap-
ter to adapt it to the horizontal direction, that only solves the simple problem of how to
get tiles on the screen, which is relatively easy to do. The majority of the source code for
Warbirds Pacifica in the last chapter handled animating the airplanes, bullets, and explo-
sions. Likewise, the real challenge to a platform game is not getting the level to scroll hor-
izontally, but designing the level so
that solid tiles can be used as obsta-
cles by the player without requiring
a lot of custom code (or worse, a
separate data file describing the
tiles stored in the map file). In
other words, you really want to do
most of the work in Mappy, and
then perform a few simple function
calls in the game to determine
when a collision has occurred.
Figure 14.1 Platform games feature a character who
walks and jumps.
Creating Horizontal Platform Levels with Mappy 491
Some code is required to cause a sprite to interact with tiles in a level, such as when you are
blocking the player’s movement, allowing the player to jump up on a solid tile, and so on.
As you will soon see, the logic for accomplishing this key ingredient of platform gameplay
is relatively easy to understand because it uses a simple collision detection routine that is
based on the properties of the tiles stored in the Mappy-generated level file.
Creating Horizontal Platform Levels with Mappy
There are many ways to write a platform game. You might store map values in an array in
your source code, containing the tile numbers for the map as well as solid block informa-
tion used for collision detection. This is definitely an option, especially if you are writing
a simple platform game. However, why do something the hard way when there is a better
way to do it? As you saw in the last two chapters, Mappy is a powerful level-editing pro-
gram used to create map files (with the .fmp extension). These map files can contain mul-
tiple layers for each map and can include animated tiles as well.
In Chapter 10, I explained how to develop a simple scrolling engine using a single large
bitmap. (This engine was put to use to enhance the Tank War game.) Later, in Chapter 12,
I introduced you to Mappy and explained how to walk the level (or preview it with source
code). Now that you are using the MappyAL library, introduced in the previous chapter
on vertical scrolling, there is no longer any need to work with the map directly. You have
seen and experienced a logical progression from simple to advanced, while the difficulty
has been reduced in each new chapter. This chapter is even simpler than the last one, and
I will demonstrate with a sample program shortly.
Before you can delve into the source code for a platform game, I need to show you some
new tricks in Mappy because you need to create a level with two types of blocks—
background and foreground. Try
not to confuse block type with lay-
ering. Mappy supports multiple
layers, but I am not using layers to
accomplish platform-style gameplay.
Instead, the background tiles are
static and repeated across the entire
level, whereas the foreground tiles
are used basically to support the
player. Take a look at Figure 14.2 for
an example. You can see the player
standing on a ledge, which is how
this template game looks at startup.
Figure 14.2 The solid tile blocks keep the player from
falling through the bottom of the screen.
In the background you see a colorful image containing various shapes, while the fore-
ground contains solid tiles. However, as far as Mappy is concerned, this map is made up
of a single layer of tiles.
Allow me to explain. There are basically two ways to add a background to a Mappy level.
You can simply insert generic neutral tiles in the empty spaces or you can insert a bitmap
image. You might be wondering how to do that. Mappy includes a feature that can divide
a solid bitmap into tiles and then construct a map out of it. The key is making sure your
starting level size has the same dimensions as the source bitmap.
Run Mappy, open the File menu, and select New Map. Set each tile to 32×32 and set the map
size to 20×15 tiles. The result of these dimensions is a 640×480-pixel map. Also, you will be
working with true color (16-bit or higher color depth) in this chapter (see Figure 14.3).
Now, use your favorite graphic editor to
create a 640×480 bitmap image or use one
of your favorite bitmaps resized to these
dimensions. Normally at this point, you
would use Import to load a tile map into
Mappy, but the process for converting a
solid image into tiles is a little different.
Open the MapTools menu. Select the
Useful Functions menu item and select
Create Map from Big Picture, as shown in
Figure 14.4.
Chapter 14
■
Horizontal Scrolling Platform Games492
Figure 14.3 The New Map dialog box in Mappy
Figure 14.4 Creating a map from a large bitmap image
To demonstrate, I created a colorful bitmap image and used it as the basis for a new map
in Mappy using this special feature. But before you create a new map, let me give you a lit-
tle pointer. The background tiles must be stored with the foreground tiles. You’ll want to
create a new source bitmap that has room for your background image and the tiles used
in the game. Paste your background image into the new bitmap at the top, with the game
tiles located underneath. Also be sure to leave some extra space at the bottom so it is eas-
ier to add new tiles as you are developing the game (see Figure 14.5).
Using this combined source bitmap, go into Mappy and, after having created the 640×480
map (20 tiles across, 15 tiles down, 32×32 pixels per tile), select Useful Functions, Create
Map from Big Picture. The resulting map should look similar to the one shown in Figure
14.6. If you scroll down in the tile palette, you should see the foreground tiles below the
background image tiles. See how Mappy has divided the image into a set of tiles?
Naturally, you could do this sort of thing with source code by blitting a transparent tile
map over a background image, but doing this in Mappy is more interesting (and saves you
time writing source code).
You might be wondering, “What next? Am I creating a scrolling game out of a 640×480
tile map?” Not at all; this is only the first step. You must use a tile map that is exactly the
same size as the background image in your source bitmap, or the background tiles will be
tweaked. Once the background has been generated, you can resize the map.
Open the MapTools menu and select Resize Map to bring up the Resize Map Array dialog
box shown in Figure 14.7.
Creating Horizontal Platform Levels with Mappy 493
Figure 14.5 The background image and game tiles are stored in
the same bitmap image and imported into Mappy.
Press the button labeled 4 to instruct the resize routine to
preserve the existing tiles during the resize. The new map
can be any size you want, but I normally choose the largest
map size possible until I’ve designed the level, to provide a
lot of work space. Besides, it’s more fun to include large
levels in your games than smaller ones. Just keep in mind
that Mappy supports a maximum of 30,000 tiles. If you
want your game to scroll upward (as the player is jumping
on tiles), keep that in mind. Fifteen tiles deep equates to
480 pixels. You can enter 20 for the height if you want. That
is probably a better idea after all, to allow some room for
jumping.
Next, you can experiment with the Brush menu to duplicate the background tiles across
the entire level, unless you intend to vary the background. I created a background that
meshes well from either side to provide a seamless image when scrolling left or right.
Basically, you can choose Grab New Brush, then use the mouse to select a rectangular set
of tiles with which to create the brush, and then give the new brush a name. From then
on, anywhere you click will duplicate that section of tiles. I used this method to fill the
entire level with the same small background tiles. The beautiful thing about this is you end
up with a very small memory footprint for such an apparently huge background image.
Chapter 14
■
Horizontal Scrolling Platform Games494
Figure 14.6 A new tile map has been generated based on the source bitmap image.
Figure 14.7 The Resize Map
Array dialog box
After resizing and filling the map with the background tiles, the result might look some-
thing like Figure 14.8.
Separating the Foreground Tiles
After you have filled the level with the background tiles, it’s time to get started designing
the level. But first, you need to make a change to the underlying structure of the fore-
ground tiles, setting them to the FG1 property to differentiate them from the background
tiles. This will allow you to identify these tiles in the game to facilitate collision detection
on the edges of the tiles.
If you decided to skip over the step earlier in which I suggested adding tiles below the
bitmap image, you will need to complete it at this time because the background tiles are
not suitable for creating a game level.
The tiles provided on the CD-ROM in the \chapter14\PlatformScroller project folder will
suffice if you want to simply copy the file off the CD-ROM. I have called the original tile
image blocks1.bmp and the combined image blocks2.bmp. (This second one will be used
in the PlatformScroller demo shortly.)
Throughout this discussion, I want to encourage you to use your own artwork in the
game. Create your own funky background image as I have done for the PlatformScroller
program that is coming up. As for the tiles, that is a more difficult matter because there is
no easy way to draw attractive tiles. As expected, I am using a tileset from Ari Feldman’s
SpriteLib in this chapter as well. (See for more information.)
Creating Horizontal Platform Levels with Mappy 495
Figure 14.8 A very large horizontally oriented level in Mappy with a bitmap background image
SpriteLib is a good place to start when you need sprites and tiles with which to develop
your game, although it is not a replacement for your own commissioned artwork. Contact
Ari to find out how to order a custom sprite set.
Assuming you are using the blocks2.bmp file I created and stored in the project folder for
this chapter, you’ll want to scroll down in the tile palette to tile 156, the first foreground
tile in the tile set (see Figure 14.9).
After you have identified the first foreground tile, you can use this number in the next step.
What you are going to do is change the property of the tiles. Double-click on tile #156 to
bring up the tile editor. By default, tiles that have been added to the map are assigned to the
background, which is the standard level used in
simple games (see Figure 14.10).
Do you see the four small boxes on the bottom-
left of the Block Properties dialog box? These rep-
resent the tile image used for each level (BG, FG1,
FG2, FG3). Click on the BG box to bring up the
Pick Block Graphic dialog box. Scroll up to the
very first tile, which is blank, and select it, and
then close the dialog box (see Figure 14.11).
Chapter 14
■
Horizontal Scrolling Platform Games496
Figure 14.9 Highlighting the first foreground tile in Mappy (right side of the screen)
Figure 14.10 The Block Properties
dialog box provides an interface for
changing the properties of the tiles.
Next, click on the FG1 map layer box and locate the tile image
you just removed from BG. If you have a hard time locating
tiles, I recommend first selecting FG1 before you remove the
BG tile. After you have selected the correct tile, you have
essentially moved the tile from BG to FG1. In a moment, I
will show you a method to quickly make this change on a
range of tiles.
The next property to change on the foreground tiles is the col-
lision. If you look for the Collision boxes near the middle of
the Block Properties dialog box, you’ll see four check boxes.
Check all of them so the tile properties look like Figure 14.12.
Have you noticed that the Block Properties dialog
box has many options that don’t immediately
seem useful? Mappy is actually capable of storing
quite a bit of information for each tile. Imagine
being able to set the collision property while also
having access to seven numeric values and three
Booleans. This is more than enough information
for even a highly complex RPG, which typically
has more complicated maps than other games. You can set these values in Mappy for use
in the game, and you can also read or set the values in your program using the various
properties and arrays in MappyAL. For reference, open the mappyal.h file, which contains
all the definitions. You can also examine some of the sample programs that come with
MappyAL (included on the CD-ROM under \mappy\mappyal).
For the purpose of creating a simple platform game, you only need to set the four colli-
sion boxes. (Note that you can fine-tune the collision results in your game by setting only
certain collision boxes here.)
Performing a Range Block Edit
Open the MapEdit menu and select Range Edit Blocks to bring up the Range Alter Block
Properties dialog box shown in Figure 14.13.
In the From field, enter the number of the first foreground tile. If you are using the
blocks2.bmp file for this chapter project, the tile number is 156.
Creating Horizontal Platform Levels with Mappy 497
Figure 14.11 The Pick
Block Graphic dialog box is
used to select a tile for each
of the four scroll layers.
Figure 14.12 Changing the collision
properties of the tile
In the To field, enter the number of the last tile in
the foreground tile set, which is 337 in this case.
You now have an opportunity to set any of the
property values for the range of blocks. Make sure
all four collision boxes are fully checked.
The most important thing to do with this range
edit is swap the BG for the FG1 layer. This will
have the same effect as the manual edit you per-
formed earlier, and it will affect all of the tiles in
one fell swoop.
After clicking on OK to perform the action, you can save the map file and move on to the
next section. You might want to double-click on one of the tiles to ensure that the change
from BG to FG1 has been made.
If you have not added any tiles to your map, you must do that before you continue. As a
general rule, the edges of the map should be walled, and a floor should be across the bot-
tom, or at least insert a platform for the start position if your level design does not include
a floor. You might want to let the player “fall” as part of the challenge for a level, in which
case you’ll need to check the Y position of the player’s sprite to determine when the player
has dropped below the floor. Just be careful to design your level so that there is room for
the player to fall. The PlatformScroller program to follow does not account for sprites
going out of range, but normally when the player falls below the bottom edge of the
screen, he has lost a life and must restart the level.
Developing a Scrolling Platform Game
The PlatformScroller program included on the CD-ROM is all ready to run, but I will go over
the construction of this program and the artwork used by it. You already created the map in
the last section, but you can also use the provided map file (sample.fmp) if you want.
Describing the Game
The PlatformScroller demo features an animated player character who can run left or right
(controlled by the arrow keys) and jump (controlled by the spacebar). The map is quite
large, 1,500 tiles across (48,000 pixels) by 15 tiles down (480 pixels). The PlatformScroller
engine is capable of handling up and down scroll directions, so you can design maps that
go up, for instance, by allowing the player to jump from ledge to ledge, by flying, or by
some other means. Figure 14.14 shows the player jumping. It is up to the level designer to
ensure that the player has a path on which to walk, and it is up to the programmer to han-
dle cases in which the player falls off the screen (and usually dies).
Chapter 14
■
Horizontal Scrolling Platform Games498
Figure 14.13 The Range Alter Block
Properties dialog box
The background image is an exam-
ple; you should design your own
background imagery, as described
earlier in this chapter. Although I
have not gotten into the subject in
this book, you can also feature par-
allax scrolling using MappyAL by
creating additional layers in the
map file. MappyAL has the code to
draw parallax layers. Of course, you
can draw multiple layers yourself
using the standard Allegro
blit
function.
The Game Artwork
The artwork for the PlatformScroller demo is primarily comprised of the background
image and foreground tiles you have already seen. For reference, the tiles are shown in
Figure 14.15.
The only animated artwork
in the game is the player
character that moves around
the level, running and jump-
ing (see Figure 14.16). This
character is represented by a
sprite with eight frames of
animation. Four additional
animation frames are pro-
vided in the guy.bmp file that
you can use for a jumping
animation. I have not used
these frames to keep the
source code listing relatively
short (in contrast to the long
listing for Warbirds Pacifica
in the previous chapter).
499Developing a Scrolling Platform Game
Figure 14.14 The
PlatformScroller
program
demonstrates how the player’s sprite can interact with
tiles using the collision properties set within Mappy.
Figure 14.15 The source tiles used in
PlatformScroller
(which you may use to modify the level)
Using the Platform Scroller
Most of the source code for the PlatformScroller demo is familiar from previous chapters,
including the
SPRITE
struct and so on. The new information that might need clarification
has to do with tile collision.
You might recall from the Block Properties dialog box in Mappy that you set four colli-
sion boxes. These values are stored in a struct called
BLKSTR
.
//structure for data blocks
typedef struct {
long int bgoff, fgoff; //offsets from start of graphic blocks
long int fgoff2, fgoff3; //more overlay blocks
unsigned long int user1, user2; //user long data
unsigned short int user3, user4; //user short data
unsigned char user5, user6, user7; //user byte data
unsigned char tl : 1; //bits for collision detection
unsigned char tr : 1;
unsigned char bl : 1;
unsigned char br : 1;
unsigned char trigger : 1; //bits to trigger an event
unsigned char unused1 : 1;
unsigned char unused2 : 1;
unsigned char unused3 : 1;
} BLKSTR;
You might be able to identify the members of the struct after seeing them represented in
the Block Properties dialog box. You might notice the seven integer values (
user1
to
user7
)
and the three values (
unused1
,
unused2
,
unused3
).
The values you need for collision detection with tiles are called
tl
and
tr
(for top-left and top-
right) and
bl
and
br
(you guessed it, for bottom-left and bottom-right). What is needed to
Chapter 14
■
Horizontal Scrolling Platform Games500
Figure 14.16 The source image containing the animated player character in
the
PlatformScroller
demo
determine when a collision takes place? It’s remarkably easy thanks to MappyAL. You can
retrieve the block number from an (x,y) position (presumably, the player’s sprite loca-
tion), and then simply return a value specifying whether that tile has one or more of the
collision values (
tl
,
tr
,
bl
,
br
) set to 1 or 0. Simply returning the result is enough to pass a
true or false response from a collision function. So here you have it:
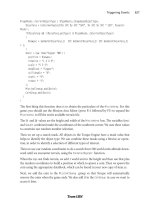
int collided(int x, int y)
{
BLKSTR *blockdata;
blockdata = MapGetBlock(x/mapblockwidth, y/mapblockheight);
return blockdata->tl;
}
The
MapGetBlock
function accepts a (row,column) value pair and simply returns a pointer
to the block located in that position of the map. This is extremely handy, isn’t it?
Writing the Source Code
Because the collision and ability to retrieve a specific tile from the map are so easy to han-
dle, the source code for the PlatformScroller program is equally manageable. There is some
code to manage the player’s position, but a small amount of study reveals the simplicity
of this code. The player’s position is tracked as player->x and player->y and is compared
to the collision values to determine when the sprite should stop moving (left, right, or
down). There is currently no facility for handling the bottom edge of tiles; the sprite can
jump through a tile from below, but not from above (see Figure 14.17). This might be a
feature you will need, depending on the requirements of your own games.
The source code for the Platform
Scroller demo follows. As was the
case with the projects in the last
chapter, you will need to include
the mappyal.h and mappyal.c files
(which make up the MappyAL
library) and include a linker refer-
ence to alleg.lib as usual (or -lalleg,
depending on your compiler). I have
highlighted in bold significant sec-
tions of new code that contribute
to the logic of the game or require
special attention.
Developing a Scrolling Platform Game 501
Figure 14.17 The player can jump through tiles from
below, but will stop when landing on top of a tile.
#include <stdio.h>
#include <allegro.h>
#include “mappyal.h”
#define MODE GFX_AUTODETECT_FULLSCREEN
#define WIDTH 640
#define HEIGHT 480
#define JUMPIT 1600
//define the sprite structure
typedef struct SPRITE
{
int dir, alive;
int x,y;
int width,height;
int xspeed,yspeed;
int xdelay,ydelay;
int xcount,ycount;
int curframe,maxframe,animdir;
int framecount,framedelay;
}SPRITE;
//declare the bitmaps and sprites
BITMAP *player_image[8];
SPRITE *player;
BITMAP *buffer;
BITMAP *temp;
//tile grabber
BITMAP *grabframe(BITMAP *source,
int width, int height,
int startx, int starty,
int columns, int frame)
{
BITMAP *temp = create_bitmap(width,height);
int x = startx + (frame % columns) * width;
int y = starty + (frame / columns) * height;
blit(source,temp,x,y,0,0,width,height);
return temp;
}
int collided(int x, int y)
{
Chapter 14
■
Horizontal Scrolling Platform Games502
BLKSTR *blockdata;
blockdata = MapGetBlock(x/mapblockwidth, y/mapblockheight);
return blockdata->tl;
}
int main (void)
{
int mapxoff, mapyoff;
int oldpy, oldpx;
int facing = 0;
int jump = JUMPIT;
int n;
allegro_init();
install_timer();
install_keyboard();
set_color_depth(16);
set_gfx_mode(MODE, WIDTH, HEIGHT, 0, 0);
//load the player sprite
temp = load_bitmap(“guy.bmp”, NULL);
for (n=0; n<8; n++)
player_image[n] = grabframe(temp,50,64,0,0,8,n);
destroy_bitmap(temp);
//initialize the sprite
player = malloc(sizeof(SPRITE));
player->x = 80;
player->y = 100;
player->curframe=0;
player->framecount=0;
player->framedelay=6;
player->maxframe=7;
player->width=player_image[0]->w;
player->height=player_image[0]->h;
//load the map
if (MapLoad(“sample.fmp”)) exit(0);
//create the double buffer
buffer = create_bitmap (WIDTH, HEIGHT);
clear(buffer);
Developing a Scrolling Platform Game 503
//main loop
while (!key[KEY_ESC])
{
oldpy = player->y;
oldpx = player->x;
if (key[KEY_RIGHT])
{
facing = 1;
player->x+=2;
if (++player->framecount > player->framedelay)
{
player->framecount=0;
if (++player->curframe > player->maxframe)
player->curframe=1;
}
}
else if (key[KEY_LEFT])
{
facing = 0;
player->x-=2;
if (++player->framecount > player->framedelay)
{
player->framecount=0;
if (++player->curframe > player->maxframe)
player->curframe=1;
}
}
else player->curframe=0;
//handle jumping
if (jump==JUMPIT)
{
if (!collided(player->x + player->width/2,
player->y + player->height + 5))
jump = 0;
if (key[KEY_SPACE])
jump = 30;
}
else
{
Chapter 14
■
Horizontal Scrolling Platform Games504
player->y -= jump/3;
jump—;
}
if (jump<0)
{
if (collided(player->x + player->width/2,
player->y + player->height))
{
jump = JUMPIT;
while (collided(player->x + player->width/2,
player->y + player->height))
player->y -= 2;
}
}
//check for collision with foreground tiles
if (!facing)
{
if (collided(player->x, player->y + player->height))
player->x = oldpx;
}
else
{
if (collided(player->x + player->width,
player->y + player->height))
player->x = oldpx;
}
//update the map scroll position
mapxoff = player->x + player->width/2 - WIDTH/2 + 10;
mapyoff = player->y + player->height/2 - HEIGHT/2 + 10;
//avoid moving beyond the map edge
if (mapxoff < 0) mapxoff = 0;
if (mapxoff > (mapwidth * mapblockwidth - WIDTH))
mapxoff = mapwidth * mapblockwidth - WIDTH;
if (mapyoff < 0)
mapyoff = 0;
if (mapyoff > (mapheight * mapblockheight - HEIGHT))
mapyoff = mapheight * mapblockheight - HEIGHT;
Developing a Scrolling Platform Game 505
//draw the background tiles
MapDrawBG(buffer, mapxoff, mapyoff, 0, 0, WIDTH-1, HEIGHT-1);
//draw foreground tiles
MapDrawFG(buffer, mapxoff, mapyoff, 0, 0, WIDTH-1, HEIGHT-1, 0);
//draw the player’s sprite
if (facing)
draw_sprite(buffer, player_image[player->curframe],
(player->x-mapxoff), (player->y-mapyoff));
else
draw_sprite_h_flip(buffer, player_image[player->curframe],
(player->x-mapxoff), (player->y-mapyoff));
//blit the double buffer
vsync();
acquire_screen();
blit(buffer, screen, 0, 0, 0, 0, WIDTH-1, HEIGHT-1);
release_screen();
} //while
//clean up
for (n=0; n<9; n++)
destroy_bitmap(player_image[n]);
free(player);
destroy_bitmap(buffer);
MapFreeMem();
allegro_exit();
}
END_OF_MAIN();
Summary
This chapter provided an introduction to horizontal scrolling platform games, explained
how to create platform levels with Mappy, and demonstrated how to put platforming into
practice with a sample demonstration program that you could use as a template for any
number of platform games. This subject might seem dated to some, but when does great
gameplay ever get old? If you take a look at the many Game Boy Advance titles being
released this year, you’ll notice that most of them are scrolling arcade-style games or plat-
formers! The market for such games has not waned in the two decades since the inception
of this genre and it does not look like it will let up any time soon. So have fun and create
the next Super Mario World, and I guarantee you, someone will publish your game.
Chapter 14
■
Horizontal Scrolling Platform Games506
Chapter Quiz
You can find the answers to this chapter quiz in Appendix A, “Chapter Quiz Answers.”
1. Which term is often used to describe a horizontal-scrolling game with a walking
character?
A. Shooter
B. Platform
C. RPG
D. Walker
2. What is the name of the map-editing tool you have used in the last several chapters?
A. Mappy
B. Map Editor
C. Mapper
D. Tile Editor
3. What is the identifier for the Mappy block property representing the background?
A. BG1
B. BACK
C. BG
D. BGND
4. What is the identifier for the Mappy block property representing the first
foreground layer?
A. FG1
B. FORE1
C. FG
D. LV1
5. Which dialog box allows the editing of tile properties in Mappy?
A. Tile Properties
B. Map Tile Editor
C. Map Block Editor
D. Block Properties
Chapter Quiz 507
6. Which menu item brings up the Range Alter Block Properties dialog?
A. Range Alter Block Properties
B. Range Edit Blocks
C. Range Edit Tile Properties
D. Range Block Edit
7. What is the name of the MappyAL struct that contains information about tile
blocks?
A.
BLOCKS
B.
TILEBLOCK
C.
BLKSTR
D.
BLKINFO
8. What MappyAL function returns a pointer to a block specified by the (x,y)
parameters?
A.
MapGetBlock
B.
GetDataBlock
C.
GetTileAt
D.
MapGetTile
9. What is the name of the function that draws the map’s background?
A.
MapDrawBG
B.
DrawBackground
C.
DrawMapBack
D.
DrawMapBG
10. Which MappyAL block struct member was used to detect collisions in the
sample program?
A.
bl
B.
br
C.
tl
D.
tr
Chapter 14
■
Horizontal Scrolling Platform Games508
Taking it to the
Next Level
Chapter 15
Mastering the Audible Realm: Allegro’s Sound Support . . . . . . . . . . .511
Chapter 16
Using Datafiles to Store Game Resources . . . . . . . . . . . . . . . . . . . . . . .539
Chapter 17
Playing FLIC Movies . . . . . . . . . . . . . . . . . . . . . . . . . . . . . . . . . . . . . . . . .551
Chapter 18
Introduction to Artificial Intelligence . . . . . . . . . . . . . . . . . . . . . . . . . .563
Chapter 19
The Mathematical Side of Games . . . . . . . . . . . . . . . . . . . . . . . . . . . . . .585
Chapter 20
Publishing Your Game . . . . . . . . . . . . . . . . . . . . . . . . . . . . . . . . . . . . . . .611
PART III
W
elcome to Part III of Game Programming All in One, 2nd Edition. Part III
includes six chapters that push the boundaries of your game development skills
to the limit. You will find coverage of sound mixing and sample playback, storing
game resources in datafiles, and playing FLIC movies before you delve into the complex
subjects of artificial intelligence and mathematics. The book ends with a chapter about
how to get your games published.
511
Mastering the Audible
Realm: Allegro’s Sound
Support
chapter 15
M
ost game programmers are interested in pushing graphics to the limit, first and
foremost, and few of us really get enthusiastic about the sound effects and music
in a game. That is natural, since the graphics system is the most critical aspect
of the game. Sound can be an equal partner with the graphics to provide a memorable,
challenging, and satisfying game experience far beyond pretty graphics alone. Indeed, the
sound effects and music are often what gamers love most about a game.
This chapter provides an introduction to the sound support that comes with Allegro, and
Allegro is significantly loaded with features! Allegro provides an interface to the underlying
sound system available on any particular computer system first, and if some features are
not available, Allegro will emulate them if necessary. For instance, a basic digital sound
mixer is often the first request of a game designer considering the sound support for a
game because this is the core of a sound engine. Allegro will interface with DirectSound
on Windows systems to provide the mixer and many more features and will take advan-
tage of any similar standardized library support in other operating systems to provide a
consistent level of performance and function in a game on any system.
Here is a breakdown of the major topics in this chapter:
■
Understanding sound initialization routines
■
Working with standard sample playback routines
■
Using low-level sample playback routines
Chapter 15
■
Mastering the Audible Realm: Allegro’s Sound Support512
The PlayWave Program
I want to get started right away with a sample program to demonstrate how to load and
play a WAV file through the sound system because this is the usual beginning of a more
complex sound system in a game. Figure 15.1 shows the output from the PlayWave pro-
gram. As with all the other support functions in Allegro, you only need to link to the
Allegro library file (alleg.lib or liballeg.a) and include allegro.h in your program—no
other special requirements are needed. Essentially, you have a built-in sound system along
with everything else in Allegro. Go ahead and try out this program; I will explain how it
works later in this chapter. All you need to run it is a sample WAV file, which you can usu-
ally find in abundance on the Web in public domain sound libraries. I have included a
sample clapping.wav file in the project folder for this program on the CD-ROM; it is in
\chapter15\PlayWave.
#include <allegro.h>
#define MODE GFX_AUTODETECT_WINDOWED
#define WIDTH 640
#define HEIGHT 480
#define WHITE makecol(255,255,255)
void main(void)
{
SAMPLE *sample;
int panning = 128;
int pitch = 1000;
int volume = 128;
Figure 15.1 The
PlayWave
program demonstrates how to initialize the
sound system and play a WAV file.
//initialize the program
allegro_init();
install_keyboard();
install_timer();
set_color_depth(16);
set_gfx_mode(MODE, WIDTH, HEIGHT, 0, 0);
text_mode(0);
//install a digital sound driver
if (install_sound(DIGI_AUTODETECT, MIDI_NONE, “”) != 0)
{
allegro_message(“Error initializing sound system”);
return;
}
//display program information
textout(screen,font,”PlayWave Program (ESC to quit)”,0,0,WHITE);
textprintf(screen,font,0,10,WHITE,”Sound Driver: %s”,digi_driver->name);
textout(screen,font,”Playing clapping.wav ”,0,20,WHITE);
textout(screen,font,”Left,Right - Pan Left,Right”,0,50,WHITE);
textout(screen,font,”Up,Down - Pitch Raise,Lower”,0,60,WHITE);
textout(screen,font,”-,+ - Volume Down,Up”,0,70,WHITE);
//load the wave file
sample = load_sample(“clapping.wav”);
if (!sample)
{
allegro_message(“Error reading wave file”);
return;
}
//play the sample with looping
play_sample(sample, volume, pan, pitch, TRUE);
//main loop
while (!key[KEY_ESC])
{
//change the panning
if ((key[KEY_LEFT]) && (panning > 0))
panning—;
else if ((key[KEY_RIGHT]) && (panning < 255))
panning++;
The PlayWave Program 513