Java Extreme Programming Cookbook phần 5 pot
Bạn đang xem bản rút gọn của tài liệu. Xem và tải ngay bản đầy đủ của tài liệu tại đây (312.3 KB, 28 trang )
Example 5-2 demonstrates how you can test the content of the top table. In this example, the table is
located based on the text found within its first cell using the
WebResponse.getTableStartingWith( ) method.
Example 5-2. Simple table testing
public void testPersonTable( ) throws Exception {
WebConversation webConversation = new WebConversation(
);
WebResponse response = webConversation.getResponse(
"http://localhost:8080/news/sampleTable.html");
// get the HTML table with 'First Name' as the text of
its
// first non-blank cell
WebTable table = response.getTableStartingWith("First
Name");
assertEquals("column count", 2, table.getColumnCount(
));
assertEquals("row count", 3, table.getRowCount( ));
// get the cell at row 2, column 0
TableCell cell = table.getTableCell(2, 0);
assertEquals("cell text", "Tanner", cell.asText( ));
}
Once the WebTable object is located, the test uses various methods on the WebTable class to
obtain the number of rows and columns, as well as to locate a
TableCell at a particular position.
While this approach is fine for simple tables, it tends to be too fragile. People may redesign page
layout frequently, and this sort of test is sensitive to things like exact row and column positions. A
better approach, shown in Example 5-3
, is to assign identifiers to critical portions of your tables.
Example 5-3. Testing a table with identifiers
public void testAccountTable( ) throws Exception {
WebConversation webConversation = new WebConversation(
);
WebResponse response = webConversation.getResponse(
"http://localhost:8080/news/sampleTable.html");
WebTable accountTable =
response.getTableWithID("accountInfoTbl");
assertNotNull("account table", accountTable);
// get the checking account number
TableCell checkingCell =
accountTable.getTableCellWithID("checkingAcctNbr");
assertEquals("Checking account number",
"12345", checkingCell.asText( ));
}
Now, by locating identifiers, you can rearrange your table layout as you see fit. Unless you change the
identifiers, your tests continue functioning. Example 5-4
shows the HTML for the table being tested
here, so you can see what the
id tag looks like.
Example 5-4. HTML for table using identifiers
<table id="accountInfoTbl" border="1">
<tr id="headingRow">
<th>Account Type</th><th>Number</th><th>Balance</th>
</tr>
<tr>
<td>Checking</td>
<td id="checkingAcctNbr">12345</td>
<td id="checkingAcctBal">$5,436.00</td>
</tr>
<tr>
<td>Savings</td>
<td id="savingsAcctNbr">54321</td>
<td id="savingsAcctBal">$3,698.04</td>
</tr>
</table>
If you are concerned about the larger HTML pages required by the ID
attributes, consider writing a script to strip out all of the identifiers after your
tests have all passed.
5.7.4 See Also
Recipe 5.6 discusses testable HTML.
5.8 Testing a Form Tag and Refactoring Your Tests
5.8.1 Problem
You want to test for the existence of an HTML form.
5.8.2 Solution
Use the com.meterware.httpunit.WebForm class to test the form method and action.
5.8.3 Discussion
Adding HTML forms to a web application implies that the application is beginning to take on
dynamic behavior. As your application gets more complex, you should continually refactor your tests
in order to keep them as simple as possible. The solution outlined here shows how to test for an
HTML form, as well as showing a refactored test fixture. Example 5-5
opens with a test for a basic
HTML form.
Example 5-5. Refactored unit test
package com.oreilly.javaxp.httpunit;
import com.meterware.httpunit.*;
import junit.framework.TestCase;
public class TestNewsletter extends TestCase {
private WebConversation webConversation;
public TestNewsletter(String name) {
super(name);
}
public void setUp( ) throws Exception {
this.webConversation = new WebConversation( );
}
tests from earlier recipes are not shown here
public void testSubscriptionForm( ) throws Exception {
WebForm form = getBlankSubscriptionForm( );
assertEquals("subscription form action",
"subscription", form.getAction( ));
assertEquals("subscription form method",
"post", form.getMethod().toLowerCase( ));
}
private WebForm getBlankSubscriptionForm( ) throws
Exception {
WebResponse response = getBlankSubscriptionPage( );
return response.getFormWithID("subscriptionForm");
}
private WebResponse getBlankSubscriptionPage( ) throws
Exception {
return this.webConversation.getResponse(
"http://localhost:8080/news/subscription");
}
}
The HTML form we are testing will eventually allow the user to enter their name and email address to
subscribe or unsubscribe from a newsletter. For now, it is sufficient to test that the form exists. Once
the form is tested, you can move on to testing the content within the form as shown in the next recipe.
The test fixture shown in Example 5-5
is designed to make it easy to get to the WebForm object
using the
getBlankSubscriptionForm( ) method. As you write more and more tests, you
should look for repeated functionality and refactor it into helper methods as shown here. Since most of
the tests in this chapter require an instance of the
WebConversation class, its initialization has
been moved to the
setUp( ) method.
Example 5-6 shows a refactored version of the servlet that was originally presented in Recipe 5.5. As
you can see, the
println( ) statements have been removed. Instead, the servlet uses
RequestDispatcher to delegate page rendering to a JSP.
Example 5-6. Servlet that dispatches to a JSP
package com.oreilly.javaxp.httpunit;
import javax.servlet.*;
import javax.servlet.http.*;
import java.io.IOException;
public class NewsletterServlet extends HttpServlet {
protected void doGet(HttpServletRequest req,
HttpServletResponse res)
throws ServletException, IOException {
RequestDispatcher dispatcher =
req.getRequestDispatcher("subscription.jsp");
dispatcher.forward(req, res);
}
}
Using servlets in combination with JSPs is a much more realistic way to implement a complex web
application. From the perspective of HttpUnit, the server-side architecture rarely matters. HttpUnit is
simulating a web browser, so it does not need to know that the servlet is dispatching to a JSP.
Unit tests from earlier recipes tested NewsletterServlet when it was
written using println( ) statements. After refactoring the servlet to use
RequestDispatcher, the tests still pass. These tests provide
reassurance that the servlet implementation change did not break things that
used to work.
The final piece of the refactored web application is the JSP, shown in Example 5-7. Since the test only
checks to see if the form exists, the JSP is simple, only generating the form.
Example 5-7. subscription.jsp
<html>
<head>
<title>Newsletter Subscription</title>
</head>
<body>
<h1>Newsletter Subscription</h1>
<form method="post" action="subscription"
id="subscriptionForm">
</form>
</body>
</html>
Chapter Development
We wrote this chapter in roughly the same order as it is presented. The code, a web
application for subscribing and unsubscribing from a newsletter, evolved as the recipes
were written.
Writing a solid Ant buildfile that could easily compile and deploy the application to Tomcat
was a major hurdle that took nearly as much time as writing most of the code. But this time
was well worth the effort, because it made the test-first development of new features go
incredibly quickly.
The initial servlet, as shown in Recipe 5.5
, consisted of println( ) statements. Once
we got to the point where we wanted to test HTML forms, however, we decided to refactor
the servlet so it delegated page rendering tasks to a JSP.
While refactoring, we initially mistyped "subscription.jsp" as "subscription" in my
RequestDispatcher logic. The existing unit tests failed. Once we fixed this, my HTML form
test from Recipe 5.8
caught the fact that the JSP form action was set to "subscribe" instead
of "subscription". Without unit tests, we would have had to manually click on every
hyperlink in the web application in order to catch these errors. As your own apps grow, a
full suite of unit tests becomes increasingly valuable.
5.9 Testing for Elements on HTML Forms
5.9.1 Problem
You want to test for the existence of various elements in your HTML forms, such as buttons and
fields.
5.9.2 Solution
Use JUnit's WebForm class to parse the HTML form. WebForm provides numerous methods to
check that buttons, fields, radio buttons, and other elements exist on the page.
5.9.3 Discussion
Building on the example from the previous recipe, you might start by writing a test to check for the
existence of buttons on the HTML page as shown here.
public void testButtonsOnSubscriptionForm( ) throws Exception
{
WebForm form = getBlankSubscriptionForm( );
SubmitButton subscribeBtn =
form.getSubmitButton("subscribeBtn");
SubmitButton unsubscribeBtn =
form.getSubmitButton("unsubscribeBtn");
assertNotNull("subscribeBtn should not be null",
subscribeBtn);
assertNotNull("unsubscribeBtn should not be null",
unsubscribeBtn);
}
The getBlankSubscriptionForm( ) method is shown back in Example 5-5. When you
first write this test, it fails because the buttons do not exist yet. After observing the test failure, you
can update the JSP from Example 5-7
to include the two buttons.
<form method="post" action="subscription"
id="subscriptionForm">
<input type="submit" name="subscribeBtn"
value="Subscribe"/>
<input type="submit" name="unsubscribeBtn"
value="Unsubscribe"/>
</form>
Now, the testButtonsOnSubscriptionForm( ) test should pass. Next, you might want
to test for fields that allow the user to enter their name and email address. Here is that test code:
public void testFieldsOnSubscriptionForm( ) throws
Exception {
WebForm form = getBlankSubscriptionForm( );
// get the values of the two text fields
// HttpUnit treats most HTML form elements the same
way
String nameFieldValue =
form.getParameterValue("nameField");
String emailFieldValue =
form.getParameterValue("emailField");
// the empty fields should contain empty strings. If
they are
// null, this indicates they are not present on the
page.
assertEquals("nameField", "", nameFieldValue);
assertEquals("emailFieldValue", "", emailFieldValue);
}
The getParameterValue( ) method checks to see if the HTML form contains elements with
a given name. We are looking for input fields with certain names. You can also use the
getParameterValue( ) method to check for other HTML form elements, such as lists and
multiline text areas.
Example 5-8
shows the JSP, containing all of the form elements that our tests are checking for.
Example 5-8. JSP containing the HTML form
<html>
<head>
<title>Newsletter Subscription</title>
</head>
<body>
<h1>Newsletter Subscription</h1>
<form method="post" action="subscription"
id="subscriptionForm">
<table>
<tr>
<td>Name:</td>
<td><input type="text" name="nameField"></td>
</tr>
<tr>
<td>Email:</td>
<td><input type="text" name="emailField">
(required)</td>
</tr>
</table>
<input type="submit" name="subscribeBtn"
value="Subscribe"/>
<input type="submit" name="unsubscribeBtn"
value="Unsubscribe"/>
</form>
</body>
</html>
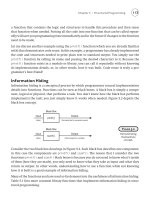
Figure 5-2 shows what the JSP looks like when rendered in Mozilla. This is a simple page layout, but
you can add fancy layout and graphics later. Again, having the unit tests in place allows you to make
page layout changes later without fear of accidentally breaking the web application functionality that
currently works.
Figure 5-2. Newsletter subscription page
It is important to note that the HttpUnit tests are not verifying every aspect of page layout. While they
do a good job of testing the page's functionality, you must still manually inspect the actual web
application to ensure the page layout is visually appealing and correct.
5.9.4 See Also
Recipe 5.8 shows how to check for the existence of a form.
5.10 Submitting Form Data
5.10.1 Problem
You want to write a test that submits your HTML forms and verifies the forms functionality.
5.10.2 Solution
Set parameters on the WebForm using its setParameter( ) method. Then simulate clicking a
button by asking for one of the form's buttons and submitting it using the
WebConversation
instance.
5.10.3 Discussion
You fill in form field values using the setParameter( ) method on a WebForm instance. This
simulates what the user would do if he was filling out a form in a web browser. You then ask the form
for a
WebRequest object, passing in the name of one of the submit buttons. All of this is shown in
Example 5-9
.
Example 5-9. Submitting a form
public void testSubmitSubscriptionWithoutRequiredField( )
throws Exception {
WebForm form = getBlankSubscriptionForm( );
form.setParameter("nameField", "Eric Burke");
WebRequest request = form.getRequest("subscribeBtn");
// Submit the page. The web app should return us right
back to
// the subscription page because the Email address is not
specified
WebResponse response =
this.webConversation.getResponse(request);
// make sure the user is warned about the missing field
String pageText = response.getText( );
assertTrue("Required fields warning is not present",
pageText.indexOf("Email address is required") > -
1);
// make sure the nameField has the original text
form = response.getFormWithID("subscriptionForm");
assertEquals("Name field should be pre-filled",
"Eric Burke",
form.getParameterValue("nameField"));
}
The comments in Example 5-9 explain what is expected at each step. The overall goal is to ensure that
the form treats the email address as a required field. If the field is missing, the form should be
redisplayed with an error message. When the form is redisplayed, the name field should be pre-filled
with the previously entered value.
Example 5-10
shows the updated servlet. As is typical in a web application, the validation logic is
contained within the servlet, rather than the JSP. Even better, you might want to refactor the validation
logic into a helper class rather than the servlet itself. This step would allow you to write standalone
tests against the validation logic without invoking the servlet. Once the request is fully validated, the
servlet dispatches to the JSP for rendering.
Example 5-10. Servlet with validation logic
public class NewsletterServlet extends HttpServlet {
protected void doGet(HttpServletRequest req,
HttpServletResponse res) throws ServletException,
IOException {
dispatchToSubscriptionPage(req, res);
}
protected void doPost(HttpServletRequest req,
HttpServletResponse res)
throws ServletException, IOException {
if (req.getParameter("subscribeBtn") != null) {
handleSubscribeButton(req, res);
} else if (req.getParameter("unsubscribeBtn") != null)
{
// @todo - handle this later, but only after
writing more tests
}
dispatchToSubscriptionPage(req, res);
}
private void dispatchToSubscriptionPage(HttpServletRequest
req,
HttpServletResponse res) throws ServletException,
IOException {
RequestDispatcher dispatcher =
req.getRequestDispatcher("subscription.jsp");
dispatcher.forward(req, res);
}
private void handleSubscribeButton(HttpServletRequest req,
HttpServletResponse res) throws ServletException,
IOException {
String name = req.getParameter("nameField");
String email = req.getParameter("emailField");
// email is required
if (email == null || email.trim().length( ) == 0) {
req.setAttribute("errorMessage",
"Email address is required");
dispatchToSubscriptionPage(req, res);
} else {
// @todo - subscribe the user!
}
}
}
The NewsletterServlet is nearly at its final form. A doPost( ) method was added to
handle the form submission, and the logic formerly found in
doGet( ) has been refactored into the
dispatchToSubscriptionPage( ) method. This refactoring avoids code duplication and
is easily tested with the existing suite of unit tests.
Pay particular attention to the
@todo comments. These indicate that portions of the code are not
complete. With the test-first approach taken in this chapter, these pieces of functionality should not be
written until the corresponding unit tests are written. You might also consider putting your
@todo
comments in your test cases, rather than in the code itself. This strategy provides stronger
encouragement to focus on test-driven development when those features are eventually added.
Avoid the urge to write all of the functionality at once. Instead, work on tiny
pieces of functionality with each new test. This process reduces the likelihood
that you will procrastinate and skip some of the tests.
Finally, Example 5-11 shows the revised JSP. The JSP now contains logic to display the error
message attribute, which is sometimes provided by the servlet. It also pre-fills the value of the name
field if necessary.
Example 5-11. Revised JSP with some dynamic display
<html>
<% String errorMsg = (String)
request.getAttribute("errorMessage");
String name = request.getParameter("nameField");
if (name == null) {
name = "";
}
%>
<head>
<title>Newsletter Subscription</title>
</head>
<body>
<h1>Newsletter Subscription</h1>
<% if (errorMsg != null) { %>
<font color="red"><%= errorMsg %></font>
<% } %>
<form method="post" action="subscription"
id="subscriptionForm">
<table>
<tr>
<td>Name:</td>
<td><input type="text" name="nameField"
value="<%= name %>"></td>
</tr>
<tr>
<td>Email:</td>
<td><input type="text" name="emailField">
(required)</td>
</tr>
</table>
<input type="submit" name="subscribeBtn"
value="Subscribe"/>
<input type="submit" name="unsubscribeBtn"
value="Unsubscribe"/>
</form>
</body>
</html>
At this point, the tests (including all of the old tests) should pass. It is also a good idea to try out the
web app inside of a web browser to see if you forgot to test anything. The test-first process can
continue until all of the functionality is implemented.
5.10.4 See Also
Recipe 5.8 and Recipe 5.9 show how to test other aspects of HTML forms.
5.11 Testing Through a Firewall
5.11.1 Problem
You want to test a remote web site, but your development machines are behind a firewall.
5.11.2 Solution
Set the proxySet, proxyHost, and proxyPort system properties.
5.11.3 Discussion
HttpUnit uses java.net.HttpURLConnection, which checks the proxySet system
property to determine if it should operate through a proxy server. If this property is set, the
proxyHost and proxyPort properties specify the server name and port.
You can set these properties in your unit test method using this code:
System.getProperties( ).put("proxySet", "true");
System.getProperties( ).put("proxyHost", "myProxyHostName");
System.getProperties( ).put("proxyPort", "10000");
5.11.4 See Also
Recipe 3.6 shows how to set system properties using Ant.
5.12 Testing Cookies
5.12.1 Problem
You want to create cookies and test for the existence of cookies.
5.12.2 Solution
Use WebConversation's addCookie( ) method to create new cookies, and its
getCookieValue( ) method to retrieve cookie values.
5.12.3 Discussion
Cookies are little pieces of information that web applications store on the client browser's machine.
Cookies allow web sites to maintain state information as you view different web pages. HttpUnit
creates cookies and retrieve cookies using methods on the
WebConversation class.
For the sake of an example, let's look at a simple JSP that uses cookies. Example 5-12
shows a JSP
that creates a new cookie and then displays the array of cookies from the client.
Example 5-12. A JSP that generates and displays cookies
<% generate a cookie %>
<%
Cookie cookie = new Cookie("customerId", "12345");
response.addCookie(cookie);
%>
<html>
<head><title>Cookie Demo</title></head>
<body>
<h1>Cookies in this request</h1>
<table>
<tr>
<th>Cookie Name</th>
<th>Value</th>
</tr>
<% print all of the cookies for this request %>
<% Cookie[] cookies = request.getCookies( );
int numCookies = (cookies != null) ? cookies.length : 0;
for (int i=0; i<numCookies; i++) { %>
<tr>
<td><%= cookies[i].getName( ) %></td>
<td><%= cookies[i].getValue( ) %></td>
</tr>
<% } %>
</table>
</body>
</html>
The unit test, shown in Example 5-13, works with the JSP shown in Example 5-12. The unit test
accomplishes two tasks. First, it shows how you can create new cookies from your own unit tests. In
this case, it creates a cookie named "shoppingCartId". Creating a new cookie mimics a real web
application in which the shopping cart cookie was created on a prior page.
Example 5-13. A unit test that uses cookies
public void testCookies( ) throws Exception {
this.webConversation.addCookie("shoppingCartId", "98765");
WebRequest req = new GetMethodWebRequest(
"http://localhost:8080/news/cookieDemo.jsp");
WebResponse cookieDemoPage =
this.webConversation.getResponse(req);
// the JSP should have created the customerId cookie
assertEquals("customer ID cookie", "12345",
this.webConversation.getCookieValue("customerId"));
// make sure the cookie we generated on the client was
found
// somewhere in the HTML page
String pageSource = cookieDemoPage.getText( );
assertTrue("shoppingCardId cookie was not found",
pageSource.indexOf("shoppingCartId") > -1);
}
The testCookies( ) method also verifies that the JSP was able to create a new cookie, named
"customerId". We use the
getCookieValue( ) method to retrieve the cookie. If the JSP failed
to create the cookie, its value will be null.
Finally, the unit test verifies that the JSP displays the cookie that was generated from the test. It does
this using a very primitive technique, but one that works. It converts the entire page into a string using
the
getText( ) method. The test then searches for "shoppingCartId" as a substring of the page's
text. If the text is found, it means the JSP was able to receive the cookie from the unit test. This is not
something you would normally test. Instead, it is used here to show that HttpUnit's cookie
functionality works.
5.12.4 See Also
See O'Reilly's Java Servlet Programming by Jason Hunter to learn more about cookies.
5.13 Testing Secure Pages
5.13.1 Problem
You want to test a page that requires a username and password for login.
5.13.2 Solution
Simulate HTTP BASIC authentication using WebConversation's setAuthorization(
)
method.
5.13.3 Discussion
If your web application is configured to use HTTP BASIC authentication, you can use HttpUnit to
simulate what happens when users enter a username and password in their browser. Our first unit test,
shown next, verifies that the web application prevents unauthorized users from entering a secured web
page.
public void testViewSubscribersWithoutLogin( ) throws
Exception {
try {
this.webConversation.getResponse(
"http://localhost:8080/news/viewSubscribers");
fail("viewSubscribers should require a login");
} catch (AuthorizationRequiredException expected) {
// ignored
}
}
If the web app prompts for a username and password, HttpUnit throws an
AuthorizationRequiredException. Since this is the expected behavior, we catch the
exception and ignore it. If the exception is not thrown, the test fails because the page is not secure.
The next test shows how to enter a username and password within a unit test. Behind the scenes, this
simulates what happens when the user types in this information in the browser's login dialog.
public void testViewSubscribersWithLogin( ) throws Exception
{
this.webConversation.setAuthorization("eric", "secret");
this.webConversation.getResponse(
"http://localhost:8080/news/viewSubscribers");
}
J2EE web applications support numerous types of authentication; this recipe shows how to use
HttpUnit along with HTTP BASIC authentication. If you are using form-based authentication, you
write your test just like you are testing any other HTML form.
5.13.4 See Also
See O'Reilly's Java Servlet Programming by Jason Hunter to learn more about servlet security.
Chapter 6. Mock Objects
Section 6.1. Introduction
Section 6.2. Event Listener Testing
Section 6.3. Mock Object Self-Validation
Section 6.4. Writing Testable JDBC Code
Section 6.5. Testing JDBC Code
Section 6.6. Generating Mock Objects with MockMaker
Section 6.7. Breaking Up Methods to Avoid Mock Objects
Section 6.8. Testing Server-Side Business Logic
6.1 Introduction
Writing tests for simple, standalone Java classes is easy. Just create an instance of your class and run
tests against its methods. But testing gets a whole lot more interesting for classes with complex
dependencies on other parts of your application. When testing becomes difficult, consider refactoring
your code in order to minimize dependencies. But there will always be cases where classes cannot be
tested in isolation.
Suppose that a class named
Automobile only runs in the context of a class named Engine. In
order to test all aspects of the
Automobile class, you find that you have to create many different
kinds of
Engines. Rather than create real Engine objects, which may require a lot of setup logic,
you can write a dummy
Engine implementation. This dummy implementation is known as a mock
object and it provides a simple way to set up fake testing data.
The mock
Engine can even include assertions to ensure that instances of Automobile use the
Engine correctly. For example, the Engine may verify that Automobile only calls the
Engine.startup( ) method one time. This ability to verify that objects use their environment
correctly is a key advantage of mock objects when compared to other testing techniques that only
check to see if classes react to method calls correctly.
A mock object is a "fake" implementation of a class or interface, almost always written for the specific
purpose of supporting unit tests. When writing JDBC unit tests, you might create mock
implementations of interfaces such as
Connection, ResultSet, and Statement. In the
case of Swing code, you might create a mock implementation of the
TableModelListener
interface. You create mock objects that always return well-known data and your unit tests use these to
exercise your application logic without relying on real objects or databases.
Mock objects should be simple, and should not have dependencies on other mock objects or too many
other parts of your application. If your mock objects require a lot of complex setup before they are
useful, you probably made them too complex and should look for ways to refactor your code.
Additionally, mock objects can provide a self-validation mechanism whereby you can set up an
expected set of conditions. As soon as an expectation is violated, the mock object fails the current test.
Self-validation helps you locate problems as soon as they occur. If you reuse the same mock object in
many different tests, this ability to perform some types of self-validation ensures that you do not have
to duplicate the same validation logic in all of your tests.
The recipes in this chapter show a few different ways to implement and use the concept of mock
objects. In the simplest form, a mock object is a dummy implementation of a Java interface. You
implement specific methods that only return data pertinent to your unit tests. We also show how to use
Mock Objects, an open source project containing mock implementations of many well-known Java
interfaces and abstract classes. Finally, we introduce MockMaker, another open source tool for
automatically generating new mock objects.
What Is a Mock Object?
There are two widely accepted interpretations of the term mock object:
• The generic definition states that a mock object is any dummy object that stands in
for a real object that is not available, or is difficult to use in a test case.
• A more rigid interpretation states that a mock object must have the ability to set up
expectations and provide a self-validation mechanism.
Recipe 6.3 shows an example of a mock object that supports expectations and self-
validation. This is also the approach taken by tools like MockMaker when they generate
mock objects for you. We believe that this is a useful approach because it provides a
standard, well-understood way to support these features.
On the other hand, if your tests do not require sophisticated mock objects, there is nothing
wrong with the first definition listed above. In our opinion, you should write mock objects
to support your tests, only adding features that you currently need.
6.2 Event Listener Testing
6.2.1 Problem
You want to create a mock implementation of an event listener interface.
6.2.2 Solution
Write a class that implements the interface, but only define behavior for the methods you need for
your current test.
6.2.3 Discussion
Java Swing user interfaces rely heavily on models and views. In the case of tables, for instance, the
TableModel interface is the model and JTable is one possible view. The table model
communicates with its view(s) by sending
TableModelEvents whenever its data changes. Since
numerous views may observe a single model, it is imperative that the model only sends the minimum
number of events. Poorly written models commonly send too many events, often causing severe
performance problems.
Let's look at how we can use mock objects to test the events fired by a custom table model. Our table
model displays a collection of
Account objects. A mock table model listener verifies that the
correct event is delivered whenever a new account is added to the model. We'll start with the
Account class, as shown in Example 6-1.
Example 6-1. The Account class
package com.oreilly.mock;
public class Account {
public static final int CHECKING = 0;
public static final int SAVINGS = 1;
private int acctType;
private String acctNumber;
private double balance;
public Account(int acctType, String acctNumber, double
balance) {
this.acctType = acctType;
this.acctNumber = acctNumber;
this.balance = balance;
}
public int getAccountType( ) {
return this.acctType;
}
public String getAccountNumber( ) {
return this.acctNumber;
}
public double getBalance( ) {
return this.balance;
}
}
Our table model consists of three columns of data, for the account type, number, and balance. Each
row in the table represents a different account. With this knowledge, we can write a basic table model
as shown next in Example 6-2
.
Example 6-2. Account table model
package com.oreilly.mock;
import javax.swing.table.AbstractTableModel;
import java.util.ArrayList;
import java.util.List;
public class AccountTableModel extends AbstractTableModel {
public static final int ACCT_TYPE_COL = 0;
public static final int ACCT_BALANCE_COL = 1;
public static final int ACCT_NUMBER_COL = 2;
private List accounts = new ArrayList( );
public int getRowCount( ) {
return this.accounts.size( );
}
public int getColumnCount( ) {
return 3;
}
public Object getValueAt(int rowIndex, int columnIndex) {
Account acct = (Account) this.accounts.get(rowIndex);
switch (columnIndex) {
case ACCT_BALANCE_COL:
return new Double(acct.getBalance( ));
case ACCT_NUMBER_COL:
return acct.getAccountNumber( );
case ACCT_TYPE_COL:
return new Integer(acct.getAccountType( ));
}
throw new IllegalArgumentException("Illegal column: "
+ columnIndex);
}
public void addAccount(Account acct) {
// @todo - implement this!
}
}
Tests for the getRowCount( ), getColumnCount( ), and getValueAt( ) methods
are not shown here. To test these methods, you can create an instance of the table model and call the
methods, checking for the expected values. The
addAccount( ) method, however, is more
interesting because it requires a mock object.
The mock object is necessary because we want to verify that calling
addAccount( ) fires a
single
TableModelEvent. The mock object implements the TableModelListener
interface and keeps track of the events it receives. Example 6-3
shows such a mock object. This is a
primitive mock object because it does not provide a way to set up expectations, nor does it provide a
verify( ) method. We will see how to incorporate these concepts in coming recipes.
Example 6-3. Mock table model listener
package com.oreilly.mock;
import javax.swing.event.TableModelEvent;
import javax.swing.event.TableModelListener;
import java.util.ArrayList;
import java.util.List;
public class MockTableModelListener implements
TableModelListener {
private List events = new ArrayList( );
public void tableChanged(TableModelEvent e) {
this.events.add(e);
}
public int getEventCount( ) {
return this.events.size( );
}
public List getEvents( ) {
return this.events;
}
}
The mock object implements TableModelListener and keeps a list of all events received. The
unit test creates an instance of the mock object, adds it as a listener to the custom table model, and
calls the
addAccount( ) method. Afterwards, it asks the mock object for the event list and
verifies that the correct event was delivered. The unit test is shown in Example 6-4
.
Example 6-4. Account table model test case
package com.oreilly.mock;
import junit.framework.TestCase;
import javax.swing.event.TableModelEvent;
public class UnitTestAccount extends TestCase {
private AccountTableModel acctTableModel;
private Account[] accounts = new Account[]{
new Account(Account.CHECKING, "001", 0.0),
new Account(Account.CHECKING, "002", 1.1),
new Account(Account.SAVINGS, "003", 2.2)
};
protected void setUp( ) throws Exception {
this.acctTableModel = new AccountTableModel( );
for (int i = 0; i < this.accounts.length; i++) {
this.acctTableModel.addAccount(this.accounts[i]);
}
}
public void testAddAccountFiresCorrectEvent( ) {
// create the mock listener
MockTableModelListener mockListener =
new MockTableModelListener( );
// add the listener to the table model
this.acctTableModel.addTableModelListener(mockListener);
// call a method that is supposed to fire a
TableModelEvent
this.acctTableModel.addAccount(new Account(
Account.CHECKING, "12345", 100.50));
// verify that the correct event was fired
assertEquals("Event count", 1,
mockListener.getEventCount( ));
TableModelEvent evt = (TableModelEvent)
mockListener.getEvents( ).get(0);
assertEquals("Event type",
TableModelEvent.INSERT, evt.getType( ));
assertEquals("Column",
TableModelEvent.ALL_COLUMNS, evt.getColumn(
));
assertEquals("First row",
this.acctTableModel.getRowCount( )-1,
evt.getFirstRow( ));
assertEquals("Last row",
this.acctTableModel.getRowCount( )-1,
evt.getLastRow( ));
}
}
With the test in hand (and failing), we can implement the addAccount( ) method as shown here:
public void addAccount(Account acct) {
int row = this.accounts.size( );
this.accounts.add(acct);
fireTableRowsInserted(row, row);
}
The method takes advantage of the fact that our table model extends from
AbstractTableModel, which provides the fireTableRowsInserted( ) method.
The unit test verifies that
addAccount( ) calls this method rather than something like
fireTableDataChanged( ) or fireTableStructureChanged( ), both common
mistakes when creating custom table models. After writing the method, the test passes.
You can follow this technique as you add more functionality to the custom table model. You might
add methods to remove accounts, modify accounts, and move rows around. Each of these operations
should fire a specific, fine-grained table model event, which subsequent tests confirm using the mock
table model listener.
6.2.4 See Also
The next recipe shows how to simplify the tests by using a mock object that encapsulates the
validation logic.
6.3 Mock Object Self-Validation
6.3.1 Problem
You want to avoid duplicated validation logic in your tests.
6.3.2 Solution
Put the validation logic inside of the mock object. This way, every test that uses the mock object will
reuse the validation logic automatically.
6.3.3 Discussion
The code in the previous recipe showed how to create a mock table model listener that kept track of a
list of events. As you write more tests using this mock object, you will find that your tests have to
repeatedly check the number of events as well as every field within the event objects. Rather than
repeating this logic in each of your tests, move some of the validation logic into the mock object.
Example 6-5
shows how this step simplifies your tests.
Example 6-5. Improved unit test
public void testAddAccountEvent( ) {
MockTableModelListener mockListener = new
MockTableModelListener( );
mockListener.setExpectedEventCount(1);
TableModelEvent evt = new TableModelEvent(
this.acctTableModel,
this.accounts.length,
this.accounts.length,
TableModelEvent.ALL_COLUMNS,
TableModelEvent.INSERT);
mockListener.addExpectedEvent(evt);
this.acctTableModel.addTableModelListener(mockListener);
this.acctTableModel.addAccount(new Account(
Account.CHECKING, "12345", 100.50));
mockListener.verify( );
}
The modified unit test begins by setting the expected event count on the improved mock object. The
mock object will fail the test as soon as it receives too many events. This is useful because it lets you
see test failures as soon as the extra events are delivered, making diagnosis easier.
The test also registers a specific expected event. Once the account is added to the table model, the test
calls
verify( ), which tests against the expected event. Example 6-6 shows the new, improved
mock object.
Example 6-6. Self-validating mock listener
package com.oreilly.mock;
import junit.framework.Assert;
import javax.swing.event.TableModelEvent;
import javax.swing.event.TableModelListener;
import javax.swing.table.TableModel;
import java.util.ArrayList;
import java.util.List;
public class MockTableModelListener implements
TableModelListener {
private static final int NONE_EXPECTED = -1;
private List events = new ArrayList( );
private List expectedEvents = null;
private int expectedEventCount = NONE_EXPECTED;
public void addExpectedEvent(TableModelEvent e) {
if (this.expectedEvents == null) {
this.expectedEvents = new ArrayList( );
}
this.expectedEvents.add(new
ComparableTableModelEvent(e));
}
public void setExpectedEventCount(int n) {
this.expectedEventCount = n;
}
public void tableChanged(TableModelEvent e) {
this.events.add(e);
if (this.expectedEventCount > NONE_EXPECTED
&& this.events.size( ) >
this.expectedEventCount) {
Assert.fail("Exceeded the expected event count: "
+ this.expectedEventCount);
}
}
public int getEventCount( ) {
return this.events.size( );
}
public List getEvents( ) {
return this.events;
}
public void verify( ) {
if (this.expectedEventCount > NONE_EXPECTED) {
Assert.assertEquals("Expected event count",
this.expectedEventCount,
this.events.size( ));
}
if (this.expectedEvents != null) {
Assert.assertEquals("Expected events",
this.expectedEvents,
this.events);
}
}
class ComparableTableModelEvent extends TableModelEvent {
public ComparableTableModelEvent(TableModelEvent orig)
{
super((TableModel) orig.getSource(),
orig.getFirstRow( ),
orig.getLastRow(), orig.getColumn(),
orig.getType( ));
}
public boolean equals(Object obj) {
TableModelEvent tm = (TableModelEvent) obj;
return getSource() == tm.getSource( )
&& getFirstRow() == tm.getFirstRow( )
&& getLastRow() == tm.getLastRow( )
&& getColumn() == tm.getColumn( )
&& getType() == tm.getType( );
}
}
}
As you can see, the mock object is significantly more complex in this approach. Only write
sophisticated mock objects when you find yourself using them in a lot of different tests. As is
customary in an XP approach, start simple and then refactor the tests and mock objects as you observe
duplicated code.
Our mock object illustrates an interesting point about JUnit. The methods in the
junit.framework.Assert class are static, so we can call them from our mock object, which
is not itself a unit test:
Assert.fail("Exceeded the expected event count: "
+ this.expectedEventCount);
6.3.4 See Also
Recipe 6.7 shows how to autogenerate complex mock objects using MockMaker.
6.4 Writing Testable JDBC Code
6.4.1 Problem
You want to design your JDBC code so it is testable.
6.4.2 Solution
Modularize your code so that the JDBC connection is created independently of your database logic.
This allows you to test your logic using a mock connection, statement, and result set.
This solution illustrates a generally useful pattern. When you create an object,
give it references to the objects it needs to talk to, rather than having it go
somewhere and get them. This step gives you the ability to reuse the object in
other applications or test it in isolation. The idea is not specific to JDBC.
6.4.3 Discussion
A good unit test exercises a small piece of functionality in isolation from the remainder of the system.
You may want to test your JDBC logic without actually creating a real database. Testing without a
database is advantageous for numerous reasons:
• The tests run faster.
• You don't have to keep a testing database in sync with your unit tests.
• You can test all sorts of error conditions without going to the trouble of creating invalid data
in your database.
Testing against a real database is very important, but can be done separately from your other tests.
You may end up with 25 tests that actually use a real database and another 50 tests that simulate the
database using mock objects. Effective testing requires a variety of approaches (and plenty of
creativity) to ensure adequate coverage and good test performance.
Let's start with a class called
AccountFactory containing a method that retrieves an Account
object from a database. You might write something like this:
public Account getAccount(String acctNumber) throws
DataSourceException {