jQuery UI 1.6 The User Interface Library for jQuery phần 5 pdf
Bạn đang xem bản rút gọn của tài liệu. Xem và tải ngay bản đầy đủ của tài liệu tại đây (704.77 KB, 43 trang )
Chapter 6
[ 157 ]
To highlight how useful these callback properties are, we can extend the previous
internationalization examples to allow visitors to choose any available language of
the date picker. In a new page in your text editor, add the following code:
<!DOCTYPE HTML PUBLIC "-//W3C//DTD HTML 4.01//EN" " />TR/html4/strict.dtd">
<html lang="en">
<head>
<link rel="stylesheet" type="text/css" href="jquery.ui-1.5b4/
themes/flora/flora.datepicker.css">
<link rel="stylesheet" type="text/css" href="styles/
intlPicker.css">
<meta http-equiv="Content-Type" content="text/html;
charset=utf-8">
<title>jQuery UI Date Picker Example 8</title>
</head>
<body>
<a id="uk" href="#" title="English"></a><a id="france" href="#"
title="Français"></a>
<div class="row"><label>Enter a date: </label><input id="date">
</div>
<script type="text/javascript" src="jqueryui1.6rc2/
jquery-1.2.6.js"></script>
<script type="text/javascript" src="jqueryui1.6rc2/ui/
ui.core.js"></script>
<script type="text/javascript" src="jqueryui1.6rc2/ui/
ui.datepicker.js"></script>
<script type="text/javascript" src="jqueryui1.6rc2/ui/i18n/
ui.datepicker-fr.js"></script>
<script type="text/javascript">
//define function to be executed on document ready
$(function(){
//flag variable
var locale = "en";
$("a").click(function() {
(this.id != "france") ? locale = "en" : locale = "fr";
});
function setLocale() {
return (locale == "fr") ? $.datepicker.regional['fr'] :
$.datepicker.regional[''];
}
//create the date picker
$("#date").datepicker({ beforeShow:setLocale });
});
</script>
</body>
</html>
Date Picker
[ 158 ]
This can be saved as datePicker8.html. We have wrapped the <label> and
<input> elements from the previous examples for styling purposes. We also added
two new link elements which will be used as buttons to select the language of the
date picker. We've also linked to the French language pack as we did before.
The rst thing we do in the code in this example is set the locale variable that will
be used to tell the date picker which language it should display. We set it to en as the
default value.
Next, we set a click handler which will react to either of the buttons being clicked.
The anonymous function looks at the id attribute of the anchor that was clicked and
updates the value of the locale variable accordingly.
Following the click handler, we set a callback function called setLocale, which is
used to return new settings for the date picker. When the date picker is initialized,
the $.datepicker manager object is created with various properties to control how
the date picker functions. We can use this manager object to update the locale of the
date picker, which is exactly what we do in this example.
We've congured the beforeShow property of the date picker within the constructor
function and specied our callback function as its value. The beforeShow event is
red just before the date picker is shown. When this happens, our callback function
checks the value of the locale variable and shows the appropriate language by
setting the regional property of the manager object. Note that only languages that
have their language pack included in the page will work.
We also use a custom stylesheet for this example. It's relatively simple, consisting of
the following selectors and rules:
#uk {
background:url( /img/Uk.png) no-repeat;
width:32px; height:32px; display:block; float:left;
margin-right:5px;
}
#france {
background:url( /img/France.png) no-repeat;
width:32px; height:32px; display:block; float:left;
}
.row { clear:both; }
Chapter 6
[ 159 ]
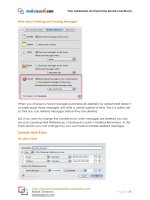
Save this in the styles folder as intlPicker.css. When you run this page in your
browser, you should be able to set the locale, to either French or English, by clicking
the corresponding ag. Here's how the page should look:
Trigger buttons
By default, the date picker is opened when the <input> element it is associated with
receives focus. However, we can change this very easily so the date picker opens
when a <button> is clicked instead. The most basic type of <button> can be enabled
with just the showOn property, which we can use with the next example:
<!DOCTYPE HTML PUBLIC "-//W3C//DTD HTML 4.01//EN" " />TR/html4/strict.dtd">
<html lang="en">
<head>
<link rel="stylesheet" type="text/css" href="jqueryui1.6rc2/
themes/flora/flora.datepicker.css">
<meta http-equiv="Content-Type" content="text/html;
charset=utf-8">
<title>jQuery UI Date Picker Example 9</title>
</head>
<body>
<label>Enter a date: </label><input id="date">
<script type="text/javascript" src="jqueryui1.6rc2/
jquery-1.2.6.js"></script>
<script type="text/javascript" src="jqueryui1.6rc2/ui/
ui.core.js"></script>
Date Picker
[ 160 ]
<script type="text/javascript" src="jqueryui1.6rc2/ui/
ui.datepicker.js"></script>
<script type="text/javascript">
//define function to be executed on document ready
$(function(){
//create config object
var pickerOpts = {
showOn: "button"
};
//create the date picker
$("#date").datepicker(pickerOpts);
});
</script>
</body>
</html>
Save this as datePicker9.html. Setting the showOn property to true in our
conguration object will automatically add a simple <button> element directly
after the associated <input> element. The date picker will now only open when the
<button> is clicked, rather than when the <input> is focused. The new <button> is
shown in the following screenshot:
The text shown on the <button> (… in this example) can easily be changed by
providing a new string as the value of the buttonText property. We can just
as easily add an image to the <button> as well. Using either the buttonImage
or buttonImageOnly properties, an image will be used instead of a traditional
<button>. Change the conguration object so that it appears as follows:
var pickerOpts = {
showOn: "button",
buttonImage: 'img/date-picker/cal.png',date-picker/cal.png',cal.png',
buttonImageOnly: true
};
Chapter 6
[ 161 ]
Save this as datePicker10.html. This should give you a nice image-only button.
The buttonImage property allows us to specify the relative path of the image to use,
and the buttonImageOnly property ensures that only the image is shown, not the
image on top of the <button>. This is illustrated in the following screenshot:
You should note that when an image is used instead of a <button>, the value of the
buttonText property is used as the title and alt attributes of the image.
The calendar icon used in this example was taken, with thanks,
from the Silk Icon Pack by Mark James and is available at
.
Multiple months
The date picker need not only display a single month. Instead, it can be congured
to show multiple months. It takes just two properties to implement multiple months,
although I prefer to use four properties. Create the following new page:
<!DOCTYPE HTML PUBLIC "-//W3C//DTD HTML 4.01//EN" " />TR/html4/strict.dtd">
<html lang="en">
<head>
<link rel="stylesheet" type="text/css" href="jqueryui1.6rc2/
themes/flora/flora.datepicker.css">
<meta http-equiv="Content-Type" content="text/html;
charset=utf-8">
<title>jQuery UI Date Picker Example 11</title>
</head>
<body>
<label>Enter a date: </label><input id="date">
<script type="text/javascript" src="jqueryui1.6rc2/
jquery-1.2.6.js"></script>
<script type="text/javascript" src="jqueryui1.6rc2/ui/
ui.core.js"></script>
<script type="text/javascript" src="jqueryui1.6rc2/ui/
ui.datepicker.js"></script>
Date Picker
[ 162 ]
<script type="text/javascript">
//define function to be executed on document ready
$(function(){
//create config object
var pickerOpts = {
numberOfMonths: 2,
stepMonths: 2,
changeMonth: false,
changeYear: false
};
//create the date picker
$("#date").datepicker(pickerOpts);
});
</script>
</body>
</html>
Save this as datePicker11.html. The numberOfMonths property takes an
integer representing, of all things, the number of months you would like displayed
at once. The stepMonths property controls how many months are changed
when the Prev or Next links are used. This should be set to the same value as the
numberOfMonths property.
By default, the changeMonth and changeYear drop-downs will be shown above
the rst month. Personally, I think the date picker looks better without these when
using multiple months. So, we've removed them by setting the changeMonth and
changeYear properties to false.
The date picker in this conguration will appear like this:
Chapter 6
[ 163 ]
Enabling range selection
In some situations, you may want your visitors to be able to select a range of
dates instead of a single date. Like everything else, the date picker widget makes
conguring selectable ranges easy as we only need to work with two conguration
properties. In a new le, add the following code:
<!DOCTYPE HTML PUBLIC "-//W3C//DTD HTML 4.01//EN" " />TR/html4/strict.dtd">
<html lang="en">
<head>
<link rel="stylesheet" type="text/css" href="jqueryui1.6rc2/
themes/flora/flora.datepicker.css">
<meta http-equiv="Content-Type" content="text/html;
charset=utf-8">
<title>jQuery UI Date Picker Example 12</title>
<style type="text/css">
input { width:180px; }
</style>
</head>
<body>
<label>Enter a date: </label><input id="date">
<script type="text/javascript" src="jqueryui1.6rc2/
jquery-1.2.6.js"></script>
<script type="text/javascript" src="jqueryui1.6rc2/ui/
ui.core.js"></script>
<script type="text/javascript" src="jqueryui1.6rc2/ui/
ui.datepicker.js"></script>
<script type="text/javascript">
//define function to be executed on document ready
$(function(){
//create config object
var pickerOpts = {
rangeSelect: true,
rangeSeparator: " to "
};
//create the date picker
$("#date").datepicker(pickerOpts);
});
</script>
</body>
</html>
Date Picker
[ 164 ]
Save this as datePicker12.html. Enabling selectable ranges of dates, instead of
single days, simply requires setting the rangeSelect property to true. Optionally,
we can also change the text that is used as the separator between the two dates once
they have been added to the <input> eld. The default is a – character, but we have
substituted this for the string to (with a space on either side).
We've also had to increase the width of the <input> element slightly so that it is
wide enough to show all of the selected range. This has been done using a simple
style rule added to the <head> of the page, which is purely for the purposes of this
example. All style rules should normally go into their own stylesheet.
Once a date has been selected, the <input> element should appear as in the
following screenshot:
The behavior of the widget changes slightly when range selection is enabled. Now,
after a date is selected, the widget doesn't close instantly, it stays open and all dates
prior to the selected date become unselectable.
The date picker closes once a second date has been selected and both the starting
and ending dates are added to the <input> eld along with the separator. If the
date picker is opened a second time, the range that was selected is highlighted.
Configuring alternative animations
The date picker API exposes two properties related to animations. These are the
showAnim and showOptions properties. By default, the date picker uses the show
effect to display the widget. This shows the date picker smoothly increasing in size
and opacity.
However, we can change this, so that it uses any of the other effects included with
the library (see chapter 12), which we'll do in the next example. In a new page in
your text editor, add the following code:
<!DOCTYPE HTML PUBLIC "-//W3C//DTD HTML 4.01//EN" " />TR/html4/strict.dtd">
<html lang="en">
Chapter 6
[ 165 ]
<head>
<link rel="stylesheet" type="text/css" href="jqueryui1.6rc2/
themes/flora/flora.datepicker.css">
<meta http-equiv="Content-Type" content="text/html;
charset=utf-8">
<title>jQuery UI Date Picker Example 13</title>
</head>
<body>
<div class="row"><label>Enter a date: </label><input id="date">
</div>
<script type="text/javascript" src="jqueryui1.6rc2/
jquery-1.2.6.js"></script>
<script type="text/javascript" src="jqueryui1.6rc2/ui/
ui.core.js"></script>
<script type="text/javascript" src="jqueryui1.6rc2/ui/
ui.datepicker.js"></script>
<script type="text/javascript" src="jqueryui1.6rc2/ui/
effects.core.js"></script>
<script type="text/javascript" src="jqueryui1.6rc2/ui/
effects.drop.js"></script>
<script type="text/javascript">
//define function to be executed on document ready
$(function(){
//define config object
var pickerOpts = {
showAnim: "drop",
showOptions: { direction: "up" }
};
//create the date picker
$("#date").datepicker(pickerOpts);
});
</script>
</body>
</html>
Save this as datepicker13.html. To use alternative effects, we need to use two new
<script> resources. These are the effects.core.js and the source le of the effect
we wish to use in this example, effects.drop.js. We'll look at both of these effects
in more detail in the last chapter, but they are essential for this example to work.
Our simple conguration object congures the animation to drop using the showAnim
property, and sets the direction property of the effect using showOptions. When
you run this example now, the date picker should slide down into position instead of
opening. Other effects can be implemented in the same way.
Date Picker
[ 166 ]
Date picking methods
Apart from the enormous number of properties at our disposal, there are also a
number of useful methods dened that make programmatically working with the
date picker a breeze. The date picker class denes the following methods:
Method Usage
change
Use a conguration object to change a pre-existing (attached) date picker
destroy
Disconnect and remove an attached date picker
dialog
Open the date picker in a dialog widget
disable
Disable an <input> eld (and therefore the attached date picker)
enable
Enable a disabled <input> eld (and date picker)
getDate
Get the currently selected date
hide
Programmatically close a date picker
isDisabled
Determine whether a date picker is disabled
setDate
Programmatically select a date
show
Programmatically show a date picker
The change method produces a similar result to the beforeShow property that we
looked at earlier. However, the method is called in a different way of course. We can
rework the internationalized date picker example we looked at to make use of the
change method instead of the beforeShow property. In a new le in your text editing
tool, create the following page:
<!DOCTYPE HTML PUBLIC "-//W3C//DTD HTML 4.01//EN" " />TR/html4/strict.dtd">
<html lang="en">
<head>
<link rel="stylesheet" type="text/css" href="jqueryui1.6rc2/
themes/flora/flora.datepicker.css">
<link rel="stylesheet" type="text/css" href="styles/
intlPicker.css">
<meta http-equiv="Content-Type" content="text/html;
charset=utf-8">
<title>jQuery UI Date Picker Example 14</title>
</head>
<body>
<a id="uk" href="#" title="English"></a><a id="france" href="#"
title="Français"></a>
<div class="row"><label>Enter a date: </label><input id="date">
</div>
Chapter 6
[ 167 ]
<script type="text/javascript" src="jqueryui1.6rc2/
jquery-1.2.6.js"></script>
<script type="text/javascript" src="jqueryui1.6rc2/ui/
ui.core.js"></script>
<script type="text/javascript" src="jqueryui1.6rc2/ui/
ui.datepicker.js"></script>
<script type="text/javascript" src="jqueryui1.6rc2/ui/i18n/
ui.datepicker-fr.js"></script>
<script type="text/javascript">
//define function to be executed on document ready
$(function(){
//create default english date picker
$("#date").datepicker($.datepicker.regional['']);
//define click handler for uk flag
$("#uk").click(function() {
//change date picker using default language as config object
$("#date").datepicker("change", $.datepicker.regional['']);
});
//define click handler for french flag
$("#france").click(function() {
//change date picker using french config object
$("#date").datepicker("change", $.datepicker.regional['fr']);
});
});
</script>
</body>
</html>
Save this as datePicker14.html. This le differs from example 8 in that each of
the ag buttons have their own click handler. Within each click handler we use the
change method to set the regional property of the manager object.
To make the date picker English by default, we set the regional property of the
manager object within the constructor method. We could also make it French by
default by simply not setting the regional property and letting the widget pick
up the language pack automatically.
As you can see, using the change method is extremely easy. Whenever one of the
ag icons is clicked, the change method is called and the appropriate method is
passed into the constructor method as an argument.
It works exactly as intended, although once the date picker has been opened the rst
time, clicking an icon will instantly open the date picker. Perhaps we could do with a
suppressDisplay property to prevent this happening!
Date Picker
[ 168 ]
Putting the date picker in a dialog
The dialog method produces the same highly usable and effective date picker
widget, but displays it in a oating dialog box. The method is easy to use, but makes
some aspects of using the widget non-autonomous, as we shall see. In a new le in
your editor, add the following page:
<!DOCTYPE HTML PUBLIC "-//W3C//DTD HTML 4.01//EN" " />TR/html4/strict.dtd">
<html lang="en">
<head>
<link rel="stylesheet" type="text/css" href="jqueryui1.6rc2/
themes/flora/flora.datepicker.css">
<link rel="stylesheet" type="text/css" href="styles/
dialogDatePicker.css">
<meta http-equiv="Content-Type" content="text/html;
charset=utf-8">
<title>jQuery UI Date Picker Example 15</title>
</head>
<body>
<div id="row"><label>Enter a date: </label><input id="date">
<a id="invoke" title="Click to open Date Picker Dialog" href="#">
</a></div>
<script type="text/javascript" src="jqueryui1.6rc2/
jquery-1.2.6.js"></script>
<script type="text/javascript" src="jqueryui1.6rc2/ui/
ui.core.js"></script>
<script type="text/javascript" src="jqueryui1.6rc2/ui/
ui.datepicker.js"></script>
<script type="text/javascript">
//define function to be executed on document ready
$(function(){
//define click handler for date picker link
$("#invoke").click(function() {
//create the date picker in a dialog
$("#date").datepicker("dialog", "", updateDate);
//write chosen date to input
function updateDate(date) {
$("#date").val(date);
}
});
});
</script>
</body>
</html>
Chapter 6
[ 169 ]
Save this as datePicker15.html. We still use the datePicker constructor method,
but this time it is wrapped in a click-handler for the link we are using as the trigger
button. The dialog method takes two arguments. The rst argument can accept a
string which is used to set the initial date of the date picker. In this example, we've
supplied an empty string so the date picker defaults to the current date. The second
argument is a callback function to execute when a date is selected.
This function automatically receives the selected date as an argument so it is easy
to update the value of the input eld using the callback. Updating the text eld is
something that we need to do manually following the use of the dialog method.
The reason we need to wrap the constructor method in the click handler, and use a
button to open the date picker, is that if we don't do this, the dialog will automatically
be displayed when the page loads and not when the <input> is focused.
A basic stylesheet is used to position the button, which is as follows:
#row { width:249px; }
#invoke {
background:url( /img/date-picker/cal.png) no-repeat;
width:16px; height:16px;
display:block; float:right;
margin-top:-18px;
}
This can be saved as dialogDatePicker.css in the styles folder.
Now when the date picker is opened, it will appear at the center of the page, oating
above any existing content. The date picker has some additional styling, but essentially
functions in the same way as before. The following screenshot shows how it appears:
Date Picker
[ 170 ]
The destroy method is used in the same way here as it is with the other widgets we
have looked at, and the enable, disable, isDisabled, show, and hide methods
are all intuitive and easy to use. Let's just quickly take a look at a generalized
example that covers all of them. Create a new le in your text editor and add to it
the following code:
<!DOCTYPE HTML PUBLIC "-//W3C//DTD HTML 4.01//EN" " />TR/html4/strict.dtd">
<html lang="en">
<head>
<link rel="stylesheet" type="text/css" href="jqueryui1.6rc2/
themes/flora/flora.datepicker.css">
<link rel="stylesheet" type="text/css" href="styles/
dialogDatePicker.css">
<meta http-equiv="Content-Type" content="text/html;
charset=utf-8">
<title>jQuery UI Date Picker Example 16</title>
</head>
<body>
<h2>Would you like to select a date using the date picker?</h2>
<label for="yes">Yes</label><input type="radio" name="pickerGroup"
id="yes"><label for="notNow">Not now</label><input type="radio"
name="pickerGroup" id="notNow"><label for="notEver">Not ever
</label><input type="radio" name="pickerGroup" id="notEver"><br>
<label>Enter a date: </label><input id="date">
<script type="text/javascript" src="jqueryui1.6rc2/
jquery-1.2.6.js"></script>
<script type="text/javascript" src="jqueryui1.6rc2/ui/
ui.core.js"></script>
<script type="text/javascript" src="jqueryui1.6rc2/ui/
ui.datepicker.js"></script>
<script type="text/javascript">
//define function to be executed on document ready
$(function(){
//define config object
var pickerOpts = {
onSelect: handleSelect,
beforeShow: handleShow
};
//create basic date picker
$("#date").datepicker(pickerOpts);
//add click handler for yes radio
$("#yes").click(function(){
Chapter 6
[ 171 ]
//enable date picker and input if they are currently
disabled
($("#date").datepicker("isDisabled") == true) ? $("#date")
.datepicker("enable") : null;
});
//add click handler for not now radio
$("#notNow").click(function(){
//disable date picker and input if they are not currently
disabled
($("#date").datepicker("isDisabled") == false) ? $("#date")
.datepicker("disable") : null;
});
//add click handler for not ever radio
$("#notEver").click(function() {
//destroy date picker
$("#date").datepicker("destroy");
(!$("#date").attr("disabled")) ? null : $("#date")
.removeAttr("disabled") ;
//add prompt text after input
$("<p>").text("You will need to enter a date manually")
.insertAfter("#date");
});
//define handleSelect function
function handleSelect(date) {
//add prompt text after input
$("<p>").text("You chose " + date + " is this correct?")
.attr("id", "prompt").insertAfter("#date");
//add buttons
$("<button>").text("Yes").attr("id", "btnYes")
.insertAfter("#prompt");
$("<button>").text("No").attr("id", "btnNo")
.insertAfter("#btnYes");
//add click handler for yes button
$("#btnYes").click(function() {
//change prompt text
$("#prompt").text("Thanks for choosing a date!");
$("button").remove();
});
//add click handler for no button
$("#btnNo").click(function() {
//reopen date picker
Date Picker
[ 172 ]
$("#date").datepicker("show", "fast");
$("#prompt").remove();
$("button").remove();
});
}
//define handleShow function
function handleShow() {
//add a close rollover
$("<a>").text("rollover to close date picker").attr({
id: "rollClose",
href: "#"
}).css({
marginTop: "200px",
display: "block"
}).insertAfter("#date");
//add rollover handler
$("#rollClose").mouseover(function() {
//close date picker
$("#date").datepicker("hide", "fast");
//remove rollover link
$("#rollClose").remove();
});
}
});
</script>
</body>
</html>
Save this as datePicker16.html. It's a huge page, for which I apologize, but it
exposes a great deal of the method functionality that the widget has within it. The
page is simple enough. We have a heading, some radio buttons, and the required
<input> element. The nal <script> block however is another story. Let's break
down what each part does.
We rst dene the pickerOpts literal object and add function names as the values of
the onSelect and beforeShow properties. As you know, these properties are called
at different points during a date picker interaction. They are called when a date is
selected and directly before the date picker is shown. We also associate the date
picker with the <input> element in the usual way:
//define config object
var pickerOpts = {
onSelect: handleSelect,
Chapter 6
[ 173 ]
beforeShow: handleShow
};
//create basic date picker
$("#date").datepicker(pickerOpts);
Next, we add the functionality for our radio buttons which allows us to make use
of the isDisabled, enable, and disable methods. When the yes radio button
is selected, we check whether the input or date picker are disabled and if so, call
the enable method. If the no radio is selected, we do the opposite, after checking
whether the input or date picker is enabled:
//add click handler for yes radio
$("#yes").click(function(){
//enable date picker and input if they are currently disabled
($("#date").datepicker("isDisabled") == true) ? $("#date").
datepicker("enable") : null;
});
//add click handler for not now radio
$("#notNow").click(function(){
//disable date picker and input if they are not currently disabled
($("#date").datepicker("isDisabled") == false) ? $("#date").
datepicker("disable") : null;
});
If the nal radio button is selected, we use the destroy method to completely
remove the date picker. We check whether the <input> element is disabled and if it
is, we remove the disabled attribute so that a date can be entered manually. We also
add some text to say that a date will now need to be entered manually.
//add click handler for not ever radio
$("#notEver").click(function() {
//destroy date picker
$("#date").datepicker("destroy");
(!$("#date").attr("disabled")) ? null : $("#date").
removeAttr("disabled") ;
//add prompt text after input
$("<p>").text("You will need to enter a date manually").
insertAfter("#date");
});
Date Picker
[ 174 ]
Next, we need to add the callback functions which were supplied as values for the
two properties in our conguration object. The handleSelect function, which will
be executed every time a date is selected, adds some text to the page verifying that
the selected date is correct. If the no button is clicked, we use the show method to
reopen the date picker. We can also control the speed at which the date picker is
displayed by supplying a second argument (the string fast in this case):
//define handleSelect function
function handleSelect(date) {
//add prompt text after input
$("<p>").text("You chose " + date + " is this correct?").attr("id",
"prompt").insertAfter("#date");
//add buttons
$("<button>").text("Yes").attr("id", "btnYes").
insertAfter("#prompt");
$("<button>").text("No").attr("id", "btnNo").insertAfter("#btnYes");
//add click handler for yes button
$("#btnYes").click(function() {
//change prompt text
$("#prompt").text("Thanks for choosing a date!");
$("button").remove();
});
//add click handler for no button
$("#btnNo").click(function() {
//reopen date picker
$("#date").datepicker("show", "fast");
$("#prompt").remove();
$("button").remove();
});
}
Finally, we add the callback function for the beforeShow property. With this
function we add a link to the page which, calls the hide method to close the
date picker without selecting a date when rolled over:
//define handleShow function
function handleShow() {
//add a close rollover
$("<a>").text("rollover to close date picker").attr({
id: "rollClose",
href: "#"
}).css({
marginTop: "200px",
Chapter 6
[ 175 ]
display: "block"
}).insertAfter("#date");
//add rollover handler
$("#rollClose").mouseover(function() {
//close date picker
$("#date").datepicker("hide", "fast");
//remove rollover link
$("#rollClose").remove();
});
}
Using a rollover in this example is necessary as clicking outside of the date picker
while it is open closes it automatically. Here's a screenshot of how the page should
look after a date has been selected:
Fun with date picker
We've nearly looked at all of the inherent functionality of the date picker. I'm not
saying we've covered everything that can be done with it of course, but we've looked
at enough now to have a very good understanding of the properties and methods
that it exposes. However, I've saved a couple of properties and methods for us to
have some fun with in our last date picker example.
Date Picker
[ 176 ]
For this example, we'll work a little AJAX magic into the mix and create a date
picker, which prior to opening, will communicate with the server to see if there are
any dates that cannot be selected. It could be a date picker that a freelance consultant
uses to accept bookings from clients. In a new page in your text editor, add the
following code:
<!DOCTYPE HTML PUBLIC "-//W3C//DTD HTML 4.01//EN" " />TR/html4/strict.dtd">
<html lang="en">
<head>
<link rel="stylesheet" type="text/css" href="jqueryui1.6rc2/
themes/flora/flora.datepicker.css">
<link rel="stylesheet" type="text/css" href="styles/
ajaxDatepicker.css">
<meta http-equiv="Content-Type" content="text/html;
charset=utf-8">
<title>jQuery UI AJAX Date Picker</title>
</head>
<body>
<div class="container">
<p>Use the date picker to request a consultation period</p>
<label>Book period:</label><input id="date">
<div class="key"></div><label class="keyLabel"> = Already
Booked</label>
</div>
<script type="text/javascript" src="jqueryui1.6rc2/
jquery-1.2.6.js"></script>
<script type="text/javascript" src="jqueryui1.6rc2/ui/
ui.core.js"></script>
<script type="text/javascript" src="jqueryui1.6rc2/ui/
ui.datepicker.js"></script>
<script type="text/javascript">
//define function to be executed on document ready
$(function(){
//arrays to hold ajax dates
var months = [];
var days = [];
//get pre-booked dates from server
function getDates() {
$.getJSON("
bookedDates.php?jsoncallback=?",
function(data) {
//process results
Chapter 6
[ 177 ]
for (x = 0; x < data.dates.length; x++) {
//put results into arrays
months.push(data.dates[x].month);
days.push(data.dates[x].day);
}
});
};
getDates();
//define config object
var pickerOpts = {
beforeShowDay: addDates,
minDate: +1
};
//create date picker
$("#date").datepicker(pickerOpts);
//add pre-booked dates to datepicker
function addDates(date){
//filter out weekends
if (date.getDay() == 0 || date.getDay() == 6) {
return [false, "weekend_class"];
}
//check each day in arrays
for (x = 0; x < days.length; x++) {
//if date is same as current day
if (date.getMonth() == months[x] - 1 && date.getDate() ==
days[x]) {
//make day unselectable
return [false, "preBooked_class"];
}
}
//other dates are selectable
return [true, ''];
} });
</script>
</body>
</html>
Save this as AJAXdatepicker.html. The rst part of our script initially declares
two empty arrays, and then creates a new function called getDates. This function
performs an AJAX request and obtains the JSON object from the PHP le.
Date Picker
[ 178 ]
The format of the JSON is an object called dates which contains an array of objects.
Each object contains a month and a day property representing one date that should
be made unselectable. The function pushes the value of each property into either the
months or days array for a later function's use. We immediately call this function so
the results can already be processed for the date picker to use.
//arrays to hold ajax dates
var months = [];
var days = [];
//get pre-booked dates from server
function getDates() {
$.getJSON("
bookedDates.php?jsoncallback=?",
function(data) {
//process results
for (x = 0; x < data.dates.length; x++) {
//put results into arrays
months.push(data.dates[x].month);
days.push(data.dates[x].day);
}
});
};
getDates();
Next, we dene a conguration object for the date picker. The properties of the
object are simply the callback function to make the dates specied in the JSON object
unselectable, and the minDate property will be set to the relative value +1 as we
don't want people to book dates in the past, or on the current day:
//define config object
var pickerOpts = {
beforeShowDay: addDates,
minDate: +1,
};
Finally, we dene the addDates callback function which is invoked on the
beforeShowDay event. This event occurs once for each of the 35 individual day
squares in the date picker. Even the empty squares.
Our function is passed the current date and must return an array containing two
items. The rst is a boolean indicating whether the day is selectable, and optionally
a class name to give the date.
Chapter 6
[ 179 ]
Our function rst checks to see whether the day portion of the current date is equal
to either 0 (for Sunday) or 6 (for Saturday). If it is, we return false as the rst item in
the array, and specify the class name weekend_class as the second item.
There is a built-in function of the manager object, $.datepicker.
noWeekends, which automatically makes weekends unselectable. This
is specied as the value of the beforeShowDay property when used,
but we cannot use it in this example as we are providing our own
callback function.
We then loop through each item in our months and days arrays to see if any of the
dates passed to the callback function match the items in the arrays. If both the month
and day items match a date, the array returns with false and a custom class name as
its items. If the date does not match, we return an array containing true to indicate
that the day is selectable. This allows us to specify any number of dates that cannot
be selected in the date picker:
//add pre-booked dates to datepicker
function addDates(date){
//filter out weekends
if (date.getDay() == 0 || date.getDay() == 6) {
return [false, "weekend_class"];
}
//check each day in arrays
for (x = 0; x < days.length; x++) {
//if date is same as current day
if (date.getMonth() == months[x] - 1 && date.getDate() == days[x])
{
//make day unselectable
return [false, "preBooked_class"];
}
}
//other dates are selectable
return [true, ''];
}
In addition to the HTML page, we'll also need a little styling. In a new page in your
editor, create the following stylesheet:
.container {
border:1px solid #3399cc; width:380px;
height:250px; padding:0 0 0 10px;
}
p {
Date Picker
[ 180 ]
font-family:Verdana; font-size:90%;
margin-top:10px;
}
label {
margin-right:98px; float:left;
font-family:Verdana; font-size:80%;
}
.keyLabel {
font-size:70%;
}
.key {
width:16px; height:16px;
background-color:#FF0000;
float:left; margin-right:3px;
}
.divider {
background:url( /date-picker/img/divider.gif) repeat-x;
width:160px; height:2px; clear:both;
position:relative; top:10px;
}
#date {
width:183px; text-align:center;
}
.datepicker .weekend_class {
background:url( /img/date-picker/weekendRepeat.gif) repeat-x;
}
.datepicker .preBooked_class {
color:#fff; background-color:#FF3300;
}
#confirmation {
font-size:70%; width:150px;
line-height:2em; position:relative;
top:10px;
}
#request {
margin:10px 0 0 10px;
}
#thanks {
font-size:70%; margin-top:15px;
}
Chapter 6
[ 181 ]
Save this as AJAXdatepicker.css in your styles folder. I used PHP to provide the
JSON object in response to the AJAX request made by our page. If you don't want to
install and congure PHP on your web server, you can use the le that I have placed
at the URL specied in the example. For anyone that is interested, the PHP used is
as follows:
<?php
header('Content-type: application/json');
//define booked dates as JSON
$dates = "({
'dates':[
{'month':12,'day':2},
{'month':12,'day':3},
etc
]})";
$response = $_GET["jsoncallback"] . $dates;
echo $response;
?>
The pre-booked dates are just hard-coded into the PHP le. Again, in a proper
implementation, you'd probably need a more robust way of storing these dates,
such as a database.
When you run the page in your browser and open the date picker, the dates specied
by the PHP le should be styled according to our class name and should also be
completely non-responsive, as in the following screenshot: