//provide additional information to the selection that doesn't get searched function customMatch(data, i, max) { return data + " (result number " + i + ")"; } //define config object [ 204 ]
Chapter 7 var autocompOpts = { data: suggestions, formatMatch: customMatch } //turn specified element into an auto-complete $("#suggest").autocomplete(autocompOpts); }); </script> </body> </html>
Save this as autocomplete11.html. All we do in this example is append some additional text to each selection when it is added to the text field. We use the data argument to return the actual selection, and the i argument to add which number the result is. After making a selection from the suggestion menu, the page should look like this:
We've been working with a flat data structure in our examples so far and have provided a simple array containing the data items to match search terms against. We can also use more complex objects within our data structure, with additional
data supplied using arbitrary keys and values. The keys will still be available to the functions for advanced formatting that we have just looked at. This will give us the ability to provide additional information alongside the matched results.
Matching properties There are several properties which are used to configure how matching occurs with the auto-complete search term and results. The mustMatch property, for example, configures the auto-complete so that the text field may only contain results supplied by the widget. Let's look at a basic example. Change the configuration object used with our auto-complete in autocomplete12.html to the following: //create config object var autocompOpts = { data: suggestions, mustMatch: true }; [ 205 ]
Auto-Complete
Save the change as autocomplete12.html. When we run this file in our browser, we see that as we start typing in the <input> with a letter that is a match for one of the results in our data set, the widget behaves as it has done so far. If we start typing a letter in the <input> that isn't a match for our data (like a z for example) and then type another letter, the value of the <input> is cleared as a result of the mustMatch property. Now let's look at a property that allows us to match not only the start of results in our data set, but to find matches within the strings which make up the data. Change the configuration object, used in the previous example, to this instead:
Save this variation as autocomplete13.html. Again, the premise with this property is simple. When a letter is entered into the text field, not just the results that start with the match are returned, but all results containing the match are returned as well, as you can see in the following screenshot:
[ 206 ]
Chapter 7
Remote data We have used local data in all our examples so far, which is perfect for smaller data sets. The data will be cached once it has been loaded, and continue to be available to the text field while the page is open. It's efficient and easy to code. However, when working with larger stores of data, it is more efficient to process the suggestions on the server and return only those suggestions that are required. Auto-complete makes working with remote data just as easy as working with local data, provided you have the back-end code to support it. There are a series of properties that are used solely with remote data sets. These properties include the following: •
cacheLength
•
extraParams
•
matchCase
•
matchSubset
•
url
As we'll be working with remote data for the next few examples, we can use a slightly larger dataset. For this example, I've created a new MySQL database called data with a new table inside it called countries. We'll be using the auto-complete widget to provide a list of countries of birth on what could be part of an account creation form. The data source we'll use for this example contains 128 records, which is still small enough to run locally with great efficiency, but is much larger than what we have worked with so far. I usually use PHP where necessary because I'm somewhat used to and like its syntax. That's not to say that it's the only back-end language that could be used, or indeed the most practical, or most suited to the task at hand. Nevertheless, let's get started with the next example. In a new file in your text editor, add the following page: <!DOCTYPE HTML PUBLIC "-//W3C//DTD HTML 4.01//EN" " />TR/html4/strict.dtd"> <html lang="en"> <head>
<title>jQuery UI Auto Complete Widget Example 14</title> </head>
[ 207 ]
Auto-Complete <body> <label>Please enter your country of birth:</label> <input type="text" id="suggest">
</script> </body> </html>
Save this file as autocomplete14.html. Instead of using the data property to point to a local data source, we instead use the url property to point to the URL from which the data can be obtained. No additional configuration is required for this simple implementation, although we do, of course, need a backend. For reference, the backend that I used for this example consists of the database I already mentioned and the following PHP file: /* connection information */ $host = "localhost"; $user = "root"; $password = "your password here"; $database = "autoComp"; /* make connection */ $server = mysql_connect($host, $user, $password); $connection = mysql_select_db($database, $server); /* get querystring parameter */ $param = $_GET['q']; /* protect against sql injection */ [ 208 ]
Chapter 7 mysql_real_escape_string($param, $server); /* query the database */ $query = mysql_query("SELECT * FROM countries WHERE country LIKE '$param%'");
/* loop through and return matching entries */ for ($x = 0; $x < mysql_num_rows($query); $x++) { $row = mysql_fetch_assoc($query); $output = $row['country']."\n"; echo $output; } mysql_close($server); ?>
I don't want to go into too much explanation here as this backend is just one of many possibilities and has been provided in supplementary information. I do want to mention the search term, which is passed to the backend as part of the GET request, and is available to our PHP file under the q super global variable. We also included the limit request variable, which will be set to the same value as the configured max property. This property has the value of 100 by default with local data sources, but is set to 10 by the widget when using a remote data source. The following screenshot shows the remote auto-complete in action. It looks exactly as it did before, but we know that our slightly larger data set is actually remote:
[ 209 ]
Auto-Complete
Sending additional data to the server The only remote configuration property not related to caching is the extraParams property. This can be used to send additional, arbitrary data to the server. Using this property is easy. All we need to do is provide a nested object literal as the value of the property. Change the configuration object used with autocomplete14.html to the following:
Save this as autocomplete15.html. We're not actually going to do anything with the data, but using Firebug, we can easily see that our test data has been added to the query and sent with the rest of the request:
Caching The remaining remote properties are all related to the caching services provided by auto-complete, and they can all be used together for optimal cache performance. I mentioned earlier that a GET request is performed on every keystroke. That's not quite the whole truth and is where the local cache comes in. Every time a keystroke is detected in the associated text field, the local cache is checked first for matching results, and then a GET request to the remote data source is made if nothing in the local cache matches. [ 210 ]
Chapter 7
The cacheLength property simply tells the widget how many items, if any, should be stored in the local cache. Caching can be disabled completely by setting this property to 1. The matchCase property configures the widget exactly the way that it implies. When this is set to true, the auto-complete widget becomes case sensitive, so the term a will not be a match for A. Finally matchSubset, which by default is set to true, makes subsets of the items in
the cache match, so when a second letter is typed into the input, only the subset of results from the cache will be shown.
Auto-complete methods Now that we've looked at the configurable properties supplied by the auto-complete API, let's move on to look at the methods it exposes. The following table lists the methods available when working with auto-complete: Method destroy
Usage
flushCache
Empties the cache
result
A function specified as the second argument to this method can be used to handle the selection of a result
search
Programmatically triggers the search event
setData
Supplies a new configuration object as the second argument of this method to update the configuration of the matched <input> element's auto-complete
Removes auto-complete functionality from the <input>
Like each of the other widgets, auto-complete has a method for removing auto-complete functionality programmatically. This is, of course, the destroy method that we have seen many times before. When called, the <input> element will no longer be associated with the auto-complete engine, and typing into it will not invoke the suggestion menu. The search and result methods are closely linked. The result method allows us to specify a callback function that is triggered when the search event fires. This occurs either when a visitor selects a result from the suggestion menu, or when the search method is used to invoke the search event programmatically.
[ 211 ]
Auto-Complete
Let's look at the result method in our next example. Change autocomplete15.html to the following: <!DOCTYPE HTML PUBLIC "-//W3C//DTD HTML 4.01//EN" " />TR/html4/strict.dtd"> <html lang="en"> <head>
<title>jQuery UI Auto Complete Widget Example 16</title> </head> <body>
<label>Please enter your country of birth:</label> <input type="text" id="suggest">
[ 212 ]
Chapter 7 }); }); </script> </body> </html>
Save this file as autocomplete16.html. We set up a little greets object that holds localized greetings for all of the countries that begin with A. We should, of course, provide these for all of the countries in our table, but this would make the example far larger than it needs to be. We then create our configuration object and initialise the widget as normal. Finally, we add an inline handler for the result event, and use it to retrieve the appropriate greeting from our greets object. It is then appended to the page whenever a suggestion from the menu is selected (after removing any previous messages if they exist):
We looked at the local caching of back-end results that is handled by auto-complete and saw how this can be fine-tuned to suit an individual implementation. Apart from configuring the cache, the auto-complete API also gives us the means to empty the cache at any given point by calling the flushCache method. Flushing the cache may be required during the execution of your application if there is a change to the data set that the auto-complete is tied to at the backend, and hence the URL used to query it. Changing things like the URL that the widget gets its data from, or any of the other configuration properties, is made easy with the setData method. This method updates the configuration options of the auto-complete instance and takes as its
second argument the new configuration object.
[ 213 ]
Auto-Complete
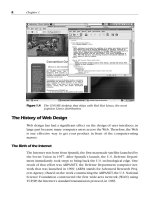
Fun with auto-complete For our last auto-complete example, we can create a simple email system front-end that features an auto-complete attached to an <textarea> that is used to enter the address(es) that the email will be sent to. It can be connected to a back-end data source containing the visitor's email contacts. The following screenshot shows the kind of result we're aiming for:
While we won't be using every property and method exposed by the API, we can certainly put a range of them to good use with this example to reinforce what we've learned over this the course of this chapter. Start off with the following basic web page: <!DOCTYPE HTML PUBLIC "-//W3C//DTD HTML 4.01//EN" " />TR/html4/strict.dtd"> <html lang="en"> <head>
<title>jQuery UI Auto Complete Email Field Example with JSON! </title> [ 214 ]
Save this as mailAddress.css in the styles folder. Now let's move swiftly on to the most important, and unquestionably the most fun part of the example, the JavaScript. In the empty <script> element in mailAddress.html, add the following code: //function to execute when doc ready $(function() { //get JSON $.getJSON("http://localhost/jqueryui/contacts.php ?jsoncallback =?", function(data) {
[ 215 ]
Auto-Complete //create arrays for data var names = []; var mails = []; //populate arrays for (var x = 0; x < data.contacts.length; x++) { names.push(data.contacts[x].name); mails.push(data.contacts[x].mail); } //add mail address to selected name function mailMatch(data, i, max) {
return data + " (" + mails[i - 1] + ")" } //create config var autocompOpts = { data: names, width: 706, multiple: true, multipleSeparator: "; ", formatMatch: mailMatch }; //turn specified element into auto-complete $("#address").autocomplete(autocompOpts); }); });
We're using a combination of both remote and local data in this example. First, we use jQuery's getJSON method to retrieve a JSON object outputted by a PHP file. We use a JSONP callback that processes the returned JSON following a successful request. The JSON object will be structured in exactly the same way as the object we used in the AJAX date picker earlier in the book, and will be an array where each item in the array is an object containing name and mail keys where the contact's name is the value of name and their email address is the value of mail. The data from the JSON object is used to populate two arrays. The first array will consist of each of the name values from each item, and the mails array will contain the mail addresses. Because every value in the database that is pulled has two properties, the items in each array will always be in sync, so names[1] will always match mails[1].
[ 216 ]
Chapter 7
We then add a custom function to format the data that is added to the <textarea>. The auto-complete will use the local names array as the data source. Therefore, each time a name is selected from the auto-complete suggestion menu, the matching email address is added. After this, we create the configuration object used to make auto-complete do the things we want, such as adding support for multiple selections, and then initialize the widget as normal. We obviously need a PHP file as well to get the data out of the database in order to pass it back to our JSONP callback. Again, this is being provided in a supplementary manner: header('Content-type: application/json'); //connection information $host = "localhost"; $user = "root"; $password = "your password here"; $database = "autoComp"; //make connection $server = mysql_connect($host, $user, $password); $connection = mysql_select_db($database, $server); //protect against sql injection mysql_real_escape_string($param, $server); //query the database $query = mysql_query("SELECT * FROM contacts"); //start JSON object $contacts = "({ 'contacts':["; //loop through and return matching entries for ($x = 0; $x < mysql_num_rows($query); $x++) {
$row = mysql_fetch_assoc($query); $contacts .= "{'name':'" . $row["name"] . "','mail':'" . $row["mail"] . "'}"; //add comma if not last row, closing brackets if is if ($x < mysql_num_rows($query) -1) $contacts .= ","; else $contacts .= "]})"; } //return JSON with GET for JSONP callback $response = $_GET["jsoncallback"] . $contacts; echo $response; mysql_close($server); ?>
[ 217 ]
Auto-Complete
I understand that you may not have the setup to run this file, or have any interest in learning or using PHP, and that's fine. Partly, the reason for using dynamic data locally via JSON and a JSONP callback is that you can still use this example without having your own local web server. To this end, I have placed a copy of this file on my own web server. To use it, simply change the URL in the getJSON method to /> Summary The auto-complete is a fantastic and very fresh addition to the jQuery UI library. It's intelligent, attractive, and intuitive to use. As we've seen with the other library components, it's also easy to use from a developer's perspective and flexible enough
to be tailored to many individual situations. Your visitors will love it because it makes arduous tasks, like the completion of forms, easier and quicker. It also improves the appearance and overall functionality of your site while lending an air of quiet professionalism. We saw that this component brings to the table an impressive number of configurable properties that allows us to fine-tune the user-experience with high precision. We can use advanced formatting and matching properties to control the data that is outputted and how matching is performed, customize the appearance of the drop-down suggestion menu, and much more. We also looked at the methods exposed by this component, including the usual destroy method for removing functionality. We can also programmatically flush the local cache and provide a new configuration object. Unlike most of the other components we have seen so far, the auto-complete event model is method-based instead of property-based. However, it is equally as effective at allowing us to react to important events fired during an interaction.
[ 218 ]
Drag and Drop So far in this book, we've covered the complete range of fully released interface widgets, as well as one still (at the time of writing) in its beta phase. Over the next four chapters, we're going to shift our focus to the core interaction helpers. These components of the library differ from those that we've already looked at in that they are not physical objects that exist on the page. Instead, they give an object a set of generic behaviors to suit common implementational requirements. You don't actually see them on the page, but the effects that they add to different elements, and how they cause them to behave, can easily be seen. These are low-level components as opposed to the high-level widgets. There are currently five different interaction helpers, each catering for a
specific interaction. They help the elements used on your pages to be more engaging and interactive for your visitors, which adds value to your site and can help make your web applications appear more professional. They also help to blur the distinction between the browser and the desktop as application platforms. In this chapter, we'll be covering two very closely related components— draggables and droppables. The draggables API transforms any specified element into something that your visitors can pick up with the mouse pointer and drag around the page. Methods are exposed which allow you to restrict the draggables movement, make it return to its starting point after being dropped, and much more. The droppables API allows you to define a region of the page, or a container of some kind, for people to drop the draggables on to in order to make something else happen. For example, to define a choice that is made, or add a product to a shopping basket. A rich set of events are fired by the droppable that lets us react to the most interesting moments of any drag interaction.
Drag and Drop
The full range of subjects we'll be covering in this chapter are: •
How to make elements draggable
•
How to determine the new position of an element that has been dragged
•
The properties that are available for configuring draggable objects
•
How to make an element return to its starting point once the drag ends
•
How to use event callbacks at different points in an interaction
•
The role of a drag helper
•
Containing draggables
•
How to control draggability with the component's methods
•
Turning an element into a drop target
•
Defining accepted draggables
•
Working with droppable class names
•
Defining drop tolerance
•
Reacting to interactions between draggables and droppables
The deal with drag and droppables We'll be devoting ourselves to these two components for the duration of this chapter because of how closely related they are. Dragging and dropping, as behaviors, go hand-in-hand with each other. Where one is found, the other is invariably close by. It's all very well dragging an element around a web page, but if there's nowhere for that element to be dragged to, or on top of, then the whole exercise is pointless. You can use the draggable class completely independent of the droppable class as pure dragging, for the sake of dragging, can have its uses, such as with the dialog. However, you can't use the droppable class with the draggable. You don't need to make use of any of draggables methods of course, but using droppables without having anything to drop onto them is of no value. These two components aren't designed to be used beyond simple drag and drop scenarios (which in themselves are complex pieces of web mechanics). If you have a more advanced requirement, like reordering list-based elements for example, you'll need to turn to a more specialized class, like the sortables component that we'll be looking at in the next chapter.
[ 220 ]
Chapter 8
Draggables The draggables component is used to make any specified element, or collection of elements, draggable, so that they can be 'picked up' and moved around the page by a visitor. Draggability is a great effect, and is a feature that can be used in numerous ways to improve the interface of our web pages. Using jQuery UI means that we don't have to worry about all the tricky differences between browsers that originally made draggable elements on web pages a nightmare to implement and maintain.
A basic drag implementation Let's look at the default implementation by first making a simple image draggable. We won't do any additional configuration. Therefore, all this code will allow you to do is 'pick up' the image with the mouse pointer and drag it around the viewport. The element is made to appear draggable by having its left and top style properties manipulated in line with the mouse pointer. We don't need to worry about how this is achieved by the library, thanks to the object-oriented concept of encapsulation. In a new file in your text editor, add the following code: <!DOCTYPE HTML PUBLIC "-//W3C//DTD HTML 4.01//EN" " />TR/html4/strict.dtd"> <html lang="en"> <head>
<title>jQuery UI Draggable Example 1</title> </head>
ui.draggable.js Encapsulation Encapsulation is an object-oriented term that simply means we don't need to know how any particular module of code works internally. All we need to know is how to use the API that it exposes.
We're using a plain <div> with a background image specified in the CSS file we're linking to in the <head> of the page. Use the following stylesheet for the draggable element: #drag { background:url(../img/draggable.png) no-repeat; width:114px; height:114px; cursor:move; }
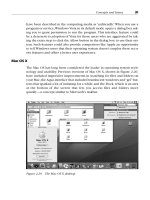
Save this as draggable.css in your styles folder. When you view the page in a browser, you'll see that the image can be moved around to your heart's content, as shown in the following screenshot:
[ 222 ]
Chapter 8
Configuring draggable properties The draggables extension has a wide range of configurable properties, giving you a very fine degree of control over the behavior that it adds. The following table lists the properties that we can manipulate to configure and control our draggable elements: Property appendTo
Usage
axis
Constrains draggables to one axis of motion and can take the strings x and y as values
cancel
Prevents certain elements from being dragged if they match the selector
containment
Prevents draggables from being dragged out of the bounds of its parent element
cursor
Specifies a CSS cursor to be used with the draggable
cursorAt
Specifies a default position at which the cursor appears relative to the draggable while it is being dragged
delay
Specifies a time in milliseconds for the start of the drag to be delayed
distance
Specifies the distance in pixels that the pointer should move with the mouse button held down on the draggable before drag begins
grid
Makes the draggable snap to an imaginary grid on the page
Specifies a container element for draggables with a helper attached
[ 223 ]
Drag and Drop
Property handle
Usage
helper
Defines a pseudo-drag element which is dragged in place of the draggable
opacity
Sets the opacity of the helper element
revert
Makes the draggable return to its start position once dragging ends
scroll
Makes the draggables container automatically scroll
scrollSensitivity
Defines how close the draggable should get to the edge of the viewport before it begins to scroll
scrollSpeed
Sets the speed at which the viewport scrolls
snap
Causes drag objects to snap to the edges of specified elements
snapMode
Can be set to either inside, outside,���� both, with both or being the default
snapTolerance
The distance from snapping elements that draggables should reach before snapping occurs
refreshPositions
Calculates all draggable positions on every mouse move
zIndex
Sets the z-index of the helper element
Defines a specific part of the draggable which is used to hold the pointer on in order to drag.
Let's put some of these properties to use. They can be configured in exactly the same way as the properties of the widgets that we looked at in previous chapters.
This is done by creating a literal object with the chosen properties and their values configured, and passing this object into the draggable constructor method. In the first example a moment ago, we used CSS to specify that the move cursor should be used when the pointer hovers over our draggable <div>. Let's change this and use the cursor property of the draggables component instead. Remove cursor:move from draggable.css and change draggable1.html to the following: <!DOCTYPE HTML PUBLIC "-//W3C//DTD HTML 4.01//EN" " />TR/html4/strict.dtd"> <html lang="en"> <head>