jQuery UI 1.6 The User Interface Library for jQuery phần 8 pdf
Bạn đang xem bản rút gọn của tài liệu. Xem và tải ngay bản đầy đủ của tài liệu tại đây (816.55 KB, 43 trang )
Resizing
[ 286 ]
We use the knobHandles property again, simply for the purpose in this example that
it looks better than the flora resize handles. We'll also need some custom styling for
them, which we'll add in a moment.
All we need to do to enable animation is set the animate property to true. That's it,
no further conguration is required. Another option we have is to set the speed of the
animation, which we have done in this example, by supplying the animateDuration
property. This can either be an integer to represent the number of milliseconds the
animation can last for, or using one of the strings slow, normal, or fast.
Resizable callbacks
Like other components of the library, resizable denes a selection of custom events
and allows us to easily execute functions when these events occur. This makes the
most of interactions between your visitors and the elements on your pages. Resizable
denes the following callback properties:
Property Triggered
resize
When the resizable is in the process of being resized
start
When the resize interaction begins
stop
When the resize interaction ends
Hooking into these custom methods is just as easy for resizables as it has been for the
other components of the library we have looked at. Let's explore a basic example to
highlight this fact. Create the following new page in your text editor:
<!DOCTYPE HTML PUBLIC "-//W3C//DTD HTML 4.01//EN" " />TR/html4/strict.dtd">
<html lang="en">
<head>
<link rel="stylesheet" type="text/css" href="jqueryui1.6rc2/
themes/flora/flora.resizable.css">
<link rel="stylesheet" type="text/css" href="styles/resize.css">
<meta http-equiv="Content-Type" content="text/html;
charset=utf-8">
<title>jQuery UI Resizable Example 9</title>
</head>
<body>
<div class="resize">
<p> Lorem ipsum dolor sit amet, consectetuer adipiscing elit.
Suspendisse auctor ligula vel odio. Nam et sem vitae nibh
convallis euismod.</p>
</div>
Chapter 9
[ 287 ]
<script type="text/javascript" src="jqueryui1.6rc2/
jquery-1.2.6.js"></script>
<script type="text/javascript" src="jqueryui1.6rc2/ui/
ui.core.js"></script>
<script type="text/javascript" src="jqueryui1.6rc2/ui/
ui.resizable.js"></script>
<script type="text/javascript">
//function to execute when doc ready
$(function() {
//define config object
var resizeOpts = {
stop: reportNewSize
}
//display new size of resizable
function reportNewSize() {
//create and display the tip
$("<div>").addClass("tip").text("The resizable is now " +
$(this).height() + " pixels high, and " + $(this).width() + " pixels
wide").css({
border: "2px solid #66cc00",
fontSize: "80%",
fontWeight: "bold",
position: "absolute",
display: "none",
left: 38,
marginTop: 5,
width: $(this).width() - 2
}).appendTo("body").fadeIn("slow", goAway);
//hide the tip
function goAway() {
setTimeout("$('.tip').fadeOut('slow')", 2000);
}
}
//make specified element resizable
$(".resize").resizable(resizeOpts);
});
</script>
</body>
</html>
Resizing
[ 288 ]
Save this as resizable9.html. We use the stop property to specify a callback
function that will be executed as soon as the resize interaction stops. Our callback
simply creates a new <div> element and adds a string of text to it. It then sets
some of the new element's CSS properties before appending it to the page after
the resizable and calling the standard jQuery fadeIn() method.
We can also easily use a second callback function, called at the end of the fadeIn
effect, which hides the new <div> after a specied length of time. The following
screenshot shows how our page looks before the <div> fades away:
Like the other library components, these callbacks can automatically receive up
to two arguments which are the event object, and an object containing useful
properties of the resizable.
The second object has two properties we can make use of. The options property,
which gives you access to the options used to initialize the resizable, and the axis
property, which tells us which handle was dragged. We didn't need to use either
of these properties in the last example however, so referred to the $(this)
object instead.
Chapter 9
[ 289 ]
Resizable methods
This component comes with the three basic methods found with all of the interaction
components of the library, namely the destroy, disable, and enable methods.
These work and are used in the same way as the methods by the same names that
come with the other interaction components. Therefore, we won't be looking at these
in any great detail in this chapter.
Fun with resizable
For our nal resizable example, let's look at combining this component with one
of the widgets that we looked at in a previous chapter. This will help us see how
compatible this component is with the rest of the library. We'll be working with the
tabs component in the following example. The following screenshot shows the page
we will end up with:
In your text editor, add the following code:
<!DOCTYPE HTML PUBLIC "-//W3C//DTD HTML 4.01//EN" " />TR/html4/strict.dtd">
<html lang="en">
<head>
<link rel="stylesheet" type="text/css" href="jqueryui1.6rc2/
themes/flora/flora.resizable.css">
Resizing
[ 290 ]
<link rel="stylesheet" type="text/css" href="jqueryui1.6rc2/
themes/flora/flora.tabs.css">
<link rel="stylesheet" type="text/css" href="styles/
resizableTabsTheme.css">
<meta http-equiv="Content-Type" content="text/html;
charset=utf-8">
<title>jQuery UI Resizable Tabs Example</title>
</head>
<body>
<ul id="myTabs">
<li><a href="#0"><span>Tab 1</span></a></li>
<li><a href="#1"><span>Tab 2</span></a></li>
</ul>
<div class="tab" id="0">This is the content panel linked to the
first tab, it is shown by default.</div>
<div class="tab" id="1">This content is linked to the second tab
and will be shown when its tab is clicked.</div>
<script type="text/javascript" src="jqueryui1.6rc2/
jquery-1.2.6.js"></script>
<script type="text/javascript" src="jqueryui1.6rc2/ui/
ui.core.js"></script>
<script type="text/javascript" src="jqueryui1.6rc2/ui/
ui.resizable.js"></script>
<script type="text/javascript" src="jqueryui1.6rc2/ui/
ui.tabs.js"></script>
<script type="text/javascript">
//define function to be executed on document ready
$(function(){
//set initial tab size
var newHeight = 100;
var newWidth = 300;
var tabOpts = {
show: setSize
}
function setSize(e, ui) {
//set the dimensions of the tab
var panel = ui.panel;
$(panel).height(newHeight).width(newWidth);
}
//create the tabs
var tabs = $("#myTabs").tabs(tabOpts);
//define config object for resizeable
var resizeOpts = {
autoHide: true,
stop: resizeSibling
};
//resize the other tab at the same time
Chapter 9
[ 291 ]
function resizeSibling() {
//get the new dimensions
newHeight = $(this).height();
newWidth = $(this).width();
}
//make tabs resizable
$(".tab").resizable(resizeOpts);
});
</script>
</body>
</html>
Save this as resizableTabs.html. We also link to a new stylesheet for this example.
It's similar to those used in previous tab and resizable examples and contains the
following code:
.ui-tabs-panel {
border:1px solid #0000cc;
background:#d8d8f7;
}
.ui-tabs-nav a, .ui-tabs-nav a span {
background:url( /img/tab-sprite.gif) no-repeat;
}
.ui-tabs-nav a {
background-position:100% 0%;
}
.ui-resizable-e {
background:url( /img/resizable/tabResizable-e.gif) repeat right
center;
width:7px;
}
.ui-resizable-s {
background:url( /img/resizable/tabResizable-s.gif) repeat center
top; height:7px;
}
.ui-resizable-se {
background:url( /img/resizable/tabResizable-se.gif) repeat 0%;
}
This can be saved as resizableTabsTheme.css in the styles folder. Making the
tabs widget resizable is extremely easy and only requires calling the resizable
method on tab's underlying <ul>.
Resizing
[ 292 ]
We're using two conguration objects in this example. One object for each
component. Apart from setting the autoHide property for the resizable in our
conguration object, we also dene a function that should be called when the stop
event occurs. The function executed whenever a tab is shown is to set the dimensions
of the tab panel that has just been shown.
Because this function will be called when the page loads, as well as on each
subsequent tab display, we also specify initial values that are passed to the
width and height jQuery methods.
The second function, which is executed whenever a resize occurs, simply gets the
new size of the tab that has been resized and saves the new width and height values
to our two variables for later use (such as whenever a tab is shown). Together, these
functions allow you to resize a tab, and have all tabs assume the new size.
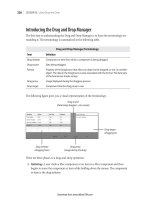
Summary
In this chapter we covered resizables. This is a component which allows us to easily
resize any on-screen element. It dynamically adds resize handles to the specied
sides of the target element and handles all of the tricky DHTML resizing for us,
neatly encapsulating the behaviour into a compact, easy-to-use class.
We rst looked at the different theming options available when using resizable, and
how easy it is to create our own theme by overriding the original styling of the flora
or default themes.
We then looked at some of the congurable properties we can use with the widget,
such as how to specify which handles to add to the resizable, and how the minimum
and maximum sizes of the element can be limited.
We briey looked at how to maintain an image's aspect ratio while it is being
resized. We also explored how to use ghosts, helpers, and animations to improve
the usability and appearance of the resizable component.
We looked at the event model exposed by the component's API and how we can
react to elements being resized in an easy and effective way. Our nal example
explored resizable's compatibility with other widgets in the library.
Selecting
The selectables component allows you to dene a series of elements that can be
'chosen' by dragging a selection square around them or by clicking them, as if they
were les in Windows Explorer (or Finder on the Mac). In this way, elements on the
page can be treated as le-like objects, allowing either single or groups of elements to
be selected.
A selection square has been a standard part of modern operating systems for a long
time. For example, if you wanted to select some of the icons on your desktop, you
could hold the mouse button down on a blank part of the desktop and drag a square
around the icons you wanted to select.
The selectables interaction helper adds this same functionality to our web pages,
which could be very useful in a variety of situations. This is yet another example
of how the web is increasingly becoming less distinct from the desktop as an
application platform.
Topics that will be covered in this section include:
Creating the default implementation
How selectable class names reect the state of selectables
Filtering selectable elements
Working with selectable's built-in callback functions
A look at selectable's methods
•
•
•
•
•
Selecting
[ 294 ]
Basic implementation
A demonstration that you can play with will tell you more about the functionality
provided by this library component than merely reading about it. The rst thing we
should do is invoke the default implementation to get a glimpse at the effects of this
component. In a new le in your text editor, add the following code:
<!DOCTYPE HTML PUBLIC "-//W3C//DTD HTML 4.01//EN" " />TR/html4/strict.dtd">
<html lang="en">
<head>
<meta http-equiv="Content-Type" content="text/html;
charset=utf-8">
<title>jQuery UI Selectable Example 1</title>
</head>
<body>
<ul id="selectables">
<li>This list item can be selected</li>
<li>This list item can be selected</li>
<li>This list item can be selected</li>
<li>This list item can be selected</li>
<li>This list item can be selected</li>
</ul>
<script type="text/javascript" src="jqueryui1.6rc2/
jquery-1.2.6.js"></script>
<script type="text/javascript" src="jqueryui1.6rc2/ui/
ui.core.js"></script>
<script type="text/javascript" src="jqueryui1.6rc2/ui/
ui.selectable.js"></script>
<script type="text/javascript">
//function to execute when doc ready
$(function() {
//make specified elements selectable
$("#selectables").selectable();
});
</script>
</body>
</html>
Save this as selectable1.html and run it in a browser. You should observe
that you can drag a selection square around one or more of the list items. The list
items don't do anything once they are selected of course, as this is only the default
implementation. We simply call the selectable constructor method on the parent
list element and then all of its child <li> elements are made selectable.
Chapter 10
[ 295 ]
Note that there is no default or flora styling associated with the selectables
component. Other default behavior includes clicking on individual elements causes
only them to be selected and clicking outside of the selected elements will deselect
them. Holding down the Ctrl key while clicking will enable multi-select. The
following screenshot shows the selected square enclosing the list items:
The minimum set of library les we need for a selectable implementation is:
jquery-1.2.6.js
ui.core.js
ui.selectable.js
Apart from building selectables from list items, we can also build them from other
elements, such as a collection of <div> elements:
<!DOCTYPE HTML PUBLIC "-//W3C//DTD HTML 4.01//EN" " />TR/html4/strict.dtd">
<html lang="en">
<head>
<link rel="stylesheet" type="text/css" href="styles/
selectable.css">
<meta http-equiv="Content-Type" content="text/html;
charset=utf-8">
<title>jQuery UI Selectable Example 2</title>
</head>
<body>
•
•
•
Selecting
[ 296 ]
<div id="selectables">
<div>This div can be selected</div>
<div>This div can be selected</div>
<div>This div can be selected</div>
<div>This div can be selected</div>
<div>This div can be selected</div>
<div>This div can be selected</div>
</div>
<script type="text/javascript" src="jqueryui1.6rc2/
jquery-1.2.6.js"></script>
<script type="text/javascript" src="jqueryui1.6rc2/ui/
ui.core.js"></script>
<script type="text/javascript" src="jqueryui1.6rc2/ui/
ui.selectable.js"></script>
<script type="text/javascript">
//function to execute when doc ready
$(function() {
//make specified elements selectable
$("#selectables").selectable();
});
</script>
</body>
</html>
Save this as selectable2.html. Everything is essentially the same as before.
We're just basing the example on different elements, using <div> instead of <li>.
However, due to the nature of these elements, we should add a little basic styling
so that we can see what we're working with.
In a new le in your text editor, add the following code:
#selectables div {
width:160px; height:25px;
padding:5px 0 0 10px; margin:10px 0 0 10px;
border:1px solid #000;
}
Chapter 10
[ 297 ]
Save this as selectable.css in your styles folder. It's not much, but it
helps to clarify the individual selectables in the example, as shown in the
following screenshot:
Selectee class names
The elements which are made selectable are all initially given the class ui-selectee.
While the selecting square is actually around selectable elements, they are given the
class ui-selecting. Once the select interaction ends, any selectables that have been
selected are given the class ui-selected. A previously selected element that is not
part of the current selection is given the class ui-unselecting.
The component also makes it very easy to add custom styling to show when
elements are either in the process of being selected or have been selected. Let's
add some additional styling now to reect the selecting and selected states. Add
the following new selectors and rules to selectable.css:
#selectables div.ui-selecting {
border:1px solid #66CC00;
}
#selectables div.ui-selected {
background:#66CC00;
}
Selecting
[ 298 ]
With the addition of this simple CSS, we can add visual cues to elements which are
part of the current selection, both during and following a select interaction. The
following screenshot shows that some elements have been selected:
Configurable properties of the selectable
class
The selectable class is quite compact, with relatively few congurable properties
compared to the other interaction helpers. The following properties are available
for conguration:
Property Default Value Usage
autoRefresh true
Automatically refreshes the size and position of each
selectable at the start of a select interaction
filter "*"
Used to specify child elements to make selectable
Chapter 10
[ 299 ]
Filtering selectables
There may be situations when we don't want to allow all of the elements within the
targeted container selectable. In this situation, we can easily make use of the filter
property to nominate specic elements, based on a CSS selector, that we want
selecting to be enabled on. Change selectable2.html so that it appears as follows:
<!DOCTYPE HTML PUBLIC "-//W3C//DTD HTML 4.01//EN" " />TR/html4/strict.dtd">
<html lang="en">
<head>
<link rel="stylesheet" type="text/css" href="styles/
selectableFiltered.css">
<meta http-equiv="Content-Type" content="text/html;
charset=utf-8">
<title>jQuery UI Selectable Example 3</title>
</head>
<body>
<div id="selectables">
<div class="unselectable">This div can't be selected</div>
<div class="selectable">This div can be selected</div>
<div class="selectable">This div can be selected</div>
<div class="selectable">This div can be selected</div>
<div class="selectable">This div can be selected</div>
<div class="selectable">This div can be selected</div>
</div>
<script type="text/javascript" src="jqueryui1.6rc2/
jquery-1.2.6.js"></script>
<script type="text/javascript" src="jqueryui1.6rc2/ui/
ui.core.js"></script>
<script type="text/javascript" src="jqueryui1.6rc2/ui/
ui.selectable.js"></script>
<script type="text/javascript">
//function to execute when doc ready
$(function() {
//define config object
var selectableObj = {
filter: ".selectable"
}
//make specified elements selectable
$("#selectables").selectable(selectableObj);
});
</script>
</body>
</html>
Selecting
[ 300 ]
Save this version as selectable3.html. In the underlying mark-up, we have given
different class names to different elements. This is based on whether we want them
to be selectable or not. In the JavaScript, we dene a conguration object containing
the filter property. The value of this property is the class selector of the elements
that we want to be selectable.
We also used a new stylesheet in this example to give the unselectable elements
their own styling. This new stylesheet is the same as the previous stylesheet with
the addition of the following selector and rules:
.unselectable { background-color:#999999; color:#666666; }
The new stylesheet can be saved as selectableFiltered.css. The following
screenshot shows how the page should look:
Chapter 10
[ 301 ]
Selectable callbacks
In addition to the two standard properties of the selectable API, there are also a
series of properties that can be used to specify executable callback functions at
specic points during a select interaction. These properties are as follows:
Property Triggered When
selected
The select interaction ends and each element added to the selection
triggers the callback
selecting
Each selected element triggers the callback during the select interaction
start
A select interaction begins
stop
This is red once regardless of the number of items selected as the select
interaction ends
unselected
Any elements that are part of the selectable but are not selected during
the interaction will re this callback
unselecting
Unselected elements will re this during the select interaction
Like the draggable and droppable components that we looked at earlier, selecting
really only becomes useful when something happens to the elements once they have
been selected. Let's put some of these callbacks to work so that we can appreciate
their use. Change selectable3.html so that it appears as follows:
<!DOCTYPE HTML PUBLIC "-//W3C//DTD HTML 4.01//EN" " />TR/html4/strict.dtd">
<html lang="en">
<head>
<link rel="stylesheet" type="text/css" href="styles/
selectable.css">
<meta http-equiv="Content-Type" content="text/html;
charset=utf-8">
<title>jQuery UI Selectable Example 4</title>
</head>
<body>
<div id="selectables">
<div id="selectabl1" class="selectable">This div can be
selected</div>
<div id="selectabl2" class="selectable">This div can be
selected</div>
<div id="selectabl3" class="selectable">This div can be
selected</div>
<div id="selectabl4" class="selectable">This div can be
selected</div>
<div id="selectabl5" class="selectable">This div can be
selected</div>
Selecting
[ 302 ]
<div id="selectabl6" class="selectable">This div can be
selected</div>
</div>
<script type="text/javascript" src="jqueryui1.6rc2/
jquery-1.2.6.js"></script>
<script type="text/javascript" src="jqueryui1.6rc2/ui/
ui.core.js"></script>
<script type="text/javascript" src="jqueryui1.6rc2/ui/
ui.selectable.js"></script>
<script type="text/javascript">
//function to execute when doc ready
$(function() {
//define config object
var selectableObj = {
selected: function(e, ui) {
$("#" + ui.selected.id).text("I have been selected!");
},
unselected: function(e, ui) {
$("#" + ui.unselected.id).text("This div can be
selected");
},
start: function(e) {
$("<div>").attr("id", "tip").text("Drag the lasso around
elements, or click to select").css({
position:"absolute", backgroundColor:"#ffffcc",
border:"1px solid #3366ff", width:"310px",
height:"20px", textAlign:"center",
left:e.pageX, top:e.pageY – 30
}).appendTo($("body"));
},
stop: function() {
$("#tip").fadeOut();
}
}
//make specified elements selectable
$("#selectables").selectable(selectableObj);
});
</script>
</body>
</html>
Save this as selectable4.html. To the HTML elements, we've added id attributes
so that we can easily target specic elements. In the <script>, we've added
anonymous functions to the selected, unselected, start, and stop properties.
These will be executed at the appropriate times during an interaction.
Chapter 10
[ 303 ]
As with other components, these functions are automatically passed two objects.
The rst is the original browser event object and the other represents the selectable
element. However, not all callbacks can successfully work with the second
object – start and stop for example.
When a <div> is selected, we change its inner text to reect the selection using
the selected anonymous function. We are able to get the id of the element that
has been selected using the selected.id property of the second object that is
automatically passed to our function. When an element is unselected, we set the
text back to its original value using the same technique.
We can also alter the inner text of any selectable that hasn't been selected using the
unselected function. This could be useful for letting our visitors know that the
element could be selected if they wanted to include it in the selection.
At the start of any interaction, we create a little tool tip that is appended to the
<body> of the page, slightly offset from the mouse pointer, using the start
anonymous function. We can get the pointer coordinates using the e (event) object,
which is passed as the rst argument to our callbacks. At the end of the selection,
we then remove the tool tip using the stop property
The selecting and unselecting callback properties work in exactly the same way.
For an example of how they work, we could use the following <script> block:
<script type="text/javascript">
//function to execute when doc ready
$(function() {
//define config object
var selectableObj = {
selecting: function(e, ui) {
$("#" + ui.selecting.id).text("I am part of the selection");
},
unselecting: function(e, ui) {
$("#" + ui.unselecting.id).text("I was part of the
selection");
}
}
//make specified elements selectable
$("#selectables").selectable(selectableObj);
});
</script>
Save this as selectable5.html. This time we use the selecting and unselecting
properties to specify anonymous functions, which again, change the inner text of the
elements at certain times during an interaction.
Selecting
[ 304 ]
We do the same type of thing as before using the same techniques. This time, we're
just using different callbacks and different properties of the objects passed to them.
The effects of these callbacks are shown in the following screenshot:
The second object passed to any of the selectable callbacks contains a property
relating to the type of custom event. For example, the selected callback receives an
object with a selected property which can be used to gain information about the
element that was added to the selection. All callbacks have a matching property that
can be used in this way.
Selectable methods
The methods that we can use to control the selectables component from our code
are similar to the methods found in the other interaction components and follow
the same pattern of usage. These are listed in the following table:
Method Usage
disable
Disables selectable functionality
enable
Re-enables selectable functionality
refresh
Manually refreshes the positions and sizes of selectables and is used
when autoRefresh is set to false.
toggle
Toggles the enabled and disabled states of selectables
destroy
Permanently removes selectable functionality
Chapter 10
[ 305 ]
Two new methods that are unique to this component are the toggle and refresh
methods. When the autoRefresh property is set to false, the refresh method can
be used to manually perform a refresh at certain times.
Setting the autoRefresh property to false can yield performance gains when there
are many selectables on the page. However, there will still be times when you will
need to refresh the size and positions of the selectables, which is exactly what the
refresh method does.
The toggle method allows you to easily switch between enabled and disabled states,
without having to have separate code routines for the two states, and without having
to do any kind of state detection.
If the selectables are currently enabled, toggle will disable them. If they are
currently disabled, toggle will enable them. Using this method is child's play, but
we haven't come across it in any of the other components. So, let's take a quick look
at it in the wild. Create the following new page in your text editor:
<!DOCTYPE HTML PUBLIC "-//W3C//DTD HTML 4.01//EN" " />TR/html4/strict.dtd">
<html lang="en">
<head>
<link rel="stylesheet" type="text/css" href="styles/
selectable.css">
<meta http-equiv="Content-Type" content="text/html;
charset=utf-8">
<title>jQuery UI Selectable Example 6</title>
</head>
<body>
<div id="selectables">
<div id="selectabl1" class="selectable">This div can be
selected</div>
<div id="selectabl2" class="selectable">This div can be
selected</div>
<div id="selectabl3" class="selectable">This div can be
selected</div>
<div id="selectabl4" class="selectable">This div can be
selected</div>
<div id="selectabl5" class="selectable">This div can be
selected</div>
<div id="selectabl6" class="selectable">This div can be
selected</div>
</div>
<button id="toggle">Toggle Selectability</button>
<script type="text/javascript" src="jqueryui1.6rc2/
jquery-1.2.6.js"></script>
Selecting
[ 306 ]
<script type="text/javascript" src="jqueryui1.6rc2/ui/
ui.core.js"></script>
<script type="text/javascript" src="jqueryui1.6rc2/ui/
ui.selectable.js"></script>
<script type="text/javascript">
//function to execute when doc ready
$(function() {
//make specified elements selectable
$("#selectables").selectable();
//define click handler for button
$("#toggle").click(function() {
//toggle selectability
$("#selectables").selectable("toggle");
});
});
</script>
</body>
</html>
Save this as selectable6.html. The page contains a new <button> element, which
enables or disables selectability depending on its current state. After making the
parent <div> selectable in the normal way, we then dene a click handler for the
<button>. Within this click handler, we simply call the toggle method.
At this stage, there will be no visual indication that anything has happened when
we click the <button>. Although if you use Firebug, you can see that the class name
attached to the outer parent of the selectables changes depending on its state.
When the <button> is clicked for the rst time, the <div> is given the
additional class name called ui-selectable-disabled. You can see this
in the following screenshot:
Chapter 10
[ 307 ]
If the <button> is clicked a second time, the extra class name is removed. To make
it more obvious that the selectables have been disabled (or enabled again), we can
use this additional class name to add some alternative styling to identify when
selectability is disabled. In a new le in your text editor, add the following selector
and rules:
.ui-selectable-disabled .selectable {
border:1px solid #666666; background-color:#cccccc;
color:#999999;
}
Save this as selectableToggle.css in the styles folder. In selectable6.html,
add our new stylesheet to the <head> of the page:
<link rel="stylesheet" type="text/css" href="styles/selectableToggle.
css">
Selecting
[ 308 ]
Resave the page as selectable7.html. Now when the <button> is clicked, our new
style rules are applied and it becomes easier to see that something has happened, as
in the following screenshot:
We could also very easily use the callback properties again to specify a function that
changes the inner text of the disabled elements like we did in a previous example.
Fun with selectables
In our nal selectable example, we're going to make a basic image viewer. Images
can be chosen for viewing by selecting the appropriate thumbnail.
Although this sounds like a relatively easy achievement, in addition to the actual
mechanics of displaying the selected image, we'll also need to consider how to
handle multiple selections. The following screenshot shows an example of what
we'll end up with:
Chapter 10
[ 309 ]
The images used in this example are provided in the code download because they
need to be the correct size for this example to look right. There should be eight of
both the large and thumbnail versions of each image, and the sizes of each are 100
by 100 pixels for the thumbnails and 400 by 400 pixels for the large versions.
We need to create two new folders called large and thumbs within our img
directory. Then you should place the thumbnail images from the code download,
or an equivalent number of equivalently sized images, in the thumbs folder and
the full-sized images from the code download, or larger versions of your own
thumbnails, into the large folder.
Selecting
[ 310 ]
Let's get started with the code. In a fresh page in your text editor, add the
following page:
<!DOCTYPE HTML PUBLIC "-//W3C//DTD HTML 4.01//EN" " />TR/html4/strict.dtd">
<html lang="en">
<head>
<link rel="stylesheet" type="text/css" href="jquery.ui-1.5b4/
themes/flora/flora.tabs.css">
<link rel="stylesheet" type="text/css" href="styles/
imageSelector.css">
<meta http-equiv="Content-Type" content="text/html;
charset=utf-8">
<title>jQuery UI Image Selection Example</title>
</head>
<body>
<div id="imageSelector">
<div id="status"></div>
<div id="viewer"><span class="top"></span><span
class="bottom"></span></div>
<div id="thumbs">
<span class="top"></span>
<img id="Matt_Boat" src="img/thumbs/a.jpg">
<img id="Matt_and_James" src="img/thumbs/b.jpg">
<img id="James" src="img/thumbs/c.jpg">
<img id="Matt_and_James_2" src="img/thumbs/d.jpg">
<img id="Matt_Beach" src="img/thumbs/e.jpg">
<img id="Matt_Beach_2" src="img/thumbs/f.jpg">
<img id="Beth" src="img/thumbs/g.jpg">
<img id="Matt_Swing" src="img/thumbs/h.jpg">
<span class="bottom"></span>
</div>
</div>
<script type="text/javascript" src="jqueryui1.6rc2/
jquery-1.2.6.js"></script>
<script type="text/javascript" src="jqueryui1.6rc2/ui/
ui.core.js"></script>
<script type="text/javascript" src="jqueryui1.6rc2/ui/
ui.selectable.js"></script>
<script type="text/javascript" src="jqueryui1.6rc2/ui/
ui.tabs.js"></script>
<script type="text/javascript">
//function to execute when doc ready
$(function() {
var x = 0;