mcts self paced training kit exam 70-536 microsoft net framework 3.5 application development foundation phần 7 pps
Bạn đang xem bản rút gọn của tài liệu. Xem và tải ngay bản đầy đủ của tài liệu tại đây (649.93 KB, 82 trang )
460 Chapter 11 Application Security
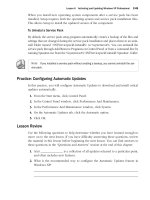
Figure 11-5 CAS complements, but does not replace, role-based security
Exam Tip No assembly can have more permissions than the user running the assembly,
regardless of how the assembly uses CAS.
How to Use the .NET Framework 2.0 Configuration Tool to
Configure CAS
The .NET Framework 2.0 Configuration tool provides a graphical interface for man-
aging .NET Framework security policy and applications that use remoting services.
You can perform many different CAS-related tasks, including the following:
Q Evaluating an assembly to determine the code groups of which it is a member
Q Evaluating an assembly to determine which permissions it will be assigned
Q Adding new permission sets
Q Adding new code groups
Q Increasing an assembly’s trust
Q Adjusting zone security
Q Resetting policy levels
Other
protected
resources
Registry
Hard
disk
Operating system security
Code-access security
Your assembly
.NET Framework runtime
Operating system
Lesson 1: Understanding CAS 461
MORE INFO .NET Framework 2.0 Configuration tool
This chapter covers using the .NET Framework 2.0 Configuration tool only to manage CAS policy.
For more information about the .NET Framework 2.0 Configuration tool, refer to Chapter 9.
The following sections provide procedures for performing these tasks.
How to Determine Which Code Groups Grant Permissions to an
Assembly
When troubleshooting CAS permissions, you might need to determine which code
groups grant permissions to your assembly. To do this, start the .NET Framework 2.0
Configuration tool from the Administrative Tools folder (or by opening the
%WinDir%\Microsoft.NET\Framework\v2.0.50727\Mscorcfg.msc snap-in) and per-
form the following steps:
1. Expand the My Computer node and then click Runtime Security Policy.
2. Click Evaluate Assembly. The Evaluate An Assembly wizard appears.
3. On the What Would You Like To Evaluate? page, click Browse. Select your
assembly and then click Open.
4. Select the View Code Groups That Grant Permissions To The Assembly option
and then click Next.
5. Expand each policy level to determine which code groups grant permissions to
your assembly. Figure 11-6 shows an assembly that receives permissions from
the My_Computer_Zone code group.
Figure 11-6 Use the Evaluate An Assembly wizard to determine which code groups apply
permissions to your assembly
6. Click Finish.
462 Chapter 11 Application Security
How to Determine Total CAS Permissions Granted to an Assembly
When troubleshooting CAS permissions, you might need to determine which permis-
sions the runtime will grant to your assembly. To do this, start the .NET Framework 2.0
Configuration tool and perform the following steps:
1. Expand the My Computer node and then click Runtime Security Policy.
2. Click Evaluate Assembly. The Evaluate An Assembly Wizard appears.
3. On the What Would You Like To Evaluate? page, click Browse. Select your
assembly and then click Open.
4. Select the View Permissions Granted To The Assembly option and then click
Next.
5. The wizard displays each permission assigned to your assembly. To view the
detailed permission settings, select any permission, click View Permission and then
click Finish.
How to Add a Permission Set
To create a new permission set, start the .NET Framework 2.0 Configuration tool and
perform the following steps:
1. Expand the My Computer node and then expand Runtime Security Policy.
2. Expand Enterprise, Machine, or User, depending on the policy level in which
you want to define the permission set.
3. Click Permission Sets. In the right pane, click Create New Permission Set.
4. On the Identify The New Permission Set page, specify a name and description,
and click Next.
5. On the Assign Individual Permissions To Permission Set page, perform the
following steps:
a. Click the permission that you want to add to the permission set and
click Add.
b. For each permission, specify the permission settings that are unique to that
permission and click OK.
c. Repeat this process for each individual permission required by your
permission set.
6. Click Finish.
Lesson 1: Understanding CAS 463
How to Add a Code Group
To add a code group, start the .NET Framework 2.0 Configuration tool and perform
the following steps:
1. Expand the My Computer node and then expand Runtime Security Policy.
2. Expand Enterprise, Machine, or User, depending on the policy level in which
you want to define the code group.
3. Expand Code Groups, expand All_Code (if possible), and examine the existing
child code groups. If the code group that you want to create defines a subset of
permissions for an existing code group, click that code group. Otherwise, click
All_Code.
4. Click Add A Child Code Group.
5. On the Identify The New Code Group page, type a name and a description, and
then click Next.
6. On the Choose A Condition Type page, specify the condition type for the code
group by choosing the evidence that the runtime will use to identify the code
and then click Next.
7. On the Assign A Permission Set To The Code Group page, select the Use
Existing Permission Set option if one of the current permission sets exactly
meets your needs. Otherwise, select the Create A New Permission Set option
and then click Next.
8. If you selected the Create A New Permission Set option, perform the following
steps:
a. On the Identify The New Permission Set page, specify a name and descrip-
tion and then click Next.
b. On the Assign Individual Permissions To Permission Set page, click the per-
missions you want in the permission set and click Add. For each permis-
sion, specify the permission settings that are unique to that permission,
click OK, and then click Next.
9. On the Completing The Wizard page, click Finish.
How to Increase an Assembly’s Trust
If you have restricted the default CAS permissions on your computer, you might need
to grant additional trust to specific assemblies to grant them the permissions they
464 Chapter 11 Application Security
need to run correctly. To do this, start the .NET Framework 2.0 Configuration tool
and perform the following steps:
1. Expand the My Computer node and then click Runtime Security Policy.
2. Click Increase Assembly Trust. The Trust An Assembly wizard appears.
3. On the What Would You Like To Modify? page, perform either or both of the fol-
lowing, as desired:
T Select the Make Changes To This Computer option to adjust the Machine
policy level.
T Select the Make Changes For The Current User Only option to adjust the
User policy level.
4. Click Next.
NOTE You must be an administrator to adjust the Machine policy level.
5. On the What Assembly Do You Want To Trust? page, click Browse. Select the
assembly that you want to trust and then click Open. You can trust only assem-
blies that have a strong name. Click Next.
6. On the Choose The Minimum Level Of Trust For The Assembly page, select the
minimum trust level for the assembly and then click Next.
7. On the Completing The Wizard page, review your selections and then click Finish.
How to Adjust Zone Security
By default, the .NET Framework includes five zones, each with a unique set of CAS per-
missions. You should use these default zones whenever possible, but you might need to
change the permission set that a zone uses. To do this, start the .NET Framework 2.0
Configuration tool and perform the following steps:
1. Expand the My Computer node and then expand Runtime Security Policy,
expand Machine, expand Code Groups, and expand All_Code.
2. Click the zone that you want to adjust. In the right pane, click Edit Code Group
Properties.
3. Click the Permission Set tab (shown in Figure 11-7), click an item in the Permis-
sion Set list to specify the desired permission set, and then click OK.
Lesson 1: Understanding CAS 465
Figure 11-7 Adjust the permissions assigned to a zone by adjusting the associated code group’s
properties
As a developer, one of the first things you should do is adjust the permission set
assigned to the My_Computer_Zone code group. By default, it’s set to FullTrust,
which means any CAS statements in your applications are completely ignored.
Change this to the Everything permission set, which grants similar permissions but
respects CAS statements in assemblies. Alternatively, you can restrict access to local
assemblies further by choosing another permission set.
How to Reset Policy Levels
You might need to restore the default policy levels after making modifications. To do
this, start the .NET Framework 2.0 Configuration tool and perform the following steps:
1. Expand the My Computer node and then click Runtime Security Policy. In the
right pane, click Reset All Policy Levels.
2. Click Yes and then click OK.
The .NET Framework 2.0 Configuration tool restores the original policy level settings,
including removing all custom code groups and permission sets that you created.
How to Use the Code Access Security Policy Tool
You can use the Code Access Security Policy tool (Caspol.exe, located in %Windir%\
Microsoft.NET\Framework\v2.0.50727\) to examine and modify Machine-, User-, and
466 Chapter 11 Application Security
Enterprise-level CAS policies. Although the .NET Framework 2.0 Configuration tool is
the most convenient tool to use for manual configuration, Caspol provides similar func-
tionality at the command line.
MORE INFO Caspol
Caspol features a dizzying set of parameters, and this book covers only a handful of the most
common ones. For complete instructions, at the command prompt, run this command:
Caspol -?
Caspol Parameters
Caspol uses an extremely complicated set of options. Table 11-5 lists the most com-
monly used options. The –addgroup and –chggroup options take additional parameters
in the form of membership conditions and flags. Membership conditions, described in
Table 11-6, are the evidence that the .NET Framework uses to determine to which code
group to assign an assembly. Flags define the name, description, and other options and
are listed in Table 11-7.
Table 11-5 Commonly Used Caspol Options
Option Description
–addfulltrust
assembly_file
Adds an assembly that implements a custom security
object (such as a custom permission or a custom
membership condition) to the full trust assembly list
for a specific policy level. The assembly_file argument
specifies the assembly to add. This file must be signed
with a strong name.
–addgroup parent_name
membership_condition
permission_set_name
[flags]
Adds a new code group. The parent_name argument
specifies the name of the code group that will be the
parent of the code group being added. The
membership_condition argument specifies the
membership condition for the new code group
(described in Table 11-6).
The permission_set_name argument is the name of the
permission set to be associated with the new code
group. You can also set one or more flags for the new
group (described in Table 11-7).
Lesson 1: Understanding CAS 467
–all Indicates that all options following this one apply to
the Enterprise, Machine, and the current User policy.
–chggroup name
{membership_condition
| permission_set_name
| flags}
Changes a code group’s membership condition,
permission set, or the settings of the exclusive,
levelfinal, name, or description flags. The name
argument specifies the name of the code group to
change. The permission_set_name argument specifies
the name of the permission set to associate with the
code group. See Tables 11-6 and 11-7 for information
about the membership_condition and flags arguments.
–enterprise Indicates that all options following this one apply to
the Enterprise-level policy. Users who are not
enterprise administrators do not have sufficient rights
to modify the Enterprise policy, although they can
view it.
–execution {on | off} Turns on or off the mechanism that checks for the
permission to run before code starts to run.
–help Displays command syntax and options for Caspol.
–list Lists the code group hierarchy and the permission sets
for the specified Machine, User, or Enterprise policy
level or all policy levels.
–listdescription Lists all code group descriptions for the specified
policy level.
–listfulltrust Lists the contents of the full trust assembly list for the
specified policy level.
–listgroups Displays the code groups of the specified policy level
or all policy levels. Caspol displays the code group’s
label first, followed by the name if it is not null.
–listpset Displays the permission sets for the specified policy
level or all policy levels.
Table 11-5 Commonly Used Caspol Options
Option Description
468 Chapter 11 Application Security
–machine Indicates that all options following this one apply to
the Machine-level policy. Users who are not
administrators do not have sufficient rights to modify
the Machine policy, although they can view it. For
administrators, –machine is the default.
–quiet Temporarily disables the prompt that is normally
displayed for an option that causes policy changes.
–recover Recovers policy from a backup file. Whenever a policy
change is made, Caspol stores the old policy in a
backup file.
–remgroup name Removes the specified code group. If the specified code
group has child code groups, Caspol also removes all
the child code groups.
–rempset
permission_set_name
Removes the specified permission set from policy. The
permission_set_name argument indicates which
permission set to remove. Caspol removes the
permission set only if it is not associated with any code
group. The built-in permission sets cannot be removed.
–reset Returns policy to its default state.
–resolvegroup
assembly_file
Shows the code groups to which a specific assembly
(assembly_file) belongs.
–resolveperm
assembly_file
Displays all permissions that security policy would
grant the assembly (assembly_file) if the assembly were
allowed to run.
–security {on | off} Turns code access security on or off. When code access
security is disabled, all code access demands succeed.
–user Indicates that all options following this one apply to
the User-level policy for the user on whose behalf
Caspol is running. For nonadministrative users, -user is
the default.
–? Displays command syntax and options for Caspol.
Table 11-5 Commonly Used Caspol Options
Option Description
Lesson 1: Understanding CAS 469
Table 11-6
Caspol Membership Conditions
This Membership
Condition
Specifies
–all All code.
–appdir The application directory. If you specify –
appdir as the membership condition, the
URL evidence of code is compared with
the application directory evidence of that
code. If both evidence values are the same,
this membership condition is satisfied.
–hash hash_algorithm {–hex
hash_value | –file assembly_file }
Code that has the given assembly hash. To
use a hash as a code group membership
condition, you must specify either the
hash value or the assembly file.
–pub { –cert cert_file_name | –file
signed_file_name | –hex hex_string }
Code that has the given software
publisher, as denoted by a certificate file,
a signature on a file, or the hexadecimal
representation of an X509 certificate.
–site website Code that has the given site of origin. For
example:
-site www.microsoft.com
–strong –file file_name {name |
–noname} {version | –noversion}
Code that has a specific strong name, as
designated by the filename, the assembly
name as a string, and the assembly version
in the format major.minor.build.revision.
For example:
–strong –file myAssembly.exe
myAssembly 1.2.3.4
(Enter the previous code as a single
command. It is shown here on multiple
lines so it can fit on the printed page.)
470 Chapter 11 Application Security
–url URL Code that originates from the given URL.
The URL must include a protocol, such
as http:// or ftp://. In addition, a wildcard
character (*) can be used to
specify multiple assemblies from a
particular URL.
To specify a file share on a network, use
the following syntax:
–url \\servername\sharename\*
The trailing asterisk (*) is required to
identify the share properly.
–zone zonename Code with the given zone of origin. The
zonename argument can be one of the
following values: MyComputer, Intranet,
Trusted, Internet, or Untrusted.
Table 11-7 Caspol Flags
Flag Description
–description description If used with the –addgroup option, specifies the
description for a code group to add. If used with the
–chggroup option, specifies the description for a
code group to edit. You must add double quotes
around the description, even if it does not include
spaces.
–exclusive {on|off} When set to on, indicates that only the permission
set associated with the code group you are adding
or modifying is considered when some code fits the
membership condition of the code group. When
this option is set to off, Caspol considers the
permission sets of all matching code groups in the
policy level.
Table 11-6 Caspol Membership Conditions
This Membership
Condition
Specifies
Lesson 1: Understanding CAS 471
How to Perform Common Tasks with Caspol
The following list provides usage examples for common tasks that you might want to
perform with Caspol:
NOTE The commands in this section have been formatted to fit on the printed page. They should
be entered as a single command at the command prompt.
To grant an assembly full trust
Caspol –addfulltrust assemblyname.exe
For example, to grant the C:\Program Files\Mine\Mine.exe assembly full trust, you
would run the following command:
Caspol –addfulltrust "C:\Program Files\Mine\Mine.exe"
To add a code group to the Machine policy
Caspol –machine –addgroup Parent_ Code_Group
Membership_Conditions Permission_Set -name "Group_Name"
–levelfinal {on|off} When set to on, indicates that no policy level
below the level in which the added or modified
code group occurs is considered. This option is
typically used at the Machine policy level.
For example, if you set this flag for a code group at
the Machine level, and some code matches this
code group’s membership condition, Caspol does
not calculate or apply the User-level policy for
this code.
–name "name" If used with the –addgroup option, specifies the
scripting name for a code group to add. If used with
the -chggroup option, specifies the scripting name
for a code group to edit. The name argument must
be enclosed in double quotation marks, even
though it cannot include spaces.
Table 11-7 Caspol Flags
Flag Description
472 Chapter 11 Application Security
For example, to add a code group named My_Code_Group to the Machine policy
level’s All_Code code group, using a URL of \\devserver\devshare\, which grants
LocalIntranet permissions, you would run the following command with administra-
tive privileges:
Caspol -machine -addgroup All_Code -url \\devserver\devshare\* LocalIntranet
-name "My_Code_Group"
To add a code group to the User policy
Caspol -user -addgroup Parent_Code_ Group Membership_Condition
Permission_Set -name "Group_Name"
Similarly, to add a code group named User_Code_Group to the User policy level’s
All_Code group, using a site of www.contoso.com, which grants FullTrust permissions,
you would run the following command:
Caspol -user -addgroup All_Code -site www.contoso.com FullTrust -name
"User_Code_Group"
NOTE Refreshing the .NET Framework 2.0 Configuration tool
You must close and reopen the .NET Framework 2.0 Configuration tool to see changes caused by
Caspol. But then again, if you have the .NET Framework 2.0 Configuration tool open, why are you
using Caspol?
To adjust zone security for a Machine policy
Caspol -chggroup Code_Group Permission_Set
For example, to change the Machine My_Computer_Zone security policy to use the
LocalIntranet permission set, run the following command with administrative privileges:
Caspol -chggroup My_Computer_Zone LocalIntranet
To reset policy levels for the Machine policy level
Caspol -recover
Lab: Configuring CAS
In this lab, you will configure CAS using both the graphical .NET Framework 2.0 Con-
figuration tool and the command-line Caspol tool. Complete Exercises 1 through 3.
The last step of Exercise 3 restores your original settings to ensure that future prac-
tices work correctly.
Lesson 1: Understanding CAS 473
Exercise 1: Compile and Test the Permissions of a Sample Assembly
In this exercise, you will compile and test the permissions of a sample assembly in a
restricted My_Computer_Zone.
1. Log on to your computer as an Administrator.
NOTE Logging on as an Administrator
For other practices in this chapter, and most tasks on your computer, you should be logged
on as a standard user. This exercise is an exception because it uses the default C$ share, to
which only administrators have access by default. You can log on as a standard user if you
create a new share that can be accessed by standard users.
2. Navigate to the \<InstallHome>\Chapter11\Lesson1\Exercise1\Partial folder
and open either the C# version or the Visual Basic .NET version of the solu-
tion file.
3. From the Build menu select Build Solution. Visual Studio compiles the
application.
4. Copy the ListPermissions.exe file to the root of your C: drive, and respond to any
User Account Control (UAC) prompts that appear.
5. Open a command prompt and run the command C:\ListPermissions.exe. List-
Permissions runs and displays several common permissions, and whether the
assembly currently has that permission. Notice that you have all the listed per-
missions. Press Enter. Answer the following question:
Why does the assembly have all the permissions?
The assembly is currently running in the My_Computer_Zone because
you started it from the C:\ drive. By default, that zone uses the FullTrust permis-
sion set.
6. Run the command \\127.0.0.1\c$\ListPermissions.exe. Notice that you are
now missing several permissions; in particular, IsolatedStorageFilePermission is
missing. Press Enter. Answer the following question:
Why is the assembly now missing permissions, and what code group deter-
mined the permissions?
The assembly is now being run from a shared folder, so it is running from the
Internet zone. Because the IP address being used is the special loopback
address, it is part of the Internet_Same_Site_Access code group.
474 Chapter 11 Application Security
Exercise 2: Create a Code Group and Permission Set with the .NET
Framework 2.0 Configuration Tool
In this exercise, you will use the .NET Framework 2.0 Configuration tool to create a
code group that uses a new permission set.
1. Start the .NET Framework 2.0 Configuration tool. Expand My Computer, Run-time
Security Policy, Machine, Code Groups, and then All_Code.
2. Right-click All_Code and then click New. The Create Code Group wizard
appears.
3. In the Name box, type Local_Shared_Folder. In the Description box, type Code
run from a network drive mapped to the local shared C: drive an then click
Next.
4. On the Choose A Condition Type page, select URL. In the URL box (as shown in
Figure 11-8), type file://127.0.0.1/c$/* and then click Next.
Figure 11-8 Use the URL condition to specify code groups for assemblies running from
shared folders
5. On the Assign A Permission Set To The Code Group page, select the Create A
New Permission Set option and then click Next.
6. On the Identify The New Permission Set page, type GenerousPermissions in the
Name box. In the Description box, type Permissions for the ListPermissions
assembly and then click Next.
Lesson 1: Understanding CAS 475
7. On the Assign Individual Permissions To Permission Set page, double-click Isolated
Storage File. In the Permission Settings dialog box, select the Grant Assemblies
Unrestricted Access To File-Based Storage option. Click OK and then click Next.
8. On the Completing The Wizard page, click Finish.
9. Open a command prompt and run the command \\127.0.0.1\c$\ListPermis-
sions.exe. Notice that ListPermission now has the IsolatedStorageFilePermission.
Press Enter. Answer the following question:
Why does the assembly now have the IsolatedStorageFilePermission?
The assembly is currently running in both the Local_Shared_Folder code group
and the Internet_Same_Site_Access code group. The permissions in the Generous-
Permissions permission set have been added to the previously existing permissions.
Exercise 3: Modify a Code Group with the Caspol Tool and Restore
Default Settings
In this exercise, you modify the newly created code group with the Caspol tool, test
the change, and then restore the default settings.
1. Open the Visual Studio 2008 Command Prompt with Administrative privileges,
and run the following command to change the Local_Shared_Folder code group
permission set to Everything:
Caspol -chggroup Local_Shared_Folder Everything
2. When prompted, press Y and then press Enter. If you receive an error message,
manually rename the code group permission set to Local_Shared_Folder and
repeat step 1.
3. Run \\127.0.0.1\c$\Listpermissions. Notice that the assembly now has all
permissions, indicating that the Local_Shared_Folder code group now has the
Everything permission set.
4. Restore the default CAS settings by running the command Caspol –recover.
Lesson Summary
Q CAS is a security system that authorizes managed assemblies to access system
resources.
Q CAS is implemented by using the following four components:
T Evidence, which identifies an assembly
T Permissions, which describe which resources an assembly can access
476 Chapter 11 Application Security
T Permission sets, which collect multiple permissions
T Code groups, which assign permissions to an assembly based on evidence
Q A security policy is a logical grouping of code groups and permission sets. You can
use multiple levels of security policy to simplify CAS administration. Assemblies
receive the most restrictive set of permissions assigned by each of the policy levels.
Q CAS permissions can never override a user’s operating system permissions. An
assembly’s effective permissions are the intersection of the permissions granted
to the assembly by CAS and the permissions granted to the user by the operating
system.
Q The .NET Framework 2.0 Configuration tool is a graphical tool for configuring
any aspect of CAS. To use the tool, start the Microsoft .NET Framework 2.0 Con-
figuration from the Administrative Tools group or by opening the %WinDir%\
Microsoft.NET\Framework\v2.0.50727\Mscorcfg.msc snap-in.
Q The Code Access Security Policy tool, Caspol, is a command-line tool with a large
number of options for controlling almost every aspect of CAS behavior. To use
Caspol, call it from the directory the .NET Framework 2.0 is installed into.
Lesson Review
You can use the following questions to test your knowledge of general CAS informa-
tion. The questions are also available on the companion CD if you prefer to review
them in electronic form.
NOTE Answers
Answers to these questions and explanations of why each answer choice is right or wrong are
located in the “Answers” section at the end of the book.
1. Which of the following evidence types require an assembly to be signed?
(Choose all that apply.)
A. Zone
B. Strong Name
C. Hash
D. Publisher
2. Which permission must an assembly have to connect to a Web server?
A. SocketPermission
B. WebPermission
Lesson 1: Understanding CAS 477
C. DnsPermission
D. ServiceControllerPermission
3. Which of the following code groups offers the most restrictive permission set?
A. My_Computer_Zone
B. LocalIntranet_Zone
C. Internet_Zone
D. Restricted_Zone
4. Your user account has Read access to a file named Text.txt. You run an assembly
in the My_Computer_Zone code group, which grants it the FullTrust permis-
sion set. Which of the following actions can the assembly perform on the file?
A. Read
B. Write
C. Change permissions
D. Delete
478 Chapter 11 Application Security
Lesson 2: Using Declarative Security to Protect Assemblies
In Lesson 1, you learned that CAS can restrict permissions granted to an application.
In some situations, CAS security is so restrictive that your application won’t have the
permissions required for even the most basic functionality, and the runtime should
detect this problem and prevent your assembly from running. In other situations,
your application has more permissions than necessary, which violates the principle of
least privilege and makes your application unnecessarily vulnerable to abuse.
You can use declarative CAS demands to ensure that your assembly has all necessary
permissions but none that it does not require. As an additional benefit, administrators
deploying your application can examine the assembly’s declarative CAS demands to
identify the minimum permissions they need to grant to take advantage of all your
application’s functionality.
After this lesson, you will be able to:
Q Describe why you should use CAS assembly declarations
Q List the classes built into the .NET Framework for CAS permissions
Q List the three types of CAS assembly declarations
Q Create CAS assembly declarations
Q Explain the guidelines for effectively implementing CAS assembly declarations
Estimated lesson time: 45 minutes
Reasons to Use CAS Assembly Declarations
There are three main reasons to use CAS assembly declarations:
Q To ensure that the runtime never runs your application without granting access to
required resources
If you have not built exception handling into your applica-
tion to respond to situations in which your assembly lacks the necessary CAS
permissions, use SecurityAction.RequestMinimum to declare all CAS permissions
required by your application. If a user attempts to run your application and CAS
security policy does not grant a required permission, the runtime throws an
exception. Users might not be able to identify the problem based on the excep-
tion information displayed by the runtime, but an administrator should under-
stand the problem. Either way, using SecurityAction.RequestMinimum is better
than having unexpected exceptions while your application is running.
Q To create a small sandbox for your application to ensure that an attacker does not
manipulate your application to cause it to access unintended resources
The princi-
ple of least privilege reduces the chances of an attacker abusing your assembly by
Lesson 2: Using Declarative Security to Protect Assemblies 479
causing it to take unintended actions, such as revealing the contents of private
files, destroying data, or propagating malicious viruses and worms. By using
assembly CAS declarations to restrict your assembly’s CAS permissions to the bare
minimum, you eliminate the risk of an attacker manipulating your application into
accessing resources that it would not normally access. This reduces the risk of
common attacks, such as canonicalization attacks in which the attacker tricks an
application into processing an invalid file by providing a malformed path.
Q To verify that your application can run with limited CAS permissions and therefore run
in partially trusted zones
There is currently no way to identify the permissions
required by an application easily. However, if you develop and test your application
using SecurityAction.RequestOptional CAS declarations, the runtime grants your
assembly only those permissions that you specify. If you add code that requires
additional permissions, the runtime throws a System.Security.Policy.Policy
Exception, indicating the required permission. You can then add another Security-
Action.RequestOptional CAS declaration, ensuring that you maintain an accurate
list of required permissions.
Classes for CAS Permissions
CAS can restrict access to many types of resources—from files and folders, to printers,
to network access. For each type of resource that can be protected, the .NET Frame-
work provides a class. Table 11-8 lists each class used for assembly CAS declarations
and the rights that the class represents.
NOTE Using Attributes
The .NET Framework also provides attribute classes for each of the classes listed in Table 11-8. The
attribute classes have Attribute appended to the name. You don’t need to worry about this when
writing code, however, because the .NET Framework automatically uses the attribute classes when
you reference these classes declaratively.
Table 11-8
Classes and Interfaces Used for Assembly CAS Declarations
Class Right Represented
AspNetHostingPermission Access resources in ASP.NET-hosted environments.
DataProtectionPermission Access encrypted data and memory.
DirectoryServicesPermission Access to the System.DirectoryServices classes.
DnsPermission Access to DNS.
EnvironmentPermission Read or write environment variables.
480 Chapter 11 Application Security
EventLogPermission Gives Read or Write access to event log services.
FileDialogPermission Access files that have been selected by the user in an
Open dialog box.
FileIOPermission Read, append, or write files or directories.
GacIdentityPermission Defines the identity permission for files originating
in the global assembly cache (GAC).
IsolatedStorage
File-Permission
Access isolated storage, which is storage that is
associated with a specific user and with some aspect
of the code’s identity, such as its Web site, publisher,
or signature.
IUnrestrictedPermission An interface that allows a permission to expose an
unrestricted state.
KeyContainerPermission Access to public key encryption containers.
MessageQueuePermission Access message queues through the managed
Microsoft Message Queuing (MSMQ) interfaces.
OdbcPermission Access an ODBC data source.
OleDbPermission Access databases using OLE DB.
OraclePermission Access an Oracle database.
Performance
Counter-Permission
Access performance counters.
PrincipalPermission Control access based on username and group
memberships. This class is discussed in Chapter 12,
“User and Data Security.”
PrintingPermission Access printers.
ReflectionPermission Discover information about a type at runtime.
RegistryPermission Read, write, create, or delete registry keys and values.
SecurityPermission Execute, assert permissions, call into unmanaged
code, skip verification, and other rights.
Table 11-8 Classes and Interfaces Used for Assembly CAS Declarations
Class Right Represented
Lesson 2: Using Declarative Security to Protect Assemblies 481
Each class has unique members that you can use to control permissions further. For
example, you can set the OleDbPermissionAttribute.AllowBlankPassword property to
control whether your assembly will be allowed to use a blank password. Similarly, the
DirectoryServicesPermissionAttribute.Path property can be defined to limit your assem-
bly’s access to a specific branch of the AD DS. (Because of the large number of classes,
this book does not describe the use of each class and property.)
Because the permission attribute classes are inherited from the CodeAccessSecurity
Attribute class, they share some common properties and methods. However, you usu-
ally need to be familiar with only two standard properties:
Q Action Specifies the security action to take. Set this using the SecurityAction
enumeration.
Q Unrestricted A Boolean value that specifies that the permission enables access to
all the class’s resources. Setting this value to true is equivalent to selecting the
Grant Assemblies Unrestricted Access option when specifying permission set-
tings with the .NET Framework 2.0 Configuration tool.
ServiceControllerPermission Access running or stopped services.
SiteIdentityPermission Defines the identity permission for the Web site from
which the code originates.
SocketPermission Make or accept connections on a transport address.
SqlClientPermission Access SQL Server databases.
StorePermission Access stores containing X.509 certificates.
StrongName
Identity-Permission
Defines the identity permission for strong names.
UIPermission Access user interface functionality. Required to
debug an assembly.
UrlIdentityPermission Defines the identity permission for the URL from
which the code originates.
WebPermission Make or accept connections on a Web address.
ZoneIdentityPermission Defines the identity permission for the zone from
which the code originates.
Table 11-8 Classes and Interfaces Used for Assembly CAS Declarations
Class Right Represented
482 Chapter 11 Application Security
Types of Assembly Permission Declarations
All permission attribute classes define the Action property, which specifies how the
runtime interprets the permission. When creating assembly CAS declarations, you
must always set the Action property to one of three members of the SecurityAction enu-
meration. The following list describes each of these choices:
Q SecurityAction.RequestMinimum Requires a permission for your assembly to
run. If your assembly lacks the specified CAS permission, the runtime throws a
System.Security.Policy.PolicyException.
Q SecurityAction.RequestOptional Refuses all permissions not listed in a Security
Action.RequestOptional or SecurityAction.RequestMinimum declaration. Defining
permissions with this action ensures that your application will have no more per-
missions than those you have declared. If your assembly lacks the requested CAS
permissions, the runtime does not throw an exception, unlike its behavior with
SecurityAction.RequestMinimum. Therefore, use SecurityAction.RequestMinimum
and SecurityAction.RequestOptional together when your application cannot adapt
to a missing permission.
Q SecurityAction.RequestRefuse Reduces the permissions assigned to your applica-
tion. Use this type of declaration to ensure that your application does not have
access to critical resources that could potentially be abused. Unlike Security
Action.RequestMinimum, this declaration never causes the runtime to throw an
exception at load time.
NOTE Confusing Names
If these security action names are confusing, the problem is not you. Why is a declaration called
RequestMinimum if it’s actually a requirement? The name RequestMinimum sounds like your code is
politely asking for permissions. Given the way RequestMinimum behaves, it should be called
RequireMinimum because the runtime doesn’t respond nicely to a request for permissions that it
can’t provide—it throws an exception and refuses to run your assembly. Also, the runtime never
grants your code permissions that the code wouldn’t have had anyway. RequestOptional should
actually be called RefuseAllExcept because the primary purpose is to list explicitly only those CAS
permissions your application should have.
How to Create Assembly Declarations
The following code sample shows an assembly that requires CAS read access to the
C:\Windows\Win.ini file. If security policy does not grant that permission to the
assembly, the runtime throws an exception before running the assembly:
Lesson 2: Using Declarative Security to Protect Assemblies 483
' VB
Imports System.Security.Permissions
<Assembly: FileIOPermissionAttribute(SecurityAction.RequestMinimum, _
Read := "C:\windows\win.ini")>
Module Module1
Sub Main()
Console.WriteLine("Hello, World!")
End Sub
End Module
// C#
using System.Security.Permissions;
[assembly:FileIOPermissionAttribute(SecurityAction.RequestMinimum,
Read=@"C:\windows\win.ini")]
namespace DeclarativeExample
{
class Program
{
static void Main(string[] args)
{
Console.WriteLine("Hello, World!");
}
}
}
NOTE What You Say You Need vs. What You Really Need
The sample doesn’t actually access the C:\Windows\Win.ini file. CAS declarations are completely
arbitrary. It’s up to you to make sure they’re consistent with your application’s requirements.
The preceding example uses SecurityAction.RequestMinimum to cause the .NET Frame-
work runtime to throw an exception if the assembly does not have CAS permissions
to read the C:\Windows\Win.ini file. This ensures that the assembly does not run
unless the runtime provides the required permission, thereby preventing the applica-
tion from experiencing problems while running. However, throwing the exception
does not improve the security of the assembly because it does nothing to restrict the
assembly’s permissions.
Exam Tip For the exam, remember that CAS is significant only for partially trusted assemblies.
The runtime completely ignores CAS declarations for fully trusted assemblies.
To improve the assembly’s security, specify the SecurityAction.RequestOptional or
SecurityAction.RequestRefuse enumerations for the permission’s Action property.
Optionally, you can combine multiple declarations in a single assembly. For example,
484 Chapter 11 Application Security
if you want the runtime to throw an exception if you don’t have access to the HKEY_
LOCAL_MACHINE\Software registry key, and you don’t want any other CAS permis-
sions (except, of course, the Enable Assembly Execution security permission), you
would use the following declarations:
' VB
<Assembly: RegistryPermission(SecurityAction.RequestMinimum, _
Read:="HKEY_LOCAL_MACHINE\Software")>
<Assembly: UIPermission(SecurityAction.RequestOptional, _
Unrestricted:=True)>
<Assembly: RegistryPermission(SecurityAction.RequestOptional, _
Read:="HKEY_LOCAL_MACHINE\Software")>
// C#
[assembly:RegistryPermission(SecurityAction.RequestMinimum,
Read=@"HKEY_LOCAL_MACHINE\Software")]
[assembly: UIPermission(SecurityAction.RequestMinimum, Unrestricted = true)]
[assembly: RegistryPermission(SecurityAction.RequestOptional,
Read=@"HKEY_LOCAL_MACHINE\Software")]
If you use any SecurityAction.RequestOptional declarations and you want to debug your
assembly, you must also declare the UIPermission attribute and set the Unrestricted
parameter to true, as shown in the second statement of the previous example. You can
specify either SecurityAction.RequestOptional or SecurityAction.RequestMinimal for the
UIPermission attribute. Otherwise, your assembly does not have permission to inter-
act with the debugger. You can run the assembly without a debugger, though.
You can combine RequestMinimum, RequestOptional, and RequestRefuse, but combin-
ing RequestOptional and RequestRefuse might accomplish nothing. After all, Request
Optional refuses all permissions except those explicitly listed. The only case in which
you would combine RequestOptional and RequestRefuse is to refuse a subset of the spec-
ified RequestOptional permissions.
For example, the following declarations (which require adding a reference for the
System.Drawing namespace) cause the runtime to throw an exception if the assembly
does not have CAS printing permissions. The runtime denies all CAS permissions
except printing, opening windows, and file system access to the C:\ drive. Access to
the C:\Windows directory also is denied:
' VB
<Assembly: PrintingPermission(SecurityAction.RequestMinimum)>
<Assembly: UIPermission(SecurityAction.RequestOptional, _
Unrestricted:=True)>
<Assembly: FileIOPermissionAttribute(SecurityAction.RequestOptional, _
Read:="C:\")>
<Assembly: FileIOPermissionAttribute(SecurityAction.RequestRefuse, _
Read:="C:\Windows\")>


![mcsa-mcse implementing & administering security in a microsoft windows server 2003 network self-paced training kit [exam 70-299]](https://media.store123doc.com/images/document/14/rc/qt/medium_qtj1395723053.jpg)