Learn htML and Css with w3schools phần 4 pps
Bạn đang xem bản rút gọn của tài liệu. Xem và tải ngay bản đầy đủ của tài liệu tại đây (393.58 KB, 24 trang )
Learn HTML and CSS with w3schools
62
Adjusting Image Sizes
The following example, shown in Figure 10.7, demonstrates how to display images
in different sizes on the page.
The width and height attributes allow the page to render properly and more effi-
ciently before the image is downloaded. Without them, the page will render once,
then re-render when each image is loaded.
The image will be scaled to fit the stated height and width. Sometimes this can have
a desired effect, other times it's disastrous.
Try it yourself >>
<html>
<body>
<p>
<img src="hackanm.gif" width="20" height="20" />
</p>
<p>
<img src="hackanm.gif" width="45" height="45" />
</p>
<p>
<img src="hackanm.gif" width="70" height="70" />
</p>
<p>You can make an image smaller or larger by changing the
values of the height and width attributes.</p>
</body>
</html>
Figure 10.7
Chapter 10: HTML images
63
alt Attribute
The alt attribute is used to define an alternate text for an image. The alt attribute
tells the reader what he or she is missing on a page if the browser can’t load images.
The browser will then display the alternate text instead of the image.
The value of the alt attribute is an author-defined text:
<img src="boat.gif" alt="Big Boat" />
It is a good practice to include alternate text for every image on a page to improve the
display and usefulness of your document for people who have text-only browsers.
The following example shows what happens when the image file is not available.
The results are in Figure 10.8.
Try it yourself >>
<html>
<body>
<p>
An image:
<img src=" /constr4.gif" alt=”Site_Under_Construction”
width="200" height="50" />
</p>
</body>
</html>
Figure 10.8
Creating an Image Map
The following example demonstrates how to create an image map with clickable
regions. Each of the regions is a hyperlink. The results of this example are shown
in Figure 10.9.
Creating a simple image link was covered in Chapter 9, “HTML Links”.
Learn HTML and CSS with w3schools
64
Try it yourself >>
<html>
<body>
<p>Click on the sun or on one of the planets to watch it
closer:</p>
<img src="planets.gif" width="145" height="126" alt="Planets"
usemap="#planetmap" />
<map name="planetmap">
<area shape="rect" coords="0,0,82,126" alt="Sun" href="sun.
htm" />
<area shape="circle" coords="90,58,3" alt="Mercury"
href="mercur.htm" />
<area shape="circle" coords="124,58,8" alt="Venus"
href="venus.htm" />
</map>
</body>
</html>
Figure 10.9
Complete Tag Reference
w3schools’ tag reference contains additional information about these tags and their
attributes. A full list of legal attributes for each HTML element is listed in the
w3schools Complete HTML Reference online at:
/>65
CHAPTER 11
HTML TABLES
In This Chapter
❑ Creating HTML Tables
❑ Table Borders
❑ Table with No Border
❑ Headings in a Table
❑ Table with a Caption
❑ Cells Spanning Multiple Columns
❑ Tags Inside a Table
❑ Cell Padding
❑ Cell Spacing
❑ Table Background Colors and Images
❑ Cell Background Colors and Images
❑ frame Attribute
❑ Using frame and border to Control Table Borders
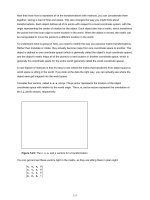
Creating HTML Tables
Tables are an excellent way to organize and display information on a page. Tables
are defined using the <table> tag.
A table is divided into rows with the <tr> tag, and each row is divided into data
cells using the <td> tag. The letters td stand for “table data,” which is the content of
a data cell. A data cell can contain text, images, lists, paragraphs, forms, horizontal
rules, tables, and so on. A simple HTML table appears in Figure 11.1.
Learn HTML and CSS with w3schools
66
Figure 11.1
A basic table includes the following tags:
8Each table starts with a table tag.
8Each table row starts with a tr tag.
8Each table data (cell) starts with a td tag.
Following is an example of code for a table with one row and one column.
Try it yourself >>
<html>
<body>
<h4>One column:</h4>
<table border="1">
<tr>
<td>100</td>
</tr>
</table>
</html>
</body>
Dow n l o a d from W o w ! eBoo k < w w w.wowe b o o k .com>
Chapter 11: HTML Tables
67
The following code creates a table with one row and three columns.
Try it yourself >>
<html>
<body>
<table border="1">
<tr>
<td>100</td>
<td>200</td>
<td>300</td>
</tr>
</table>
</html>
</body>
The following code creates a table with two rows and three columns.
Try it yourself >>
<html>
<body>
<table border="1">
<tr>
<td>100</td>
<td>200</td>
<td>300</td>
</tr>
<tr>
<td>400</td>
<td>500</td>
<td>600</td>
</tr>
</table>
</body>
</html>
Learn HTML and CSS with w3schools
68
The results of these three example tables appear in Figure 11.2.
Figure 11.2
Table Borders
The border attribute controls the appearance of the table’s borders or lines. The
default border is 0, so if you do not specify a border attribute, the table is dis-
played without any borders. Sometimes this is useful, but most of the time, you
want the borders to be visible. The following example demonstrates the use of dif-
ferent table borders. The results of this example are shown in Figure 11.3.
Try it yourself >>
<html>
<body>
<h4>With a normal border:</h4>
<table border="1">
<tr>
<td>First</td>
<td>Row</td>
</tr>
<tr>
<td>Second</td>
<td>Row</td>
</tr>
</table>
<h4>With a thick border:</h4>
<table border="8">
Chapter 11: HTML Tables
69
<tr>
<td>First</td>
<td>Row</td>
</tr>
<tr>
<td>Second</td>
<td>Row</td>
</tr>
</table>
<h4>With a very thick border:</h4>
<table border="15">
<tr>
<td>First</td>
<td>Row</td>
</tr>
<tr>
<td>Second</td>
<td>Row</td>
</tr>
</table>
</body>
</html>
Figure 11.3
Learn HTML and CSS with w3schools
70
Table with No Border
If you don't provide a border attribute, the default is none. The following example
shows two ways to create a table with no borders. Figure 11.4 displays the table as
it appears in the browser. Figure 11.4 displays the table as it appears in the browser.
Try it yourself >>
<html>
<body>
<h4>This table has no borders:</h4>
<table>
<tr>
<td>100</td>
<td>200</td>
<td>300</td>
</tr>
<tr>
<td>400</td>
<td>500</td>
<td>600</td>
</tr>
</table>
<h4>This table also has no borders:</h4>
<table border="0">
<tr>
<td>100</td>
<td>200</td>
<td>300</td>
</tr>
<tr>
<td>400</td>
<td>500</td>
<td>600</td>
</tr>
</table>
</body>
</html>
Chapter 11: HTML Tables
71
Figure 11.4
Headings in a Table
Table headings are defined with the <th> tag. Figure 11.5 shows the table as it
appears in the browser.
Try it yourself >>
<html>
<body>
<table border="1">
<tr>
<th>Heading</th>
<th>Another Heading</th>
</tr>
<tr>
<td>row 1, cell 1</td>
<td>row 1, cell 2</td>
</tr>
<tr>
<td>row 2, cell 1</td>
<td>row 2, cell 2</td>
</tr>
</table>
<h4>Vertical headers:</h4>
<table border="1">
<tr>
<th>First Name:</th>
(continued)
Learn HTML and CSS with w3schools
72
<td>Bill Gates</td>
</tr>
<tr>
<th>Telephone:</th>
<td>555 777 1854</td>
</tr>
<tr>
<th>Telephone:</th>
<td>555 777 1855</td>
</tr>
</table>
</body>
</html>
Figure 11.5
Empty Cells in a Table
Table cells with no content do not display very well in most browsers. Notice that
the borders around the empty table cell are missing (except when using Mozilla
Firefox). Figure 11.6 shows the table as it appears in the browser.
Try it yourself >>
<html>
<body>
(continued)
Chapter 11: HTML Tables
73
<table border="1">
<tr>
<td>row 1, cell 1</td>
<td>row 1, cell 2</td>
</tr>
<tr>
<td>row 2, cell 1</td>
<td></td>
</tr>
</table>
</body>
</html>
Figure 11.6
To avoid this, add a nonbreaking space ( ) to empty data cells to ensure the
borders are visible, as shown in Figure 11.7.
Try it yourself >>
<table border="1">
<tr>
<td>row 1, cell 1</td>
<td>row 1, cell 2</td>
</tr>
<tr>
<td>row 2, cell 1</td>
<td> </td>
</tr>
</table>
Learn HTML and CSS with w3schools
74
Figure 11.7
Table with a Caption
The following example demonstrates how to create a table with a caption, as shown
in Figure 11.8.
Try it yourself >>
<html>
<body>
<h4>This table has a caption, and a thick border:</h4>
<table border="6">
<caption>My Caption</caption>
<tr>
<td>100</td>
<td>200</td>
<td>300</td>
</tr>
<tr>
<td>400</td>
<td>500</td>
<td>600</td>
</tr>
</table>
</body>
</html>
The <thead>,<tbody>, and <tfoot> elements are seldom used, because of
bad browser support. Expect this to change in future versions of HTML.
T I P
Chapter 11: HTML Tables
75
Figure 11.8
Cells Spanning Multiple Columns
In this example, you learn how to define table cells that span more than one row or
one column, as shown in Figure 11.9.
Try it yourself >>
<html>
<body>
<h4>Cell that spans two columns:</h4>
<table border="1">
<tr>
<th>Name</th>
<th colspan="2">Telephone</th>
</tr>
<tr>
<td>Bill Gates</td>
<td>555 77 854</td>
<td>555 77 855</td>
</tr>
</table>
<h4>Cell that spans two rows:</h4>
<table border="1">
<tr>
<th>First Name:</th>
<td>Bill Gates</td>
</tr>
<tr>
<th rowspan="2">Telephone:</th>
<td>555 77 854</td>
(continued)
Learn HTML and CSS with w3schools
76
</tr>
<tr>
<td>555 77 855</td>
</tr>
</table>
</body>
</html>
Figure 11.9
Tags Inside a Table
This example demonstrates how to display elements inside other elements. The
results appear in Figure 11.10.
Try it yourself >>
<html>
<body>
<table border="1">
<tr>
<td>
<p>This is a paragraph</p>
<p>This is another paragraph</p>
</td>
<td>This cell contains a table:
(continued)
Chapter 11: HTML Tables
77
<table border="1">
<tr>
<td>A</td>
<td>B</td>
</tr>
<tr>
<td>C</td>
<td>D</td>
</tr>
</table>
</td>
</tr>
<tr>
<td>This cell contains a list
<ul>
<li>apples</li>
<li>bananas</li>
<li>pineapples</li>
</ul>
</td>
<td>HELLO</td>
</tr>
</table>
</body>
</html>
Figure 11.10
Dow n l o a d from W o w ! eBoo k < w w w.wowe b o o k .com>
Learn HTML and CSS with w3schools
78
Cell Padding
This example demonstrates how to use cell padding to create more white space
between the cell content and its borders. The results appear in Figure 11.11.
Try it yourself >>
<html>
<body>
<h4>Without cellpadding:</h4>
<table border="1">
<tr>
<td>First</td>
<td>Row</td>
</tr>
<tr>
<td>Second</td>
<td>Row</td>
</tr>
</table>
<h4>With cellpadding:</h4>
<table border="1" cellpadding="10">
<tr>
<td>First</td>
<td>Row</td>
</tr>
<tr>
<td>Second</td>
<td>Row</td>
</tr>
</table>
</body>
</html>
Chapter 11: HTML Tables
79
Figure 11.11
Cell Spacing
This example demonstrates how to use cell spacing to increase the distance between
the cells, as shown in Figure 11.12
Try it yourself >>
<html>
<body>
<h4>Without cellspacing:</h4>
<table border="1">
<tr>
<td>First</td>
<td>Row</td>
</tr>
<tr>
<td>Second</td>
<td>Row</td>
</tr>
</table>
<h4>With cellspacing:</h4>
<table border="1" cellspacing="10">
<tr>
<td>First</td>
(continued)
Learn HTML and CSS with w3schools
80
<td>Row</td>
</tr>
<tr>
<td>Second</td>
<td>Row</td>
</tr>
</table>
</body>
</html>
Figure 11.12
Table Background Colors and Images
This example demonstrates how to add a background to a table, as shown in Figure
11.13.
Try it yourself >>
<html>
<body>
<h4>A background color:</h4>
<table border="1" bgcolor="gray">
<tr>
<td>First</td>
<td>Row</td>
</tr>
<tr>
Chapter 11: HTML Tables
81
<td>Second</td>
<td>Row</td>
</tr>
</table>
<h4>A background image:</h4>
<table border="1" background="bgdesert.jpg">
<tr>
<td>First</td>
<td>Row</td>
</tr>
<tr>
<td>Second</td>
<td>Row</td>
</tr>
</table>
</body>
</html>
Figure 11.13
Learn HTML and CSS with w3schools
82
Cell Background Colors and Images
The following example demonstrates how to add a background to one or more table
cells. The result is shown in Figure 11.14.
Try it yourself >>
<html>
<body>
<h4>Cell backgrounds:</h4>
<table border="1">
<tr>
<td bgcolor="gray">First</td>
<td>Row</td>
</tr>
<tr>
<td background="bgdesert.jpg">
Second</td>
<td>Row</td>
</tr>
</table>
</body>
</html>
Figure 11.14
Aligning Cell Content
This sample code demonstrates how to use the align attribute to align the content
of cells to create a neatly organized table. The results of the code are shown in Figure
11.15.
Try it yourself >>
<html>
Chapter 11: HTML Tables
83
<body>
<table width="400" border="1">
<tr>
<th align="left">Money spent on </th>
<th align="right">January</th>
<th align="right">February</th>
</tr>
<tr>
<td align="left">Clothes</td>
<td align="right">$241.10</td>
<td align="right">$50.20</td>
</tr>
<tr>
<td align="left">Make-Up</td>
<td align="right">$30.00</td>
<td align="right">$44.45</td>
</tr>
<tr>
<td align="left">Food</td>
<td align="right">$730.40</td>
<td align="right">$650.00</td>
</tr>
<tr>
<th align="left">Sum</th>
<th align="right">$1001.50</th>
<th align="right">$744.65</th>
</tr>
</table>
</body>
</html>
Figure 11.15
Learn HTML and CSS with w3schools
84
frame Attribute
This example demonstrates how to use the frame attribute to control the borders
around the table. The results of these examples appear in Figures 11.16 through
11.18. If you see no frames around the tables in your browser, either your browser
is too old or it does not support the attribute.
Try it yourself >>
<html>
<body>
<h4>With frame="border":</h4>
<table frame="border">
<tr>
<td>First</td>
<td>Row</td>
</tr>
<tr>
<td>Second</td>
<td>Row</td>
</tr>
</table>
<h4>With frame="box":</h4>
<table frame="box">
<tr>
<td>First</td>
<td>Row</td>
</tr>
<tr>
<td>Second</td>
<td>Row</td>
</tr>
</table>
<h4>With frame="void":</h4>
<table frame="void">
<tr>
<td>First</td>
<td>Row</td>
</tr>
<tr>
<td>Second</td>
<td>Row</td>
</tr>
Chapter 11: HTML Tables
85
</table>
<html>
<body>
Figure 11.16
Try it yourself >>
<html>
<body>
<h4>With frame="above":</h4>
<table frame="above">
<tr>
<td>First</td>
<td>Row</td>
</tr>
<tr>
<td>Second</td>
<td>Row</td>
</tr>
</table>
<h4>With frame="below":</h4>
<table frame="below">
<tr>
(continued)