microsoft visual basic 2008 step by step phần 3 doc
Bạn đang xem bản rút gọn của tài liệu. Xem và tải ngay bản đầy đủ của tài liệu tại đây (868.81 KB, 57 trang )
86 Part I Getting Started with Microsoft Visual Basic 2008
As I mentioned earlier, you may open either the project fi le (Input Controls.vbproj) or
the solutions fi le (Input Controls.sln) to open solutions with only one project. In either
case, the Input Controls project opens in the IDE.
3. If the project’s form isn’t visible, click the Form1.vb form in Solution Explorer, and then
click the View Designer button.
4. Move or close the windows that block your view of the form so that you can see how
the objects are laid out.
You see a form similar to this:
The Input Controls form contains radio button, check box, list box, combo box, picture
box, button, and label objects. These objects work together to create a simple order
entry program that demonstrates how the Visual Basic input objects work. When the
Input Controls program is run, it loads images from the c:\vb08sbs\chap03\input con-
trols folder and displays them in the six picture boxes on the form.
Note
If you installed the practice fi les in a location other than the default c:\vb08sbs
folder, the statements in the program that load the artwork from the disk contain an in-
correct path. (Each statement begins with c:\vb08sbs\chap03\input controls, as you’ll see
soon.) If this is the case, you can make the program work by renaming your practice fi les
folder \vb08sbs or by changing the paths in the Code Editor by using the editing keys or
the Quick Replace command on the Edit menu.
5. Click the Start Debugging button on the Standard toolbar.
The program runs in the IDE.
6. Click the Laptop radio button in the Computer box.
Chapter 3 Working with Toolbox Controls 87
The image of a laptop computer appears in the Products Ordered area on the right
side of the form. The user can click various options, and the current choice is depicted
in the order area on the right. In the Computer box, a group of radio buttons is used
to gather input from the user.
Radio buttons force the user to choose one (and only one) item from a list of possibili-
ties. (Radio buttons are called option buttons in Visual Basic 6.) When radio buttons are
placed inside a group box object on a form, the radio buttons are considered to be part
of a group, and only one option can be chosen. To create a group box, click the GroupBox
control on the Containers tab of the Toolbox, and then draw the control on your form.
(The GroupBox control replaces the Frame control in Visual Basic 6.) You can give the
group of radio buttons a title (as I have) by setting the Text property of the group box
object. When you move a group box object on the form, the controls within it also move.
7. Click to select the Answering Machine, Calculator, and Copy Machine check boxes in
the Offi ce Equipment box.
Check boxes are used in a program so that the user can select more than one option
at a time from a list. Click to clear the Calculator check box again, and notice that the
picture of the calculator disappears from the order area. Because each user interface
element responds to click events as they occur, order choices are refl ected immediately.
The code that completes these tasks is nearly identical to the code you entered earlier
in the CheckBox program.
8. Click Satellite Dish in the Peripherals list box.
A picture of a satellite dish is added to the order area.
List boxes are used to get a single response from a list of choices. They are created with
the ListBox control, and might contain many items to choose from. (Scroll bars appear
if the list of items is longer than the list box.) Unlike radio buttons, a list box doesn’t
require that the user be presented with a default selection. And from a programmatic
standpoint, items in a list box can be added to, removed from, or sorted while the pro-
gram is running. If you would like to see check marks next to the items in your list box,
use the CheckedListBox control in the Toolbox instead of the ListBox control.
9. Now choose U.S. Dollars (sorry, no credit) from the payment list in the Payment
Method combo box.
Combo boxes, or drop-down list boxes, are similar to regular list boxes, but they take
up less space. (The “combo” in a combo box basically comes from a “combination”
of an editable text box and a drop-down list.) Visual Basic automatically handles the
opening, closing, and scrolling of the list box. All you do as a programmer is create the
combo box by using the ComboBox control in the Toolbox, set the Text property to
provide directions or a default value, and then write code to add items to the combo
box and to process the user’s combo box selection. You’ll see examples of each task in
the program code for the Input Controls demonstration in the next section.
88 Part I Getting Started with Microsoft Visual Basic 2008
After you make your order selections, your screen looks something like this:
10. Practice making a few more changes to the order list (try different computers, peripherals,
and payment methods), and then click the Quit button in the program to exit.
When you click Quit, the program closes, and the IDE appears.
Looking at the Input Controls Program Code
Although you haven’t had much formal experience with program code yet, it’s worth taking a
quick look at a few event procedures in Input Controls to see how the program processes input
from the user interface elements. In these procedures, you’ll see the If…Then and Select Case
statements at work. You’ll learn about these and other decision structures in Chapter 6. For
now, concentrate on the CheckState property, which changes when a check box is selected,
and the SelectedIndex property, which changes when a list box is selected.
Examine check box and list box code
1. Be sure the program has stopped running, and then double-click the Answering
Machine check box in the Offi ce Equipment group box to display the CheckBox1_
CheckedChanged event procedure in the Code Editor.
You see the following program code:
'If the CheckState property for a check box is 1, it has a mark in it
If CheckBox1.CheckState = 1 Then
PictureBox2.Image = System.Drawing.Image.FromFile _
("c:\vb08sbs\chap03\input controls\answmach")
PictureBox2.Visible = True
Else
'If there is no mark, hide the image
PictureBox2.Visible = False
End If
Chapter 3 Working with Toolbox Controls 89
As you learned in Chapter 2, the fi rst line of this event procedure is a comment. Comments
are displayed in green type and are simply notes written by the programmer to describe
what’s important or interesting about this particular piece of program code. (Comments
are also occasionally generated by automated programming tools that compile programs
or insert code snippets.) I wrote this comment to remind myself that the CheckState
property contains a crucial value in this routine—a value of 1 if the fi rst check box
was checked.
The rest of the event procedure is nearly identical to the one you just wrote in the
CheckBox program. If you scroll down in the Code Editor, you see a similar event pro-
cedure for the CheckBox2 and CheckBox3 objects.
2. At the top edge of the Code Editor, click the Form1.vb [Design] tab to display the form
again, and then double-click the Peripherals list box on the form.
The ListBox1_SelectedIndexChanged event procedure appears in the Code Editor. You
see the following program statements:
'The item you picked (0-2) is held in the SelectedIndex property
Select Case ListBox1.SelectedIndex
Case 0
PictureBox3.Image = System.Drawing.Image.FromFile _
("c:\vb08sbs\chap03\input controls\harddisk")
Case 1
PictureBox3.Image = System.Drawing.Image.FromFile _
("c:\vb08sbs\chap03\input controls\printer")
Case 2
PictureBox3.Image = System.Drawing.Image.FromFile _
("c:\vb08sbs\chap03\input controls\satedish")
End Select
Here you see code that executes when the user clicks an item in the Peripherals list box in
the program. In this case, the important keyword is ListBox1.SelectedIndex, which is read
“the SelectedIndex property of the list box object named ListBox1.” After the user clicks an
item in the list box, the SelectedIndex property returns a number that corresponds to the
location of the item in the list box. (The fi rst item is numbered 0, the second item is num-
bered 1, and so on.)
In the previous code, SelectedIndex is evaluated by the Select Case decision structure,
and a different image is loaded depending on the value of the SelectedIndex property.
If the value is 0, a picture of a hard disk is loaded; if the value is 1, a picture of a printer
is loaded; and if the value is 2, a picture of a satellite dish is loaded. You’ll learn more
about how the Select Case decision structure works in Chapter 6.
3. At the top edge of the Code Editor, click the Form1.vb [Design] tab to display the form
again, and then double-click the form (not any of the objects) to display the code asso-
ciated with the form itself.
90 Part I Getting Started with Microsoft Visual Basic 2008
The Form1_Load event procedure appears in the Code Editor. This is the procedure that’s
executed each time the Input Controls program is loaded into memory. Programmers
put program statements in this special procedure when they want them executed every
time a form loads. (Your program can display more than one form, or none at all, but
the default behavior is that Visual Basic loads and runs the Form1_Load event procedure
each time the user runs the program.) Often, as in the Input Controls program, these
statements defi ne an aspect of the user interface that couldn’t be created by using the
controls in the Toolbox or the Properties window.
Here’s what the Form1_Load event procedure looks like for this program:
'These program statements run when the form loads
PictureBox1.Image = System.Drawing.Image.FromFile _
("c:\vb08sbs\chap03\input controls\pcomputr")
'Add items to a list box like this:
ListBox1.Items.Add("Extra hard disk")
ListBox1.Items.Add("Printer")
ListBox1.Items.Add("Satellite dish")
'Combo boxes are also filled with the Add method:
ComboBox1.Items.Add("U.S. Dollars")
ComboBox1.Items.Add("Check")
ComboBox1.Items.Add("English Pounds")
Three lines in this event procedure are comments displayed in green type. The second
line in the event procedure loads the personal computer image into the fi rst picture
box. (This line is broken in two using a space and the line continuation character, but
the compiler still thinks of it as one line.) Loading an image establishes the default set-
ting refl ected in the Computer radio button group box. Note also that text between
double quotes is displayed in red type.
The next three lines add items to the Peripherals list box (ListBox1) in the program. The
words in quotes will appear in the list box when it appears on the form. Below the list
box program statements, the items in the Payment Method combo box (ComboBox1)
are specifi ed. The important keyword in both these groups is Add, which is a special
function, or method, that adds items to list box and combo box objects.
You’re fi nished using the Input Controls program. Take a few minutes to examine any other
parts of the program you’re interested in, and then move on to the next exercise.
Chapter 3 Working with Toolbox Controls 91
Tip As noted on the previous page, most of the images in this simple example were
loaded using an absolute path name in the program code. This works fi ne as long as the
image exists at the specifi ed path. However, in a commercial application, you can’t always be
sure that your user won’t move around your application fi les, causing programs like this one
to generate an error when the fi les they use are no longer in the expected location. To make
your applications more seaworthy or robust, it is usually better to use relative paths when ac-
cessing images and other resources. You can also embed images and other resources within
your application. For information about this handy technique, which is carefully described
within your very own Visual Studio documentation fi les, see “How to: Create Embedded
Resources” and “Accessing Application Resources” in the Visual Studio 2008 documentation.
One Step Further: Using the LinkLabel Control
Providing access to the Web is now a standard feature of many Windows applications, and
with Visual Studio, adding this functionality is easier than ever. You can create a Visual Basic
program that runs from a Web server by creating a Web Forms project and using controls
in the Toolbox optimized for the Web. Alternatively, you can use Visual Basic to create a
Windows application that opens a Web browser within the application, providing access to
the Web while remaining a Windows program running on a client computer. We’ll postpone
writing Web Forms projects for a little while longer in this book, but in the following exercise
you’ll learn how to use the LinkLabel Toolbox control to create a Web link in a Windows pro-
gram that provides access to the Internet through Windows Internet Explorer or the default
Web browser on your system.
Note
To learn more about writing Web-aware Visual Basic 2008 applications, read Chapter 20,
“Creating Web Sites and Web Pages Using Visual Web Developer and ASP.NET.”
Create the WebLink program
1. On the File menu, click Close Project to close the Input Controls project.
2. On the File menu, click New Project.
The New Project dialog box opens.
3. Create a new Visual Basic Windows Forms Application project named MyWebLink.
The new project is created, and a blank form appears in the Designer.
92 Part I Getting Started with Microsoft Visual Basic 2008
4. Click the LinkLabel control in the Toolbox, and draw a rectangular link label object on
your form.
Link label objects look like label objects, except that all label text is displayed in blue
underlined type on the form.
5. Set the Text property of the link label object to the URL for the Microsoft Press home
page:
/>Your form looks like this:
6. Click the form in the IDE to select it. (Click the form itself, not the link label object.)
This is the technique you use to view the properties of the default form, Form1, in the
Properties window. Like other objects in your project, the form also has properties that
you can set.
7. Set the Text property of the form object to Web Link Test.
The Text property for a form controls what appears on the form’s title bar at design
time and when the program runs. Although this customization isn’t related exclusively
to the Web, I thought you’d enjoy picking up that skill now, before we move on to
other projects. (We’ll customize the title bar in most of the programs we build.)
8. Double-click the link label object, and then type the following program code in the
LinkLabel1_LinkClicked event procedure:
' Change the color of the link by setting LinkVisited to True.
LinkLabel1.LinkVisited = True
' Use the Process.Start method to open the default browser
' using the Microsoft Press URL:
System.Diagnostics.Process.Start _
(" /> Chapter 3 Working with Toolbox Controls 93
I’ve included comments in the program code to give you some practice entering them.
As soon as you enter the single quote character ('), Visual Studio changes the color of
the line to green, identifying the line as a comment. Comments are for documentation
purposes only—they aren’t evaluated or executed by the compiler.
The two program statements that aren’t comments control how the link works. Setting
the LinkVisited property to True gives the link that dimmer color of purple, which indi-
cates in many browsers that the HTML document associated with the link has already
been viewed. Although setting this property isn’t necessary to display a Web page,
it’s a good programming practice to provide the user with information in a way that’s
consistent with other applications.
The second program statement (which I have broken into two lines) runs the default
Web browser (such as Internet Explorer) if the browser isn’t already running. (If the
browser is running, the URL just loads immediately.) The Start method in the Process
class performs the important work, by starting a process or executable program ses-
sion in memory for the browser. The Process class, which manages many other aspects
of program execution, is a member of the System.Diagnostics namespace. By including
an Internet address or a URL along with the Start method, I’m letting Visual Basic know
that I want to view a Web site, and Visual Basic is clever enough to know that the de-
fault system browser is the tool that would best display that URL, even though I didn’t
identify the browser by name.
An exciting feature of the Process.Start method is that it can be used to run other
Windows applications, too. If I did want to identify a particular browser by name to
open the URL, I could have specifi ed one using the following syntax. (Here I’ll request
the Internet Explorer browser.)
System.Diagnostics.Process.Start("IExplore.exe", _
" />Here two arguments are used with the Start method, separated by a comma. The exact
location for the program named IExplore.exe on my system isn’t specifi ed, but Visual
Basic will search the current system path for it when the program runs.
If I wanted to run a different application with the Start method—for example, if I wanted
to run the Microsoft Word application and open the document c:\myletter.doc—I could
use the following syntax:
System.Diagnostics.Process.Start("Winword.exe", _
"c:\myletter.doc")
As you can see, the Start method in the Process class is very useful.
Now that you’ve entered your code, you should save your project. (If you experimented
with the Start syntax as I showed you, restore the original code shown at the beginning
of step 8 fi rst.)
94 Part I Getting Started with Microsoft Visual Basic 2008
9. Click the Save All button on the Standard toolbar to save your changes, and specify c:\
vb08sbs\chap03 as the location.
You can now run the program.
Run the WebLink program
Tip The complete WebLink program is located in the c:\vb08sbs\chap03\weblink folder.
1. Click the Start Debugging button on the Standard toolbar to run the WebLink program.
The form opens and runs, showing its Web site link and handsome title bar text.
2. Click the link to open the Web site at />Recall that it’s only a happy coincidence that the link label Text property contains the
same URL as the site you named in the program code. (It is not necessary that these
two items match.) You can enter any text you like in the link label. You can also use
the Image property for a link label to specify a picture to display in the background
of the link label. The following fi gure shows what the Microsoft Press Web page looks
like (in English) when the WebLink program displays it using Internet Explorer.
Chapter 3 Working with Toolbox Controls 95
3. Display the form again. (Click the Web Link Test form icon on the Windows taskbar if
the form isn’t visible.)
Notice that the link now appears in a dimmed style. Like a standard Web link, your link
label communicates that it’s been used (but is still active) by the color and intensity that
it appears in.
4. Click the Close button on the form to quit the test utility.
You’re fi nished writing code in this chapter, and you’re gaining valuable experience with
some of the Toolbox controls available for creating Windows Forms applications. Let’s
keep going!
Chapter 3 Quick Reference
To Do this
Create a text box Click the TextBox control, and draw the box.
Create a button Click the Button control, and draw the button.
Change a property at
run time
Change the value of the property by using program code. For example:
Label1.Text = "Hello!"
Create a radio button Use the RadioButton control. To create multiple radio buttons, place more
than one button object inside a box that you create by using the GroupBox
control.
Create a check box Click the CheckBox control, and draw a check box.
Create a list box Click the ListBox control, and draw a list box.
Create a drop-down
list box
Click the ComboBox control, and draw a drop-down list box.
Add items to a list box Include statements with the Add method in the Form1_Load event procedure
of your program. For example:
ListBox1.Items.Add("Printer")
Use a comment in
code
Type a single quotation mark (‘) in the Code Editor, and then type a descrip-
tive comment that will be ignored by the compiler. For example:
' Use the Process.Start method to start IE
Display a Web page Create a link to the Web page by using the LinkLabel control, and then open
the link in a browser by using the Process.Start method in program code.
T
o
D
o
t
hi
s
97
Chapter 4
Working with Menus, Toolbars, and
Dialog Boxes
After completing this chapter, you will be able to:
Add menus to your programs by using the MenuStrip control.
Process menu and toolbar selections by using event procedures and the Code Editor.
Add toolbars and buttons by using the ToolStrip control.
Use the OpenFileDialog and ColorDialog controls to create standard dialog boxes.
Add access keys and shortcut keys to menus.
In Chapter 3, “Working with Toolbox Controls,” you used several Microsoft Visual Studio 2008
controls to gather input from the user while he or she used a program. In this chapter, you’ll
learn how to present choices to the user by creating professional-looking menus, toolbars,
and dialog boxes.
A menu is located on the menu bar and contains a list of related commands; a toolbar con-
tains buttons and other tools that perform useful work in a program. Most menu and toolbar
commands are executed immediately after they’re clicked; for example, when the user clicks
the Copy command on the Edit menu, information is copied to the Clipboard immediately. If a
menu command is followed by an ellipsis (…), however, clicking the command displays a dialog
box requesting more information before the command is carried out, and many toolbar but-
tons also display dialog boxes.
In this chapter, you’ll learn how to use the MenuStrip and ToolStrip controls to add a profes-
sional look to your application’s user interface. You’ll also learn how to process menu, toolbar,
and dialog box commands.
98 Part I Getting Started with Microsoft Visual Basic 2008
Adding Menus by Using the MenuStrip Control
The MenuStrip control is a tool that adds menus to your programs, which you can customize
with property settings in the Properties window. With MenuStrip, you can add new menus,
modify and reorder existing menus, and delete old menus. You can also create a standard
menu confi guration automatically, and you can enhance your menus with special effects,
such as access keys, check marks, and keyboard shortcuts. The menus look perfect—just like
a professional Microsoft Windows application—but MenuStrip creates only the visible part of
your menus and commands. You still need to write event procedures that process the menu
selections and make the commands perform useful work. In the following exercise, you’ll take
your fi rst steps with this process by using the MenuStrip control to create a Clock menu con-
taining commands that display the current date and time.
Create a menu
1. Start Visual Studio.
2. On the File menu, click New Project.
The New Project dialog box opens.
3. Create a new Windows Forms Application project named MyMenu.
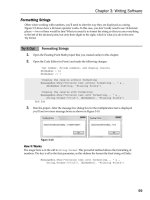
4. Click the MenuStrip control on the Menus & Toolbars tab of the Toolbox, and then draw
a menu control on your form.
Don’t worry about the location—Visual Studio will move the control and resize it
automatically. Your form looks like the one shown here:
Chapter 4 Working with Menus, Toolbars, and Dialog Boxes 99
The menu strip object doesn’t appear on your form, but below it. That’s different from
Microsoft Visual Basic 6, which in one way or another displays all objects on the form
itself—even those that don’t have a visual representation when the program ran, such
as the Timer control. But in Visual Studio, non-visible objects, such as menus and timers,
are displayed in the IDE in a separate pane named the component tray, and you can
select them, set their properties, or delete them from this pane.
In addition to the menu strip object in the component tray, Visual Studio displays a
visual representation of the menu you created at the top of the form. The Type Here
tag encourages you to click the tag and enter the title of your menu. After you enter the
fi rst menu title, you can enter submenu titles and other menu names by pressing
the arrow keys and typing additional names. Best of all, you can come back to this
in-line Menu Designer later and edit what you’ve done or add additional menu items—
the menu strip object is fully customizable and with it you can create an exciting menu-
driven user interface like the ones you’ve seen in the best Windows applications.
5. Click the Type Here tag, type Clock, and then press Enter.
The word “Clock” is entered as the name of your fi rst menu, and two additional Type
Here tags appear with which you can create submenu items below the new Clock menu
or additional menu titles. The submenu item is currently selected.
6. Type Date to create a Date command for the Clock menu, and then press Enter.
Visual Studio adds the Date command to the menu and selects the next submenu item.
7. Type Time to create a Time command for the menu, and then press Enter.
You now have a Clock menu with two menu commands, Date and Time. You could
continue to create additional menus or commands, but what you’ve done is suffi cient
for this example program. Your form looks like the one shown here:
100 Part I Getting Started with Microsoft Visual Basic 2008
8. Click the form to close the Menu Designer.
The Menu Designer closes, and your form opens in the IDE with a new Clock menu.
You’re ready to start customizing the menu now.
Adding Access Keys to Menu Commands
With most applications, you can access and execute menu commands by using the key-
board. For example, in Visual Studio you can open the File menu by pressing the Alt
key and then pressing the F key. Once the File menu is open, you can open a project
by pressing the P key. The key that you press in addition to the Alt key and the key that
you press to execute a command in an open menu are called access keys. You can identify
the access key of a menu item because it’s underlined.
Visual Studio makes it easy to provide access key support. To add an access key to a menu
item, activate the Menu Designer, and then type an ampersand (&) before the appropriate
letter in the menu name. When you open the menu at run time (when the program is run-
ning), your program automatically supports the access key.
Menu Conventions
By convention, each menu title and menu command in a Windows application has an
initial capital letter. File and Edit are often the fi rst two menu names on the menu bar,
and Help is usually the last. Other common menu names are View, Format, and Window.
No matter what menus and commands you use in your applications, take care to be
clear and consistent with them. Menus and commands should be easy to use and should
have as much in common as possible with those in other Windows–based applications.
As you create menu items, use the following guidelines:
Use short, specifi c captions consisting of one or two words at most.
Assign each menu item an access key. Use the fi rst letter of the item if possible,
or the access key that is commonly assigned (such as x for Exit).
Menu items at the same level must have a unique access key.
If a command is used as an on/off toggle, place a check mark to the left of the
item when it’s active. You can add a check mark by setting the Checked property
of the menu command to True in the Properties window.
Place an ellipsis (…) after a menu command that requires the user to enter more
information before the command can be executed. The ellipsis indicates that
you’ll open a dialog box if the user selects this item.
Chapter 4 Working with Menus, Toolbars, and Dialog Boxes 101
Note By default, most versions of Windows don’t display the underline for access keys in a pro-
gram until you press the Alt key for the fi rst time. In Windows 2000, you can turn off this option
(making the underline visible at all times) by clicking the Effects tab of the Display control panel.
In Windows XP and Windows Server 2003, you can turn off this option by using the Effects but-
ton on the Appearance tab of the Display Properties control panel. In Windows Vista, you can
turn off this option by clicking the Appearance And Personalization option in Control Panel,
clicking Ease Of Access Center, clicking Make The Keyboard Easier To Use, and then selecting
Underline Keyboard Shortcuts And Access Keys.
Try adding access keys to the Clock menu now.
Add access keys
1. Click the Clock menu name on the form, pause a moment, and then click it again.
The menu name is highlighted, and a blinking I-beam (text-editing cursor) appears at the
end of the selection. With the I-beam, you can edit your menu name or add the amper-
sand character (&) for an access key. (If you double-clicked the menu name, the Code Editor
might have opened. If that happened, close the Code Editor and repeat step 1.)
2. Press the Left Arrow key fi ve times to move the I-beam to just before the Clock
menu name.
The I-beam blinks before the letter C in Clock.
3. Type & to defi ne the letter C as the access key for the Clock menu.
An ampersand appears in the text box in front of the word Clock.
4. Click the Date command in the menu list, and then click Date a second time to display
the I-beam.
5. Type & before the letter D.
The letter D is now defi ned as the access key for the Date command.
6. Click the Time command in the menu list, and then click the command a second time
to display the I-beam.
7. Type & before the letter T.
The letter T is now defi ned as the access key for the Time command.
102 Part I Getting Started with Microsoft Visual Basic 2008
8. Press Enter.
Pressing Enter locks in your text-editing changes. Your form looks this:
Now you’ll practice using the Menu Designer to switch the order of the Date and Time
commands on the Clock menu. Changing the order of menu items is an important skill
because at times you’ll think of a better way to defi ne your menus.
Change the order of menu items
1. Click the Clock menu on the form to display its menu items.
To change the order of a menu item, simply drag the item to a new location on the
menu. Try it now.
2. Drag the Time menu on top of the Date menu, and then release the mouse button.
Dragging one menu item on top of another menu item means that you want to place
the fi rst menu item ahead of the second menu item on the menu. As quickly as that,
Visual Studio moved the Time menu item ahead of the Date item.
You’ve fi nished creating the user interface for the Clock menu. Now you’ll use the menu
event procedures to process the user’s menu selections in the program.
Note
To delete a menu item from a menu, click the unwanted item in the menu list, and then
press the Delete key. (If you try this now, remember that Visual Studio also has an Undo com-
mand, located on both the Edit menu and the Standard toolbar, so you can reverse the effects
of the deletion.)
Chapter 4 Working with Menus, Toolbars, and Dialog Boxes 103
Processing Menu Choices
After menus and commands are confi gured by using the menu strip object, they also
become new objects in your program. To make the menu objects do meaningful work,
you need to write event procedures for them. Menu event procedures typically contain
program statements that display or process information on the user interface form and
modify one or more menu properties. If more information is needed from the user to
process the selected command, you can write your event procedure so that it displays
a dialog box or one of the input controls you used in Chapter 3.
In the following exercise, you’ll add a label object to your form to display the output of the
Time and Date commands on the Clock menu.
Add a label object to the form
1. Click the Label control in the Toolbox.
2. Create a label in the middle of the form.
The label object appears on the form and bears the name Label1 in the program code.
3. Set the following properties for the label:
Object Property Setting
Label1 AutoSize
BorderStyle
Font
Text
TextAlign
False
FixedSingle
Microsoft Sans Serif, Bold, 14-point
(empty)
MiddleCenter
4. Resize the label object so that it is larger (it will be holding clock and date values), and
position it in the center of the form. Your form should look similar to the following:
Ob
j
ect Propert
y
Settin
g
104 Part I Getting Started with Microsoft Visual Basic 2008
Now you’ll add program statements to the Time and Date event procedures to process the
menu commands.
Note
In the following exercises, you’ll enter program code to process menu choices. It’s OK if
you’re still a bit hazy on what program code does and how you use it—you’ll learn much more
about program statements in Chapters 5 through 7.
Edit the menu event procedures
1. Click the Clock menu on the form to display its commands.
2. Double-click the Time command in the menu to open an event procedure for the
command in the Code Editor.
The TimeToolStripMenuItem_Click event procedure appears in the Code Editor. The
name TimeToolStripMenuItem_Click includes the name Time that you gave this menu
command. The words ToolStripMenuItem indicate that in its underlying technology,
the MenuStrip control is related to the ToolStrip control. (We’ll see further examples
of that later in this chapter.) The _Click syntax means that this is the event procedure
that runs when a user clicks the menu item.
We’ll keep this menu name for now, but if you wanted to create your own internal
names for menu objects, you could select the object, open the Properties window,
and change the Name property. Although I won’t bother with that extra step in this
chapter, later in the book you’ll practice renaming objects in your program to con-
form more readily to professional programming practices.
3. Type the following program statement:
Label1.Text = TimeString
This program statement displays the current time (from the system clock) in the Text
property of the Label1 object, replacing the previous Label1 text (if any). TimeString
is a property that contains the current time formatted for display or printing. You can
use TimeString at any time in your programs to display the time accurately down to
the second. (TimeString is essentially a replacement for the older Visual Basic TIME$
statement.)
Note
The Visual Basic TimeString property returns the current system time. You can set
the system time by using the Clock, Language, and Region category in the Windows Vista
Control Panel.
Chapter 4 Working with Menus, Toolbars, and Dialog Boxes 105
4. Press Enter.
Visual Basic interprets the line and adjusts capitalization and spacing, if necessary.
(Visual Basic checks each line for syntax errors as you enter it.)
Tip
You can enter a line by pressing Enter or Esc.
5. Click the View Designer button in Solution Explorer, and then double-click the Date
command on the Clock menu.
The DateToolStripMenuItem_Click event procedure appears in the Code Editor. This event
procedure is executed when the user clicks the Date command on the Clock menu.
6. Type the following program statement:
Label1.Text = DateString
This program statement displays the current date (from the system clock) in the Text
property of the Label1 object, replacing the previous Label1 text. The DateString prop-
erty is also available for general use in your programs. Assign DateString to the Text
property of an object whenever you want to display the current date on a form.
Note
The Visual Basic DateString property returns the current system date. You can set
the system date by using the Clock, Language, and Region category in the Windows Vista
Control Panel.
7. Press Enter to enter the line.
Your screen looks similar to this:
106 Part I Getting Started with Microsoft Visual Basic 2008
You’ve fi nished entering the menu demonstration program. Now you’ll save your
changes to the project and prepare to run it.
8. Click the Save All button on the Standard toolbar, and then specify the c:\vb08sbs\chap04
folder as the location.
Run the Menu program
Tip The complete Menu program is located in the c:\vb08sbs\chap04\menu folder.
1. Click the Start Debugging button on the Standard toolbar.
The Menu program runs in the IDE.
2. Click the Clock menu on the menu bar.
The Clock menu appears.
3. Click the Time command.
The current system time appears in the label box, as shown here:
Now you’ll try displaying the current date by using the access keys on the menu.
4. Press and release the Alt key, and then press the letter C.
The Clock menu opens and the fi rst item on it is highlighted.
Chapter 4 Working with Menus, Toolbars, and Dialog Boxes 107
5. Press D to display the current date.
The current date appears in the label box.
6. Click the Close button on the program’s title bar to stop the program.
Congratulations! You’ve created a working program that makes use of menus and access
keys. In the next exercise, you’ll learn how to use toolbars.
System Clock Properties and Functions
You can use various properties and functions to retrieve chronological values from the
system clock. You can use these values to create custom calendars, clocks, and alarms
in your programs. The following table lists the most useful system clock functions. For
more information, check the Visual Studio online Help.
Property or function Description
TimeString This property sets or returns the current time from the system
clock.
DateString This property sets or returns the current date from the system
clock.
Now This property returns an encoded value representing the cur-
rent date and time. This property is most useful as an argu-
ment for other system clock functions.
Hour (date) This function extracts the hour portion of the specifi ed date/
time value (0 through 23).
Minute (date) This function extracts the minute portion of the specifi ed
date/time value (0 through 59).
Second (date) This function extracts the second portion of the specifi ed
date/time value (0 through 59).
Month (date) This function extracts a whole number representing the
month (1 through 12).
Year (date) This function extracts the year portion of the specifi ed date/
time value.
Weekday (date) This function extracts a whole number representing the day of
the week (1 is Sunday, 2 is Monday, and so on).
P
ropert
y
or functio
n
D
escri
p
tion
108 Part I Getting Started with Microsoft Visual Basic 2008
Adding Toolbars with the ToolStrip Control
Parallel to the MenuStrip control, you can use the Visual Studio ToolStrip control to quickly
add toolbars to your program’s user interface. The ToolStrip control is placed on a Visual
Basic form but resides in the component tray in the IDE, just like the MenuStrip control.
You can also add a variety of features to your toolbars, including labels, combo boxes,
text boxes, and split buttons. Toolbars look especially exciting when you add them, but
remember that as with menu commands, you must write an event procedure for each
button that you want to use in your program. Still, compared with earlier versions of
Visual Basic, it is amazing how much toolbar programming and confi guring the IDE
does for you. Practice creating a toolbar now.
Create a toolbar
1. Click the ToolStrip control on the Menus & Toolbars tab of the Toolbox, and then draw
a toolbar control on your form.
Don’t worry about the location—Visual Studio will create a toolbar on your form
automatically and extend it across the window. The tool strip object itself appears
below the form in the component tray. On the form, the default toolbar contains
one button. Now you’ll use a special shortcut feature to populate the toolbar
automatically.
2. Click the tiny shortcut arrow in the upper-right corner of the new toolbar.
The shortcut arrow points to the right and looks similar to the shortcut arrow we
saw in the PictureBox control in Chapter 2, “Writing Your First Program.” This short-
cut arrow is called a smart tag. When you click the arrow, a ToolStrip Tasks window
opens that includes a few of the most common toolbar tasks and properties. You
can confi gure the toolbar quickly with these commands.
3. Click Insert Standard Items.
Visual Studio adds a collection of standard toolbar buttons to the toolbar, including
New, Open, Save, Print, Cut, Copy, Paste, and Help. Your form looks similar to the
illustration on the next page.
Chapter 4 Working with Menus, Toolbars, and Dialog Boxes 109
It is not necessary for you to start with a full toolbar of buttons as I have done here—
I’m merely demonstrating one of the useful “automatic” features of Visual Studio 2008.
You could also create the buttons on your toolbar one by one using the ToolStrip edit-
ing commands, as I’ll demonstrate shortly. But for many applications, clicking Insert
Standard Items is a time-saving feature. Remember, however, that although these tool-
bar buttons look professional, they are not functional yet. They need event procedures
to make them work.
4. Click the Add ToolStripButton arrow on the right side of the new toolbar, then click the
Button item.
Add ToolStripButton adds additional items to your toolbar, such as buttons, labels,
split buttons, text boxes, combo boxes, and other useful interface elements. You’ve
now created a custom toolbar button; by default it contains a picture of a mountain
and a sun.
5. Widen the form window to ensure that you can see all of the tool strip items.
6. Right-click the new button, point to DisplayStyle, and click ImageAndText.
Your new button displays both text and a graphical image on the toolbar. Visual
Studio names your new button ToolStripButton1 in the program, and this name
appears by default on the toolbar. If necessary, widen the form window to see the
new button, because it contains the default text value ToolStripButton1.
110 Part I Getting Started with Microsoft Visual Basic 2008
7. Select the ToolStripButton1 object.
8. Change the ToolStripButton1 object’s Text property to Color, which is the name of your
button on the form, and then press Enter.
The Color button appears on the toolbar. You’ll use this button later in the program to
change the color of text on the form. Now insert a custom bitmap for your button.
9. Right-click the Color button, and then click the Set Image command.
10. Click Local Resource (if it is not already selected), and then click the Import button.
11. Browse to the c:\vb08sbs\chap04 folder, click the ColorButton bitmap fi le that I created
for you, click Open, and then click OK.
Visual Studio loads the pink, blue, and yellow paint icon into the Color button, as
shown in the following illustration:
Your new button is complete, and you have learned how to add your own buttons to the
toolbar, in addition to the default items supplied by Visual Studio. Now you’ll learn how to
delete and rearrange toolbar buttons.
Move and delete toolbar buttons
1. Drag the new Color button to the left side of the toolbar.
Visual Studio lets you rearrange your toolbar buttons by using simple drag movements.
2. Right-click the second button in the toolbar (New), then click the Delete command.
The New button is removed from the toolbar. With the Delete command, you can de-
lete unwanted buttons, which makes it easy to customize the standard toolbar buttons
provided by the ToolStrip control.
3. Delete the Save and Print buttons, but be sure to keep the Color and Open buttons.
Now you’ll learn to use dialog box controls and connect them to toolbar buttons.