Beginning Microsoft Visual Basic 2008 phần 2 pps
Bạn đang xem bản rút gọn của tài liệu. Xem và tải ngay bản đầy đủ của tài liệu tại đây (1.03 MB, 92 trang )
Chapter 3: Writing Software
59
Formatting Strings
Often when working with numbers, you ’ ll need to alter the way they are displayed as a string.
Figure 3 - 5 shows how a division operator works. In this case, you don ’ t really need to see 14 decimal
places — two or three would be fine! What you need is to format the string so that you see everything
to the left of the decimal point, but only three digits to the right, which is what you do in the next
Try It Out.
Try It Out Formatting Strings
1.
Open the Floating - Point Math project that you created earlier in this chapter.
2. Open the Code Editor for Form1 and make the following changes:
‘Set number, divide numbers, and display results
dblNumber = 12
dblNumber /= 7
‘Display the results without formatting
MessageBox.Show(“Division test without formatting “ & _
dblNumber.ToString, “Floating Points”)
‘Display the results with formatting
MessageBox.Show(“Division test with formatting “ & _
String.Format(“{0:n3}”, dblNumber), “Floating Points”)
End Sub
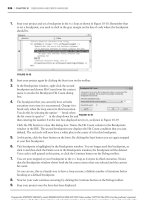
3. Run the project. After the message box dialog box for the multiplication test is displayed
you ’ ll see two more message boxes as shown in Figure 3 - 10 .
Figure 3-10
How It Works
The magic here is in the call to String.Format . This powerful method allows the formatting of
numbers. The key is all in the first parameter, as this defines the format the final string will take:
MessageBox.Show(“Division test with formatting “ & _
String.Format(“{0:n3}”, dblNumber), “Floating Points”)
c03.indd 59c03.indd 59 4/1/08 6:21:11 PM4/1/08 6:21:11 PM
Chapter 3: Writing Software
60
You passed String.Format two parameters. The first parameter, “ {0:n3} ” , is the format that you
want. The second parameter,
dblNumber , is the value that you want to format. Note that since you are
formatting a number to a string representation, you do not need to provide the
ToString method
after
dblNumber as in the previous call to the Show method of the MessageBox class. This is because
the
String.Format method is looking for a number and not a string.
The
0 in the format tells String.Format to work with the zeroth data parameter, which is just a cute
way of saying “ the second parameter ” , or
dblNumber . What follows the colon is how you want
dblNumber to be formatted. You said n3 , which means “ floating - point number, three decimal places. ”
You could have said
n2 for “ floating - point number, two decimal places. ”
Localized Formatting
When building .NET applications, it ’ s important to realize that the user may be familiar with cultural
conventions that are uncommon to you. For example, if you live in the United States, you ’ re used to
seeing the decimal separator as a period (
. ). However, if you live in France, the decimal separator is
actually a comma (
, ).
Windows can deal with such problems for you based on the locale settings of the computer. If you use
the .NET Framework in the correct way, by and large you ’ ll never need to worry about this problem.
Here ’ s an example — if you use a formatting string of
n3 again, you are telling .NET that you want to
format the number with thousands separators and also that you want the number displayed to three
decimal places (1,714.286).
The equation changed from 12 / 7 to 12000 / 7 to allow the display of the thousands separator (,).
Now, if you tell your computer that you want to use the French locale settings, and you run the same code
(you make no changes whatsoever to the application itself), you ’ ll see 1 714,286.
You can change your language options by going to the Control Panel and clicking the Regional and
Language Options icon and changing the language to French.
In France, the thousands separator is a space, not a comma, while the decimal separator is a comma, not
a period. By using
String.Format appropriately, you can write one application that works properly
regardless of how the user has configured the locale settings on the computer.
Replacing Substrings
Another common string manipulation replaces occurrences of one string with another. To demonstrate
this, in the next Try It Out you ’ ll modify your Strings application to replace the string
“ Hello ” with the
string
“ Goodbye ” .
c03.indd 60c03.indd 60 4/1/08 6:21:12 PM4/1/08 6:21:12 PM
Chapter 3: Writing Software
61
Try It Out Replacing Substrings
1.
Open the Strings project that you were working with earlier.
2. Return to the Forms Designer for Form1, add another Button control and set its Name property
to btnReplace and set its
Text property to Replace . Double - click the button and add the
following highlighted code to its
Click event handler:
Private Sub btnReplace_Click(ByVal sender As System.Object, _
ByVal e As System.EventArgs) Handles btnReplace.Click
‘Declare variables
Dim strData As String
Dim strResults As String
‘Get the text from the TextBox
strData = txtString.Text
‘Replace the string occurance
strResults = strData.Replace(“Hello”, “Goodbye”)
‘Display the new string
MessageBox.Show(strResults, “Strings”)
End Sub
3. Run the project and enter Hello World! into the text box (using this exact capitalization).
4. Click the Replace button. You should see a message box that says Goodbye World!
How It Works
Replace works by taking the substring to look for as the first parameter and the new substring to
replace it with as the second parameter. After the replacement is made, a new string is returned that
you can display in the usual way.
‘Replace the string occurance
strResults = strData.Replace(“Hello”, “Goodbye”)
You ’ re not limited to a single search and replace within this code. If you enter Hello twice into the text
box and click the button, you ’ ll notice two
Goodbye returns. However, the case is important — if you
enter hello, it will not be replaced. You ’ ll take a look at case - insensitive string comparisons in the next
chapter.
Using Dates
Another data type that you ’ ll often use is Date . This data type holds, not surprisingly, a date value. You
learn to display the current date in the next Try It Out.
c03.indd 61c03.indd 61 4/1/08 6:21:12 PM4/1/08 6:21:12 PM
Chapter 3: Writing Software
62
Try It Out Displaying the Current Date
1.
Create a new Windows Forms Application project called Date Demo .
2. In the usual way, use the Toolbox to draw a new Button control on the form. Call it
btnShowDate and set its
Text property to Show Date.
3. Double - click the button to bring up its Click event handler and add this code:
Private Sub btnShowDate_Click(ByVal sender As System.Object, _
ByVal e As System.EventArgs) Handles btnShowDate.Click
‘Declare variable
Dim dteResults As Date
‘Get the current date and time
dteResults = Now
‘Display the results
MessageBox.Show(dteResults.ToString, “Date Demo”)
End Sub
4. Save your project by clicking the Save All button on the toolbar.
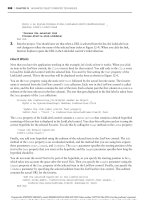
5. Run the project and click the button. You should see something like Figure 3 - 11 depending on
the locale settings on your machine.
Figure 3-11
How It Works
The Date data type can be used to hold a value that represents any date and time. After creating the
variable, you initialized it to the current date and time using the
Now property. Then you display the
date in a message box dialog box. Note that since you want to display a
Date data type as a string,
that you once again use the
ToString method to convert the results to a string format.
‘Declare variable
Dim dteResults As Date
‘Get the current date and time
dteResults = Now
‘Display the results
MessageBox.Show(dteResults.ToString, “Date Demo”)
c03.indd 62c03.indd 62 4/1/08 6:21:13 PM4/1/08 6:21:13 PM
Chapter 3: Writing Software
63
Date data types aren ’ t any different from other data types, although you can do more with them. In
the next couple of sections, you ’ ll see ways to manipulate dates and control the way they are
displayed on the screen.
Formatting Date Strings
You ’ ve already seen one way in which dates can be formatted. By default, if you pass a Date variable to
MessageBox.Show , the date and time are displayed as shown in Figure 3 - 11 .
Because this machine is in the United States, the date is shown in m/d/yyyy format and the time is
shown using the 12 - hour clock. This is another example of how the computer ’ s locale setting affects the
formatting of different data types. For example, if you set your computer to the United Kingdom locale,
the date is in dd/mm/yyyy format and the time is displayed using the 24 - hour clock, for example,
07/08/2004 07:02:47.
Although you can control the date format to the nth degree, it ’ s best to rely on .NET to ascertain how the
user wants strings to look and automatically display them in their preferred format. In the next Try It
Out, you ’ ll look at four useful methods that enable you to format dates.
Try It Out Formatting Dates
1.
Return to the Code Editor for Form1, find the Click event handler for the button, and add the
following highlighted code:
‘Display the results
MessageBox.Show(dteResults.ToString, “Date Demo”)
‘Display dates
MessageBox.Show(dteResults.ToLongDateString, “Date Demo”)
MessageBox.Show(dteResults.ToShortDateString, “Date Demo”)
‘Display times
MessageBox.Show(dteResults.ToLongTimeString, “Date Demo”)
MessageBox.Show(dteResults.ToShortTimeString, “Date Demo”)
End Sub
2. Run the project. You ’ ll be able to click through five message boxes. You have already seen the
first message box dialog box; it displays the date and time according to your computers locale
settings. The next message dialog box displays the long date, and the next message dialog box
displays the short date. The fourth message box displays the long time, and the last message
box displays the short time.
How It Works
You ’ re seeing the four basic ways that you can display dates and times in Windows applications,
namely long date, short date, long time, and short time. The names of the formats are self - explanatory!
c03.indd 63c03.indd 63 4/1/08 6:21:13 PM4/1/08 6:21:13 PM
Chapter 3: Writing Software
64
‘Display dates
MessageBox.Show(dteResults.ToLongDateString, “Date Demo”)
MessageBox.Show(dteResults.ToShortDateString, “Date Demo”)
‘Display times
MessageBox.Show(dteResults.ToLongTimeString, “Date Demo”)
MessageBox.Show(dteResults.ToShortTimeString, “Date Demo”)
Extracting Date Properties
When you have a variable of type Date , there are several properties that you can call to learn more about
the date; let ’ s look at them.
Try It Out Extracting Date Properties
1.
Return to the Forms Designer for the Date Demo project and add another Button control to
Form1 and set its
Name property to btnDateProperties and its Text property to Date
Properties. Double - click the button and add the following highlighted code to the
Click
event:
Private Sub btnDateProperties_Click(ByVal sender As System.Object, _
ByVal e As System.EventArgs) Handles btnDateProperties.Click
‘Declare variable
Dim dteResults As Date
‘Get the current date and time
dteResults = Now
‘Display the various date properties
MessageBox.Show(“Month: “ & dteResults.Month, “Date Demo”)
MessageBox.Show(“Day: “ & dteResults.Day, “Date Demo”)
MessageBox.Show(“Year: “ & dteResults.Year, “Date Demo”)
MessageBox.Show(“Hour: “ & dteResults.Hour, “Date Demo”)
MessageBox.Show(“Minute: “ & dteResults.Minute, “Date Demo”)
MessageBox.Show(“Second: “ & dteResults.Second, “Date Demo”)
MessageBox.Show(“Day of week: “ & dteResults.DayOfWeek, “Date Demo”)
MessageBox.Show(“Day of year: “ & dteResults.DayOfYear, “Date Demo”)
End Sub
2. Run the project. If you click the button, you ’ ll see a set of fairly self - explanatory message
boxes.
How It Works
Again, there ’ s nothing here that ’ s rocket science. If you want to know the hour, use the Hour property.
To get at the year, use
Year , and so on.
c03.indd 64c03.indd 64 4/1/08 6:21:13 PM4/1/08 6:21:13 PM
Chapter 3: Writing Software
65
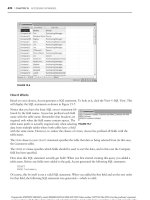
Date Constants
In the preceding Try It Out, when you called DayOfWeek property, you were actually given an integer
value, as shown in Figure 3 - 12 .
Figure 3-12
The date that we ’ re working with, September 3, 2007, is a Monday, and, although it may not be
immediately obvious, Monday is 1. Because the first day of the week is Sunday in the United States, you
start counting from Sunday, with Sunday being 0. However, there is a possibility that you ’ re working on
a computer whose locale setting starts the calendar on a Monday, in which case
DayOfWeek would
return
0 . Complicated? Perhaps, but just remember that you can ’ t guarantee that what you think is
“ Day 1 ” is always going to be Monday. Likewise, what ’ s Wednesday in English is Mittwoch in German.
If you need to know the name of the day or the month in your application, a better approach is to get
.NET to get the name for you, again from the particular locale settings of the computer, as you do in the
next Try It Out.
Try It Out Getting the Names of the Weekday and the Month
1.
Return to the Form Designer in the Date Demo project, add a new Button control and set its
Name property to btnDateNames and its Text property to Date Names. Double - click the
button and add the following highlighted code to the
Click event handler:
Private Sub btnDateNames_Click(ByVal sender As System.Object, _
ByVal e As System.EventArgs) Handles btnDateNames.Click
‘Declare variable
Dim dteResults As Date
‘Get the current date and time
dteResults = Now
MessageBox.Show(“Weekday name: “ & dteResults.ToString(“dddd”), _
“Date Demo”)
MessageBox.Show(“Month name: “ & dteResults.ToString(“MMMM”), _
“Date Demo”)
End Sub
2. Run the project and click the button. You will see a message box that tells you the weekday
name (Monday, for example) and a second one that tells you the month (September, for
example).
c03.indd 65c03.indd 65 4/1/08 6:21:14 PM4/1/08 6:21:14 PM
Chapter 3: Writing Software
66
How It Works
When you used your ToLongDateString method and its siblings, you were basically allowing .NET
to look in the locale settings for the computer for the date format the user preferred. In this example,
you ’ re using the
ToString method but supplying your own format string.
MessageBox.Show(“Weekday name: “ & dteResults.ToString(“dddd”), _
“Date Demo”)
MessageBox.Show(“Month name: “ & dteResults.ToString(“MMMM”), _
“Date Demo”)
Usually, it ’ s best practice not to use the ToString method to format dates to different string values,
because you should rely on the built - in formats in .NET, but here you ’ re using the
“ dddd ” string to
get the weekday name and
“ MMMM ” to get the month name. (The case is important here — “ mmmm ”
won ’ t work.)
To show this works, if the computer is set to use Italian locale settings, you get one message box telling
you the weekday name is
Luned ì and another telling you the month name is Settembre .
Defining Date Literals
You know that if you want to use a string literal in your code, you can do this:
Dim strResults As String
strResults = “Woobie”
Date literals work in more or less the same way. However, you use pound signs ( # ) to delimit the start
and end of the date. You learn to define date literals in the next Try It Out.
Try It Out Defi ning Date Literals
1.
Return to the Forms Designer for the Date Demo project and add another Button control to
the form and set its
Name property to btnDateLiterals and its Text property to Date Literals.
Double - click the button and add the following highlighted code to the
Click event handler:
Private Sub btnDateLiterals_Click(ByVal sender As System.Object, _
ByVal e As System.EventArgs) Handles btnDateLiterals.Click
‘Declare variable
Dim dteResults As Date
‘Set a date and time
dteResults = #1/1/2010 8:01:00 AM#
‘Display the date and time
MessageBox.Show(dteResults.ToLongDateString & “ “ & _
dteResults.ToLongTimeString, “Date Demo”)
End Sub
c03.indd 66c03.indd 66 4/1/08 6:21:14 PM4/1/08 6:21:14 PM
Chapter 3: Writing Software
67
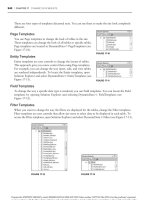
2. Run the project and click the button. You should see the message box shown in Figure 3 - 13 .
Figure 3-13
How It Works
When defining a date literal, it must be defined in the mm/dd/yyyy format, regardless of the actual
locale settings of the computer. You may or may not see an error if you try to define the date in the
format dd/mm/yyyy. This is because you could put in a date in the format dd/mm/yyyy (for
example, 06/07/2008) that is also a valid date in the required mm/dd/yyyy format. This requirement
reduces ambiguity: Does 6/7/2008 mean July 6 or June 7?
In fact, this is a general truth of programming as a whole: There are no such things as dialects when
writing software. It ’ s usually best to conform to North American standards. As you ’ ll see through the
rest of this book, this includes variables and method names, for example
GetColor rather than
GetColour .
It ’ s also worth noting that you don ’ t have to supply both a date and a time. You can supply one, the
other, or both.
Manipulating Dates
One thing that ’ s always been pretty tricky for programmers to do is manipulate dates. Most of you will
remember New Year ’ s Eve 1999, waiting to see whether computers could deal with tipping into a new
century. Also, dealing with leap years has always been a bit of a problem.
The next turn of the century that also features a leap year will be 2399 to 2400. In the next Try It Out,
you ’ ll take a look at how you can use some of the methods available on the
Date data type to adjust the
date around that particular leap year.
Try It Out Manipulating Dates
1.
Return to the Forms Designer for the Date Demo project and add another Button control to
the form and set its
Name property to btnDateManipulation and its Text property to Date
Manipulation. Double - click the button and add the following highlighted code to the
Click
event handler:
Private Sub btnDateManipulation_Click(ByVal sender As System.Object, _
ByVal e As System.EventArgs) Handles btnDateManipulation.Click
c03.indd 67c03.indd 67 4/1/08 6:21:14 PM4/1/08 6:21:14 PM
Chapter 3: Writing Software
68
‘Declare variables
Dim dteStartDate As Date
Dim dteChangedDate As Date
‘Start in the year 2400
dteStartDate = #2/28/2400#
‘Add a day and display the results
dteChangedDate = dteStartDate.AddDays(1)
MessageBox.Show(dteChangedDate.ToLongDateString, “Date Demo”)
‘Add some months and display the results
dteChangedDate = dteStartDate.AddMonths(6)
MessageBox.Show(dteChangedDate.ToLongDateString, “Date Demo”)
‘Subtract a year and display the results
dteChangedDate = dteStartDate.AddYears(-1)
MessageBox.Show(dteChangedDate.ToLongDateString, “Date Demo”)
End Sub
2. Run the project and click the button. You ’ ll see three message boxes, one after another. The
first message box displays the long date for 2/29/2400, whereas the second message box
displays the long date for 8/28/2400. The final message box displays the long date for
2/28/2399.
How It Works
The Date data type supports several methods for manipulating dates. Here are three of them:
‘Add a day and display the results
dteChangedDate = dteStartDate.AddDays(1)
MessageBox.Show(dteChangedDate.ToLongDateString, “Date Demo”)
‘Add some months and display the results
dteChangedDate = dteStartDate.AddMonths(6)
MessageBox.Show(dteChangedDate.ToLongDateString, “Date Demo”)
‘Subtract a year and display the results
dteChangedDate = dteStartDate.AddYears(-1)
MessageBox.Show(dteChangedDate.ToLongDateString, “Date Demo”)
It ’ s worth noting that when you supply a negative number to any of the Add methods when working
with
Date variables, the effect is subtraction (demonstrated by going from 2400 back to 2399). The
other important
Add methods are AddHours , AddMinutes , AddSeconds , and AddMilliseconds .
Boolean
So far, you ’ ve seen the Integer , Double , Single , String , and Date data types. The other one you need
to look at is
Boolean . After you ’ ve done that, you ’ ve seen all of the simple data types that you ’ re most
likely to use in your programs.
c03.indd 68c03.indd 68 4/1/08 6:21:15 PM4/1/08 6:21:15 PM
Chapter 3: Writing Software
69
A Boolean variable can be either True or False . It can never be anything else. Boolean values are
really important when it ’ s time for your programs to start making decisions, which is something you
look at in more detail in Chapter 4 .
Storing Variables
The most limited resource on your computer is typically its memory. It is important that you try to
get the most out of the available memory. Whenever you create a variable, you are using a piece of
memory, so you must strive to use as few variables as possible and use the variables that you do have in
the most efficient manner.
Today, absolute optimization of variables is not something you need to go into a deep level of detail
about, for two reasons. First, computers have far more memory these days, so the days when
programmers tried to cram payroll systems into 32KB of memory are long gone. Second, the compilers
themselves have a great deal of intelligence built into them these days, to help generate the most
optimized code possible.
Binary
Computers use binary to represent everything. That means that whatever you store in a computer must
be expressed as a binary pattern of ones and zeros. Take a simple integer, 27. In binary code, this number
is actually 11011, each digit referring to a power of two. The diagram in Figure 3 - 14 shows how you
represent 27 in the more familiar base - 10 format, and then in binary.
100,000 10,000 1,000 100 10 1
10,000,
000
1,000,
000
00002700
10
5
10
4
10
3
10
2
10
1
10
0
10
7
10
6
2؋ 10؉ 7 ؋ 1؍ 27
In base-10, each digit represents a power
of 10. To find what number the “pattern of
base-10 digits” represents, you multiply the
relevant number by the power of 10 that
the digit represents and add the results.
In base-2, or binary, each digit represents
a power of two. To find what number the
“pattern of binary” represents, you multiply
the relevant number by the power of two
that the digit represents and add the results.
32168421128 64
01101100
2
5
2
4
2
3
2
2
2
1
2
0
2
7
2
6
1؋ 16؉ 1 ؋ 8؉ 1؋ 2 ؉ 1؋ 1؍27
Figure 3-14
Although this may appear to be a bit obscure, look what ’ s happening. In base - 10, the decimal system
that you ’ re familiar with, each digit fits into a slot . This slot represents a power of 10 — the first
representing 10 to the power zero, the second 10 to the power one, and so on. If you want to know what
number the pattern represents, you take each slot in turn, multiply it by the value it represents, and add
the results.
c03.indd 69c03.indd 69 4/1/08 6:21:15 PM4/1/08 6:21:15 PM
Chapter 3: Writing Software
70
The same applies to binary — it ’ s just that you ’ re not familiar with dealing with base-2. To convert the
number back to base-10, you take the digit in each slot in turn and multiply that power of two by
the number that the slot represents (zero or one). Add all of the results together and you get the number.
Bits and Bytes
In computer terms, a binary slot is called a bit . It is the smallest possible unit of information, the answer
to a single yes/no question, represented by a part of the computer ’ s circuitry that either has electricity
flowing in it or not. The reason why there are eight slots/bits on the diagram in Figure 3 - 14 is that there
are eight bits in a byte . A byte is the unit of measurement that you use when talking about computer
memory.
A kilobyte or KB is 1,024 bytes. You use 1,024 rather than 1,000 because 1,024 is the 10th power of 2, so as
far as the computer is concerned it ’ s a round number. Computers don ’ t tend to think of things in terms
of 10s like you do, so 1,024 is more natural to a computer than 1,000 is.
Likewise, a megabyte is 1,024 kilobytes, or 1,048,576 bytes. Again, that is another round number because
this is the 20th power of 2. A gigabyte is 1,024 megabytes, or 1,073,741,824 bytes. (Again, think 2 to the
power of 30 and you ’ re on the right track.) Finally, a terabyte is 2 to the 40th power, and a petabyte is 2 to
the 50th power.
So what ’ s the point of all this? Well, having an understanding of how computers store variables helps
you design your programs better. Suppose your computer has 256MB of memory. That ’ s 262,144KB or
268,435,456 bytes or (multiply by 8) 2,147,483,648 bits. As you write your software, you have to make the
best possible use of this available memory.
Representing Values
Most desktop computers in use today are 32 - bit, which means that they ’ re optimized for dealing with
integer values that are 32 bits in length. The number you just saw in the example was an 8 - bit number.
With an 8 - bit number, the largest value you can store is:
1x128 + 1x64 + 1x32 + 1x16 + 1x8 + 1x4 + 1x2 + 1x1 = 255
A 32 - bit number can represent any value between – 2,147,483,648 and 2,147,483,647. Now, if you define a
variable like this:
Dim intNumber As Integer
you want to store an integer. In response to this, .NET will allocate a 32 - bit block of memory in
which you can store any number between 0 and 2,147,483,647. Also, remember you have only a finite
amount of memory, and on your 256MB computer; you can store only a maximum of 67,108,864 long
numbers. Sounds like a lot, but remember that memory is for sharing. You shouldn ’ t write software that
deliberately tries to use as much memory as possible. Be frugal!
You also defined variables that were double - precision floating - point numbers, like this:
Dim dblNumber As Double
c03.indd 70c03.indd 70 4/1/08 6:21:16 PM4/1/08 6:21:16 PM
Chapter 3: Writing Software
71
To represent a double - precision floating point number, you need 64 bits of memory. That means you can
store only a maximum of 33,554,432 double - precision floating - point numbers.
Single - precision floating - point numbers take up 32 bits of memory — in other words half as much as a
double - precision number and the same as an integer value.
If you do define an integer, whether you store 1, 3, 249, or 2,147,483,647, you ’ re always using exactly the
same amount of memory, 32 bits. The size of the number has no bearing on the amount of memory
required to store it. This might seem incredibly wasteful, but the computer relies on numbers of the same
type taking the same amount of storage. Without this, it would be unable to work at a decent speed.
Now look at how you define a string:
Dim strResults As String
strResults = “Hello World!”
Unlike integers and doubles, strings do not have a fixed length. Each character in the string takes up two
bytes, or 16 bits. So, to represent this 12 - character string, you need 24 bytes, or 192 bits. That means that
your computer is able to store only a little over two million strings of that length. Obviously, if the string
is twice as long, you can hold half as many, and so on.
A common mistake that new programmers make is not taking into consideration the impact the data
type has on storage. If you have a variable that ’ s supposed to hold a string, and you try to hold a
numeric value in it, like this:
Dim strData As String
strData = “65536”
you ’ re using 10 bytes (or 80 bits) to store it. That ’ s less efficient than storing the value in an Integer data
type. To store this numerical value in a string, each character in the string has to be converted into a
numerical representation. This is done according to something called Unicode , which is a standard way
of defining the way computers store characters. Each character has a unique number between 0 and
65,535, and it ’ s this value that is stored in each byte allocated to the string.
Here are the Unicode codes for each character in the string:
6: Unicode 54, binary 0000000000110110
5: Unicode 53, binary 0000000000110101
5: Unicode 53, binary 0000000000110101
3: Unicode 51, binary 0000000000110011
6: Unicode 54, binary 0000000000110110
Each character requires 16 bits, so to store a 5 - digit number in a string requires 80 bits — five 16 bit
numbers. What you should do is this:
Dim intNumber As Integer
intNumber = 65536
❑
❑
❑
❑
❑
c03.indd 71c03.indd 71 4/1/08 6:21:16 PM4/1/08 6:21:16 PM
Chapter 3: Writing Software
72
This stores the value as a single number binary pattern. An Integer uses 32 bits, so the binary
representation will be 00000000000000010000000000000000, far smaller than the space needed to store it
as a string.
Converting Values
Although strings seem natural to us, they ’ re unnatural to a computer. A computer wants to take two
numbers and perform some simple mathematical operation on them. However, a computer can
perform such a vast number of these simple operations each second that you, as humans, get the results
you want.
Let ’ s imagine that a computer wants to add 1 to the value 27. You already know that you can represent
27 in binary as 11011. Figure 3 - 15 shows what happens when you want to add 1 to the value 27.
As you can see, binary math is no different from decimal (base - 10) math. If you try to add one to the first
bit, it won ’ t fit, so you revert it to zero and carry the one to the next bit. The same happens, and you
carry the one to the third bit. At this point, you ’ ve finished, and if you add up the value you get 28,
as intended.
1؋ 16؉ 1 ؋ 8؉ 1؋ 2 ؉ 1؋ 1؍ 27
1؋ 16؉ 1 ؋ 8؉ 1؋ 4 ؍ 28
Just like the math you’re familiar
with, if you hit the “ceiling” value
for the base (in this case“2”), you
set the digit to “0” and carry “1”.
carry 1carry 1
add 1
32 16 8 4 2 1128 64
01101100
2
5
2
4
2
3
2
2
2
1
2
0
2
7
2
6
32 16 8 4 2 1128 64
01110000
2
5
2
4
2
3
2
2
2
1
2
0
2
7
2
6
Figure 3-15
Any value that you have in your program ultimately has to be converted to simple numbers for the
computer to do anything with them. To make the program run more efficiently, you have to keep
the number of conversions to a minimum. Here ’ s an example:
Dim strResults As String
strResults = “27”
strResults = strResults + 1
MessageBox.Show(strResults)
c03.indd 72c03.indd 72 4/1/08 6:21:16 PM4/1/08 6:21:16 PM
Chapter 3: Writing Software
73
Let ’ s look at what ’ s happening:
1. You create a string variable called strResults .
2. You assign the value 27 to that string. This uses 4 bytes of memory.
3. To add 1 to the value, the computer has to convert 27 to an internal, hidden Integer variable
that contains the value
27 . This uses an additional 4 bytes of memory, taking the total to 8.
However, more importantly, this conversion takes time!
4. When the string is converted to an integer, 1 is added to it.
5. The new value then has to be converted into a string.
6. The string containing the new value is displayed on the screen.
To write an efficient program, you don ’ t want to be constantly converting variables between different
types. You want to perform the conversion only when it ’ s absolutely necessary.
Here ’ s some more code that has the same effect:
Dim intNumber As Integer
intNumber = 27
intNumber += 1
MessageBox.Show(intNumber.ToString)
1. You create an integer variable called intNumber .
2. You assign the value 27 to the variable.
3. You add 1 to the variable.
4. You convert the variable to a string and display it on the screen.
In this case, you have to do only one conversion, and it ’ s a logical one; use the
ToString method on the
Integer data type. MessageBox.Show works in terms of strings and characters, so that ’ s what it ’ s most
comfortable with.
What you have done is cut the conversions from two (string to integer, integer to string) down to one.
This will make your program run more efficiently and use less memory. Again, it ’ s a small improvement,
but imagine this improvement occurring hundreds of thousands of times each minute — you ’ ll get an
improvement in the performance of the system as a whole.
It is absolutely vital that you work with the correct data type for your needs. In simple applications like
the ones you ’ ve created in this chapter, a performance penalty is not really noticeable. However, when
you write more complex, sophisticated applications, you ’ ll really want to optimize your code by using
the right data type.
Methods
A method is a self - contained block of code that does something. Methods, also called procedures, are
essential for two reasons. First, they break a program up and make it more understandable. Second, they
promote code reuse — a topic you ’ ll be spending most of your time on throughout the rest of this book.
c03.indd 73c03.indd 73 4/1/08 6:21:16 PM4/1/08 6:21:16 PM
Chapter 3: Writing Software
74
As you know, when you write code you start with a high - level algorithm and keep refining the detail of
that algorithm until you get the software code that expresses all of the algorithms up to and including
the high - level one. A method describes a line in one of those algorithms, for example “ open a file ” ,
“ display text on screen ” , “ print a document ” , and so on.
Knowing how to break up a program into methods is something that comes with experience. To add to
the frustration, it ’ s far easier to understand why you need to use methods when you ’ re working on far
more complex programs than the ones you ’ ve seen so far. In the rest of this section, we ’ ll endeavor to
show you how and why to use methods.
Why Use Methods?
In day - to - day use, you need to pass information to a method for it to produce the expected results. This
might be a single integer value, a set of string values, or a combination of both. These are known as input
values . However, some methods don ’ t take input values, so having input values is not a requirement of a
method. The method uses these input values and a combination of environmental information (for
instance, facts about the current state of the program that the method knows about) to do
something useful.
We say that when you give information to a method, you pass it data. You can also refer to that data as
parameters . Finally, when you want to use a method, you call it.
To summarize, you call a method, passing data in through parameters.
The reason for using methods is to promote this idea of code reuse. The principle behind using a method
makes sense if you consider the program from a fairly high level. If you have an understanding of all the
algorithms involved in a program, you can find commonality. If you need to do the same thing more
than once, you should wrap it up into a method that you can reuse.
Imagine you have a program that comprises many algorithms. Some of those algorithms call for the area
of a circle to be calculated. Because some of those algorithms need to know how to calculate the area of a
circle, it ’ s a good candidate for a method. You write code that knows how to find the area of a circle
given its radius, encapsulate it (wrap it up) into a method, which you can reuse when you ’ re coding the
other algorithms. This means that you don ’ t have to keep writing code that does the same thing — you
do it once and reuse it as often as needed.
It might be the case that one algorithm needs to work out the area of a circle with 100 for its radius, and
another needs to work out one with a radius of 200. By building the method in such a way that it takes
the radius as a parameter, you can use the method from wherever you want.
With Visual Basic 2008, you can define a method using the
Sub keyword or using the Function
keyword.
Sub , short for subroutine , is used when the method doesn ’ t return a value, as mentioned in
Chapter 1 .
Function is used when the method returns a value.
c03.indd 74c03.indd 74 4/1/08 6:21:17 PM4/1/08 6:21:17 PM
Chapter 3: Writing Software
75
Methods You ’ ve Already Seen
The good news is that you ’ ve been using methods already. Consider the following code that you wrote
at the beginning of this chapter:
Private Sub btnAdd_Click(ByVal sender As System.Object, _
ByVal e As System.EventArgs) Handles btnAdd.Click
‘Define a variable for intNumber
Dim intNumber As Integer
‘Set the initial value
intNumber = 27
‘Add 1 to the value of intNumber
intNumber = intNumber + 1
‘Display the new value of intNumber
MessageBox.Show(“Value of intNumber + 1 = “ & intNumber.ToString, _
“Variables”)
End Sub
That code is a method — it ’ s a self - contained block of code that does something. In this case, it adds 1 to
the value of
intNumber and displays the result in a message box.
This method does not return a value (that is, it ’ s a subroutine, so it starts with the
Sub keyword and ends
with the
End Sub statement). Anything between these two statements is the code assigned to the
method. Let ’ s take a look at how the method is defined (this code was automatically created by Visual
Basic 2008):
Private Sub btnAdd_Click(ByVal sender As System.Object, _
ByVal e As System.EventArgs) Handles btnAdd.Click
1. First of all, you have the word Private . The meaning of this keyword is discussed in later chap-
ters. For now, think of it as ensuring that this method cannot be called up by anything other than
the user clicking the Add button.
2. Second, you have the keyword Sub to tell Visual Basic 2008 that you want to define a
subroutine.
3. Third, you have btnAdd_Click . This is the name of the subroutine.
4. Fourth, you have ByVal sender As System.Object, ByVal e As System.EventArgs .
This tells Visual Basic 2008 that the method takes two parameters —
sender and e . We ’ ll talk
about this more later.
5. Finally, you have Handles btnAdd.Click . This tells Visual Basic 2008 that this method should
be called whenever the
Click event on the control btnAdd is fired.
In the next Try It Out, you take a look at how you can build a method that displays a message box and
call the same method from three separate buttons.
c03.indd 75c03.indd 75 4/1/08 6:21:17 PM4/1/08 6:21:17 PM
Chapter 3: Writing Software
76
Try It Out Using Methods
1.
Create a new Windows Forms Application project called Three Buttons .
2. Use the Toolbox to draw three buttons on the form.
3. Double - click the first button (Button1) to create a new Click event handler. Add the
highlighted code:
Private Sub Button1_Click(ByVal sender As System.Object, _
ByVal e As System.EventArgs) Handles Button1.Click
‘Call your method
SayHello()
End Sub
Private Sub SayHello()
‘Display a message box
MessageBox.Show(“Hello World!”, “Three Buttons”)
End Sub
4. Save your project by clicking the Save All button on the toolbar.
5. Run the project and you ’ ll see the form with three buttons appear. Click the topmost button
and you ’ ll see “ Hello World! ” displayed in a message box.
How It Works
As you know now, when you double - click a Button control in the Designer, a new method is
automatically created:
Private Sub Button1_Click(ByVal sender As System.Object, _
ByVal e As System.EventArgs) Handles Button1.Click
End Sub
The Handles Button1.Click statement at the end tells Visual Basic 2008 that this method should
automatically be called when the
Click event on the button is fired. As part of this, Visual Basic 2008
provides two parameters, which you don ’ t have to worry about for now. Outside of this method,
you ’ ve defined a new method:
Private Sub SayHello()
‘Display a message box
MessageBox.Show(“Hello World!”, “Three Buttons”)
End Sub
The new method is called SayHello . Anything that appears between the Sub and End Sub keywords
is part of the method and when that method is called, the code is executed. In this case, you ’ ve asked
it to display a message box.
c03.indd 76c03.indd 76 4/1/08 6:21:17 PM4/1/08 6:21:17 PM
Chapter 3: Writing Software
77
So you know that when the button is clicked, Visual Basic 2008 will call the Button1 _ Click method.
You then call the
SayHello method. The upshot of all this is that when the button is clicked, the
message box is displayed:
Private Sub Button1_Click(ByVal sender As System.Object, _
ByVal e As System.EventArgs) Handles Button1.Click
‘Call your method
SayHello()
End Sub
That should make the general premise behind methods a little clearer, but why did you need to
break the code into a separate method to display the message box? You learn more about that in the next
Try It Out.
Try It Out Reusing the Method
1.
If your project is still running, stop it.
2. Return to the Forms Designer, and double - click the second button and add the highlighted
code to the new event handler:
Private Sub Button2_Click(ByVal sender As System.Object, _
ByVal e As System.EventArgs) Handles Button2.Click
‘Call your method
SayHello()
End Sub
3. Switch back to the Forms Designer and double - click the third button and add the
highlighted code:
Private Sub Button3_Click(ByVal sender As System.Object, _
ByVal e As System.EventArgs) Handles Button3.Click
‘Call your method
SayHello()
End Sub
4. Now run the project. You ’ ll notice that when you click each of the buttons, they all bring up
the same message box.
5. Stop the project and find the SayHello method definition. Change the text to be displayed,
like this:
Private Sub SayHello()
‘Display a message box
MessageBox.Show(“I have changed!”, “Three Buttons”)
End Sub
c03.indd 77c03.indd 77 4/1/08 6:21:18 PM4/1/08 6:21:18 PM
Chapter 3: Writing Software
78
6. Run the project again and click each of the three buttons. You ’ ll notice that the text displayed
on the message boxes has changed.
How It Works
Each of the event handlers calls the same SayHello() method:
Private Sub Button1_Click(ByVal sender As System.Object, _
ByVal e As System.EventArgs) Handles Button1.Click
‘Call your method
SayHello()
End Sub
Private Sub Button2_Click(ByVal sender As System.Object, _
ByVal e As System.EventArgs) Handles Button2.Click
‘Call your method
SayHello()
End Sub
Private Sub Button3_Click(ByVal sender As System.Object, _
ByVal e As System.EventArgs) Handles Button3.Click
‘Call your method
SayHello()
End Sub
You ’ ll also notice that the Handles keyword on each of the methods ties the method to a different
control — Button1, Button2, or Button3.
What ’ s really important (and clever) here is that when you change the way that
SayHello works, the
effect you see on each button is the same. This is a really important programming concept. You can
centralize code in your application so that when you change it in once place, the effect is felt
throughout the application. Likewise, this saves you from having to enter the same or very similar
code repeatedly.
Building a Method
In the next Try It Out, you ’ ll build a method that ’ s capable of returning a value. Specifically, you ’ ll build
a method that can return the area of a circle if its radius is given. You can do this with the following
algorithm:
1. Square the radius.
2. Multiply it by pi.
c03.indd 78c03.indd 78 4/1/08 6:21:18 PM4/1/08 6:21:18 PM
Chapter 3: Writing Software
79
Try It Out Building a Method
1.
To try out this exercise, reuse the Three Buttons project and return to the Code Editor.
2. Add this code to define a new method (which will be a function, because it returns a value):
‘CalculateAreaFromRadius - find the area of a circle
Private Function CalculateAreaFromRadius(ByVal radius As Double) As Double
‘Declare variables
Dim dblRadiusSquared As Double
Dim dblResult As Double
‘Square the radius
dblRadiusSquared = radius * radius
‘Multiply it by pi
dblResult = dblRadiusSquared * Math.PI
‘Return the result
Return dblResult
End Function
3. Now delete the existing code from the Button1_Click event handler, and add the
highlighted code:
Private Sub Button1_Click(ByVal sender As System.Object, _
ByVal e As System.EventArgs) Handles Button1.Click
‘Declare variable
Dim dblArea As Double
‘Calculate the area of a circle with a radius of 100
dblArea = CalculateAreaFromRadius(100)
‘Display the results
MessageBox.Show(dblArea.ToString, “Area of 100”)
End Sub
4. Run the project and click Button1. You ’ ll see results like the one shown in Figure 3 - 16 :
Figure 3-16
c03.indd 79c03.indd 79 4/1/08 6:21:18 PM4/1/08 6:21:18 PM
Chapter 3: Writing Software
80
How It Works
First, you build a separate method called CalculateAreaFromRadius . You do this by using the
Private Function . . . End Function block.
Private Function CalculateAreaFromRadius(ByVal radius As Double) As Double
End Function
Anything between Private Function and End Function is the body of the method and will be
executed only when the method is called.
The
ByVal radius As Double portion defines a parameter for the method. When a parameter is
passed by value , as indicated here by the keyword
ByVal , .NET in effect creates a new variable and
stores the passed parameter information in it. Even if the method is called with a variable given for the
parameter, the contents of that original variable are not modified by the method. In this case, you ’ re
telling .NET that you want to pass a parameter into the method called
radius . In effect, this statement
creates a variable called
radius , just as if you had done this:
Dim radius As Double
In fact, there ’ s a little more. The variable will be automatically set to the value passed through as a
parameter, so if you pass
200 through as the value of the parameter, what you ’ re effectively doing
is this:
Dim radius As Double = 200
If you passed 999 as the value of the parameter, you ’ d have this:
Dim radius As Double = 999
Another way of passing a parameter is by reference, using the keyword ByRef instead of ByVal . When
a parameter is passed by reference, the parameter name used within the method body effectively becomes
another name for the variable specified when the method is called, so that anything the method does that
modifies the parameter value modifies the original variable value as well.
The
As Double sitting at the end of the method declaration tells Visual Basic 2008 that this method
will return a double - precision floating - point number back to whoever called it:
Private Function CalculateAreaFromRadius(ByVal radius As Double) As Double
Now you can look at the method properly. First off, you know that to find the area of a circle you have
this algorithm:
1. Get a number that represents the radius of a circle.
2. Square the number.
3. Multiply it by pi ( ).
c03.indd 80c03.indd 80 4/1/08 6:21:19 PM4/1/08 6:21:19 PM
Chapter 3: Writing Software
81
And that ’ s precisely what you ’ ve done:
‘Declare variables
Dim dblRadiusSquared As Double
Dim dblResult As Double
‘Square the radius
dblRadiusSquared = radius * radius
‘Multiply it by pi
dblResult = dblRadiusSquared * Math.PI
The Math.PI in the previous code is a constant defined in .NET that defines the value of pi ( ) for us.
After the last line, you need to return the result to whatever code called the method. This is done with
this statement:
‘Return the result
Return dblResult
The code you added in Button1_Click calls the method and tells the user the results:
‘Declare variable
Dim dblArea As Double
‘Calculate the area of a circle with a radius of 100
dblArea = CalculateAreaFromRadius(100)
‘Display the results
MessageBox.Show(dblArea.ToString, “Area of 100”)
The first thing to do is define a variable called dblArea that will contain the area of the circle. You set
this variable to whatever value
CalculateAreaFromRadius returns. Using parentheses at the end of
a method name is how you send the parameters. In this case, you ’ re passing just one parameter and
you ’ re passing the value 100.
After you call the method, you wait for the method to finish calculating the area. This area is returned
from the method (the
Return result line defined within CalculateAreaFromRadius ) and stored in
the variable
dblArea . You can then display this on the screen in the usual way.
Choosing Method Names
The .NET Framework has a few standards for how things should be named. These conventions help
developers move between languages — a topic discussed in Chapter 2 . We recommend that whenever
you create a method, you use Pascal casing . This is a practice in which the first letter in each word in the
method is uppercase but nothing else is. This is merely a suggestion for best coding practices and is not a
requirement of Visual Basic 2008. An example of this is as follows:
CalculateAreaFromRadius
OpenXmlFile
GetEnvironmentValue
❑
❑
❑
c03.indd 81c03.indd 81 4/1/08 6:21:19 PM4/1/08 6:21:19 PM
Chapter 3: Writing Software
82
Note that even when an abbreviation is used (in this case, XML), it isn ’ t written in uppercase. This
alleviates confusion for developers, who may or may not know how something should be capitalized.
We recommend that you always write parameter names in camel casing . (If you ’ ve ever seen Java code,
you ’ ll be familiar with this.) To get camel casing, you do the same as Pascal casing, but you don ’ t
capitalize the very first letter:
myAccount
customerDetails
updatedDnsRecord
Again, abbreviations (such as DNS) are not treated as a special case, so they appear as a mix of upper
and lowercase letters, just like in Pascal casing.
The name camel casing comes from the fact that the identifier has a hump in the middle, for example,
camelCasing . Pascal casing comes from the fact that the convention was invented for use with the
programming language Pascal.
In Chapter 2 , you saw that .NET isn ’ t tied to a particular language. Because some languages are
casesensitive and others are not, it ’ s important that you define standards to make life easier for
programmers who may be coming from different programming language backgrounds.
The term case - sensitive means that the positions of uppercase and lowercase letters are important. In a
case - sensitive language,
MYACCOUNT is not the same as myAccount . However, Visual Basic 2008 is not
a case - sensitive language, meaning that for all intents and purposes you can do whatever you like with
respect to capitalization; in other words
MYACCOUNT would be the same as mYacCounT .
Note that languages such as Java, C#, and C++ are case - sensitive.
Scope
When introducing the concept of methods, we described them as self - contained . This has an important
effect on the way that variables are used and defined in methods. Imagine you have these two methods,
both of which define a variable called
strName :
Private Sub DisplaySebastiansName()
‘Declare variable and set value
Dim strName As String
strName = “Sebastian Blackwood”
‘Display results
MessageBox.Show(strName, “Scope Demo”)
End Sub
Private Sub DisplayBalthazarsName()
‘Declare variable and set value
❑
❑
❑
c03.indd 82c03.indd 82 4/1/08 6:21:19 PM4/1/08 6:21:19 PM
Chapter 3: Writing Software
83
Dim strName As String
strName = “Balthazar Keech”
‘Display results
MessageBox.Show(strName, “Scope Demo”)
End Sub
Even though both of these methods use a variable with the same name ( strName ), the self - contained
feature of methods means that this is perfectly practicable and the variable names won ’ t affect each
other. Try it out next.
Try It Out Scope
1.
Create a new Windows Forms Application project called Scope Demo .
2. Add a Button control to the form and set its Name property btnScope and its Text property to
Scope. Double - click the button and add the following highlighted code to the
Click event
handler and add the other two methods:
Private Sub btnScope_Click(ByVal sender As System.Object, _
ByVal e As System.EventArgs) Handles btnScope.Click
‘Call a method
DisplayBalthazarsName()
End Sub
Private Sub DisplaySebastiansName()
‘Declare variable and set value
Dim strName As String
strName = “Sebastian Blackwood”
‘Display results
MessageBox.Show(strName, “Scope Demo”)
End Sub
Private Sub DisplayBalthazarsName()
‘Declare variable and set value
Dim strName As String
strName = “Balthazar Keech”
‘Display results
MessageBox.Show(strName, “Scope Demo”)
End Sub
3. Save your project by clicking the Save All button on the toolbar.
4. Run the project and you ’ ll see the message box displaying the name Balthazar Keech when
you click the button.
c03.indd 83c03.indd 83 4/1/08 6:21:20 PM4/1/08 6:21:20 PM