microsoft visual basic 2008 step by step phần 4 potx
Bạn đang xem bản rút gọn của tài liệu. Xem và tải ngay bản đầy đủ của tài liệu tại đây (732.03 KB, 57 trang )
Chapter 5 Visual Basic Variables and Formulas, and the .NET Framework 143
The heart of the event procedure is a Select Case decision structure. In the next chapter,
we’ll discuss how this group of program statements selects one choice from many. For
now, notice how each section of the Select Case block assigns a sample value to one of
the fundamental data type variables and then assigns the variable to the Text property
of the Label4 object on the form. I used code like this in Chapter 3 to process list box
choices, and you can use these techniques to work with list boxes and data types in
your own programs.
Note
If you have more than one form in your project, you need to declare variables in a
slightly different way (and place) to give them scope throughout your program (that is, in
each form that your project contains). The type of variable that you’ll declare is a public, or
global, variable, and it’s declared in a module, a special fi le that contains declarations and
procedures not associated with a particular form. For information about creating public
variables in modules, see Chapter 10, “Creating Modules and Procedures.”
12. Scroll through the ListBox1_SelectedIndexChanged event procedure, and examine each
of the variable assignments closely.
Try changing the data in a few of the variable assignment statements and running the
program again to see what the data looks like. In particular, you might try assigning
values to variables that are outside their accepted range, as shown in the data types
table presented earlier. If you make such an error, Visual Basic adds a jagged line below
the incorrect value in the Code Editor, and the program won’t run until you change it.
To learn more about your mistake, you can point to the jagged underlined value and
read a short tooltip error message about the problem.
Tip
By default, a green jagged line indicates a warning, a red jagged line indicates a syntax
error, a blue jagged line indicates a compiler error, and a purple jagged line indicates some
other error.
13. If you made any changes you want to save to disk, click the Save All button on the
Standard toolbar.
144 Part II Programming Fundamentals
User-Defi ned Data Types
Visual Basic also lets you create your own data types. This feature is most useful when
you’re dealing with a group of data items that naturally fi t together but fall into different
data categories. You create a user-defi ned type (UDT) by using the Structure statement,
and you declare variables associated with the new type by using the Dim statement. Be
aware that the Structure statement cannot be located in an event procedure—it must
be located at the top of the form along with other variable declarations, or in a code
module.
For example, the following declaration creates a user-defi ned data type named Employee
that can store the name, date of birth, and hire date associated with a worker:
Structure Employee
Dim Name As String
Dim DateOfBirth As Date
Dim HireDate As Date
End Structure
After you create a data type, you can use it in the program code for the form’s or module’s
event procedures. The following statements use the new Employee type. The fi rst state-
ment creates a variable named ProductManager, of the Employee type, and the second
statement assigns the name “Greg Baker” to the Name component of the variable:
Dim ProductManager As Employee
ProductManager.Name = "Greg Baker"
This looks a little similar to setting a property, doesn’t it? Visual Basic uses the same
notation for the relationship between objects and properties as it uses for the rela-
tionship between user-defi ned data types and component variables.
Constants: Variables That Don’t Change
If a variable in your program contains a value that never changes (such as π, a fi xed math-
ematical entity), you might consider storing the value as a constant instead of as a variable.
A constant is a meaningful name that takes the place of a number or a text string that
doesn’t change. Constants are useful because they increase the readability of program
code, they can reduce programming mistakes, and they make global changes easier to
accomplish later. Constants operate a lot like variables, but you can’t modify their values
at run time. They are declared with the Const keyword, as shown in the following example:
Const Pi As Double = 3.14159265
Chapter 5 Visual Basic Variables and Formulas, and the .NET Framework 145
This statement creates a constant named Pi that can be used in place of the value of π in the
program code. To make a constant available to all the objects and event procedures in your
form, place the statement at the top of your form along with other variable and structure
declarations that will have scope in all of the form’s event procedures. To make the constant
available to all the forms and modules in a program (not just Form1), create the constant in a
code module, with the Public keyword in front of it. For example:
Public Const Pi As Double = 3.14159265
The following exercise demonstrates how you can use a constant in an event procedure.
Use a constant in an event procedure
1. On the File menu, click Open Project.
The Open Project dialog box opens.
2. Open the Constant Tester project in the c:\vb08sbs\chap05\constant tester folder.
3. If the project’s form isn’t visible, click Form1.vb in Solution Explorer, and then click the
View Designer button.
The Constant Tester form opens in the Designer. Constant Tester is a skeleton program.
The user interface is fi nished, but you need to type in the program code.
4. Double-click the Show Constant button on the form.
The Button1_Click event procedure appears in the Code Editor.
5. Type the following statements in the Button1_Click event procedure:
Const Pi As Double = 3.14159265
Label1.Text = Pi
Tip The location you choose for your declarations should be based on how you plan to
use the constants or the variables. Programmers typically keep the scope for declarations
as small as possible, while still making them available for code that needs to use them. For
example, if a constant is needed only in a single event procedure, you should put the con-
stant declaration within that event procedure. However, you could also place the declara-
tion at the top of the form’s code, which would give all the event procedures in your form
access to it.
6. Click the Start Debugging button on the Standard toolbar to run the program.
146 Part II Programming Fundamentals
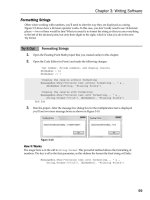
7. Click the Show Constant button.
The Pi constant appears in the label box, as shown here:
8. Click the Quit button to stop the program.
Constants are useful in program code, especially in involved mathematical formulas,
such as Area =
πr
2
. The next section describes how you can use operators and variables
to write similar formulas.
Working with Visual Basic Operators
A formula is a statement that combines numbers, variables, operators, and keywords to create
a new value. Visual Basic contains several language elements designed for use in formulas. In
this section, you’ll practice working with arithmetic (or mathematical) operators, the symbols
used to tie together the parts of a formula. With a few exceptions, the arithmetic symbols
you’ll use are the ones you use in everyday life, and their operations are fairly intuitive. You’ll
see each operator demonstrated in the following exercises.
Visual Basic includes the following arithmetic operators:
Operator Description
+ Addition
– Subtraction
* Multiplication
/ Division
\ Integer (whole number) division
Mod Remainder division
^ Exponentiation (raising to a power)
& String concatenation (combination)
O
p
erator
D
escri
p
tio
n
Chapter 5 Visual Basic Variables and Formulas, and the .NET Framework 147
Basic Math: The +, –, *, and / Operators
The operators for addition, subtraction, multiplication, and division are pretty straightforward
and can be used in any formula where numbers or numeric variables are used. The following
exercise demonstrates how you can use them in a program.
Work with basic operators
1. On the File menu, click Open Project.
2. Open the Basic Math project in the c:\vb08sbs\chap05\basic math folder.
3. If the project’s form isn’t visible, click Form1.vb in Solution Explorer, and then click the
View Designer button.
The Basic Math form opens in the Designer. The Basic Math program demonstrates how
the addition, subtraction, multiplication, and division operators work with numbers you
type. It also demonstrates how you can use text box, radio button, and button objects
to process user input in a program.
4. Click the Start Debugging button on the Standard toolbar.
The Basic Math program runs in the IDE. The program displays two text boxes in which
you enter numeric values, a group of operator radio buttons, a box that displays results,
and two button objects (Calculate and Quit).
5. Type 100 in the Variable 1 text box, and then press Tab.
The insertion point, or focus, moves to the second text box.
6. Type 17 in the Variable 2 text box.
You can now apply any of the mathematical operators to the values in the text boxes.
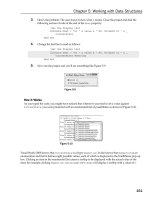
7. Click the Addition radio button, and then click the Calculate button.
The operator is applied to the two values, and the number 117 appears in the Result
box, as shown in the following illustration.
148 Part II Programming Fundamentals
8. Practice using the subtraction, multiplication, and division operators with the two
numbers in the variable boxes. (Click Calculate to calculate each formula.)
The results appear in the Result box. Feel free to experiment with different numbers in
the variable text boxes. (Try a few numbers with decimal points if you like.) I used the
Double data type to declare the variables, so you can use very large numbers.
Now try the following test to see what happens:
9. Type 100 in the Variable 1 text box, type 0 in the Variable 2 text box, click the Division
radio button, and then click Calculate.
Dividing by zero is not allowed in mathematical calculations, because it produces an
infi nite result. But Visual Basic is able to handle this calculation and displays a value of
Infi nity in the Result text box. Being able to handle some divide-by-zero conditions is a
feature that Visual Basic 2008 automatically provides.
10. When you’ve fi nished contemplating this and other tests, click the Quit button.
The program stops, and the development environment returns.
Now take a look at the program code to see how the results were calculated. Basic Math
uses a few of the standard input controls you experimented with in Chapter 3 and an event
procedure that uses variables and operators to process the simple mathematical formulas.
The program declares its variables at the top of the form so that they can be used in all of
the Form1 event procedures.
Examine the Basic Math program code
1. Double-click the Calculate button on the form.
The Code Editor displays the Button1_Click event procedure. At the top of the form’s
code, you’ll see the following statement, which declares two variables of type Double:
'Declare FirstNum and SecondNum variables
Dim FirstNum, SecondNum As Double
I used the Double type because I wanted a large, general purpose variable type that
could handle many different numbers—integers, numbers with decimal points, very
big numbers, small numbers, and so on. The variables are declared on the same line
by using the shortcut notation. Both FirstNum and SecondNum are of type Double,
and are used to hold the values input in the fi rst and second text boxes, respectively.
2. Scroll down in the Code Editor to see the contents of the Button1_Click event
procedure.
Your screen looks similar to this:
Chapter 5 Visual Basic Variables and Formulas, and the .NET Framework 149
The fi rst two statements in the event procedure transfer data entered in the text box
objects into the FirstNum and SecondNum variables.
'Assign text box values to variables
FirstNum = TextBox1.Text
SecondNum = TextBox2.Text
The TextBox control handles the transfer with the Text property—a property that accepts
text entered by the user and makes it available for use in the program. I’ll make frequent
use of the TextBox control in this book. When it’s set to multiline and resized, it can dis-
play many lines of text—even a whole fi le!
After the text box values are assigned to the variables, the event procedure determines
which radio button has been selected, calculates the mathematical formula, and dis-
plays the result in a third text box. The fi rst radio button test looks like this:
'Determine checked button and calculate
If RadioButton1.Checked = True Then
TextBox3.Text = FirstNum + SecondNum
End If
Remember from Chapter 3 that only one radio button object in a group box object can
be selected at any given time. You can tell whether a radio button has been selected by
evaluating the Checked property. If it’s True, the button has been selected. If the Checked
property is False, the button has not been selected. After this simple test, you’re ready to
compute the result and display it in the third text box object. That’s all there is to using
basic arithmetic operators. (You’ll learn more about the syntax of If Then tests in
Chapter 6, “Using Decision Structures.”)
You’re done using the Basic Math program.
150 Part II Programming Fundamentals
Shortcut Operators
An interesting feature of Visual Basic is that you can use shortcut operators for math-
ematical and string operations that involve changing the value of an existing variable.
For example, if you combine the + symbol with the = symbol, you can add to a vari-
able without repeating the variable name twice in the formula. Thus, you can write the
formula X = X + 6 by using the syntax X += 6. The following table shows examples of
these shortcut operators.
Operation Long-form syntax Shortcut syntax
Addition (+) X = X + 6 X += 6
Subtraction (-) X = X – 6 X -= 6
Multiplication (*) X = X * 6 X *= 6
Division (/) X = X / 6 X /= 6
Integer division (\) X = X \ 6 X \= 6
Exponentiation (^) X = X ^ 6 X ^= 6
String concatenation (&) X = X & “ABC” X &= “ABC”
Using Advanced Operators: \, Mod, ^, and &
In addition to the four basic arithmetic operators, Visual Basic includes four advanced opera-
tors, which perform integer division (\), remainder division (Mod), exponentiation (^), and string
concatenation (&). These operators are useful in special-purpose mathematical formulas and
text processing applications. The following utility (a slight modifi cation of the Basic Math pro-
gram) shows how you can use each of these operators in a program.
Work with advanced operators
1. On the File menu, click Open Project.
The Open Project dialog box opens.
2. Open the Advanced Math project in the c:\vb08sbs\chap05\advanced math folder.
3. If the project’s form isn’t visible, click Form1.vb in Solution Explorer, and then click the
View Designer button.
The Advanced Math form opens in the Designer. The Advanced Math program is
identical to the Basic Math program, with the exception of the operators shown in
the radio buttons and in the program.
O
perat
i
on Long-
f
orm synta
x
S
h
ortcut synta
x
Chapter 5 Visual Basic Variables and Formulas, and the .NET Framework 151
4. Click the Start Debugging button on the Standard toolbar.
The program displays two text boxes in which you enter numeric values, a group of
operator radio buttons, a text box that displays results, and two buttons.
5. Type 9 in the Variable 1 text box, and then press Tab.
6. Type 2 in the Variable 2 text box.
You can now apply any of the advanced operators to the values in the text boxes.
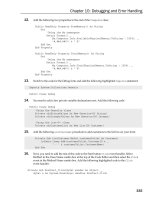
7. Click the Integer Division radio button, and then click the Calculate button.
The operator is applied to the two values, and the number 4 appears in the Result box,
as shown here:
Integer division produces only the whole number result of the division operation.
Although 9 divided by 2 equals 4.5, the integer division operation returns only the fi rst
part, an integer (the whole number 4). You might fi nd this result useful if you’re work-
ing with quantities that can’t easily be divided into fractional components, such as the
number of adults who can fi t in a car.
8. Click the Remainder radio button, and then click the Calculate button.
The number 1 appears in the Result box. Remainder division (modulus arithmetic)
returns the remainder (the part left over) after two numbers are divided. Because 9
divided by 2 equals 4 with a remainder of 1 (2 * 4 + 1 = 9), the result produced by
the Mod operator is 1. In addition to adding an early-seventies vibe to your code, the
Mod operator can help you track “leftovers” in your calculations, such as the amount
of money left over after a fi nancial transaction.
9. Click the Exponentiation radio button, and then click the Calculate button.
The number 81 appears in the Result box. The exponentiation operator (^) raises a
number to a specifi ed power. For example, 9 ^ 2 equals 9
2
, or 81. In a Visual Basic
formula, 9
2
is written 9 ^ 2.
152 Part II Programming Fundamentals
10. Click the Concatenation radio button, and then click the Calculate button.
The number 92 appears in the Result box. The string concatenation operator (&) com-
bines two strings in a formula, but not through addition. The result is a combination
of the “9” character and the “2” character. String concatenation can be performed on
numeric variables—for example, if you’re displaying the inning-by-inning score of a
baseball game as they do in old-time score boxes—but concatenation is more com-
monly performed on string values or variables.
Because I declared the FirstNum and SecondNum variables as type Double, you can’t
combine words or letters by using the program code as written. As an example, try the
following test, which causes an error and ends the program.
11. Type birth in the Variable 1 text box, type day in the Variable 2 text box, verify that
Concatenation is selected, and then click Calculate.
Visual Basic is unable to process the text values you entered, so the program stops
running, and an error message appears on the screen.
This type of error is called a run-time error—an error that surfaces not during the design
and compilation of the program, but later, when the program is running and encounters
a condition that it doesn’t know how to process. If this seems odd, you might imagine
that Visual Basic is simply offering you a modern rendition of the robot plea “Does not
compute!” from the best science fi ction fi lms of the 1950s. The computer-speak message
“Conversion from string “birth” to type ‘Double’ is not valid” means that the words you
entered in the text boxes (“birth” and “day”) could not be converted, or cast, by Visual
Basic to variables of the type Double. Double types can only contain numbers. Period.
Chapter 5 Visual Basic Variables and Formulas, and the .NET Framework 153
As we shall explore in more detail later, Visual Studio doesn’t leave you hanging with
such a problem, but provides a dialog box with different types of information to help
you resolve the run-time error. For now, you have learned another important lesson
about data types and when not to mix them.
12. Click the Stop Debugging button on the Standard toolbar to end the program.
Your program ends and returns you to the development environment.
Note
In Chapter 8, “Debugging Visual Basic Programs,” you’ll learn about debugging
mode, which allows you to track down the defects, or bugs, in your program code.
Now take a look at the program code to see how variables were declared and how the
advanced operators were used.
13. Scroll to the code at the top of the Code Editor.
You see the following comment and program statement:
'Declare FirstNum and SecondNum variables
Dim FirstNum, SecondNum As Double
As you might recall from the previous exercise, FirstNum and SecondNum are the
variables that hold numbers coming in from the TextBox1 and TextBox2 objects.
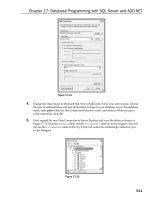
14. Change the data type from Double to String so that you can properly test how the
string concatenation (&) operator works.
15. Scroll down in the Code Editor to see how the advanced operators are used in the
program code.
You see the following code:
'Assign text box values to variables
FirstNum = TextBox1.Text
SecondNum = TextBox2.Text
'Determine checked button and calculate
If RadioButton1.Checked = True Then
TextBox3.Text = FirstNum \ SecondNum
End If
If RadioButton2.Checked = True Then
TextBox3.Text = FirstNum Mod SecondNum
End If
If RadioButton3.Checked = True Then
TextBox3.Text = FirstNum ^ SecondNum
End If
If RadioButton4.Checked = True Then
TextBox3.Text = FirstNum & SecondNum
End If
154 Part II Programming Fundamentals
Like the Basic Math program, this program loads data from the text boxes and places it
in the FirstNum and SecondNum variables. The program then checks to see which radio
button the user checked and computes the requested formula. In this event procedure,
the integer division (\), remainder (Mod), exponentiation (^), and string concatenation
(&) operators are used. Now that you’ve changed the data type of the variables to String,
run the program again to see how the & operator works on text.
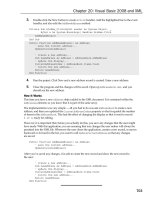
16. Click the Start Debugging button.
17. Type birth in the Variable 1 text box, type day in the Variable 2 text box, click
Concatenation, and then click Calculate.
The program now concatenates the string values and doesn’t produce a run-time error,
as shown here:
18. Click the Quit button to close the program.
You’re fi nished working with the Advanced Math program.
Tip
Run-time errors are diffi cult to avoid completely—even the most sophisticated application
programs, such as Microsoft Word or Microsoft Excel, sometimes run into error conditions that
they can’t handle, producing run-time errors, or crashes. Designing your programs to handle many
different data types and operating conditions helps you produce solid, or robust, applications. In
Chapter 9, “Trapping Errors by Using Structured Error Handling,” you’ll learn about another helpful
tool for preventing run-time error crashes—the structured error handler.
Working with Methods in the Microsoft .NET Framework
Now and then you’ll want to do a little extra number crunching in your programs. You might
need to round a number, calculate a complex mathematical expression, or introduce random-
ness into your programs. The math methods shown in the following table can help you work
with numbers in your formulas. These methods are provided by the Microsoft .NET Framework,
a class library that lets you tap into the power of the Windows operating system and accom-
plish many of the common programming tasks that you need to create your projects. The
Chapter 5 Visual Basic Variables and Formulas, and the .NET Framework 155
.NET Framework is a major feature of Visual Studio that is shared by Visual Basic, Microsoft
Visual C++, Microsoft Visual C#, and other tools in Visual Studio. It’s an underlying interface
that becomes part of the Windows operating system itself, and it is installed on each com-
puter that runs Visual Studio programs.
The .NET Framework is organized into classes that you can use in your programming
projects. The process is quite simple, and you’ll experiment with how it works now by
using a math method in the System.Math class of the .NET Framework.
What’s New in Microsoft .NET Framework 3.5?
Visual Studio 2008 includes a new version of the .NET Framework—Microsoft .NET
Framework 3.5. This is an update to the .NET Framework 3.0 software that provided
support for the Windows Vista operating system, and the .NET Framework 2.0 soft-
ware that shipped with Visual Studio 2005 and provided support for 64-bit processors.
Version 3.5 adds new classes that provide additional functionality for distributed mo-
bile applications, interprocess communication, time zone operations, ASP.NET, Visual
Web Developer, and much more. The .NET Framework 3.5 also includes support for
new advanced technologies, such as Language Integrated Query (LINQ) for querying
different types of data, Windows Presentation Foundation (WPF) for creating complex
graphics, Windows Communication Foundation (WCF) for creating applications that
work with Web services, and Windows Workfl ow Foundation (WF) for creating work-
fl ow-type applications. Many of the improvements in the .NET Framework will come
to you automatically as you use Visual Basic 2008, and some will become useful as you
explore advanced programming techniques.
The following table offers a partial list of the math methods in the System.Math class. The
argument n in the table represents the number, variable, or expression you want the
method to evaluate. If you use any of these methods, be sure that you put the statement
Imports System.Math
at the very top of your form’s code in the Code Editor.
Method Purpose
Abs(n) Returns the absolute value of n.
Atan(n) Returns the arctangent, in radians, of n.
Cos(n) Returns the cosine of the angle n. The angle n is expressed in radians.
Exp(n) Returns the constant e raised to the power n.
Sign(n) Returns -1 if n is less than 0, 0 if n is 0, and +1 if n is greater than 0.
Sin(n) Returns the sine of the angle n. The angle n is expressed in radians.
Sqrt(n) Returns the square root of n.
Tan(n) Returns the tangent of the angle n. The angle n is expressed in radians.
Method
P
ur
p
os
e
156 Part II Programming Fundamentals
Use the System.Math class to compute square roots
1. On the File menu, click New Project.
The New Project dialog box opens.
2. Create a new Visual Basic Windows Forms Application project named My Framework
Math.
The new project is created, and a blank form opens in the Designer.
3. Click the Button control on the Windows Forms tab of the Toolbox, and create a button
object at the top of your form.
4. Click the TextBox control in the Toolbox, and draw a text box below the button object.
5. Set the Text property of the button object to Square Root.
6. Double-click the button object to display the Code Editor.
7. At the very top of the Code Editor, above the Public Class Form1 statement, type the
following program statement:
Imports System.Math
The System.Math class is a collection of methods provided by the .NET Framework for
arithmetic operations. The .NET Framework is organized in a hierarchical fashion and can
be very deep. The Imports statement makes it easier to reference classes, properties, and
methods in your project. For example, if you didn’t include the previous Imports state-
ment, to call the Sqrt method you would have to type System.Math.Sqrt instead of just
Sqrt. The Imports statement must be the fi rst statement in your program—it must come
even before the variables that you declare for the form and the Public Class Form1 state-
ment that Visual Basic automatically provides.
8. Move down in the Code Editor, and add the following code to the Button1_Click event
procedure between the Private Sub and End Sub statements:
Dim Result As Double
Result = Sqrt(625)
TextBox1.Text = Result
These three statements declare a variable of the double type named Result, use the
Sqrt method to compute the square root of 625, and assign the Result variable to the
Text property of the text box object so that the answer is displayed.
9. Click the Save All button on the Standard toolbar to save your changes. Specify the
c:\vb08sbs\chap05 folder as the location.
10. Click the Start Debugging button on the Standard toolbar.
The Framework Math program runs in the IDE.
Chapter 5 Visual Basic Variables and Formulas, and the .NET Framework 157
11. Click the Square Root button.
Visual Basic calculates the square root of 625 and displays the result (25) in the text box.
As you can see here, the Sqrt method works!
12. Click the Close button on the form to end the program.
To make it easier to reference classes, properties, and methods in the .NET Framework, in-
clude the Imports statement, and specify the appropriate namespace or class. You can use
this technique to use any class in the .NET Framework, and you’ll see many more examples
of this technique as you work through Microsoft Visual Basic 2008 Step by Step.
One Step Further: Establishing Order of Precedence
In the previous few exercises, you experimented with several arithmetic operators and one
string operator. Visual Basic lets you mix as many arithmetic operators as you like in a formula,
as long as each numeric variable and expression is separated from another by one operator.
For example, this is an acceptable Visual Basic formula:
Total = 10 + 15 * 2 / 4 ^ 2
The formula processes several values and assigns the result to a variable named Total. But
how is such an expression evaluated by Visual Basic? In other words, what sequence does
Visual Basic follow when solving the formula? You might not have noticed, but the order of
evaluation matters a great deal in this example.
Visual Basic solves this dilemma by establishing a specifi c order of precedence for math-
ematical operations. This list of rules tells Visual Basic which operator to use fi rst, second,
and so on when evaluating an expression that contains more than one operator.
158 Part II Programming Fundamentals
The following table lists the operators from fi rst to last in the order in which they are evaluated.
(Operators on the same level in this table are evaluated from left to right as they appear in an
expression.)
Operator Order of precedence
( ) Values within parentheses are always evaluated fi rst.
^ Exponentiation (raising a number to a power) is second.
– Negation (creating a negative number) is third.
* / Multiplication and division are fourth.
\ Integer division is fi fth.
Mod Remainder division is sixth.
+ - Addition and subtraction are last.
Given the order of precedence in this table, the expression
Total = 10 + 15 * 2 / 4 ^ 2
is evaluated by Visual Basic in the following steps. (Shading is used to show each step in the
order of evaluation.)
Total = 10 + 15 * 2 / 4 ^ 2
Total = 10 + 15 * 2 / 16
Total = 10 + 30 / 16
Total = 10 + 1.875
Total = 11.875
Using Parentheses in a Formula
You can use one or more pairs of parentheses in a formula to clarify the order of precedence.
For example, Visual Basic calculates the formula
Number = (8 - 5 * 3) ^ 2
by determining the value within the parentheses (-7) before doing the exponentiation—even
though exponentiation is higher in order of precedence than subtraction and multiplication,
according to the preceding table. You can further refi ne the calculation by placing nested
parentheses in the formula. For example,
Number = ((8 - 5) * 3) ^ 2
directs Visual Basic to calculate the difference in the inner set of parentheses fi rst, perform
the operation in the outer parentheses next, and then determine the exponentiation. The
result produced by the two formulas is different: the fi rst formula evaluates to 49 and the
second to 81. Parentheses can change the result of a mathematical operation, as well as
make it easier to read.
O
perator
O
rder o
f
precedenc
e
Chapter 5 Visual Basic Variables and Formulas, and the .NET Framework 159
Chapter 5 Quick Reference
To Do this
Declare a variable Type Dim followed by the variable name, the As keyword, and the variable
data type in the program code. To make the variable valid in all of a form’s
event procedures, place this statement at the top of the code for the form,
before any event procedures. For example:
Dim Country As String
Change the value of a
variable
Assign a new value with the assignment operator of (=). For example:
Country = "Japan"
Get input by using a
dialog box
Use the InputBox function, and assign the result to a variable. For example:
UserName = InputBox("What is your name?")
Display output in a
dialog box
Use the MsgBox function. (The string to be displayed in the dialog box can
be stored in a variable.) For example:
Forecast = "Rain, mainly on the plain."
MsgBox(Forecast, , "Spain Weather Report")
Create a constant Type the Const keyword followed by the constant name, the assignment
operator (=), the constant data type, and the fi xed value. For example:
Const JackBennysAge As Short = 39
Create a formula Link together numeric variables or values with one of the seven arithmetic
operators, and then assign the result to a variable or a property. For example:
Result = 1 ^ 2 * 3 \ 4 'this equals 0
Combine text strings Use the string concatenation operator (&). For example:
Msg = "Hello" & "," & " world!"
Make it easier to
reference a class
library from the
.NET Framework
Place an Imports statement at the very top of the form’s code that identifi es
the class library. For example:
Imports System.Math
Make a call to a
method from an
included class
library
Use the method name, and include any necessary arguments so that it can
be used in a formula or a program statement. For example, to make a call to
the Sqrt method in the System.Math class:
Hypotenuse = Sqrt(x ^ 2 + y ^ 2)
Control the evaluation
order in a formula
Use parentheses in the formula. For example:
Result = 1 + 2 ^ 3 \ 4 'this equals 3
Result = (1 + 2) ^ ( 3 \ 4) 'this equals 1
T
o Do th
is
161
Chapter 6
Using Decision Structures
After completing this chapter, you will be able to:
Write conditional expressions.
Use an If Then statement to branch to a set of program statements based on a varying
condition.
Use the MaskedTextBox control to receive user input in a specifi c format.
Short-circuit an If Then statement.
Use a Select Case statement to select one choice from many options in program code.
Use the Name property to rename objects within a program.
Manage mouse events and write a MouseHover event handler.
In the past few chapters, you used several features of Microsoft Visual Basic 2008 to process
user input. You used menus, toolbars, dialog boxes, and other Toolbox controls to display
choices for the user, and you processed input by using property settings, variables, operators,
formulas, and the Microsoft .NET Framework.
In this chapter, you’ll learn how to branch conditionally to a specifi c area in your program
based on input you receive from the user. You’ll also learn how to evaluate one or more prop-
erties or variables by using conditional expressions, and then execute one or more program
statements based on the results. In short, you’ll increase your programming vocabulary by
creating code blocks called decision structures that control how your program executes, or
fl ows, internally.
162 Part II Programming Fundamentals
Event-Driven Programming
The programs you’ve written so far in this book have displayed Toolbox controls, menus, tool-
bars, and dialog boxes on the screen, and with these programs, users could manipulate the
screen elements in whatever order they saw fi t. The programs put the user in charge, waited
patiently for a response, and then processed the input predictably. In programming circles, this
methodology is known as event-driven programming. You build a program by creating a group
of “intelligent” objects that know how to respond when the user interacts with them, and then
the program processes the input by using event procedures associated with the objects. The
following diagram shows how an event-driven program works in Visual Basic:
Receive input by
using object.
Process input by
using event procedure.
Return control
to the user.
Program input can also come from the computer system itself. For example, your program
might be notifi ed when a piece of electronic mail arrives or when a specifi ed period of
time has elapsed on the system clock. The computer, not the user, triggers these events.
Regardless of how an event is triggered, Visual Basic reacts by calling the event procedure
associated with the object that recognized the event. So far, you’ve dealt primarily with the
Click, CheckedChanged, and SelectedIndexChanged events. However, Visual Basic objects
also can respond to several other types of events.
The event-driven nature of Visual Basic means that most of the computing done in your
programs is accomplished by event procedures. These event-specifi c blocks of code process
input, calculate new values, display output, and handle other tasks.
In this chapter, you’ll learn how to use decision structures to compare variables, properties,
and values, and how to execute one or more statements based on the results. In Chapter 7,
“Using Loops and Timers,” you’ll use loops to execute a group of statements over and over
until a condition is met or while a specifi c condition is true. Together, these powerful fl ow-
control structures will help you build your event procedures so that they can respond to
almost any situation.
Chapter 6 Using Decision Structures 163
Events Supported by Visual Basic Objects
Each object in Visual Basic has a predefi ned set of events to which it can respond. These
events are listed when you select an object name in the Class Name list box at the top
of the Code Editor and then click the Method Name arrow. (Events are visually identifi ed
in Visual Studio by a lightning bolt icon.) You can write an event procedure for any of
these events, and if that event occurs in the program, Visual Basic will execute the event
procedure that’s associated with it. For example, a list box object supports more than 60
events, including Click, DoubleClick, DragDrop, DragOver, GotFocus, KeyDown, KeyPress,
KeyUp, LostFocus, MouseDown, MouseMove, MouseUp, MouseHover, TextChanged, and
Validated. You probably won’t need to write code for more than three or four of these
events in your applications, but it’s nice to know that you have so many choices when
you create elements in your interface. The following illustration shows a partial listing
of the events for a list box object in the Code Editor:
Class Name
Events
164 Part II Programming Fundamentals
Using Conditional Expressions
One of the most useful tools for processing information in an event procedure is a conditional
expression. A conditional expression is a part of a complete program statement that asks a
True-or-False question about a property, a variable, or another piece of data in the program
code. For example, the conditional expression
Price < 100
evaluates to True if the Price variable contains a value that is less than 100, and it evaluates to
False if Price contains a value that is greater than or equal to 100.
You can use the following comparison operators in a conditional expression:
Comparison operator Meaning
=
Equal to
<>
Not equal to
>
Greater than
<
Less than
>=
Greater than or equal to
<=
Less than or equal to
The following table shows some conditional expressions and their results. You’ll work with
conditional expressions several times in this chapter.
Conditional expression Result
10 <> 20
True (10 is not equal to 20)
Score < 20
True if Score is less than 20; otherwise, False
Score = Label1.Text
True if the Text property of the Label1 object contains the same value
as the Score variable; otherwise, False
TextBox1.Text = "Bill"
True if the word “Bill” is in the TextBox1 object; otherwise, False
Com
p
arison o
p
erato
r
M
eaning
Cond
i
t
i
onal express
i
o
n
R
esu
lt
Chapter 6 Using Decision Structures 165
If Then Decision Structures
When a conditional expression is used in a special block of statements called a decision
structure, it controls whether other statements in your program are executed and in what
order they’re executed. You can use an If Then decision structure to evaluate a condition in
the program and take a course of action based on the result. In its simplest form, an If Then
decision structure is written on a single line:
If condition Then statement
where condition is a conditional expression, and statement is a valid Visual Basic program
statement. For example,
If Score >= 20 Then Label1.Text = "You win!"
is an If Then decision structure that uses the conditional expression
Score >= 20
to determine whether the program should set the Text property of the Label1 object to “You
win!” If the Score variable contains a value that’s greater than or equal to 20, Visual Basic sets
the Text property; otherwise, it skips the assignment statement and executes the next line in
the event procedure. This sort of comparison always results in a True or False value. A condi-
tional expression never results in maybe.
Testing Several Conditions in an If Then Decision Structure
Visual Basic also supports an If Then decision structure that you can use to include several
conditional expressions. This block of statements can be several lines long and contains the
important keywords ElseIf, Else, and End If.
If condition1 Then
statements executed if condition1 is True
ElseIf condition2 Then
statements executed if condition2 is True
[Additional ElseIf conditions and statements can be placed here]
Else
statements executed if none of the conditions is True
End If
In this structure, condition1 is evaluated fi rst. If this conditional expression is True, the block of
statements below it is executed, one statement at a time. (You can include one or more pro-
gram statements.) If the fi rst condition isn’t True, the second conditional expression (condition2)
is evaluated. If the second condition is True, the second block of statements is executed. (You
can add additional ElseIf conditions and statements if you have more conditions to evaluate.)
If none of the conditional expressions is True, the statements below the Else keyword are
executed. Finally, the whole structure is closed by the End If keywords.
166 Part II Programming Fundamentals
The following code shows how a multiple-line If Then structure could be used to determine
the amount of tax due in a hypothetical progressive tax return. (The income and percentage
numbers are from the projected United States Internal Revenue Service 2007 Tax Rate Schedule
for single fi ling status.)
Dim AdjustedIncome, TaxDue As Double
AdjustedIncome = 50000
If AdjustedIncome <= 7825 Then '10% tax bracket
TaxDue = AdjustedIncome * 0.1
ElseIf AdjustedIncome <= 31850 Then '15% tax bracket
TaxDue = 782.5 + ((AdjustedIncome - 7825) * 0.15)
ElseIf AdjustedIncome <= 77100 Then '25% tax bracket
TaxDue = 4386.25 + ((AdjustedIncome - 31850) * 0.25)
ElseIf AdjustedIncome <= 160850 Then '28% tax bracket
TaxDue = 15698.75 + ((AdjustedIncome - 77100) * 0.28)
ElseIf AdjustedIncome <= 349700 Then '33% tax bracket
TaxDue = 39148.75 + ((AdjustedIncome - 160850) * 0.33)
Else '35% tax bracket
TaxDue = 101469.25 + ((AdjustedIncome - 349700) * 0.35)
End If
Important The order of the conditional expressions in your If Then and ElseIf statements is
critical. What happens if you reverse the order of the conditional expressions in the tax com-
putation example and list the rates in the structure from highest to lowest? Taxpayers in the 10
percent, 15 percent, 25 percent, 28 percent, and 33 percent tax brackets are all placed in the
35 percent tax bracket because they all have an income that’s less than or equal to $349,700.
(Visual Basic stops at the fi rst conditional expression that is True, even if others are also True.)
Because all the conditional expressions in this example test the same variable, they need to be
listed in ascending order to get the taxpayers to fall out in the right places. Moral: when you
use more than one conditional expression, consider the order carefully.
This useful decision structure tests the double-precision variable AdjustedIncome at the fi rst
income level and subsequent income levels until one of the conditional expressions evaluates
to True, and then determines the taxpayer’s income tax accordingly. With some simple modifi -
cations, it could be used to compute the tax owed by any taxpayer in a progressive tax system,
such as the one in the United States. Provided that the tax rates are complete and up to date
and that the value in the AdjustedIncome variable is correct, the program as written will give
the correct tax owed for single U.S. taxpayers for 2007. If the tax rates change, it’s a simple
matter to update the conditional expressions. With an additional decision structure to deter-
mine taxpayers’ fi ling status, the program readily extends itself to include all U.S. taxpayers.
Chapter 6 Using Decision Structures 167
Tip Expressions that can be evaluated as True or False are also known as Boolean expressions,
and the True or False result can be assigned to a Boolean variable or property. You can assign
Boolean values to certain object properties or Boolean variables that have been created by using
the Dim statement and the As Boolean keywords.
In the next exercise, you’ll use an If Then decision structure that recognizes users as they
enter a program—a simple way to get started with writing your own decision structures.
You’ll also learn how to use the MaskedTextBox control to receive input from the user in a
specifi c format.
Validate users by using If Then
1. Start Visual Studio, and create a new Windows Forms Application project named My
User Validation.
The new project is created, and a blank form opens in the Designer.
2. Click the form, and set the form’s Text property to “User Validation”.
3. Use the Label control to create a label on your form, and use the Properties window to
set the Text property to “Enter Your Social Security Number”.
4. Use the Button control to create a button on your form, and set the button’s Text
property to “Sign In”.
5. Click the MaskedTextBox control on the Common Controls tab in the Toolbox, and
then create a masked text box object on your form below the label.
The MaskedTextBox control is similar to the TextBox control that you have been using,
but by using MaskedTextBox, you can control the format of the information entered by
the user into your program. You control the format by setting the Mask property; you
can use a predefi ned format supplied by the control or choose your own format.
You’ll use the MaskedTextBox control in this program to require that users enter a
Social Security Number in the standard nine-digit format used by the United States
Internal Revenue Service.
6. With the MaskedTextBox1 object selected, click the Mask property in the Properties
window, and then click the ellipses button next to it.
The Input Mask dialog box opens, showing a list of your predefi ned formatting
patterns, or masks.