microsoft visual basic 2008 step by step phần 7 pdf
Bạn đang xem bản rút gọn của tài liệu. Xem và tải ngay bản đầy đủ của tài liệu tại đây (961.25 KB, 57 trang )
314 Part II Programming Fundamentals
Visual Basic executes the event procedure for the Button2 object. You see a message
box that looks like this:
5. Click OK in the message box, type a different Web site in the form’s text box, and then
click the Visit Site button.
You might want to visit the Microsoft Visual Basic Developer Center site located at
to learn more about Visual Basic.
6. Visit a few more Web sites by using the URL Collection form, and then click the List
Recent Sites button.
Each time you click List Recent Sites, the MsgBox function expands to show the growing
URL history list, as shown here:
If you visit more than a few dozen Web sites, you’ll need to replace the MsgBox function
with a multiline text box on the form. (Can you fi gure out how to write the code?)
7. When you’re fi nished, click the Close button on the form, and then close your Web
browser.
Congratulations! You’ve learned how to use the Controls collection and how to process
collections by using a For Each Next loop. These skills will be useful whenever you work
with collections in the System.Collections namespace. As you become more familiar with
classic computer science data structures and algorithms related to list management
(stacks, queues, dictionaries, hash tables, and other structured lists), you’ll fi nd that
System.Collections provides Visual Studio equivalents to help you manage information
in extremely innovative ways. (For a few book ideas related to data structures and algo-
rithms, see “General Books About Programming and Computer Science” in the Appendix,
“Where to Go for More Information.”)
Chapter 12 Working with Collections and the System.Collections Namespace 315
One Step Further: VBA Collections
If you decide to write Visual Basic macros for Microsoft Offi ce applications in the future,
you’ll fi nd that collections play a big role in the object models of Microsoft Offi ce Word,
Microsoft Offi ce Excel, Microsoft Offi ce Access, Microsoft Offi ce PowerPoint, and several
other applications that support the Visual Basic for Applications (VBA) programming lan-
guage. In Word, for example, all the open documents are stored in the Documents collection,
and each paragraph in the current document is stored in the Paragraphs collection. You can
manipulate these collections with a For Each Next loop just as you did the collections in the
preceding exercises. Offi ce 2003 and the 2007 Microsoft Offi ce system offer a large installa-
tion base for solutions based on VBA.
Tip
As a software developer, you should be aware that not everyone has upgraded to the 2007
Offi ce system yet. In some cases, you’ll need to offer solutions based on VBA for several Offi ce
versions, because a typical business or organization will have multiple versions of Offi ce in use.
The following sample code comes from a Word VBA macro that uses a For Each Next loop to
search each open document in the Documents collection for a fi le named MyLetter.doc. If the
fi le is found in the collection, the macro saves the fi le by using the Save method. If the fi le isn’t
found in the collection, the macro attempts to open the fi le from the c:\vb08sbs\chap12 folder.
Dim aDoc As Document
Dim docFound As Boolean
Dim docLocation As String
docFound = False
docLocation = "c:\vb08sbs\chap12\myletter.doc"
For Each aDoc In Documents
If InStr(1, aDoc.Name, "myletter.doc", 1) Then
docFound = True
aDoc.Save
Exit For
End If
Next aDoc
If docFound = False Then
Documents.Open FileName:=docLocation
End If
The macro begins by declaring three variables. The aDoc object variable represents the
current collection element in the For Each Next loop. The docFound Boolean variable
assigns a Boolean value of True if the document is found in the Documents collection. The
docLocation string variable contains the path of the MyLetter.doc fi le on disk. (This routine
assumes that the MyLetter.doc fi le is with your book sample fi les in c:\vb08sbs\chap12.)
The For Each Next loop cycles through each document in the Documents collection,
searching for the MyLetter fi le. If the fi le is detected by the InStr function (which detects
one string in another), the fi le is saved. If the fi le isn’t found, the macro attempts to open
it by using the Open method of the Documents object.
316 Part II Programming Fundamentals
Also note the Exit For statement, which I use to exit the For Each Next loop when the My
Letter fi le has been found and saved. Exit For is a special program statement that you can
use to exit a For Next loop or a For Each Next loop when continuing will cause unwanted
results. In this example, if the MyLetter.doc fi le is located in the collection, continuing the
search is fruitless, and the Exit For statement affords a graceful way to stop the loop as soon
as its task is completed.
Entering the Word Macro
I’ve included this sample Word macro to show you how you can use collections in Visual
Basic for Applications, but the source code is designed for Word, not the Visual Studio IDE.
If you aren’t working in Word, the Documents collection won’t have any meaning to the
compiler.
The steps you follow to try the macro depend on the version of Word you are using. If you
are using Word 2003, you’ll need to start Word, click the Macros command on the Macro
submenu of the Tools menu, create a new name for the macro (I used OpenMyDoc), and
then enter the code by using the Visual Basic Editor. If you are using Word 2007, you’ll need
to start Word, click the Developer tab, click the Macros command, create a new name for the
macro, and then enter the code by using the Visual Basic Editor. (If the Developer tab is not
shown, you will need to enable it in the Word Options dialog box.)
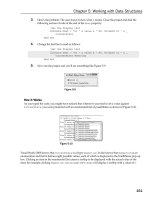
In the Visual Basic Editor, the completed macro looks like the following illustration. You can run
the macro by clicking the Run Sub/UserForm button on the toolbar, just as you would run a
program in the Visual Studio IDE.
Chapter 12 Working with Collections and the System.Collections Namespace 317
Tip Word macros are generally compatible between versions, although I have sometimes run
into problems when upgrading VBA macros or supporting multiple versions of Offi ce. If you are
using a different version of Word, you may need to slightly modify the sample code shown here.
Chapter 12 Quick Reference
To Do this
Process objects in a
collection
Write a For Each Next loop that addresses each member of the collection
individually. For example:
Dim ctrl As Control
For Each ctrl In Controls
ctrl.Text = "Click Me!"
Next
Move objects in the
Controls collection
from left to right
across the screen
Modify the Control.Left property of each collection object in a For Each
Next loop. For example:
Dim ctrl As Control
For Each ctrl In Controls
ctrl.Left = ctrl.Left + 25
Next
Give special treatment
to an object in a col-
lection
Test the Name property of the objects in the collection by using a For Each
Next loop. For example:
Dim ctrl As Control
For Each ctrl In Controls
If ctrl.Name <> "btnMoveObjects" Then
ctrl.Left = ctrl.Left + 25
End If
Next
Create a new collec-
tion and add mem-
bers to it
Declare a variable by using the New Collection syntax. Use the Add method
to add members. For example:
Dim URLsVisited As New Collection() URLsVisited.Add(TextBox1.Text)
Use Visual Basic
for Applications
collections in Word
If you are using Word 2003, start the program, click the Macros command
on the Macro submenu of the Tools menu, give the macro a name, click
Create, and then enter the macro code by using the Visual Basic Editor. If
you are using Word 2007, start the program, click the Developer tab, click
the Macros command, give the macro a name, click Create, and then enter
the macro code by using the Visual Basic Editor.
Word exposes many useful collections, including Documents and Paragraphs.
T
o Do th
is
319
Chapter 13
Exploring Text Files and String
Processing
After completing this chapter, you will be able to:
Display a text fi le by using a text box object, the LineInput function, and the
StreamReader class.
Use the My namespace, a time-saving “speed dial” feature within Visual Studio 2008.
Save notes in a text fi le by using the PrintLine function and the SaveFileDialog control.
Use string processing techniques to compare, combine, and sort strings.
Managing electronic documents is an important function in any modern business, and
Microsoft Visual Basic 2008 provides numerous mechanisms for working with different
document types and manipulating the information in documents. The most basic docu-
ment type is the text fi le, which is made up of non-formatted words and paragraphs,
letters, numbers, and a variety of special-purpose characters and symbols.
In this chapter, you’ll learn how to work with information stored in text fi les on your system.
You’ll learn how to open a text fi le and display its contents in a text box object, and you’ll learn
how to create a new text fi le on disk. You’ll also learn more about managing strings in your
programs, and you’ll use methods in the Microsoft .NET Framework String and StreamReader
classes to combine, sort, and display words, lines, and entire text fi les.
Displaying Text Files by Using a Text Box Object
The simplest way to display a text fi le in a program is to use a text box object. As you have
learned, you can create text box objects in any size. If the contents of the text fi le don’t fi t
neatly in the text box, you can also add scroll bars to the text box so that the user can examine
the entire fi le. To use the Visual Basic language to load the contents of a text fi le into a text box,
you need to use four functions. These functions are described in the following table and are
demonstrated in the fi rst exercise in this chapter. As I noted earlier, several of these functions
replace older keywords in the Visual Basic language.
Function Description
FileOpen Opens a text fi le for input or output
LineInput Reads a line of input from the text fi le
EOF Checks for the end of the text fi le
FileClose Closes the text fi le
Funct
i
o
n
Descr
i
pt
i
o
n
320 Part II Programming Fundamentals
Opening a Text File for Input
A text fi le consists of one or more lines of numbers, words, or characters. Text fi les are distinct
from document fi les and Web pages, which contain formatting codes, and from executable fi les,
which contain instructions for the operating system. Typical text fi les on your system are identi-
fi ed by Windows Explorer as “Text Documents” or have the fi le name extension .txt, .ini, .log, or
.inf. Because text fi les contain only ordinary, recognizable characters, you can display them
easily by using text box objects.
By using an OpenFileDialog control to prompt the user for the fi le’s path, you can let the
user choose which text fi le to open in a program. This control contains the Filter property,
which controls the type of fi les displayed; the ShowDialog method, which displays the Open
dialog box; and the FileName property, which returns the path specifi ed by the user. The
OpenFileDialog control doesn’t open the fi le; it just gets the path.
The FileOpen Function
After you get the path from the user, you open the fi le in the program by using the FileOpen
function. The abbreviated syntax for the FileOpen function is
FileOpen(fi lenumber, pathname, mode)
You can fi nd the complete list of arguments in the Visual Studio documentation. These are
the most important:
fi lenumber is an integer from 1 through 255.
pathname is a valid Microsoft Windows path.
mode is a keyword indicating how the fi le will be used. (You’ll use the OpenMode.Input
and OpenMode.Output modes in this chapter.)
The fi le number is associated with the fi le when it’s opened. You then use this fi le number in
your code whenever you need to refer to the open fi le. Aside from this association, there’s
nothing special about fi le numbers; Visual Basic simply uses them to keep track of the differ-
ent fi les you open in your program.
A typical FileOpen function using an OpenFileDialog object looks like this:
FileOpen(1, OpenFileDialog1.FileName, OpenMode.Input)
Here the OpenFileDialog1.FileName property represents the path, OpenMode.Input is the
mode, and 1 is the fi le number.
Chapter 13 Exploring Text Files and String Processing 321
Tip Text fi les that are opened by using this syntax are called sequential fi les because you must
work with their contents in sequential order. In contrast, you can access the information in a
database fi le in any order. (You’ll learn more about databases in Chapter 18, “Getting Started
with ADO.NET.”)
The following exercise demonstrates how you can use an OpenFileDialog control and
the FileOpen function to open a text fi le. The exercise also demonstrates how you can
use the LineInput and EOF functions to display the contents of a text fi le in a text box and
how you can use the FileClose function to close a fi le. (For more information about using
controls on the Dialogs tab of the Toolbox to create standard dialog boxes, see Chapter 4,
“Working with Menus, Toolbars, and Dialog Boxes.”)
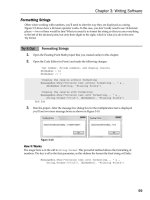
Run the Text Browser program
1. Start Microsoft Visual Studio, and open the Text Browser project in the c:\vb08sbs\
chap13\text browser folder.
The project opens in the IDE.
2. If the project’s form isn’t visible, display it now.
The Text Browser form opens, as shown here:
322 Part II Programming Fundamentals
The form contains a large text box object that has scroll bars. It also contains a menu
strip object that places Open, Close, and Exit commands on the File menu; an open fi le
dialog object; and a label providing operating instructions. I also created the property
settings shown in the following table. (Note especially the text box settings.)
Object Property Setting
txtNote Enabled
Multiline
Name
ScrollBars
False
True
txtNote
Both
CloseToolStripMenuItem Enabled False
lblNote Text
Name
“Load a text fi le with the Open command.”
lblNote
Form1 Text “Text Browser”
3. Click the Start Debugging button on the Standard toolbar.
The Text Browser program runs.
4. On the Text Browser File menu, click the Open command.
The Open dialog box opens.
5. Open the c:\vb08sbs\chap13\text browser folder.
The contents of the Text Browser folder are shown here:
Ob
j
ect Propert
y
Settin
g
Chapter 13 Exploring Text Files and String Processing 323
6. Double-click the Badbills.txt fi le name.
Badbills, a text fi le containing an article written in 1951 in the United States about the
dangers of counterfeit money, appears in the text box, as shown here:
7. Use the scroll bars to view the entire document. Memorize number 5.
8. When you’re fi nished, click the Close command on the File menu to close the fi le, and
then click the Exit command to quit the program.
The program stops, and the IDE returns.
Now you’ll take a look at two important event procedures in the program.
Examine the Text Browser program code
1. On the Text Browser form File menu, double-click the Open command.
The OpenToolStripMenuItem_Click event procedure appears in the Code Editor.
2. Resize the Code Editor to see more of the program code, if necessary.
324 Part II Programming Fundamentals
The OpenToolStripMenuItem_Click event procedure contains the following program code:
Dim AllText As String = "", LineOfText As String = ""
OpenFileDialog1.Filter = "Text files (*.TXT)|*.TXT"
OpenFileDialog1.ShowDialog() 'display Open dialog box
If OpenFileDialog1.FileName <> "" Then
Try 'open file and trap any errors using handler
FileOpen(1, OpenFileDialog1.FileName, OpenMode.Input)
Do Until EOF(1) 'read lines from file
LineOfText = LineInput(1)
'add each line to the AllText variable
AllText = AllText & LineOfText & vbCrLf
Loop
lblNote.Text = OpenFileDialog1.FileName 'update label
txtNote.Text = AllText 'display file
txtNote.Enabled = True 'allow text cursor
CloseToolStripMenuItem.Enabled = True 'enable Close command
OpenToolStripMenuItem.Enabled = False 'disable Open command
Catch
MsgBox("Error opening file.")
Finally
FileClose(1) 'close file
End Try
End If
This event procedure performs the following actions:
Declares variables and assigns a value to the Filter property of the open fi le dia-
log object.
Prompts the user for a path by using the OpenFileDialog1 object.
Traps errors by using a Try Catch code block.
Opens the specifi ed fi le for input by using the FileOpen function.
Uses the LineInput function to copy one line at a time from the fi le into a string
named AllText.
Copies lines until the end of the fi le (EOF) is reached or until there’s no more
room in the string. The AllText string has room for a very large fi le, but if an error
occurs during the copying process, the Catch clause displays the error.
Displays the AllText string in the text box, and enables the scroll bars and text
cursor.
Updates the File menu commands, and closes the fi le by using the FileClose
function.
Take a moment to see how the statements in the OpenToolStripMenuItem_Click event
procedure work—especially the FileOpen, LineInput, EOF, and FileClose functions. The
error handler in the procedure displays a message and aborts the loading process if
an error occurs.
Chapter 13 Exploring Text Files and String Processing 325
Tip For more information about the statements and functions, highlight the keyword you’re
interested in, and press F1 to see a discussion of it in the Visual Studio documentation.
3. Display the CloseToolStripMenuItem_Click event procedure, which is executed when the
Close menu command is clicked.
The event procedure looks like this:
txtNote.Text = "" 'clear text box
lblNote.Text = "Load a text file with the Open command."
CloseToolStripMenuItem.Enabled = False 'disable Close command
OpenToolStripMenuItem.Enabled = True 'enable Open command
The procedure clears the text box, updates the lblNote label, disables the Close command,
and enables the Open command.
Now you can use this simple program as a template for more advanced programs that process
text fi les. In the next section, you’ll learn how to type your own text into a text box and how to
save the text in the text box to a fi le on disk.
Using the StreamReader Class and My.Computer.
FileSystem to Open Text Files
In addition to the Visual Basic commands that open and display text fi les, there are two
additional techniques that you can use to open text fi les in a Visual Studio program: the
StreamReader class and the My namespace. Because these techniques use .NET Framework
objects that are available in all Visual Studio programming languages, I prefer them over
the “Visual Basic only” functions. However, Microsoft has been careful to preserve multiple
fi le operation mechanisms for aesthetic and compatibility reasons, so the choice is ulti-
mately up to you.
The StreamReader Class
The StreamReader class in the .NET Framework library allows you to open and display text
fi les in your programs. I’ll use this technique several times in this book when I work with
text fi les (for example, in Chapter 16, “Inheriting Forms and Creating Base Classes”). To
make it easier to use the StreamReader class, you add the following Imports statement
to the top of your code, as discussed in Chapter 5, “Visual Basic Variables and Formulas,
and the .NET Framework”:
Imports System.IO
326 Part II Programming Fundamentals
Then, if your program contains a text box object, you can display a text fi le inside the text
box by using the following program code. (The text fi le opened in this example is Badbills.txt,
and the code assumes an object named TextBox1 has been created on your form.)
Dim StreamToDisplay As StreamReader
StreamToDisplay = New StreamReader("C:\vb08sbs\chap13\text browser\badbills.txt")
TextBox1.Text = StreamToDisplay.ReadToEnd
StreamToDisplay.Close()
TextBox1.Select(0, 0)
StreamReader is a .NET Framework alternative to opening a text fi le by using the Visual Basic
FileOpen function. In this StreamReader example, I declare a variable named StreamToDisplay
of the type StreamReader to hold the contents of the text fi le, and then I specify a valid path
for the fi le I want to open. Next I read the contents of the text fi le into the StreamToDisplay
variable by using the ReadToEnd method, which retrieves all the text in the fi le from the
current location (the beginning of the text fi le) to the end of the text fi le and assigns it to
the Text property of the text box object. The fi nal statements close the text fi le and use the
Select method to remove the selection in the text box.
The My Namespace
The second alternative to opening text fi les in a program is a helpful feature of Visual Basic
that uses the My namespace. The My namespace is a rapid access feature designed to sim-
plify accessing the .NET Framework to perform common tasks, such as manipulating forms,
exploring the host computer and its fi le system, displaying information about the current
application or its user, and accessing Web services. Most of these capabilities were previously
available through the .NET Framework Base Class Library, but due to its complexity, many
programmers found the features diffi cult to locate and use. The My namespace was added
in Visual Studio 2005 to make programming easier.
The My namespace is organized into several categories of functionality, as shown in the
following table.
Object Description
My.Application Information related to the current application, including the title, directory, and
version number.
My.Computer Information about the hardware, software, and fi les located on the current (local)
computer. My.Computer includes My.Computer.FileSystem, which you can use to
open text fi les and encoded fi les on the system.
My.Forms Information about the forms in your current Visual Studio project. Chapter 16
shows how to use My.Forms to switch back and forth between forms at run time.
My.Resources Information about your application’s resources (read only). Allows you to dynam-
ically retrieve resources for your application.
Object Descri
p
tio
n
Chapter 13 Exploring Text Files and String Processing 327
Object Description
My.Settings Information about your application’s settings. Allows you to dynamically store
and retrieve property settings and other information for your application.
My.User Information about the current user active on My.Computer.
My.WebServices Information about Web services active on My.Computer, and a mechanism to
access new Web services.
The My namespace is truly a “speed dial” feature, fully explorable via the Microsoft
IntelliSense feature of the Code Editor. For example, to use a message box to display the
name of the current computer followed by the name of the current user in a program, you
can simply type:
MsgBox(My.User.Name)
This produces output similar to the following:
The My.Computer object can display many categories of information about your computer
and its fi les. For example, the following statement displays the current system time (the local
date and time) maintained by the computer:
MsgBox(My.Computer.Clock.LocalTime)
You can use the My.Computer.FileSystem object along with the ReadAllText method to
open a text fi le and display its contents within a text box object. Here’s the syntax you
can use if you have a text box object on your form named txtNote (as in the last sample
program) and you plan to use an open fi le dialog object named OpenFileDialog1 to get
the name of the text fi le from the user:
Dim AllText As String = ""
OpenFileDialog1.Filter = "Text files (*.TXT)|*.TXT"
OpenFileDialog1.ShowDialog() 'display Open dialog box
If OpenFileDialog1.FileName <> "" Then
AllText = My.Computer.FileSystem.ReadAllText(OpenFileDialog1.FileName)
txtNote.Text = AllText 'display file
End If
The ReadAllText method copies the entire contents of the given text fi le to a string variable or
object (in this case, a string variable named AllText), so in terms of performance and coding
time, ReadAllText is faster than reading the fi le one line at a time with the LineInput function.
Ob
j
ec
t
Descr
i
pt
i
o
n
328 Part II Programming Fundamentals
Because of this speed factor, the My namespace provides an excellent shortcut to many
common programming tasks. It is important to take note of this feature and its possible
uses, but the My namespace is effi cient here because we are reading the entire text fi le.
The LineInput function and StreamReader class offer more features than the current imple-
mentation of the My namespace, and especially the ability to process fi les one line at a time
(a crucial capability for sorting and parsing tasks, as we shall soon see). So it is best to mas-
ter each of the three methods for opening text fi les discussed in this chapter. The one you
use in actual programming practice will depend on the task at hand, and the way you plan
to use your code in the future.
Creating a New Text File on Disk
To create a new text fi le on disk by using Visual Basic, you can use many of the functions and
keywords used in the last example. Creating new fi les on disk and saving data to them is use-
ful if you plan to generate custom reports or logs, save important calculations or values, or
create a special-purpose word processor or text editor. Here’s an overview of the steps you’ll
need to follow in the program:
1. Get input from the user or perform mathematical calculations, or do both.
2. Assign the results of your processing to one or more variables. For example, you could
assign the contents of a text box to a string variable named InputForFile.
3. Prompt the user for a path by using a SaveFileDialog control. You use the ShowDialog
method to display the dialog box.
4. Use the path received in the dialog box to open the fi le for output.
5. Use the PrintLine function to save one or more values to the open fi le.
6. Close the fi le when you’re fi nished by using the FileClose function.
The following exercise demonstrates how you can use TextBox and SaveFileDialog controls
to create a simple note-taking utility. The program uses the FileOpen function to open a fi le,
the PrintLine function to store string data in it, and the FileClose function to close the fi le.
You can use this program to take notes at home or at work and then to stamp them with
the current date and time.
Run the Quick Note program
1. Click the Close Project command on the File menu.
2. Open the Quick Note project in the c:\vb08sbs\chap13\quick note folder.
The project opens in the IDE.
Chapter 13 Exploring Text Files and String Processing 329
3. If the project’s form isn’t visible, display it now.
The Quick Note form opens, as shown in the following illustration. It looks similar
to the Text Browser form. However, I replaced the OpenFileDialog control with the
SaveFileDialog control on the form. The File menu contains the Save As, Insert Date,
and Exit commands.
I set the following properties in the project:
Object Property Setting
txtNote Multiline
Name
ScrollBars
True
txtNote
Vertical
lblNote Text “Type your note and then save it to disk.”
Form1 Text “Quick Note”
4. Click the Start Debugging button.
5. Type the following text, or some text of your own, in the text box:
How to Detect Counterfeit Coins
1. Drop coins on a hard surface. Genuine coins have a bell-like ring; most
counterfeit coins sound dull.
2. Feel all coins. Most counterfeit coins feel greasy.
3. Cut edges of questionable coins. Genuine coins are not easily cut.
Ob
j
ect
P
roperty
S
ett
i
ng
330 Part II Programming Fundamentals
When you’re fi nished, your screen looks similar to this:
Tip To paste text from the Windows Clipboard into the text box, press Ctrl+V or
Shift+Insert. To copy text from the text box to the Windows Clipboard, select the text,
and then press Ctrl+C.
Now try using the commands on the File menu.
6. On the File menu, click the Insert Date command.
The current date and time appear as the fi rst line in the text box, as shown here:
The Insert Date command provides a handy way to include the current time stamp in a
fi le, which is useful if you’re creating a diary or a logbook.
7. On the File menu, click the Save As command.
The program displays a Save As dialog box with all the expected features. The default
fi le type is set to .txt. Your screen looks like the illustration on the following page.
Chapter 13 Exploring Text Files and String Processing 331
8. In the Save As dialog box, open the c:\vb08sbs\chap13\quick note folder if it isn’t
already open. Then type Badcoins.txt in the File Name text box, and click Save.
The text of your document is saved in the new Badcoins.txt text fi le.
9. On the File menu, click the Exit command.
The program stops, and the development environment returns.
Now you’ll take a look at the event procedures in the program.
Examine the Quick Note program code
1. On the Quick Note form File menu, double-click the Insert Date command.
The InsertDateToolStripMenuItem_Click event procedure appears in the Code Editor.
You see the following program code:
txtNote.Text = My.Computer.Clock.LocalTime & vbCrLf & txtNote.Text
txtNote.Select(1, 0) 'remove selection
This event procedure adds the current date and time to the text box by linking together,
or concatenating, the current date (generated by the My.Computer.Clock object and the
LocalTime property), a carriage return (added by the vbCrLf constant), and the Text prop-
erty. You could use a similar technique to add just the current date (by using DateString)
or any other information to the text in the text box.
332 Part II Programming Fundamentals
2. Take a moment to see how the concatenation statements work, and then examine the
SaveAsToolStripMenuItem_Click event procedure in the Code Editor.
You see the following program code:
SaveFileDialog1.Filter = "Text files (*.txt)|*.txt"
SaveFileDialog1.ShowDialog()
If SaveFileDialog1.FileName <> "" Then
FileOpen(1, SaveFileDialog1.FileName, OpenMode.Output)
PrintLine(1, txtNote.Text) 'copy text to disk
FileClose(1)
End If
This block of statements uses a save fi le dialog object to display a Save As dialog box,
verifi es whether the user selected a fi le, opens the fi le for output as fi le number 1,
writes the value in the txtNote.Text property to disk by using the PrintLine function,
and then closes the text fi le. Note especially the statement
PrintLine(1, txtNote.Text) 'copy text to disk
which assigns the entire contents of the text box to the open fi le. PrintLine is similar to
the older Visual Basic Print and Print# statements; it directs output to the specifi ed fi le
rather than to the screen or the printer. The important point to note here is that the
entire fi le is stored in the txtNote.Text property.
3. Review the FileOpen, PrintLine, and FileClose functions, and then close the program by
using the Close Project command on the File menu.
You’re fi nished with the Quick Note program.
Processing Text Strings with Program Code
As you learned in the preceding exercises, you can quickly open, edit, and save text fi les
to disk with the TextBox control and a handful of well-chosen program statements. Visual
Basic also provides a number of powerful statements and functions specifi cally designed
for processing the textual elements in your programs. In this section, you’ll learn how to
extract useful information from a text string, copy a list of strings into an array, and sort
a list of strings.
An extremely useful skill to develop when working with textual elements is the ability to sort
a list of strings. The basic concepts in sorting are simple. You draw up a list of items to sort,
and then compare the items one by one until the list is sorted in ascending or descending
alphabetical order.
Chapter 13 Exploring Text Files and String Processing 333
In Visual Basic, you compare one item with another by using the same relational operators
that you use to compare numeric values. The tricky part (which sometimes provokes long-
winded discussion among computer scientists) is the specifi c sorting algorithm you use to
compare elements in a list. We won’t get into the advantages and disadvantages of different
sorting algorithms in this chapter. (The bone of contention is usually speed, which makes a
difference only when several thousand items are sorted.) Instead, we’ll explore how the basic
string comparisons are made in a sort. Along the way, you’ll learn the skills necessary to sort
your own text boxes, list boxes, fi les, and databases.
The String Class and Useful Methods and Keywords
The most common task you’ve accomplished so far with strings is concatenating them by
using the concatenation operator (&). For example, the following program statement con-
catenates three literal string expressions and assigns the result “Bring on the circus!” to the
string variable Slogan:
Dim Slogan As String
Slogan = "Bring" & " on the " & "circus!"
You can also concatenate and manipulate strings by using methods in the String class of
the .NET Framework library. For example, the String.Concat method allows equivalent string
concatenation by using this syntax:
Dim Slogan As String
Slogan = String.Concat("Bring", " on the ", "circus!")
Visual Basic 2008 features two methods for string concatenation and many other string-
processing tasks: You can use operators and functions from earlier versions of Visual Basic
(Mid, UCase, LCase, and so on), or you can use newer methods from the .NET Framework
(Substring, ToUpper, ToLower, and so on). There’s no real “penalty” for using either string-
processing technique, although the older methods exist primarily for compatibility purposes.
(By supporting both methods, Microsoft hopes to welcome upgraders and let them learn
new features at their own pace.) In the rest of this chapter, I’ll focus on the newer string-
processing functions from the .NET Framework String class. However, you can use either
string-processing method or a combination of both.
334 Part II Programming Fundamentals
The following table lists several of the .NET Framework methods that appear in subsequent
exercises and their close equivalents in the Visual Basic programming language. The fourth
column in the table provides sample code for the methods in the String class of the .NET
Framework.
.NET
Framework
method
Visual
Basic
function Description .NET Framework example
ToUpper UCase Changes letters in a string to
uppercase.
Dim Nam e, N ew Na me As String
Name = "Kim"
NewName = Name.ToUpper
'NewName = "KIM"
ToLower LCase Changes letters in a string to
lowercase.
Dim Nam e, N ew Na me As String
Name = "Kim"
NewName = Name.ToLower
'NewName = "kim"
Length Len Determines the number of
characters in a string.
Dim River As String
Dim Size As Short
River = "Mississippi"
Size = River.Length
'Size = 11
Substring Mid Returns a fi xed number of
characters in a string from a
given starting point. (Note:
The fi rst element in a string
has an index of 0.)
Dim Cols, Middle As String
Cols = "First Second Third"
Middle = Cols.SubString(6, 6)
'Middle = "Second"
IndexOf InStr Finds the starting point of
one string within a larger
string.
Dim Name As String
Dim Start As Short
Name = "Abraham"
Start = Name.IndexOf("h")
'Start = 4
Trim Trim Removes leading and
following spaces from a
string.
Dim Spacey, Trimmed As String
Spacey = " Hello "
Trimmed = Spacey.Trim
'Trimmed = "Hello"
Remove Removes characters from the
middle of a string.
Dim RawStr, CleanStr As String
RawStr = "Hello333 there"
CleanStr = RawStr.Remove(5, 3)
'CleanStr = "Hello there"
Insert Adds characters to the middle
of a string.
Dim Oldstr, Newstr As String
Oldstr = "Hi Felix"
Newstr = Oldstr.Insert(3, "there ")
'Newstr = "Hi there Felix"
StrComp Compares strings and
disregards case differences.
Dim str1 As String = "Soccer"
Dim str2 As String = "SOCCER"
Dim Match As Short
Match = StrComp(str1, _
str2, CompareMethod.Text)
'Match = 0 [strings match]
.
NET
Framework
m
et
h
od
Vi
sual
B
asic
fu
n
ct
i
o
n Descri
p
tio
n
.NET Framework exam
p
le
Chapter 13 Exploring Text Files and String Processing 335
Sorting Text
Before Visual Basic can compare one character with another in a sort, it must convert each
character into a number by using a translation table called the ASCII character set (also called
the ANSI character set). ASCII is an acronym for American Standard Code for Information
Interchange. Each of the basic symbols that you can display on your computer has a different
ASCII code. These codes include the basic set of “typewriter” characters (codes 32 through
127) and special “control” characters, such as tab, line feed, and carriage return (codes 0
through 31). For example, the lowercase letter “a” corresponds to the ASCII code 97, and the
uppercase letter “A” corresponds to the ASCII code 65. As a result, Visual Basic treats these
two characters quite differently when sorting or performing other comparisons.
In the 1980s, IBM extended ASCII with codes 128 through 255, which represent accented,
Greek, and graphic characters, as well as miscellaneous symbols. ASCII and these additional
characters and symbols are typically known as the IBM extended character set.
Tip
To see a table of the codes in the ASCII character set, search for “Chr, ChrW functions” in the
Visual Studio documentation, and then click ASCII Character Codes in the See Also section near
the end of the article.
The ASCII character set is still the most important numeric code for beginning programmers
to learn, but it isn’t the only character set. As the market for computers and application soft-
ware has become more global, a more comprehensive standard for character representation
called Unicode has emerged. Unicode can hold up to 65,536 symbols—plenty of space to
represent the traditional symbols in the ASCII character set plus most (written) international
languages and symbols. A standards body maintains the Unicode character set and adds
symbols to it periodically. Windows Server 2003, Windows XP, Windows Vista, and Visual
Studio have been specifi cally designed to manage ASCII and Unicode character sets. (For
more information about the relationship between Unicode, ASCII, and Visual Basic data
types, see “Working with Specifi c Data Types” in Chapter 5.)
In the following sections, you’ll learn more about using the ASCII character set to process
strings in your programs. As your applications become more sophisticated and you start
planning for the global distribution of your software, you’ll need to learn more about
Unicode and other international settings.
336 Part II Programming Fundamentals
Working with ASCII Codes
To determine the ASCII code of a particular letter, you can use the Visual Basic Asc function.
For example, the following program statement assigns the number 122 (the ASCII code for
the lowercase letter “z”) to the AscCode short integer variable:
Dim AscCode As Short
AscCode = Asc("z")
Conversely, you can convert an ASCII code to a letter with the Chr function. For example, this
program statement assigns the letter “z” to the letter character variable:
Dim letter As Char
letter = Chr(122)
The same result could also be achieved if you used the AscCode variable just declared as
shown here:
letter = Chr(AscCode)
How can you compare one text string or ASCII code with another? You simply use one of the
six relational operators Visual Basic supplies for working with textual and numeric elements.
These relational operators are shown in the following table.
Operator Meaning
<> Not equal to
=Equal to
<Less than
>Greater than
<= Less than or equal to
>= Greater than or equal to
A character is “greater than” another character if its ASCII code is higher. For example, the
ASCII value of the letter “B” is greater than the ASCII value of the letter “A,” so the expression
"A" < "B"
is true, and the expression
"A" > "B"
is false.
O
perator Mean
i
n
g
Chapter 13 Exploring Text Files and String Processing 337
When comparing two strings that each contain more than one character, Visual Basic begins
by comparing the fi rst character in the fi rst string with the fi rst character in the second string
and then proceeds character by character through the strings until it fi nds a difference. For
example, the strings Mike and Michael are the same up to the third characters (“k” and “c”).
Because the ASCII value of “k” is greater than that of “c,” the expression
"Mike" > "Michael"
is true.
If no differences are found between the strings, they are equal. If two strings are equal
through several characters but one of the strings continues and the other one ends, the
longer string is greater than the shorter string. For example, the expression
"AAAAA" > "AAA"
is true.
Sorting Strings in a Text Box
The following exercise demonstrates how you can use relational operators and several string
methods and functions to sort lines of text in a text box. The program is a revision of the
Quick Note utility and features an Open command that opens an existing fi le and a Close
command that closes the fi le. There’s also a Sort Text command on the File menu that you
can use to sort the text currently displayed in the text box.
Because the entire contents of a text box are stored in one string, the program must fi rst
break that long string into smaller individual strings. These strings can then be sorted by using
the ShellSort Sub procedure, a sorting routine based on an algorithm created by Donald Shell
in 1959. To simplify these tasks, I created a module that defi nes a dynamic string array to hold
each of the lines in the text box. I also placed the ShellSort Sub procedure in the module so
that I can call it from any event procedure in the project. (For more about using modules,
see Chapter 10, “Creating Modules and Procedures.”) Although you learned how to use
the powerful Array.Sort method in Chapter 11, “Using Arrays to Manage Numeric and
String Data,” the ShellSort procedure is a more fl exible and customizable tool. Building
the routine from scratch also gives you a little more experience with processing textual
values—an important learning goal of this chapter.
338 Part II Programming Fundamentals
Another interesting aspect of this program is the routine that determines the number of lines
in the text box object. No existing Visual Basic function computes this value automatically. I
wanted the program to be able to sort a text box of any size line by line. To accomplish this, I
created the code that follows. It uses the Substring method to examine one letter at a time in
the text box object and then uses the Chr function to search for the carriage return character,
ASCII code 13, at the end of each line. (Note in particular how the Substring method is used
as part of the Text property of the txtNote object. The String class automatically provides this
method, and many others, for any properties or variables that are declared in the String type.)
Dim ln, curline, letter As String
Dim i, charsInFile, lineCount As Short
'determine number of lines in text box object (txtNote)
lineCount = 0 'this variable holds total number of lines
charsInFile = txtNote.Text.Length 'get total characters
For i = 0 To charsInFile - 1 ‘move one char at a time
letter = txtNote.Text.Substring(i, 1) 'get letter
If letter = Chr(13) Then 'if carriage ret found
lineCount += 1 ‘go to next line (add to count)
i += 1 'skip linefeed char (typically follows cr on PC)
End If
Next i
The total number of lines in the text box is assigned to the lineCount short integer variable. I
use this value a little later to dimension a dynamic array in the program to hold each individual
text string. The resulting array of strings then gets passed to the ShellSort Sub procedure for
sorting, and ShellSort returns the string array in alphabetical order. After the string array is
sorted, I can simply copy it back to the text box by using a For loop.
Run the Sort Text program
1. Open the Sort Text project located in the c:\vb08sbs\chap13\sort text folder.
2. Click the Start Debugging button to run the program.
3. Type the following text, or some text of your own, in the text box:
Zebra
Gorilla
Moon
Banana
Apple
Turtle