microsoft visual basic 2008 step by step phần 8 pdf
Bạn đang xem bản rút gọn của tài liệu. Xem và tải ngay bản đầy đủ của tài liệu tại đây (907.58 KB, 57 trang )
Chapter 14 Managing Windows Forms and Controls at Run Time 371
To Do this
Create a new form with
program code and set its
properties
Create the form by using the Dim and New keywords and the Form class,
and then set any necessary properties. For example:
Dim form2 As New Form
form2.Text = "My New Form"
Position a startup form
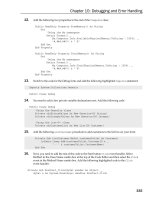
on the Windows desktop
Set the StartPosition property to one of the available options, such as
CenterScreen or CenterParent.
Size and position a start-
up form on the Windows
desktop by using code
Set the StartPosition to Manual, declare a Rectangle structure that defi nes
the form’s size and position, and then use the DesktopBounds property to
size and position the form on the desktop. For example:
form2.StartPosition = FormStartPosition.Manual
Dim Form2Rect As New Rectangle _
(200, 100, 300, 250)
form2.DesktopBounds = Form2Rect
Minimize, maximize, or
restore a form at run
time
Set the MaximizeBox and MinimizeBox properties for the form to True in
design mode to allow for maximize and minimize operations. In the pro-
gram code, set the form’s WindowState property to FormWindowState.
Minimized, FormWindowState.Maximized, or FormWindowState.Normal
when you want to change the window state of the form.
Add controls to a form at
run time
Create a control of the desired type, set its properties, and then add it to
the form’s Controls collection. For example:
Dim button1 as New Button
button1.Text = "Click Me"
button1.Location = New Point(20, 25)
form2.Controls.Add(button1)
Anchor an object a
specifi c distance
from specifi c edges
of the form
Set the Anchor property of the object, and specify the edges you want to
remain a constant distance from. Use the Or operator when specifying
multiple edges. For example:
Button1.Anchor = AnchorStyles.Bottom Or _
AnchorStyles.Right
Dock an object to one of
the form’s edges
Set the Dock property of the object, and specify the edge you want the
object to be attached to. For example:
PictureBox1.Dock = DockStyle.Top
Specify the startup form
in a project
Click the Properties command on the Project menu to open the Project
Designer. For a Windows Forms Application project, you can specify any
form in your project as the startup form by clicking the form name in the
Startup Form list box.
Create a Visual Basic
program with no user
interface (or only a
command line interface)
Create a console application project by clicking the New Project com-
mand on the File menu, clicking the Console Application template, and
clicking OK. You then add the program code to one or more modules,
not forms, and execution begins with a procedure named Sub Main.
T
o Do th
is
373
Chapter 15
Adding Graphics and Animation
Effects
After completing this chapter, you will be able to:
Use the System.Drawing namespace to add graphics to your forms.
Create animation effects on your forms.
Expand or shrink objects on a form at run time.
Change the transparency of a form.
For many developers, adding artwork and special effects to an application is the most
exciting—and addictive—part of programming. Fortunately, creating impressive and useful
graphical effects with Microsoft Visual Basic 2008 is both satisfying and easy.
In this chapter, you’ll learn how to add a number of visually interesting features to your pro-
grams. You’ll learn how to create artwork on a form using the System.Drawing namespace,
how to create simple animation effects by using PictureBox and Timer controls, and how to
expand or shrink objects at run time by using the Height and Width properties. You’ll also
learn how to change the transparency of the form, and change a form’s background image
and color. When you’ve fi nished, you’ll have many of the skills you need to create a visually
exciting user interface.
What will you be able to do on your own? This is the point when your imagination takes
over. One of my favorite results is from a reader of a previous version of this book who
used what he had learned about Visual Basic and graphics to build his own electrocardio-
graph machine, complete with analog circuitry and a Windows form displaying digital
data from the homemade EKG. If this isn’t your idea of fun, you might more modestly
decide to enhance your application’s start page so that it contains custom artwork and
visual effects—perhaps in combination with one or more digital photographs loaded
into picture box objects on a form.
Even game programmers can have some serious fun using graphics in Visual Basic and
Microsoft Visual Studio. However, if you’re planning on creating the next version of Microsoft
Zoo Tycoon or Microsoft Halo, you had better plan for much more than visual output. Modern
video games contain huge libraries of objects and complex formulas for rendering graphical
images that go well beyond the scope of this book. But that still leaves a lot of room for
experimentation and fun!
374 Part III Designing the User Interface
Adding Artwork by Using the System.Drawing
Namespace
Adding ready-made artwork to your programs is easy in Visual Basic. Throughout this book,
you’ve experimented with adding bitmaps and icons to a form by using picture box objects.
Now you’ll learn how to create original artwork on your forms by using the GDI+ functions
in the System.Drawing namespace, an application programming interface (API) provided by
the Microsoft .NET Framework for creating two-dimensional vector graphics, imaging, and
typography within the Windows operating system. The effects that you create can add color,
shape, and texture to your forms.
Using a Form’s Coordinate System
The fi rst thing to learn about creating graphics is the layout of the form’s predefi ned coordi-
nate system. In Visual Basic, each form has its own coordinate system. The coordinate system’s
starting point, or origin, is the upper-left corner of a form. The default coordinate system is
made up of rows and columns of device-independent picture elements, or pixels, which rep-
resent the smallest points that you can locate, or address, on a Visual Basic form.
In the Visual Basic coordinate system, rows of pixels are aligned to the x-axis (horizontal
axis), and columns of pixels are aligned to the y-axis (vertical axis). You defi ne locations in
the coordinate system by identifying the intersection of a row and a column with the nota-
tion (x, y). The (x, y) coordinates of the upper-left corner of a form are always (0, 0). The
following illustration shows how the location for a picture box object on the form is
described in the Visual Basic coordinate system:
x-axis
y-axis
(0,0) x=128 pixels
y=56 pixels
(128,56)
Chapter 15 Adding Graphics and Animation Effects 375
Visual Basic works along with your computer’s video display driver software to determine how
pixels are displayed on the form and how shapes such as lines, rectangles, curves, and circles
are displayed. Occasionally, more than one pixel is turned on to display a particular shape,
such as the line drawing shown in the following illustration. The logic that handles this type
of rendering isn’t your responsibility—it’s handled by your display adapter and the drawing
routines in the GDI+ graphics library. The following illustration shows a zoomed-in view of the
distortion or jagged edges you sometimes see in Visual Basic and Windows applications:
Pixel (0,0)
Pixel (7,4) Pixel (15,10)
The System.Drawing.Graphics Class
The System.Drawing namespace includes numerous classes for creating artwork and special
effects in your programs. In this section, you’ll learn a little about the System.Drawing.Graphics
class, which provides methods and properties for drawing shapes on your forms. You can
learn about the other classes by referring to the Visual Studio documentation.
Whether you’re creating simple illustrations or building complex drawings, it’s important
to be able to render many of the standard geometric shapes in your programs. The follow-
ing table lists several of the fundamental drawing shapes and the methods you use in the
System.Drawing.Graphics class to create them.
Shape Method Description
Line DrawLine Simple line connecting two points.
Rectangle DrawRectangle Rectangle or square connecting four points.
Arc DrawArc Curved line connecting two points (a portion of an ellipse).
Circle/Ellipse DrawEllipse Elliptical shape that is “bounded” by a rectangle.
Polygon DrawPolygon Complex shape with a variable number of points and sides
(stored in an array).
Curve DrawCurve A curved line that passes through a variable number of points
(stored in an array); complex curves called cardinal splines can
also be drawn with this method.
Bézier splines DrawBezier A curve drawn by using four points. (Points two and three are
“control” points.)
S
h
ap
e
Met
h
o
d
D
escr
i
pt
i
on
376 Part III Designing the User Interface
In addition to the preceding methods, which create empty or “non-fi lled” shapes, there are
several methods for drawing shapes that are fi lled with color. These methods usually have a
“Fill” prefi x, such as FillRectangle, FillEllipse, and FillPolygon.
When you use a graphics method in the System.Drawing.Graphics class, you need to create
a Graphics object in your code to represent the class and either a Pen or Brush object to
indicate the attributes of the shape you want to draw, such as line width and fi ll color. The
Pen object is passed as one of the arguments to the methods that aren’t fi lled with color.
The Brush object is passed as an argument when a fi ll color is desired. For example, the fol-
lowing call to the DrawLine method uses a Pen object and four integer values to draw a line
that starts at pixel (20, 30) and ends at pixel (100, 80). The Graphics object is declared by
using the name GraphicsFun, and the Pen object is declared by using the name PenColor.
Dim GraphicsFun As Graphics
Dim PenColor As New Pen(Color.Red)
GraphicsFun = Me.CreateGraphics
GraphicsFun.DrawLine(PenColor, 20, 30, 100, 80)
The syntax for the DrawLine method is important, but also note the three lines above it,
which are required to use a method in the System.Drawing.Graphics class. You must create
variables to represent both the Graphics and Pen objects, and the Graphics variable needs
to be instantiated by using the CreateGraphics method for the Windows form. Note that the
System.Drawing.Graphics namespace is included in your project automatically—you don’t
need to include an Imports statement in your code to reference the class.
Using the Form’s Paint Event
If you test the previous DrawLine method in a program, you’ll notice that the line you created
lasts, or persists, on the form only as long as nothing else covers it up. If a dialog box opens on
the form momentarily and covers the line, the line is no longer visible when the entire form is
visible again. The line also disappears if you minimize the form window and then maximize it
again. To address this shortcoming, you need to place your graphics code in the form’s Paint
event procedure so that each time the form is refreshed, the graphics are repainted, too.
In the following exercise, you’ll create three shapes on a form by using the form’s Paint
event procedure. The shapes you draw will continue to persist even if the form is covered
or minimized.
Create line, rectangle, and ellipse shapes
1. Start Visual Studio, and create a new Windows Forms Application project named My
Draw Shapes.
2. Resize the form so that it’s longer and wider than the default form size.
Chapter 15 Adding Graphics and Animation Effects 377
You’ll need a little extra space to create the graphics shapes. You won’t be using any
Toolbox controls, however. You’ll create the shapes by placing program code in the
form’s Form1_Paint event procedure.
3. Set the Text property of Form1 to “Draw Shapes”.
4. Click the View Code button in Solution Explorer to display the Code Editor.
5. In the Class Name list box, click Form1 Events.
Form1 Events is the list of events in your project associated with the Form1 object.
6. In the Method Name list box, click the Paint event.
7. The Form1_Paint event procedure appears in the Code Editor.
This event procedure is where you place code that should be executed when Visual
Basic refreshes the form.
8. Type the following program code:
'Prepare GraphicsFun variable for graphics calls
Dim GraphicsFun As Graphics
GraphicsFun = Me.CreateGraphics
'Use a red pen color to draw a line and an ellipse
Dim PenColor As New Pen(Color.Red)
GraphicsFun.DrawLine(PenColor, 20, 30, 100, 80)
GraphicsFun.DrawEllipse(PenColor, 10, 120, 200, 160)
'Use a green brush color to create a filled rectangle
Dim BrushColor As New SolidBrush(Color.Green)
GraphicsFun.FillRectangle(BrushColor, 150, 10, 250, 100)
'Create a blue cardinal spline curve with four points
Dim Points() As Point = {New Point(358, 280), _
New Point(300, 320), New Point(275, 155), New Point(350, 180)}
For tension As Single = 0 To 2.5 Step 0.5
GraphicsFun.DrawCurve(Pens.DodgerBlue, Points, tension)
Next
This sample event procedure draws four graphic shapes on your form: a red line, a red
ellipse, a green-fi lled rectangle, and a blue cardinal spline (a complex curve made up
of fi ve lines). To enable graphics programming, the routine declares a variable named
GraphicsFun in the code and uses the CreateGraphics method to activate or instantiate
the variable. The PenColor variable of type Pen is used to set the drawing color in the
line and ellipse, and the BrushColor variable of type SolidBrush is used to set the fi ll
color in the rectangle. These examples are obviously just the tip of the graphics library
iceberg—there are many more shapes, colors, and variations that you can create by
using the methods in the System.Drawing.Graphics class.
Tip
The complete Draw Shapes program is located in the c:\vb08sbs\chap15\draw shapes
folder.
378 Part III Designing the User Interface
9. Click the Start Debugging button on the Standard toolbar to run the program.
Visual Basic loads the form and executes the form’s Paint event. Your form looks like this:
10. Minimize the form, and then restore it again.
The form’s Paint event is executed again, and the graphics shapes are refreshed on the
form.
11. Click the Close button to end the program.
12. Click the Save All button on the Standard toolbar to save the project, and specify the
c:\vb08sbs\chap15 folder as the location.
Now you’re ready to move on to some simple animation effects.
Adding Animation to Your Programs
Displaying bitmaps and drawing shapes adds visual interest to a program, but for program-
mers, the king of graphical effects has always been animation. Animation is the simulation
of movement produced by rapidly displaying a series of related images on the screen. Real
animation involves moving objects programmatically, and it often involves changing the size
or shape of the images along the way.
In this section, you’ll learn how to add simple animation to your programs. You’ll learn how
to update the Top and Left properties of a picture box, control the rate of animation by using
a timer object, and sense the edge of your form’s window.
Chapter 15 Adding Graphics and Animation Effects 379
Moving Objects on the Form
In Visual Basic 6, a special method named Move allows you to move objects in the coordinate
system. The Move method is no longer supported by Visual Basic 2008 controls. However,
you can use the properties and method shown in the following table instead.
Keyword Description
Left This property can be used to move an object horizontally (left or right).
Top This property can be used to move an object vertically (up or down).
Location This property can be used to move an object to the specifi ed location.
SetBounds This method sets the boundaries of an object to the specifi ed location and size.
The following sections discuss how you can use the Left, Top, and Location properties to
move objects.
To move an object in a horizontal direction, use the Left property, which uses the syntax
object.Left = horizontal
where object is the name of the object on the form that you want to move, and horizontal is
the new horizontal, or x-axis, coordinate of the left edge of the object, measured in pixels.
For example, the following program statement moves a picture box object to a location 300
pixels to the right of the left window edge:
PictureBox1.Left = 300
To move a relative distance to the right or left, you would add or subtract pixels from the
current Left property setting. For example, to move an object 50 pixels to the right, you add
50 to the Left property, as follows:
PictureBox1.Left = PictureBox1.Left + 50
In a similar way, you can change the vertical location of an object on a form by setting the
Top property, which takes the syntax
object.Top = vertical
where object is the name of the object on the form that you want to move, and vertical is
the new vertical, or y-axis, coordinate of the top edge of the object, measured in pixels. For
example, the following program statement moves a picture box object to a location 150 pix-
els below the window’s title bar:
PictureBox1.Top = 150
Ke
y
word
D
escri
p
tion
380 Part III Designing the User Interface
Relative movements down or up are easily made by adding or subtracting pixels from the
current Top property setting. For example, to move 30 pixels in a downward direction, you
add 30 to the current Top property, as follows:
PictureBox1.Top = PictureBox1.Top + 30
The Location Property
To move an object in both vertical and horizontal directions, you can use a combination of
the Left and Top property settings. For example, to relocate the upper-left corner of a picture
box object to the (x, y) coordinates (300, 200), you enter the following program code:
PictureBox1.Left = 300
PictureBox1.Top = 200
However, the designers of Visual Studio don’t recommend using two program statements
to relocate an object if you plan to make numerous object movements in a program (for
example, if you plan to move an object hundreds or thousands of times during an elaborate
animation effect). Instead, you should use the Location property with the syntax
object.Location = New Point(horizontal, vertical)
where object is the name of the object, horizontal is the horizontal x-axis coordinate, vertical
is the vertical y-axis coordinate, and Point is a structure identifying the pixel location for
the upper-left corner of the object. For example, the following program statement moves
a picture box object to an (x, y) coordinate of (300, 200):
PictureBox1.Location = New Point(300, 200)
To perform a relative movement using the Location property, the Location.X and Location.Y
properties are needed. For example, the program statement
PictureBox1.Location = New Point(PictureBox1.Location.X - 50, _
PictureBox1.Location.Y - 40)
moves the picture box object 50 pixels left and 40 pixels up on the form. Although this
construction seems a bit unwieldy, it’s the recommended way to relocate objects in relative
movements on your form at run time.
Creating Animation by Using a Timer Object
The trick to creating animation in a program is placing one or more Location property updates
in a timer event procedure so that at set intervals the timer causes one or more objects to drift
across the screen. In Chapter 7, “Using Loops and Timers,” you learned how to use a timer ob-
ject to update a simple clock utility every second so that it displayed the correct time. When
Chapter 15 Adding Graphics and Animation Effects 381
you create animation, you set the Interval property of the timer to a much faster rate—1/5
second (200 milliseconds), 1/10 second (100 milliseconds), or less. The exact rate you choose
depends on how fast you want the animation to run.
Another trick is to use the Top and Left properties and the size of the form to “sense” the edges
of the form. By using these values in an event procedure, you can stop the animation (disable
the timer) when an object reaches the edge of the form. And by using the Top property, the
Left property, form size properties, and an If Then or Select Case decision structure, you can
make an object appear to bounce off one or more edges of the form.
The following exercise demonstrates how you can animate a picture box containing a Sun
icon (Sun.ico) by using the Location property and a timer object. In this exercise, you’ll use
the Top property to detect the top edge of the form, and you’ll use the Size.Height property
to detect the bottom edge. The Sun icon will move back and forth between these extremes
each time you click a button.
Animate a Sun icon on your form
1. Click the Close Project command on the File menu, and then create a new Windows
Forms Application project named My Moving Icon.
2. Using the Button control, draw two button objects in the lower-left corner of the form.
3. Using the PictureBox control, draw a small rectangular picture box object in the lower-
right corner of the form.
This is the object that you’ll animate in the program.
4. Double-click the Timer control on the Components tab of the Toolbox to add it to the
component tray below the form.
The timer object is the mechanism that controls the pace of the animation. Recall
that the timer object itself isn’t visible on the form, so it’s shown below the form in
the component tray reserved for non-visible objects.
5. Set the following properties for the button, picture box, timer, and form objects. To
set the PictureBox1 object’s Image property, select All Files in the Files of Type list box
before you browse to the fi le (fi les of the .ico type are not displayed by default).
Object Property Setting
Button1 Text “Move Up”
Button2 Text “Move Down”
PictureBox1 Image
SizeMode
“c:\vb08sbs\chap15\sun.ico”
StretchImage
Timer1 Interval 75
Form1 Text “Basic Animation”
Ob
j
ect
P
ropert
y
Sett
i
n
g
382 Part III Designing the User Interface
After you set these properties, your form looks similar to this:
6. Double-click the Move Up button to edit its event procedure.
The Button1_Click event procedure appears in the Code Editor.
7. Type the following program code:
GoingUp = True
Timer1.Enabled = True
This simple event procedure sets the GoingUp variable to True and enables the timer
object. The actual program code to move the picture box object and sense the correct
direction is stored in the Timer1_Tick event procedure. The GoingUp variable has a jag-
ged underline now because you have not declared it yet.
8. Near the top of the form’s program code (below the statement Public Class Form1),
type the following variable declaration:
Dim GoingUp As Boolean 'GoingUp stores current direction
This variable declaration makes GoingUp available to all the event procedures in the
form, so the jagged underline in the Button1_Click event procedure is removed. I’ve
used a Boolean variable because there are only two possible directions for movement
in this program—up and down.
9. Display the form again, double-click the Move Down button, and then enter the following
program code in the Button2_Click event procedure:
GoingUp = False
Timer1.Enabled = True
Chapter 15 Adding Graphics and Animation Effects 383
This routine is very similar to the Button1_Click event procedure, except that it changes
the direction from up to down.
10. Display the form again, double-click the Timer1 object, and then enter the following
program code in the Timer1_Tick event procedure:
If GoingUp = True Then
'move picture box toward the top
If PictureBox1.Top > 10 Then
PictureBox1.Location = New Point _
(PictureBox1.Location.X - 10, _
PictureBox1.Location.Y - 10)
End If
Else
'move picture box toward the bottom
If PictureBox1.Top < (Me.Size.Height - 75) Then
PictureBox1.Location = New Point _
(PictureBox1.Location.X + 10, _
PictureBox1.Location.Y + 10)
End If
End If
As long as the timer is enabled, this If Then decision structure is executed every 75
milliseconds. The fi rst line in the procedure checks whether the GoingUp Boolean
variable is set to True, indicating that the icon is moving toward the top of the form.
If it’s set to True, the procedure moves the picture box object to a relative position 10
pixels closer to both the top and left edges of the form.
If the GoingUp variable is currently set to False, the decision structure moves the icon
down instead. In this case, the picture box object moves until the edge of the form
is detected. The height of the form can be determined by using the Me.Size.Height
property. (I subtract 75 from the form height so that the icon is still displayed on the
form.) The Me object in this example represents the form (Form1).
As you’ll see when you run the program, this movement gives the icon animation a
steady drifting quality. To make the icon move faster, you decrease the Interval setting for
the timer object. To make the icon move slower, you increase the Interval setting.
Run the Moving Icon program
Tip The complete Moving Icon program is located in the c:\vb08sbs\chap15\moving icon
folder.
1. Click the Start Debugging button to run the program.
The Moving Icon program runs in the IDE.
2. Click the Move Up button.
384 Part III Designing the User Interface
The picture box object moves up the form on a diagonal path, as indicated here:
After a few moments, the button comes to rest at the upper edge of the form.
Note
If you placed the picture box object in the lower-right corner of the form as in-
structed in step 3 of the previous exercise, you see something similar to this illustration.
However, if you placed the picture box object in another location, or created a smaller
form, the image might drift off the screen when you click Move Up or Move Down. Can
you tell why?
3. Click the Move Down button.
The picture box moves back down again to the lower-right corner of the screen.
4. Click both buttons again several times, and ponder the animation effects.
Note that you don’t need to wait for one animation effect to end before you click the
next button. The Timer1_Tick event procedure uses the GoingUp variable immediately
to manage your direction requests, so it doesn’t matter whether the picture box has
fi nished going in one direction. Consider this effect for a moment, and imagine how
you could use a similar type of logic to build your own Visual Basic video games. You
could increase or decrease the animation rates according to specifi c conditions or
“collisions” on screen, and you could force the animated objects to move in differ-
ent directions. You could also change the picture displayed by the picture box object
based on where the icon is on the screen or what conditions it encounters.
5. When you’re fi nished running the program, click the Close button on the form to stop
the demonstration.
6. Click the Save All button to save the project, and specify the c:\vb08sbs\chap15 folder
as the location.
Chapter 15 Adding Graphics and Animation Effects 385
Expanding and Shrinking Objects While a Program
Is Running
In addition to maintaining a Top property and a Left property, Visual Basic maintains a Height
property and a Width property for most objects on a form. You can use these properties in
clever ways to expand and shrink objects while a program is running. The following exercise
shows you how to do it.
Expand a picture box at run time
1. On the File menu, click the Close Project command.
2. Create a new Windows Forms Application project named My Zoom In.
3. Display the form, click the PictureBox control in the Toolbox, and then draw a small
picture box object near the upper-left corner of the form.
4. Set the following properties for the picture box and the form. When you set the
properties for the picture box, note the current values in the Height and Width prop-
erties within the Size property. (You can set these at design time, too.) Since this is an
image from space, we’re using a black background for the form, and a .jpg image of
stars in the background. These two form properties, BackColor and BackgroundImage,
are being introduced for the fi rst time in this chapter.
Object Property Setting
PictureBox1 Image
SizeMode
“c:\vb08sbs\chap15\earth.jpg”
StretchImage
Form1 Text
BackColor
BackgroundImage
“Approaching Earth”
Black
“c:\vb08sbs\chap15\space.jpg”
5. Double-click the PictureBox1 object on the form.
The PictureBox1_Click event procedure appears in the Code Editor.
6. Type the following program code in the PictureBox1_Click event procedure:
PictureBox1.Height = PictureBox1.Height + 15
PictureBox1.Width = PictureBox1.Width + 15
7. These two lines increase the height and width of the Earth icon by 15 pixels each time
the user clicks the picture box. If you stretch your imagination a little, watching the
effect makes you feel like you’re approaching Earth in a spaceship.
Ob
j
ect
P
ropert
y
Sett
i
n
g
386 Part III Designing the User Interface
8. Click the Save All button, and then save the project in the c:\vb08sbs\chap15 folder.
Tip
The complete Zoom In program is located in the c:\vb08sbs\chap15\zoom in folder.
9. Click the Start Debugging button to run the program.
The Earth image appears alone on the form.
Stars appear in the background because you have loaded the space.jpg fi le onto the
form with the BackImage property. Any area not covered by the BackImage property
on the form will be black because you’ve used the BackColor property to simulate the
quiet melancholy of outer space.
10. Click the Earth image several times to expand it on the screen.
After 10 or 11 clicks, your screen looks similar to this:
Because the image was relatively low resolution, it will eventually become somewhat
blurry if you magnify it much more. You can address this limitation by saving smaller
images at a higher resolution. The wispy clouds on Earth mitigate the blurring problem
in this example, however. (In print, this will not look that great, so be sure to try it out
on your computer!)
11. When you get close enough to establish a standard orbit, click the Close button to quit
the program.
The program stops, and the development environment returns.
Chapter 15 Adding Graphics and Animation Effects 387
One Step Further: Changing Form Transparency
Interested in one last special effect? With GDI+, you can do things that are diffi cult or even
impossible in earlier versions of Visual Basic. For example, you can make a form partially
transparent so that you can see through it. Let’s say you’re designing a photo-display pro-
gram that includes a separate form with various options to manipulate the photos. You can
make the option form partially transparent so that the user can see any photos beneath it
while still having access to the options.
In the following exercise, you’ll change the transparency of a form by changing the value of
the Opacity property.
Set the Opacity property
1. On the File menu, click the Close Project command.
2. Create a new Windows Forms Application project named My Transparent Form.
3. Display the form, click the Button control in the Toolbox, and then draw two buttons on
the form.
4. Set the following properties for the two buttons and the form:
Object Property Setting
Button1 Text “Set Opacity”
Button2 Text “Restore”
Form1 Text “Transparent Form”
5. Double-click the Set Opacity button on the form.
6. Type the following program code in the Button1_Click event procedure:
Me.Opacity = 0.75
Opacity is specifi ed as a percentage, so it has a range of 0 to 1. This line sets the Opacity
of Form1 (Me) to 75 percent.
7. Display the form again, double-click the Restore button, and then enter the following
program code in the Button2_Click event procedure:
Me.Opacity = 1
This line restores the opacity to 100 percent.
Ob
j
ect Propert
y
Settin
g
388 Part III Designing the User Interface
8. Click the Save All button, and save the project in the c:\vb08sbs\chap15 folder.
Tip
The complete Transparent Form program is located in the c:\vb08sbs\chap15\
transparent form folder.
9. Click the Start Debugging button to run the program.
10. Click the Set Opacity button.
Notice how you can see through the form, as shown here:
11. Click the Restore button.
The transparency effect is removed.
12. When you’re done testing the transparency effect, click the Close button to quit the
program.
The program stops, and the development environment returns.
Chapter 15 Adding Graphics and Animation Effects 389
Chapter 15 Quick Reference
To Do this
Create lines or shapes
on a form
Use methods in the System.Drawing.Graphics namespace. For example,
the following program statements draw an ellipse on the form:
Dim GraphicsFun As Graphics
GraphicsFun = Me.CreateGraphics
Dim PenColor As New Pen(System.Drawing.Color.Red)
GraphicsFun.DrawEllipse(PenColor, 10, _
120, 200, 160)
Create lines or shapes
that persist on the form
during window redraws
Place the graphics methods in the Paint event procedure for the form.
Move an object on a
form
Relocate the object by using the Location property, the New keyword,
and the Point structure. For example:
PictureBox1.Location = New Point(300, 200)
Animate an object Use a timer event procedure to modify the Left, Top, or Location properties
for an object on the form. The timer’s Interval property controls animation
speed.
Expand or shrink an
object at run time
Change the object’s Height property or Width property.
Set the background
color on a form
Change the form’s BackColor property.
Set the background
image on a form
Change the form’s BackgroundImage property.
Change the transparency
of a form
Change the form’s Opacity property.
T
o Do th
is
391
Chapter 16
Inheriting Forms and Creating Base
Classes
After completing this chapter, you will be able to:
Use the Inheritance Picker to incorporate existing forms in your projects.
Create your own base classes with custom properties and methods.
Derive new classes from base classes by using the Inherits statement.
An important skill for virtually all professional software developers today is the ability to
understand and utilize object-oriented programming (OOP) techniques. The changes associ-
ated with OOP have been gaining momentum in recent versions of Visual Basic.
Although
Microsoft Visual Basic 6 offers several object-oriented programming features, experts say
that it lags behind the “true” OOP languages, such as Microsoft Visual C++, because it lacks
inheritance, a mechanism that allows one class to acquire the interface and behavior charac-
teristics of another class.
Beginning with Microsoft Visual Basic .NET 2002, the Visual Basic language and IDE have sup-
ported inheritance, which means that you can build one form in the development environment
and pass its characteristics and functionality on to other forms. In addition, you can build your
own classes and inherit properties, methods, and events from them. These capabilities have
been enhanced in Microsoft Visual Studio 2008.
In this chapter, you’ll experiment with both types of inheritance. You’ll learn how to integrate
existing forms into your projects by using the Inheritance Picker dialog box that is part of Visual
Studio 2008, and you’ll learn how to create your own classes and derive new ones from them
by using the Inherits statement. With these skills, you’ll be able to utilize many of the forms and
coding routines you’ve already developed, making Visual Basic programming a faster and more
fl exible endeavor. These improvements will help you design compelling user interfaces rapidly
and will extend the work that you have done in other programming projects.
392 Part III Designing the User Interface
Inheriting a Form by Using the Inheritance Picker
In object-oriented programming syntax, inheritance means having one class receive the
objects, properties, methods, and other attributes of another class. As I mentioned in the
section “Adding New Forms to a Program” in Chapter 14, “Managing Windows Forms and
Controls at Run Time,” Visual Basic goes through this process routinely when it creates a
new form in the development environment. The fi rst form in a project (Form1) relies on the
System.Windows.Forms.Form class for its defi nition and default values. In fact, this class is
identifi ed in the Properties window when you select a form in the Designer, as shown in
the following illustration:
Although you haven’t realized it, you’ve been using inheritance all along to defi ne the Windows
forms that you’ve been using to build Visual Basic applications. Although existing forms can be
inherited by using program code as well, the designers of Visual Studio considered the task to
be so important that they designed a special dialog box in the development environment to
facilitate the process. This dialog box is called the Inheritance Picker, and it’s accessed through
the Add New Item command on the Project menu. In the following exercise, you’ll use the
Inheritance Picker to create a second copy of a dialog box in a project.
Inherit a simple dialog box
1. Start Visual Studio, and create a new Visual Basic Windows Forms Application project
named My Form Inheritance.
2. Display the form in the project, and use the Button control to add two button objects
at the bottom of the form, positioned side by side.
3. Change the Text properties of the Button1 and Button2 buttons to “OK” and “Cancel”,
respectively.
4. Double-click the OK button to display the Button1_Click event procedure in the Code
Editor.
5. Type the following program statement:
MsgBox("You clicked OK")
Chapter 16 Inheriting Forms and Creating Base Classes 393
6. Display the form again, double-click the Cancel button, and then type the following
program statement in the Button2_Click event procedure:
MsgBox("You clicked Cancel")
7. Display the form again, and set the Text property of the form to “Dialog Box.”
You now have a simple form that can be used as the basis of a dialog box in a program.
With some customization, you can use this basic form to process several tasks—you
just need to add the controls that are specifi c to your individual application.
8. Click the Save All button to save your project, and specify the c:\vb08sbs\chap16 folder
as the location.
Now you’ll practice inheriting the form. The fi rst step in this process is building, or
compiling, the project because you can inherit only from forms that are compiled into
.exe or .dll fi les. Each time the base form is recompiled, changes made to the base
form are passed to the derived (inherited) form.
9. Click the Build My Form Inheritance command on the Build menu.
Visual Basic compiles your project and creates an .exe fi le.
10. Click the Add New Item command on the Project menu, and then click the Windows
Forms category on the left side of the dialog box and the Inherited Form template on
the right side of the dialog box.
The Add New Item dialog box looks as shown in the following illustration.
As usual, Visual Studio lists all the possible templates you could include in your projects,
not just those related to inheritance. The Inherited Form template gives you access to
the Inheritance Picker dialog box.
394 Part III Designing the User Interface
You can also use the Name text box at the bottom of the dialog box to assign a name
to your inherited form, although it is not necessary for this example. This name will
appear in Solution Explorer and in the fi le name of the form on disk.
11. Click Add to accept the default settings for the new, inherited form.
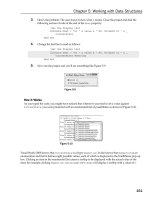
Visual Studio displays the Inheritance Picker dialog box, as shown here:
This dialog box lists all the inheritable forms in the current project. If you want to
browse for another compiled form, click the Browse button, and locate the .dll fi le on
your system.
Note
If you want to inherit a form that isn’t a component of the current project, the form
must be compiled as a .dll fi le.
12. Click Form1 in the Inheritance Picker dialog box, and then click OK.
Visual Studio creates the Form2.vb entry in Solution Explorer and displays the inherited
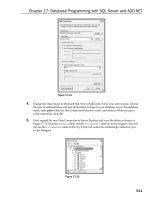
form in the Designer. Notice in the fi gure on the following page that the form looks
identical to the Form1 window you created earlier, except that the two buttons contain
tiny icons, which indicate that the objects come from an inherited source.
Chapter 16 Inheriting Forms and Creating Base Classes 395
Inherited form shown
in Solution Explorer
Icon indicates this
subject is inherited.
It can be diffi cult to tell an inherited form from a base form (the tiny inheritance icons
aren’t that obvious), but you can also use Solution Explorer and the IDE tabs to distin-
guish between the forms.
Now you’ll add a few new elements to the inherited form.
Customize the inherited form
1. Use the Button control to add a third button object to Form2 (the inherited form).
2. Set the Text property for the button object to “Click Me!”.
3. Double-click the Click Me! button.
4. In the Button3_Click event procedure, type the following program statement:
MsgBox("This is the inherited form!")
5. Display Form2 again, and then try double-clicking the OK and Cancel buttons on
the form.
You can’t display or edit the event procedures or properties for these inherited objects
without taking additional steps that are beyond the scope of this chapter. (Tiny “lock”
icons indicate that the inherited objects are read-only.) However, you can add new
objects to the form to customize it.