microsoft visual basic 2008 step by step phần 9 ppsx
Bạn đang xem bản rút gọn của tài liệu. Xem và tải ngay bản đầy đủ của tài liệu tại đây (1.57 MB, 57 trang )
428 Part III Designing the User Interface
The PrintPreviewDialog control displays a custom Print Preview dialog box.
The PageSetupDialog control displays a custom Page Setup dialog box.
As with other dialog boxes, you can add these printing controls to your form by using the
Toolbox, or you can create them programmatically.
In the following exercise, you’ll add Print Preview and Page Setup dialog boxes to the Print
File program you’ve been working with. In the completed practice fi les, I’ve named this
project Print Dialogs so that you can distinguish the code of the two projects, but you
can add the dialog box features directly to the Print File project if you want.
Add PrintPreviewDialog and PageSetupDialog controls
1. If you didn’t complete the previous exercise, open the Print File project from the
c:\vb08sbs\chap17\print fi le folder.
The Print File project is the starting point for this project.
2. Display the form, and then use the Button control to add two additional buttons to the
top of the form.
3. Double-click the PrintPreviewDialog control on the Printing tab of the Toolbox.
A print preview dialog object is added to the component tray.
4. Double-click the PageSetupDialog control on the Printing tab of the Toolbox.
A page setup dialog object is added to the component tray. If the objects in the
component tray obscure one another, you can drag them to a better (more visible)
location, or you can right-click the component tray and select Line Up Icons.
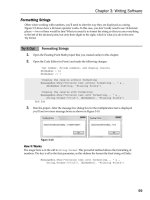
5. Set the following properties for the button objects on the form:
Object Property Setting
Button1 Name
Enabled
Text
btnSetup
False
“Page Setup”
Button2 Name
Enabled
Text
btnPreview
False
“Print Preview”
Your form looks like this:
Ob
j
ect Propert
y
S
ettin
g
Chapter 17 Working with Printers 429
6. Double-click the Page Setup button (btnSetup) to display the btnSetup_Click event
procedure in the Code Editor.
7. Type the following program code:
Try
'Load page settings and display page setup dialog box
PageSetupDialog1.PageSettings = PrintPageSettings
PageSetupDialog1.ShowDialog()
Catch ex As Exception
'Display error message
MessageBox.Show(ex.Message)
End Try
The code for creating a Page Setup dialog box in this program is quite simple because the
PrintPageSettings variable has already been defi ned at the top of the form. This variable
holds the current page defi nition information, and when it’s assigned to the PageSettings
property of the PageSetupDialog1 object, the ShowDialog method automatically loads a
dialog box that allows the user to modify what the program has selected as the default
page orientation, margins, and so on. The Try Catch error handler simply handles any er-
rors that might occur when the ShowDialog method is used.
8. Display the form again, and then double-click the Print Preview button (btnPreview)
to display the btnPreview_Click event procedure.
9. Type the following program code:
430 Part III Designing the User Interface
Try
'Specify current page settings
PrintDocument1.DefaultPageSettings = PrintPageSettings
'Specify document for print preview dialog box and show
StringToPrint = RichTextBox1.Text
PrintPreviewDialog1.Document = PrintDocument1
PrintPreviewDialog1.ShowDialog()
Catch ex As Exception
'Display error message
MessageBox.Show(ex.Message)
End Try
In a similar way, the btnPreview_Click event procedure assigns the PrintPageSettings
variable to the DefaultPageSettings property of the PrintDocument1 object, and then
it copies the text in the rich text box object to the StringToPrint variable and opens
the Print Preview dialog box. Print Preview automatically uses the page settings data
to display a visual representation of the document as it will be printed—you don’t
need to display this information manually.
Now you’ll make a slight modifi cation to the program code in the btnOpen_Click event
procedure.
10. Scroll up to the btnOpen_Click event procedure in the Code Editor.
This is the procedure that displays the Open dialog box, opens a text fi le, and enables
the printing buttons. Because you just added the Page Setup and Print Preview buttons,
you have to add program code to enable those two printing buttons as well.
11. Scroll to the bottom of the event procedure, just before the fi nal Catch code block, and
locate the following program statement:
btnPrint.Enabled = True
12. Below that statement, add the following lines of code:
btnSetup.Enabled = True
btnPreview.Enabled = True
Now your program will enable the print buttons when there’s a document available
to print.
13. Click the Save All button on the toolbar to save your changes.
Chapter 17 Working with Printers 431
Test the Page Setup and Print Preview features
Tip The complete Print Dialogs program is located in the c:\vb08sbs\chap17\print dialogs
folder.
1. Click the Start Debugging button on the toolbar.
The program opens, with only the fi rst button object enabled.
2. Click the Open button, and then open the longfi le.txt fi le in the c:\vb08sbs\chap17 folder.
The remaining three button objects are now enabled, as shown here:
3. Click the Page Setup button.
Your program displays the Page Setup dialog box, as shown here:
432 Part III Designing the User Interface
Page Setup provides numerous useful options, including the ability to change the paper
size and source, the orientation of the printing (Portrait or Landscape), and the page
margins (Left, Right, Top, and Bottom).
4. Change the Left margin to 2, and then click OK.
The left margin will now be 2 inches.
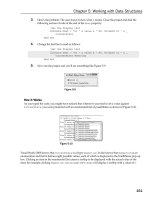
5. Click the Print Preview button.
Your program displays the Print Preview dialog box, as shown in the following
illustration:
One page
Two pages
Three pages
Four pages
Six pages
Zoom
Page
Select
box
If you’ve used the Print Preview command in Microsoft Offi ce Word or Microsoft Offi ce
Excel, you will recognize several of the buttons and preview features in this Print Preview
dialog box. The Zoom, One Page, Two Pages, Three Pages, Four Pages, Six Pages, and
Page Select box controls all work automatically in the dialog box. No program code is
required to make them operate.
6. Click the Four Pages button to display your document four pages at a time.
Chapter 17 Working with Printers 433
7. Click the Maximize button on the Print Preview title bar to make the window full size.
8. Click the Zoom arrow, and then click 150%.
Your screen looks like this:
9. Click the Zoom button and return the view to Auto.
10. Click the Three Pages button, and then click the Up arrow in the Page Select box to
view pages 2 through 4.
As you can see, this Print Preview window is quite impressive—and you incorporated it
into your program with just a few lines of code!
11. If you want to test printing the entire document again, click the Print button.
12. When you’re fi nished experimenting, click the Close button to close the Print Preview
dialog box, and then click the Close button to close the program.
You’re done working with printers for now.
434 Part III Designing the User Interface
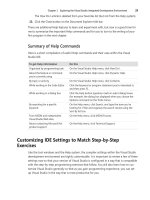
Chapter 17 Quick Reference
To Do this
Make it easier to refer-
ence the printing classes
in your projects
Add the following Imports statement to the top of your form:
Imports System.Drawing.Printing
Create a printing event
handler
Double-click the PrintDocument1 object in the component tray
or
Use the AddHandler statement and the AddressOf operator. For example:
AddHandler PrintDocument1.PrintPage, _
AddressOf Me.PrintGraphic
Create a PrintDocument
object in your project
Double-click the PrintDocument control on the Printing tab of the Toolbox.
or
Include the following variable declaration in your program code:
Dim PrintDoc As New PrintDocument
Print graphics from a
printing event handler
Use the Graphics.DrawImage method. For example:
ev.Graphics.DrawImage(Image.FromFile _
(TextBox1.Text), ev.Graphics.VisibleClipBounds)
Print text from a
printing event handler
Use the Graphics.DrawString method in an event handler. For example:
ev.Graphics.DrawString(TextBox1.Text, _
New Font("Arial", 11, FontStyle.Regular), _
Brushes.Black, 120, 120)
Call a printing event
handler
Use the Print method of an object of type PrintDocument. For example:
PrintDoc.Print()
Print multipage text
documents
Write a handler for the PrintPage event, which receives an argument of the
type PrintPageEventArgs. Compute the rectangular area on the page for
the text, use the MeasureString method to determine how much text will
fi t on the current page, and use the DrawString method to print the text
on the page. If additional pages are needed, set the HasMorePages prop-
erty to True. When all text has been printed, set HasMorePages to False.
Open a text fi le by
using the FileStream
class, and load it into a
RichTextBox object
Create a variable of type FileStream, specifying the path and fi le mode,
load the stream into a RichTextBox, and then close the stream. For ex-
ample:
Imports System.IO 'at the top of the form
Dim MyFileStream As New FileStream( _
FilePath, FileMode.Open)
RichTextBox1.LoadFile(MyFileStream, _
RichTextBoxStreamType.PlainText)
MyFileStream.Close()
Display printing dialog
boxes in your programs
Use the PrintDialog, PrintPreviewDialog, and PageSetupDialog controls on
the Printing tab of the Toolbox.
T
o
D
o th
i
s
Microsoft Visual Basic 2008 Step by Step
435
Part IV
Database and Web Programming
In this part:
Chapter 18, Getting Started with ADO.NET . . . . . . . . . . . . . . . . . . . . . . . . . . . . . . 437
Chapter 19, Data Presentation Using the DataGridView Control. . . . . . . . . . . . . 465
Chapter 20, Creating Web Sites and Web Pages by Using
Visual Web Developer and ASP.NET . . . . . . . . . . . . . . . . . . . . . . . . . 489
In Part IV, you’ll learn how to work with information stored in databases and Web sites.
First, you’ll learn about Microsoft ADO.NET, an important paradigm for working with
database information, and you’ll learn how to display, modify, and search for database
content by using a combination of program code and Windows Forms controls. Microsoft
Visual Studio 2008 was specifi cally designed to create applications that provide access
to a rich variety of data sources. These custom interfaces have traditionally been called
database front ends, meaning that through your Microsoft Visual Basic application, the
user is given a more useful window into database information than simply manipulating
raw database records. However, a more appropriate description in Visual Studio 2008 is
that you can build datacentric applications, meaning that through your application, the
user is invited to explore the full potential of any number of rich data source connections,
whether to local or remote locations, and that the application places this data at the center
of the user‘s computing experience.
Chapter 18
Getting Started with ADO.NET
After completing this chapter, you will be able to:
Use the Data Source Confi guration Wizard to establish a connection to a database and
build a dataset.
Use the Dataset Designer and the Data Sources window to examine dataset members
and create bound objects on forms.
Create datacentric applications by using dataset and data navigator objects.
Use bound TextBox and MaskedTextBox controls to display database information on a
Windows form.
Write SQL statements to fi lter and sort dataset information by using the Visual Studio
Query Builder tool.
In this chapter, you’ll take your fi rst steps with ADO.NET and with datacentric applications.
You’ll use the Data Source Confi guration Wizard to establish a connection to a Microsoft Offi ce
Access database on your system, you’ll create a dataset that represents a subset of useful fi elds
and records from a database table, and you’ll use the Dataset Designer and Data Sources win-
dow to examine dataset members and create bound objects on your forms. You’ll also learn
how to use TextBox and MaskedTextBox controls to present database information to your user,
and you’ll learn to write SQL SELECT statements that fi lter datasets (and therefore what your
user sees and uses) in interesting ways.
Database Programming with ADO.NET
A database is an organized collection of information stored in a fi le. You can create powerful
databases by using any of a variety of database products, including Access, Microsoft SQL
Server, and Oracle. You can also store and transmit database information by using XML, a
fi le format designed for exchanging structured data over the Internet and in other settings.
Creating and maintaining databases has become an essential task for all major corporations,
government institutions, non-profi t agencies, and most small businesses. Rich data resources—
for example, customer addresses, manufacturing inventories, account balances, employee
records, donor lists, and order histories—have become the lifeblood of the business world.
438 Part IV Database and Web Programming
You can use Visual Studio 2008 to create new databases, but Visual Studio 2008 is primarily
designed for displaying, analyzing, and manipulating the information in existing databases.
ADO.NET, fi rst introduced in Microsoft Visual Studio .NET 2002, is still the standard data
model for database programming in Visual Studio 2008. ADO.NET has been improved over
the years to work with a large number of data access scenarios, and it has been carefully
optimized for Internet use. For example, it uses the same basic method for accessing local,
client-server, and Internet-based data sources, and the internal data format of ADO.NET
is XML.
Fortunately, most of the database applications that programmers created using Visual
Basic 2005 and ADO.NET still function very well, and the basic techniques for accessing
a database are mostly the same in Visual Basic 2008. However, there are two new data-
base technologies in Visual Studio 2008 that will be of considerable use to experienced
database programmers. These technologies are Language-Integrated Query (LINQ) and
the ADO.NET Entity Framework.
LINQ is included with Visual Studio 2008 and offers the capability to write object-oriented
database queries directly within Visual Basic code. Some time after the initial release of
Visual Studio 2008, Microsoft also pledges to release the ADO.NET Entity Framework,
which introduces a new object model, powerful new features, and tools that will make
database applications even freer from hard-coded dependencies on a particular data
engine or logical model. As database technology and the Internet continue to advance,
ADO.NET will continue to evolve, and Visual Basic programmers should be well-positioned
to benefi t.
Database Terminology
An underlying theme in the preceding section is that database programmers are often faced
with new technologies to decode and master, a reorientation often initiated by the terms “new
paradigm” or “new database model”. Although continually learning new techniques can be a
source of frustration, the rapid pace of change can be explained partially by the relative new-
ness of distributed and multiple-tier database application programming in Windows, as well
as technical innovations, security needs, and Web programming challenges that are beyond
the control of the Visual Studio development team. In this chapter, however, we’ll be starting
at the beginning, and with database programming more than almost any other subject, you
really need to be exposed to topics step by step. Let’s start by understanding some basic
database terminology.
Chapter 18 Getting Started with ADO.NET 439
A fi eld (also called a column) is a category of information stored in a database. Typical fi elds
in a customer database might contain customer names, addresses, phone numbers, and
comments. All the information about a particular customer or business is called a record
(less commonly called a row). When a database is created, information is entered in a table
of fi elds and records. Records correspond to rows in the table, and fi elds correspond to
columns, as shown here:
A relational database can consist of multiple linked tables. In general, most of the databases
that you connect to from Visual Studio will probably be relational databases that contain
multiple tables of data organized around a particular theme.
In ADO.NET, various objects are used to retrieve and modify information in a database. The
following illustration shows an overview of the approach that will be covered in more detail
in this chapter:
Database
Connection Dataset
Table
adapter
Data
navigation
440 Part IV Database and Web Programming
First a connection is made, which specifi es connection information about the database and
creates something for other controls and components to bind to. Next the Data Sources
Confi guration Wizard creates a dataset, which is a representation of one or more database
tables you plan to work with in your program. (You don’t manipulate the actual data, but
rather a copy of it.) The Data Sources Confi guration Wizard also adds an XML schema fi le to
your project and associates a table adapter and data navigator with the dataset to handle
retrieving data from the database, posting changes, and moving from one record to the
next in the dataset. You can then bind information in the dataset to controls on a form by
using the Data Sources window or DataBindings property settings.
Working with an Access Database
In the following sections, you’ll learn how to use the ADO.NET data access technology in
Visual Basic 2008. You’ll get started by using the Data Source Confi guration Wizard to
establish a connection to a database named Students.mdb that I created in Access 2002/2003
format. (Of course, it also works with Access 2007, if you have the latest version of Microsoft’s
database software.) Students.mdb contains various tables of academic information that
would be useful for a teacher who is tracking student coursework or a school administrator
who is scheduling rooms, assigning classes, or building a time schedule. You’ll learn how to
create a dataset based on a table of information in the Students database, and you’ll display
this information on a Windows form. When you’ve fi nished, you’ll be able to put these skills
to work in your own database projects.
Tip
Although the sample in this chapter uses an Access database, you don’t have to have
Access installed. Visual Studio and ADO.NET include the necessary support to understand
the Access fi le format, as well as other formats. If you decide to open the database in Access,
you’ll fi nd that Students.mdb is in Access 2002/2003 format. I have also included the fi le in
Access 2000 format (Students_2000format.mdb) so that you can experiment with the sample
database in Access even if you have an earlier version.
Establish a connection by using the Data Source Confi guration Wizard
1. Start Visual Studio, and create a new Visual Basic Windows Forms Application project
named My ADO Form.
A new project opens in the IDE.
2. On the Data menu, click the Add New Data Source command.
The Data Source Confi guration Wizard starts in the development environment, as
shown in the illustration on the following page.
Chapter 18 Getting Started with ADO.NET 441
The Data Source Connection Wizard is a feature within the Visual Studio 2008 IDE
that automatically prepares your Visual Basic program to receive database information.
The wizard prompts you for the type of database that you will be connecting to (a local
or remote database, Web service, or custom data object that you have created), estab-
lishes a connection to the data, and then creates a dataset within the program to hold
specifi c database tables and fi elds. The end result is that the wizard opens the Data
Sources window and fi lls it with a visual representation of each database object that
you can use in your program.
3. Click the Database icon (if it is not already selected) in the Data Source Confi guration
Wizard, and then click Next.
The wizard displays a screen that helps you establish a connection to your database
by building a statement called a connection string. A connection string contains the
information that Visual Studio needs to open and extract information from a database
fi le. This includes a path name and fi le name, but also potentially sensitive data such
as a username and password. For this reason, the connection string is treated carefully
within the Data Source Connection Wizard, and you should take care to protect it from
unauthorized access as you copy your source fi les from place to place.
442 Part IV Database and Web Programming
4. Click the New Connection button.
The fi rst time that you click the New Connection button, the Choose Data Source
dialog box opens, prompting you to select the database format that you plan to
use. If you see the Add Connection dialog box instead of the Choose Data Source
dialog box, it simply means that your copy of Visual Studio has already been con-
fi gured to favor a particular database format. No problem; simply click the Change
button in the Add Connection dialog box, and you’ll see the same thing that fi rst-
time wizard users see, except that the title bar reads Change Data Source, as shown
in the following illustration:
The Change/Choose Data Source dialog box is the place where you select your pre-
ferred database format, which Visual Studio uses as the default format. In this chapter,
you’ll select the Access format, but note that you can change the database format to
one of the other choices at any time. You can also establish more than one database
connection—each to a different type of database—within a single project.
5. Click Microsoft Access Database File, and then click OK (or Continue).
The Add Connection dialog box opens, as shown in the illustration on the following
page.
Chapter 18 Getting Started with ADO.NET 443
Now you’ll specify the location and connection settings for your database, so that
Visual Studio can build a valid connection string.
6. Click Browse.
The Select Microsoft Access Database File dialog box opens, which functions like an
Open dialog box.
7. Browse to the c:\vb08sbs\chap18 folder, click the Students database, and then
click Open.
You have selected the Access database in 2002/2003 format that I built to demonstrate
how database fi elds and records are displayed within a Visual Basic program. The Add
Connections dialog box opens again with the path name recorded. I don’t restrict access
to this fi le in any way, so a username and password are not necessary with Students.mdb.
However, if your database requires a username and/or password for use, you can specify
it now in the User Name and Password boxes. These values are then included in the
connection string.
8. Click the Test Connection button.
444 Part IV Database and Web Programming
Visual Studio attempts to open the specifi ed database fi le with the connection string
that the wizard has built for you. If the database is in a recognized format and the
username and password entries (if any) are correct, you see the following message:
9. Click OK to close the message box, and then click OK to close the Add Connection
dialog box.
Visual Studio displays the Data Source Confi guration Wizard again.
10. Click the plus sign (+) next to the Connection String item in the dialog box to display
your completed connection string.
Your wizard page looks similar to the following:
The connection string identifi es a provider (also called a managed provider) named
Microsoft.Jet.OLEDB.4.0, which is an underlying database component that understands
how to connect to a database and extract data from it. The two most popular providers
offered by Visual Studio are Microsoft Jet OLE DB and Microsoft SQL Server, but third-
party providers are available for many of the other popular database formats.
Chapter 18 Getting Started with ADO.NET 445
11. Click the Next button.
The wizard displays an alert message indicating that a new local database has been
selected, and you are asked if the database should be copied to your project folders.
(This message appears only the fi rst time that you make a connection to a local data-
base fi le. If you are repeating this exercise, you probably won’t see the message.)
12. Click No to avoid making an extra copy of the database at this time.
You are not commercially distributing this project; it is only a sample program, and an
extra copy is not needed.
The Data Source Confi guration Wizard now asks you the following question: “Do you
want to save the connection string to the application confi guration fi le?” Saving the
connection string is the default selection, and in this example, the recommended string
name is “StudentsConnectionString”. You usually want to save this string within your
application’s default confi guration fi le, because then if the location of your database
changes, you can edit the string in your confi guration fi le (which is listed in Solution
Explorer), as opposed to tracking down the connection string within your program
code and recompiling the application.
13. Click Next to save the default connection string.
You are now prompted to select the subset of database objects that you want to use
for this particular project, as shown in the following dialog box:
446 Part IV Database and Web Programming
Note Visual Studio allows you to use just part of a database or to combine different
databases—useful features when you’re working to build datacentric applications.
The items you select in this dialog box are referred to within the project as database
objects. Database objects can include tables of fi elds and records, database views, stored
procedures, functions, and other items unique to your database. The collective term for all
the database objects that you select is a dataset. In this project, the dataset is assigned the
default name StudentsDataSet, which you can adjust in the DataSet Name box.
Tip
Note that the dataset you create now only represents the data in your database—if
you add, delete, or modify database records in the dataset, you don’t actually modify the
underlying database tables until you issue a command that writes your changes back to
the original database. Database programmers call this kind of arrangement a disconnected
data source, meaning that there is a layer of abstraction between the actual database and
your dataset.
14. Click the plus sign (+) next to the Tables node to expand the list of the tables included
in the Students.mdb database.
The list of the tables that appears in the wizard includes Assignments, Classes, Departments,
and Instructors. Each table relates to some aspect of academic scheduling. The table we’ll
use in this example is Instructors.
15. Click the plus sign (+) next to the Instructors node, and then select the check boxes for
the Instructor and PhoneNumber fi elds.
You’ll add these two fi elds to the StudentsDataSet dataset. The wizard page looks
like the illustration shown on the following page.
Chapter 18 Getting Started with ADO.NET 447
16. Click Finish to complete and close the Data Source Confi guration Wizard.
Visual Studio fi nishes the tasks of adding a database connection to your project and
confi guring the dataset with the selected database objects. (Depending on how the
Visual Studio IDE has been used and confi gured, you might or might not see a Data
Sources tab or window now.)
17. Click the Save All button on the Standard toolbar to save your changes. Specify the
c:\vb08sbs\chap18 folder as the location.
18. If Solution Explorer is not currently visible, open it now to display the major fi les and
components contained in the ADO Form project.
448 Part IV Database and Web Programming
Your screen looks like this:
In addition to the standard Solution Explorer entries for a project, you see a new
fi le named StudentsDataSet.xsd. This fi le is an XML schema that describes the tables,
fi elds, data types, and other elements in the dataset that you have just created. The
presence of the schema fi le means that you have added a typed dataset to your
project. (Typed datasets have a schema fi le associated with them, but un-typed
datasets don’t.) Typed datasets are advantageous because they enable the Microsoft
IntelliSense feature of the Visual Studio Code Editor, and they give you specifi c infor-
mation about the fi elds and tables you’re using.
19. Click the schema fi le in Solution Explorer, and then click the View Designer button.
You see a visual representation of the tables, fi elds, and data adapter commands
related to your new dataset in a visual tool called the Dataset Designer. The Dataset
Designer contains tools for creating components that communicate between your
database and your application—what database programmers call data access layer
components. You can create and modify table adapters, table adapter queries, data
tables, data columns, and data relationships with the Dataset Designer. You can also
use the Dataset Designer to review and set important properties related to objects
in a dataset, such as the length of database fi elds and the data types associated
with fi elds.
20. Click the Instructor fi eld, and then press F4 to highlight the Properties window.
21. Click the MaxLength property.
Your screen looks similar to the illustration on the following page.
Chapter 18 Getting Started with ADO.NET 449
Here the Dataset Designer is shown with an active dataset named StudentsDataSet,
and the Properties window shows that the MaxLength property is set to allow for a
maximum of 50 characters in the Instructor fi eld. Although this length seems suffi cient,
you can adjust this property (and others, too) if you fi nd that the underlying database
settings are inadequate for your application.
Setting the Dataset Designer aside for a moment, let’s continue building the sample database
application in the Data Sources window.
The Data Sources Window
The Data Sources window is a useful and timesaving feature of the Visual Studio 2008 IDE.
Its purpose is to display a visual representation of the datasets that have been confi gured
for use within your project, and to help you bind these datasets to controls on the form.
Remember that a dataset is just a temporary representation of database information in your
program, and that each dataset contains only a subset of the tables and fi elds within your
entire database fi le; that is, only the items that you selected while using the Data Source
Confi guration Wizard. The dataset is displayed in a hierarchical (tree) view in the Data
Sources window, with a root node for each of the objects that you selected in the wizard.
Each time you run the wizard to create a new dataset, a new dataset tree is added to the
Data Sources window, giving you potential access to a wide range of data sources and
views within a single program.
450 Part IV Database and Web Programming
If you have been following the instructions for selecting fi elds in the Instructors table of
the Students database, you have something interesting to display in the Data Sources
window now. To prepare for the following exercises and display the Data Sources window,
display the form again (click the Form1.vb [Design] tab), and then click the Show Data
Sources command on the Data menu. (You can also click the Data Sources tab if it is
visible.) When the Data Sources window is open, expand the Instructors table so that
you can see the two fi elds that we selected. Your Data Sources window looks like this,
with the important features identifi ed:
Selected fields within
Instructors table (only
2 of 4 fields used in
this example)
Refresh dataset.
Add or remove dataset fields.
Edit selected dataset in Designer.
Add dataset to project.
Instructors table from
Students.mdb database
New StudentDataSet
dataset created using
Data Source Configuration
Wizard
The easiest way to display the information in a dataset on a form (and therefore for your
users) is to drag objects from the Data Sources window to the Windows Forms Designer.
(This is the Designer you used in earlier chapters, but I am calling it the Windows Forms
Designer here to distinguish it from the Dataset Designer.)
Chapter 19, “Data Presentation Using the DataGridView Control,” describes how you can
display entire tables of data on a form. In the remainder of this chapter, however, you’ll
experiment with dragging individual fi elds of data to the Windows Forms Designer to
bind controls to select fi elds in the Students database. Give it a try now.
Chapter 18 Getting Started with ADO.NET 451
Use the Data Sources window to create database objects on a form
1. In the Data Sources window, click the plus sign (+) next to the Instructors node to display
the available fi elds in StudentsDataSet. (If you have not already done so.)
Your Data Sources window looks like the previous illustration. In Visual Studio 2008, you
can display individual fi elds or an entire table of data by simply dragging the desired
database objects onto your form.
2. Click the Instructor fi eld, which contains the name of each instructor in the Students
database. An arrow appears to the right of the Instructor fi eld in the Data Sources win-
dow. If the arrow does not appear, make sure that the Form1.vb [Design] tab is active in
the Designer window, and then click Instructor again.
3. Click the Instructor arrow.
Clicking this arrow displays a list of options related to how a database fi eld is displayed
on the form when you drag it, as shown in the following illustration.
Although I haven’t discussed it yet, most of the controls on the Common Controls tab
of the Toolbox have the built-in ability to display database information. In Visual Studio
terminology, these controls are called bound controls when they are connected to data-
ready fi elds in a dataset. The list of controls you see now is a group of popular options
for displaying string information from a database, but you can add additional controls
to the list (or remove items) by clicking the Customize command. In this case, however,
you’ll simply use the TextBox control, the default bound control for string data.
452 Part IV Database and Web Programming
4. Click TextBox in the list, and then drag the Instructor fi eld to the middle of the form in
the Windows Forms Designer.
As you drag the fi eld over the form, a plus sign below the pointer indicates that adding
this database object to a form is a valid operation. When you release the mouse button,
Visual Studio creates a data-ready text box object and places a professional-looking
navigation bar at the top of the form. The form looks something like this (your Data
Sources window might be in a different location):
Visual Studio has actually created two objects for this Instructor fi eld: a descriptive label
object containing the name of the fi eld, and a bound text box object that will display
the contents of the fi eld when you run the program. Below the form in the component
tray, Visual Studio has also created several objects to manage internal aspects of the
data access process. These objects include:
StudentsDataSet, the dataset you created with the Data Source Confi guration
Wizard to represent fi elds in the Students database
InstructorsBindingSource, an intermediary component that acts as a conduit
between the Instructors table and bound objects on the form
InstructorsTableAdapter, an intermediary component that moves data between
StudentsDataSet and tables in the underlying Students database
InstructorsBindingNavigator, which provides navigation services and properties
related to the navigation toolbar and the Instructors table