Mobile Web Development phần 8 pps
Bạn đang xem bản rút gọn của tài liệu. Xem và tải ngay bản đầy đủ của tài liệu tại đây (576.6 KB, 23 trang )
Making Money via Mobile Devices
[ 150 ]
Using SMS in Mobile Payment
Almost all the wallpaper and ringtone providers are running on Premium
SMS-based payments. Even the votes we cast using SMS on a television contest are
charged higher than normal. The following gure illustrates how SMS can be used
to place an order.
There are a few important aspects of this ow.
POTR will advertise pizzas in newspapers, television, or any other media.
Along with product information, we will also put up a code.
To order, the customer has to send a message to a special number (called the
Short Code) with a message in a specic format.
The Short Code may be shared by many service providers, and hence
the message may contain a keyword that will determine that it's meant
for POTR.
Along with the keyword, it will also have order information. The item code
and quantity in our case.
The network operator will deliver the message to the SMS Gateway, or Short
Code Service Provider.
The SMS Gateway will make an HTTP GET/POST request to POTR and pass
on the entire message, along with the sender information.
POTR can now process the order the way it wants. In our case, Luigi'll call
back and conrm the order and take the address of the customer!
•
•
•
•
•
•
•
Chapter 8
[ 151 ]
The customer is charged a premium fee for sending the message. POTR gets
charged for SMS Gateway services and short code provisioning.
POTR also takes care of order fulllment. The customer will get a hot pizza
in the next half an hour!
Let's look closer at two components of this ow: Receiving Messages and
Short Codes.
Receiving Text Messages
We have seen how we can send messages using an SMS Gateway in Chapter 6.
The process is as simple as making an HTTP request to the gateway-provided URL
with certain parameters. But when we want to receive text messages, the job gets a
little complicated.
To receive messages, we need a number that people can send messages to and then,
a system that will receive and read messages sent to that number. The nal step in
the process is to forward the message to our application via an HTTP request. The
critical part in this process is the number that people can send messages to. We need
to buy such a number from the SMS gateway and pay a monthly fee to keep it alive.
Such a number will normally be the full 12 to 16 digit mobile number. Some services
can also use a "tagged number". A tagged number is an actual mobile number with
some additional digits added at the end. All messages sent to the actual mobile
number, irrespective of the tagged digits, will come to that number. The gateway
can then route the message to the appropriate account based on the tagged numbers
we have purchased.
But Luigi thinks this number is too long! And he wants to get a Short Code!
Getting a Short Code
A short code is like a domain name—an easy-to-remember number that will be used
to access applications online. Luigi, like many others, wants to map the short code to
POTR—and wants to buy 7687 as his short code. A short code is constant across all
network operators in the region (typically a continent). So all mobile users can send a
message to the same short code and we will be able to receive them.
The process of getting a short code can be time consuming—Clickatell takes
up to 90 days. For the US and the UK, you can register short codes from
(US) or (UK).
Other countries have their own process of acquiring a short code.
•
•
Making Money via Mobile Devices
[ 152 ]
Even short codes have two types: Random or Vanity. Vanity short codes are
easier-to-remember codes that are sold at a premium price. Random short codes are
random 4-6 digit numbers. The charges for both random or vanity short codes vary
for different continents.
Assuming we have got the 7687 short code for POTR, let us see how we can receive
messages to it! Not all SMS gateways offer such a two-way messaging facility, but
Clickatell has it. So let's get going!
Receiving Messages via Clickatell
1. The rst step is to activate two-way messaging on our account. We then
buy the short code and wait for it to function. In the meanwhile, we can go
ahead and do our integration code. Refer to />products/two_way.php for more details on two-way messaging activation
with Clickatell.
2. To receive messages via HTTP, we must set up a callback URL with our API.
We set this up from our Clickatell Central account.
3. Our callback URL will point to receiveMessage.inc.php—a new le we are
creating. In the le, we rst validate incoming parameters from Clickatell.
Let's see how this bit looks in the le.
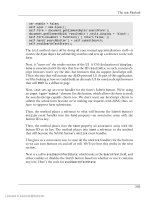
<?php
// Clickatell sends us following parameters
$from = $_REQUEST['from'];
$to = $_REQUEST['to'];
$timestamp = $_REQUEST['timestamp'];
$text = $_REQUEST['text'];
if ($from == "" || $to == "" || $timestamp == "" || $text == "")
{
echo "<p>Invalid parameters.</p>";
return;
}
?>
4. We can now split the text into order parameters then loop over them and add
items to the order. The following code shows the structure of this part, added
right after the previous code.
// Process the message here
// Message format is "POTR (Item Code)x(Qty)"
// Push a space around x so that we can split at space later
$text = str_replace('x', ' x ', $text);
// Convert all double spaces into single spaces
while(ereg(' ', $text))
Chapter 8
[ 153 ]
{
$text = str_replace(' ', ' ', $text);
}
$text = strtoupper(trim($text));
// Now we can split at space to get order parameters
$params = explode(' ', $text);
$identifier = array_shift($params);
if ($identifier != 'POTR')
{
echo "<p>Invalid command.!</p>";
}
for($i = 0; $i < count($params); $i = $i + 3)
{
$itemCode = $params[$i];
$qty = $params[$i+2];
// Validate the itemCode and qty here
// Add to order
}
// Save the order and notify customer
5. We now have a basic structure ready for processing incoming messages!
We do not need to show any output here, because the request will come
from Clickatell.
Sending Messages That Can Be Replied To
Clickatell needs an additional parameter while sending messages to make sure they
can be replied to. This parameter is called "MO" (Mobile Originated) and the value
for that must be 1. When we pass this parameter, Clickatell will set the number in
the "from" parameter as the one that users can reply to. It will also try to route the
message through an appropriate network operator. When the user replies to the
message, Clickatell can pick it up and route it to our application. This completes the
two-way messaging for us!
So far, we have seen many advanced methods of receiving payments via mobile
devices. But some payment gateways make it absolutely easy to get payments via
SMS! Just send an SMS like "send 5 to "! Sounds interesting? Let's
nd out more!
Making Money via Mobile Devices
[ 154 ]
Making it Easier—Payment Gateways
Help get More Money!
We mentioned that you have a good choice of mobile payment gateways. Many of
these gateways support more than one method to get mobile payments. For example,
Obopay (among others) makes it absolutely easy to send money to someone. You can
send an SMS to 62729 (in the US) like "send 6505551212 17.95 Pepperoni Pizza plus
Coke" (see the following gure). The money will then be sent to the user with mobile
phone number 6505551212. If the owner of that number does not have an Obopay
account, she or he will get an SMS notication and can sign up to receive money.
Obopay allows payments via WAP, and also special software that you can download
and install on your phone. PayPal too has a "Text 2 Buy" service that allows sending
money with a simple message.
Bango on the other hand, specializes in digital goods under $10. It covers a lot of
regions of the world. And it also complies to Payforit (rt-codes.
com/payforit/)—a payment service supported by all UK mobile network operators.
Bango also provides extensive reports and search integration.
Chapter 8
[ 155 ]
Different mobile payment gateways may offer different features. But the cost is also
a major factor to consider. Consider all the costs involved when you decide on the
payment gateway—including short code charges.
We now have a good foundation in mobile payment. Let's review what we learned in
this chapter.
Summary
In this chapter, we learned to receive payments and messages via devices.
Specically we looked at:
Using SetMobileCheckout and DoMobileCheckoutPayment for payment
through PayPal
Premium SMS, Credit Card, Proximity Payments, and other methods of
Mobile Payment, their pros and cons
An overview of security concerns in Mobile Payments
Receiving Text Messages via Clickatell
The usage of short codes and how to obtain one
Luigi now wants an automated system to process orders coming via phone: an
interactive voice response system that can give order status updates to customers
and even take orders! Let's do some talking in the next chapter then!
•
•
•
•
•
Call in 1-800-POTR-NOW. Luigi greets you. He asks you the kind of pizza you want
to order, the size, crust, and toppings you want. He conrms the order and takes
your address, giving a promise to deliver the pizza within half an hour. You nish
the call and wait for the fresh, hot, and delicious pizza to arrive!
Luigi has been doing this for years now. He loves to talk to the customers, but it gets
too much sometimes! He has now come to us to nd an alternative. He says, "How
about a computer answering the call and taking the order?"
Hmm, that's an interesting challenge! Let us explore and develop an interactive voice
response (IVR) system for Luigi in this chapter. Specically, we will look at:
Setting up an interactive voice response platform
Playing pre-recorded audio and text to speech
Accepting keypad inputs
Accepting voice input and doing speech recognition
Performing dynamic calculations on input
Integrating with server-side scripting
Voice-driven systems bring a wealth of opportunities. Unlike a few years ago, it is
possible now to do complex speech recognition. If you had to build an interactive
voice based system earlier, you had to know arcane details about the hardware and
network you were deploying on. Now, with standards-based languages, the job is
much easier.
Let's get on and discover how easily we can build a sophisticated voice-driven
ordering system for Luigi.
•
•
•
•
•
•
Interactive Voice
[ 158 ]
First, Some Basics
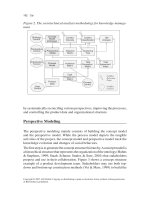
You wouldn't want to jump off a plane without parachute, right? So how can we get
to the implementation without knowing some fundamentals? The following gure
shows how a typical IVR application may function.
The user calls in using any network or device. The call arrives on the IVR server.
Telephony hardware sitting on the server passes on this call to the IVR software. The
IVR software processes the call—prompting the caller and accepting input via the
keypad or voice. These inputs dene the ow of the call. The IVR software optionally
talks to a web or database server to dynamically retrieve or store information. Once
the application work is nished, the call completes.
If only it was that easy! We must bust some jargon before we can get deeper into
these systems!
Busting Some Jargon
As with any technology, IVR is full of its own jargon. Let's rst understand it:
VoiceXML (VXML): This is an XML-based language to develop voice-based
applications. There are other options available, but W3C's VoiceXML is
becoming the standard. VoiceXML has elements similar to XHTML, and
works much like a form a customer is lling out. The only difference is that
the form is being lled over a phone call in VoiceXML.
CCXML: Call Control XML allows sophisticated call routing and
conferencing. CCXML can be used in conjunction with VoiceXML.
grXML: Grammar XML allows the speech recognition engine to identify
what was spoken. grXML rules determine valid input for your applications.
•
•
•
Chapter 9
[ 159 ]
VoIP: Voice over IP is a protocol to transmit voice over standard IP networks.
Skype and all other voice messengers use VoIP. And if you are wondering
how VoIP relates to IVR, well, you can set up an IVR application that works
over VoIP and you wouldn't need phone lines. People can call in using their
VoIP software and you won't even touch the telecom networks!
SIP: Session Initiation Protocol is a way to make Voice over IP (VoIP) calls.
SIP is used extensively in VoIP applications to establish calls.
DTMF: Dual Tone Multi-Frequency, or "touch tone", input means input via
the phone's numeric keypad.
Text To Speech (TTS): Converting a text to audio. There are many
text-to-speech engines available, and different voices too—e.g. Male
and Female.
Speech Recognition: The process of understanding spoken words and
converting them to text. For IVR applications, it's best to limit speech
recognition to a few words per input.
IVR Infrastructure: Hosted or Owned?
The easiest way to run a voice application is to nd a company that hosts
VoiceXML-based IVR applications. It will also give you a number that customers
can call to access your application. There are many service providers in this space
and you can go for the best in your location. You can nd some on Ken Rehor's
World of VoiceXML page ( />Alternatively, you can also set up your own server. You can get a VoiceXML
platform and hook up a few telephone lines to it via supported interfaces. You can
even get a VoiceXML plugin for your existing PBX system if you are using Asterisk
(www.asterisk.org) or similar PBX software.
For our exploration, we will use Voxeo's Prophecy Server (www.voxeo.com).
Prophecy is a free download, and is free to use for up to two simultaneous
connections. It's standards compliant, and Voxeo also provides hosting. On
top of that, Prophecy comes with a great speech recognition engine, VoiceXML
development tools, and a helpful community! The whole deal is too good to be true!
Time for Action: Setting Up an Interactive Voice
Response Platform
1. Download Prophecy from www.voxeo.com, and install it on your machine.
For starters, the "small TTS" version is good.
•
•
•
•
•
Interactive Voice
[ 160 ]
2. Once it's running, you will get a Voxeo icon in your system tray. Select
Prophecy Home option from there. Go to admin, and get a license key for
your setup. This routine will take you to Voxeo's site. You can take the free
2-port license, and it will get set up automatically.
3. Now go to the Voxeo menu in the system tray and open Log Viewer. This
opens up a console that's indispensable for debugging voice applications!
The messages in the log viewer may not make sense right now, but that's OK!
The following screenshot shows how the Log Viewer looks.
4. Now, open the SIP Phone from the Voxeo system tray menu. That should
bring up a screen like the one shown in the following screenshot. This is
the phone we will use to test our applications! To get an experience of how
voice applications work, click on the Dial button. You will be greeted by
the default Voxeo application, and from there you can perform a few basic
tests—DTMF detection, auto attendant, conferencing, call back, etc. Go ahead
and try them to ensure everything is set up correctly!
Chapter 9
[ 161 ]
5. At this time, you can also look at the various tools in the Prophecy Home.
There is a VoiceXML designer and tools to hook up your application with
VoIP service providers. But we are ready with our platform now.
Getting Curious?
If you tried that sample Voxeo application, you will be curious about how things are
working. The SIP Phone is a software phone. It uses SIP protocol to make calls to the
Prophecy server. Prophecy's services are waiting for a call. Once the call comes in,
they look up the location of the le that handles the call—just like how a web server
would process a request. The le is loaded, processed, and audio output delivered to
the caller.
Examining the Log Viewer will tell you a lot about the internals, how different parts
of the Prophecy server work together and how they process user input.
We have got a taste of voice applications, now. Let's start writing our own Pizza
Ordering application!
Designing the Call Flow of Our Application
Just as we need to take care of usability in our mobile web applications, we need
to take care of it in our voice applications as well—in fact, more so in a voice
application. Customers do not like to talk to machines, and when they do, they
simply want to get their job done fast. If the machine cannot understand them,
their frustration will increase. Customers also don't want to go through an endless
chain of questions and number punching. Recall your experience calling a customer
support number.
That's pretty much how our clients will feel about our application if we don't
plan well!
Some principles we can follow in our applications are:
Keep it short and simple.
Don't let the user feel the machine is more intelligent than her or him.
Don't have questions whose response the application can't understand.
Test with real users, in real conditions!
•
•
•
•
Interactive Voice
[ 162 ]
Considering all that, let's put together a simple call ow for POTR. The following
gure shows this ow. Notice that we have removed the side dish selection, and
selecting different types of pizzas in this ow. We are also not taking the customer's
address yet. We can add all that later.
The rst step is to welcome the caller. Time for some music!
Creating an Application to Play Audio
We want to greet our customers with a nice welcome message. They are used to
hearing Luigi's voice, so we want them to continue with that. Yes, we were talking
about Luigi's voice when we mentioned music! Here are the steps to build our rst
IVR application that plays Luigi's welcome greeting!
Time for Action: Creating an Application and
Welcoming Callers
1. Using voice recording software (such as Sound Recorder on Windows),
create a short welcome greeting. Save the le in 8bit, 8kHz u-law format as
welcome.wav. Most servers will play back audio in this format, even if you
save it in higher quality, so it's best to save in 8/8 format at the beginning.
We have recorded Luigi's voice and saved the le!
Chapter 9
[ 163 ]
2. Voxeo applications are stored in the Program Files\Voxeo\www folder by
default. Locate the folder on your computer and create a new folder in it.
Name it potr.
3. Copy the welcome.wav le to the potr folder we just created.
4. Create a new text le in this folder. Name it index.xml, and enter the
following code in the le.
<?xml version="1.0" encoding="UTF-8"?>
<vxml version = "2.1">
<meta name="maintainer" content=""/>
<form id="main">
<block>
<audio src="welcome.wav">
Welcome to Pizza On The Run.
</audio>
</block>
</form>
</vxml>
5. Go to Prophecy Home—Administration. Then Call Routing. Change the
route 1 to point to our application. Set the Route ID as potr, Route Type as
VXML, and the Route URL as http://127.0.0.1:9990/potr/index.xml.
The following screenshot shows how you can do it. Once they are changed
changed, go to the bottom of the page and save the settings.
6. Go to SIP Phone now, and dial sip: You should be greeted by
your audio recording!
How Did This Work?
127.0.0.1 is the IP address of the local computer. So we are telling the phone to call
an account named potr on this computer. Since we created a route for potr earlier,
Prophecy will know that it has to process the VXML le at the given URL in response
to this call. It will look up that le next.
Interactive Voice
[ 164 ]
The index.xml le is a standard XML le, somewhat similar to XHTML. The rst
line is a declaration for XML and the next for Voice XML. The meta maintainer tag
lets the server know who's managing this application. This is useful because the
Prophecy server can send detailed reports of all errors to this email address.
The <form> tag denes a "dialog" in voice XML. It's one interaction with the caller.
In our application, we have only one interaction so far, hence only one form. Within
the form we have a <block> of tags. Blocks are sub-divisions of a form. The <audio>
tag is our main tag. We specied the location of the audio we want to play in the
src attribute. The text within the <audio> tags is the alternative text that should be
played as voice if the source le is not found. This is a good backup mechanism and
should always be used.
Now that we have the welcome part done, let's gure out how we can prompt the
caller to select an option and process that.
Making Choices by Key Presses
We want the caller to select if she or he wants to order a pizza online or talk to our
chef. And we want her or him to do this by pressing a key. We need to recognize the
key she or he pressed, and if it is a valid key, redirect control to the next form.
To take any input from the caller, we need to add a eld to our VXML form.
<field> is very similar to an <input> tag in HTML. Within the <field> element,
we can <prompt> the user with choices. The user will make a choice after we have
completed prompting. And then, we can recognize what she or he entered.
To do any recognition—voice or keystroke—we need to develop grammar.
The grammar rules will dene what are valid inputs, and which eld should
be populated with what value when a valid input is received. Once the eld is
populated with the recognized value, VoiceXML can check the value of the eld and
decide on the next action.
With this knowledge, let us see how to put things together.
Time for Action: Prompting the User for Next Action
1. First, let us create a eld in the form to accept user input. Add the following
code right after the </block> line in our index.xml le.
<field name="option">
<grammar src="dtmf_grammar.xml" type="application/grammar-xml"/>
<prompt>
Chapter 9
[ 165 ]
Press one to order a pizza online.
Press nine to speak to our chef.
Press zero at any time to return to this menu.
</prompt>
</field>
2. The code we added will prompt the user to make a choice. We need
to validate the user input via the grammar. We have already added a
<grammar> tag to the <field> tag, so let us create a new le called
dtmf_grammar.xml with the following code:
<?xml version="1.0" encoding="UTF-8"?>
<grammar root="MAINRULE" mode="dtmf" xmlns="http://www.
w3.org/2001/06/grammar" xml:lang="en-US">
<rule id="MAINRULE">
<item repeat="1">
<ruleref uri="#DTMFDIGIT"/>
<tag>assign(digit $return)</tag>
</item>
<tag><![CDATA[ <option ($digit)> ]]> </tag>
</rule>
<rule id="DTMFDIGIT">
<one-of>
<item> 0 <tag>return ("zero")</tag></item>
<item> 1 <tag>return ("one")</tag></item>
<item> 9 <tag>return ("nine")</tag></item>
</one-of>
</rule>
</grammar>
3. In the grammar le we dened that the value should be populated in the
option eld name using a <tag> element. Once the eld is lled, we would
like to navigate the user to another form we will create. The following code
shows how we can handle this. Add this code after the </field> line in
index.xml.
<filled>
<if cond="option == 'one'">
<goto next="order.xml#pizzaSelection"/>
<elseif cond="option == 'nine'"/>
<goto next="#callChef"/>
<elseif cond="option == 'zero'"/>
<goto next="#main"/>
</if>
</filled>
Interactive Voice
[ 166 ]
4. We don't have a form with id callChef, or the order.xml le, but let's go
ahead and run this code. It will welcome the caller, prompt her or him to
make a choice, and act on the choice if valid! When you press 1 or 9, you will
hear an error message because the form/le does not exists.
How Does All This Fit Together?
Let's take it bite by bite and understand how it's working.
The <field> tag is required to take any kind of input. The <prompt> tag plays back
all text in it as audio. As a matter of fact, all text within tags in a VXML document
will be played back as audio (almost!). We have named our eld as option, and we
will use this name later to check its value.
The grammar le is critical. The rst two lines dene that it's a Grammar XML le,
the mode of grammar is DTMF (key presses), and that the default rule in this le is
MAINRULE. The DTMFDIGIT rule dictates that it can accept any one of the digits 1, 9, and
0, and when any one of them is received, it should return an appropriate string value
to the calling rule. We can use the numbers 1, 9, and 0 here because we have kept the
mode of the grammar le as DTMF, else we would have to use dtmf-1, dtmf-9, and
dtmf-0. But of course, switching the mode is what good programmers do!
The MAINRULE has a single item that has to occur once and only once. That item is
the DTMFDIGIT rule. A rule can refer other rules using the <ruleref> tag.
Let's look at <tag> now. We have seen three different ways of using it in this le:
<tag>assign(digit $return)</tag>
<tag><![CDATA[ <option ($digit)> ]]> </tag>
<tag>return ("zero")</tag>
Essentially, <tag> is used to dene what should be done as a result of this item. In
the rst case, we assign the value returned from the called rule to a variable. In the
second case, we assign the value of the variable to a eld in the VXML le. We enclose
it in CDATA as we have < and > in the value. The last case is used in rules that are
called from other rules. In this case, we return the value zero. Returning values like
this allows us to keep the assignment to the VXML eld in a single place; and calling
another rule from the main rule allows us to keep things modular and exible.
Keep a Watch on Your Syntax
Make sure you make your VXML and grXML les in correct syntax.
Wrong syntax is the cause of major development problems in voice
applications. As a test, you can open the XML le with a web browser and
verify that all tags are nested correctly.
If you still have problems, check the messages in the Log Viewer.
•
•
•
Chapter 9
[ 167 ]
The <filled> code segment is executed once the grammar is processed and our
option eld is populated. Notice how the condition is written in double quotes.
That's why values are enclosed in single quotes in conditions.
The <goto> element facilitates navigation in VoiceXML—just like the <a> tag in
HTML. The value of the next attribute can be another form in the same document,
or another VXML le. You can also point to a particular form within another
VXML le, e.g. if we want to take the caller to pizza selection form with order.
xml#pizzaSelection.
That's the rst cut of our pizza ordering application. We promised the caller we will
connect them to our chef if they press 9. Let's see how we can do that now!
Transferring Calls in Voice XML
When we want to connect our customers with our chef, we need to call our 1-800
number and transfer the line. VXML has a simple tag for this: <transfer>. You can
specify the destination number and protocol in it, and the server will automatically
call that number, and bridge the lines when connected.
So this could be the code to connect our caller to our chef:
<transfer name="chefCall" dest="tel:+18007687669" bridge="true"
connecttimeout="20s">
But what if the line is busy? What if someone calls at 3 A.M. and Luigi can't pick up
the phone? And hey, what if someone entered 4 in our rst menu? Or what if they
did not understand what to do and kept holding the receiver? We need to build
some error handling!
Handling Errors
Voice XML provides events for many common problems. For example to take some
action when the user input did not match any rules in the grammar, we can use the
<nomatch> tag. We can use the <noinput> tag and write a <prompt> in it, or even
<reprompt> the last prompt if there was no input from the user. We can raise our
custom events and log errors to the log le too.
These events can be handled at the document level, providing a common fallback for
any problems—we will do just that!
Now that we have grasped these concepts, let us review our complete index.xml le.
<?xml version="1.0" encoding="UTF-8"?>
<vxml version = "2.1">
<meta name="maintainer" content=""/>
Interactive Voice
[ 168 ]
<link dtmf="0" next="#main"/>
<form id="main">
<block>
<audio src="welcome.wav">Welcome to Pizza On The Run.</audio>
</block>
<field name="option">
<grammar src="dtmf_grammar.xml" type="application/grammar-xml"/>
<prompt>Press one to order a pizza online.
Press nine to speak to our chef.
Press zero at any time to return to this menu.
</prompt>
</field>
<filled>
<if cond="option == 'one'">
<goto next="order.xml#pizzaSelection"/>
<elseif cond="option == 'nine'"/>
<goto next="#callChef"/>
<elseif cond="option == 'zero'"/>
<goto next="#main"/>
</if>
</filled>
</form>
<form id="callChef">
<block>
<prompt>Please wait while I connect you to our chef
</prompt>
<transfer name="chefCall" dest="tel:+18007687669"
bridge="true" connecttimeout="20s">
<filled>
<if cond="chefCall == 'busy'">
<prompt>Sorry, looks like chef is busy talking to
someone else.
</prompt>
<elseif cond="chefCall == 'noanswer'"/>
<prompt>Umm the chef is not answering. May be he is
making some pizza!
</prompt>
<elseif cond="chefCall == 'far_end_disconnect'"/>
<prompt>Chef hung up on you. I hope the call went well!
</prompt>
<elseif cond="chefCall == 'near_end_disconnect'"/>
<prompt>Thank you for taking time to speak to our chef.
I think he liked your call.
</prompt>
</if>
Chapter 9
[ 169 ]
</filled>
</transfer>
</block>
</form>
<noinput>
<prompt>I did not hear anything. Please try again.</prompt>
<reprompt/>
</noinput>
<nomatch>
<prompt>Sorry, I did not understand that.</prompt>
<reprompt/>
</nomatch>
</vxml>
As we discussed, the <noinput> and <nomatch> elements are written at the
document level, and repeat the last prompt after letting the user know that the
system couldn't match or understand what they said/pressed.
Error handling for the <transfer> tag is a little different. When the transfer tag
executes, the result will be populated in the chefCall eld. The status values are
self-explanatory—busy, noanswer, far_end_disconnect, and near_end_disconnect.
Adding Global Navigation with the <link> Tag
One new thing you may notice with this code is the use of a <link> tag near the top
of the document. Here's what we have: <link dtmf="0" next="#main"/>. This tag
takes the caller to the main form, if they press 0 from anywhere in the application.
How about ordering pizzas now? Are we ready for it yet? How will we prompt and
detect which pizza the caller wants? We can give them a set of options and ask them
to press a key to select one of them. But what's the fun in that? How about them
saying what pizza they want and our system understanding it?
Sounds interesting? Let's gure it out!
Recognizing Voice
We know that we can do speech recognition in our voice application. We have
already seen how we can prompt the user to select an option. But how do we
actually do speech recognition?
Interactive Voice
[ 170 ]
We offer three pizzas on our voice application: Vegi Delight, Bacons Cheese Treat,
and Pepperoni Spice. If we asked the user which pizza they want, and just caught
any of the words in pizza's names, we can understand what's the match. Let's make
the grammar for this.
<?xml version="1.0" encoding="UTF-8"?>
<grammar root="PIZZA" xmlns=" xml:
lang="en-US">
<rule id="PIZZA" scope="public">
<one-of>
<item> vegi <tag><![CDATA[ <pizza "Vegi Delight"> ]]></tag></item>
<item> delight <tag><![CDATA[ <pizza "Vegi Delight">
]]></tag></item>
<item> pepperoni <tag><![CDATA[ <pizza "Pepperoni Spice">
]]></tag></item>
<item> spice <tag><![CDATA[ <pizza "Pepperoni Spice">
]]></tag></item>
<item> bacon <tag><![CDATA[ <pizza "Bacon Cheese Treat">
]]></tag></item>
<item> cheese <tag><![CDATA[ <pizza "Bacon Cheese Treat">
]]></tag></item>
<item> treat <tag><![CDATA[ <pizza "Bacon Cheese Treat">
]]></tag></item>
</one-of>
</rule>
</grammar>
If you observe the above code, you will notice it's quite simple. We match any word
from the names of the pizzas and assign the full name of the pizza to a VXML eld
called pizza. There is only one rule in the le, and it is also the root rule.
What do we do after recognizing the pizza? We need to ask the user for the crust and
size she or he wants, the topping she or he would like, and then conrm the order.
We will need to store all her or his selections into some variables and then pass them
on to the server where we will save the order.
Storing Variables at the Application Level
Before we can pass variables to the server side, we need to create variables! VXML
provides a mechanism to store variables at application level. Even if you have
multiple XML les in the same application, they can access these variables from the
application scope.
Chapter 9
[ 171 ]
We can dene an application-level variable at the top of the VXML document
like this: <var name="pizza" expr="''"/>. The expression can contain a valid
expression enclosed in double quotes. We want to start with a blank string, so our
expression will be just two single quotes.
The actual value will be lled once we get the input from the user. We can write a
tag like <assign name="application.pizza" expr="pizza$.interpretation.
pizza"/> to assign the grammar interpretation of the pizza eld to the application-
level variable pizza.
$ is a special shadow variable that stores details of the pizza interpretation.
interpretation.pizza refers to the value assigned to pizza eld from grammar.
The shadow variable can also tell you the condence in speech recognition and the
way the word was uttered. But let's stay on our job for now!
Detecting the Caller's Phone Number
If we want to take an order, we need to know who ordered it! How will we do that?
If we can nd the caller's phone number, we can obtain the rest of the details from
our existing customer database, or call her or him up and nd out the address. Caller
ID is very critical to any telephony provider (how will they bill them otherwise?), so
we can easily get the caller's phone number.
It will be available in the session.callerid variable throughout our application.
And as it goes, even the number they called will be available in the session.
calledid variable!
Time for Action: Let's Put It All Together
Let's put what we have learned about application variables, caller ID, and pizza
grammar in code now.
1. Create a le called order.xml in the same directory as index.xml.
2. Enter the following code in the order.xml le.
<?xml version="1.0" encoding="UTF-8"?>
<vxml version = "2.1" application="index.xml">
<meta name="maintainer" content=""/>
<link dtmf="0" next="index.xml#main"/>
<! Variables to store order information >
<var name="pizza" expr="''"/>
<var name="size" expr="''"/>
<var name="crust" expr="''"/>
<var name="topping" expr="''"/>
Interactive Voice
[ 172 ]
<var name="quantity" expr="''"/>
<var name="customer" expr="''"/>
<form id="pizzaSelection">
<field name="pizza">
<grammar src="pizza_grammar.xml" type="application/grammar-xml"/>
<prompt>Which Pizza do you want to order? We've got Vegi Delight,
Pepperoni Spice and Bacon Cheese Treat.</prompt>
<noinput>
<prompt>Sorry, I could not hear you. Please say again.</prompt>
<reprompt/>
</noinput>
<nomatch>
<prompt>Umm, that's not a pizza we make. Please try again.
</prompt>
<reprompt/>
</nomatch>
</field>
<filled namelist="pizza" mode="all">
<assign name="application.customer" expr="session.callerid"/>
<assign name="application.pizza" expr="pizza$.
interpretation.pizza"/>
<prompt>
You chose <value expr="application.pizza" />.
</prompt>
<goto next="#crustSelection" />
</filled>
</form>
</vxml>
3. If you haven't already, create a pizza_grammar.xml le in the same folder
and put in the previous code in it.
4. You can now make a call to our application again. Select 1 to order a pizza
and you will be asked to select the pizza you want.
5. Say out a word that's not in our grammar le! You will get the nomatch
message and be asked to make the selection again.
6. Say a valid name and you will get a conrmation voice letting you know the
pizza you selected!
What's Cooking There?
Notice that we specied an application attribute in our <vxml> tag. This is
necessary to use application-level variables. The value should be the name of the
main XML le—index.xml in our case. Similarly, we have changed the reference in
the <link> tag to point to the main form in index.xml.