more iphone 3 development phần 5 pps
Bạn đang xem bản rút gọn của tài liệu. Xem và tải ngay bản đầy đủ của tài liệu tại đây (825.92 KB, 57 trang )
CHAPTER 7: Relationships, Fetched Properties, and Expressions
212
Save the file.
We’re actually creating two categories in this one file pair. We could have just as easily
added these four methods in a single category, but to make things more organized,
we’re separating the methods by the entity that they are used to edit.
Switch over to ManagedObjectEditor-SuperDB.m and replace its contents with the
following:
#import "ManagedObjectEditor-SuperDB.h"
@implementation ManagedObjectEditor (HeroEditor)
+ (id)controllerForHero {
id ret = [[[self class] alloc] initHeroEditor];
return [ret autorelease];
}
- (id)initHeroEditor {
if (self = [super initWithStyle:UITableViewStyleGrouped])
{
sectionNames = [[NSArray alloc] initWithObjects:
[NSNull null],
NSLocalizedString(@"General", @"General"),
NSLocalizedString(@"Powers", @"Powers"),
NSLocalizedString(@"Reports", @"Reports"),
nil];
rowLabels = [[NSArray alloc] initWithObjects:
// Section 1
[NSArray arrayWithObjects:NSLocalizedString(@"Name", @"Name"), nil],
// Section 2
[NSArray arrayWithObjects:NSLocalizedString(@"Identity", @"Identity"),
NSLocalizedString(@"Birthdate", @"Birthdate"),
NSLocalizedString(@"Age", @"Age"),
NSLocalizedString(@"Sex", @"Sex"),
NSLocalizedString(@"Fav. Color", @"Favorite Color"),
nil],
// Section 3
[NSArray arrayWithObject:@"name"], // label here is the key on the
// other object to use as the label
// Section 4
[NSArray arrayWithObjects:
NSLocalizedString(@"All Older Heroes", @"All Older Heroes"]),
NSLocalizedString(@"All Younger Heroes", @"All Younger Heroes"),
NSLocalizedString(@"Same Sex Heroes", @"Same Sex Heroes"),
NSLocalizedString(@"Opposite Sex Heroes", @" Opposite Sex Heroes"),
nil],
// Sentinel
nil];
rowKeys = [[NSArray alloc] initWithObjects:
CHAPTER 7: Relationships, Fetched Properties, and Expressions
213
// Section 1
[NSArray arrayWithObjects:@"name", nil],
// Section 2
[NSArray arrayWithObjects:@"secretIdentity", @"birthdate", @"age",
@"sex", @"favoriteColor", nil],
// Section 3
[NSArray arrayWithObject:@"powers"],
// Section 4
[NSArray arrayWithObjects:@"olderHeroes", @"youngerHeroes",
@"sameSexHeroes", @"oppositeSexHeroes", nil],
// Sentinel
nil];
rowControllers = [[NSArray alloc] initWithObjects:
// Section 1
[NSArray arrayWithObject:@"ManagedObjectStringEditor"],
// Section 2
[NSArray arrayWithObjects:@"ManagedObjectStringEditor",
@"ManagedObjectDateEditor",
[NSNull null],
@"ManagedObjectSingleSelectionListEditor",
@"ManagedObjectColorEditor",
nil],
// Section 3
[NSArray arrayWithObject:kToManyRelationship],
// Section 4
[NSArray arrayWithObjects:
@"ManagedObjectFetchedPropertyDisplayer",
@"ManagedObjectFetchedPropertyDisplayer",
@"ManagedObjectFetchedPropertyDisplayer",
@"ManagedObjectFetchedPropertyDisplayer",
nil],
// Sentinel
nil];
rowArguments = [[NSArray alloc] initWithObjects:
// Section 1
[NSArray arrayWithObject:[NSNull null]],
// Section 2
[NSArray arrayWithObjects:[NSNull null],
[NSNull null],
[NSNull null],
[NSDictionary dictionaryWithObject:
[NSArray arrayWithObjects:@"Male", @"Female", nil]
forKey:@"list"],
[NSNull null],
CHAPTER 7: Relationships, Fetched Properties, and Expressions
214
[NSNull null],
nil],
// Section 3
[NSArray arrayWithObject:[NSDictionary dictionaryWithObjectsAndKeys:
@"controllerForPower", kSelectorKey, nil]],
//Section 4
[NSArray arrayWithObjects:
[NSDictionary dictionaryWithObjectsAndKeys:
@"name", @"displayKey", @"controllerForHero",
@"controllerFactoryMethod", nil],
[NSDictionary dictionaryWithObjectsAndKeys:
@"name", @"displayKey", @"controllerForHero",
@"controllerFactoryMethod", nil],
[NSDictionary dictionaryWithObjectsAndKeys:
@"name", @"displayKey", @"controllerForHero",
@"controllerFactoryMethod", nil],
[NSDictionary dictionaryWithObjectsAndKeys:
@"name", @"displayKey", @"controllerForHero",
@"controllerFactoryMethod", nil],
nil],
// Sentinel
nil];
}
return self;
}
@end
@implementation ManagedObjectEditor (PowerEditor)
+ (id)controllerForPower {
id ret = [[[self class] alloc] initPowerEditor];
return [ret autorelease];
}
- (id)initPowerEditor {
if (self = [[[self class] alloc] initWithStyle:UITableViewStyleGrouped]) {
sectionNames = [[NSArray alloc] initWithObjects:[NSNull null],
[NSNull null], nil];
rowLabels = [[NSArray alloc] initWithObjects:
[NSArray arrayWithObject:NSLocalizedString(@"Name", @"Name")],
[NSArray arrayWithObject:NSLocalizedString(@"Source", @"Source")],
nil];
rowKeys = [[NSArray alloc] initWithObjects:
[NSArray arrayWithObject:@"name"],
[NSArray arrayWithObject:@"source"],
nil];
rowControllers = [[NSArray alloc] initWithObjects:
[NSArray arrayWithObject:@"ManagedObjectStringEditor"],
[NSArray arrayWithObject:@"ManagedObjectStringEditor"],
nil];
rowArguments = [[NSArray alloc] initWithObjects:
CHAPTER 7: Relationships, Fetched Properties, and Expressions
215
[NSArray arrayWithObject:[NSNull null]],
[NSArray arrayWithObject:[NSNull null]],
nil];
}
return self;
}
@end
The two init methods should look familiar to you. They set up the structure arrays, just
as in viewDidLoad. The contents of the Hero arrays have gotten a little more complex,
since we’ve added a to-many relationship and four fetched properties, but the basic
concept is unchanged from before.
You should look these over to make sure you understand what they’re doing. We’ve
been working with the nested arrays long enough now that we’re not going to step
through them line by line.
Deleting the Nib Instance
We need to delete the instance of ManagedObjectEditor in MainWindow.xib. If you
remember from the earlier chapters, there is an instance of HeroEditController in the
nib, and that instance is used to edit all heroes. When we refactored
HeroEditController, the instance of the nib became an instance of
ManagedObjectEditor.
We can no longer instantiate our controller class from the nib file because the nested
arrays won’t be set up properly if we leave it like this. We used to create the arrays in
viewDidLoad, but that is no longer the case, so we need to create the controller instance
in code to make sure that those arrays are created.
Double-click MainWindow.xib in the Groups & Files pane to open Interface Builder. Look
in the nib’s main window for an icon labeled Managed Object Editor. Single-click it to
select it, and then press the Delete key on your keyboard to delete it. Note that if you are
in list mode, Managed Object Editor will also have a child Table View. No worries—that
child view will disappear when you delete the parent. Save the nib and go back to
Xcode.
Updating HeroListController
Now that we’re not creating an instance of ManagedObjectEditor in MainWindow.xib, we
need to take care of that task in code. We will do this in HeroListViewController, which
is the navigation controller’s root view controller. Single-click HeroListViewController.m
and add the following import statements at the top of the file:
#import "HeroListViewController.h"
#import "SuperDBAppDelegate.h"
#import "ManagedObjectEditor.h"
#import "Hero.h"
#import "ManagedObjectEditor-SuperDB.h"
CHAPTER 7: Relationships, Fetched Properties, and Expressions
216
@implementation HeroListViewController
Next, we need to create the controller class in viewDidLoad. Insert the following line of
code into viewDidLoad to accomplish that:
- (void)viewDidLoad {
[super viewDidLoad];
self.detailController = [ManagedObjectEditor controllerForHero];
NSError *error = nil;
Because we’re using the factory method controllerForHero, the controller class that is
created will have all the arrays populated so that it works correctly and allows the user
to edit the Hero entity.
Creating the Fetched Property Attribute Controller
At this point, the application should run and work mostly okay, with the exception of the
fetched properties. We haven’t written the controller to display them yet. Let’s do that
now. You’ve written enough of these attribute editing classes, so we won’t walk through
this one step by step.
Create a new file by single-clicking the Classes folder and selecting N from the File
menu. Use the Objective-C class template, subclass NSObject, and name the new file
ManagedObjectFetchedPropertyDisplayer.m, making sure to create the header file as
well. Once the file is created, single-click ManagedObjectFetchedPropertyDisplayer.h
and replace the contents with the following:
#import <Foundation/Foundation.h>
#import "ManagedObjectAttributeEditor.h"
@interface ManagedObjectFetchedPropertyDisplayer : ManagedObjectAttributeEditor {
NSString *displayKey;
NSString *controllerFactoryMethod;
}
@property (nonatomic, retain) NSString *displayKey;
@end
Save the file.
Switch over to ManagedObjectFetchedPropertyDisplayer.m and replace its contents
with the following:
#import "ManagedObjectFetchedPropertyDisplayer.h"
#import "NSArray-Set.h"
#import "ManagedObjectEditor.h"
@implementation ManagedObjectFetchedPropertyDisplayer
@synthesize displayKey;
- (void)viewWillAppear:(BOOL)animated {
[super viewWillAppear:animated];
CHAPTER 7: Relationships, Fetched Properties, and Expressions
217
self.navigationItem.leftBarButtonItem = nil;
self.navigationItem.rightBarButtonItem = nil;
}
- (void)dealloc {
[displayKey release];
[super dealloc];
}
#pragma mark -
#pragma mark Table View Methods
- (NSInteger)tableView:(UITableView *)theTableView
numberOfRowsInSection:(NSInteger)section {
NSArray *array = [self.managedObject valueForKey:keypath];
return [array count];
}
- (UITableViewCell *)tableView:(UITableView *)theTableView
cellForRowAtIndexPath:(NSIndexPath *)indexPath {
static NSString *CellIdentifier = @"Fetched Property Display Cell";
UITableViewCell *cell = [theTableView
dequeueReusableCellWithIdentifier:CellIdentifier];
if (cell == nil) {
cell = [[[UITableViewCell alloc] initWithStyle:UITableViewCellStyleDefault
reuseIdentifier:CellIdentifier] autorelease];
}
NSArray *array = [self.managedObject valueForKey:keypath];
NSManagedObject *oneObject = [array objectAtIndex:[indexPath row]];
cell.textLabel.text = [oneObject valueForKey:displayKey];
cell.accessoryType = UITableViewCellAccessoryDisclosureIndicator;
return cell;
}
- (void)tableView:(UITableView *)tableView
didSelectRowAtIndexPath:(NSIndexPath *)indexPath {
NSArray *array = [self.managedObject valueForKey:keypath];
NSManagedObject *oneObject = [array objectAtIndex:[indexPath row]];
SEL factorySelector = NSSelectorFromString(controllerFactoryMethod);
ManagedObjectEditor *controller = [ManagedObjectEditor
performSelector:factorySelector];
controller.managedObject = oneObject;
[self.navigationController pushViewController:controller animated:YES];
}
@end
This attribute editor uses Objective-C’s dynamic dispatching to let the calling object
specify a factory method that can be used to edit any of the objects in the fetched
relationship. Selecting a hero in one of the lists drills down and lets you edit that hero in
a new instance of ManagedObjectEditor. In fact, you can drill down endlessly, even in
our simple application—at least until you run out of memory.
CHAPTER 7: Relationships, Fetched Properties, and Expressions
218
Build and run the application, and then test it. Try out the four fetched properties, and
make sure you see the heroes you expect to see in each one. Try drilling down to edit
the heroes from the fetched property.
It’s pretty good, and you can extend this application quite a bit without writing any code
except new factory methods to populate those arrays.
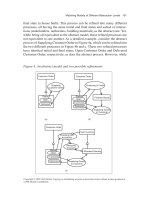
Cleaning Up Deleted Objects
There is still one minor problem to address. Select a hero or create a new one, and then
hit the plus button to add a new power to the hero. Once the new view comes up,
immediately hit the Cancel button. When you get back to the original hero, you’ll see two
insert rows, as shown in Figure 7–18.
Figure 7–18. Oops! That’s not good.
Here’s what’s happening. When we added the new power, the power instance was
added to the managed object context in memory. When we pressed the Cancel button,
we deleted the object from the context. But instead, the delete rule should have come
into play, and the object should have been deleted from the data structure that Core
Data uses to represent the relationship in memory. This is a bug—at least as of this
writing. We could have ignored this, hoping that the bug was fixed before the book was
released, but we didn’t want to leave you hanging. There are a number of ways that we
could handle this.
CHAPTER 7: Relationships, Fetched Properties, and Expressions
219
We could, for example, give the ManagedObjectEditor class a property that points to its
parent controller—the one that created it and pushed it onto the navigation stack. With
that information, we could then remove the offending object from the relationship when
we delete it. That creates a dependency, however. It operates under the assumption that
the parent view controller is the same class, and we know that that’s not always true,
because HeroListController is the parent view controller for one instance of this class.
How can we fix the problem, then?
What we can do is loop through the properties of the managed object looking for
instances of NSSet, which we know will represent to-many relationships. When we find
one, we can loop through the objects in the relationship, and if we find a deleted one,
we can remove it.
In order to get access to information about an object’s properties, we need to use the
Objective-C runtime, which is a library of C functions that are responsible for Objective-
C’s dynamic nature.
Single-click ManagedObjectEditor.m. In order to call any of the Objective-C runtime’s
functions, we need to import two header files. Insert the following two lines of code near
the top of the file:
#import "ManagedObjectEditor.h"
#import "NSArray-NestedArrays.h"
#import "HeroValueDisplay.h"
#import "ManagedObjectAttributeEditor.h"
#import "NSManagedObject-IsNew.h"
#import "NSArray-Set.h"
#import <objc/runtime.h>
#import <objc/message.h>
Now, look for the viewWillAppear: method. At the very beginning of that method, insert
the following code:
- (void)viewWillAppear:(BOOL)animated {
unsigned int outCount;
objc_property_t *propList =
class_copyPropertyList([self.managedObject class], &outCount);
for (int i = 0; i < outCount; i++) {
objc_property_t oneProp = propList[i];
NSString *propName = [NSString
stringWithUTF8String:property_getName(oneProp)];
NSString *attrs = [NSString stringWithUTF8String:
property_getAttributes(oneProp)];
if ([attrs rangeOfString:@"NSSet"].location != NSNotFound) {
NSMutableSet *objects = [self.managedObject
CHAPTER 7: Relationships, Fetched Properties, and Expressions
220
valueForKey:propName];
NSMutableArray *toDelete = [NSMutableArray array];
for (NSManagedObject *oneObject in objects) {
if ([oneObject isDeleted])
[toDelete addObject:oneObject];
}
for (NSManagedObject *oneObject in toDelete) {
[objects removeObject:oneObject];
NSError *error;
if (![self.managedObject.managedObjectContext save:&error])
NSLog(@"Error saving: %@", [error localizedDescription]);
}
}
}
free(propList);
[self.tableView reloadData];
NOTE: The Objective-C runtime is fairly advanced juju, so if you don’t 100% understand this
right now, don’t worry about it. You can read up on the Objective-C runtime in Apple’s
documentation:
/>ce/ObjCRuntimeRef/Reference/reference.html
This is the first time we’ve worked with the Objective-C runtime directly. Although for
most programming jobs there’s no need to dive down into the runtime, having access to
the same functions that are used to implement Objective-C gives us an incredible
amount of power. Let’s quickly run through what we’re doing here, but don’t feel like
you have to grok this one the first time through.
First, we declare an int, which will hold the number of properties that managedObject
has. Then we declare a pointer to an objc_property_t, which is a datatype that
represents Objective-C 2.0 properties, and use a runtime function called
class_copyPropertyList() to retrieve the list of pointers to the managedObject
properties. This function also populates outCount with the number of properties.
unsigned int outCount;
objc_property_t *propList =
class_copyPropertyList([self.managedObject class], &outCount);
Next, we use a for loop to iterate over the properties:
for (int i=0; i < outCount; i++) {
We grab a reference to the structure that points to one property in the list, and then get
the property’s name as an NSString instance. We also get the property’s attributes,
which are contained in a string. The format for the attribute string is documented in
CHAPTER 7: Relationships, Fetched Properties, and Expressions
221
Apple’s Objective-C runtime documentation, but for our purposes, all we need to know
is that it contains (among other things) the class of the property.
objc_property_t oneProp = propList[i];
NSString *propName = [NSString
stringWithUTF8String:property_getName(oneProp)];
NSString *attrs = [NSString stringWithUTF8String:
property_getAttributes(oneProp)];
We check to see if the attribute string contains @"NSSet":
if ([attrs rangeOfString:@"NSSet"].location != NSNotFound) {
If it does, we then retrieve the set and create an instance of NSMutableArray to keep
track of the objects that need to be deleted. It is not safe to delete objects from a
collection while we are iterating over it, so we’ll stick them in an array. Then, when we’re
finished iterating, we’ll iterate through the array of objects that need to be deleted and
remove them.
NSMutableSet *objects = [self.managedObject
valueForKey:propName];
NSMutableArray *toDelete = [NSMutableArray array];
for (NSManagedObject *oneObject in objects) {
if ([oneObject isDeleted])
[toDelete addObject:oneObject];
}
for (NSManagedObject *oneObject in toDelete) {
[objects removeObject:oneObject];
NSError *error;
if (![self.managedObject.managedObjectContext save:&error])
NSLog(@"Error saving: %@", [error localizedDescription]);
}
}
}
And, believe it or not, the application is done. Build and run it, and try it out. See how
many times you can drill down. Try creating new powers, deleting existing powers, and
canceling when editing both new and existing powers.
Now, if you really want to challenge yourself, try adding more entities and relationships
and using ManagedObjectEditor instances and its nested arrays to allow editing of those
new entities. In short, play. Get used to this application. Expand it. Change it. Break it.
And then fix it. That’s the best way to cement your understanding of everything we did in
this chapter.
Wonderful to the Core
This chapter and the previous chapters have given you a solid foundation in the use of
Core Data. Along the way, we’ve also tried to give you some information about how to
design complex iPhone applications so that they can be maintained and expanded
without writing unnecessary code or repeating the same logic in multiple places. We’ve
demonstrated just how much benefit you can get from taking the time to write code
generically. We’ve showed you how to look for opportunities to refactor your code to
CHAPTER 7: Relationships, Fetched Properties, and Expressions
222
make it smaller, more efficient, easier to maintain, and just generally more pleasant to be
around.
We could go on for several more chapters about Core Data and not exhaust the topic.
But Core Data is not the only new framework introduced in iPhone SDK 3. At this point,
you should have a solid enough understanding of Core Data to be able to, armed with
Apple’s documentation, take your explorations even further.
Now it’s time to leave our friend Core Data behind and explore some of the other
aspects of iPhone SDK 3.
223
Part
Further Explorations
We’ve devoted six chapters to the biggest of the new APIs, but Core Data is not all that
iPhone SDK 3 brings to the table for iPhone developers. A whole slew of new
functionality has been made available, including peer-to-peer connectivity, mapping,
push services, in-application e-mail, copy and paste, and undo—to name just a few. In
the next chapters, we’re going to show you how to use several of these exciting new
APIs in your own applications, as well as dive into a few more advanced topics such as
networking and concurrency.
II
224
225
225
Chapter
Peer-to-Peer Over
Bluetooth Using GameKit
One of the coolest new frameworks added to the iPhone 3 SDK is called GameKit.
GameKit makes it easy to wirelessly connect multiple iPhones or iPod touches using
Bluetooth. Bluetooth is a wireless networking option built into all but the first-generation
iPhone and iPod touch. GameKit allows any supported devices to communicate with
any other supported devices that are within roughly 30 feet (about 10 meters) of each
other. Though the name implies differently, GameKit is useful for nongaming apps, too.
For example, you might build a social networking app that allows people to easily
transfer contact information over Bluetooth.
CAUTION: The code in this chapter will not run in the simulator because the simulator does not
support Bluetooth. The only way to build and debug apps on a device attached to your machine is
by joining the paid iPhone Developer Program. So you’ll need to do that if you want to fully
experience this chapter’s chewy goodness.
In addition, the game we’re building in this chapter requires the use of two second-generation
devices (iPhone 3G or 3Gs, or second-generation iPod touch) to run and test. As of this writing,
you cannot play GameKit games between a device and the simulator. If you have only one
device, you will not be able to try out the game in this chapter. We will be adding online play in
the next chapter, so you might want to follow along, even if you can’t test your application yet.
As of this writing, GameKit has three basic components:
The session allows iPhone OS devices running the same application
to easily send information back and forth over Bluetooth without
writing any networking code.
The peer picker provides an easy way to find other devices without
writing any networking or discovery (Bonjour) code.
8
CHAPTER 8: Peer-to-Peer Over Bluetooth Using GameKit
226
The in-game voice functionality allows users to send voice
communications using GameKit sessions or over the Internet.
NOTE: We won’t use in-game voice in this chapter’s example, but it’s actually pretty
straightforward. If you want to learn more about it, here’s a link to the official Apple doc:
/>Internet/Conceptual/GameKit_Guide/InGameVoice/InGameVoice.html
Under the hood, GameKit sessions leverage Bonjour, Apple’s technology for zero-
configuration network device discovery. As a result, devices using GameKit are capable
of finding each other on the network without the user needing to enter an IP address or
domain name.
This Chapter’s Application
In this chapter, we’re going to explore GameKit by writing a simple networked game.
We’ll write a two-player version of tic-tac-toe (Figure 8–1) that will use GameKit to let
people on two different iPhones or iPod touches play against each other over Bluetooth.
We won’t be implementing online play over the Internet or local area network in this
chapter. However, we will discuss online communications in the next chapter.
Figure 8–1. We’ll use a simple game of tic-tac-toe to show you the basics of GameKit.
CHAPTER 8: Peer-to-Peer Over Bluetooth Using GameKit
227
When users launch our application, they will be presented with an empty tic-tac-toe
board and a single button labeled New Game. (For the sake of simplicity, we’re not
going to implement a single-device mode to let two players play on the same device.)
When the user presses the New Game button, the application will start looking for
Bluetooth peers using the peer picker (Figure 8–2).
Figure 8–2. When the user presses the New Game button, it will launch the peer picker to look for other devices
running the tic-tac-toe game.
If another device within range runs the TicTacToe application, and the user also presses
the New Game button, then the two devices will find each other, and the peer picker
will present a dialog to the users, letting them choose among the available peers (Figure
8–3).
CHAPTER 8: Peer-to-Peer Over Bluetooth Using GameKit
228
Figure 8–3. When another device within range starts a game, the two devices will show up in each other’s peer
picker dialog.
After one player selects a peer, the other person will be asked to accept or refuse the
connection. If the connection is accepted, the two applications will negotiate to see who
goes first. Each side will randomly select a number, the numbers will be compared, and
the highest number will go first. Once that decision is made, play will commence (Figure
8–4) until someone wins (Figure 8–5).
Figure 8–4. The user whose turn it is can tap any available space. That space will get an X or an O on both users’
devices.
CHAPTER 8: Peer-to-Peer Over Bluetooth Using GameKit
229
Figure 8–5. Play continues until one player wins or there is a tie.
Network Communication Models
Before we look at how GameKit and the peer picker work, let’s talk generally about
communication models used in networked programs, so that we’re all on the same page
in terms of terminology.
Client-Server Model
You’re probably familiar with the client-server model, as it is the model used by the
World Wide Web. Machines called servers listen for connections from other machines,
referred to as clients. The server then takes actions based on the requests received
from the clients. In the context of the Web, the client is usually a web browser, and there
can be any number of clients attaching to a single server. The clients never
communicate with each other directly, but direct all communications through the server.
Most massively multiplayer online role-playing games (MMORPGs) like World of
Warcraft also use this model. Figure 8–6 represents a client-server scenario.
CHAPTER 8: Peer-to-Peer Over Bluetooth Using GameKit
230
Figure 8–6. The client-server model features one machine acting as a server with all communications—even
communications between clients—going through the server.
In the context of an iPhone application, a client-server setup is where one phone acts as
a server and listens for other iPhones running the same program. The other phones can
then connect to that server. If you’ve ever played a game where one machine “hosts” a
game and others then join the game, that game is almost certainly using a client-server
model.
A drawback with the client-server model is that everything depends on the server, which
means that the game cannot continue if anything happens to the server. If the user
whose phone is acting as the server quits, crashes, or moves out of range, the entire
game is ended. Since all the other machines communicate through the central server,
they lose the ability to communicate if the server is unavailable. This is generally not an
issue with client-server games where the client is a hefty server farm connected to the
Internet by redundant high-speed lines, but it certainly can be an issue with mobile
games.
Peer-to-Peer Model
In the peer-to-peer model, all the individual devices (called peers) can communicate
with each other directly. A central server may be used to initiate the connection or to
facilitate certain operations, but the main distinguishing feature of the peer-to-peer
CHAPTER 8: Peer-to-Peer Over Bluetooth Using GameKit
231
model is that peers can talk to each other directly, and can continue to do so even in the
absence of a server (Figure 8–7).
The peer-to-peer model was popularized by file-sharing services like BitTorrent. A
centralized sever is used to find other peers that have the file you are looking for, but
once the connection is made to those other peers, they can continue, even if the server
goes offline.
Figure 8–7. In the peer-to-peer model, peers can talk to each other directly, and can continue to do so even in
the absence of a server.
The simplest and probably the most common implementation of the peer-to-peer model
on the iPhone is when you have two devices connected to each other. This is the model
you use in head-to-head games, for example. GameKit makes this kind of peer-to-peer
network exceedingly simple to set up and configure, as you’ll see in this chapter.
Hybrid Client-Server/Peer-to-Peer
The client-server and peer-to-peer models of network communication are not mutually
exclusive, and it is possible to create programs that utilize a hybrid of both. For example,
a client-server game might allow certain communications to go directly from client to
client, without going through the server. In a game that had a chat window, it might
allow messages intended for only one recipient to go directly from the machine of the
CHAPTER 8: Peer-to-Peer Over Bluetooth Using GameKit
232
sender to the machine of the intended recipient, while any other kind of chat would go to
the server to be distributed to all clients.
You should keep these different networking models in mind as we discuss the
mechanics of making connections and transferring data between application nodes.
Node is a generic term that refers to any computer connected to an application’s
network. A client, server, or peer is a node. The game we will be writing in this chapter
will use a simple, two-machine, peer-to-peer model.
The GameKit Session
The key to GameKit is the session, represented by the class GKSession. The session
represents our end of a network connection with one or more other iPhones. Regardless
of whether you are acting as a client, a server, or a peer, an instance of GKSession will
represent the connections you have with other phones. You will use GKSession whether
you employ the peer picker or write your own code to find machines to connect to and
let the user select from them.
NOTE: As you make your way through the next few pages, don’t worry too much about where
each of these elements is implemented. This will all come together in the project you create in
this chapter.
You will also use GKSession to send data to connected peers. You will implement
session delegate methods to get notified of changes to the session, such as when
another node connects or disconnects, as well as to receive data sent by other nodes.
Creating the Session
To use a session, you must first create allocate and initialize a GKSession object, like so:
GKSession *theSession = [[GKSession alloc] initWithSessionID:@"com.apress.Foo"
displayName:nil sessionMode:GKSessionModePeer];
There are three arguments you pass in when initializing a session:
The first argument is a session identifier, which is a string that is
unique to your application. This is used to prevent your application’s
sessions from accidentally connecting to sessions from another
program. Since the session identifier is a string, it can be anything,
though the convention is to use a reverse DNS-style name, such as
com.apress.Foo. By assigning session identifiers in this manner, rather
than by just randomly picking a word or phrase, you are less likely to
accidentally choose a session identifier that is used by another
application on the App Store.
CHAPTER 8: Peer-to-Peer Over Bluetooth Using GameKit
233
The second argument is the display name. This is a name that will be
provided to the other nodes to uniquely identify your phone. If you
pass in nil, the display name will default to the device’s name as set
in iTunes. If multiple devices are connected, this will allow the other
users to see which devices are available and connect to the correct
one. In Figure 8–3, you can see an example of where the unique
identifier is used. In that example, one other device is advertising itself
with the same session identifier as us, using a display name of iPhone.
The last argument is the session mode. Session modes determine
how the session will behave once it’s all set up and ready to make
connections. There are three options:
If you specify GKSessionModeServer, your session will advertise
itself on the network so that other devices can see it and connect
to it, but it won’t look for other sessions being advertised.
If you specify GKSessionModeClient, the session will not advertise
itself on the network, but will look for other sessions that are
advertising themselves.
If you specify GKSessionModePeer, your session will both
advertise its availability on the network and also look for other
sessions.
NOTE: Although you will generally use GKSessionModePeer when establishing a peer-to-peer
network, and GKSessionModeServer and GKSessionModeClient when setting up a client-
server network, these constants dictate only whether an individual session will advertise its
availability on the network using Bonjour, or look for other available nodes. They are not
necessarily indicative of which of the network models is being used by the application.
Regardless of the type of session you create, it won’t actually start advertising its
availability or looking for other available nodes until you tell it to do so. You do that by
setting the session property available to YES. Alternatively, you can have the node stop
advertising its availability and/or stop looking for other available nodes by setting
available to NO.
Finding and Connecting to Other Sessions
When a session that was created using GKSessionModeClient or GKSessionModePeer
finds another node advertising its availability, it will call the method
session:peer:didChangeState: and pass in a state of GKPeerStateAvailable. This same
method will be called every time a peer becomes available or unavailable, as well as
when a peer connects or disconnects. The second argument will tell you which peer’s
state changed, and the last argument will tell you its new state.
CHAPTER 8: Peer-to-Peer Over Bluetooth Using GameKit
234
If you find one or more other sessions that are available, you can choose to connect the
session to one of the available sessions by calling connectToPeer:withTimeout:. Here’s
an example of session:peer:didChangeState: that connects to the first available peer it
finds:
- (void)session:(GKSession *)session peer:(NSString *)peerID
didChangeState:(GKPeerConnectionState)inState {
if (inState == GKPeerStateAvailable) {
[session connectToPeer:peerID withTimeout:60];
session.available = NO;
}
}
This isn’t a very realistic example, as you would normally allow the user to choose the
node to which they connect. It’s a good example though, because it shows both of the
basic functions of a client node. In this example, we’ve set available to NO after we
connect. This will cause our session to stop looking for additional sessions. Since a
session can connect to multiple peers, you won’t always want to do this. If your
application supports multiple connections, then you will want to leave it at YES.
Listening for Other Sessions
When a session is specified with a session mode of GKSessionModeServer or
GKSessionModePeer, it will be notified when another node attempts to connect. When this
happens, the session will call the method
session:didReceiveConnectionRequestFromPeer:. You can choose to accept the
connection by calling acceptConnectionFromPeer:error:, or you can reject it by calling
denyConnectionFromPeer:. The following is an example that assumes the presence of a
Boolean instance variable called amAcceptingConnections. If it’s set to YES, it accepts the
connection, and if it’s set to NO, it rejects the connection.
- (void)session:(GKSession *)session
didReceiveConnectionRequestFromPeer:(NSString *)peerID {
if (amAcceptingConnections) {
NSError *error;
if (![session acceptConnectionFromPeer:peerID error:&error])
// Handle error
} else {
[session denyConnectionFromPeer:peerID];
}
}
Sending Data to a Peer
Once you have a session that is connected to another node, it’s very easy to send data
to that node. All you need to do is call one of two methods. Which method you call
depends on whether you want to send the information to all connected sessions or to
just specific ones. To send data to just specified peers, you use the method
sendData:toPeers:withDataMode:error:, and to send data to every connected peer, you
use the method sendDataToAllPeers:withDataMode:error:.
CHAPTER 8: Peer-to-Peer Over Bluetooth Using GameKit
235
In both cases, you need to specify a data mode for the connection. The data mode tells
the session how it should try to send the data. There are two options:
GKSendDataReliable: This option ensures that the information will
arrive at the other session. It will send the data in chunks if it’s over a
certain size, and wait for an acknowledgment from the other peer for
every chunk.
GKSendDataUnreliable: This mode sends the data immediately and
does not wait for acknowledgment. It’s much faster than
GKSendDataReliable, but there is a small chance of the complete
message not arriving at the other node.
Usually, the GKSendDataReliable data mode is the one you’ll want to use, though if you
have a program where speed of transmission matters more than accuracy, then you’ll
want to consider GKSendDataUnreliable.
Here is what it looks like when you send data to a single peer:
NSError *error = nil;
If (![session sendData:theData toPeers:[NSArray arrayWithObject:thePeerID]
withDataMode:GKSendDataReliable error:&error]) {
// Do error handling
}
And here’s what it looks like to send data to all connected peers:
NSError *error = nil;
if (![session sendDataToAllPeers:data withDataMode:GKSendDataReliable
error:&error]) {
// Do error handling
}
Packaging Up Information to Send
Any information that you can get into an instance of NSData can be sent to other peers.
There are two basic approaches to doing this for use in GameKit. The first is to use
archiving and unarchiving, just as we did in the archiving section of Chapter 11 of
Beginning iPhone 3 Development (Apress, 2009).
With the archiving/unarchiving method, you define a class to hold a single packet of
data to be sent. That class will contain instance variables to hold whatever types of data
you might need to send. When it’s time to send a packet, you create and initialize an
instance of the packet object, and then you use NSKeyedArchiver to archive the instance
of that object into an instance of NSData, which can be passed to
sendData:toPeers:withDataMode:error: or to
sendDataToAllPeers:withDataMode:error:. We’ll use this approach in this chapter’s
example. However, this approach incurs a small amount of overhead, since it requires
the creation of objects to be passed, along with archiving and unarchiving those objects.
Although archiving objects is the best approach in many cases, because it is easy to
implement and it fits well with the design of Cocoa Touch, there may be some cases
CHAPTER 8: Peer-to-Peer Over Bluetooth Using GameKit
236
where applications need to constantly send a lot of data to their peers, and this
overhead might be unacceptable. In those situations, a faster option is to just use a
static array (a regular old C array, not an NSArray) as a local variable in the method that
sends the data.
You can copy any data you need to send to the peer into this static array, and then
create an NSData instance from that static array. There’s still some object creation
involved in creating the NSData instance, but it’s one object instead of two, and you
don’t have the overhead of archiving. Here’s a simple example of sending data using
this faster technique:
NSUInteger packetData[2];
packet[0] = foo;
packet[1] = bar;
NSData *packet = [NSData dataWithBytes:packetData
length:2 * sizeof(packetData)];
NSError *error = nil;
if (![session sendDataToAllPeers:packet withDataMode:GKSendDataReliable
error:&error]) {
// Handle error
}
Receiving Data from a Peer
When a session receives data from a peer, the session passes the data to a method on
an object known as a data receive handler. The method is
receiveData:fromPeer:inSession:context:. By default, the data receive handler is the
session’s delegate, but it doesn’t have to be. You can specify another object to handle
the task by calling setDataReceiveHandler:withContext: on the session and passing in
the object you want to receive data from the session.
Whichever object is specified as the data receive handler must implement
receiveData:fromPeer:inSession:context:, and that method will be called any time
new data comes in from a peer. There’s no need to acknowledge receipt of the data or
worry about waiting for the entire packet. You can just use the provided data as is
appropriate for your program. All the gnarly aspects of network data transmission are
handled for you. Every call to sendDataToAllPeers:withDataMode:error: made by other
peers, and every call to sendData:toPeers:withDataMode:error: made by other peers
who specify your peer identifier, will result in one call of the data receive handler.
Here’s an example of a data receive handler method that would be the counterpart to
our earlier send example:
- (void) receiveData:(NSData *)data fromPeer:(NSString *)peer
inSession: (GKSession *)theSession context:(void *)context {
NSUInteger *packet = [data bytes];
NSUInteger foo = packet[0];
NSUInteger bar = packet[0];
// Do something with foo and bar
}
We’ll look at receiving archived objects when we build this chapter’s example.