Macromedia Flash MX Game Design Demystified phần 4 pptx
Bạn đang xem bản rút gọn của tài liệu. Xem và tải ngay bản đầy đủ của tài liệu tại đây (1.05 MB, 38 trang )
The tiles in the world of this game have numerous frames.
This simple technique is very powerful. You can create a whole city using tiles for grass, road, sidewalks,
bushes, walls, and so on. This allows you to reuse your graphical assets efficiently and conveniently. In the
case of puzzle games that use TBWs, such as Pac-Man and Minesweeper, the complexity of the tiles is low.
They usually just have a few different items that they need to show, such as a dot to be collected, or a maze
wall. These games profit from the use of TBWs mostly because TBWs reduce the amount of processing that
occurs by using a simple math trick. This trick is explained in the next section.
One of the most convenient programmatic benefits of using TBWs is their ability to easily store information
about certain areas of the map. To take advantage of this, I use a two-dimensional array in which each
represents a tile in the world. An object is stored in each element, and then information about the tile that it
represents is stored in this object. For instance, if a tile were of a rock, then information might be stored in
object to say there was a rock in this spot and that the character could not move through it. Or if the tile
sand, then information might be stored to specify that the character should be slowed to half its regular
when passing through this cell. In a game like Pac-Man, in which there might be a 15-by-15
g
rid, there would
be a two-dimensional array with an object that represented each tile. That's 225 (15 times 15) objects. Each
object would contain information saying if it was a wall, if it was empty, or if it contained a dot to be
How this information is stored (in this case, the two-dimensional array) is called a
data structure. A common
alternative to the two-dimensional–array data structure is to store and name the objects logically. In the
Man example, the 225 objects would be created and given logical names, each based on the cell it
So, for instance, the name of the object representing the cell in the third column and eleventh row would
something like
cell3_11
. This is the way we store data in the example game we're working with in this
chapter.
Another very useful feature of TBWs is their ability to store the information needed to build the world in an
external file or a database. Using a standardized protocol like XML, you can easily store such information.
is great news, because it means you can create a game and load in an unlimited number of levels! Usually
you'll need a
level editor—an application you build, and that assists you in creating a level. You usually
"program" the level editor to output information in savable form, such as an XML document (which is just
you can store in a file or a database. That file can be loaded into the game, and Flash will interpret it and
the information in it to dynamically build the level. In the final section of this chapter we'll look at a simple
example of a level editor. The example mentioned earlier, Shark Attack!, loads its levels from external XML
files. You can see them in the same directory. They are level1.xml, level2.xml, and level3.xml. You can
and view them with a normal text editor like NotePad or SimpleText.
Board games like chess and checkers are not usually considered tile-based worlds, but they can be treated
such. You can use the same two-dimensional–array data structure to store information about the tiles, such
the tile color, or which piece is sitting in the tile.
If you are really itching to see how all this looks and works in an actual game, just hang on. In the third
of this book we'll see this information applied in the tile-based game called Don't Fall!
ActionScript Review: Arrays and Two-Dimensional Arrays
An array is a type of object that can store multiple pieces of data. Each piece of data is called an
element. For instance,
names = ["Jobe",
"Kelly",
"Wendy"]
is a line of ActionScript that
creates an array called
name
that contains three elements. The length of this array is 3, and it is
considered a one-dimensional array. Each element has a number called an
index associated
position, starting with 0. So in our example,
"Jobe"
has an index of 0 and
"Wendy"
has an
of 2. To retrieve the contents of an index in an array, you must use the index like this:
myName
names[0]
. That line of ActionScript would create a variable called
myName
with a value of
Each element in an array can store any data type, including objects, strings, and other arrays.
you store another array as an element in the array, then you are creating a two-dimensional
For instance,
names = [["Jobe",
"Kelly"],["Free",
"Chance"]]
is a two-dimensional
array. The main array contains two elements, each of which stores another array with two
elements. You access an element of the main array the same way as above—by using the
You then access an element of the array that is being stored in that element by the same
So to access the name
"Free"
from this two-dimensional array, I use this syntax,
names[1]
That points to the array that has an index of 1 (which is the second array) and then points to the
first element of that array. With all of this in mind, if we had a 20-by-20 TBW that had all of its
objects stored in a two-dimensional array called
cells
, then we could access the object that
represents the cell in the 17th column and 9th row by using the syntax
cells[17][9]
.
I l
@ve RuBoard
I l
@ve RuBoard
Top-Down Tile Creation and Management
In
Chapter 8, "The Isometric Worldview," we'll continue our discussion about TBWs
Most TBWs in Flash are going to be in either top-down view or 3D isometric view, like Shark Attack! The way
you store and manipulate the tile data is exactly the same for both of those views, but the way you display
tiles on the screen is not. In this chapter we look at how to create the tiles in the top-down view and how to
store information about those tiles. In the last part of this section, we'll introduce a very powerful but simple
math trick that can greatly reduce the processing needed to use a TBW.
Creating the Grid and Storing Information
To build the grid of tiles on the screen, you must use
nested loops—loops within loops. If you wanted to build
j
ust one strai
g
ht line of ten tiles, you would only need to use one loop. In each iteration of that loop
that in this example there would be ten iterations per outer loop) you would use
attachMovie()
to create
instance of a movie clip, and then you would place it in the correct spot on the stage. Since a grid has
of these types of lines ri
g
ht under each other, we loop the loop to create the entire
g
rid. Remember that we
have one loop to create a row of tiles, so then we run this loop one time for each row we want to add.
We have an outer loop set to loop, say, ten times. For each loop there is an inner loop that adds the movie-
tiles to the row. Here is sample ActionScript that would handle
j
ust addin
g
one line of ten movie clips to the
stage.
1
11
1 for (var i=1; i<=10; ++i) {
2
22
2 //code to add and place the movie clip
3
33
3 }
That would add one horizontal line of ten movie cli
p
s. To make this a
g
rid, we need to start this loo
p
one time
for each row that we want to add. So we add an outer loop.
1
11
1 for (var j=1; j<=10; ++j) {
2
22
2 for (var i=1; i<=10; ++i) {
3
33
3 //code to add and place the movie clip
4
44
4 }
5
55
5 }
What happens is this:
z
The outer loop starts at
j=1
(which is row 1). While
j=1
, the inner loop runs from
i=1
to
i=10
placin
g
movie clips. Row 1 is now complete.
z
The outer loop moves to
j=2
(which is row 2). While
j=2
, the inner loop runs from
i=1
to
i=10
movie clips. Row 2 is now complete.
z
And so on, eight more times.
we explore their role in isometric-view games.
Think of the inner loop as a day and the outer loop as a week. The inner loop loops
through 24 hours in a day, but it does this from start to finish for each day (the outer
loop). So over the course of one week, there would be 7*24 iterations.
Open grid.fla in the Chapter07 directory on the CD to see an example. You will see
movie clips on the stage. One of them has an instance name of
grid
, and the other
has no instance name but has a library name of tile. This movie clip also has a
identifier of tile so that we can create instances of it on the sta
g
e usin
g
ActionScript.
addition, the tile clip has eight frames, each with a different tile. The grid movie clip
was placed there so that we can attach the movie clips to it. Building the grid in a
movie clip is cleaner than attaching dozens of movie clips to the main timeline. This
the first in a strin
g
of example files we'll look at in this chapter, each one buildin
g
on
1.
Creates an object called
game
that we use to store information about the grid.
2.
Creates a function called
buildGrid()
that builds the grid on the stage and builds the data structure
that we use to store information about each tile.
3.
Executes the
buildGrid()
function.
Here is the ActionScript used to create the
game
object.
1
11
1 game = {};
2
22
2 game.columns = 10;
3
33
3 game.rows = 10;
4
44
4 game.spacing = 30;
5
55
5 game.depth = 1000;
6
66
6 game.path = _root.grid;
7
77
7 game.numberOfTypes = 8;
Line 1 creates the
game
object, and all of the following lines add information to that object. Lines 2 and 3
define the dimensions of the grid; line 4 defines the spacing (the number of units between the registration
points of the tiles). The next line sets a variable to the object called
depth
. This value will be incremented
used to assign a depth to each newly created movie clip. As we have seen in the previous chapters, we are
starting to make it a habit to store references to movie clips in an object. That makes our code more
oriented. So in line 6, you can see that a reference to the grid movie clip is created. Whenever we want to
anything with the grid, we don't have to type
_root.grid—we type game.path. The reference
game.path
will
interpreted as
_root.grid
since that is the reference we pointed it to in line 6 above. If at some point
the game-design process we had to change the name or location of the grid movie clip, then all we would
to do to update the code would be to change the
game.path
reference to point to the new grid location. If
did not use this
game.path
reference, then chan
g
in
g
the name or path to
g
rid would be a lar
g
e undertakin
g
,
because we'd have to update a lot of code. The final line of ActionScript above sets a variable called
numberOfTypes
on the
game
object. This variable stores the number of tile types there are in this game
definition. Since we have eight frames in the tile clip, each a different tile, then we give
numberOfTypes
a
value of 8.
Next, a function called
buildGrid()
is defined.
1
11
1 function buildGrid() {
2
22
2 for (var j=1; j<=game.rows; ++j) {
3
33
3 for (var i=1; i<=game.columns; ++i) {
4
44
4 var name = "cell"+i+"_"+j;
5
55
5 var x = (i-1)*game.spacing;
6
66
6 var y = (j-1)*game.spacing;
7
77
7 var type = 1;
8
88
8 game.path.attachMovie("cell", name, ++game.depth);
9
99
9 game.path[name]._x = x;
10
1010
10 game.path[name]._y = y;
11
1111
11 game[name] = {x:i, y:j, name:name, type:type,
clip:game.path[name]};
12
1212
12 }
13
1313
13 }
14
1414
14 }
This function uses nested loops, as described earlier in this section. The outer loop loops through the number
rows. In each iteration of the outer loop, the inner loop loops through for each column. Each tile (which we
a
cell here) is named uniquely by using the row and column of the cell as part of that cell's name. For
if the cell belongs to column 8 and row 6, the name would be
cell8_6
. In lines 5 and 6, the intended
of the new movie clip is calculated. Then a variable called
type
is created with a value of 1. This refers to
frame that the tile will display. In this example we start each tile on frame 1. Next, the movie clip is
and positioned. In line 11 we do something really important—we create an object to store information
the cell that was just created, such as its type, its name, and a reference to the movie clip it represents.
the previous. By the end of the chapter you'll have a very simple Pac-Man–like start
a game. The ActionScript in this file does three things:
The final line of ActionScript in this file (not shown) is
buildGrid()
. It calls the function that we
j
ust
to create the grid.
Precision Detection
Now it's time to introduce the trick I mentioned: a simple but powerful maneuver that lightens the processor
load in TBWs tremendously. Imagine this: If the game of Pac-Man were written in Flash, how would you
if the Pac-Man character was colliding with a dot to be collected (or eaten, or whatever it is that Pac-Man
with it)? First of all, in Pac-Man everything moves fairly slowly, and precision isn't important, so
hitTest()
would not be a bad choice. Many early game programmers (including myself at one time) have guessed
you'd need to loop through the entire board, constantly performing
hitTest(),
to see if Pac-Man has
with any dots. That is not a very efficient process. Luckily there is a trick that allows us to easily know
cell Pac-Man is in, and therefore only check for a collision in that cell. And of course, one collision detection
lot less CPU-intensive than 100 collision detections. Let's see how to determine which cell Pac-Man is in.
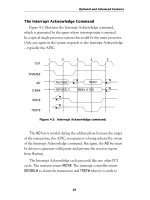
First, let's look at only one direction, horizontal. In the figure above, you can see that there are five cells,
with a width of 20. Pac-Man's
x position is 53. Which cell is he in?
1
11
1 spacing = 20;
2
22
2 x = 53;
3
33
3 cell_column = Math.ceil(x/spacing);
In line 1, we set a variable called
spacing
. That is the width of each cell. Line 2 creates a variable called x
stores the position of Pac-Man. In line 3 we employ the simple math trick by dividing the position by the
spacing. We then round that number up to the nearest integer. With this trick we can easily find which cell
Man is in! This works in the same way for a vertical situation.
Like the horizontal example, this one also contains five cells, each with a width of 20. The
y position of Pac-
is 30. Here is how you find the number of the cell he's in:
1
11
1 spacing = 20;
2
22
2 y = 30;
3
33
3 cell_row = Math.ceil(y/spacing);
By putting both of these together, we can locate Pac-Man's position in the grid. We find the row and the
he's in, and that specifies the cell in the grid.
1
11
1 spacing = 20;
2
22
2 x = 53;
3
33
3 y = 30;
4
44
4 cell_column = Math.ceil(x/spacing);
5
55
5 cell_row = Math.ceil(y/spacing);
Now that we know which cell Pac-Man is in, we can perform a
hitTest()
between the Pac-Man movie clip
a dot in that tile. Perhaps you can now understand why this is such a powerful trick. If you are making a
in which the character is walking around, and a few tiles contain water, then when your character is in one
those cells, you can make him swim, or drown, or just slow down a little bit. What typically happens is the
following:
1.
You detect which cell the character is in.
2.
You look up the object that represents that cell.
3.
You look at the type of cell that your character is in. If it is a cell of fire, then your character
might get hurt. If it is a cell with a secret key, then your character can pick it up and gain
points.
1
11
1 function gameClicked(mx, my) {
2
22
2 var x = Math.ceil(mx/game.spacing);
3
33
3 var y = math.ceil(my/game.spacing);
4
44
4 var cell = "cell"+x+"_"+y;
5
55
5 var ob = game[cell];
6
66
6 if (ob.type<game.numberOfTypes) {
7
77
7 ++ob.type;
8
88
8 } else {
9
99
9 ob.type = 1;
10
1010
10 }
11
1111
11 ob.clip.tile.gotoAndStop(ob.type);
12
1212
12 }
Now let's look at a simple example of this trick. Open grid_click.fla in the Chapter07
directory. This file is a modified version of grid.fla. With the added ActionScript in this
file, you click a cell and its type changes. If you click one cell enough times, it arrives
back at its original cell type. I've used the trick I just introduced to determine which
cell was clicked when the mouse button was pressed. Here is the added ActionScript:
13
1313
13 _root.onMouseDown = function() {
14
1414
14 var mx = _xmouse;
15
1515
15 var my = _ymouse;
16
1616
16 if (game.path.hitTest(mx, my)) {
17
1717
17 gameClicked(game.path._xmouse, game.path._ymouse);
18
1818
18 }
19
1919
19 };
Look at lines 13–19 first, the
onMouseDown
event. When the mouse button is pressed, the coordinates of the
mouse are saved. If these coordinates are over the grid movie clip (referenced by
game.path
), we call the
gameClicked()
function above, passing the coordinates of the mouse into
gameClicked()
. In lines 2 and
we use the trick described in this section to determine the cell that was clicked. In the following line we
construct the name of the object that contains information about this cell, and then in line 5 we create a
reference to that object called
ob
. Lines 6–10 check to see if
ob.type
is less than 8, and if it is, we
it; otherwise we set it back to 1. Finally, on line 11, we change the frame where the movie clip is to match
of the tile type.
Create a SWF from this file and test it out. Click the cells to change the cell types. Types 2–8 are walls. You
easily create unique configurations of the board.
In the next section we will go over how to add a character to this TBW.
A character can be anything from a ball to a human. In most games, a character is
something the game player can relate to, usually some living being. In the example
given in the next section, the character is a ball.
I l
@ve RuBoard
I l
@ve RuBoard
Adding a Character to the World
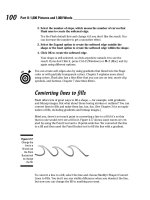
In this section we're going to add a character to the simple world we have just created. Our character is
nothing more than a ball. The goal is to be able to move the ball around the grid using the arrow keys. If a
has a type of greater than 1, it is a wall, and we will not let the ball enter this cell.
When an arrow key is pressed, we look ahead to see where the edge of the ball would be if we were to move
there. If the edge is in an acceptable cell (type = 1), then we move the ball there; if not, then we disregard
key press. More specifically, if the right arrow key is pressed, then we look at the ball's current position, plus
the ball's speed, plus the ball's radius to form a number that represents the far right edge of the ball if it
to be moved one quantity (or unit) of speed to the right. We then check to see in which cell that far-right
is. If it is in a cell of type = 1, then we move the ball there.
Looking ahead:where is he going to go?
1.
A function called
initializeBall()
that creates an object to hold the information about the
(which is a ball). This function also creates a few new variables on the
game
object.
2.
A function called
moveBall()
. When this function is called, it moves the ball to a new position if that
new position is valid.
3.
An
onEnterFrame
event. This checks for key presses in every frame. If one of the arrow keys is
pressed, then the
moveBall()
function is called.
Here is the
initializeBall()
function:
1
11
1 function initializeBall() {
2
22
2 game.speed = 3;
3
33
3 game.path.ball.swapDepths(10000);
4
44
4 game.ball = {startx:1, starty:1, clip:game.path.ball};
5
55
5 var x = (game.ball.startx-1)*game.spacing+game.spacing/2;
6
66
6 var y = (game.ball.starty-1)*game.spacing+game.spacing/2;
To see this in action, open character_in_grid.fla in the Chapter07 directory. You will
a new movie clip inside the grid movie clip. It is the character and has an instance
name of
ball
. The ActionScript has three additions:
7
77
7 game.ball.clip._x = x;
8
88
8 game.ball.clip._y = y;
9
99
9 game.ball.x = x;
10
1010
10 game.ball.y = y;
11
1111
11 game.ball.radius = game.ball.clip._width/2;
12
1212
12 }
The purpose of this function is to initialize all objects and variables needed to hold information about the ball.
Line 2 above sets a variable called
speed
to the
game
object. This represents the speed at which the ball can
move. If a key press is detected on any frame, then the ball will be moved that amount. The next line
the ball movie clip to a high depth. This is done so that we can see it over the tiles that were attached to
stage. If we do not send the ball to a higher depth than the tiles, then it will be hidden behind the tiles. In
4 an object called
ball
is defined on the
game
ob
j
ect. This ob
j
ect is used to store information about the ball,
such as the startin
g
position of the ball and a reference to the movie clip it represents. You'll notice that we
the variables
startx
and
starty
both to 1. This is because we are going to start the ball in the first tile.
next two lines use the
startx
and
starty
position to calculate the place on the stage where the ball needs
be placed. We add
game.spacing/2
to both positions so that the ball will be centered in the tile rather than
on its registration point. In lines 9–11 we store the
x and y positions of the ball and its radius on the
ball
object.
Next, let's look at the
onEnterFrame
event. We'll save the
moveBall()
function for last.
1
11
1 _root.onEnterFrame = function() {
2
22
2 if (Key.isDown(Key.RIGHT)) {
3
33
3 moveBall("right");
4
44
4 } else if (Key.isDown(Key.LEFT)) {
5
55
5 moveBall("left");
6
66
6 }
7
77
7 if (Key.isDown(Key.UP)) {
8
88
8 moveBall("up");
9
99
9 } else if (Key.isDown(Key.DOWN)) {
10
1010
10 moveBall("down");
11
1111
11 }
12
1212
12 };
There are two conditional chunks of code in here. One checks to see if either the right or left arrow key is
pressed; the other checks to see if either the up or down arrow is pressed. If the right or left arrow key is
detected as being pressed, then the
moveBall()
function is called, and the name of the pressed key is
in as a string. Likewise, if the up or down arrow key has been detected as being pressed, then the
function is called, and the pressed key is passed in as a string.
Now let's look at the
moveBall()
function. It is not complicated, but it is fairly long. This is because we
the same sorts of actions for each arrow key (four times).
1
11
1 function moveBall(dir) {
2
22
2 ob = game.ball;
3
33
3 if (dir == "right") {
4
44
4 var tempx = ob.x+ob.radius+game.speed;
5
55
5 var tempy = ob.y;
6
66
6 var cellx = Math.ceil(tempx/game.spacing);
7
77
7 var celly = Math.ceil(tempy/game.spacing);
8
88
8 var tempCell = game["cell"+cellx+"_"+celly];
9
99
9 if (tempCell.type != 1) {
10
1010
10 return;
11
1111
11 } else {
12
1212
12 ob.x += game.speed;
13
1313
13 ob.clip._x = ob.x;
14
1414
14 }
15
1515
15 } else if (dir == "left") {
16
1616
16 var tempx = ob.x-ob.radius-game.speed;
17
1717
17 var tempy = ob.y;
18
1818
18 var cellx = Math.ceil(tempx/game.spacing);
19
1919
19 var celly = Math.ceil(tempy/game.spacing);
20
2020
20 var tempCell = game["cell"+cellx+"_"+celly];
21
2121
21 if (tempCell.type != 1) {
22
2222
22 return;
23
2323
23 } else {
24
2424
24 ob.x -= game.speed;
25
2525
25 ob.clip._x = ob.x;
26
2626
26 }
27
2727
27 } else if (dir == "up") {
28
2828
28 var tempx = ob.x;
29
2929
29 var tempy = ob.y-ob.radius-game.speed;
30
3030
30 var cellx = Math.ceil(tempx/game.spacing);
31
3131
31 var celly = Math.ceil(tempy/game.spacing);
32
3232
32 var tempCell = game["cell"+cellx+"_"+celly];
33
3333
33 if (tempCell.type != 1) {
34
3434
34 return;
35
3535
35 } else {
36
3636
36 ob.y -= game.speed;
37
3737
37 ob.clip._y = ob.y;
38
3838
38 }
39
3939
39 } else if (dir == "down") {
40
4040
40 var tempx = ob.x;
41
4141
41 var tempy = ob.y+ob.radius+game.speed;
42
4242
42 var cellx = Math.ceil(tempx/game.spacing);
43
4343
43 var celly = Math.ceil(tempy/game.spacing);
44
4444
44 var tempCell = game["cell"+cellx+"_"+celly];
45
4545
45 if (tempCell.type != 1) {
46
4646
46 return;
47
4747
47 } else {
48
4848
48 ob.y += game.speed;
49
4949
49 ob.clip._y = ob.y;
50
5050
50 }
51
5151
51 }
52
5252
52 }
This function accepts a parameter called
dir
. It represents the string that is passed in, telling the function
which key was pressed. In line 2 of the function, we set a reference to the
game.ball
object called
ob
.
a temporary reference is not absolutely necessary, but it does make the typing a little shorter and actually
speeds up the ActionScript a little bit. Next we have an
if
statement that checks to see if
dir
is
"right"
,
"left"
,
"up"
, or
"down"
. Very similar actions are repeated for each of the four pieces of this conditional
statement. First let's look at lines 3–14, the
"right"
conditional. The first action in this chunk of code, line
sets a variable called
tempx
that represents the ball's right edge. Since the user is trying to move the ball to
the right, we check to see if the ball's right edge would still be in a valid cell if we moved it in that
do this, we use our math trick to determine the cell using the variables
tempx
and
tempy
. We then check
object that represents the cell the ball would be over. If the
type
variable on that object is
1
, then it is a
move. If it is not valid (line 9), then we return out of the function (line 10). If it is a valid type, then we
the ball's position (lines 11–14).
The next three parts of this big conditional statement do the same thing as the first part, except in how
calculate the ball's edge and update the ball's position. The edge of the ball we are interested in depends
direction of movement. If the down key was pressed, then we are interested in the lowest edge of the ball.
the left key was pressed, then we are interested in the leftmost edge of the ball. Finally—all together now—
the up key was pressed, then we are interested in the topmost edge of the ball.
Generate a SWF from this file. You can then use your arrow keys to move the ball around. Click the grid to
some walls. Move the ball around and notice how it will not enter a cell that has a wall. Notice that all walls
treated in the same way; it doesn't matter what the wall looks like or how much of the cell the wall occupies.
Using creatively drawn walls or smaller cell sizes, this is not as apparent.
One other thing to note is that this is just one way to treat cells in a TBW. More-advanced games have real
collision detection within a cell. In that case, the ball could enter a cell that has a wall, but then collision
detection checks would kick in to make sure the ball did not move through the wall itself.
I l
@ve RuBoard
I l
@ve RuBoard
Externalizing the World Data
One of the best features of TBWs is the ease with which you can store the data that represents a world. For
instance, for a game of Pac-Man
(
without the
g
hosts
)
y
ou can easil
y
create a text document to store the t
yp
e
each cell. This text document is usually XML formatted. At a later date this information can be loaded into
game and the world can be built. In this section we'll look at a simple example of how to do this. (We're
to assume that you have some knowledge of XML and how to work with extracting data from XML objects in
Flash.)
Here is the XML structure we will use to store the world data:
The XML listed above only describes a two-by-two grid. We're going to create an XML file that describes a
by-ten grid. So there will be ten
<row>
nodes, and ten
<cell>
nodes in each
<row>
node. In the XML
the first
<row>
node represents the first row of cells in a grid. The two
<cell>
nodes in the
<row>
node
represent the two cells in that row in a grid. The
type
attribute in the
<cell>
node represents the frame
that cell should show.
Let's look at the Create Game label first. This is a very simple level editor. On this frame you can click each
individually to change its type. Once you are happy with the configuration of the board, you can click the
Generate XML button, and an XML document representing this map will be generated and then shown in
Output window. The Generate XML button calls a function called
generateXML()
. Here is the ActionScript
this function:
1
11
1 function generateXML() {
2
22
2 var xml = "<map>";
3
33
3 for (var j=1; j<=game.rows; ++j) {
4
44
4 xml += "<row>";
5
55
5 for (var i=1; i<=game.columns; ++i) {
6
66
6 var name = "cell"+i+"_"+j;
7
77
7 var type = game[name].type;
8
88
8 var temp = "<cell type=\""+type+"\" />";
9
99
9 xml += temp;
10
1010
10 }
11
1111
11 xml += "</row>";
12
1212
12 }
13
1313
13 xml += "</map>";
14
1414
14 trace(xml);
15
1515
15 }
This function creates an XML document like the one shown earlier in this section, except that it has ten
nodes, and ten
<cell>
nodes per
<row>
node. First, a local variable called
xml
is defined with
"<map>"
as
value. Then we loop through the entire board. At the beginning of every outer loop, we append
"<row>
" to
xml
variable. For each iteration of the inner loop, we create a
<cell>
node with a "
type"
attribute that
the value of the current cell's type. This node is then appended to the
xml
variable. At the end of each outer
loop, we append
"</row>
" to the
xml
variable, closing the current
<row>
node. After all the loops, we close
Open game.fla from the CD. Take a look at the tile movie clip in the library. It's got a
simple new addition—a movie clip with an instance name of
dot
on frame 1. As the
moves over the dots, they disappear, much as they do in Pac-Man. There are three
frame labels in this movie, Start, Create Game, and Play Game. The Start frame
you two choices, Create Game or Play Game. If you click the Create Game button,
you are taken to the Create Game frame. On this frame you can configure a level
then click to have the XML for this level generated. If you choose Play Game, you
taken to the Play Game frame. On this frame the data for the level is loaded from
XML file and the level is created. You can then move the ball around on this level,
collecting dots.
the root node by appending
"</map>
" to the
xml
variable. Finally, we trace the
xml
variable so that its
contents are shown in the Output window.
Generate a SWF file from this, and test the XML generation. Once you have created a level you're happy
copy the contents from the Output window and save it to a file called game.xml in your current working
directory. Now how will this file of yours
g
et used? You're about to find out. Next we're
g
oin
g
to discuss the
Game frame; that's where this file will be loaded, and your level will be created from it.
Close the SWF file and look at the FLA file again. Move to the Play Game frame. This frame loads the
file, interprets it, and builds the level. Once the level is built, the character can move around the level
dots. There are a few ActionScript additions to this frame that you have not yet seen. There is a simple
collision-detection function that checks for ball-dot collisions, and there is the code that loads and
XML. Here is the code that loads the XML and defines the event handler for the
onLoad
event:
1
11
1 board = new XML();
2
22
2 board.onLoad = buildGrid;
3
33
3 board.load("game.xml");
An XML document must be loaded into an XML object, so first we're going to create an XML object called
board
. Also, so that we will know when the file is finished loading, in line 2 we set an event handler for the
onLoad
event for the
board
XML object. When the file is finished loading, the function
buildGrid()
is
In line 3 we load a file into the XML object, passing in the path to the file.
The
buildGrid()
function is changed substantially from the one you've gotten used to seeing in our
examples. Here it interprets the XML and builds the level from it.
1
11
1 function buildGrid() {
2
22
2 board = board.firstChild;
3
33
3 var tempArray = [];
4
44
4 tempArray = board.childNodes;
5
55
5 for (var j=1; j<=game.rows; ++j) {
6
66
6 var tempArray2 = [];
7
77
7 tempArray2 = tempArray[j-1].childNodes;
8
88
8 for (var i=1; i<=game.columns; ++i) {
9
99
9 var name = "cell"+i+"_"+j;
10
1010
10 var x = (i-1)*game.spacing;
11
1111
11 var y = (j-1)*game.spacing;
12
1212
12 var type = tempArray2[i-1].attributes.type;
13
1313
13 game.path.attachMovie("cell", name, ++game.depth);
14
1414
14 game.path[name]._x = x;
15
1515
15 game.path[name]._y = y;
16
1616
16 game[name] = {x:i, y:j, name:name, type:type,
clip:game.path[name],
dot:game.path[name].tile.dot};
17
1717
17 game[name].clip.tile.gotoAndStop(type);
18
1818
18 }
19
1919
19 }
20
2020
20 initializeBall();
21
2121
21 }
Line 2 of this function sets the contents of the XML object to that of its first child node. The next two lines
create an array of the child nodes of the
<map>
node. That means that every element in this array contains a
<row> node. Lines 6 and 7 create an array that contains the child nodes of the
j
th
<row>
node from the
tempArray
array. The child nodes of a
<row>
node are the
<cell>
nodes. In line 12 we set a local variable
called
type
that stores the number extracted from the
type
node of the
i
th
<cell>
node in the
array.
There is one more addition to the ActionScript on this frame—the
detectDot()
function. A reference to a
movie clip is passed into this function, and a
hitTest()
is performed between
ball
and
dot
. If the
()
method returns a value of
true
, then a collision occurred, and
dot
has its visibility set to
false
.
1
11
1 function detectDot(tempCell) {
2
22
2 if (game.ball.clip.hitTest(tempCell.dot)) {
3
33
3 tempCell.dot._visible = false;
4
44
4 }
5
55
5 }
This function is called from the
moveBall()
function. You may remember that in the
moveBall()
there are four chunks of code, one for each arrow key. If the place where you attempt to move the ball is
then the
detectDot()
function is called.
Generate a SWF from this file. When you click the Play Game button, you'll notice that your XML file has
loaded and interpreted. You can now move the ball around the map and collect dots! This is a very simple
example of a TBW with an editor.
In this chapter you have learned what makes up a tile-based world. You have also seen the main benefits
using TBWs—reuse of graphical assets and some programming advantages. With the knowledge gained in
chapter, you will be able to build more-complicated tile-based worlds. In the third section of this book you
see more TBW examples.
I l
@ve RuBoard
I l
@ve RuBoard
Points to Remembe
r
z
Tiles (also called
cells) allow the reuse of most visual assets you create for a game, and can be the
building blocks for the appearance of many games.
z
Tiles help you assemble an entire game world using code.
z
Using a simple math trick only possible with TBWs, you can greatly reduce the processing power
to run your game.
z
A tile is a movie clip.
z
The data structure used with tile-based worlds (one object for each tile) makes storing information
each tile very easy.
z
You can easily store the information needed to build a TBW in an external file or database. This
information, which usually represents a level in a game, can later be loaded in, and the world or level
constructed.
z
Nested loops are used to build a grid of tiles for your game.
z
A trick to pinpoint the location of a character allows you to then perform collision detection only
the character and the objects in that cell, which reduces the code intensity because you are not
for collisions with every object on the screen, only the ones in that cell.
I l
@ve RuBoard
I l
@ve RuBoard
Chapter 8. The Isometric Worldview
Introduction to Isometrics
A Technical Look at Isometrics
Z
-sorting
Deconstruction of a Simple World
Points to Remember
An
isometric view is a specific three-dimensional (3D) view. In 3D, as you have undoubtedly seen in some
Flash games, the camera (the viewpoint of your computer screen) can move anywhere and rotate
There is a specific position of this camera that
g
ives an isometric view. This view is popular in many
g
ames,
including Diablo II, and has been shown to be very effective when used properly in Flash. In this chapter
will discuss why this view is popular and how to treat it mathematically. We'll also provide real examples of
to use it. To get the most out of this chapter, you should have read, or be familiar with the concepts
Chapter 7
, "Tile-Based Worlds."
I l
@ve RuBoard
I l
@ve RuBoard
Introduction to Isometrics
Sometimes explaining and understanding a concept is easier with comparisons. With this in mind we will
discuss 3D in games in general and then specifically talk about isometrics.
It is rare today to find professionally created games for sale that are not 3D. Even games that are typically
two-dimensional, such as card games, often have some sort of 3D element. As mentioned in
Chapter 1, "First
Steps," 3D can be applied to a
g
ame in many ways. Games like Unreal Tournament use a real 3D en
g
ine. A
engine can rotate objects and display them correctly onscreen, changing the camera's viewpoint at any
and uses very detailed z-sorting.
Z-sorting is the concept and act of placing one object on top of another to
give the appearance of it being in front. (In Flash, the objects we'll work with will be movie clips.) The
in which we arrange the objects is called the
stacking order. Each object in the stack is at a specific depth—
assigned by a relative numeric value—also known as a z-index. Z-sortin
g
can be applied to several different
types of situations including a 3D world (as in this chapter) or the open windows of your operating system.
Courtesy of Epic Games, Inc.
For instance, your keyboard is in front of your monitor, so it has a higher z-sorting number—the closer to the
game player, the higher the number.) One of the most powerful things about advanced 3D engines, such as
one written for a game like Unreal Tournament, is that they can map bitmaps to shapes. (For instance, the
bitmap of a human face can be mapped onto the shape of a head, which is a polygon. When this shape
in the 3D world, it appears to be a human head.) With this type of 3D engine, all shapes are rendered
onscreen mathematically. There are usually some premade bitmaps, like the human face mentioned above,
for the most part all of the objects are created and moved on the fly. This type of engine is very processor-
intensive, and because of the real-time creation of objects, it can limit the game's level of detail.
Early on in the online game world, developers discovered that a 3D world was great for many types of games
but that changing camera views wasn't always important. With this in mind, some games were developed
only one camera view—an isometric view (the angles of which will be discussed in the next section).
At this
p
oint, before we talk more about the isometric view, it is im
p
ortant to note the
concept of
perspective. Imagine that you are standing on a long, straight road. As
look down this road, its two sides appear to converge far off in the distance. As we
know, the sides of the road do not actually converge way off in the distance. If you
were to travel to the end of the road, then you would see that it is just as wide at
end as it is at the beginning. This visual illusion is called perspective. Without
perspective, the road would appear to stay the same width, and in fact it would
probably be impossible to
g
et a feelin
g
for how lon
g
the road is. Perspective helps to
give us an idea of an object's dimensions.
Courtesy of Blizzard Entertainment®
The well-known game Diablo II is a good example of a game with an isometric viewpoint.
Games that use an isometric view do not use perspective. Why is this so important? Imagine creating a first-
person-view 3D game in Flash. As a car drives by your character, the perspective of the car is constantly
chan
g
in
g
. New
p
arts of the car are revealed as the car moves b
y
, and eventuall
y
it vanishes. As the character
with the first-person-view walks down the street, the perspective of every object on the screen is constantly
changing. To create a game like that, you would need a true 3D engine. Yes, very limited versions of this can
be created in Flash (with highly advanced tricks), but for the most part it should not be considered a realistic
possibility—not as of this writing, anyway. With an isometric view there is no perspective. This means we can
create many different angles of objects, and then place those objects on the screen. For instance, with an
isometric view
y
ou can create a tree and
p
lace it an
y
where in the world without havin
g
to worr
y
about its size
or perspective, since those attributes are never going to change. This is good news for first-time as well as
seasoned Flash developers, because it means we can create 3D games without a 3D engine.
A road in an isometric world never converges. But the amazing thing is, it looks great!
There is some controversy over what constitutes a 3D engine. In this chapter I give you equations and
functions to handle placing and moving objects in a 3D world and then mapping that onto a 2D screen. To
people this is a 3D engine; to others (usually hard-core programmers) a 3D engine has to be able to handle
real-time graphics rendering as well.
Let's recap the main points introduced here:
z
An isometric view is a specific camera angle in a 3D world (mathematical specifics are in the next
section).
z
In an isometric world you don't use perspective. The implication of this is that you can create reusable
objects rather than having to render them in real time.
z
An isometric view is much less processor-intensive than other 3D views, which makes it more workable
in Flash.
Next we will discuss the math, geometry, and trigonometry used to create this view and to display it on a 2D
screen (that is, projecting from a 3D to a 2D plane).
I don't mean to discourage anyone reading this chapter from attempting more of a
"real" 3D a
pp
roach in
g
ames. With Flash's drawin
g
API and with cool tricks
(
which
y
ou
can find on the Web or develop yourself), you can accomplish some amazing things.
fact, I have been working on something of my own—a car-racing game—that wasn't
finished in time for this book. If you are interested in seeing this game, it will
be on my Web site, Electrotank (
www.electrotank.com), sometime in spring 2003.
I l
@ve RuBoard
I l
@ve RuBoard
A Technical Look at Isometrics
In this section we'll take a different look at isometrics. We'll discuss everything you need to know in order to
place objects in an isometric world and to map them back to the computer screen.
The Orientation of the Isometric World
Before moving forward, we need to look at the Flash coordinate system in a new way. Up to this point in the
book we have been seeing the coordinate system as two-dimensional; that is, having an
x-axis and a y-axis.
Flash does not have a
z-axis, but if it did, the positive end would extend out past the back of the computer
screen.
The isometric world we will be dealing with can be conceptualized (and then treated mathematically) as a
second 3D coordinate system sitting inside this Flash coordinate system. Let's call this second system "the
isometric system" and the first "the Flash system." The Flash system is stationary; it cannot move since it is
bound to your computer monitor. The isometric system is only isometric when it is oriented in a specific way
within the Flash s
y
stem. Please note that the isometric s
y
stem does not chan
g
e when its orientation chan
g
es.
The only thing that makes it isometric is how it is seen from the Flash system.
Before it is rotated, the new coordinate system is aligned with Flash's coordinate system.
Now let's assume that the isometric s
y
stem is com
p
letel
y
ali
g
ned with the Flash s
y
stem. In this case, there is
no difference between the Flash system and the isometric system; in fact, it is not yet isometric. What has to
happen to this second system to make it appear isometric, as seen from the Flash system?
z
It must be rotated 30° around its
x-axis.
The
x-axis is treated like an axle, so it stays still while the coordinate system rotates. Before the
rotation, all three axes lie along all three of Flash's axes. After the rotation, the isometric system's
x-
still lies along Flash's
x-axis, but the other axes are no longer aligned.
Rotated 30° around the x-axis
z
It must then be rotated 45°around its own
y-axis.
During this rotation, the
y-axis is treated like an axle, so it stays stationary while the rest of the
isometric system is rotated around it. When this rotation has been completed, all three of the
axes are in different positions from their starting places, and it appears to be an isometric system as
seen from the Flash system.
Rotated around isometric system's y-axis 45°
Final product:the isometric view as seen from the Flash coordinate system (your monitor).
Cube in an isometric world
Take a look at the demo.swf file in the Chapter08 directory on the CD. This file was
created to help you visualize how these two rotations take place. It shows a straight-
orientation in the Flash system (before it is isometric) and then rotates the cube in
steps. When it is finished animating, the cube is seen in an isometric view.
Placing an Object in the Isometric World
Throughout this book we have been advocating using code to describe visual elements—their
p
osition, s
p
eed,
and other properties—and to store this information (as opposed to storing information in the movie clips
themselves). If the position of something needs to be updated on the stage, then we do so at the end of the
frame after all needed calculations are done. We take the position that we have calculated in memory and
assign that value to the
_x
and
_y
properties of the movie clip. This technique will be used in this chapter as
well: We will discuss the position coordinates in the isometric system and in the Flash system, and how to
between them.
Why is this view called
isometric? If you look at the cube in the figure above, you will
notice that only three faces are exposed. The area of each of these three faces is
same. The prefix
iso means "the same," and metric signifies "measurement."
Before continuing, I want to mention some restrictions we will be observing. First,
at the image below.
We are going to restrict where we place objects to the quadrant of the isometric world formed by the x- and
axes. Specifically, if we extend this quadrant upward in the
–y direction, we form an octant (a quadrant
in size, extended in an orthogonal, or perpendicular, direction). This octant is shown in the image below.
The reason we restrict object placement to this octant has to do with z-sorting. (As a reminder, z-sorting
to changing the depth of movie clips to make them appear to be at the correct distance from the screen.)
instance, as a character walks around a tree, you want the character to appear behind the tree at some
but in front of it at others. The issue of finding a good way to handle z-sorting has plagued Flash
a long time. With this octant restriction, we can use a technique I developed for z-sorting that makes it
lightning-fast. We'll talk about this in the next section. To recap, the reason why we restrict object
this octant is so that we can use a specific and fast z-sorting technique. If someone comes up with
better, please let me know!
When working with 3D worlds, the coding architecture we've been using throughout this book (mentioned