PHP in Action phần 5 potx
Bạn đang xem bản rút gọn của tài liệu. Xem và tải ngay bản đầy đủ của tài liệu tại đây (810.18 KB, 55 trang )
DATABASE SELECT 195
The test plays the part of a typical piece of client code. By writing the test first, we
get to play with the interface of our class a little before we commit to it. In effect, we
get to try it out first in the test.
We already have an empty test class called TestOfMysqlTransaction. Each individ-
ual test will be implemented as a method in the test class. Here is our first real test:
require_once(' /transaction.php');
class TestOfMysqlTransaction extends UnitTestCase {
function testCanReadSimpleSelect() {
b
$transaction = new MysqlTransaction();
$result = $transaction->select('select 1 as one');
$row = $result->next();
$this->assertEqual($row['one'], 1);
d
}
}
b SimpleTest does some magic here. When the test case executes, it searches itself for all
methods that start with “test” and runs them. If the method starts with any other
name, it will be skipped. We’ll make use of this later, but for now just remember to
put “test” at the beginning of each method you want to run.
C Now we start pretending that the feature has been implemented as outlined in
figure 9.2. “Select” sounds like a good name for an
SQL select method. We pretend
that the transaction class has a
select() method that is able to run an SQL SELECT.
We also pretend that the results of the
select() call will come back as an iterator
(see section 7.5). Each call to
next() on the iterator will give us a row as a PHP
array(). Here we only expect to fetch one row, so the usual iterator loop is absent.
D The assertEqual() method is a SimpleTest assertion, one of quite a few avail-
able. If the two parameters do not match up, a failure message will be dispatched to
the test reporter and we will get a big red bar.
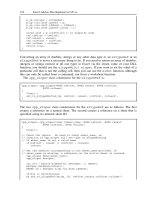
Figure 9.3 is a simplified class diagram of the test setup. The MysqlTransaction and
MysqlResult classes are in gray because they don’t exist yet. They are implied by the
code in the test method. The UnitTestCase class is part of the SimpleTest framework.
Only one method of this class is shown, although it has many others.
When we run this test case, we don’t get to see the red bar. Instead the results are
quite spectacular, as in figure 9.4.
We haven’t yet created the file classes/transaction.php, causing a crash. This is
because we are writing the tests before we write the code, any code, even creating the
file. Why? Because we want the least amount of code that we can get away with. It’s
easy to make assumptions about what you will need and miss a much simpler solution.
c
196 CHAPTER 9 TEST-DRIVEN DEVELOPMENT
9.2.3 Make it pass
The test result tells us what we need to do next. It’s telling us that it’s unable to open
the file transaction.php
. This is not surprising, since the file does not exist. We have
to create the file.
If we create an empty transaction.php file and run the test again, it will tell us that
the MysqlTransaction class does not exist. If we create the class, we get another fatal
error telling us that we are trying to run a nonexistent method.
This process leads us to the following code, the minimum needed to avoid a fatal
PHP error:
<?php
class MysqlTransaction {
function select() {
return new MysqlResult();
}
}
Figure 9.3 Our first real test,
the infrastructure needed to
make it work, and the classes
implied by the test
Figure 9.4
Now the test causes a fatal er-
ror, since we have a test, but
the code to be tested does not
exist yet.
DATABASE SELECT 197
class MysqlResult {
function next() {
}
}
?>
It isn’t fully functional, but does prevent a PHP crash. The output is in figure 9.5.
It takes only a single failure to get that big red bar. That’s the way it works. This
might seem brutal, but there are no partially passing test suites, in the same way as
there is no such thing as partially correct code. The only way to get the green bar back
is with 100 percent passing tests.
We can achieve a green bar simply by returning the correct row:
class MysqlResult {
function next() {
return array('one' => '1');
}
}
And sure enough, we get the green bar (see figure 9.6).
Notice the small steps: write a line, look at the tests, write a line, check whether
it’s green. Did we just cheat by simply hard-coding the desired result? Well, yes we did.
This is what Kent Beck, the inventor of
TDD, calls the FakeIt pattern. We will find
it’s easier to work with code when we have a green bar. For this reason, we get to the
green bar any way we can, even if it’s a simplistic, stupid, fake implementation. Once
green, we can refactor the code to the solution we really want.
In a way, the code is actually correct despite our hack. It works; it just doesn’t meet
any real user requirements. Any other developer looking at the tests might be a bit dis-
appointed when she sees our current implementation, but it’s pretty obvious that we
Figure 9.5
The test case no longer crashes,
but the test fails since the code is
not fully functional yet.
Figure 9.6
We've made the test pass by
hard-coding the output of the
desired result.
198 CHAPTER 9 TEST-DRIVEN DEVELOPMENT
have done a temporary hack. If we were run over by a bus, she could carry on from this
point without confusion. All code is a work in progress, and in a way this is no different.
9.2.4 Make it work
Since we weren’t run over by a bus and we’re still alive, it’s still our job to write some
more code. We want to go from the fake implementation to code that actually does
something useful. Instead of just returning a hard-coded value that satisfies the test,
we want to get the real value that’s stored in the database and return it. But before we
can get anything from the database, we need to connect to it, so let’s start with this:
class MysqlTransaction {
function select($sql) {
$connection = mysql_connect(
'localhost', 'me', 'secret', 'test', true);
return new MysqlResult();
}
}
Not much of a change, just adding the connect call and doing nothing with it. The
choice of call is quite interesting here. Assuming that we want to be backward com-
patible with version 4.0 of My
SQL and don’t currently have PDO installed, we use the
older
PHP function mysql_connect() rather than the newer Mysqli or PDO
interfaces. Note that this doesn’t affect the tests. If you want to write your Mysql-
Transaction class using
PDO, it won’t substantially affect this chapter.
When we run the tests, we get the result in figure 9.7.
We haven’t set up the access to My
SQL, and so PHP generates a warning about our
failure to connect. SimpleTest reports this as an exception, because it cannot be tied
to any failed assertion.
Note that we only added one line before we ran the test suite. Running the tests
is easy, just a single mouse click, so why not run them often? That way we get feedback
the instant a line of code fails. Saving up a whole slew of errors before running the tests
will take longer to sort out. With a small investment of a mouse click every few lines,
we maintain a steady rhythm.
Figure 9.7
This time we're unable to get the
MySQL connection, and the test
case tells us what's wrong.
DATABASE SELECT 199
Once the user name, password, and database have been set up, we are back to green.
We’ll skip a few steps here and go straight to the resulting code (see listing 7.1). Nor-
mally this would take a couple of test cycles to sort out.
class MysqlTransaction {
private $connection;
function __construct($host, $user, $password, $db) {
$this->connection = mysql_connect(
$host, $user, $password, $db, true);
}
function select($sql) {
$result = @mysql_query($sql, $this->connection);
return new MysqlResult($result);
}
}
class MysqlResult {
private $result;
function __construct($result) {
$this->result = $result;
}
function next() {
return mysql_fetch_assoc($this->result);
}
}
Depending on the settings in your php.ini, you will receive various warnings about
My
SQL queries. We are going to trap all errors with exceptions, so we’ll suppress the
legacy
PHP errors with the “@” operator. The test has also been modified slightly, so
that the connection now takes the connection parameters from the test case:
class TestOfMysqlTransaction extends UnitTestCase {
function testCanReadSimpleSelect() {
$transaction = new MysqlTransaction(
'localhost', 'me', 'secret', 'test');
$result = $transaction->select('select 1 as one');
$row = $result->next();
$this->assertEqual($row['one'], '1');
}
}
Job done. We have implemented our first feature. In doing so, we have left a trail of
tests (
OK, just one) which specify the program so far. We have also gone in small steps,
and so written only enough code to get the test to pass. 100 percent test coverage and
lean code. That’s a nice benefit of this style of coding. We are building quality in.
Right now we are green, as shown in figure 9.8.
Listing 9.1 The MysqlTransaction class fully implemented
200 CHAPTER 9 TEST-DRIVEN DEVELOPMENT
At last our Transaction class is up and running, and we have implemented the
select() feature. From now on, things get faster. We need to implement the abil-
ity to write to the database as well. But first, we want to do some error checking.
9.2.5 Test until you are confident
The rules of this game are, write a test and watch it fail, get it green, modify (refactor)
the code while green. This cycle is often abbreviated “red, green, refactor.” We only
add features once we have a failing test. We are only allowed to add a test once all the
other tests are passing. If you try to add features with other code not working, you
just dig yourself into a mess. If you ever catch yourself doing that, stop, roll back, and
recode in smaller steps. It will be quicker than floundering.
We are green, so let’s add a test for some error checking:
class TestOfMysqlTransaction extends UnitTestCase {
function testShouldThrowExceptionOnBadSelectSyntax() {
$transaction = new MysqlTransaction(
'localhost', 'me', 'secret', 'test');
$this->expectException();
$transaction->select('not valid SQL');
}
}
b That’s a long method name, isn’t it? We prefer long test method names that exactly
explain what the test does. This makes the test more readable, makes the test output
more readable when things go wrong, and also helps to keep us focused. With a wool-
ier name such as
testErrorChecking(), we might be tempted to test many
more things. With a precise goal, we know when we are finished and ready to move
on to the next feature. A test has to tell a story.
C This time there is a funny sort of assertion. expectException() tells SimpleTest
to expect an exception to be thrown before the end of the test. If it isn’t, SimpleTest
registers a failure. We must get an exception to get to green.
Getting the test to pass is pretty easy, and involves changing only the
select()
method of our transaction class:
Figure 9.8
Finally, when the feature has
been fully implemented, the
test passes.
b
Long,
intention-
revealing
method
name
c
We had better
get an exception
DATABASE INSERT AND UPDATE 201
class MysqlTransaction {
function select($sql) {
$result = @mysql_query($sql, $this->connection);
if ($error = mysql_error($this->connection)) {
throw new Exception($error);
}
return new MysqlResult($result);
}
}
Normally we would add more error checking here. In fact, we would keep adding
tests until we had covered every type of error we could think of. At that point, we are
confident in our code and can move on. For brevity, we are going to skip connection
errors and so on, and move on to the
execute() method. We have a lot of ground
to cover.
9.3 DATABASE INSERT AND UPDATE
We are now the proud owners of a
read-only database transaction
class. It can do
SQL SELECT, but
no
INSERT or UPDATE. We need
some way to get data into the data-
base as well; typing it manually on
the My
SQL command line gets
tedious. Insert and update is actu-
ally simpler than select, since we
need not worry about how to process the result. Figure 9.9 shows how simple it is.
We’ll add an
execute() method to our MysqlTransaction class. The exe-
cute()
method is like the select() method, but returns no result. It’s used for
inserting or updating data. Because we have been moving forward successfully, we’ll
also move in larger steps. That’s one of the joys of test-driven development; you can
adjust the speed as you go. Clear run of green? Speed up. Keep getting failures? Slow
down and take smaller steps. The idea is steady, confident progress. In the first sub-
section, we’ll take a first shot at writing a test and then clean it up by separating the
database setup code from the test itself. In the second subsection, we’ll implement the
execute() method, committing a small sin by cutting and pasting from the
select() method. Then we’ll atone for our sin by eliminating the duplication we
just caused.
9.3.1 Making the tests more readable
We want to write data to the database. Since we already have a way to read data, we
can test the ability to write data by reading it back and checking that we get the same
value back. Here is a test that writes a row and reads it back again. It’s a more aggres-
sive test, but it’s not well written:
Figure 9.9 Inserting or updating data involves
just one call from the client to the MysqlTransac-
tion class.
202 CHAPTER 9 TEST-DRIVEN DEVELOPMENT
class TestOfMysqlTransaction extends UnitTestCase {
function testCanWriteRowAndReadItBack() {
$transaction = new MysqlTransaction(
'localhost', 'me', 'secret', 'test');
$transaction->execute('create table numbers (integer n)');
$transaction->execute('insert into numbers (n) values (1)');
$result = $transaction->select('select * from numbers');
$row = $result->next();
$this->assertEqual($row['n'], '1');
$transaction->execute('drop table numbers');
}
}
bd We need a test table in the database so that we insert and retrieve data without affect-
ing anything else. Before the main test code, we create and drop the table.
c We use the transaction class to insert a value into the database and retrieve it. Then
we assert that the value retrieved is the equal to the one we inserted.
What we see here is that the setup code (creating and dropping the table) and the test
code are hopelessly intermingled. As a result, this test doesn’t tell a story. It’s difficult
to read. We’ll rewrite the test case to make things clearer. First the schema handling:
class TestOfMysqlTransaction extends UnitTestCase {
private function createSchema() {
$transaction = new MysqlTransaction(
'localhost', 'me', 'secret', 'test');
$transaction->execute('drop table if exists numbers');
$transaction->execute(
'create table numbers (n integer) type=InnoDB');
}
private function dropSchema() {
$transaction = new MysqlTransaction(
'localhost', 'me', 'secret', 'test');
$transaction->execute('drop table if exists numbers');
}
}
We’ve pulled the schema handling code out into separate methods. These methods
won’t be run automatically by the testing tool, because they are private and don’t start
with the string
‘test’. This is handy for adding helper methods to the test case,
useful for common test code.
Note that you will need a transactional version of My
SQL for the following to
work. That
type=InnoDB statement at the end of the table creation tells MySQL to
use a transactional table type. My
SQL’s default table type is non-transactional, which
could lead to a surprise. You might need to install My
SQL-max rather than the stan-
dard My
SQL distribution for this feature to be present, depending on which version
you are using.
Create the
table
b
Insert and retrieve data
c
d
Drop the table
DATABASE INSERT AND UPDATE 203
Extracting this code makes the main test flow a little easier. We have a setup section,
the code snippet, the assertion, and finally we tear down the schema:
class TestOfMysqlTransaction extends UnitTestCase {
function testCanWriteRowAndReadItBack() {
$this->createSchema();
$transaction = new MysqlTransaction(
'localhost', 'me', 'secret', 'test');
$transaction->execute('insert into numbers (n) values (1)');
$result = $transaction->select('select * from numbers');
$row = $result->next();
$this->assertEqual($row['n'], '1');
$this->dropSchema();
}
}
Later on, we will find a way to clean this code up even more.
Why so much effort getting the tests to read well? After all, we only get paid for
production code, not test code. It’s because we are not just writing test code. It’s about
having an executable specification that other developers can read. As the tests become
an executable design document, they gradually replace the paper artifacts. It becomes
less about testing the code, and more about designing the code as you go. We’d put a
lot of effort into our design documents to make them readable, so now that the tests
are specifying the design, we’ll expend the same effort on the tests. The other devel-
opers will thank us.
9.3.2 Red, green, refactor
Right now, the test will crash. Our next goal is not to get the test to pass, but to get it
to fail in a well-defined, informative way by giving us a red bar. To get the test from
crash to red, we have to add the
execute() method to MysqlTransaction.
Then we’re ready to go for green. Here is the MysqlTransaction code I added to get
to green, running the tests at each step. In the first step, we had never selected a data-
base after logging on. This is easily fixed by selecting a database in the constructor and
checking for errors:
class MysqlTransaction {
function __construct($host, $user, $password, $db) {
$this->connection = mysql_connect(
$host, $user, $password, $db, true);
mysql_select_db($db, $this->connection);
if ($error = mysql_error($this->connection)) {
throw new Exception($error);
}
}
//
}
204 CHAPTER 9 TEST-DRIVEN DEVELOPMENT
Then we have to actually write the execute() method. Most of the code is already in
the
select() method. As we want to get to green as quickly as possible, we’ll cut and
paste the code we need from the
select() method to the execute() method.
class MysqlTransaction {
function execute($sql) {
mysql_query($sql, $this->connection);
if ($error = mysql_error($this->connection)) {
throw new Exception($error);
}
}
}
OK, the cut and paste got us to green, but we have a lot of duplicated code now. Once
green, though, it’s much easier to refactor the code. We just go in small steps and run
the tests each time. If we tried to do this on red, trying to get a perfect solution in one
go, likely we would get into a tangle. Refactoring is easier with passing tests.
First we’ll create a new method:
class MysqlTransaction {
private function throwOnMysqlError() {
if ($error = mysql_error($this->connection)) {
throw new Exception($error);
}
}
}
We run the tests. Next we make select() use the new method:
class MysqlTransaction {
function select($sql) {
$result = mysql_query($sql, $this->connection);
$this->throwOnMysqlError();
return new MysqlResult($result);
}
//
}
We run the tests again (still green) and then factor the error check out of the con-
structor and the
execute() method (not shown). Once we are happy that the code
cannot be improved, we are ready to add another test.
That’s a strange order to do things. Normally we design, then code, then test, then
debug. Here we test, then code, then design once the first draft of the code is written.
This takes faith that we will be able to shuffle the code about once it is already written.
This faith is actually well placed. Did you notice we no longer have a debug step?
You would have thought that making changes would now involve changing tests
as well as code. Sometimes it does, but that’s a small price to pay. The biggest barrier
to change is usually fear: fear that something will break, and that the damage will not
REAL DATABASE TRANSACTIONS 205
show up until later. This results in the code becoming rather rigid as it grows more
complicated. Sadly, this fear often blocks attempts to remove complexity, so this is a
bad situation to be in. Having good test coverage removes the fear and allows changes
to happen more often. The code is much easier to refactor with tests around it.
Paradoxically, unit tests make the code more fluid. It’s a bit like tightrope walking. You
go faster with a safety net.
It can be difficult to get used to writing code before putting in a lot of design work.
Personally, I have always found this aspect hardest to deal with, feeling that I should
have a clear vision before I start. This is that production-line mentality creeping in
again. The trouble is that when you try the clear-vision approach on complicated
problems, it turns out that the clear visions aren’t really that clear. Sometimes they are
even completely wrong. Nowadays I have a rule of thumb: “No design survives the first
line of code.” I still do some early design, but I just make it a rough sketch. Less to
throw away after we have started coding.
We’ve implemented all the basic features of the class, except the actual database
transactions. It’s time to get that done as well.
9.4 REAL DATABASE TRANSACTIONS
All this talk about design might leave you thinking that TDD is not about testing,
and there is a grain of truth to this. It is about testing as well, and to prove it we still
have a knotty problem to sort out. Our class is called MysqlTransaction and yet we
haven’t tested any transactional behavior.
In this section, we’ll first find out how to test transactions. Then we’ll add the
actual Mysql transactional behavior to our code. Based on our experience from the
example, we’ll discuss whether testing really removes the need for debugging, and what
else we need to do to ensure that we’ve done all we can to produce code of high quality.
9.4.1 Testing transactions
We’ll add a
commit() method to the tests and have the rule that nothing is commit-
ted to the database until this method is called. This means that some of our test code
won’t yet make sense. In particular, when we build and drop the schema, we have to
commit these steps, too. For example, here is a fixed
createSchema() method in
the tests:
class TestOfMysqlTransaction extends UnitTestCase {
function createSchema() {
$transaction = new MysqlTransaction(
'localhost', 'me', 'secret', 'test');
$transaction->execute(
'create table numbers (n integer) type=InnoDB');
$transaction->commit();
}
}
206 CHAPTER 9 TEST-DRIVEN DEVELOPMENT
Of course, we add an empty method to the code to get the tests back to green. Now
that our tests match the desired interface, we can move on.
Testing transactions is tricky, to say the least. For the transaction test, we’ll set up
a sample row of data, and then we’ll start two transactions. The first will modify the
data, hopefully successfully. Then the second transaction will attempt to modify the
data before the first one has been committed. We should get an exception when the
second update query is executed.
We shall see that this is a tough test to get right. Still, this extra effort is easier than
finding out later that your website has some mysteriously inconsistent data. Here is the
helper method to set up the data:
class TestOfMysqlTransaction extends UnitTestCase {
function setUpRow() {
$this->createSchema();
$transaction = new MysqlTransaction(
'localhost', 'me', 'secret', 'test');
$transaction->execute('insert into numbers (n) values (1)');
$transaction->commit();
}
}
That was easy. Here is the test:
class TestOfMysqlTransaction extends UnitTestCase {
function testRowConflictBlowsOutTransaction() {
$this->setUpRow();
$one = new MysqlTransaction(
'localhost', 'me', 'secret', 'test');
$one->execute('update numbers set n = 2 where n = 1');
$two = new MysqlTransaction(
'localhost', 'me', 'secret', 'test');
try {
$two->execute('update numbers set n = 3 where n = 1');
$this->fail('Should have thrown');
} catch (Exception $e) { }
$this->dropSchema();
}
}
b We start by running the helper method that inserts the row that the transactions will
compete for.
C Then we create and run the first transaction without committing it.
D The second transaction is similar and should throw an exception as soon as we try to
execute it. The test for the exception is similar to the one we used earlier in this chapter.
We’re only testing the failure behavior here. There is no need for any commits in the
test, since we’re not supposed to get to commit anyway. Note that we haven’t used
expectException() here, because we want to ensure that dropSchema() is
b
Insert
test rows
Create
transaction,
no commit
c
Second
transaction
d
REAL DATABASE TRANSACTIONS 207
run. The
fail() method just issues a failure if we get to it. Of course, we should
have thrown by then. If we do, our test reaches the end without failures.
Now that we have a failing test, let’s code.
9.4.2 Implementing transactions
In order to get real transactional behavior, we need to open the transaction and com-
mit it. We want to open it implicitly when the MysqlTransaction object is created,
and commit it only when
commit() is called explicitly. We start by opening a trans-
action in the constructor:
class MysqlTransaction {
function __construct($host, $user, $password, $db) {
$this->connection = mysql_connect(
$host, $user, $password, $db, true);
mysql_select_db($db, $this->connection);
$this->throwOnMysqlError();
$this->begin();
}
//
}
Opening the transaction is fairly technical. Here is the version for MySQL:
class MysqlTransaction {
private function begin() {
$this->execute(
'set transaction isolation level serializable');
$this->execute('begin');
}
//
}
The isolation level is chosen for maximum MySQL consistency. In other words, it’s the
safest and slowest isolation level. By contrast, the
commit() method is pretty generic:
class MysqlTransaction {
function commit() {
$this->execute('commit');
mysql_close($this->connection);
unset($this->connection);
}
}
Once the transaction is committed, we don’t want to send any more statements. Clos-
ing the connection will ensure any further queries throw exceptions.
If you run this test, you will likely get a web server timeout. On my default instal-
lation, the web server page timeout is set to 30 seconds, but the My
SQL deadlock time-
out is set at 50 seconds. This causes the page to timeout first. If you increase the page
timeouts in your web server and your php.ini file, you will see the test pass after 50
208 CHAPTER 9 TEST-DRIVEN DEVELOPMENT
seconds. This is too long. Unit testing works because of the fast feedback. We like to
run the tests after each code edit. We cannot afford to wait 50 seconds for one test,
as that would kill a lot of the benefit.
For a web environment database server, the deadlock wait is actually too long any-
way. In your my.ini (Windows) or my.cnf (Unix), you can change the timeout with
innodb_lock_wait_timeout=1
This causes the test to take just 1 second. Even that extra second is not ideal, but we
could live with this. We won’t have permission to change this setting in a production
environment, so we will tend to move all of the slow tests into their own test group.
They are run less often, usually when rolling out to a server, or overnight on a special
test machine. You might want to do this for your development box as well, just to
keep the tests fast. When classes depend on the outside world like this, you often have
to make some testing compromises. In the next chapter, we’ll look at ways to ease
such problems.
9.4.3 The end of debugging?
Our code is starting to look quite well-tested now, and hopefully we have managed to
head off a lot of future disasters. Is unit testing the end of debugging? Sadly, no.
If you are developing the usual hacky way, your manual tests will catch about 25
percent of the bugs in your program (see Facts and Fallacies of Software Engineering by
Robert Glass). By manual tests, we mean print statements and run-throughs with a
debugger. The remaining bugs will either be from failure to think of enough tests (35
percent), or combinatorial effects of different features (around 40 percent). How does
TDD make a dent on these figures?
By testing in very small units, we reduce combinatorial effects of features. In addi-
tion, the code we write is naturally easy to test, as that was one of the running con-
straints in its production. This also helps to make features independent during time.
As we combine our units of code, we will also write integration tests specifically aimed
at testing combinations of actions. These are much easier when we know that the
underlying parts are working perfectly in isolation.
Simply forgetting a test happens less often when you have the attitude that “we
have finished when we cannot think of any more tests.” By having an explicit point
in the process, this thought allows us to explore new testing ideas. Again, we would
expect a small reduction in missing tests due to this pause.
If optimistically we reduce both these bug counts by a factor of two, we have a
conundrum. Teams adopting
TDD often report dramatic drops in defect rates, much
more than a factor of two. What’s happening?
In contrast to testing, code inspection can reduce defect rates by a factor of ten.
Code is easier to inspect if it’s minimal and the intent is clear. As
TDD pushes us away
from grand up-front designs, to a series of lean additions, it naturally leads to cleaner
code. If this is the case, part of the effect of unit testing may be the incidental boost
SUMMARY 209
it gives to code inspection. Test-protected code is much easier for multiple developers
to work on and play with. As each one improves the code, he finds new tests and fixes
that help to clean it up. The code keeps getting better as you add developers, rather
than backsliding.
This is the benefit of building quality in. By reducing confusion, you reduce devel-
opment time, too. To contradict Stalin: “Quality has a quantity all of its own.”
9.4.4 Testing is a tool, not a substitute
It’s up to us to write correct code. Because code inspection is still part of the process,
writing code that feels right is still important. That’s why we have refactoring as the
last stage. The code is not finished just because the tests pass; it’s finished when the
tests pass and everyone is happy with the code. Right now, I am not happy with the
way our transaction class doesn’t clean up after itself in the face of exceptions. I want
a destructor:
class MysqlTransaction {
function __destruct() {
if (isset($this->connection)) {
@mysql_query('rollback', $this->connection);
@mysql_close($this->connection);
}
}
}
I’ve used the raw mysql_query() function here. If we used our own execute()
method, failure would result in another exception. Throwing exceptions in a destruc-
tory is bad form.
9.5 SUMMARY
In the next chapter, we will build further on our knowledge of unit testing, learning
how to set up test suites properly. We will also use mock objects and other fake soft-
ware entities to make it easier to test units in isolation.
Are you happy with the code you see? Can you think of any more tests? Do you
feel in charge of the quality of the code that you write?
And William Edwards Deming? Building quality into the system had its own
rewards for the twentieth-century Japanese economy. With less money being spent on
finding defects, especially finding them late, industry was actually able to cut costs
while raising quality. Buyers of Japanese products benefited not just from a lower price,
but more reliability and better design.
TQM would turn Japan into an industrial
power. In 1950, though, shocked at Japan’s post-war poverty, Deming waived his fee.
210
CHAPTER 10
Advanced testing
techniques
10.1 A contact manager with persistence 211
10.2 Sending an email to a contact 219
10.3 A fake mail server 225
10.4 Summary 230
Once, as I was zapping TV channels, I happened upon an unfamiliar soap opera. A
man was saying to a woman, “We’re real people; we have real feelings.” If I had been
following the program from the start, I would probably have been mildly amused by
this. But coming in suddenly, it struck me how extraordinary a statement this was, a
fictional character bombastically proclaiming himself real.
Working with software, we’re used to juggling the real and the unreal. In comput-
ing, it’s a matter of taste whether you consider anything real or not, other than hard-
ware and moving electrons. Ultimately, it’s mostly fake. The kind of fiction in which
dreams and reality mingle in complex ways (like The Matrix) seems like a natural thing
to us.
But the idea that some software objects are “fakes,” in contrast to normal objects,
is important in testing. Most fake objects are referred to as mock objects. Their fakeness
does not imply that ordinary objects are as real as chairs or giraffes. Instead, the fake-
ness of mock objects is determined by the fact that they work only in the context of
testing and not in an ordinary program.
A CONTACT MANAGER WITH PERSISTENCE 211
For an interesting example of fakeness from the presumably real world of physical
technology, consider incubators, the kind that help premature infants survive. From
our unit-testing point of view, an incubator is a complete fake implementation of a
womb. It maintains a similar stable environment, using a high-precision thermostat,
feeding tubes, and monitoring equipment. It might be less than perfect from both an
emotional and a medical point of view, and yet it has some definite practical advan-
tages. Above all, it’s isolated. It has few dependencies on its environment beyond a sup-
ply of electrical current. In my (perhaps totally misguided) imagination, given slightly
more automation than is common in hospitals, a baby could survive for weeks or even
months in an incubator even if no other human beings were around.
A womb, on the other hand, although itself a highly predictable environment,
depends on a complex and unpredictable biological system known as a human being.
(A woman, to be precise; I’m using the term human being to emphasize the fact that
gender is irrelevant to this discussion.)
In addition to their inherent complexity, human beings have their own dependen-
cies on environmental factors. To state the obvious, they need food, water, housing,
clothes, and even have complex psychological needs. The existence of dependencies,
and dependencies on dependencies, means that you need real people (even the kind
that have real feelings) to staff the maternity ward.
These issues, dependencies and predictability, are crucial in software testing. When
a single component has a failure, we don’t want other tests to fail, even if those other
parts use the failing component. Most importantly, we want the tests to be controlled
and not subject to random failure. We want our code to run in a tightly controlled
environment like an incubator or a padded cell.
The need for this increases with rising complexity. Testing a single class as you code
it is usually straightforward. Continually testing an entire code base day in and day
out, perhaps with multiple developers and multiple skills, means solving a few addi-
tional problems.
We have to be able to run every test in the application, for a start. This allows us
to regularly monitor the health of our code base. We would normally run every test
before each check-in of code.
In this chapter, we will be building the internal workings of a contact manager that
implements persistence using the MysqlTransaction class from the previous chapter.
Working test-first as usual, we will first implement the Contact class and its persistence
feature. Then we’ll design and implement a feature that lets us send an email to a con-
tact. To test that, we’ll be using mock objects. Finally, we’ll use a program called fake-
mail to test the sending of the email for real.
10.1 A CONTACT MANAGER WITH PERSISTENCE
Our examples are now going to get more realistic. We are going to build a simple cus-
tomer relationship manager. This will be a tool to keep track of clients, initiate
212 CHAPTER 10 ADVANCED TESTING TECHNIQUES
contact with web site visitors, and manage personal email conversations. It will even-
tually be capable of sending and storing every kind of message and contact detail we
will ever need. All that is in the future, though. Right now, we are just getting started.
Since we need to add another group of tests, we start this section by finding out
how to run multiple test cases effectively. Then we write a test case for contact persis-
tence. Working from the test case, we implement simple Contact and ContactFinder
classes. We clean our test case up by implementing
setUp() and tearDown()
methods to eliminate duplication. At that point, surprisingly, our implementation is
still incomplete, so we finish up by integrating a mail library. If you thought you
needed to start at the bottom, coding around a mail library, then you are in for a pleas-
ant surprise.
10.1.1 Running multiple test cases
A contact manager must be able keep track of an email address in a database and send
a message to it. So this is the aspect that we’ll tackle first. Of course we start with a
test case:
<?php
class TestOfContact extends UnitTestCase {
}
?>
We place this snippet into a classes/test/contact_test.php file. We already have a test
file called transaction_test.php in the same directory. It’s a good idea to run all the
tests together until the full test suite becomes so large that it’s no longer practical. We
want to be able to run all these tests at once, even though they are in multiple files.
You might be thinking that we have skipped all of the SimpleTest scaffolding at this
point. What happened to including SimpleTest, and all that stuff about running with
a reporter that we have in the transaction test script? In fact, it is rarely needed. Instead,
we will place the test scaffold code into its own file called classes/test/all_tests.php.
Here it is:
<?php
require_once('simpletest/unit_tester.php');
require_once('simpletest/reporter.php');
class AllTests extends TestSuite {
function __construct() {
parent::__construct('All tests');
$this->addTestFile('transaction_test.php');
$this->addTestFile('contact_test.php');
}
}
$test = new AllTests();
$test->run(new HtmlReporter())
;
?>
b This includes the SimpleTest toolkit as before.
b
Require the
SimpleTest files
c
Create a
test suite
d
Add the test
from the files
e
Run the full
test suite
A CONTACT MANAGER WITH PERSISTENCE 213
C Next we create a test suite. The ‘All tests’ string is the title that will be displayed in the
browser.
D Then the magic happens. In the constructor, we add the test using addTest-
File().
Now each test file will be included with a PHP require(). SimpleTest
will scan the global class list before and after the include, and then any new test
classes are added to the test suite. For this to work, the test file must not have been
included before. A test file can have any number of test classes and other code, and
any number of test files can be included in a group. In case you were wondering,
suites can nest if a group definition is itself loaded with
addTestFile(). The
resulting test structure, test cases and groups within groups, is an example of the
Composite pattern that we introduced in section 7.6.
E All that’s left is to run the AllTests group.
The all_tests.php file will get executed when we want to run the tests. Right now, that
doesn’t work, because our transaction_test.php file from the last chapter messes
things up. Our TestOfMysqlTransactionTest gets run twice. This is because it is still
set to run as a standalone script. To make further progress, we must go back and strip
away the runner code from our first test:
<?php
require_once(' /transaction.php');
class TestOfMysqlTransaction extends UnitTestCase {
}
$test = new TestOfMysqlTransaction();
$test->run(new HtmlReporter());
?>
When we run all_tests.php, we still get a failure, but this is just SimpleTest warning
us that we haven’t entered any test methods yet.
With the runner code in its own file, adding more tests just means including the
files under test, and then declaring test classes. Adding a test case is a single line of code
and adding a test is a single line of code. We don’t like duplicating test code any more
than we like duplicating production code. You can have as many test cases in a file as
you like, and as many tests in a test case as you like.
That’s enough about how SimpleTest works; let’s return to our contact manager
application.
10.1.2 Testing the contact’s persistence
Our contact manager won’t do us much good if the contacts have to be re-entered
every time we run it. The contacts have to persist across sessions. That means we have
to be able to save a contact to the database and retrieve it again. Where do we start?
We write a test, of course:
214 CHAPTER 10 ADVANCED TESTING TECHNIQUES
<?php
require_once(' /contact.php');
class TestOfContactPersistence extends UnitTestCase {
function testContactCanBeFoundAgain() {
$contact = new Contact('Me', '');
$transaction = new MysqlTransaction(
'localhost', 'me', 'secret', 'test');
$contact->save($transaction);
$finder = new ContactFinder();
$contact = $finder->findByName($transaction, 'Me');
$this->assertEqual($contact->getEmail(), '');
}
}
?>
The first part of the test saves a new contact to the database. Right now, we assume a
Contact object is just a name, an email address, and a
save() method. After saving
it, we immediately try to retrieve a copy. For finding contacts, we’ll not surprisingly
use a ContactFinder class. We’ll take a guess for now, and assume that we will need to
find a contact by name. This isn’t unreasonable, but this is not the usual thinking
when designing an application. In real life, there would be a requirement driving the
code, and we would only add the methods that we definitely need. A complete appli-
cation would be too much to absorb for an example, so our design is proceeding bot-
tom-up. In the coming chapters, we’ll complete our survey of test driving code, and
demonstrate how an application can be built top-down.
The approach is now similar to our transaction_test.php in the previous chapter.
We let the test define the interface, and then write enough code to avoid a
PHP crash.
Here is the minimum code in classes/contact.php that gives us a red bar instead of a
crash:
<?php
class Contact {
function getEmail() {
}
function save($transaction) {
}
}
class ContactFinder {
function findByName($transaction, $name) {
return new Contact();
}
}
?>
A CONTACT MANAGER WITH PERSISTENCE 215
To get the test to pass, we use the FakeIt pattern again, or “cheating” if you prefer.
Since the test says that the
getEmail() method should return , all we
need to do is hard-code this particular email address:
class Contact {
function getEmail() {
return '';
}
//
}
Since the code now has the ability to return this email address only, it’s not general
enough. It should be able to return any email address we want. Looking back at the
test, what is the Contact object doing? Ignoring the fact that it’s being saved to and
then re-created from the database, its own work is accepting the contact’s name and
email address as arguments to the constructor and returning the email address when
we ask for it. The test also implies that it has some way of returning its name, but the
details are up to the implementation. Notice how deftly the test defines the interface.
It only requires what is absolutely needed.
10.1.3 The Contact and ContactFinder classes
At this point, it might occur to us that the test we’ve written is actually pretty elabo-
rate in its workings. We have the choice of writing another, very simple, test case spe-
cifically for the Contact class. Alternatively, we can assume that it’s not necessary,
since our existing test case seems to be exercising all of the Contact object’s very sim-
ple features. It comes down to what you consider a “unit” in unit testing. To me,
Contact and ContactFinder are so closely tied that it makes more sense to test them
together.
Let’s just implement the Contact class and see what happens:
class Contact {
private $name;
private $email;
function __construct($name, $email) {
$this->name = $name;
$this->email = $email;
}
function getEmail() {
return $this->email;
}
//
}
Now the test fails. We have a red bar, and the simple reason is that the ContactFinder
is still rudimentary. We are dumping a fully formed Contact object into a black hole
and re-creating a new, empty one without the correct email address. To get back to
green quickly, we can do another FakeIt. The last time, we hard-coded the return
216 CHAPTER 10 ADVANCED TESTING TECHNIQUES
value from the Contact object. Now we hard-code the return value from the Contact-
Finder:
class ContactFinder {
function findByName($transaction, $name) {
return new Contact($name, '');
}
}
This works and we are green. If it hadn’t worked, our best bet would have been to
take a step back and actually implement a separate test (or tests) for the Contact
object to make sure the email getter was working. As mentioned in the previous chap-
ter, you can adjust your speed. And you know you need to adjust it if you lose track
and become unsure of what’s happened and where to go. If you take a step and lose
your footing, go back and then take a smaller step forward. As it is, though, the step
we have taken is small enough and pushes our design along nicely.
Another small step is to let the ContactFinder read the data for the contact object
from the database:
class ContactFinder {
function findByName($transaction, $name) {
$result = $transaction->select(
"select * from contacts where name='$name'");
return new Contact($name, '');
}
}
We’re still returning the hard-coded Contact object; that practically guarantees that
the
assertEqual() in our test will still pass. However, we do get an exception
from our MysqlTransaction, which says “Table ‘test.contacts’ doesn’t exist.” This leads
us to the thorny issue of where to create the schema. Although this chapter is a dis-
cussion about thorny issues and testing techniques, it’s not about how to organize an
application into packages. We’ll take the simplest approach: using an
SQL script to
create the table that the exception is screaming about. To avoid mixing
SQL scripts
with our
PHP code, we create a top-level directory called database and place the
following scripts in it. The first is database/create_schema.sql:
create table contacts(
name varchar(255),
email varchar(255)
) type=InnoDB;
Then there is the corresponding database/drop_schema.sql:
drop table if exists contacts;
We need to add these scripts to our test case. We will call them through our well-
tested MysqlTransaction class:
A CONTACT MANAGER WITH PERSISTENCE 217
class TestOfContactPersistence extends UnitTestCase {
function createSchema() {
$transaction = new MysqlTransaction(
'localhost', 'me', 'secret', 'test');
$transaction->execute(file_get_contents(
' / /database/create_schema.sql'));
$transaction->commit();
}
function dropSchema() {
$transaction = new MysqlTransaction(
'localhost', 'me', 'secret', 'test');
$transaction->execute(file_get_contents(
' / /database/drop_schema.sql'));
$transaction->commit();
}
}
At this point, we could call these methods at the beginning and end of our test, as we
did in the TestOfMysqlTransaction class in the previous chapter. In that class, we
wanted to use these methods in only a few tests, and we wanted them used differently
each time. In our new situation, we will want to create and drop the schema for every
test. That means adding calls to
createSchema() and dropSchema() for every
method. That’s a lot of repetitive clutter.
10.1.4 setUp() and tearDown()
Again, the original JUnit authors have thought of this situation, and both SimpleTest
and
PHPUnit have copied the solution. SimpleTest test cases come with a setUp()
method that is run before every test and a tearDown() that is run after every test.
By default, these methods do nothing, but we can override them with our own code:
class TestOfContactPersistence extends UnitTestCase {
function setUp() {
$this->dropSchema();
$this->createSchema();
}
function tearDown() {
$this->dropSchema();
}
//
}
Note that we call dropSchema() in the setUp() method as well as the tear-
Down()
. This doesn’t cause us any harm and ensures we start with an up-to-date
schema when we change things between tests. By repeating the action in the tear-
down, we make sure that we leave no trace of our test. If we do leave a trace, this
could inadvertently affect a developer’s environment or another test case.
Are you shocked that we would drop the whole database and re-create it for every
test, possibly hundreds of times? It turns out that this doesn’t significantly slow the
tests down. What’s nice is it absolutely guarantees that the database starts in a clean
218 CHAPTER 10 ADVANCED TESTING TECHNIQUES
state each time. The alternative is to create the schema once, then delete just our test
data. This is possible, but carries a risk, since we might easily forget to delete some of
it. When a test leaves test data in the database, the next test might perform differently,
causing a different test result than we would get when running the test completely on
its own. This problem is known as test interference.
If it takes us a year to develop our customer relations software, then there will be
many changes of schema and many changes of individual tests. If any of these lead to
test interference, we could waste hours trying to track down a bug that doesn’t exist.
Worse, we could have incorrect code when one test falsely relies on data entered by
another. That’s a lot of wasted effort, just to save a fraction of a second on our test runs.
We also miss out on the confidence and cleaner tests we get from a complete drop. It
pays to be brutal with our test setup.
10.1.5 The final version
Back to our ContactFinder class. When we last looked, it was still basically a fake. We
got the result object from the database, but then we threw it away and returned a
hard-coded Contact object created to match the test. We’ll complete it by getting the
database row from the result object and creating the Contact object from the row:
class ContactFinder {
function findByName($transaction, $name) {
$result = $transaction->select(
"select * from contacts where name='$name'");
$row = $result->next();
return new Contact($row['name'], $row['email']);
}
}
This is supposed to be the finished version of the ContactFinder, but we can’t be sure
yet, since the test fails because of an incomplete Contact class. The row is not being
written to the database, since the Contact object’s
save() method is an empty stub.
Filling it out, we end up with this:
class Contact {
function save($transaction) {
$transaction->execute(
"insert into contacts (name, email) " .
"values ('" . $this->name . "', '" .
$this->email . "')");
}
}
We don’t want duplicate rows in our database, but at the same time, the name field is
unlikely to be unique. We could use the
email field as a database key, but this
doesn’t completely solve the problem. Suppose we make contact with someone, but
have an incorrect email address. When we find out her real email address, we natu-
rally want to overwrite our current entry. The trouble is, writing out a new Contact
SENDING AN EMAIL TO A CONTACT 219
will still leave the old version unless we explicitly delete the incorrect one. Worse,
what if two people are sharing the same email address? Or someone uses multiple
email addresses? What about merging two similar databases? Keeping historical
records? Human identity is a complex problem.
The problem is so complex that we will skip it and return to the subject of data
class design in chapter 21. Whatever scheme we come up with, we should be able to
write tests for our current test case. Here, we’ll tackle another problem instead—actu-
ally sending a mail.
10.2 SENDING AN EMAIL TO A CONTACT
We want to be able to use the contact manager to send an email to a contact. To this
end, we’ll put a
send() method in the Contact class. It will accept the message text
as an argument and send the text to the email address stored in the Contact object.
Just the tiniest bit of up-front design is appropriate here. We need to know what
classes will be involved and the basics of how they will interact. We may change our
minds about both of those things when we write the tests and implement the classes,
but it helps to have a mini-plan.
We will start this section with that design. To test it without sending actual emails,
we turn to mock objects, first using a manually coded mock class, and then using Sim-
pleTest’s mock objects. This enables us to implement the email feature in the Contact
class without having implemented the underlying Mailer class. This means that we’re
implementing top-down, and mock objects make that possible. Finally, we discuss the
limitations of mock objects and the need for integration testing.
10.2.1 Designing the Mailer class and its test environment
There is an appropriately named
mail() function built into PHP. At first sight, the
simplest thing that could possibly work is to use that. If we spray
mail() calls all
over our code, though, we will find ourselves sending emails on every test. Instead we
use a separate Mailer class for this work. As we will see shortly, a Mailer class will be a
requirement for building our padded cell or incubator. So let’s have a look at the basic
class design to get a rough idea of what we’re aiming for (see figure 10.1). The Con-
tact object will be able to send the message by using the Mailer, which is introduced
as an argument to the Contact’s
send() method.
Trying to test this brings on tougher challenges than before, since the end result is
an email, and emails end up outside our cozy class environment. The obvious way to
test whether an email has been sent by the Contact object is to set up the test to mail
Figure 10.1
Class design for Contact
class using a Mailer