Apress Pro Apache Struts with Ajax phần 9 docx
Bạn đang xem bản rút gọn của tài liệu. Xem và tải ngay bản đầy đủ của tài liệu tại đây (931.93 KB, 53 trang )
Now on to the implementation of JavaEdgeRequestProcessor:
package com.apress.javaedge.struts.controller;
import java.io.IOException;
import javax.servlet.ServletException;
import javax.servlet.http.HttpServletRequest;
import javax.servlet.http.HttpServletResponse;
public class JavaEdgeRequestProcessor
extends org.apache.struts.action.RequestProcessor {
private RequestProcessorHelper helper = null;
public JavaEdgeRequestProcessor() {
super();
helper = new RequestProcessorHelper();
}
public void process(
HttpServletRequest request,
HttpServletResponse response)
throws IOException, ServletException {
if(helper.checkMember(request, response)) {
super.process(request, response);
}
}
}
First off, notice that this class extends org.apache.struts.action.RequestProcessor and
also that you need to define a private field to hold an instance of RequestProcessorHelper,
which is actually instantiated within the constructor. The important part of this class is the
process() method. Within process(), you use the RequestProcessorHelper class to check for
the existence of the MemberVO in the session and to create one as appropriate. The important
thing to notice here is that if checkMember() returns true (that is, it executed successfully), then
you allow the request chain to continue with a call to super.process(). If the checkMember()
method does not succeed, most likely because the anonymous user is not in the database and
there is no MemberVO in the session, then checkMember() sends the request elsewhere with this
code:
RequestDispatcher rd = request.getRequestDispatcher(
"/WEB-INF/jsp/systemError.jsp");
rd.forward(request, response);
If this code executes and the request chain is executed further by Struts, then a
ServletException will be generated because when Struts comes to redirect to the view,
it will find that the response has already been committed by the RequestDispatcher in
CHAPTER 11 ■ EXTENDING THE STRUTS FRAMEWORK402
Ch11_7389_CMP2 9/25/06 9:12 PM Page 402
checkMember(). So to recap this, if you want to send the user somewhere else within the
process() method, do not call super.process(); simply set the response as appropriate
with RequestDispatcher and then allow the process() method to end. The code for the
JavaEdgeTilesRequestProcessor is almost identical, other than the obvious difference in
parent class.
That is the actual code; now on to how to configure it. First off, you want to remove the
<filter> and <filter-mapping> tags for MemberFilter in the web.xml file so you can test the
processor. Now all you need to do is change the controller definition within struts-config.xml
depending on which controller you plan to use. If you want to use tiles, then you must have the
Tiles plug-in defined in the configuration file and you need to change the controller definition to
<controller
processorClass=
"com.apress.javaedge.struts.controller.JavaEdgeTilesRequestProcessor"
/>
If you just want to use Struts without the Tiles framework, then use the following con-
troller definition:
<controller
processorClass="com.apress.javaedge.struts.controller.JavaEdgeRequestProcessor"
/>
Now start up the application and it should work just fine—RequestProcessor now takes
care of the MemberVO class in the session and not the MemberFilter class.
Verifying Host Access with RequestProcessor
Earlier on in the chapter we presented a solution to restrict access to the web application based
on the host address. The solution used a customized base Action class to perform the check
before the execute() method of an Action was run. There were two main problems with this
solution. First, it required almost as much code to hook into the base Action as to perform the
check manually within each Action. Second, it relied on developers to remember to derive their
actions from the correct base class and to call super.execute() before any other processing. As
we promised, we will be showing you a better solution to this problem; however, before we con-
tinue along the road with the RequestProcessor class, we want to show you how to provide
custom configuration handling for your Action classes so you can then use this knowledge to
provide a much more reusable solution to the secure page problem.
Creating Configuration Beans
If you have read this book from the beginning, it may not have escaped your notice that in
Chapter 2 we described the configuration attributes for the <action> tag and left one of them
with no more than a cursory description, the className attribute. Well, now we’re going to
explain exactly what it is for.
Struts uses another Jakarta project called Commons Digester to handle the reading of the
configuration file and its transformation into a set of Java objects. The Digester project actu-
ally started out as part of Struts, but proved so useful that the Struts team separated it out into
a entirely new project.
CHAPTER 11 ■ EXTENDING THE STRUTS FRAMEWORK 403
Ch11_7389_CMP2 9/25/06 9:12 PM Page 403
The Struts team realized that extension capabilities in the world would be of no use
without some way to provide additional configuration details for the extensions people were
building. To this end, when integrating Digester into Struts, the Struts team left an extension
point in the configuration logic so that you can replace the configuration beans with your own
implementation and provide them with additional parameters.
In this section, we are going to build a configuration bean that will be used in conjunction
with the RequestProcessor code in the next section to provide pages that are accessible only
from the host machine.
Building the JavaEdgeActionMapping
As of Struts 1.1, the default configuration bean for an <action> node is the ActionMapping
class. By extending this class, you can provide additional configuration data to your custom
RequestProcessors or actions.
Okay, so that’s the theory behind it; now for an example. In this example, we are going to
show you how to build a configuration bean that will allow you to specify whether or not a
particular action mapping should be restricted to the local host only.
The code for the actual configuration bean is fairly basic, so here it is in full:
package com.apress.javaedge.struts.config;
import org.apache.struts.action.ActionMapping;
public class JavaEdgeActionMapping extends ActionMapping {
private boolean secure = false;
public JavaEdgeActionMapping() {
super();
}
public boolean isSecure () {
return secure;
}
public void setSecure(boolean isSecure) {
secure = isSecure;
}
}
The JavaEdgeActionMapping class derives from org.apache.struts.action.ActionMapping,
which is the default configuration bean for <action> nodes. Other than an explicit call to the
parent constructor, the only thing this class has is a single boolean property, secure, with both
get() and set() methods.
That’s all there is to the Java code. Now all you need to do is add the appropriate configu-
ration details to the struts-config.xml file. To secure the home page, you just set the className
attribute to the full name of the custom configuration bean, in this case com.apress.javaedge.
CHAPTER 11 ■ EXTENDING THE STRUTS FRAMEWORK404
Ch11_7389_CMP2 9/25/06 9:12 PM Page 404
struts.config.JavaEdgeActionMapping, and then use the <set-property> tag set the secure
property to true.
<action path="/homePageSetup"
type="com.apress.javaedge.struts.homepage.HomePageSetupAction"
unknown="true"
className="com.apress.javaedge.struts.config.JavaEdgeActionMapping">
<set-property property="secure" value="false" />
<forward name="homepage.success" path="/WEB-INF/jsp/homePage.jsp" />
</action>
Now when you request the home page from a remote machine, what happens? It is still
displayed. At this point, all you have done is provide the configuration data, nothing more. In
the next section, we are going to revisit the RequestProcessor classes, this time to implement
the processActionPerform() method to make use of this additional configuration data.
Revisiting RequestProcessor
At this point, we have taken you through the basic mechanics of extending the RequestProcessor
class and through building custom configuration beans. In this section, we are going to combine
that knowledge to build a much more comprehensive solution to the secure page problem that
was highlighted in the “Extending Action and ActionForm” section.
To recap the last section, we showed you how to build a custom configuration bean that
allows you to specify whether or not a page should be restricted to being viewed on the host
machine, by setting the secure property accordingly. Now you need to implement the code
within your RequestProcessor to read this configuration data and act appropriately.
You already have the basics of the RequestProcessor classes in place for both Tiles-based
and non–Tiles-based applications. All you need to do is extend these classes to provide the
desired features. To start, implement the checkHost() method in the RequestProcessorHelper
class:
public boolean checkHost(
HttpServletRequest request,
HttpServletResponse response,
ActionMapping mapping) throws IOException, ServletException {
if (mapping instanceof JavaEdgeActionMapping) {
JavaEdgeActionMapping jeMapping = (JavaEdgeActionMapping) mapping;
if (jeMapping.getSecure()) {
String hostAddress = request.getRemoteHost();
if (!hostAddress.equals("localhost")) {
RequestDispatcher rd =
CHAPTER 11 ■ EXTENDING THE STRUTS FRAMEWORK 405
Ch11_7389_CMP2 9/25/06 9:12 PM Page 405
request.getRequestDispatcher(
"/WEB-INF/jsp/accessDenied.jsp");
rd.forward(request, response);
// Secure action and different host.
// Deny access.
return false;
} else {
// Host address matches, allow access.
return true;
}
} else {
// Not a secure action, allow access.
return true;
}
} else {
// Not a secure action, allow access.
return true;
}
}
This method is quite complex, so we’ll take you through it step by step. First off is the list
of arguments the method accepts and its return type:
public boolean checkHost(
HttpServletRequest request,
HttpServletResponse response,
ActionMapping mapping) {
You define the checkHost() method as returning a boolean, which will be true if the users are
allowed access to the resource and false if they are not. In this way, you indicate when calling the
method from your custom RequestProcessor class whether to allow Struts to carry on processing
or not. As you can see, you include HttpServletRequest and HttpServletResponse arguments,
along with an ActionMapping argument. If you recall from the previous section, “Creating Configu-
ration Beans,” ActionMapping is the default configuration class for all action mappings in the
Struts framework. As such, Struts will pass this argument to the RequestProcessor; it is up to you
to check it to see if it is actually your custom configuration bean, which is exactly what occurs as
the first line of code for this method.
if (mapping instanceof JavaEdgeActionMapping) {
JavaEdgeActionMapping jeMapping = (JavaEdgeActionMapping) mapping;
} else {
// Not a secure action, allow access.
return true;
}
CHAPTER 11 ■ EXTENDING THE STRUTS FRAMEWORK406
Ch11_7389_CMP2 9/25/06 9:12 PM Page 406
If ActionMapping is an instance of JavaEdgeActionMapping, then you cast it to that type,
ready for additional checks; if not, then you assume that the resource the user is requesting is
not intended to be secure, so you return true, indicating that the user is allowed access. If you
are dealing with an instance of JavaEdgeActionMapping, then you first check the return value of
getSecure().
if (jeMapping.getSecure()) {
String hostAddress = request.getRemoteHost();
if (!hostAddress.equals("localhost")) {
RequestDispatcher rd =
request.getRequestDispatcher("/WEB-INF/jsp/accessDenied.jsp");
rd.forward(request, response);
// Secure action and different host.
// Deny access.
return false;
} else {
// Host address matches, allow access.
return true;
}
} else {
// Not a secure action, allow access.
return true;
}
If getSecure() returns false, then although the configuration bean has been set to
JavaEdgeActionMapping, the secure property is false, and this resource is intended for
public access. If, however, getSecure() returns true, then you perform further checks to see
if the host name of the requesting user is localhost. If the user is requesting from localhost,
then you return true to allow that user access; otherwise, you forward the request to the
accessDenied.jsp page and return false.
As far as explanations go, that was pretty intense, so just to recap: checkMember() will be
passed an instance of ActionMapping. If this ActionMapping instance is in fact an instance of
JavaEdgeActionMapping, then the method will perform further checks on the request; other-
wise, the method returns true. If the ActionMapping argument is a JavaEdgeActionMapping
instance, then the method checks to see if the getSecure() method returns true or false. If
getSecure() is false, then the user is cleared to view the resource and the method returns
true. If getSecure() is true, then checkMember() checks the host address of the requesting user.
If the user is requesting from localhost, then they are allowed access and checkMember()
returns true; otherwise the request is forwarded elsewhere and checkMember() returns false.
Now all that is left for us to do is hook into the appropriate method in the
JavaEdgeRequestProcessor and JavaEdgeTilesRequestProcessor classes. If you use forwards
or includes in your application as well as normal actions, then you will actually want to hook
into three methods in the RequestProcessor: processActionPerform(), processForward(),
and processInclude(); since processActionPerform is only called for actions, includes and
CHAPTER 11 ■ EXTENDING THE STRUTS FRAMEWORK 407
Ch11_7389_CMP2 9/25/06 9:12 PM Page 407
forwards have their own methods to hook into. Here is the code for processForward() and
processInclude() taken from JavaEdgeRequestProcessor:
protected boolean processForward(
HttpServletRequest request,
HttpServletResponse response,
ActionMapping mapping)
throws IOException, ServletException {
if (helper.checkHost(request, response, mapping)) {
return super.processForward(request, response, mapping);
} else {
return false;
}
}
protected boolean processInclude(
HttpServletRequest request,
HttpServletResponse response,
ActionMapping mapping)
throws IOException, ServletException {
if (helper.checkHost(request, response, mapping)) {
return super.processInclude(request, response, mapping);
} else {
return false;
}
}
As you can see, the methods are very similar, only differing in which method of the super-
class they call internally. The logic here is quite simple. If checkHost() returns true, then the
user is allowed access to the resource, and the method defers control to the superclass; this
allows Struts to process as normal and will return the value of the corresponding method of
the superclass. However, if checkHost() returns false, then the method returns false to stop
Struts from performing any more processing and causing an error, since the response has
already been committed by the call to RequestDispatcher.forward() in the checkHost()
method.
The code for processActionPerform() does not differ that much:
protected ActionForward processActionPerform(
HttpServletRequest request,
HttpServletResponse response,
Action action,
ActionForm form,
ActionMapping mapping)
throws IOException, ServletException {
if (helper.checkHost(request, response, mapping)) {
CHAPTER 11 ■ EXTENDING THE STRUTS FRAMEWORK408
Ch11_7389_CMP2 9/25/06 9:12 PM Page 408
return super.processActionPerform(
request,
response,
action,
form,
mapping);
} else {
return null;
}
}
Aside from the noticeable increase in method arguments, the only difference here is that
the method returns ActionForward instead of boolean. So, as with the previous method, if the
user is allowed to view the resource, then control is passed to the superclass and the appropri-
ate result is returned from the method, resulting in Struts carrying on processing as normal.
However, if the user isn’t allowed to view the resource, then the method returns null, which
will instruct Struts to stop any more processing, thus avoiding any errors.
As you can see from the code examples, you don’t actually need very much code to build
your own RequestProcessor and custom configuration beans. If you follow the patterns for
managing the response, then you shouldn’t come across any errors in which Struts tries to
manipulate a response that you have already committed earlier on. Just remember in this situ-
ation that if you send the request elsewhere, then you have to instruct Struts to stop
processing using the methods described.
One point of interest before we move on to the recap is that the process() method executes
before the processActionPerform, processForward(), and processInclude() methods. In fact,
the process() method is responsible for calling those methods. So in the case of the JavaEdge
application, the session will be checked for the MemberVO and have one added if appropriate
well before the user’s right to access the resource is verified. You may find that this could have
an impact on your application, in which case you can move any logic from process() into
processActionPerform(), processForward(), and processInclude().
The last few sections have given you an in-depth look at how to extend the Struts
RequestProcessor class and how to provide additional configuration data to your custom
RequestProcessor classes using custom configuration beans. The next section describes the
fourth and final method of extending the Struts framework.
Building a Plug-In
Perhaps the most widely known method of extension in Struts is the plug-in method. In fact,
many of the additional features for Struts, such as Validator and the Tiles framework, use plug-
ins to add their functionality to the framework. Building a plug-in differs from building a
RequestProcessor in that you are not intercepting each individual request; instead, you are
hooking into the framework as it loads. Generally, plug-ins are used to load in some kind of
application-specific data or to perform startup actions that are needed to ensure that the
application will run correctly. We have also found that using plug-ins is an ideal way to run
some background processes within the context of the servlet container, without having to
fudge some kind of solution in which you have a scheduled task on the OS that requests a
specific URL at a specific interval.
CHAPTER 11 ■ EXTENDING THE STRUTS FRAMEWORK 409
Ch11_7389_CMP2 9/25/06 9:12 PM Page 409
In this section, we are going to take you through the entire process of building a plug-in
and configuring it within the Struts framework. The plug-in we are going to show you how to
build will send out an e-mail newsletter of the top stories to all members in the JavaEdge
application at a set interval.
Newsletter Service Basics
Before we get to the details of the actual plug-in implementation, we want to discuss the exact
behavior of the Newsletter Service and look at the classes that actually implement the service
before demonstrating how to hook these classes into Struts with a custom plug-in implemen-
tation.
The basic aim of the Newsletter Service is to send the list of top stories, via e-mail, to each
member registered in the JavaEdge database. The logic for loading the top stories from the
database is already built and is explained in Chapter 2. On top of this, we want to make the
interval between sending the e-mails, the address of the SMTP server used, and the sender
address of the e-mail externally configurable so they can be changed without having to go
back to the code.
Thankfully, the Struts plug-in model makes it quite easy for you to create the implementa-
tion that you want. As you will see, building the logic for the actual Newsletter Service is much
more complex than building the plug-in.
NewsletterManager
When you are building a plug-in, you should really consider refactoring the logic that plug-in
is intended to perform into a separate class. If you have to use the logic elsewhere or for some
reason you want to move from Struts to another technology, then you will have a much easier
time of it. For the Newsletter Service, you create the NewsletterManager class to take care of
the newsletter construction and the sending of e-mails.
The code for NewsletterManager is quite long, so we will go through each method sepa-
rately, instead of giving one big block of code and attempting to explain it in one go. The basic
class looks like this:
public class NewsletterManager {
private static Log log =
ServiceLocator.getInstance().getLog(NewsletterManager.class);
private String _smtpServer = "";
private String _fromAddress = "";
public NewsletterManager(String smtpServer, String fromAddress) {
_smtpServer = smtpServer;
_fromAddress = fromAddress;
}
}
Notice that you define a Commons Log instance so that you can log any errors that occur
when trying to build or send the mail. Also note that there are two private fields to hold the
address of the SMTP server and the e-mail address to use as the sender address for the outgoing
CHAPTER 11 ■ EXTENDING THE STRUTS FRAMEWORK410
Ch11_7389_CMP2 9/25/06 9:12 PM Page 410
mail. The class has a single constructor that is used to pass in values for the _smtpServer and
_fromAddress fields.
The class contains one public method, sendNewsletter(), which when called by the client
application will build the newsletter and send it via e-mail to the JavaEdge members:
public void sendNewsletter() throws ApplicationException {
String mailContent = getNewsletterContent();
Session mailSession = getMailSession();
Collection recipients = loadRecipients();
Message msg = new MimeMessage(mailSession);
try {
// From address
Address fromAddress = new InternetAddress(_fromAddress);
msg.setFrom(fromAddress);
// Subject line
msg.setSubject("JavaEdge Newsletter");
// Body content
msg.setText(mailContent);
// Recipient addresses
Iterator iter = recipients.iterator();
while(iter.hasNext()) {
MemberVO member = (MemberVO)iter.next();
if(member.getEmail().length() > 0) {
Address bccAddress = new InternetAddress(member.getEmail());
msg.addRecipient(Message.RecipientType.BCC, bccAddress);
}
}
// Send.
Transport.send(msg);
} catch (AddressException e) {
log.error("AddressException in NewsletterManager", e);
throw new ApplicationException("AddressException in NewsletterManager", e);
} catch (MessagingException e) {
log.error("MessagingException in NewsletterManager", e);
throw new ApplicationException("MessagingException in NewsletterManager", e);
}
}
CHAPTER 11 ■ EXTENDING THE STRUTS FRAMEWORK 411
Ch11_7389_CMP2 9/25/06 9:12 PM Page 411
The first line of this method creates the content for the newsletter with a call to
getNewsletterContent():
private String getNewsletterContent(){
// Load the top stories.
IStoryManager manager = StoryManagerBD.getStoryManagerBD();
Collection stories = manager.findTopStory();
// Now build the content.
StringBuffer buffer = new StringBuffer();
// Header
buffer.append("Dear Member,\n\n")
.append("Here are the top stories from the JavaEdge web site:\n\n");
// Body
Iterator iter = stories.iterator();
while(iter.hasNext()) {
StoryVO story = (StoryVO)iter.next();
buffer.append("***************************************************\n")
.append(story.getStoryTitle())
.append("\n")
.append(story.getStoryIntro())
.append("\n")
.append("<http://localhost:8080/JavaEdge/execute/storyDetailSetup?storyId=")
.append(story.getStoryId())
.append(">")
.append("\n");
}
// footer
buffer.append("***************************************************");
return buffer.toString();
}
The getNewsletterContent() method retrieves the list of top stories from the
JavaEdge database with a call to IStoryManager.findTopStory(). Once the list is loaded,
the getNewsletterContent() method builds the newsletter content in a StringBuffer object.
■Note In a real application, you would probably use something like Jakarta Velocity to externalize the mail
content and make maintenance much easier. For more information on Jakarta Velocity, see Chapter 10.
CHAPTER 11 ■ EXTENDING THE STRUTS FRAMEWORK412
Ch11_7389_CMP2 9/25/06 9:12 PM Page 412
The content itself is fairly basic: Each story has the title and intro listed along with the link
needed to launch the JavaEdge application on the local machine with the appropriate story
displayed. Back to the sendNewsletter() method, the next line constructs a mail session with a
call to getMailSession():
private Session getMailSession() {
// Set properties
Properties mailProps = new Properties();
mailProps.put("mail.smtp.host", _smtpServer);
return Session.getDefaultInstance(mailProps);
}
This method is very basic—it simply sets the required property for the SMTP server using
the value stored in the _smtpServer field, and then returns a standard instance of javax.mail.
Session configured with the SMTP server address. Back in the sendNewsletter() method, the
next line retrieves a collection of MemberVO objects representing the entire list of members in
the JavaEdge application with a call to loadRecipients():
private Collection loadRecipients() throws ApplicationException {
MemberManagerBD manager = new MemberManagerBD();
Collection result = null;
result = manager.getAll();
return result;
}
The loadRecipients() method simply gets the list of recipients with a call to
MemberManagerBD.getAll().
■Note If you choose to implement something like this in your own application, you will probably have to
implement some kind of opt-in/opt-out feature, as most people expect it and many countries now require it
by law.
The MemberManagerBD.getAll() method was not created in previous chapters, so we have
included it here:
public Collection getAll() throws ApplicationException{
MemberDAO dao = new MemberDAO();
try {
return dao.findAll();
} catch(DataAccessException e) {
CHAPTER 11 ■ EXTENDING THE STRUTS FRAMEWORK 413
Ch11_7389_CMP2 9/25/06 9:12 PM Page 413
log.error("Error in MemberManagerBD.getAll()", e);
throw new ApplicationException(
"An application exception has been raised in MemberManagerBD.getAll()",e);
}
}
And here is the code for findAll():
public Collection findAll() throws DataAccessException {
log.debug(
"********************Starting MemberDAO.findAll()********************");
PersistenceBroker broker = null;
Collection result = null;
try {
Query query = QueryFactory.newQuery(MemberVO.class, new Criteria());
broker = ServiceLocator.getInstance().findBroker();
result = broker.getCollectionByQuery(query);
} catch(ServiceLocatorException e) {
log.error("ServiceLocatorException thrown in MemberDAO.findAll()", e);
throw new DataAccessException(
"DataAccessException error in MemberDAO.findAll()", e);
} finally {
if(broker != null) broker.close();
}
log.debug(
"******************Leaving MemberDAO.findAll()*****************");
return result;
}
You will find an explanation of the code in these methods in Chapters 4 and 5, respectively.
Back in the sendNewsletter() method, the newsletter content has now been created, a mail ses-
sion instance has been created, and the list of recipients has been loaded from the database. The
final block of code in the sendNewsletter() method builds a MimeMessage instance, populates the
sender address and subject fields, and adds a bcc recipient for each MemberVO loaded from the
database with a valid e-mail address. Once the body content is added to the MimeMessage, all that
remains is for the e-mail message to be sent with a call to Transport.send().
Notice that all exceptions generated by JavaMail are caught, wrapped, and rethrown as
ApplicationExceptions. This will simplify the exception-handling code within the client code.
It also means that if you want to use a different mail implementation than JavaMail, you can
do so without having to worry about editing client code to capture additional exceptions.
CHAPTER 11 ■ EXTENDING THE STRUTS FRAMEWORK414
Ch11_7389_CMP2 9/25/06 9:12 PM Page 414
NewsletterTask
Since the newsletter will be sent automatically at set intervals, you need some way to schedule
a task to execute the NewsletterManager.sendNewsletter() method at the appropriate time. As
of version 1.3, Java has included the Timer and TimerTask classes to allow for scheduled tasks.
By deriving a class from TimerTask and implementing the run() method, you can build a task
class that can then be scheduled to run using the Timer class. For the Newsletter Service, you
need to build the NewsletterTask class, which implements TimerTask.run() to create an
instance of NewsletterManager and call its sendNewsletter() method:
package com.apress.javaedge.struts.plugin;
import java.util.TimerTask;
import org.apache.commons.logging.Log;
import com.apress.javaedge.common.ApplicationException;
import com.apress.javaedge.common.ServiceLocator;
public class NewsletterTask extends TimerTask {
private static Log log =
ServiceLocator.getInstance().getLog(NewsletterTask.class);
private NewsletterManager manager = null;
public NewsletterTask(String smtpServer, String fromAddress) {
manager = new NewsletterManager(smtpServer, fromAddress);
}
public void run() {
log.info("Newsletter.run() started");
try {
manager.sendNewsletter();
} catch(ApplicationException e) {
log.error("Could not send newsletter", e);
}
log.debug("Newsletter.run() completed");
}
}
CHAPTER 11 ■ EXTENDING THE STRUTS FRAMEWORK 415
Ch11_7389_CMP2 9/25/06 9:12 PM Page 415
Notice that the constructor for the NewsletterTask class accepts the same set of arguments
as the NewsletterManager class, and in fact simply uses the arguments to create its own internal
instance of NewsletterManager. In the run() method, you log the start and end of the method to
ease debugging and wrap the sendNewsletter() call in a try/catch block. You don’t want any
exceptions to escape the run() method; instead, they are all caught and logged. If you don’t
catch and log the exceptions here, Struts will do it anyway, so you can’t crash your application
with a plug-in; but you want to be able to reuse this task in any framework, and you cannot rely
on that behavior existing in every framework.
NewsletterPlugIn
Now that you have the code to perform the actual logic of sending the newsletter and a
TimerTask class to enable this logic to be scheduled, we can move on to the actual plug-in.
To implement a Struts plug-in, you need to create a class that implements the org.apache.
struts.action.PlugIn interface. The interface has only two methods, init() and destroy(),
both of which return void.
The destroy() method will be called whenever your application is stopped or your appli-
cation server shuts down, provided that this occurs via the normal process and not because of
a crash. You can use the destroy() method to tear down any resources that you have open in
an orderly manner, but you cannot guarantee that this method will actually execute.
The init() method will always be executed each time your application starts up. You can
be sure that the init() method will have executed before any actions are processed since it
is indirectly called via the ActionServlet.init() method. The init() method is passed two
arguments: a reference to the ActionServlet instance for your application, and a reference to
the ModuleConfig instance for your application that contains all the configuration data for the
entire Struts application and can be used to get the properties specified for your plug-in. Since
all the logic for actually sending the e-mail is contained within the NewsletterManager class,
the NewsletterPlugIn class simply has code to read in the configuration data and to initialize a
Timer with the NewsletterTask class.
package com.apress.javaedge.struts.plugin;
import java.util.Map;
import java.util.Timer;
import javax.servlet.ServletException;
import org.apache.commons.logging.Log;
import org.apache.struts.action.ActionServlet;
import org.apache.struts.action.PlugIn;
import org.apache.struts.config.ModuleConfig;
import org.apache.struts.config.PlugInConfig;
import com.apress.javaedge.common.ServiceLocator;
public class NewsletterPlugIn implements PlugIn {
private static Log log =
CHAPTER 11 ■ EXTENDING THE STRUTS FRAMEWORK416
Ch11_7389_CMP2 9/25/06 9:12 PM Page 416
ServiceLocator.getInstance().getLog(NewsletterPlugIn.class);
private Timer timer = null;
private long intervalFactor = 1000 * 60;
private long interval = (60 * 72);
private String smtpServer = "localhost";
private String fromAddress = "";
public void init(ActionServlet servlet, ModuleConfig config)
throws ServletException {
log.info("NewsletterPlugIn.init() called");
loadConfigData(config);
startTimer();
}
public void destroy() {
log.info("NewsletterPlugIn.destroy() called");
}
private void loadConfigData(ModuleConfig config) {
PlugInConfig[] pluginConfigs = config.findPlugInConfigs();
for(int x = 0; x < pluginConfigs.length; x++) {
if(pluginConfigs[x].getClassName().equals(this.getClass().getName())) {
log.debug("Found Plug-In Configuration");
Map props = pluginConfigs[x].getProperties();
// Load in the interval property.
if(props.containsKey("interval")) {
try {
interval = Long.parseLong(props.get("interval").toString());
log.debug("Interval set to: " + interval);
} catch(Exception ignored) {
log.debug("Specified Interval was not a valid log value");
}
}
// Load the smtp server property.
if(props.containsKey("smtp.server")) {
smtpServer = props.get("smtp.server").toString();
CHAPTER 11 ■ EXTENDING THE STRUTS FRAMEWORK 417
Ch11_7389_CMP2 9/25/06 9:12 PM Page 417
log.debug("smtpServer set to: " + smtpServer);
}
// Load the from address property.
if(props.containsKey("fromAddress")) {
fromAddress = props.get("fromAddress").toString();
log.debug("fromAddress set to: " + fromAddress);
}
break;
}
}
}
private void startTimer() {
timer = new Timer();
long timerInterval = (interval * intervalFactor);
timer.schedule(
new NewsletterTask(
smtpServer, fromAddress),
timerInterval, timerInterval);
}
}
The NewsletterPlugIn class has a variety of field variables to store the configuration
details for the NewsletterManager, the Commons Log instance used for logging within the
class, and the Timer instance that the plug-in will use to schedule the sending of the newslet-
ter. Notice that you also need to define a private field, intervalFactor. The reason for this field
is that in the configuration you want to be able to specify the interval between newsletters in
minutes, but the Timer works in milliseconds. The intervalFactor stores the number of mil-
liseconds in a minute and is used to convert the interval value from the configuration into
milliseconds for the Timer. Both the init() and destroy() methods write log entries to enable
you to verify that the plug-in is actually being loaded into Struts. The init() method loads the
configuration data with a call to loadConfigData() and then starts the Timer with a call to
startTimer().
For loadConfigData(), the init() method passes in the ModuleConfig for the Struts appli-
cation. The ModuleConfig object contains the configuration details for the entire application,
not just the plug-ins. To get at the plug-in configuration, you need to call ModuleConfig.
findPlugInConfigs() to get an array of PlugInConfig objects, one for each plug-in configured
within the application. You can then loop through this array to find the PlugInConfig object
for your plug-in by comparing the getClassName() property of the PlugInConfig object with
the full name of your plug-in class. Once you have the correct PlugInConfig object, you can
call getProperties() to retrieve a Map of the configuration properties specified for the plug-in.
With the Map of configuration properties retrieved, getting the configuration data is a simple
matter of accessing the elements in the Map. The loadConfigData() method follows this pattern
CHAPTER 11 ■ EXTENDING THE STRUTS FRAMEWORK418
Ch11_7389_CMP2 9/25/06 9:12 PM Page 418
and reads in three properties from the configuration: one for the SMTP server address, one for
the sender address, and one for the interval between newsletters.
The last method of the NewsletterPlugIn class is startTimer(). This method doesn’t really
have much to do other than to create the Timer instance and then schedule the NewsletterTask
to run. In the call to Timer.schedule(), you will notice that the interval is specified twice. The
first interval is the delay before the Timer runs the task the first time, and the second interval is
the delay between runs thereafter. This means that you set the task to run five minutes after the
plug-in starts and then maybe once an hour after that.
As you can see, the actual plug-in code is very simple; the main bulk of the code for this
plug-in was the logic required to actually send the newsletter. Creating the plug-in and start-
ing the Timer requires very little code—in fact, the largest amount of code for the plug-in is
the configuration load code. All that remains now is to configure the plug-in within the Struts
application.
Configuring the Plug-In
If you have read either Chapter 6 or 7, then you will no doubt recognize the syntax used to
configure the plug-in. To configure the basic plug-in, you simply need to add the following
entry to the struts-config.xml file:
<plug-in className="com.apress.javaedge.struts.plugin.NewsletterPlugIn"/>
This will run the plug-in with the default set of parameters. Since you have specified the
default period between newsletters to be 72 hours, you need to specify a much smaller period
than this for debugging. Also, you don’t use localhost as the SMTP server, so you can use the
configuration properties to set the values without having to change the code.
<plug-in className="com.apress.javaedge.struts.plugin.NewsletterPlugIn">
<set-property property="smtp.server" value="tiger"/>
<set-property property="interval" value="1"/>
</plug-in>
As you can see, configuring the plug-in is very easy, and you are free to configure as many
plug-ins as you like within your application.
Summary
Throughout this chapter, we have taken you through various extension mechanisms for the
Struts framework, each with its own distinct advantages and disadvantages. First we presented
a simple solution for providing typed access to session parameters using a base Action class,
and also a method of securing resources using the Action class. From this discussion, you
have seen that extending the Action class does not provide the most flexibility when extending
Struts, nor does it reduce the amount of code needed to implement simple tasks in every
action.
Next, we introduced custom RequestProcessor classes and how they can be used to hook
into the request processing flow for Struts. We combined the knowledge of RequestProcessors
gained earlier in the chapter with that of building custom configuration beans in order to
provide a much more elegant solution to the problem of secure pages. From this, we have
CHAPTER 11 ■ EXTENDING THE STRUTS FRAMEWORK 419
Ch11_7389_CMP2 9/25/06 9:12 PM Page 419
CHAPTER 11 ■ EXTENDING THE STRUTS FRAMEWORK420
demonstrated that for the most part using a custom RequestProcessor is a much more desir-
able solution than using a custom Action class when you want to hook into the request flow
within your Struts application.
Lastly, we focused on providing applicationwide startup or background services using
the Struts plug-in model. The plug-in model is a very simple mechanism for you to provide
services within your application that run outside the context of a user request. Any automated
processes such as cleanup operations, marketing, or auditing that you would normally do via
some kind of OS scheduled task can now be done using a Struts plug-in.
Ch11_7389_CMP2 9/25/06 9:12 PM Page 420
Struts and Ajax
Ajax, or Asynchronous JavaScript and XML, was introduced in 2005 by Jesse James Garrett,
sometimes referred to as the “father of Ajax.” Ajax is not a single technology; rather, it is a col-
lection of concepts and technologies that allow richer, more interactive user interactions with
web applications. The term Ajax has now grown to refer to any native browser technologies
that allow for asynchronous communication with a back-end server.
The fundamental concept behind Ajax is that when a portion of a web page changes, the
entire page does not need to be refreshed. For example, when a user selects a country from a
Country drop-down list, the States drop-down list is automatically populated with the appro-
priate list of states for that country. In a typical web application, this would require a round
trip to the server and a page refresh. Using Ajax, the round trip to the server is done asynchro-
nously and only the section of the page is refreshed behind the scenes. The fundamental
technologies that allow this to happen are XML, JavaScript, and XHTML.
In this chapter, we will expose you to the new Ajax technology that takes web application
development to a completely new level. We will show you how Ajax can be used in your Struts
applications. Let us first describe what Ajax is in a little more detail.
Ajax Dissected
The basic technology behind Ajax is JavaScript. It allows
•Data to be exchanged with a server using XML or other technologies such as JavaScript
Object Notation (JSON)
•Dynamic display of new or changed data using DHTML and the Document Object
Model (DOM)
• The use of data display standards such as Cascading Style Sheets (CSS)
Let’s look at a few examples of applications in which Ajax is being used today, just to give
you a flavor of what Ajax can really do.
421
CHAPTER 12
■ ■ ■
Ch12_7389_CMP2 9/29/06 9:31 AM Page 421
Ajax on Google
Of course, as one might expect, Google is one of the biggest users of the new Ajax technologies.
Google Gmail, Google Calendar, and the Google Personalized Home page are some prime exam-
ples of web applications that implement Ajax.
Google Calendar, for example, uses Ajax to quickly add and update calendar entries.
If you use Gmail, it uses Ajax to display the little “loading” text in the top-right corner.
Ajax on Yahoo
Yahoo’s new home page also implements Ajax. A lot of personalization capabilities, and features
such as quick preview of e-mail, have been added to it recently, using the Ajax technologies.
Where Should I Use Ajax?
Here are several ideas about where Ajax might be worth using:
• Forms: This is a given. Web-based forms are slow! It should be a no-brainer to see how
and why Ajax can dramatically improve the performance of web-based forms.
• User communications: Ajax can be a very useful technology in designing user commu-
nication features such as chat pages, voting buttons, message threads, ratings, etc. An
example of this sort of feature is the Netflix movie ratings buttons.
• News: RSS feeds is another popular concept that can really leverage Ajax technologies.
A few examples of this have emerged on the web recently, such as Google News.
• Data manipulation: An example is sorting or filtering on columns in a table. Another
example is form completion with hints, such as the Google Suggest feature (you will see
some code for this later in the chapter).
■Note Ajax should not be thrown at every problem. Replacing large amounts of data with Ajax can lead to
performance and other issues. Use Ajax only when traditional JavaScript widgets don’t suffice, and when you
have to do data manipulations involving round trips to the server.
Here is a good blog you can read to find out when not to use Ajax: http://alexbosworth.
backpackit.com/pub/67688.
CHAPTER 12 ■ STRUTS AND AJAX422
Ch12_7389_CMP2 9/29/06 9:31 AM Page 422
Ajax and Web 2.0
The Internet has grown exponentially in the last decade. Web 1.0 is and was the era of primarily
static web sites transforming themselves to business processes/dynamic web applications, con-
tent management driven sites, and more recently portals. Even in the best of portals, there is still
some level of intermixing between the layers (presentation, logic, business process, and so forth).
Web 2.0 is the new buzzword. This concept is truly separating out the presentation from
the business logic. Ajax is one technology that really enables this vision—by allowing the pres-
entation to be driven by asynchronous calls to the server for data. Web Services technologies
and Service Oriented Architecture (SOA) make this vision even easier to implement.
Ajax and SOA
So what does Ajax have to do with SOA? Ajax allows pieces of a web page to be asynchronously
refreshed with new data. This data is typically retrieved by making a call to some back-end
server, such as a WebLogic or Tomcat server. The code running behind the scenes can be non-
service oriented and this would still work. However, if implemented as services, the boundaries
for the use of Ajax become close to limitless. It opens up a whole new level of data presentation
options and gives birth to a new generation of aggregated portal capabilities.
We have spent some time going over the basics of Ajax—what it is and what is does. Let’s
dive in and talk technology. In the next section, we explore the internals of Ajax.
Ajax Internals
Ajax is not a single technology, as mentioned earlier in this chapter. It is important to remember
that Ajax is not Java or .NET dependent. You can write Ajax code (in JavaScript) to communicate
with any sort of back-end code—Java, .NET, PHP, or just about anything else. From a technical
perspective, the single biggest benefit of Ajax is that it helps speed up your web application. It
does this in three basic ways:
•Better utilization of the browser cache
•Batching up of network requests in a single packet to reduce network latency issues
•Decreasing the workload on the server by not requiring it to process the entire page
Let’s look at a typical Ajax request-response cycle.
CHAPTER 12 ■ STRUTS AND AJAX 423
Ch12_7389_CMP2 9/29/06 9:31 AM Page 423
Ajax Request-Response Cycle
Figure 12-1 shows a typical user request-response cycle when using Ajax.
In this example, the user initiates a request by moving their mouse over some element
onscreen (let’s say they moved their mouse over the Password field, and you want to provide a
tool tip that displays the password rules that you would like to enforce). Using JavaScript, the
application would recognize the mouseOver and create an XMLHttpRequest object. This would
then interact with your back-end server and respond in XML. The client browser then parses
this XML and shows the tool tip to the user.
This is a typical request-response cycle using Ajax. The key thing here is the XMLHttpRequest
object, which we will examine next.
Figure 12-1. Ajax request-response cycle
JavaScript
XMLHttpRequest
BackendServer
creates
send
getDetails
callback
XML response
parseMessage
showMessage
onMouseOver()
CHAPTER 12 ■ STRUTS AND AJAX424
Ch12_7389_CMP2 9/29/06 9:31 AM Page 424
XMLHttpRequest Object
The XMLHttpRequest object was introduced by Microsoft in Internet Explorer 5.0. Recently,
Mozilla and Apple have included support for this in their web browsers (Firefox and Safari,
respectively). This object is the fundamental basis for Ajax. Microsoft’s implementation is dif-
ferent from that of other browsers, so when you create this object in your code, you need to do
a typical browser check. For Internet Explorer, create this object using
var req = new ActiveXObject("Microsoft.XMLHTTP");
For Firefox and Safari, it’s just a native object:
var req = new XMLHttpRequest();
You will see detailed code samples in the next section.
There is now a working draft in the W3C to make XMLHttpRequest a standard. The follow-
ing is the interface definition that is proposed by W3C as the standard:
interface XMLHttpRequest {
attribute Function onreadystatechange;
readonly attribute unsigned short readyState;
void open(in DOMString method, in DOMString uri);
void open(in DOMString method, in DOMString uri, in boolean async);
void open(in DOMString method, in DOMString uri,
in boolean async, in DOMString user);
void open(in DOMString method, in DOMString uri,
in boolean async, in DOMString user, in DOMString password);
void setRequestHeader(in DOMString header, in DOMString value)
raises(DOMException);
void send(in DOMString data)
raises(DOMException);
void send(in Document data)
raises(DOMException);
void abort();
DOMString getAllResponseHeaders();
DOMString getResponseHeader(in DOMString header);
attribute DOMString responseText;
attribute Document responseXML;
attribute unsigned short status;
// raises(DOMException) on retrieval
attribute DOMString statusText;
// raises(DOMException) on retrieval
};
This should give you some idea of what features are available as part of the XMLHttpRequest
object. Enough fun and games, let’s look at an example of Ajax using Struts and see how the
XMLHttpRequest object is really used.
CHAPTER 12 ■ STRUTS AND AJAX 425
Ch12_7389_CMP2 9/29/06 9:31 AM Page 425
Ajax and Struts in Action
In this section we will build an example of a simple Struts application that uses Ajax. This
application is similar to the Google Suggest feature, which offers to the user search keywords
as they start typing. Think of a City text field in your web application. Imagine how much eas-
ier it would be for your users if you could “suggest” a list of cities as they started typing. For
example, if they typed “Ba” you could show them all the cities that started with “Ba,” as shown
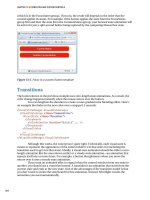
in Figure 12-2, which assumes that the country is India.
Figure 12-2. Ajax “suggest” drop-down list
The rest of the chapter focuses on the code to build this feature using Ajax and Struts. We
will build some basic Struts code that performs the same functions as shown in Figure 12-2.
It will use the same request-response cycle for Ajax invocation as shown in Figure 12-1.
Cities.jsp
Cities.jsp, shown next, is the JSP file that we will use to invoke the Ajax code to get the list of
cities as the user types more characters into a text field:
<html>
<script language="javascript">
/*
* Returns an new XMLHttpRequest object, or false if the browser
* doesn't support it
*/
var availableSelectList;
function newXMLHttpRequest() {
var xmlreq = false;
// Create XMLHttpRequest object in non-Microsoft browsers
if (window.XMLHttpRequest) {
xmlreq = new XMLHttpRequest();
} else if (window.ActiveXObject) {
try {
// Try to create XMLHttpRequest in later versions
// of Internet Explorer
CHAPTER 12 ■ STRUTS AND AJAX426
Ch12_7389_CMP2 9/29/06 9:31 AM Page 426