Pro C# 2008 and the .NET 3.5 Platform, Fourth Edition phần 7 ppsx
Bạn đang xem bản rút gọn của tài liệu. Xem và tải ngay bản đầy đủ của tài liệu tại đây (5.73 MB, 140 trang )
Configuring the Data Adapter Using the SqlCommandBuilder
When you are using a data adapter to modify tables in a DataSet, the first order of business is to
assign the
UpdateCommand, DeleteCommand, and InsertCommand properties with valid command
objects (until you do so, these properties return
null references). By “valid” command objects, I am
referring to the set of command objects used in conjunction with the table you are attempting to
update (the Inventory table in our example).
To fill up our adapter with the necessary data can entail a good amount of code, especially if we
make use of parameterized queries. Recall from Chapter 22 that a parameterized query allows us to
build a SQL statement using a set of parameter objects. Thus, if we were to take the long road, we
could implement
ConfigureAdapter() to manually create three new SqlCommand objects, each of
which contains a set of
SqlParameter objects. After this point, we could set each object to the
UpdateCommand, DeleteCommand, and InsertCommand properties of the adapter.
Thankfully, Visual Studio 2008 provides a number of designer tools to take care of this mun-
dane and tedious code on our behalf. You’ll see some of these shortcuts in action at the conclusion
of this chapter. Rather than forcing you to author the numerous code statements to fully configure a
data adapter, let’s take a massive shortcut by implementing
ConfigureAdapter() as so:
private void ConfigureAdapter(out SqlDataAdapter dAdapt)
{
// Create the adapter and set up the SelectCommand.
dAdapt = new SqlDataAdapter("Select * From Inventory", cnString);
// Obtain the remaining command objects dynamically at runtime
// using the SqlCommandBuilder.
SqlCommandBuilder builder = new SqlCommandBuilder(dAdapt);
}
To help simplify the construction of data adapter objects, each of the Microsoft-supplied
ADO.NET data providers provides a
command builder type. The SqlCommandBuilder automatically
generates the values contained within the
SqlDataAdapter’s InsertCommand, UpdateCommand, and
DeleteCommand properties based on the initial SelectCommand. Clearly, the benefit is that you have no
need to build all the
SqlCommand and SqlParameter types by hand.
An obvious question at this point is how a command builder is able to build these SQL com-
mand objects on the fly. The short answer is metadata. At runtime, when you call the
Update()
method of a data adapter, the related command builder will read the database’s schema data to
autogenerate the underlying insert, delete, and update command objects.
Obviously, doing so requires additional round-trips to the remote database, and therefore it
will certainly hurt performance if you use the
SqlCommandBuilder numerous times in a single appli-
cation. Here, we are minimizing the negative effect by calling our
ConfigureAdapter() method at
the time the
InventoryDALDisLayer object is constructed, and retaining the configured
SqlDataAdapter for use throughout the object’s lifetime.
In the previous code, notice that we made no use of the command builder object
(
SqlCommandBuilder in this case) beyond passing in the data adapter object as a constructor
parameter. As odd as this may seem, this is all we are required to do (at a minimum). Under the
hood, this type will configure the data adapter with the remaining command objects.
Now, while you may love the idea of getting something for nothing, do understand that com-
mand builders come with some critical restrictions. Specifically, a command builder is only able to
autogenerate SQL commands for use by a data adapter if all of the following conditions are true:
• The SQL Select command interacts with only a single table (e.g., no joins).
• The single table has been attributed with a primary key.
• The table must have a column(s) representing the primary key that is included in your SQL
Select statement.
CHAPTER 23 ■ ADO.NET PART II: THE DISCONNECTED LAYER812
8849CH23.qxd 10/22/07 1:54 PM Page 812
www.free-ebooks-download.org
Simpo PDF Merge and Split Unregistered Version -
Based on the way we constructed our AutoLot database, these restrictions pose no problem.
However, in a more industrial-strength database, you will need to consider if this type is at all useful
(if not, remember that Visual Studio 2008 will autogenerate a good deal of the required code, as
you’ll see at the end of this chapter).
Implementing GetAllInventory()
Now that our data adapter is ready to go, the first method of our new class type will simply use the
Fill() method of the SqlDataAdapter object to fetch a DataTable representing all records in the
Inventory table of the AutoLot database:
public DataTable GetAllInventory()
{
DataTable inv = new DataTable("Inventory");
dAdapt.Fill(inv);
return inv;
}
Implementing UpdateInventory()
The UpdateInventory() method is very simple:
public void UpdateInventory(DataTable modifiedTable)
{
dAdapt.Update(modifiedTable);
}
Here, the data adapter object will examine the RowState value of each row of the incoming
DataTable. Based on this value (RowState.Added, RowState.Deleted, or RowState.Modified), the cor-
rect command object will be leveraged behind the scenes.
■Source Code The AutoLotDAL (Part 2) project is included under the Chapter 23 subdirectory.
Building a Windows Forms Front End
At this point we can build a front end to test our new InventoryDALDisLayer object, which will be a
Windows Forms application named WindowsFormsInventoryUI. Once you have created the proj-
ect, set a reference to your updated
AutoLotDAL.dll assembly and import the following namespace:
using AutoLotDisconnectedLayer;
The design of the form consists of a single Label, DataGridView (named inventoryGrid), and
Button type (named btnUpdateInventory), which has been configured to handle the Click event.
Here is the definition of the form (which does not contain error-handling logic for simplicity; feel
free to add
try/catch logic if you so choose):
public partial class MainForm : Form
{
InventoryDALDisLayer dal = null;
public MainForm()
{
InitializeComponent();
CHAPTER 23 ■ ADO.NET PART II: THE DISCONNECTED LAYER 813
8849CH23.qxd 10/22/07 1:54 PM Page 813
www.free-ebooks-download.org
Simpo PDF Merge and Split Unregistered Version -
// Assume we have an App.config file
// storing the connection string.
string cnStr =
ConfigurationManager.ConnectionStrings["AutoLotSqlProvider"].ConnectionString;
// Create our data access object.
dal = new InventoryDALDisLayer(cnStr);
// Fill up our grid!
inventoryGrid.DataSource = dal.GetAllInventory();
}
private void btnUpdateInventory_Click(object sender, EventArgs e)
{
// Get modified data from the grid.
DataTable changedDT = (DataTable)inventoryGrid.DataSource;
// Commit our changes.
dal.UpdateInventory(changedDT);
}
}
Notice that in this example, I am assuming you have added an App.config file to store the con-
nection string data, within a
<connectionStrings> section. To make use of the ConnectionStrings
indexer of the ConfigurationManager type, be sure to set a reference to the System.Configuration.dll
assembly. Once we create the InventoryDALDisLayer object, we bind the DataTable returned from
GetAllInventory() to the DataGridView object. When the end user clicks the Update button, we
extract out the modified
DataTable from the grid (via the DataSource property) and pass it into our
UpdateInventory() method.
That’s it! Once you run this application, add a set of new rows to the grid and update/delete a
few others. Assuming you click the
Button control, you will see your changes have persisted into the
AutoLot database.
■Source Code The updated WindowsFormsInventoryUI project is included under the Chapter 23 subdirectory.
Navigating Multitabled DataSet Objects
So far, all of this chapter’s examples have operated on a single DataTable object. However, the power
of the disconnected layer really comes to light when a
DataSet object contains numerous interre-
lated
DataTables. In this case, you are able to insert any number of DataRelation objects into the
DataSet’s DataRelation collection to account for the interdependencies of the tables. Using these
objects, the client tier is able to navigate between the table data without incurring network
round-trips.
■Note Rather than updating AutoLotDAL.dll yet again in order to account for the Customers and Orders
tables, this example isolates all of the data access logic within a new Windows Forms project. However, intermix-
ing UI and data logic in a production-level application is certainly not recommended. The final examples of this
chapter leverage various database design tools to decouple the UI and data logic code.
CHAPTER 23 ■ ADO.NET PART II: THE DISCONNECTED LAYER814
8849CH23.qxd 10/22/07 1:54 PM Page 814
www.free-ebooks-download.org
Simpo PDF Merge and Split Unregistered Version -
Begin this example by creating a new Windows Forms application named
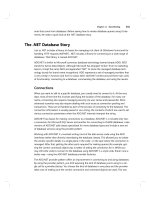
MultitabledDataSetApp. The GUI is simple enough. In Figure 23-13 you can see three
DataGridView
widgets that hold the data retrieved from the Inventory, Orders, and Customers tables of the
AutoLot database. In addition, the initial
Button (named btnUpdateDatabase) submits any and all
changes entered within the grids back to the database for processing via data adapter objects.
Figure 23-13. The initial UI will display data from each table of the AutoLot database.
Prepping the Data Adapters
To keep the data access code as simple as possible, the MainForm will make use of command builder
objects to autogenerate the SQL commands for each of the three
SqlDataAdapters (one for each
table). Here is the initial update to the
Form-derived type:
public partial class MainForm : Form
{
// Form wide DataSet.
private DataSet autoLotDS = new DataSet("AutoLot");
// Make use of command builders to simplify data adapter configuration.
private SqlCommandBuilder sqlCBInventory;
private SqlCommandBuilder sqlCBCustomers;
private SqlCommandBuilder sqlCBOrders;
// Our data adapters (for each table).
private SqlDataAdapter invTableAdapter;
private SqlDataAdapter custTableAdapter;
private SqlDataAdapter ordersTableAdapter;
CHAPTER 23 ■ ADO.NET PART II: THE DISCONNECTED LAYER 815
8849CH23.qxd 10/22/07 1:54 PM Page 815
www.free-ebooks-download.org
Simpo PDF Merge and Split Unregistered Version -
// Form wide connection string.
private string cnStr = string.Empty;
}
The constructor does the grunge work of creating your data-centric member variables and fill-
ing the
DataSet. Here, I am assuming you have authored an App.config file that contains the correct
connection string data (and that you have referenced
System.Configuration.dll and imported the
System.Configuration namespace). Also note that there is a call to a private helper function,
BuildTableRelationship(), as shown here:
public MainForm()
{
InitializeComponent();
// Get connection string from *.config file.
cnStr =
ConfigurationManager.ConnectionStrings["AutoLotSqlProvider"].ConnectionString;
// Create adapters.
invTableAdapter = new SqlDataAdapter("Select * from Inventory", cnStr);
custTableAdapter = new SqlDataAdapter("Select * from Customers", cnStr);
ordersTableAdapter = new SqlDataAdapter("Select * from Orders", cnStr);
// Autogenerate commands.
sqlCBInventory = new SqlCommandBuilder(invTableAdapter);
sqlCBOrders = new SqlCommandBuilder(ordersTableAdapter);
sqlCBCustomers = new SqlCommandBuilder(custTableAdapter);
// Add tables to DS.
invTableAdapter.Fill(autoLotDS, "Inventory");
custTableAdapter.Fill(autoLotDS, "Customers");
ordersTableAdapter.Fill(autoLotDS, "Orders");
// Build relations between tables.
BuildTableRelationship();
// Bind to grids
dataGridViewInventory.DataSource = autoLotDS.Tables["Inventory"];
dataGridViewCustomers.DataSource = autoLotDS.Tables["Customers"];
dataGridViewOrders.DataSource = autoLotDS.Tables["Orders"];
}
Building the Table Relationships
The BuildTableRelationship() helper function does the grunt work to add two DataRelation
objects into the autoLotDS object. Recall from Chapter 22 that the AutoLot database expresses a
number of parent/child relationships, accounted for with the following code:
private void BuildTableRelationship()
{
// Create CustomerOrder data relation object.
DataRelation dr = new DataRelation("CustomerOrder",
autoLotDS.Tables["Customers"].Columns["CustID"],
autoLotDS.Tables["Orders"].Columns["CustID"]);
autoLotDS.Relations.Add(dr);
CHAPTER 23 ■ ADO.NET PART II: THE DISCONNECTED LAYER816
8849CH23.qxd 10/22/07 1:54 PM Page 816
www.free-ebooks-download.org
Simpo PDF Merge and Split Unregistered Version -
// Create InventoryOrder data relation object.
dr = new DataRelation("InventoryOrder",
autoLotDS.Tables["Inventory"].Columns["CarID"],
autoLotDS.Tables["Orders"].Columns["CarID"]);
autoLotDS.Relations.Add(dr);
}
Note that when creating a DataRelation object, you establish a friendly string moniker with the
first parameter (you’ll see the usefulness of doing so in just a minute) as well as the keys used to
build the relationship itself. Notice that the parent table (the second constructor parameter) is
specified before the child table (the third constructor parameter).
Updating the Database Tables
Now that the DataSet has been filled and disconnected from the data source, you can manipulate
each
DataTable locally. To do so, simply insert, update, or delete values from any of the three
DataGridViews. When you are ready to submit the data back for processing, click the Update button.
The code behind the related
Click event should be clear at this point:
private void btnUpdateDatabase_Click(object sender, EventArgs e)
{
try
{
invTableAdapter.Update(carsDS, "Inventory");
custTableAdapter.Update(carsDS, "Customers");
ordersTableAdapter.Update(carsDS, "Orders");
}
catch (Exception ex)
{
MessageBox.Show(ex.Message);
}
}
Now run your application and perform various updates. When you rerun the application, you
should find that your grids are populated with the recent changes.
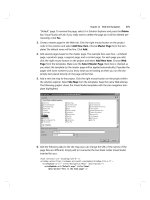
Navigating Between Related Tables
To illustrate how a DataRelation allows you to move between related tables programmatically,
extend your UI to include a new
Button type (named btnGetOrderInfo), a related TextBox (named
txtCustID), and a descriptive Label (I grouped these controls within a GroupBox simply for visual
appeal). Figure 23-14 shows one possible UI of the application.
CHAPTER 23 ■ ADO.NET PART II: THE DISCONNECTED LAYER 817
8849CH23.qxd 10/22/07 1:54 PM Page 817
www.free-ebooks-download.org
Simpo PDF Merge and Split Unregistered Version -
Figure 23-14. The updated UI allows the user to look up customer order information.
Using this updated UI, the end user is able to enter the ID of a customer and retrieve all the
relevant information about that customer’s order (name, order ID, car order, etc.), which will be
formatted into a
string type that is eventually displayed within a message box. Ponder the code
behind the new
Button’s Click event handler:
private void btnGetOrderInfo_Click(object sender, System.EventArgs e)
{
string strOrderInfo = string.Empty;
DataRow[] drsCust = null;
DataRow[] drsOrder = null;
// Get the customer ID in the text box.
int custID = int.Parse(this.txtCustID.Text);
// Now based on custID, get the correct row in Customers table.
drsCust = autoLotDS.Tables["Customers"].Select(
string.Format("CustID = {0}", custID));
strOrderInfo += string.Format("Customer {0}: {1} {2}\n",
drsCust[0]["CustID"].ToString(),
drsCust[0]["FirstName"].ToString().Trim(),
drsCust[0]["LastName"].ToString().Trim());
// Navigate from Customers table to Orders table.
drsOrder = drsCust[0].GetChildRows(autoLotDS.Relations["CustomerOrder"]);
// Get order number.
foreach (DataRow r in drsOrder)
strOrderInfo += string.Format("Order Number: {0}\n", r["OrderID"]);
// Now navigate from Orders table to Inventory table.
DataRow[] drsInv =
drsOrder[0].GetParentRows(autoLotDS.Relations["InventoryOrder"]);
// Get car info.
foreach (DataRow r in drsInv)
{
strOrderInfo += string.Format("Make: {0}\n", r["Make"]);
CHAPTER 23 ■ ADO.NET PART II: THE DISCONNECTED LAYER818
8849CH23.qxd 10/22/07 1:54 PM Page 818
www.free-ebooks-download.org
Simpo PDF Merge and Split Unregistered Version -
strOrderInfo += string.Format("Color: {0}\n", r["Color"]);
strOrderInfo += string.Format("Pet Name: {0}\n", r["PetName"]);
}
MessageBox.Show(strOrderInfo, "Order Details");
}
Let’s break down this code step by step. First, you obtain the correct customer ID from the text
box and use it to select the correct row in the Customers table, via the
Select() method. Given that
Select() returns an array of DataRow objects, you must use double indexing to ensure you fetch the
data for the first (and only) member of this array:
// Get the customer ID in the text box.
int custID = int.Parse(this.txtCustID.Text);
// Now based on custID, get the correct row in Customers table.
drsCust = autoLotDS.Tables["Customers"].Select(
string.Format("CustID = {0}", custID));
strOrderInfo += string.Format("Customer {0}: {1} {2}\n",
drsCust[0]["CustID"].ToString(),
drsCust[0]["FirstName"].ToString().Trim(),
drsCust[0]["LastName"].ToString().Trim());
Next, you navigate from the Customers table to the Orders table, using the CustomerOrder data
relation. Notice that the
DataRow.GetChildRows() method allows you to grab rows from your child
table. Once you do, you can read information out of the table:
// Navigate from Customers table to Orders table.
drsOrder = drsCust[0].GetChildRows(autoLotDS.Relations["CustomerOrder"]);
// Get order number.
foreach (DataRow r in drsOrder)
strOrderInfo += string.Format("Order Number: {0}\n", r["OrderID"]);
The final step is to navigate from the Orders table to its parent table (Inventory), using the
GetParentRows() method. At this point, you can read information from the Inventory table using
the Make, PetName, and Color columns, as shown here:
// Now navigate from Orders table to Inventory table.
DataRow[] drsInv =
drsOrder[0].GetParentRows(autoLotDS.Relations["InventoryOrder"]);
// Get car info.
foreach (DataRow r in drsInv)
{
strOrderInfo += string.Format("Make: {0}\n", r["Make"]);
strOrderInfo += string.Format("Color: {0}\n", r["Color"]);
strOrderInfo += string.Format("Pet Name: {0}\n", r["PetName"]);
}
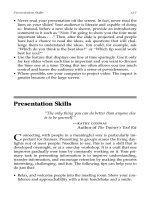
Figure 23-15 shows one possible output when specifying a customer ID with the value of 2
(Matt Walton in my copy of the AutoLot database).
CHAPTER 23 ■ ADO.NET PART II: THE DISCONNECTED LAYER 819
8849CH23.qxd 10/22/07 1:54 PM Page 819
www.free-ebooks-download.org
Simpo PDF Merge and Split Unregistered Version -
Figure 23-15. Navigating data relations
Hopefully, this last example has you convinced of the usefulness of the DataSet type. Given that
a
DataSet is completely disconnected from the underlying data source, you can work with an in-
memory copy of data and navigate around each table to make any necessary updates, deletes, or
inserts. Once you’ve finished, you can submit your changes to the data store for processing. The end
result is a very scalable and robust application.
■Source Code The MultitabledDataSetApp project is included under the Chapter 23 subdirectory.
The Data Access Tools of Visual Studio 2008
All of the ADO.NET examples in this text thus far have involved a fair amount of elbow grease, in
that we were authoring all data access logic by hand. While we did offload a good amount of said
code to a .NET code library (
AutoLotDAL.dll) for reuse in later chapters of the book, we were still
required to manually create the various objects of our data provider before interacting with the
relational database.
To wrap up our examination of the disconnected layer of ADO.NET, we will now take a look at a
number of services provided by Visual Studio 2008 that can assist you in authoring data access logic.
As you might suspect, this IDE supports a number of visual designers and code generation tools
(aka wizards) that can produce a good deal of starter code.
CHAPTER 23 ■ ADO.NET PART II: THE DISCONNECTED LAYER820
8849CH23.qxd 10/22/07 1:54 PM Page 820
www.free-ebooks-download.org
Simpo PDF Merge and Split Unregistered Version -
■Note Don’t get lulled into the belief that you will never be required to author ADO.NET logic by hand, or that the
wizard-generated code will always fit the bill 100 percent for your current project. While these tools can save you a
significant amount of time, the more you know about the ADO.NET programming model, the better, as this enables
you to customize and tweak the generated code as required.
Visually Designing the DataGridView
The first data access shortcut can be found via the DataGridView designer. While we have used this
widget in previous examples for display and editing purposes, we have not used the associated wiz-
ard that will generate data access code on our behalf. To begin, create a brand-new Windows Forms
application project named VisualDataGridViewApp. Add a descriptive
Label control and an
instance of the
DataGridView control. When you do, note that an inline editor opens to the right of
the UI widget. From the Choose Data Source drop-down box, select the Add Project Data Source
link (see Figure 23-16).
Figure 23-16. The DataGridView editor
The Data Source Configuration Wizard launches. This tool will guide you through a series
of steps that allow you to select and configure a data source, which will then be bound to the
DataGridView using a custom data adapter type. The first step of the wizard simply asks you to
identify the type of data source you wish to interact with. Select Database (see Figure 23-17) and
click the Next button.
CHAPTER 23 ■ ADO.NET PART II: THE DISCONNECTED LAYER 821
8849CH23.qxd 10/22/07 1:54 PM Page 821
www.free-ebooks-download.org
Simpo PDF Merge and Split Unregistered Version -
Figure 23-17. Selecting the type of data source
■Note This step of the wizard also allows you to connect data that comes from an external XML web service or
a custom business object within a separate .NET assembly.
The second step (which will differ slightly based on your selection in step 1) allows you to con-
figure your database connection. If you have a database currently added to Server Explorer, you
should find it automatically listed in the drop-down list. If this is not the case (or if you ever need to
connect to a database you have not previously added to Server Explorer), click the New Connection
button. Figure 23-18 shows the result of selecting the local instance of AutoLot.
The third step asks you to confirm that you wish to save your connection string within an
external
App.config file, and if so, the name to use within the <connectionStrings> element. Keep
the default settings for this step of the wizard and click the Next button.
The final step of the wizard is where you are able to select the database objects that will be
accounted for by the autogenerated
DataSet and related data adapters. While you could select each
of the data objects of the AutoLot database, here you will only concern yourself with the Inventory
table. Given this, change the suggested name of the
DataSet to InventoryDataSet (see Figure 23-19),
check the Inventory table, and click the Finish button.
CHAPTER 23 ■ ADO.NET PART II: THE DISCONNECTED LAYER822
8849CH23.qxd 10/22/07 1:54 PM Page 822
www.free-ebooks-download.org
Simpo PDF Merge and Split Unregistered Version -
Figure 23-18. Selecting the AutoLot database
Figure 23-19. Selecting the Inventory table
CHAPTER 23 ■ ADO.NET PART II: THE DISCONNECTED LAYER 823
8849CH23.qxd 10/22/07 1:55 PM Page 823
www.free-ebooks-download.org
Simpo PDF Merge and Split Unregistered Version -
Once you do so, you will notice the visual designer has been updated in a number of ways.
Most noticeable is the fact that the
DataGridView displays the schema of the Inventory table, as illus-
trated by the column headers. Also, on the bottom of the form designer (in a region dubbed the
component tray), you will see three components: a DataSet component, a BindingSource
component, and a TableAdapter component (see Figure 23-20).
Figure 23-20. Our Windows Forms project, after running the Data Source Configuration Wizard
At this point you can run your application, and lo and behold, the grid is filled with the records
of the Inventory table, as shown in Figure 23-21.
Figure 23-21. A populated DataGridView—no manual coding required!
CHAPTER 23 ■ ADO.NET PART II: THE DISCONNECTED LAYER824
8849CH23.qxd 10/22/07 1:55 PM Page 824
www.free-ebooks-download.org
Simpo PDF Merge and Split Unregistered Version -
The App.config File and the Settings.Settings File
If you examine your Solution Explorer, you will find your project now contains an App.config file. If
you open this file, you will notice the
name attribute of the <connectionStrings> element used in
previous examples:
<?xml version="1.0" encoding="utf-8" ?>
<configuration>
<configSections>
</configSections>
<connectionStrings>
<add name=
"VisualDataGridViewApp.Properties.Settings.AutoLotConnectionString"
connectionString=
"Data Source=(local)\SQLEXPRESS;
Initial Catalog=AutoLot;Integrated Security=True"
providerName="System.Data.SqlClient" />
</connectionStrings>
</configuration>
Specifically, the lengthy "VisualDataGridViewApp.Properties.Settings.
AutoLotConnectionString"
value has been set as the name of the connection string. Even stranger
is the fact that if you scan all of the generated code, you will not find any reference to the
ConfigurationManager type to read the value from the <connectionStrings> element. However, you
will find that the autogenerated data adapter object (which you will examine in more detail in just a
moment) is constructed in part by calling the following private helper function:
private void InitConnection()
{
this._connection = new global::System.Data.SqlClient.SqlConnection();
this._connection.ConnectionString = global::
VisualDataGridViewApp.Properties.Settings.Default.AutoLotConnectionString;
}
As you can see, the ConnectionString property is set via a call to Settings.Default. As it turns
out, every Visual Studio 2008 project type maintains a set of application-wide settings that are
burned into your assembly as metadata when you compile the application. The short answer is that
if you open your compiled application using
reflector.exe (see Chapter 2), you can view this inter-
nal type (see Figure 23-22).
Given the previous point, it would be possible to deploy your application
without shipping the
*.config file, as the embedded value will be used by default if a client-side *.config file is not
present.
■Note The Visual Studio 2008 settings programming model is really quite interesting; however, full coverage is
outside of the scope of this chapter (and this edition of the text, for that matter). If you are interested in learning
more, look up the topic “Managing Application Settings” in the .NET Framework 3.5 SDK documentation.
CHAPTER 23 ■ ADO.NET PART II: THE DISCONNECTED LAYER 825
8849CH23.qxd 10/22/07 1:55 PM Page 825
www.free-ebooks-download.org
Simpo PDF Merge and Split Unregistered Version -
Figure 23-22. The Settings object contains an embedded connection string value.
Examining the Generated DataSet
Now let’s take a look at some of the core aspects of this generated code. First of all, insert a new class
diagram type into your project by selecting the project icon in Solution Explorer and clicking the
View Class Diagram button. Notice that the wizard has created a new
DataSet type based on your
input, which in this case is named
InventoryDataSet. As you can see, this class defines a handful of
members, the most important of which is a property named
Inventory (see Figure 23-23).
Figure 23-23. The Data Source Configuration Wizard created a strongly typed DataSet.
CHAPTER 23 ■ ADO.NET PART II: THE DISCONNECTED LAYER826
8849CH23.qxd 10/22/07 1:55 PM Page 826
www.free-ebooks-download.org
Simpo PDF Merge and Split Unregistered Version -
If you double-click the InventoryDataSet.xsd file within Solution Explorer, you will load the
Visual Studio 2008 Dataset Designer (more details on this designer in just a bit). If you right-click
anywhere within this designer and select the View Code option, you will notice a fairly empty partial
class definition:
public partial class InventoryDataSet {
partial class InventoryDataTable
{
}
}
The real action is taking place within the designer-maintained file, InventoryDataSet.
Designer.cs
. If you open this file using Solution Explorer, you will notice that InventoryDataSet is
actually extending the
DataSet class type. When you (or a wizard) create a class extending DataSet,
you are building what is termed a
strongly typed DataSet. One benefit of using strongly typed
DataSet objects is that they contain a number of properties that map directly to the database tables
names. Thus, rather than having to drill into the collection of tables using the
Tables property, you
can simply use the
Inventory property. Consider the following partial code, commented for clarity:
// This is all designer-generated code!
public partial class InventoryDataSet : global::System.Data.DataSet
{
// A member variable of type InventoryDataTable.
private InventoryDataTable tableInventory;
// Each constructor calls a helper method named InitClass().
public InventoryDataSet()
{
this.InitClass();
}
// InitClass() preps the DataSet and adds the InventoryDataTable
// to the Tables collection.
private void InitClass()
{
this.DataSetName = "InventoryDataSet";
this.Prefix = "";
this.Namespace = " />this.EnforceConstraints = true;
this.SchemaSerializationMode =
global::System.Data.SchemaSerializationMode.IncludeSchema;
this.tableInventory = new InventoryDataTable();
base.Tables.Add(this.tableInventory);
}
// The read-only Inventory property returns
// the InventoryDataTable member variable.
public InventoryDataTable Inventory
{
get { return this.tableInventory; }
}
}
In addition to wrapping the details of maintaining a DataTable object, the designer-generated
strongly typed
DataSet could contain similar logic to expose any DataRelation objects (which we do
not currently have) that represent the connections between each of the tables.
CHAPTER 23 ■ ADO.NET PART II: THE DISCONNECTED LAYER 827
8849CH23.qxd 10/22/07 1:55 PM Page 827
www.free-ebooks-download.org
Simpo PDF Merge and Split Unregistered Version -
Examining the Generated DataTable and DataRow
In a similar fashion, the wizard created a strongly typed DataTable class and a strongly typed DataRow
class, both of which have been nested within the InventoryDataSet class. The InventoryDataTable
class (which is the same type as the member variable of the strongly typed DataSet we just exam-
ined) defines a set of properties that are based on the column names of the physical Inventory table
(
CarIDColumn, ColorColumn, MakeColumn, and PetNameColumn) as well as a custom indexer and a Count
property to obtain the current number of records.
More interestingly, this strongly typed
DataTable class defines a set of methods (see Figure 23-24)
that allow you to insert, locate, and delete rows within the table using strongly typed members (an
attractive alternative to manually navigating the
Rows and Columns indexers).
Figure 23-24. The custom DataTable type
■Note The strongly typed DataTable also defines a handful of events you can handle to monitor changes to
your table data.
The custom DataRow type is far less exotic than the generated DataSet or DataTable. As shown in
Figure 23-25, this class extends
DataRow and exposes properties that map directly to the schema of
the Inventory table (also be aware that the columns are appropriately typed).
CHAPTER 23 ■ ADO.NET PART II: THE DISCONNECTED LAYER828
8849CH23.qxd 10/22/07 1:55 PM Page 828
www.free-ebooks-download.org
Simpo PDF Merge and Split Unregistered Version -
Figure 23-25. The custom DataRow type
Examining the Generated Data Adapter
Having some strong typing for our disconnected types is a solid benefit of using the Data Source
Configuration Wizard, given that adding strongly typed classes by hand would be tedious (but
entirely possible). This same wizard was kind enough to generate a custom data adapter object that
is able to fill and update the
InventoryDataSet and InventoryDataTable class types (see Figure 23-26).
Figure 23-26. A customized data adapter that operates on the strongly typed types
CHAPTER 23 ■ ADO.NET PART II: THE DISCONNECTED LAYER 829
8849CH23.qxd 10/22/07 1:55 PM Page 829
www.free-ebooks-download.org
Simpo PDF Merge and Split Unregistered Version -
The autogenerated InventoryTableAdapter type maintains a collection of SqlCommand objects,
each of which has a fully populated set of
SqlParameter objects (this alone is a massive time-saver).
Furthermore, this custom data adapter provides a set of properties to extract the underlying con-
nection, transaction, and data adapter objects, as well as a property to obtain an array representing
each command type. The obvious benefit is you did not have to author the code!
Using the Generated Types in Code
If you were to examine the Load event handler of the form-derived type, you will find that the Fill()
method of the custom data adapter is called upon startup, passing in the custom DataTable main-
tained by the custom
DataSet:
private void MainForm_Load(object sender, EventArgs e)
{
this.inventoryTableAdapter.Fill(this.inventoryDataSet.Inventory);
}
You can use this same custom data adapter object to update changes to the grid. Update the UI
of your form with a single
Button control (named btnUpdateInventory). Handle the Click event, and
author the following code within the event handler:
private void btnUpdateInventory_Click(object sender, EventArgs e)
{
// This will push any changes within the Inventory table back to
// the database for processing.
this.inventoryTableAdapter.Update(this.inventoryDataSet.Inventory);
// Get fresh copy for grid.
this.inventoryTableAdapter.Fill(this.inventoryDataSet.Inventory);
}
Run your application once again; add, delete, or update the records displayed in the grid; and
click the Update button. When you run the program again, you will find your changes are present
and accounted for.
Understand that you are able to make use of each of these strongly typed classes directly in
your code, in (more or less) the same way you have been doing throughout this chapter. For exam-
ple, assume you have updated your form with a new chunk of UI real estate (see Figure 23-27) that
allows the user to enter a new record using a series of text boxes (granted, this is a bit redundant for
this example, as the
DataGridView will do so on your behalf).
Within the
Click event handler of the new Button, you could author the following code:
private void btnAddRow_Click(object sender, EventArgs e)
{
// Get data from widgets
int id = int.Parse(txtCarID.Text);
string make = txtMake.Text;
string color = txtColor.Text;
string petName = txtPetName.Text;
// Use custom adapter to add row.
inventoryTableAdapter.Insert(id, make, color, petName);
// Refill table data.
this.inventoryTableAdapter.Fill(this.inventoryDataSet.Inventory);
}
CHAPTER 23 ■ ADO.NET PART II: THE DISCONNECTED LAYER830
8849CH23.qxd 10/22/07 1:55 PM Page 830
www.free-ebooks-download.org
Simpo PDF Merge and Split Unregistered Version -
Figure 23-27. A simple update to the form type
Or, if you so choose, you can manually add a new row:
private void btnAddRow_Click(object sender, EventArgs e)
{
// Get new Row.
InventoryDataSet.InventoryRow newRow =
inventoryDataSet.Inventory.NewInventoryRow();
newRow.CarID = int.Parse(txtCarID.Text);
newRow.Make = txtMake.Text;
newRow.Color = txtColor.Text;
newRow.PetName = txtPetName.Text;
inventoryDataSet.Inventory.AddInventoryRow(newRow);
// Use custom adapter to add row.
inventoryTableAdapter.Update(inventoryDataSet.Inventory);
// Refill table data.
this.inventoryTableAdapter.Fill(this.inventoryDataSet.Inventory);
}
■Source Code The VisualDataGridViewApp project is included under the Chapter 23 subdirectory.
Decoupling Autogenerated Code from the UI Layer
To close, allow me to point out that while the Data Source Configuration Wizard launched by the
DataGridView has done a fantastic job of authoring a ton of grungy code on our behalf, the previous
example hard-coded the data access logic directly within the user interface layer—a major design
faux pas. Ideally, this sort of code belongs in our
AutoLotDAL.dll assembly (or some other data
CHAPTER 23 ■ ADO.NET PART II: THE DISCONNECTED LAYER 831
8849CH23.qxd 10/22/07 1:55 PM Page 831
www.free-ebooks-download.org
Simpo PDF Merge and Split Unregistered Version -
access library). However, you may wonder how to harvest the code generated via the DataGridView’s
associated wizard in a Class Library project, given that there certainly is no form designer by
default.
Thankfully, you can activate the data design tools of Visual Studio 2008 from any sort of project
(UI based or otherwise) without the need to copy and paste massive amounts of code between proj-
ects. To illustrate some of your options, open your AutoLotDAL project once again and insert into
your project a new
DataSet type (named AutoLotDataSet) via the Project ➤ Add New Item menu
option (see Figure 23-28).
Figure 23-28. Inserting a new DataSet
This will open a blank Dataset Designer surface. At this point, use Server Explorer to connect to
a given database (you should already have a connection to AutoLot), and drag and drop each data-
base object (here, I did not bother to drag over the CreditRisk table) you wish to generate onto the
surface. In Figure 23-29, you can see each of the custom aspects of AutoLot are now accounted for.
If you look at the generated code, you will find a new batch of strongly typed
DataSets, DataTables,
and
DataRows, and a custom data adapter object for each table. Because the AutoLotDataSet type
contains code to fill and update all of the tables of the AutoLot database, the amount of code auto-
generated is more than an eye-popping 3,000 lines! However, much of this is grungy infrastructure
you can remain blissfully unaware of. As you can see in Figure 23-30, the
AutoLotDataSet type is
constructed in a way that is very close to the previous
InventoryDataSet type.
CHAPTER 23 ■ ADO.NET PART II: THE DISCONNECTED LAYER832
8849CH23.qxd 10/22/07 1:55 PM Page 832
www.free-ebooks-download.org
Simpo PDF Merge and Split Unregistered Version -
Figure 23-29. Our custom strongly typed types, this time within a Class Library project
Figure 23-30. The AutoLotDataSet
CHAPTER 23 ■ ADO.NET PART II: THE DISCONNECTED LAYER 833
8849CH23.qxd 10/22/07 1:55 PM Page 833
www.free-ebooks-download.org
Simpo PDF Merge and Split Unregistered Version -
As well, you will find a custom data adapter object for each of the database objects you dragged
onto the Dataset Designer surface as well as a helpful type named
TableAdapterManager that pro-
vides a single entry point to each object (see Figure 23-31).
Figure 23-31. The autogenerated data adapter objects
■Source Code The AutoLotDAL (Part 3) project is included under the Chapter 23 subdirectory.
A UI Front End: MultitabledDataSetApp (Redux)
Using these autogenerated types is quite simple, provided you are comfortable working with the
disconnected layer. The downloadable source code for this text contains a project named Multi-
tabledDataSetApp-Redux, which, as the name implies, is an update to the MultitabledDataSetApp
project you created earlier in this chapter.
Recall that the original example made use of a loosely typed
DataSet and a batch of
SqlDataAdapter types to move the table data to and fro. This updated version makes use of the third
iteration of
AutoLotDAL.dll and the wizard-generated types. While I won’t bother to list all of the
code here (as it is more or less the same as the first iteration of this project), here are the highlights:
• You no longer need to manually author an
App.config file or use the ConfigurationManager
to obtain the connection string, as this is handled via the Settings object.
• You are now making use of the strongly typed classes within the
AutoLotDAL and
AutoLotDAL.AutoLotDataSetTableAdapters namespaces.
CHAPTER 23 ■ ADO.NET PART II: THE DISCONNECTED LAYER834
8849CH23.qxd 10/22/07 1:55 PM Page 834
www.free-ebooks-download.org
Simpo PDF Merge and Split Unregistered Version -
• You are no longer required to manually create or configure the relationships between your
tables, as the Dataset Designer has done so automatically.
Regarding the last bullet point, be aware that the names the Dataset Designer gave the table
relationships are
different from the names we gave to them in the first iteration of this project.
Therefore, the
btnGetOrderInfo_Click() method must be updated to use the correct relationship
names (which can be seen on the designer surface of the Dataset Designer), for example:
private void btnGetOrderInfo_Click(object sender, System.EventArgs e)
{
// Need to update relationship name!
drsOrder = drsCust[0].GetChildRows(autoLotDS.Relations["FK_Orders_Customers"]);
// Need to update relationship name!
DataRow[] drsInv =
drsOrder[0].GetParentRows(autoLotDS.Relations["FK_Orders_Inventory"]);
}
■Source Code The MultitabledDataSetApp-Redux project is included under the Chapter 23 subdirectory.
Summary
This chapter dove into the details of the disconnected layer of ADO.NET. As you have seen, the
centerpiece of the disconnected layer is the
DataSet. This type is an in-memory representation of
any number of tables and any number of optional interrelationships, constraints, and expressions.
The beauty of establishing relations on your local tables is that you are able to programmatically
navigate between them while disconnected from the remote data store.
You also examined the role of the data adapter type in this chapter. Using this type (and the
related
SelectCommand, InsertCommand, UpdateCommand, and DeleteCommand properties), the adapter
can resolve changes in the
DataSet with the original data store. As well, you learned how to navigate
the object model of a
DataSet using the brute-force manual approach, as well as via strongly typed
objects, typically generated by the Dataset Designer tools of Visual Studio 2008.
CHAPTER 23 ■ ADO.NET PART II: THE DISCONNECTED LAYER 835
8849CH23.qxd 10/22/07 1:55 PM Page 835
www.free-ebooks-download.org
Simpo PDF Merge and Split Unregistered Version -
8849CH23.qxd 10/22/07 1:55 PM Page 836
www.free-ebooks-download.org
Simpo PDF Merge and Split Unregistered Version -