Pro C# 2008 and the .NET 3.5 Platform, Fourth Edition phần 8 ppsx
Bạn đang xem bản rút gọn của tài liệu. Xem và tải ngay bản đầy đủ của tài liệu tại đây (4.88 MB, 140 trang )
If you are interested in learning more about building custom activities, the .NET Framework 3.5
SDK documentation provides a number of interesting examples, including the construction of a
“Send E-mail Activity.” For more details, simply browse the Custom Activities samples found under
the WF Samples node of the provided documentation (see Figure 26-29).
Figure 26-29. The .NET Framework 3.5 SDK documentation provides numerous workflow examples.
Summary
Windows Workflow Foundation (WF) is an API that was released with .NET 3.0. In essence, WF
allows you to model an application’s internal business processes directly within the application
itself. Beyond simply modeling the overall workflow, however, WF provides a complete runtime
engine and several services that round out this API’s overall functionality (transaction services, per-
sistence and tracking services, etc.). While this introductory chapter did not examine these services
in any great detail, do remember that a production-level WF application will most certainly make
use of these facilities.
When building a workflow-enabled application, Visual Studio 2008 provides several designer
tools, including a workflow designer, configuration using the Properties window, and (most impor-
tant) the Windows Workflow Toolbox. Here, you will find numerous built-in
activities that constitute
the overall composition of a particular workflow. Once you have modeled your workflow, you are
then able to execute the workflow instance using the
WorkflowRuntime type, using your host of
choice.
CHAPTER 26 ■ INTRODUCING WINDOWS WORKFLOW FOUNDATION952
8849CH26.qxd 10/10/07 11:46 AM Page 952
www.free-ebooks-download.org
Simpo PDF Merge and Split Unregistered Version -
Desktop User Interfaces
PART 6
8849CH27.qxd 10/16/07 11:59 AM Page 953
www.free-ebooks-download.org
Simpo PDF Merge and Split Unregistered Version -
8849CH27.qxd 10/16/07 11:59 AM Page 954
www.free-ebooks-download.org
Simpo PDF Merge and Split Unregistered Version -
Programming with Windows Forms
Since the release of the .NET platform (circa 2001), the base class libraries have included a partic-
ular API named Windows Forms (represented by the
System.Windows.Forms.dll assembly). As you
may know, the Windows Forms toolkit provides the types necessary to build desktop graphical user
interfaces (GUIs), create custom controls, manage resources (string tables, icons, etc.), and perform
other GUI-centric programming tasks. In addition, a separate API named GDI+ (bundled within the
System.Drawing.dll assembly) provides additional types that allow programmers to generate 2D
graphics, interact with networked printers, and manipulate image data.
The Windows Forms (and GDI+) APIs are still alive and well with the release of .NET 3.5, and
will exist within the base class library for quite some time (arguably forever, in fact). However, since
the release of .NET 3.0, Microsoft shipped a brand new GUI toolkit called Windows Presentation
Foundation (WPF). As you will see beginning in the next chapter, WPF provides a massive amount
of horsepower that can be used to build bleeding-edge user interfaces.
The point of this chapter, however, is to provide a tour of the traditional Windows Forms API
for one simple reason: many GUI applications simply might not require the horsepower offered by
WPF. In fact, for many UI applications, WPF can be overkill. Furthermore, there are many existing
Windows Forms applications scattered throughout the .NET universe that will need to be main-
tained.
Given these points, in this chapter you will come to understand the Windows Forms program-
ming model, work with the integrated designers of Visual Studio 2008, experiment with numerous
Windows Forms controls, and receive an overview of graphics programming using GDI+. To pull
this information together in a cohesive whole, we wrap things up by creating a (semicapable) paint-
ing application.
■Note Earlier editions of this text included three (fairly lengthy) chapters dedicated to the Windows Forms API.
Given that WPF is poised to become the preferred toolkit for .NET GUI development, this edition has consolidated
Windows Forms/GDI+ coverage to this single chapter. However, those who have purchased this book can down-
load the previous Windows Forms/GDI+ chapters in PDF format from the Apress website for free.
The Windows Forms Namespaces
The Windows Forms API consists of hundreds of types (classes, interfaces, structures, enums,
and delegates) that are organized within various namespaces of the
System.Windows.Forms.dll
assembly. Figure 27-1 shows these namespaces displayed through the Visual Studio 2008 object
browser.
955
CHAPTER 27
8849CH27.qxd 10/16/07 11:59 AM Page 955
www.free-ebooks-download.org
Simpo PDF Merge and Split Unregistered Version -
Figure 27-1. The Windows Forms namespaces of System.Windows.Forms.dll
By far and away, the most important namespace is System.Windows.Forms. From a high level,
the types within the
System.Windows.Forms namespace can be grouped into the following broad
categories:
•
Core infrastructure: These are types that represent the core operations of a Windows Forms
program (
Form, Application, etc.) and various types to facilitate interoperability with legacy
ActiveX controls.
•
Controls: These are types used to create rich UIs (Button, MenuStrip, ProgressBar,
DataGridView, etc.), all of which derive from the Control base class. Controls are
configurable at design time and are visible (by default) at runtime.
•
Components: These are types that do not derive from the Control base class but still provide
visual features to a Windows Forms program (
ToolTip, ErrorProvider, etc.). Many compo-
nents (such as the
Timer and BackgroundWorker) are not visible at runtime, but can be
configured visually at design time.
•
Common dialog boxes:Windows Forms provides a number of canned dialog boxes for com-
mon operations (
OpenFileDialog, PrintDialog, ColorDialog, etc.). As you would hope, you
can certainly build your own custom dialog boxes if the standard dialog boxes do not suit
your needs.
Given that the total number of types within
System.Windows.Forms is well over 100 strong, it
would be redundant (not to mention a terrible waste of paper) to list every member of the Windows
Forms family. As you work through this chapter, you will gain a firm foundation upon which to
build. However, be sure to check out the .NET Framework 3.5 SDK documentation for further
details.
Building a Simple Windows Forms Application
(IDE-Free)
As you would expect, modern .NET IDEs (such as Visual Studio 2008, C# 2008 Express, or
SharpDevelop) provide numerous form designers, visual editors, and integrated code generation
tools (aka wizards) to facilitate the construction of a Windows Forms application. While these tools
are extremely useful, they can also hinder the process of learning Windows Forms, as these same
tools tend to generate a good deal of boilerplate code that can obscure the core object model.
CHAPTER 27 ■ PROGRAMMING WITH WINDOWS FORMS956
8849CH27.qxd 10/16/07 11:59 AM Page 956
www.free-ebooks-download.org
Simpo PDF Merge and Split Unregistered Version -
Given this, our first Windows Forms example will be created using a no-frills text editor and the C#
command-line compiler (see Chapter 2 for the details of working with
csc.exe).
To begin, create a folder named SimpleWinFormsApp (I’d suggest creating this directly off your
C drive), open a Visual Studio 2008 command prompt, and using your text editor of choice, create a
file named
SimpleWFApp.cs. Author the following code within your new file, and save it in the
SimpleWinFormsApp folder.
// The minimum required namespaces.
using System;
using System.Windows.Forms;
namespace SimpleWFApp
{
// This is our application object.
class Program
{
static void Main()
{
Application.Run(new MainWindow());
}
}
// This is our main window.
class MainWindow : Form {}
}
This code represents the absolute simplest Windows Forms application. At bare minimum,
we need a class type that extends the
Form base class and a Main() method to call the static
Application.Run() method (more details on Form and Application later in this chapter). You can
compile this application using the following command set (recall from Chapter 2 that the default
response file [
csc.rsp] automatically references numerous .NET assemblies, including System.
Windows.Forms.dll
and System.Drawing.dll):
csc /target:winexe *.cs
■Note Technically speaking, you can build a Windows application at the command line using the /target:exe
option; however, if you do, you will find that a command window will be looming in the background (and it will stay
there until you shut down the main window). When you specify
/target:winexe, your executable runs as a native
Windows Forms application (without the looming command window).
If you were to run your application, you would find you have a resizable, minimizable, maxi-
mizable, and closable topmost window (see Figure 27-2).
Figure 27-2. A very simple Windows Forms application
CHAPTER 27 ■ PROGRAMMING WITH WINDOWS FORMS 957
8849CH27.qxd 10/16/07 11:59 AM Page 957
www.free-ebooks-download.org
Simpo PDF Merge and Split Unregistered Version -
Granted, our current application is not terribly exciting, but it does illustrate how simple a
Windows Forms application can be. To spruce things up a bit, let’s add a custom constructor to our
MainWindow type, which allows the caller to set various properties on the window to be displayed.
For example:
// This is our main window.
class MainWindow : Form
{
public MainWindow(string title, int height, int width)
{
// Set various properties from our parent classes.
Text = title;
Width = width;
Height = height;
// Inherited method to center the form on the screen.
CenterToScreen();
}
}
We can now update the call to Application.Run() as follows:
static void Main()
{
Application.Run(
new MainWindow("My Window", 200, 300));
}
While this is a step in the right direction, any window worth its salt will require various user
interface elements (menu systems, status bars, buttons, etc.) to allow for input. To understand how
a
Form-derived type can contain such elements, you must understand the role of the Controls prop-
erty and the underlying controls collection.
Populating the Controls Collection
The System.Windows.Forms.Control base class (which is the inheritance chain of the Form type)
defines a property named
Controls. This property wraps a custom collection nested in the Control
class named ControlsCollection. This collection (as the name suggests) references each UI element
maintained by the derived type. Like other containers, this type supports a number of methods to
insert, remove, and find a given UI widget (see Table 27-1).
Table 27-1. ControlCollection Members
Member Meaning in Life
Add() Used to insert a new Control-derived type (or array of types) in the collection
AddRange()
Clear()
Removes all entries in the collection
Count Returns the number of items in the collection
GetEnumerator() Returns the IEnumerator interface for this collection
Remove() Used to remove a control from the collection
RemoveAt()
When you wish to populate the UI of a Form-derived type, you will typically follow a very pre-
dictable series of steps:
CHAPTER 27 ■ PROGRAMMING WITH WINDOWS FORMS958
8849CH27.qxd 10/16/07 11:59 AM Page 958
www.free-ebooks-download.org
Simpo PDF Merge and Split Unregistered Version -
• Define a member variable of a given UI element within the Form derived class.
• Configure the look and feel of the UI element.
• Add the UI element to the form’s
ControlsCollection container via a call to Controls.Add().
Assume you wish to update your
MainWindow class to support a File ➤ Exit menu system. Here
are the relevant updates, with code analysis to follow:
class MainWindow : Form
{
// Members for a simple menu system.
private MenuStrip mnuMainMenu = new MenuStrip();
private ToolStripMenuItem mnuFile = new ToolStripMenuItem();
private ToolStripMenuItem mnuFileExit = new ToolStripMenuItem();
public MainWindow(string title, int height, int width)
{
// Method to create our menu system.
BuildMenuSystem();
}
private void BuildMenuSystem()
{
// Add the File menu item to the main menu.
mnuFile.Text = "&File";
mnuMainMenu.Items.Add(mnuFile);
// Now add the Exit menu to the File menu.
mnuFileExit.Text = "E&xit";
mnuFile.DropDownItems.Add(mnuFileExit);
mnuFileExit.Click += new System.EventHandler(this.mnuFileExit_Click);
// Finally, set the menu for this Form.
Controls.Add(this.mnuMainMenu);
MainMenuStrip = this.mnuMainMenu;
}
// Handler for the File | Exit event.
private void mnuFileExit_Click(object sender, EventArgs e)
{
Application.Exit();
}
}
First off, notice that the MainWindow type now maintains three new member variables. The
MenuStrip type represents the entirety of the menu system, where a given ToolStripMenuItem
represents any given topmost menu item (e.g., File) or submenu item (e.g., Exit) supported by
the host.
■Note If you have programmed with earlier versions of Windows Forms (1.0 or 1.1), you may recall that the
MainMenu type was used to hold any number of MenuItem objects. The MenuStrip control (introduced with
.NET 2.0) is similar to
MainMenu; however, MenuStrip is able to contain controls beyond “normal menu items”
(combo boxes, text boxes, etc.).
CHAPTER 27 ■ PROGRAMMING WITH WINDOWS FORMS 959
8849CH27.qxd 10/16/07 11:59 AM Page 959
www.free-ebooks-download.org
Simpo PDF Merge and Split Unregistered Version -
The menu system is configured within our BuildMenuSystem() helper function. Notice that the
text of each
ToolStripMenuItem is controlled via the Text property, each of which has been assigned
a string literal containing an embedded ampersand symbol. As you may already know, this syntax
sets the Alt key shortcut, thus selecting Alt+F will activate the File menu, while selecting Alt+X will
activate the Exit menu. Also notice that the File
ToolStripMenuItem object (mnuFile) adds subitems
via the
DropDownItems property. The MenuStrip object itself adds a topmost menu item via the Items
property.
Once the menu system has been established, it is then added to the controls collection (via the
Controls property), after which we assign our MenuStrip object to the inherited MainMenuStrip
property. While this step may seem redundant, having a specific property such as MainMenuStrip
makes it possible to dynamically establish which menu system to show a user, perhaps due to user
preferences or security settings.
The only other point of interest is the fact that we are
handling the
Click event of the File ➤ Exit menu, in
order to capture when the user selects this submenu. The
Click event works in conjunction with a standard dele-
gate type named
System.EventHandler. This event can
only call methods that take a
System.Object as the first
parameter and a
System.EventArgs as the second. Here,
our delegate target (
mnuFileExit_Click) has been imple-
mented to terminate the entire Windows application
using the static
Application.Exit() method.
Once this application has been recompiled and exe-
cuted, you will now find your simple window sports a
custom menu system (see Figure 27-3).
The Role of System.EventArgs and System.EventHandler
System.EventHandler is one of many delegate types used within the Windows Forms (and ASP.NET)
APIs during the event-handling process. As you have seen, this delegate can only point to methods
where the first argument is of type
System.Object, which is a reference to the type that sent the
event. For example, if we were to update the implementation of the
mnuFileExit_Click() method
as follows:
private void mnuFileExit_Click(object sender, EventArgs e)
{
MessageBox.Show(string.Format("{0} sent this event", sender.ToString()));
Application.Exit();
}
we would be able to verify that the mnuFileExit type sent the event, as the string
"E&xit sent this event"
is displayed within the message box. You may be wondering what purpose the second argument,
System.EventArgs, serves. In reality, the System.EventArgs type brings little to the table, as it simply
extends
Object and provides practically nothing by way of addition functionality:
public class EventArgs
{
public static readonly EventArgs Empty;
static EventArgs();
public EventArgs();
}
CHAPTER 27 ■ PROGRAMMING WITH WINDOWS FORMS960
Figure 27-3. A simple window,with a
simple menu system
8849CH27.qxd 10/16/07 11:59 AM Page 960
www.free-ebooks-download.org
Simpo PDF Merge and Split Unregistered Version -
This type is, however, very useful in the overall scheme of .NET event handling, in that it is the
parent to many (very useful) derived types. For example, the
MouseEventArgs type extends EventArgs
to provide details regarding the current state of the mouse. KeyEventArgs also extends EventArgs to
provide details of the state of the keyboard (such as which key was pressed),
PaintEventArgs
extends EventArgs to yield graphically relevant data, and so forth. You will see numerous EventArgs
descendents (and the delegates that make use of them) not when working with Windows Forms, but
with the WPF and ASP.NET APIs as well.
In any case, while we could most certainly continue to build more and more functionality into
our
MainWindow (status bars, dialog boxes, etc.) using a simple text editor, we will eventually end up
with hand cramps, as we have to manually author all the grungy control configuration logic. Thank-
fully, Visual Studio 2008 provides numerous integrated designers that take care of these details on
our behalf. As we use these tools during the remainder of this chapter, always remember that they
are authoring everyday C# code. There is nothing “magical” about them whatsoever.
■Source Code The SimpleWinFormsApp project can be found under the Chapter 27 subdirectory.
The Visual Studio Windows Forms Project Template
When you wish to leverage the Windows Forms designer tools of Visual Studio 2008, your first step is
to select the Windows Application project template via the File
➤ New Project menu option. To get
comfortable with the core Windows Forms designer tools, create a new application named
SimpleVSWinFormsApp (see Figure 27-4).
Figure 27-4. The Visual Studio Windows Forms project template
CHAPTER 27 ■ PROGRAMMING WITH WINDOWS FORMS 961
8849CH27.qxd 10/16/07 11:59 AM Page 961
www.free-ebooks-download.org
Simpo PDF Merge and Split Unregistered Version -
The Visual Designer Surface
Before we begin to build more interesting Windows applications, this first example will re-create the
previous example while leveraging the designer tools. First of all, once you create a new Windows
Forms project, you will notice that Visual Studio 2008 presents a designer surface to which you can
drag and drop any number of controls. This same designer can be used to configure the initial size
of the window, simply by resizing the form itself via the supplied grab handles (see Figure 27-5).
Figure 27-5. The visual Forms designer
When you wish to configure the look and feel of your window (as well as any control placed on
a form), you will do so using the Properties window. As you will see over the course of this chapter,
this window can be used to assign values to properties as well as establish event handlers for a given
widget. When you have a collection of controls on the designer surface, they can be selected for
configuration using the drop-down list box mounted on the top of the Properties window.
Currently our form is devoid of content, so we only see a listing for the initial
Form, which has
been given a default name of
Form1 as shown in the read-only (Name) property (see Figure 27-6).
Figure 27-6. The Properties window can be used to set properties and handle events.
■Note The Properties window can be configured to display its content by category or alphabetically using the
first two buttons mounted beneath the drop-down list box. I’d suggest that you sort the items alphabetically to
quickly find a given property or event.
CHAPTER 27 ■ PROGRAMMING WITH WINDOWS FORMS962
8849CH27.qxd 10/16/07 11:59 AM Page 962
www.free-ebooks-download.org
Simpo PDF Merge and Split Unregistered Version -
The next designer element to be aware of is the Solution Explorer window. While all Visual
Studio projects support this window, when you are building Windows Forms applications, it is
especially helpful in that you can (1) quickly change the name of the file and related class for any
window and (2) view the file that contains the designer-maintained code (more information on
this tidbit in just a moment). For now, simply right-click the
Form1.cs icon and select the Rename
option. Name this initial window to the more fitting
MainWindow.cs. Figure 27-7 shows the end result.
Figure 27-7. The Solution Explorer window allows you to rename your Form-derived type and the
related files.
Dissecting the Initial Form
Before we build our menu system, let’s examine exactly what Visual Studio 2008 has created by
default. First, right-click the
MainWindow.cs icon from the Solution Explorer window and select
View Code. Notice that the form has been defined as a partial type, which as you may recall from
Chapter 5 allows a single type to be defined within multiple code files. Also note the form’s con-
structor is making a call to a method named
InitializeComponent() and the fact that your type
“is-a”
Form.
namespace SimpleVSWinFormsApp
{
public partial class MainWindow : Form
{
public MainWindow()
{
InitializeComponent();
}
}
}
As you may be expecting, InitializeComponent() is defined in a separate file that completes
the partial class definition. As a naming convention, this file always ends in
.Designer.cs, preceded
by the name of the related C# file containing the
Form-derived type. Using the Solution Explorer
window, open your
MainWindow.Designer.cs file. Now, ponder the following code (stripped of the
code comments for simplicity):
partial class MainWindow
{
private System.ComponentModel.IContainer components = null;
protected override void Dispose(bool disposing)
{
if (disposing && (components != null))
CHAPTER 27 ■ PROGRAMMING WITH WINDOWS FORMS 963
8849CH27.qxd 10/16/07 11:59 AM Page 963
www.free-ebooks-download.org
Simpo PDF Merge and Split Unregistered Version -
{
components.Dispose();
}
base.Dispose(disposing);
}
private void InitializeComponent()
{
this.components = new System.ComponentModel.Container();
this.AutoScaleMode = System.Windows.Forms.AutoScaleMode.Font;
this.Text = "Form1";
}
}
The IContainer member variable and Dispose() methods are little more than infrastructure
used by the Visual Studio designer tools. However, do notice that the
InitializeComponent() is pres-
ent and accounted for. Not only is this method invoked by a form’s constructor at runtime, Visual
Studio makes use of this same method at design time to correctly render the UI on the Forms
designer. To illustrate, change the value assigned to the
Text property of the window to "My Main
Window"
. Once you activate the designer, you will find the form’s caption updates accordingly.
As well, when you are making use of the visual design tools (such as the Properties window),
the IDE will update
InitializeComponent() automatically. To illustrate this aspect of the Windows
Forms designer tools, ensure the Forms designer is the active window within the IDE and find the
Opacity property listed in the Properties window. Change this value to 0.8 (80%), which will give
your window a slightly transparent look and feel the next time you compile and run your program.
Once you have made this change, examine the implementation of
InitializeComponent() once
again:
private void InitializeComponent()
{
this.SuspendLayout();
//
// MainWindow
//
this.AutoScaleDimensions = new System.Drawing.SizeF(6F, 13F);
this.AutoScaleMode = System.Windows.Forms.AutoScaleMode.Font;
this.ClientSize = new System.Drawing.Size(284, 264);
this.Name = "MainWindow";
this.Opacity = 0.8;
this.Text = "My Main Window";
this.ResumeLayout(false);
}
For all practical purposes, when you are building a Windows Forms application using Visual
Studio, you can (and typically should) ignore the
*.Designer.cs files and allow the IDE to maintain
them on your behalf. If you were to author syntactically (or logically) incorrect code within
InitializeComponent(), you might break the designer. As well, Visual Studio often reformats this
method at design time. Thus, if you were to add custom code to
InitializeComponent(), the IDE
may delete it! In any case, simply remember that each window of a Windows Forms application is
composed using partial classes.
Dissecting the Program Class
Beyond providing implementation code for an initial Form-derived type, Windows Application proj-
ect types also provide a static class (named
Program) that defines your program’s entry point—Main():
CHAPTER 27 ■ PROGRAMMING WITH WINDOWS FORMS964
8849CH27.qxd 10/16/07 11:59 AM Page 964
www.free-ebooks-download.org
Simpo PDF Merge and Split Unregistered Version -
static class Program
{
[STAThread]
static void Main()
{
Application.EnableVisualStyles();
Application.SetCompatibleTextRenderingDefault(false);
Application.Run(new MainWindow());
}
}
As expected, the Main() method invokes Application.Run(), as well as a few other calls on the
Application type to establish some basic rendering options. Last but not least, note that the Main()
method has been adorned with the [STAThread] attribute. This informs the runtime that if this
thread happens to create any classic COM objects (including legacy ActiveX UI controls) during its
lifetime, they are to be placed in a COM-maintained area termed the
single-threaded apartment. In
a nutshell, this ensures that the COM objects are thread-safe, even if the author of a given COM
object did not explicitly include code to ensure this is the case.
Visually Building a Menu System
To wrap up our look at the Windows Forms visual designer tools and move on to some more illustra-
tive examples, activate the Forms designer window, locate the Toolbox window of Visual Studio
2008, and find the
MenuStrip control within the Menus & Toolbars node (see Figure 27-8).
Figure 27-8. The Toolbox window displays the Windows Forms controls that may be added to your
designer surface.
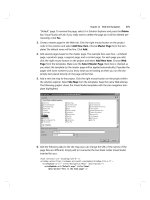
Drag a MenuStrip control onto the top of your Forms designer. Notice that Visual Studio
responds by activating the menu editor. If you look closely at this editor, you will notice a (very)
small triangle on the top-right of the control. If you click this icon, you will open a context-sensitive
inline editor that allows you to make numerous property settings at once (be aware that many Win-
dows Forms controls have similar inline editors). Just to see an example, click the Insert Standard
Items option, as shown in Figure 27-9.
CHAPTER 27 ■ PROGRAMMING WITH WINDOWS FORMS 965
8849CH27.qxd 10/16/07 11:59 AM Page 965
www.free-ebooks-download.org
Simpo PDF Merge and Split Unregistered Version -
Figure 27-9. The inline menu editor
As you can see, Visual Studio was kind enough to establish an entire menu system on your
behalf. Now, open your designer-maintained file (
MainWindow.Designer.cs) and note the numerous
lines of code added to
InitializeComponent(), as well as several new member variables that repre-
sent your menu system (as you may agree, designer tools are
good things). Finally, flip back to the
designer and undo the previous operation by clicking the Ctrl+Z keyboard combination. This will
bring you back to the initial menu editor and remove the generated code. Using the menu designer,
simply type in a topmost
File menu item followed by an Exit submenu (see Figure 27-10).
Figure 27-10. Manually building our menu system
CHAPTER 27 ■ PROGRAMMING WITH WINDOWS FORMS966
8849CH27.qxd 10/16/07 11:59 AM Page 966
www.free-ebooks-download.org
Simpo PDF Merge and Split Unregistered Version -
If you take a look at InitializeComponent(), you will find the same sort of code you authored
by hand in the first example of this chapter. To complete this exercise, flip back to the Forms
designer and click the lightning bolt button mounted on the Properties window. This will show you
all of the events you can handle for the selected control. Be sure you have selected the Exit menu
(named
exitToolStripMenuItem by default) and locate the Click event (see Figure 27-11).
Figure 27-11. Establishing events with the IDE
At this point you can enter in the name of the method to be called when the item is clicked, or
if you are feeling lazy at this point, simply double-click the event listed in the Properties window.
This will let the IDE pick the name of the event handler on your behalf (which follows the pattern
NameOfControl_NameOfEvent()).In either case, the IDE will create stub code, to which you can fill
in the implementation details. For example:
public partial class MainWindow : Form
{
public MainWindow()
{
InitializeComponent();
CenterToScreen();
}
private void exitToolStripMenuItem_Click(object sender, EventArgs e)
{
Application.Exit();
}
}
And if you are interested, take a quick peek at InitializeComponent(). As you can see, the nec-
essary event riggings have also been accounted for:
this.exitToolStripMenuItem.Click +=
new System.EventHandler(this.exitToolStripMenuItem_Click);
Hopefully, you now feel more comfortable moving around the IDE when building Windows
Forms applications. While there are obviously many additional shortcuts, editors, and integrated
code wizards, this information is more than enough to press onward.
CHAPTER 27 ■ PROGRAMMING WITH WINDOWS FORMS 967
8849CH27.qxd 10/16/07 11:59 AM Page 967
www.free-ebooks-download.org
Simpo PDF Merge and Split Unregistered Version -
The Anatomy of a Form
Now that you have examined how to build simple Windows Forms applications with (and without)
the aid of Visual Studio, let’s examine the
Form type in greater detail. In the world of Windows Forms,
the
Form type represents any window in the application, including topmost main windows, child
windows of a multiple document interface (MDI) application, as well as modal and modaless dialog
boxes. As shown in Figure 27-12, the
Form type gathers a good deal of functionality from its parent
classes and the numerous interfaces it implements.
Figure 27-12. The inheritance chain of System.Windows.Forms.Form
Table 27-2 offers a high-level look at each parent class in the Form’s inheritance chain.
Table 27-2. Base Classes in the Form Inheritance Chain
Parent Class Meaning in Life
System.Object Like any class in .NET, a Form “is-a” object.
System.MarshalByRefObject Types deriving from this class are accessed remotely
via a
reference to (not a local copy of) the remote type.
System.ComponentModel.Component This class provides a default implementation of the
IComponent interface. In the .NET universe, a
component is a type that supports design-time
editing, but is not necessarily visible at runtime.
System.Windows.Forms.Control This class defines common UI members for all
Windows Forms UI controls, including the
Form
type itself.
System.Windows.Forms.ScrollableControl This class defines support for horizontal and vertical
scrollbars, as well as members, which allow you to
manage the viewport shown within the scrollable
region.
CHAPTER 27 ■ PROGRAMMING WITH WINDOWS FORMS968
8849CH27.qxd 10/16/07 11:59 AM Page 968
www.free-ebooks-download.org
Simpo PDF Merge and Split Unregistered Version -
Parent Class Meaning in Life
System.Windows.Forms.ContainerControl This class provides focus-management functionality
for controls that can function as a container for other
controls.
System.Windows.Forms.Form This class represents any custom form, MDI child, or
dialog box.
Although the complete derivation of a
Form type involves numerous base classes and inter-
faces, do understand that you are
not required to learn the role of each and every member from
each and every parent class or implemented interface to be a proficient Windows Forms developer.
In fact, the majority of the members (specifically, properties and events) you will use on a daily
basis are easily set using the Visual Studio 2008 Properties window. This being said, it is important
that you understand the functionality provided by the
Control and Form parent classes.
The Functionality of the Control Class
The System.Windows.Forms.Control class establishes the common behaviors required by any GUI
type. The core members of
Control allow you to configure the size and position of a control, capture
keyboard and mouse input, get or set the focus/visibility of a member, and so forth. Table 27-3
defines some properties of interest, grouped by related functionality.
Table 27-3. Core Properties of the Control Type
Property Meaning in Life
BackColor These properties define the core UI of the control (colors, font for text,
ForeColor mouse cursor to display when the mouse is over the widget, etc.).
BackgroundImage
Font
Cursor
Anchor
These properties control how the control should be positioned within the
Dock container.
AutoSize
Top
These properties specify the current dimensions of the control.
Left
Bottom
Right
Bounds
ClientRectangle
Height
Width
Enabled
These properties each return a Boolean that specifies the state of the current
Focused control.
Visible
ModifierKeys
This static property checks the current state of the modifier keys (Shift, Ctrl,
and Alt) and returns the state in a
Keys type.
MouseButtons This static property checks the current state of the mouse buttons (left, right,
and middle mouse buttons) and returns this state in a
MouseButtons type.
TabIndex These properties are used to configure the tab order of the control.
TabStop
Continued
CHAPTER 27 ■ PROGRAMMING WITH WINDOWS FORMS 969
8849CH27.qxd 10/16/07 11:59 AM Page 969
www.free-ebooks-download.org
Simpo PDF Merge and Split Unregistered Version -
Table 27-3. Continued
Property Meaning in Life
Opacity This property determines the opacity of the control (0.0 is completely
transparent; 1.0 is completely opaque).
Text This property indicates the string data associated with this control.
Controls This property allows you to access a strongly typed collection
(
ControlsCollection) that contains any child controls within the
current control.
As you would guess, the
Control class also defines a number of events that allow you to inter-
cept mouse, keyboard, painting, and drag-and-drop activities (among other things). Table 27-4 lists
some events of interest, grouped by related functionality.
Table 27-4. Events of the Control Type
Event Meaning in Life
Click Various events that allow you to interact with the mouse
DoubleClick
MouseEnter
MouseLeave
MouseDown
MouseUp
MouseMove
MouseHover
MouseWheel
KeyPress
Various events that allow you to interact with the keyboard
KeyUp
KeyDown
DragDrop
Various events used to monitor drag-and-drop activity
DragEnter
DragLeave
DragOver
Paint An event that allows you to interact with the graphical rendering services of GDI+
Finally, the
Control base class also defines a number of methods that allow you to interact with
any
Control-derived type. As you examine the methods of the Control type, you will notice that a
good number of them have an
On prefix followed by the name of a specific event (OnMouseMove,
OnKeyUp, OnPaint, etc.). Each of these On-prefixed virtual methods is the default event handler for its
respective event. If you override any of these virtual members, you gain the ability to perform any
necessary pre- or postprocessing of the event before (or after) invoking your parent’s default imple-
mentation:
public partial class MainWindow : Form
{
protected
override void OnMouseDown(MouseEventArgs e)
{
// Add custom code for MouseDown event.
// Call parent implementation when finished.
base.OnMouseDown(e);
}
}
CHAPTER 27 ■ PROGRAMMING WITH WINDOWS FORMS970
8849CH27.qxd 10/16/07 11:59 AM Page 970
www.free-ebooks-download.org
Simpo PDF Merge and Split Unregistered Version -
While this can be helpful in some circumstances (especially if you are building a custom con-
trol that derives from a standard control), you will often handle events using the standard C# event
syntax (in fact, this is the default behavior of the Visual Studio designers). When you handle events
in this manner, the framework will call your custom event handler once the parent’s implementa-
tion has completed. For example, here is how you can manually handle the
MouseDown event:
public partial class MainWindow : Form
{
public MainWindow()
{
MouseDown += new MouseEventHandler(MainWindow_MouseDown);
}
private void MainWindow_MouseDown(object sender, MouseEventArgs e)
{
// Add code for MouseDown event.
}
}
Beyond these OnXXX() methods, here are a few other methods to be aware of:
•
Hide(): Hides the control and sets the Visible property to false
• Show(): Shows the control and sets the Visible property to true
• Invalidate(): Forces the control to redraw itself by sending a Paint event (more information
on graphical rendering in the section “Rendering Graphical Data Using GDI+” later in this
chapter).
The Functionality of the Form Class
The Form class is typically (but not necessarily) the direct base class for your custom Form types.
In addition to the large set of members inherited from the
Control, ScrollableControl, and
ContainerControl classes, the Form type adds additional functionality in particular to main win-
dows, MDI child windows, and dialog boxes. Let’s start with the core properties in Table 27-5.
Table 27-5. Properties of the Form Type
Property Meaning in Life
AcceptButton Gets or sets the button on the form that is clicked when the user
presses the Enter key.
ActiveMDIChild Used within the context of an MDI application.
IsMDIChildIsMDIContainer
CancelButton
Gets or sets the button control that will be clicked when the user
presses the Esc key.
ControlBox Gets or sets a value indicating whether the form has a control box.
FormBorderStyle Gets or sets the border style of the form. Used in conjunction with
the
FormBorderStyle enumeration.
Menu Gets or sets the menu to dock on the form.
MaximizeBox Used to determine whether this form will enable the maximize
MinimizeBox and minimize boxes.
ShowInTaskbar Determines whether this form will be seen on the Windows taskbar.
Continued
CHAPTER 27 ■ PROGRAMMING WITH WINDOWS FORMS 971
8849CH27.qxd 10/16/07 11:59 AM Page 971
www.free-ebooks-download.org
Simpo PDF Merge and Split Unregistered Version -
Table 27-5. Continued
Property Meaning in Life
StartPosition Gets or sets the starting position of the form at runtime, as specified
by the
FormStartPosition enumeration.
WindowState Configures how the form is to be displayed on startup. Used in
conjunction with the FormWindowState enumeration.
In addition to numerous
On-prefixed default event handlers, Table 27-6 gives a list of some core
methods defined by the
Form type.
Table 27-6. Key Methods of the Form Type
Method Meaning in Life
Activate() Activates a given form and gives it focus
Close() Closes a form
CenterToScreen() Places the form in the dead-center of the screen
LayoutMDI() Arranges each child form (as specified by the LayoutMDI enumeration) within
the parent form
ShowDialog() Displays a form as a modal dialog box
Finally, the
Form class defines a number of events, many of which fire during the form’s lifetime.
Table 27-7 hits the highlights.
Table 27-7. Select Events of the Form Type
Event Meaning in Life
Activated Occurs whenever the form is activated, meaning the form has been given the
current focus on the desktop
Closed, Closing Used to determine when the form is about to close or has closed
Deactivate Occurs whenever the form is deactivated, meaning the form has lost current
focus on the desktop
Load Occurs after the form has been allocated into memory, but is not yet visible
on the screen
MDIChildActive Sent when a child window is activated
The Life Cycle of a Form Type
If you have programmed user interfaces using GUI toolkits such as Java Swing, Mac OS X Cocoa, or
the raw Win32 API, you are aware that “window types” have a number of events that fire during their
lifetime. The same holds true for Windows Forms. As you have seen, the life of a form begins when
the type constructor is called prior to being passed into the
Application.Run() method.
Once the object has been allocated on the managed heap, the framework fires the
Load event.
Within a
Load event handler, you are free to configure the look and feel of the Form, prepare any con-
tained child controls (such as
ListBoxes, TreeViews, and whatnot), or simply allocate resources used
during the
Form’s operation (database connections, proxies to remote objects, and whatnot).
Once the
Load event has fired, the next event to fire is Activated. This event fires when the form
receives focus as the active window on the desktop. The logical counterpart to the
Activated event
CHAPTER 27 ■ PROGRAMMING WITH WINDOWS FORMS972
8849CH27.qxd 10/16/07 11:59 AM Page 972
www.free-ebooks-download.org
Simpo PDF Merge and Split Unregistered Version -
is (of course) Deactivate, which fires when the form loses focus as the active window. As you can
guess, the
Activated and Deactivate events can fire numerous times over the life of a given Form
type as the user navigates between active applications.
When the user has chosen to close the form in question, two close-centric events fire:
Closing
and Closed. The Closing event is fired first and is an ideal place to prompt the end user with the
much hated (but useful) “Are you
sure you wish to close this application?” message. This conforma-
tional step is quite helpful to ensure the user has a chance to save any application-centric data
before terminating the program.
The
Closing event works in conjunction with the CancelEventHandler delegate defined in the
System.ComponentModel namespace. If you set the CancelEventArgs.Cancel property to true, you
prevent the window from being destroyed and instruct it to return to normal operation. If you set
CancelEventArgs.Cancel to false, the Closed event fires, and the Windows Forms application exits,
which unloads the AppDomain and terminates the process.
To solidify the sequence of events that take place during a form’s lifetime, assume you have
a new Windows Forms project named FormLifeTime and have renamed the initial form to
MainWindow.cs (via Solution Explorer). Now, within your form’s constructor, handle the Load,
Activated, Deactivate, Closing, and Closed events (recall from Chapter 11 that the IDE will auto-
generate the correct delegate and event handler when you press the Tab key twice after typing
+=):
public MainWindow()
{
InitializeComponent();
// Handle various lifetime events.
Closing += new CancelEventHandler(MainWindow_Closing);
Load += new EventHandler(MainWindow_Load);
Closed += new EventHandler(MainWindow_Closed);
Activated += new EventHandler(MainWindow_Activated);
Deactivate += new EventHandler(MainWindow_Deactivate);
}
■Note The reason we are handling these events manually is that the Properties window (for some strange rea-
son) does not list the
Closing or Closed events. However, the Load, Activated, and Deactivate events can be
handled using this design-time tool.
Within the Load, Closed, Activated, and Deactivate event handlers, you are going to update the
value of a new
Form-level string member variable (named lifeTimeInfo) with a simple message
that displays the name of the event that has just been intercepted. As well, notice that within the
Closed event handler, you will display the value of this string within a message box:
private void MainWindow_Load(object sender, System.EventArgs e)
{
lifeTimeInfo += "Load event\n";
}
private void MainWindow_Activated(object sender, System.EventArgs e)
{
lifeTimeInfo += "Activate event\n";
}
private void MainWindow_Deactivate(object sender, System.EventArgs e)
{
CHAPTER 27 ■ PROGRAMMING WITH WINDOWS FORMS 973
8849CH27.qxd 10/16/07 11:59 AM Page 973
www.free-ebooks-download.org
Simpo PDF Merge and Split Unregistered Version -
lifeTimeInfo += "Deactivate event\n";
}
private void MainWindow_Closed(object sender, System.EventArgs e)
{
lifeTimeInfo += "Closed event\n";
MessageBox.Show(lifeTimeInfo);
}
Within the Closing event handler, you will prompt the user to ensure he or she wishes to termi-
nate the application using the incoming
CancelEventArgs. In the following code, notice that the
MessageBox.Show() method returns a DialogResult type that contains a value representing which
button has been selected by the end user. Here, we have crafted a message box that displays Yes and
No buttons; therefore, we are interested in discovering whether the return value from
Show() is
DialogResult.No.
private void MainWindow_Closing(object sender, CancelEventArgs e)
{
lifeTimeInfo += "Closing event\n";
// Show a message box with Yes and No buttons.
DialogResult dr = MessageBox.Show("Do you REALLY want to close this app?",
"Closing event!", MessageBoxButtons.YesNo);
// Which button was clicked?
if (dr == DialogResult.No)
e.Cancel = true;
else
e.Cancel = false;
}
Now run your application and shift the form into and out of focus a few times (to trigger the
Activated and Deactivate events). Once you finally shut down the application, you will see a mes-
sage box that looks something like Figure 27-13.
Figure 27-13. The life and times of a Form-derived type
■Source Code The FormLifeTime project can be found under the Chapter 27 subdirectory.
CHAPTER 27 ■ PROGRAMMING WITH WINDOWS FORMS974
8849CH27.qxd 10/16/07 11:59 AM Page 974
www.free-ebooks-download.org
Simpo PDF Merge and Split Unregistered Version -
Responding to Mouse Activity
Recall that the Control parent class defines a set of events that allow you to monitor mouse activity
in a variety of manners. To check this out firsthand, create a new Windows Application project
named MouseEventsApp, rename the initial form to
MainWindow.cs (via Solution Explorer), and
handle the
MouseMove event using the Properties window. This will generate the following event
handler:
public partial class MainWindow : Form
{
public MainWindow()
{
InitializeComponent();
}
// Generated via the Properties window.
private void MainWindow_MouseMove(object sender, MouseEventArgs e)
{
}
}
The MouseMove event works in conjunction with the System.Windows.Forms.MouseEventHandler
delegate. This delegate can only call methods where the first parameter is a System.Object, while
the second is of type
MouseEventArgs. This type contains various members that provide detailed
information regarding the state of the event when mouse-centric events occur:
public class MouseEventArgs : EventArgs
{
private readonly MouseButtons button;
private readonly int clicks;
private readonly int delta;
private readonly int x;
private readonly int y;
public MouseEventArgs(MouseButtons button, int clicks, int x,
int y, int delta);
public MouseButtons Button { get; }
public int Clicks { get; }
public int Delta { get; }
public Point Location { get; }
public int X { get; }
public int Y { get; }
}
While I’d bet most of the public properties are rather self-explanatory, Table 27-8 provides the
details.
Table 27-8. Properties of the MouseEventArgs Type
Property Meaning in Life
Button Gets which mouse button was pressed, as defined by the MouseButtons enumeration
Clicks Gets the number of times the mouse button was pressed and released
Delta Gets a signed count of the number of detents the mouse wheel has rotated
Continued
CHAPTER 27 ■ PROGRAMMING WITH WINDOWS FORMS 975
8849CH27.qxd 10/16/07 11:59 AM Page 975
www.free-ebooks-download.org
Simpo PDF Merge and Split Unregistered Version -
Table 27-8. Continued
Property Meaning in Life
Location Returns a Point that contains the current X and Y values
X Gets the x-coordinate of a mouse click
Y Gets the y-coordinate of a mouse click
Let’s implement our
MouseMove handler to display the current X and Y position of the mouse on
the
Form’s caption using the Location property:
private void MainWindow_MouseMove(object sender, MouseEventArgs e)
{
Text = string.Format("Mouse Position: {0}", e.Location);
}
When you run the application and move the mouse over the window, you will find the position
displayed on the title area of your
MainWindow type (see Figure 27-14).
Figure 27-14. Intercepting mouse movement
Determining Which Mouse Button Was Clicked
Another common mouse-centric detail to attend to is determining which button has been clicked
when a
MouseUp, MouseDown, MouseClick, or MouseDoubleClick event occurs.When you wish to deter-
mine exactly which button was clicked (such as left, right, or middle), you need to examine the
Button property of the MouseEventArgs class. The value of the Button property is constrained by the
related
MouseButtons enumeration:
public enum MouseButtons
{
Left,
Middle,
None,
Right,
XButton1,
XButton2
}
To illustrate, handle the MouseUp event on your MainWindow type using the Properties window.
The following
MouseUp event handler displays which mouse button was clicked inside a message
box:
private void MainWindow_MouseUp (object sender, MouseEventArgs e)
{
// Which mouse button was clicked?
CHAPTER 27 ■ PROGRAMMING WITH WINDOWS FORMS976
8849CH27.qxd 10/16/07 11:59 AM Page 976
www.free-ebooks-download.org
Simpo PDF Merge and Split Unregistered Version -