Professional ASP.NET 2.0 XML phần 4 potx
Bạn đang xem bản rút gọn của tài liệu. Xem và tải ngay bản đầy đủ của tài liệu tại đây (1.28 MB, 60 trang )
<tr>
<td style=”width: 101px; height: 41px”>
First Name:
</td>
<td style=”width: 204px; height: 41px”>
<asp:TextBox ID=”txtFirstName” runat=”server”
Width=”201px”>
</asp:TextBox>
</td>
</tr>
<tr>
<td style=”width: 101px; height: 41px”>
Last Name:
</td>
<td style=”width: 204px; height: 41px”>
<asp:TextBox ID=”txtLastName” runat=”server”
Width=”201px”>
</asp:TextBox>
</td>
</tr>
<tr>
<td style=”width: 101px; height: 41px”>
Price:
</td>
<td style=”width: 204px; height: 41px”>
<asp:TextBox ID=”txtPrice” runat=”server” Width=”201px”>
</asp:TextBox>
</td>
</tr>
<tr>
<td colspan=”2” style=”width: 101px; height: 41px”>
<asp:Button Text=”Save” runat=”server” ID=”btnSave”
Width=”95px” OnClick=”btnSave_Click”/>
</td>
</tr>
<tr>
<td colspan=”2” style=”width: 101px; height: 41px”>
<asp:Label runat=”server” ID=”lblResult”
Width=”295px”/>
</td>
</tr>
</table>
</div>
</form>
</body>
</html>
Basically, Listing 6-5 provides a Web form where you can enter the details of a book. It captures the
entered book details and saves them onto an XML file named
NewBooks.xml. At the time of writing the
file, it checks to see if the
NewBooks.xml file is already available—if so, it appends the book details to
the existing XML document; otherwise, it creates an XML document from scratch and adds the book
details to that newly created document. Finally it saves the XML file using the
Save() method.
154
Chapter 6
09_596772 ch06.qxd 12/13/05 11:13 PM Page 154
It all starts with a check to see if the XML file is already available in the file system.
if (System.IO.File.Exists(xmlPath))
If the file is available, the file is loaded onto an XML document.
doc.Load(xmlPath);
As the name suggests, the CreateBookNode() method is a helper method that basically creates a book
node that contains all the child nodes and the related attributes based on the details keyed in by the user.
XmlNode bookNode = CreateBookNode(doc);
After the book node is created, the next step is to append the book node to the root bookstore node.
Before doing that, you need to get reference to the bookstore node.
XmlNode bookStoreNode = doc.SelectSingleNode(“bookstore”);
bookStoreNode.AppendChild(bookNode);
If the NewBooks.xml file is not present in the directory, you need to create that XML file from scratch.
Start by creating the XML declaration and append that to the
XmlDocument object.
XmlNode declarationNode = doc.CreateXmlDeclaration(“1.0”, “”, “”);
doc.AppendChild(declarationNode);
Add a comment indicating the purpose of the XML document by calling the CreateComment() method.
XmlNode comment = doc.CreateComment(“This file represents a “ +
“fragment of a book store inventory database”);
doc.AppendChild(comment);
After that, create the root bookstore node.
XmlNode bookstoreNode = doc.CreateElement(“bookstore”);
Again create the book node using the CreateBookNode() helper method and then append the returned
book node to the root bookstore node.
XmlNode bookNode = CreateBookNode(doc);
//Append the book node to the bookstore node
bookstoreNode.AppendChild(bookNode);
//Append the bookstore node to the document
doc.AppendChild(bookstoreNode);
Finally, save the XML file.
doc.Save(xmlPath);
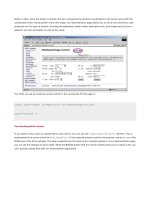
If you navigate to the above page using the browser, you see the output shown in Figure 6-5.
155
XML DOM Object Model
09_596772 ch06.qxd 12/13/05 11:13 PM Page 155
Figure 6-5
Figure 6-5 shows the output produced by the page after you enter the book details and save them. After
saving the book details, navigate to the
NewBooks.xml file through the browser, and you see the result
as shown in Figure 6-6.
Figure 6-6
156
Chapter 6
09_596772 ch06.qxd 12/13/05 11:13 PM Page 156
Changing Node Data
Node data can be changed after it has been created. For example, suppose that you want to change the
price of a specific book after it has been released. To reflect this in the document, you would need to find
the
<title> node that contains the specific book and update its sibling <price> node with the new
value. The following line of code shows how to do this using the
Value property of the XmlNode class:
priceNode.FirstChild.Value = “10.99”;
Deleting Nodes
To delete a node, simply remove it from the document. The RemoveChild() method of the XmlNode
class accomplishes this. When called on an XmlNode object, the passed child node will be removed from
its list of child nodes. For example, to delete the
<title> node from the XML document, use the follow-
ing code:
XmlDocument doc = new XmlDocument();
doc.LoadXml(“<book genre=’ autobiography’’>” +
“<title>The Autobiography of Benjamin Franklin</title>” +
“</book>”);
XmlNode root = doc.DocumentElement;
//Remove the title element.
root.RemoveChild(root.FirstChild);
In the example, the XmlDocument object is loaded from an XML string. After an XML document is loaded
in memory, you get reference to the specific nodes that you want to remove from the XML document.
After the reference to the specific node is obtained, invoke the
RemoveChild() method, passing in the
node to be removed.
Handling Events Raised by the XmlDocument
Before looking at the steps involved in handling the events raised by the XmlDocument, Table 6-3 briefly
reviews the events raised by the
XmlDocument class.
Table 6-3. Events of the XmlDocument Class
Event Description
NodeChanged Raised when the Value property of a node belonging to this
document has been changed
NodeChanging Raised when the Value property of a node belonging to this
document is about to be changed
NodeInserted Raised when a node belonging to this document has been
inserted into another node
NodeInserting Raised when a node belonging to this document is about to be
inserted into another node
NodeRemoved Raised when a node belonging to this document has been
removed from its parent
NodeRemoving Raised when a node belonging to this document is about to be
removed from this document
157
XML DOM Object Model
09_596772 ch06.qxd 12/13/05 11:13 PM Page 157
All these events require the same delegate for the event handler, as follows:
public delegate void XmlNodeChangedEventHandler(
object sender, XmlNodeChangedEventArgs e);
The XmlNodeChangedEventArgs structure contains the event data. The structure has six interesting
properties:
❑
Node —Returns an XmlNode object that denotes the node that is being added, removed, or
changed.
❑
OldParent —Returns an XmlNode object representing the parent of the node before the opera-
tion began.
❑
NewParent —Returns an XmlNode object representing the new parent of the node after the
operation is complete. The property is set to null if the node is being removed. If the node is an
attribute, the property returns the node to which the attribute refers.
❑
OldValue —Returns the original value of the node before the operation began
❑
NewValue —Returns the new value of the node
❑
Action —Contains a value indicating what type of change is occurring on the node by return-
ing an enumeration of type
XmlNodeChangedAction. Allowable values, listed in the
XmlNodeChangedAction enumeration type are Insert, Remove, and Change.
Some of the actions you can take on an XML DOM are compound actions consisting of several steps,
each of which could raise its own event. For example, be prepared to handle several events when you
set the
InnerXml property. In this case, multiple nodes could be created and appended, resulting in as
many
NodeInserting/NodeInserted pairs being raised. In some cases, the AppendChild() method
of the
XmlNode might fire a pair of NodeRemoving/NodeRemoved events prior to actually proceeding
with the insertion. By design, to ensure XML well-formedness,
AppendChild() checks whether the
node you are adding already exists in the document. If it does, the existing node is first removed to
avoid identical nodes in the same subtree. The following code shows how to set up a handler for the
NodeInserted event.
//Add a new event handler.
XmlDocument doc = new XmlDocument();
doc.NodeInserted += new XmlNodeChangedEventHandler(
NodeInsertedHandler);
//Define the event handler.
void NodeInsertedHandler(Object src, XmlNodeChangedEventArgs args)
{
Response.Write(“Node “ + args.Node.Name + “ inserted”);
}
Inside the NodeInsertedHandler() method, the name of the node is retrieved from the
XmlNodeChangedEventArgs object and displayed in the browser. As you can see, events provide with
you with a flexible approach that can be used to synchronize changes between documents.
158
Chapter 6
09_596772 ch06.qxd 12/13/05 11:13 PM Page 158
The XmlDocumentFragment Class
As you have seen in previous sections, after an XML document is loaded in memory, you can enter all
the needed changes by simply accessing the property of interest and modifying the underlying value.
For example, to change the value of an attribute, you proceed as follows:
// Retrieve a particular node and update an attribute
XmlNode node = doc.SelectSingleNode(“book”);
node.Attributes[“genre”] = “novel”;
To insert many nodes at the same time and in the same parent, you can take advantage of a little trick
based on the concept of a document fragment. To this end, .NET Framework provides a class named
XmlDocumentFragment that provides a lightweight object that is useful for tree operations. In essence, you
concatenate all the necessary markup into a string and then create a document fragment, as shown here:
XmlDocumentFragment docFragment = doc.CreateDocumentFragment();
docFragment.InnerXml = “<book genre=’novel’> </book>”;
parentNode.AppendChild(docFragment);
After creating an XmlDocumentFragment object, set its InnerXml property to the string value and add
the
XmlDocumentFragment to the parent node. The nodes defined in the body of the fragment are
inserted one after the next. Listing 6-6 shows how the
CreateBookNode() method in Listing 6-5 can be
modified to take advantage of the
XmlDocumentFragment object.
Listing 6-6: Creating Fragments of XML Using XmlDocumentFragment
XmlNode CreateBookNode(XmlDocument doc)
{
XmlDocumentFragment docFragment = doc.CreateDocumentFragment();
docFragment.InnerXml = “<book genre=’” + txtGenre.Text + “‘>” +
“<title>” + txtTitle.Text +” </title>” +
“<author><first-name>” + txtFirstName.Text + “</first-name>” +
“<last-name>” + txtLastName.Text + “</last-name></author>” +
“<price>” + txtPrice.Text + “</price></book>”;
return docFragment;
}
In general, when you set the InnerXml property on an XmlNode-based class, any detected markup text will
be parsed, and the new contents will replace the existing contents. For this reason, if you want to simply
add new children to a node, pass through the
XmlDocumentFragment class, as described in the previous
paragraph, and avoid using
InnerXml directly on the target node.
XPath Support in XML DOM
The XPath language enables you to locate nodes in your XML data that match the specified criteria. An XPath
expression can specify criteria by evaluating either the position of a node in the document hierarchy, data
values of the node, or a combination of both. Basic XPath syntax uses a path such as notation. For example,
the path
/bookstore/book/author indicates an author element that is nested inside a book element, which,
in turn, is nested in a root bookstore element. You can also use XPath to locate specific nodes. For example,
this expression locates all book nodes:
//bookstore/book
159
XML DOM Object Model
09_596772 ch06.qxd 12/13/05 11:13 PM Page 159
But this expression matches only a node with the specific genre attribute value of novel:
//bookstore/book/[@genre=’novel’]/author
The XmlNode class defines two methods that perform XPath searches: SelectNodes and
SelectSingleNode. These methods operate on all contained child nodes. Because the XmlDocument
inherits from XmlNode, you can call XmlDocument.SelectNodes() to search an entire document.
XPath provides rich and powerful search syntax, and it’s impossible to explain all of the variations you can
use in a brief discussion. However, Table 6-4 outlines some of the key ingredients in more advanced XPath
expressions and includes examples that show how they would work with the
books.xml document.
Table 6-4. XPath Expression Syntax
Expression Meaning
/ Starts an absolute path that selects from the root node.
/bookstore/book/title selects all title elements that are children of the
book element, which is itself a child of the root bookstore element.
// Starts a relative path that selects nodes anywhere.
//book/title selects all of the title elements that are children of a book
element, regardless of where they appear in the document.
@ Selects an attribute of a node.
/book/@genre selects the attribute named genre from the root book element.
* Selects any element in the path.
/book/* selects both title and author nodes because both are contained by
a root book element.
| Union operator that returns the union of the results of two paths.
/bookstore/book/title | bookstore/book/author selects the title
nodes used to describe a title and the author nodes used to describe an
author.
. Indicates the current default node.
Indicates the parent node.
//author/ selects any element that is parent to an author, which includes
the book elements.
[] Define selection criteria that can test a contained node or attribute value.
/book[@genre=”autobiography”] selects the book elements with the
indicated attribute value.
starts-with This function retrieves elements based on what text a contained element
starts with.
/bookstore/book/author[starts-with(first-name, “B”)] finds all
author elements that have a first-name element that starts with the letter B.
160
Chapter 6
09_596772 ch06.qxd 12/13/05 11:13 PM Page 160
Expression Meaning
position This function retrieves elements based on position.
/bookstore/book[position()=2] selects the second book element.
count This function counts elements. You specify the name of the child element to
count, or an asterisk (
*) for all children.
/bookstore/book/author[count(first-name) = 1] retrieves author
elements that have exactly one nested first-name element.
Listing 6-7 shows an example that allows you to select an XPath expression from a drop-down list, apply
that XPath to an XML document, and display the contents of the resultant object.
Listing 6-7: Evaluating XPath Expressions
<%@ Page Language=”C#” %>
<%@ Import Namespace=”System.Xml” %>
<script runat=”server”>
void Page_Load(object sender, EventArgs e)
{
if (!Page.IsPostBack)
{
ddlExpressions.Items.Add(“//book/title”);
ddlExpressions.Items.Add(“//book[@genre=’novel’]/title”);
ddlExpressions.Items.Add(“//book/author/first-name”);
ddlExpressions.Items.Add(“//book[@genre=’philosophy’]/title”);
ddlExpressions.Items.Add(“//book/price”);
ddlExpressions.Items.Add(“//book[3]/title”);
ddlExpressions.SelectedIndex = 0;
//Set the default selection
UpdateDisplay();
}
}
void ddlExpressions_SelectedIndexChanged(object sender, EventArgs e)
{
//Display the value produced by evaluating the XPath Expression
UpdateDisplay();
}
void UpdateDisplay()
{
lstOutput.Items.Clear();
string xmlPath = Request.PhysicalApplicationPath +
@”\App_Data\Books.xml”;
XmlDocument doc = new XmlDocument();
doc.Load(xmlPath);
XmlNodeList nodeList =
doc.DocumentElement.SelectNodes(ddlExpressions.SelectedItem.Text);
foreach (XmlNode child in nodeList)
{
lstOutput.Items.Add(“Node Name:” + child.Name);
lstOutput.Items.Add(“Node Value:” + child.FirstChild.Value);
}
161
XML DOM Object Model
09_596772 ch06.qxd 12/13/05 11:13 PM Page 161
}
</script>
<html xmlns=” >
<head runat=”server”>
<title>XPath Example</title>
</head>
<body>
<form id=”form1” runat=”server”>
<div>
Select the XPath Expression:
<asp:DropDownList ID=”ddlExpressions” AutoPostBack=”true”
runat=”server” Width=”410px”
OnSelectedIndexChanged=”ddlExpressions_SelectedIndexChanged”>
</asp:DropDownList>
<br/><br/>
<asp:ListBox ID=”lstOutput” runat=”server”
Width=”587px” Height=”168px”>
</asp:ListBox>
</div>
</form>
</body>
</html>
The Page_Load event loads the drop-down list box with the set of predefined XPath expressions.
if (!Page.IsPostBack)
{
ddlExpressions.Items.Add(“//book/title”);
ddlExpressions.Items.Add(“//book[@genre=’novel’]/title”);
ddlExpressions.Items.Add(“//book/author/first-name”);
ddlExpressions.Items.Add(“//book[@genre=’philosophy’]/title”);
ddlExpressions.Items.Add(“//book/price”);
ddlExpressions.Items.Add(“//book[3]/title”);
ddlExpressions.SelectedIndex = 0;
//Set the default selection
UpdateDisplay();
}
After loading all the values, a helper method named UpdateDisplay() is invoked. This method basically
updates the display on a results list box based on the selected XPath expression. This method is also
invoked from the
SelectedIndexChanged event of the drop-down box to evaluate the selected XPath
expression and display the results through the list box.
Code inside the
UpdateDisplay() method is simple and straightforward. After loading the XmlDocument
object with the contents of an XML file, it simply invokes the SelectNodes() method of the XmlElement
object that is returned by invoking the DocumentElement property of the XmlDocument object. To the
SelectNodes() method, the selected value in the drop-down list is supplied as an argument. The return
value of the
SelectNodes() method is an XmlNodeList object, which is then iterated through a for
each
loop. Inside the for each loop, the name and value of the node are added to the results list box.
XmlNodeList nodeList =
doc.DocumentElement.SelectNodes(ddlExpressions.SelectedItem.Text);
foreach (XmlNode child in nodeList)
{
162
Chapter 6
09_596772 ch06.qxd 12/13/05 11:13 PM Page 162
lstOutput.Items.Add(“Node Name:” + child.Name);
lstOutput.Items.Add(“Node Value:” + child.FirstChild.Value);
}
The output produced by the page looks similar to Figure 6-7.
Figure 6-7
In Figure 6-7, selecting an XPath expression in the drop-down list results in that XPath expression being
evaluated, and the output of that is displayed in the list box.
Performance Optimization with XPathNavigator
Another way to use XPath to query your XML data is to create and use an XPathNavigator object. The
XPathNavigator class, in conjunction with the other classes in the System.Xml.XPath namespace
such as
XPathDocument, XPathExpression, and the XPathNodeIterator, enables you to optimize
performance when working with XPath queries. The
XPathNavigator class has methods such as
Select, Compile, and Evaluate to perform queries on your XML data by using XPath expressions.
Among all the other things that you can do with an XPathNavigator object, keep in mind, is the use of
XPathNavigator object to process the contents of an XML document in an efficient way. For example, if
you are going to perform the same query a number of times, perhaps on a collection of documents, the query
will execute significantly faster if you pre-compile the expression. You do this by calling the
Compile()
method on the navigator, passing in an XPath expression as a string, and getting back an instance of an
XPathExpression object. You can pass that XPathExpression object to the Select method, and the
execution of the
Select method will be much quicker than if you passed in the XPath as a string every time.
By providing a cursor model, the XPathNavigator class enables you to navigate and edit XML information
items as instances of the XQuery 1.0 and XPath 2.0 Data Model. An
XPathNavigator object is created from
a class that implements the
IXPathNavigable interface such as the XPathDocument and XmlDocument
classes. Table 6-5 lists the key methods of the XPathNavigator class.
163
XML DOM Object Model
09_596772 ch06.qxd 12/13/05 11:13 PM Page 163
Table 6-5. Key Methods of the XPathNavigator Class
Method Description
AppendChild Creates a new child node at the end of the list of child nodes of the
current node
AppendChildElement Creates a new child element node at the end of the list of child
nodes of the current node using the namespace prefix, local name,
and namespace URI specified with the value specified
CheckValidity Verifies that the XML data in the XPathNavigator conforms to the
supplied XSD schema
Clone Creates a new XPathNavigator positioned at the same node as the
current
XPathNavigator
Compile Compiles a string representing an XPath expression and returns the
output in the form of an
XPathExpression object
CreateAttribute Creates an attribute node on the current element node
CreateAttributes Returns an XmlWriter object used to create new attributes on the
current element
DeleteSelf Deletes the current node and all of its child nodes
GetAttribute Gets the value of the attribute with the specified local name and
namespace URI
GetNamespace Returns the value of the namespace node corresponding to the
specified local name
GetNamespacesInScope Returns the in-scope namespaces of the current node
InsertAfter Creates a new sibling node after the currently selected node
InsertBefore Creates a new sibling node before the currently selected node
InsertElementAfter Creates a new sibling element after the current node using the name-
space prefix, local name, namespace URI, and the value specified
InsertElementBefore Creates a new sibling element before the current node using the
namespace prefix, local name, namespace URI, and the value
specified
IsDescendant Determines whether the specified XPathNavigator is a descendant
of the current
XPathNavigator
MoveToAttribute Moves the XPathNavigator to the attribute with the matching
local name and namespace URI
MoveToChild Moves the XPathNavigator to the specified child node
MoveToFirst Moves the XPathNavigator to the first sibling of the current node
MoveToFirstAttribute Moves the XPathNavigator to the first attribute of the current node
MoveToFirstChild Moves the XPathNavigator to the first child of the current node
164
Chapter 6
09_596772 ch06.qxd 12/13/05 11:13 PM Page 164
Method Description
MoveToFirstNamespace Moves the XPathNavigator to the first namespace node of the cur-
rent node
MoveToFollowing Moves the XPathNavigator to the specified element
MoveToId Moves the XPathNavigator to the attribute with the specified id
that is indicated by the supplied string
MoveToNamespace Moves the XPathNavigator to the namespace node with the
specified namespace prefix
MoveToNext Moves the XPathNavigator to the next sibling of the current node
MoveToNextAttribute Moves the XPathNavigator to the next attribute
MoveToNextNamespace Moves the XPathNavigator to the next namespace node
MoveToParent Moves the XPathNavigator to the parent node of the current node
MoveToPrevious Moves the XPathNavigator to the previous sibling of the current
node
MoveToRoot Moves the XPathNavigator to the root node that the current node
belongs to
PrependChild Creates a new child node at the beginning of the list of child nodes
of the current node
PrependChildElement Creates a new child element node at the beginning of the list of
child nodes of the current node using the namespace prefix, local
name, and namespace URI, and the value specified
ReadSubTree Reads the current node and its child nodes into the supplied
XmlReader object
ReplaceSelf Replaces the current node with the content specified
Select Selects a node set using the specified XPath expression and returns
an object of type
XPathNodeIterator
SelectAncestors
Selects all the ancestor nodes of the current node that match the
selection criteria
SelectChildren Selects all the child nodes of the current node that match the
selection criteria
SelectDescendants Selects all the descendant nodes of the current node matching the
specified criteria
SelectSingleNode Selects a single node in the XPathNavigator
SetTypedValue
Sets the typed value of the current node
SetValue Sets the value of the current node
ValueAs Returns the current node’s value as the Type specified
WriteSubTree Writes the current node and its child contents into the supplied
XmlWriter object
165
XML DOM Object Model
09_596772 ch06.qxd 12/13/05 11:13 PM Page 165
As Table 6-5 points out, the XPathNavigator also has a set of MoveToXXX() methods such as
MoveToFirstChild(), MoveToNext(), MoveToParent() —which give you the opportunity to explic-
itly position the
XPathNavigator at a specific node. For example, you might use an XPath expression to
locate a particular book node by matching the genre attribute value. After you have located the node
you are interested in, you can use the
MoveToFirstChild method to get to a particular data item.
Listing 6-8 shows how to create an
XPathDocument and load data into it, compile an XPath expression
string into an
XPathExpression object, and use the XPathNodeIterator when your XPath expression
returns an
XmlNodeList collection.
Listing 6-8: An Example of Compiled XPath Expressions
<%@ Page Language=”C#” %>
<%@ Import Namespace=”System.Xml” %>
<%@ Import Namespace=”System.Xml.XPath” %>
<script runat=”server”>
void Page_Load(object sender, EventArgs e)
{
if (!Page.IsPostBack)
{
ddlExpressions.Items.Add(“//book/title”);
ddlExpressions.Items.Add(“//book[@genre=’novel’]/title”);
ddlExpressions.Items.Add(“//book/author/first-name”);
ddlExpressions.Items.Add(“//book[@genre=’philosophy’]/title”);
ddlExpressions.Items.Add(“//book/price”);
ddlExpressions.Items.Add(“//book[3]/title”);
ddlExpressions.SelectedIndex = 0;
//Set the default selection
UpdateDisplay();
}
}
void ddlExpressions_SelectedIndexChanged(object sender, EventArgs e)
{
//Display the value produced by evaluating the XPath Expression
UpdateDisplay();
}
void UpdateDisplay()
{
lstOutput.Items.Clear();
string xmlPath = Request.PhysicalApplicationPath +
@”\App_Data\Books.xml”;
One of the new features introduced with XPathNavigator object in .NET
Framework 2.0 is the ability to edit XML data using a cursor model. With .NET
Framework 1.x, the
XPathNavigator was only constrained to navigating XML data
using a cursor model. To check if an
XPathNavigator object is editable, invoke the
CanEdit property of the XPathNavigator object that returns a Boolean value indi-
cating if the
XPathNavigator is editable.
166
Chapter 6
09_596772 ch06.qxd 12/13/05 11:13 PM Page 166
XPathDocument document = new XPathDocument(xmlPath);
XPathNavigator navigator = document.CreateNavigator();
//Compile the XPath expression
XPathExpression expr = navigator.Compile(
ddlExpressions.SelectedItem.Text);
XPathNodeIterator nodes = navigator.Select(expr);
while (nodes.MoveNext())
{
lstOutput.Items.Add(“Name :” + nodes.Current.Name);
lstOutput.Items.Add(“Value : “ + nodes.Current.Value);
}
}
</script>
<html xmlns=” >
<head runat=”server”>
<title>XPathNavigator Selection Example</title>
</head>
<body>
<form id=”form1” runat=”server”>
<div>
Select the XPath Expression:
<asp:DropDownList ID=”ddlExpressions” AutoPostBack=”true”
runat=”server” Width=”410px”
OnSelectedIndexChanged=”ddlExpressions_SelectedIndexChanged”>
</asp:DropDownList>
<br/><br/>
<asp:ListBox ID=”lstOutput” runat=”server”
Width=”587px” Height=”168px”>
</asp:ListBox>
</div>
</form>
</body>
</html>
The meat of the code in this example is contained in the UpdateDisplay() method. The implementa-
tions of
Page_Load() and the SelectedIndexChanged events are similar to the previous code listing.
The
UpdateDisplay() method starts by creating an instance of the XPathDocument object passing in
the path to the XML file.
XPathDocument document = new XPathDocument(xmlPath);
An XPathNavigator object is then instantiated by calling the CreateNavigator() method of the
XPathDocument object.
XPathNavigator navigator = document.CreateNavigator();
The selected XPath expression is then compiled into an XPathExpression object through the invocation
of the
Compile() method of the XPathNavigator object.
XPathExpression expr = navigator.Compile(
ddlExpressions.SelectedItem.Text);
You use an XPathExpression to identify all matching nodes in the XML file and then use an
XPathNodeIterator to process each matching node.
167
XML DOM Object Model
09_596772 ch06.qxd 12/13/05 11:13 PM Page 167
XPathNodeIterator nodes = navigator.Select(expr);
while (nodes.MoveNext())
{
lstOutput.Items.Add(“Name :” + nodes.Current.Name);
lstOutput.Items.Add(“Value : “ + nodes.Current.Value);
}
Save and test your work. When the application starts, you see a list of last names. These match the first
item in the drop-down list. Try the other drop-down selections to see what data is returned.
If you are evaluating an
XPathExpression that will result in a value instead of a set of nodes, use the
Evaluate() method instead of Select. Evaluate returns a value corresponding to the value that
results from the evaluation of the XPath expression. It is important to keep in mind that the XPath
expressions can result in a numeric, string, or Boolean value. The
Evaluate method simply returns an
object reference, so you have to cast the result to the appropriate type. The following lines of code show
how to accomplish this.
XPathDocument document = new XPathDocument(xmlPath);
XPathNavigator navigator = document.CreateNavigator();
Double total = (double) navigator.Evaluate(“sum(descendant::book/price)”);
For numeric values, the return result comes into the .NET code as a double, so you have to cast appropri-
ately there.
Updating an XPathNavigator Object
With the release of .NET 2.0 Framework, Microsoft has greatly increased the usefulness of the
XPathNavigator by layering the ability to write XML data on top of the reading capabilities of the
XPathNavigator object. Note, however, that the XPathNavigator objects created by XPathDocument
objects are read-only while XPathNavigator objects created by XmlDocument objects can be edited. The
CanEdit property of the XPathNavigator allows you to determine the read-only or edit status of the
XPathNavigator object.
Listing 6-9 demonstrates how to utilize an
XPathNavigator object to edit an XML document. Specifically,
the code listing adds a new discount attribute to each of the price nodes in the XML document. The
discount is calculated by applying 10 percent of the value contained in the price node.
With the ability to edit an XPathNavigator object in .NET Framework 2.0, you
should consider using
XPathNavigator as your primary programming model for
working with XML data sources especially when you want a level of abstraction
away from the underlying source.
At this point, you might be wondering why the code in Listing 6-8 utilized an
XPathDocument as opposed to using the XmlDocument as the tree model API for
parsing the XML. It is mainly due to the fact that the
XPathDocument class is optimized
for use in XPath and XSLT and can also provide better performance when running
XPath over an XML document or running XSLT over in-memory XML. In these
scenarios, the
XPathDocument should be preferred to the XmlDocument.
168
Chapter 6
09_596772 ch06.qxd 12/13/05 11:13 PM Page 168
Listing 6-9: Using XPathNavigator to Update an XML Document
<%@ Page Language=”C#” %>
<%@ Import Namespace=”System.Xml” %>
<%@ Import Namespace=”System.Xml.XPath” %>
<script runat=”server”>
void Page_Load(object sender, EventArgs e)
{
//Set the ContentType to XML to write XML values
Response.ContentType = “text/xml”;
string xmlPath = Request.PhysicalApplicationPath +
@”\App_Data\Books.xml”;
XmlDocument document = new XmlDocument();
document.Load(xmlPath);
XPathNavigator navigator = document.CreateNavigator();
int count = navigator.Select(“/bookstore/book”).Count;
//Navigate to the right nodes
navigator.MoveToChild(“bookstore”, “”);
navigator.MoveToChild(“book”, “”);
//Loop through all the book nodes
for(int i = 0; i < count; i++)
{
navigator.MoveToChild(“price”, “”);
//Calculate 10% discount on the price
double discount = navigator.ValueAsDouble * (.1);
navigator.CreateAttribute(“”, “discount”, “”,
discount.ToString());
//Move to the parent book element
navigator.MoveToParent();
//Move to the next sibling book element
navigator.MoveToNext();
}
navigator.MoveToRoot();
Response.Write (navigator.OuterXml);
}
</script>
To start with, an instance of the XPathNavigator object is created by calling the CreateNavigator()
method of the XmlDocument object. You then get the number of the book nodes contained in the
books.xml file by using the following line.
Before looping through all the book nodes, you need to get to the first book node in the document. It is
accomplished by making specific calls to the
MoveToChild() method.
After you are on the book node, all you need to do is to get reference to the price node, retrieve its value,
get 10 percent of its value, and create a new attribute with the calculated discount. The following lines of
code accomplish this.
for(int i = 0; i < count; i++)
{
navigator.MoveToChild(“price”, “”);
//Calculate 10% discount on the price
double discount = navigator.ValueAsDouble * (.1);
navigator.CreateAttribute(“”, “discount”, “”,
discount.ToString());
169
XML DOM Object Model
09_596772 ch06.qxd 12/13/05 11:13 PM Page 169
//Move to the parent book element
navigator.MoveToParent();
//Move to the next sibling book element
navigator.MoveToNext();
}
Note that after creating the code, there is a call to the MoveToParent() method, which ensures that the
navigator is pointed to the parent book node. After you are at the parent book node, moving to the next
book node is very easy —simply call the
MoveToNext() method.
Now that you have added the discount attribute to all the price nodes, you are ready to display the mod-
ified XML document. But before doing that, position the navigator back to the root node by calling the
MoveToRoot() method so that invoking OuterXml property will result in the entire XML document
being displayed.
navigator.MoveToRoot();
Response.Write(navigator.OuterXml);
That’s all there is to updating an XML document using the XPathNavigator object. Browse to the page
using a browser.
Figure 6-8
The output shown in Figure 6-8 is what you get when navigating to the page from a browser.
170
Chapter 6
09_596772 ch06.qxd 12/13/05 11:13 PM Page 170
Validating XML in an XmlDocument
Chapter 5 provided a complete discussion of the validation features available for the XML reader classes.
With the release of .NET Framework 2.0, Microsoft has built in the validation feature right into the
XmlDocument itself. By using this feature, you can perform XML schema validation of the entire subtree
or partial validation of nodes in the document. To this end, there is a new method named
Validate()
that is introduced with .NET Framework 2.0.
string xmlPath = Request.PhysicalApplicationPath +
@”\App_Data\Books.xml”;
string xsdPath = Request.PhysicalApplicationPath +
@”\App_Data\Books.xsd”;
XmlReaderSettings settings = new XmlReaderSettings();
settings.ValidationType = ValidationType.Schema;
settings.Schemas.Add(null, XmlReader.Create(xsdPath));
XmlReader reader = XmlReader.Create(xmlPath, settings);
XmlDocument doc = new XmlDocument();
doc.Load(reader);
ValidationEventHandler eventHandler = new
ValidationEventHandler(ValidationEventHandler);
doc.Validate(eventHandler);
As you can see, the validation process is initiated by the call to the Validate() method of the
XmlDocument object.
Summary
This chapter introduced the basic concepts of XML DOM in .NET Framework and provided a concise
overview of the .NET DOM classes available to read, store, and manipulate XML documents. The classes
in the
System.Xml namespaces contain probably the richest collection of XML-related functionalities
available thus far in any other software development platform. XML DOM exposes a powerful object
model that provides you with a rich set of methods and properties to manipulate the schema and
contents of XML documents. The overall programming interface of the
XmlDocument class might look
familiar to those of you who have spent some time working with the COM-based MSXML library.
The
XmlDocument class provides methods to load XML documents from a variety of sources, including
XML readers and streams. To locate a node in the in-memory tree that represents the original XML
document, you can proceed with a collection that returns only the first level of child nodes, or you can,
more effectively, use an XPath query string to locate nodes by condition. Using the
XmlDocument object,
you can also create full-featured, rich XML documents from scratch. Creating new documents using
XML DOM is not as efficient as using XML writers, but because the document is first built in memory,
you have an unprecedented level of flexibility and can fine-tune your document before it is written to
the output stream.
Editing an XML file as you are navigating through an XML document is made easier through the new
editable
XPathNavigator object. This feature makes the XPathNavigator object an ideal candidate for
building applications that periodically build or examine documents, but still require a better performing
navigator. Finally you now have the ability to perform validation of an
XmlDocument object as you are
building the XML DOM tree.
171
XML DOM Object Model
09_596772 ch06.qxd 12/13/05 11:13 PM Page 171
09_596772 ch06.qxd 12/13/05 11:13 PM Page 172
Transforming
XML Data with XSLT
In the last couple of chapters, you saw how parsers, XML schemas, and the DOM offer tremen-
dous functionality. You can use XML schemas to add structure to your data and then publish them
for others to consume. You can use the DOM from within your applications to access and modify
your XML. This chapter focuses on XSLT (eXtensible Stylesheet Language Transformation), which
you can use to transform XML and produce output that can be displayed on the Web. The W3C
describes XSLT as “a language for transforming XML documents into other XML documents.”
But XSLT can do more than that. Perhaps a better definition of XSLT is that XSLT can be used to
transform the content and structure of an XML document into some other form. While general
and broad, this description hints at the power of XSLT. Another way to describe XSLT is to use an
analogy: XSLT is to XML like SQL is to a database. Just as SQL can query and modify data, XSLT
can query portions of an XML document and produce new content. This chapter explores the con-
cepts of XSLT and demonstrates how XSLT can be used in conjunction with ASP.NET to construct
data driven Web applications.
By the end of this chapter, you will have a good understanding of the following:
❑ What is XSLT?
❑ Structure of an XSLT document
❑ Applying XSL Style Sheets to XML documents to customize the output
❑ Support provided by the .NET Framework for transforming XML documents
❑ Using XSLT to build sophisticated ASP.NET pages
❑ Performing advanced XSLT operations in conjunction with .NET 2.0
❑ Debugging XSLT style sheets using Visual Studio 2005
This chapter also harnesses the XPath skills acquired from the previous chapter, and examines
how to use transformations effectively in ASP.NET.
10_596772 ch07.qxd 12/13/05 11:16 PM Page 173
A Primer on XSLT
XSLT is a language that enables you to convert XML documents into other XML documents, into HTML
documents, or into almost anything you like. When you specify a series of XSLT instructions for convert-
ing a class of XML documents, you do it by creating an “XSL style sheet.” An XSL style sheet is an XML
document that uses specialized XML elements and attributes to describe those changes you want made.
The definition of these specialized elements and attributes comes from the W3C, the same standards
body responsible for XML and HTML.
What Is XSLT, XSL, and XPath?
XSLT was originally part of XSL, the Extensible Stylesheet Language. In fact, it’s still technically a part of
it. The XSL specification describes XSL as a language with two parts: a language for transforming XML
documents and an XML vocabulary for describing how to format document content. This vocabulary
is a collection of specialized elements called “formatting objects” that specify page layout and other
presentation-related details about the text marked up with these elements’ tags: font family, font size,
margins, line spacing, and other settings.
XSL transforms an XML document into another XML document by transforming each XML element into
an (X)HTML element. XSLT can also add new elements into the output file, or remove elements. It can
rearrange and sort elements, and test and make decisions about which elements to display, and a lot more.
One great feature of XSLT is its capability, while processing any part of a document, to grab information
from any other part of that document. The mini-language developed as part of XSLT for specifying the
path through the document tree from one part to another is called “XPath.” XPath lets you say things like
“get the
revisionDate attribute value of the element before the current element’s chapter ancestor
element.” This capability proved so valuable that the W3C also broke XPath out into its own specification
so that other W3C specifications could incorporate this language.
How Does XSLT Work?
The transformation process needs two input files, the XML document, which makes up the source tree
and the XSLT file, which consists of elements used to transform data to the required format. You can also
use more than one XSLT file in the transformation process. The output file is a result tree, which can be
an XML, HTML, or any other format. Several parsers are available for the transformation process using
XSLT. Parsers are applications that validate an XML document and perform transformations to generate
the required output. Figure 7-1 shows the transformation process.
Figure 7-1
XSLT
Stylesheet
.NET XSLT
Processor
Transformation Process
XML Source File
Target
• XML
• HTML
• CSV
• Text
174
Chapter 7
10_596772 ch07.qxd 12/13/05 11:16 PM Page 174
In the transformation process, XSLT uses XPath to define parts of the source document that match one or
more predefined templates. When a match is found, XSLT transforms the matching part of the source
document into the result document. The parts of the source document that do not match a template end
up unmodified in the result document.
Need for XSLT
Before discussing the need for XSLT, you first need to remind yourself why XML has proved to be such a
success and generated so much excitement. XML is a simple, standard way to interchange structured
textual data between computer programs. Part of its success comes because it is also readable and
writable by humans, using nothing more complicated than a text editor, but this doesn’t alter the fact
that it is primarily intended for communication between software systems. As such, XML satisfies two
compelling requirements:
❑ Separating data from presentation: The need to separate information (such as a weather forecast)
from details of the way it is to be presented on a particular device. The early motivation for this
arose from the need to deliver information not only to the traditional PC-based Web browser
(which itself comes in many flavors), but also to TV sets and WAP (Wireless Application Protocol)
phones, not to mention the continuing need to produce print-on-paper. For many information
providers, an even more important driver is the opportunity to syndicate content to other organi-
zations that can republish it with their own look-and-feel.
❑ Transmitting data between applications: The need to transmit information (such as orders and
invoices) from one organization to another without investing in software integration projects.
As electronic commerce gathers pace, the amount of data exchanged between enterprises
increases daily, and this need becomes ever more urgent.
Of course, these two ways of using XML are not mutually exclusive. An invoice can be presented onscreen
as well as being input to a financial application package, and weather forecasts can be summarized,
indexed, and aggregated by the recipient instead of being displayed directly. Another of the key benefits of
XML is that it unifies the worlds of documents and data, providing a single way of representing structure
regardless of whether the information is intended for human or machine consumption. The main point is
that, whether the XML data is ultimately used by people or by a software application, it will very rarely be
used directly in the form it arrives in: it first has to be transformed into something else such as another
XML format or HTML format.
To communicate with a human reader, this something else might be a document that can be displayed or
printed: for example, an HTML file, a PDF file, or even audible sound. Converting XML to HTML for
display is the most common application of XSLT today, and it is the one that will be used in most of the
examples in this chapter. After you have the data in HTML format, it can be displayed on any browser.
175
Transforming XML Data with XSLT
10_596772 ch07.qxd 12/13/05 11:16 PM Page 175
Figure 7-2
To transfer data between different applications, you need to be able to transform information from the
data model used by one application to the model used by another. Figure 7-2 shows how an XML file
can be converted into multiple formats using XSL style sheets. To load the data into an application, the
required format might be a comma-separated-values file, an HTML file, a WML file, or a sequence of
calls on a particular programming interface. Alternatively, it might be another XML file using a different
vocabulary from the original. As XML-based electronic commerce becomes widespread, the role of XSLT
in data conversion between applications also becomes ever more important. Just because everyone is
using XML does not mean the need for data conversion will disappear. Because the XML used in those
applications have a very different scope and purpose; but ultimately, it can handle the same content in a
different form, and there is therefore a need for transformation when information is passed from one
industry sector to the other.
XSLT Elements
If you’ve had the opportunity to work with HTML in the past, you’re already aware of how elements are
used to perform specific tasks. For example, the
<table> element can be used along with the <tr> and
<td> elements to construct a table for display in a browser. The <img> element can be used when an
image needs to be displayed, and the
<form> element can be used as a container for different form
elements such as text boxes and radio buttons. Each of these elements has a specific purpose and when
appropriate, can contain supporting child elements.
Similar to the HTML elements, the XSLT specification also lists several elements that can be used to
transform XML documents. Table 7-1 contains a listing of important elements of the XSLT specification.
Books.xml
Books_csv.xsl
XSL
Books_html.xsl
XSL
Books_wml.xsl
XSL
Books.csv
Books.html
Books.wml
176
Chapter 7
10_596772 ch07.qxd 12/13/05 11:16 PM Page 176
Table 7-1. XSLT Elements
Element Description
xsl:apply-imports Applies a template from an imported style sheet. Used in con-
junction with imported style sheets to override templates within
the source style sheet.
xsl:apply-templates By default, applies a template rule to the current element or to
the current element’s child nodes. An XPath expression can be
specified in the select attribute to direct the processor process a
node set and match accordingly.
xsl:attribute Represents an attribute node that is attached to an element that
appears in the output structure.
xsl:attribute-set Used when a commonly defined set of attributes will be applied
to different elements in the style sheet. This is similar to named
styles in CSS.
xsl:call-template Used when processing is directed to a specific template. The
template is identified by name.
xsl:choose Used in conjunction with <when> and <otherwise> to express
multiple conditional tests. Similar to using a
switch statement
in C# or
Select Case statement in VB.NET.
xsl:comment Creates a comment node in the result tree.
xsl:copy Creates a copy of the current node (without child nodes and
attributes).
xsl:copy-of Creates a copy of the current node (with child nodes and
attributes).
xsl:decimal-format Defines the characters and symbols to be used when converting
numbers into strings, with the
format-number() function.
xsl:element Creates an element with the specified name in the output
structure.
xsl:fallback Specifies an alternate code to run if the processor does not sup-
port an XSLT element. This element provides greater flexibility
during transformations as new XSLT versions come out in the
future.
xsl:for-each Loops through each node in a specified node set.
xsl:if Contains a template that will be applied only if a specified con-
dition is true.
xsl:import Imports the contents of one style sheet into another. Note an
imported style sheet has lower precedence than the importing
style sheet.
xsl:include Includes the contents of one style sheet into another. Note an
included style sheet has the same precedence as the including
style sheet.
177
Transforming XML Data with XSLT
10_596772 ch07.qxd 12/13/05 11:16 PM Page 177
Element Description
xsl:key Declares a named key that can be used in the style sheet with
the
key() function.
xsl:message Writes a message to the output (used to report errors).
xsl:namespace-alias Replaces a namespace in the style sheet to a different namespace
in the output.
xsl:number Determines the integer position of the current node and formats
a number.
xsl:otherwise Used with the xsl:choose and xsl:when elements to perform
conditional testing. Similar to using default in a
switch statement.
xsl:output Defines the format of the output document.
xsl:param Used to declare a parameter with a local or global scope. Local
parameters are scoped to the template in which they are
declared.
xsl:preserve-space Defines the elements for which white space should be preserved.
xsl:processing- Writes a processing instruction to the output.
instruction
xsl:sort Used with xsl:for-each or xsl:apply-templates to specify
sort criteria for selected node lists.
xsl:strip-space Defines the elements for which white space should be removed.
xsl:stylesheet Defines the root element of a style sheet. This element must be
the outermost element in an XSLT document and must contain a
namespace associated with the XSLT specification and a version
attribute.
xsl:template Defines a reusable template for producing output for nodes that
match a particular pattern.
xsl:text Writes literal text to the output.
xsl:transform Defines the root element of a style sheet.
xsl:value-of Writes out the value of the selected node to the result tree.
xsl:variable Used to declare and assign variable values that can be either
local or global in scope.
xsl:when Used as a child element of xsl:choose to perform multiple
conditional testing. Similar to using case in a
switch or Select
statement.
xsl:with-param Used in passing a parameter to a template that is called via
xsl:call-template.
178
Chapter 7
10_596772 ch07.qxd 12/13/05 11:16 PM Page 178