Professional Java JDK 6 Edition 2007 phần 10 pot
Bạn đang xem bản rút gọn của tài liệu. Xem và tải ngay bản đầy đủ của tài liệu tại đây (1.07 MB, 73 trang )
The toString method returns a string representation of this principal:
String toString()
The hashCode method returns a hash code for this principal:
int hashCode()
The getName method returns the name of this principal:
String getName()
When an entity submits itself to authentication, it must provide credentials (information that the security
system can use to verify the entity). For example, a user logging in to a system must provide a username
and password.
Credentials
Credentials can be of any type, and no requirements are placed on what interfaces a credential class
must implement. However, JAAS provides two interfaces that bestow behavior on a credential class that
might prove useful. These interfaces are
Refreshable and Destroyable.
The
javax.security.auth.Refreshable is useful for a credential that requires a refresh of its state
(perhaps the credential is valid only for a specific length of time). Four methods are defined on this
interface.
The
isCurrent method should return true if the credential is current or return false if it has expired
or needs a refresh of its state:
boolean isCurrent()
The refresh method refreshes the current state of the credential, making it valid again. The
javax.security.auth.Destroyable interface gives a credential semantics for destroying its contents:
void refresh() throws RefreshFailedException
The isDestroyed method returns true if the credential’s contents have been destroyed and returns
false otherwise:
boolean isDestroyed()
The destroy method destroys the contents of the credential:
void destroy() throws DestroyFailedException
Methods that require contents to be valid should throw the IllegalStateException after destroy is
called.
669
Chapter 13: Java Security
18_777106 ch13.qxp 11/28/06 10:35 PM Page 669
Authenticating a Subject
The basic manner in which a subject is authenticated is through a LoginContext object. A LoginContext
then consults another class for the specific authentication services. The sequence of steps that occurs when
a
LoginContext is used for authentication is as follows:
1. A LoginContext object is instantiated.
2. The LoginContext consults a Configuration to load all LoginModules for the current
application.
3. The login method of the LoginContext is called.
4. Each LoginModule then attempts to authenticate the subject. The LoginModule should associ-
ate principals/credentials with a successfully authenticated user.
5. The success or failure of the authentication is communicated back to the application.
Configuration
The configuration file contains a number of configurations per application for authentication. Each configu-
ration has a name (usually the application name) and then a list of login modules to use for authentication.
The configuration can have one set of login modules under the name
other to specify an authentication
scheme to use when no others match the name specified. Each set of login modules adheres to the follow-
ing syntax:
NAME {
LoginModuleClass FLAG ModuleOptions;
LoginModuleClass FLAG ModuleOptions;
}
The LoginModuleClass is the fully qualified name of a LoginModule. The FLAG can be one of the val-
ues in the following table.
Flag Name Description
Required The LoginModule is required to succeed; however, if it fails, Login
Module
s specified after the current one still execute.
Requisite The LoginModule is required to succeed. If it fails, control returns to
the application. No further
LoginModules are executed.
Sufficient The LoginModule is not required to succeed. If the LoginModule
succeeds, control is immediately returned to the application. Control
passes down the list of
LoginModules even if this one fails.
Optional The LoginModule is not required to succeed, and control passes down
the list if this one succeeds or fails.
The
ModuleOptions is a space-separated list of login module-specific name=value pairs.
670
Part II: A Broad Understanding of Java APIs, Tools, and Techniques
18_777106 ch13.qxp 11/28/06 10:35 PM Page 670
LoginContext
The LoginContext class provides a clean approach to authenticating subjects while leaving the authen-
tication details to
LoginModules. This makes it easy to change the configuration for an application by
adding or removing a
LoginModule. The LoginContext class provides the following constructors:
public LoginContext(String name) throws LoginException
public LoginContext(String name, Subject subject) throws LoginException
public LoginContext(String name, CallbackHandler callbackHandler)
throws LoginException
public LoginContext(String name, Subject subject,
CallbackHandler callbackHandler)
throws LoginException
The name parameter corresponds to an entry in the configuration used for the application. The first and
third forms of the constructor create an empty subject because one isn’t passed in. If a
LoginModule has
to communicate with the user, it can do so through a
CallbackHandler. For example, if a username
and password are required, a class can inherit from
javax.security.auth.callback.Callback
Handler
and retrieve the information from the user. The CallbackHandler interface defines a single
method:
void handle(Callback[] callbacks)
throws java.io.IOException, UnsupportedCallbackException
One or more callbacks can be specified, allowing you to separate username and password entries into
two separate callbacks all managed by a single
CallbackHandler.
The
LoginContext also provides login and logout methods.
This method causes all configured
LoginModules to authenticate the subject. If authentication succeeds,
you can retrieve the subject via
getSubject(). The subject may have revised credentials and principals
after all authentication is performed:
public void login() throws LoginException
The logout method removes credentials/principals from the authenticated subject:
public void logout() throws LoginException
Essentially, the code used for an application to log in, obtain an authenticated subject, and then log out
looks like the following snippet:
LoginContext loginContext = new LoginContext(“BasicConsoleLogin”);
try {
loginContext.login(); // utilizes callbacks
Subject subject = loginContext.getSubject();
// execute specific application code here
loginContext.logout();
671
Chapter 13: Java Security
18_777106 ch13.qxp 11/28/06 10:35 PM Page 671
} catch(LoginException le) {
// authentication failed
}
The LoginContext retrieves the set of LoginModules to execute from the configuration under the name
BasicConsoleLogin.
Authorization
Authentication provides for more of a black-and-white approach to security. The user (or other entity) is
either authenticated or not. JAAS provides authorization for granting degrees of access to an entity. Each
application can use a policy file that contains a list of permissions for various targets. The policy file pro-
vides a way to grant permissions to both code and principals.
The
javax.security.auth.AuthPermission class exists to guard access to the Policy, Subject,
LoginContext, and Configuration objects, providing a layer of security on these classes as well.
Consult the documentation for this class for a full list of permissions that it provides.
The policy file contains a list of grant sections that grant permissions to code or principals. The
grant
keyword is used to start a grant section, followed by zero or more optional elements: signedBy,
codeBase, and principal. The basic format looks like the following:
grant signedBy “signer_names”,
codeBase “URL”,
principal principal_class_name “principal_name”,
principal principal_class_name “principal_name”,
{
permission permission_class_name “target_name”, “action”,
signedBy “signer_names”;
permission permission_class_name “target_name”, “action”,
signedBy “signer_names”;
};
You can only specify signedBy and codeBase a maximum of one time, but the principal element can
be specified more than once. All of these are optional elements. By not specifying any at all, the permis-
sions specified apply to all executing code, regardless of its source.
As one example of a policy file, the
java.policy that is located in the jre/lib/security directory
that comes with Java has a policy that opens permissions wide to Java extensions:
grant codeBase “file:${{java.ext.dirs}}/*” {
permission java.security.AllPermission;
};
The codeBase element is used to specify all code located in the java.ext.dirs (a system property)
directory, which hence grants
AllPermission to all code in the Java extensions directory.
672
Part II: A Broad Understanding of Java APIs, Tools, and Techniques
18_777106 ch13.qxp 11/28/06 10:35 PM Page 672
The signedBy element is used to grant permissions only when the code is signed by the specified entity.
There are many available permissions in the Java API, such as
java.io.FilePermission, java.net
.NetPermission
, and java.security.AllPermission. Each permission has its own set of actions,
such as
FilePermission, needing to know which operations are valid on a particular file (read, write,
and so forth). Consult the online documentation for specific details on each permission.
Summary
In this chapter, you learned about Java cryptography and security. Security is very important in online
systems and systems that have multiple users. You now know some of the basics of security, such as gen-
erating and using keys, including digital signing and key management. Also introduced were the new
XML digital signature packages. You have seen how Java supports a variety of security mechanisms
from data encryption to access control, and you have an overview of how to go about securing your
application.
673
Chapter 13: Java Security
18_777106 ch13.qxp 11/28/06 10:35 PM Page 673
18_777106 ch13.qxp 11/28/06 10:35 PM Page 674
Packaging and Deploying
Your Java Applications
This chapter describes how to package and deploy your Java applications including client-side
and server-side applications. It discusses Java Web Start, JAR packaging, JAR signing, building
WAR files, and CLASSPATH manipulation. You’ll walk through the different types of Java applica-
tions and get a brief introduction to each as well as information on a few useful utilities that you
can use when creating, configuring, and deploying your own applications.
Examining Java Classpaths
One of the most potentially frustrating aspects of Java is the classpath. If you have coded in Java
even for a short length of time, you’re already familiar with the classpath. It is a system environ-
ment variable that directs the Java Virtual Machine (VM) to a set of classes and/or JAR files. This
is how the VM knows where code used by the program resides.
At times, you wind up needing a class and have no idea which JAR file has this class. You might
add a bunch of JAR files to your classpath, hoping you’ll accidentally add the right one in, never
truly knowing which JAR files are not needed. Many people complain about DLL Hell on Windows,
but a similar mismanagement of the classpath and the many files it points to can create the same sit-
uation with Java. If you use a development environment such as Eclipse, you are somewhat insu-
lated from this problem because it is easy to manage your classpath through the GUI. However, in a
deployment scenario, you may not have the luxury of a graphical tool to help manage the classpath.
A seemingly small problem (one JAR left off the classpath, for example) may take seconds to fix if
you know where the class is or—if you don’t know—much longer. Also, having multiple versions
of the same class in your classpath can lead to particularly difficult bugs to track down.
Another problem with classpaths is length limits on the environment variable imposed by the
operating system. I’ve seen more than one project with an insane number of JAR files (each with
19_777106 ch14.qxp 11/28/06 10:35 PM Page 675
a long path) specified within the classpath. Sometimes there is no great solution to this problem. If the
classpath works and nobody needs to tweak it after deployment, you should be fine. However, long
classpaths are troublesome during development and might even grow too long for the environment
space after deployment.
Here are a few suggestions to attempt to manage long classpaths. First, know where your application
is executing from and utilize relative paths instead of absolute paths. Second, attempt to group your
application and its libraries into as few JAR files as possible. A more complicated but useful solution is
grouping the common utility JAR files (perhaps third-party JAR files used by your application) and plac-
ing these in the extensions directory within the installed JRE. By default, this extensions directory is
lib/ext beneath the JRE directory. By installing a JAR file as an extension, it no longer needs to appear
on the classpath. You must ensure that the JAR file is placed within the correct JRE though. This might
entail you installing your own JRE with your application, but this too cannot be done lightly. This should
be only done with JAR files that are shared across multiple applications running within the same JRE.
Using the relative path strategy is wiser for JAR files used by only a single application.
In hoping to alleviate your burden a little, here are a couple of utility programs that may help you in
managing your classpath. The first class is a straightforward utility that accepts a list of classes stored
inside a file and verifies that each class is present somewhere within the classpath (or in one of the JAR
files in the classpath). The file containing the class list is passed in on the command line. Each line in
the file contains a single fully qualified class name:
import java.io.*;
public class ClassPathVerifier {
public static void main(String args[])
{
try {
BufferedReader br = new BufferedReader(
new InputStreamReader(
new FileInputStream(args[0])));
String clsName=””;
while( (clsName = br.readLine()) != null) {
try {
Class.forName(clsName);
System.out.print(“.”);
} catch(Exception e) {
System.out.println(“\nNOT FOUND: “ + clsName);
}
}
br.close();
} catch(IOException ioe) {
System.out.println(“IOException: “ + ioe);
ioe.printStackTrace();
}
}
}
This class uses the simple technique of passing a class name into the Class.forName method. If no
exception is thrown, the class is found. To show progress, a single period is printed for each class that is
676
Part II: A Broad Understanding of Java APIs, Tools, and Techniques
19_777106 ch14.qxp 11/28/06 10:35 PM Page 676
successfully loaded. If you manage multiple classpaths, this utility can be used to ensure that a set of
classes is always available.
A utility that packs more of a punch is listed next. The purpose of this next utility is to find which JAR
file(s) a class is inside. You need not specify a fully qualified class name—any portion of the class name
and package will do. This means that you can even search for a package instead of a particular class:
import java.io.*;
import java.util.zip.*;
import java.util.StringTokenizer;
public class ClassSearch {
private String m_baseDirectory;
private String m_classToFind;
private int m_resultsCount=0;
An interesting method that uses a bit more complex code is the searchJarFile. This method, shown in
the following example, actually opens a JAR file and searches inside it for a given class name:
public void searchJarFile(String filePath)
{
try {
FileInputStream fis = new FileInputStream(filePath);
BufferedInputStream bis = new BufferedInputStream(fis);
ZipInputStream zis = new ZipInputStream(bis);
ZipEntry ze = null;
while((ze=zis.getNextEntry()) != null) {
if(ze.isDirectory()) {
continue;
}
if(ze.getName().indexOf(m_classToFind) != -1) {
System.out.println(“ “ + ze.getName() +
“\n (inside “ + filePath + “)”);
m_resultsCount++;
}
}
} catch(Exception e) {
System.out.println(“Exception: “ + e);
e.printStackTrace();
}
}
The findHelper method searches directories and subdirectories for JAR files:
public void findHelper(File dir, int level)
{
int i;
File[] subFiles;
subFiles = dir.listFiles();
677
Chapter 14: Packaging and Deploying Your Java Applications
19_777106 ch14.qxp 11/28/06 10:35 PM Page 677
if(subFiles == null) {
return;
}
for(i=0; i<subFiles.length; i++) {
if(subFiles[i].isFile()) {
if(subFiles[i].getName().toLowerCase().indexOf(“.jar”) != -1) {
// found a jar file, process it
searchJarFile(subFiles[i].getAbsolutePath());
}
} else if(subFiles[i].isDirectory()) {
// directory, so recur
findHelper(subFiles[i], level+1);
}
}
}
The method searchClassPath is used to find a class in the JAR files specified in the given classpath:
public void searchClassPath(String classToFind)
{
String classPath = System.getProperty(“java.class.path”);
System.out.println(“Searching classpath: “ + classPath);
StringTokenizer st = new StringTokenizer(classPath, “;”);
m_classToFind = classToFind;
while(st.hasMoreTokens()) {
String jarFileName = st.nextToken();
if(jarFileName != null &&
jarFileName.toLowerCase().indexOf(“.jar”) != -1) {
searchJarFile(jarFileName);
}
}
}
The findClass method is kicked off from the main method and takes two parameters. One parameter is
the base directory that will be used as a starting point to begin the class search. The second parameter
is the class name that you are looking for. If the class name is found in any JAR files that exist in the base
directory or its subdirectories, the JAR filename and location are printed out to the console:
public void findClass(String baseDir, String classToFind)
{
System.out.println(“SEARCHING IN: “ + baseDir);
m_baseDirectory = baseDir;
m_classToFind = classToFind;
m_classToFind = m_classToFind.replaceAll(“\\.”, “/”);
File start = new File(m_baseDirectory);
System.out.println(“SEARCHING FOR: “ + m_classToFind);
System.out.println(“\nSEARCH RESULTS:”);
findHelper(start, 1);
678
Part II: A Broad Understanding of Java APIs, Tools, and Techniques
19_777106 ch14.qxp 11/28/06 10:35 PM Page 678
if(m_resultsCount == 0) {
System.out.println(“No results.”);
}
}
The main method shown in the following example is the driver method of the utility class and takes a
base directory and class name for which to search:
public static void main(String args[])
{
if(args.length < 1 || args.length > 2) {
System.out.println(“Incorrect program usage”);
System.out.println(“ java ClassSearch <base directory>” +
“ <class to find>\n”);
System.out.println(“ searches all jar files beneath base” +
“ directory for class\n”);
System.out.println(“”);
System.out.println(“ java ClassSearch <class to find>\n”);
System.out.println(“ searches all jar files in classpath” +
“ for class\n”);
System.exit(1);
}
ClassSearch cs = new ClassSearch();
if(args.length == 1) {
cs.searchClassPath(args[0]);
} else if(args.length == 2) {
cs.findClass(args[0], args[1]);
}
}
}
This class uses the zip library in Java along with the directory search facilities of the File class to search
for a class/package specified on the command line. An alternate usage allows you to search for a class
within the JAR files listed in the classpath. This allows you to find every JAR file that has a class, which
thus resolves a mess in the classpath. Here’s an example usage of the program. This assumes that the
JDK is installed in
C:\Program Files\java\jdk1.6.0:
c:\>java ClassSearch “c:\program files\java\jdk1.6.0” RSAPrivateKey
SEARCHING IN: c:\program files\java\jdk1.6.0
SEARCHING FOR: RSAPrivateKey
SEARCH RESULTS:
com/sun/deploy/security/MozillaJSSRSAPrivateKey.class
(inside c:\program files\java\jdk1.6.0\jre\lib\deploy.jar)
com/sun/deploy/security/MSCryptoRSAPrivateKey.class
(inside c:\program files\java\jdk1.6.0\jre\lib\deploy.jar)
sun/security/mscapi/RSAPrivateKey.class
(inside c:\program files\java\jdk1.6.0\jre\lib\ext\sunmscapi.jar)
sun/security/pkcs11/P11Key$P11RSAPrivateKey.class
(inside c:\program files\java\jdk1.6.0\jre\lib\ext\sunpkcs11.jar)
java/security/interfaces/RSAPrivateKey.class
679
Chapter 14: Packaging and Deploying Your Java Applications
19_777106 ch14.qxp 11/28/06 10:35 PM Page 679
(inside c:\program files\java\jdk1.6.0\jre\lib\rt.jar)
java/security/spec/RSAPrivateKeySpec.class
(inside c:\program files\java\jdk1.6.0\jre\lib\rt.jar)
sun/security/rsa/RSAPrivateKeyImpl.class
(inside c:\program files\java\jdk1.6.0\jre\lib\rt.jar)
This execution of the utility shows the various JAR files that contain either RSAPrivateKey or a related
class (because a substring search is performed with the specified class name). If you search for a more
obscure class, such as
ByteToCharDBCS_EBCDIC, you’ll find the charsets.jar file in your search
results. This utility can be used to find which JAR file a class is in but also every JAR file that contains
this class. You can find a class you need or resolve classpath confusion if the same class is in a number
of JAR files and an older version of a class you developed is being used although you’ve specified the
newer version on the command line.
Investigating the Endorsed Directory
In an installation of a Java Runtime Environment, there are packages that are not part of the standard
Java API. These packages are common third-party libraries and are considered endorsed, which means
they are distributed as an extension to the Java API. One example of an endorsed package is the org.omg
.CORBA package providing CORBA functionality. Because these packages are available to Java programs,
it is possible that there is a conflict when you distribute third-party libraries that already exist in the
endorsed directory. Java provides a mechanism called the Endorsed Standard Override Mechanism, which
gives you a way to install newer versions of libraries in the endorsed directory.
To override the endorsed standards, place JAR files in the endorsed directory within the JRE. This direc-
tory is named
endorsed and is located in the JRE installation beneath the lib directory, both on Windows
and on Unix. If you have multiple JREs or JDKs installed, make sure you place the JAR files in the correct
endorsed directory such that the VM that executes will recognize these JAR files. If you want to use a dif-
ferent directory for overriding the endorsed standards, specify it in the
java.endorsed.dirs system
property. In this property, you can list one or more directories that have JAR files you wish to use. These
directories are delimited by the value of the
File.pathSeparatorChar, which is system-specific.
There is a fixed list of standard APIs that you can override, shown in the following table. Note that you
cannot arbitrarily override a package in the standard Java API.
Packages that Can Be Overridden Packages that Can Be Overridden
javax.rmi.CORBA org.omg.DynamicAny
org.omg.CORBA org.omg.DynamicAny.DynAnyFactoryPackage
org.omg.CORBA.DynAnyPackage org.omg.DynamicAny.DynAnyPackage
org.omg.CORBA.ORBPackage org.omg.IOP
org.omg.CORBA.portable org.omg.IOP.CodecFactoryPackage
org.omg.CORBA.TypeCodePackage org.omg.IOP.CodecPackage
org.omg.CORBA_2_3 org.omg.Messaging
org.omg.CORBA_2_3.portable org.omg.PortableInterceptor
org.omg.CosNaming org.omg.PortableInterceptor.ORBInitInfoPackage
680
Part II: A Broad Understanding of Java APIs, Tools, and Techniques
19_777106 ch14.qxp 11/28/06 10:35 PM Page 680
Packages that Can Be Overridden Packages that Can Be Overridden
org.omg.CosNaming.Naming org.omg.PortableServer
ContextExtPackage org.omg.PortableServer.CurrentPackage
org.omg.CosNaming.Naming
ContextPackage
org.omg.Dynamic
Exploring Java Archives
Java wouldn’t be where it is today without the creation of its archive file format. The JAVA ARchive, which
programmers generally refer to as a JAR file, is a way to bundle multiple files, including other JARs, into a
single file that is suffixed with the
.jar extension. JAR files use the same format to compress their files as
those of the zip format. So, you can open a JAR file in a program that understands the normal zip compres-
sion and edit away. This makes the format of JAR files portable across different operating systems because
most operating systems understand the zip format or have utilities that were created for them to manipu-
late zip files. JAR files can greatly reduce the download time of classes, images, audio, and other large files
by compressing them. Applets and their resources can be compressed into a JAR file, significantly reducing
the amount of time it takes to download the applet.
JAR files can also be digitally signed for architectures that require a substantial amount of security
requirements to be imposed on the applications being constructed. By digitally signing a JAR file, you
can always tell who the author of the JAR file was and if the file has been tampered with. There are two
new enhancements to JAR support originally introduced in Java 5:
❑ Faster access to the contents of JAR files has been accomplished with a new parameter addition,
-i, to the command-line JAR tool that allows you to create a JAR file index.
❑ A new API has been added for the delete-on-close mode that is used when opening JAR files.
The major feature that separates the JAR file from a normal zip file is that of its manifest file that is con-
tained in the JAR file’s
META-INF directory. The manifest file allows you to invoke special features like
package sealing and the ability to specify the JAR as an executable JAR file. The manifest file is similar to
the format of a properties file in that it accepts
NAME-VALUE pair entries that are used for changing spe-
cific settings about the JAR file. Along with the manifest file, there are also other files that can be created
in the
META-INF directory of a JAR file. More about this subject is discussed subsequently. The indexing
support allows you to include an
INDEX.LIST in the META-INF directory, which is automatically gener-
ated when you invoke the JAR tool and specify the
-i option, allowing for quicker class loading times.
Manipulating JAR Files
The JDK contains a command-line tool called the jar tool that is used to create JAR files via the command
line. You execute the jar tool by simply typing jar at a console window. If you can’t get the tool to run,
it’s most likely that you don’t have Java set up correctly for your environment. Reread the install instruc-
tions for your environment that comes with your JDK. You can always run the tool from the
JDK/BIN
681
Chapter 14: Packaging and Deploying Your Java Applications
19_777106 ch14.qxp 11/28/06 10:35 PM Page 681
directory, but it is highly recommended that you adjust your environment so that you can run the tool
from anywhere. The correct syntax for executing the jar tool is shown in the following example:
jar {ctxu}[vfm0Mi] [jar-file] [manifest-file] [-C dir] files
Before you create your first JAR file, it is important to understand the options that can be used to create a
JAR file. Otherwise, it will seem like a big mystery as to why certain options were chosen to create the
JAR file. The following table lists the options and a description of the options for the jar tool.
Option Description
c Used to create a new archive.
t Lists the table of contents for the archive file. This is a great way to inspect the
contents of the JAR file right after you have created it to make sure it was cre-
ated successfully and the way you anticipated.
Note: The f option is usually combined with the t option to reduce the amount
of typing you have to do.
x Used to extract the specified files or all the files from the JAR file.
u Allows you to update a JAR file with specified new or changed files. More
likely you will use a tool that knows how to update a zip file format or an IDE
that can update JAR files for you because this task can be quite cumbersome if
you have a lot of files to update.
v The verbose option allows you to get more feedback from the jar tool as it cre-
ates the JAR. It is helpful when debugging issues.
f Specifies that the JAR file to update is on the command line.
m Signifies that you are supplying the JAR tool with a manifest file that is to be
included in the JAR.
0 The zero option tells the jar tool to not compress the files and just package
them into the archive.
M Prevents the default manifest file from being created. Manifest files are
optional in JAR files.
i Introduced in Java 5, this option is used to generate index information for the
JAR file into its
META-INF directory under the file named INDEX.LIST.
C [DIR] Instructs the jar tool to change the directory to the one specified and to JAR
the files that are being referenced.
Now it is time to show you just how easy it is to create a JAR file. This example will contain two Java
files and an images directory. Normally, the Java files would be compiled into classes, and the source
code would be removed, but this example simply demonstrates how almost any type of file can be con-
tained in a JAR file. The
chess directory contains two source files and a directory, images, that contains
the bitmap of the board.
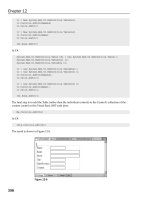
Once you know the files and directories you want to archive, you can issue a jar tool command with the
options
cvf from the root directory and literally compress the entire chess directory (see Figure 14-1)
682
Part II: A Broad Understanding of Java APIs, Tools, and Techniques
19_777106 ch14.qxp 11/28/06 10:35 PM Page 682
as well as any subdirectories under it. The c option is used to create the archive, the v option specifies
verbose, and the
f option signifies that you will be supplying the name of the JAR file to create on the
command line.
Figure 14-1
Here is an example of the jar tool in action:
C:\>jar -cvf chess.jar chess
added manifest
adding: chess/(in = 0) (out= 0)(stored 0%)
adding: chess/Chess.java(in = 0) (out= 0)(stored 0%)
adding: chess/ChessGUI.java(in = 0) (out= 0)(stored 0%)
adding: chess/images/(in = 0) (out= 0)(stored 0%)
adding: chess/images/board.bmp(in = 0) (out= 0)(stored 0%)
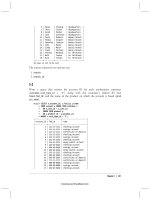
The chess.jar file is now created and contains all the files under the C:\chess directory. A default
manifest file was automatically generated by the jar tool in the
META-INF directory of the JAR file. It
contains nothing more than a version string. Figure 14-2 shows the new JAR structure.
Figure 14-2
You can also use the jar tool to see the contents of the
chess.jar file by specifying the t option on the
file. Here is an example of how to view the table of contents of a JAR file:
C:\>jar -tf chess.jar
META-INF/
META-INF/MANIFEST.MF
chess/
chess/Chess.java
chess/ChessGUI.java
chess/images/
chess/images/board.bmp
images
chess
board.bmp
Chess.java
ChessGUI.java
meta-inf
Manifest.m
f
W
#
W
#
W
#
W
#
images
chess
board.bmp
Chess.java
ChessGUI.java
W
#
W
#
W
#
W
#
683
Chapter 14: Packaging and Deploying Your Java Applications
19_777106 ch14.qxp 11/28/06 10:35 PM Page 683
Notice that the JAR utility added a META-INF directory and the file MANIFEST.MF. Besides viewing the
contents of a JAR file, you can also extract the contents of the JAR file. This may be necessary if you ever
get into a situation when you need to unpack the JAR to patch or edit files in the JAR file. To extract a
JAR file, you will need to specify the
x option. In this example, the xvf options are used. Refer to the
option table in this section for more information on options and their uses:
C:\>jar -xvf chess.jar
created: META-INF/
inflated: META-INF/MANIFEST.MF
created: chess/
extracted: chess/Chess.java
extracted: chess/ChessGUI.java
created: chess/images/
extracted: chess/images/board.bmp
The command simply extracts the JAR file to the current working directory. Now you can edit the files
and repackage them if need be.
Examining the Basic Manifest File
The manifest file can be thought of as a file that contains metadata information about the JAR file it
belongs to. By using the manifest file, you can version control, digitally sign, and seal the JAR files, pack-
ages, and extensions. When you first create your JAR file, if you didn’t specify the
-M option, a default
manifest will be created for you. The
M option prevents the default manifest file from being created. The
default manifest file looks something like this, depending on the version of Java you are using:
Manifest-Version: 1.0
Created-By: 1.6.0-rc (Sun Microsystems Inc.)
The manifest file is broken up into two general parts: a main section and an individuals section where
information about different files or packages can be listed. You don’t have to list every file you have in
the JAR file in the manifest file. In fact, you don’t have to list any unless you plan to sign particular files
in the JAR file. If you do, then those files must be listed.
Information in the manifest is broken up by name-value pair entries. The colon (:) character is used to
separate the name from the value. This is similar to property files except in property files, the delimiter
is an equals (=) sign. Any attributes that Java can’t understand are ignored, but the attributes can still
be used by the application. Therefore, these attributes are sometimes referred to as application-specific
attributes. The following table describes several of the most common main attributes you will run across
and gives a brief description of each.
Attribute Description
Manifest-Version The value of this attribute is the manifest file version.
Created-By Generated by the jar tool, this is the version of Java that was used to cre-
ate the JAR. It also includes the name of the vendor who created the Java
implementation.
Signature-Version The value of this attribute contains the signature version of the JAR file
and must contain a valid version number string with this specific format:
digit+{.digit+}*
684
Part II: A Broad Understanding of Java APIs, Tools, and Techniques
19_777106 ch14.qxp 11/28/06 10:35 PM Page 684
Attribute Description
Class-Path The class loader uses this value to create an internal search path that will
look for extensions or libraries that this application needs. URLs are sep-
arated by spaces.
Main-Class This attribute is needed if you are creating a self-executing JAR file. You
need to specify the name of the class file that contains the main method.
When you specify the name, do not include the
.class extension, or
your JAR will not execute.
Sealed This attribute has only two possible values: true or false. If true, all the
packages in the JAR file are sealed unless they are defined individually to
be different. If sealed, the class loader will only load classes from the JAR
file that are in the same package as the first class loaded from the JAR.
Though the manifest is not an exciting file to read about, it definitely is worth exploring so you have a
general understanding of the power and flexibility it provides JAR files.
Examining Applets and JARs
One of the most common uses for JAR files is to bundle applet code inside of JAR files and make them
accessible, like any other applet via a web browser. Because of this feature, a special attribute called an
extension in the manifest can be used to incorporate other packages in your applets. For more informa-
tion on applets, see the “Analyzing Applets” section within this chapter.
Here is a list of the extension attributes that can be used to optimize your applets.
Attribute Description
Extension-List This attribute is where you list the optional packages that you would like
to include in your applets. The package names should be separated by a
single space.
(extension)- The unique name of the package that the Java plug-in will use to
Extension-Name determine if the package is installed is stored in this attribute.
(extension)- This attribute lets the Java plug-in know which is the minimum version
Specification-Version required of the package to use.
(extension)- This attribute lets the Java plug-in know which is the minimal version of
Implementation- the package that is required. If the version is too old, the plug-in will
Version attempt to download a newer version of the package.
(extension)- This attribute is used to assign a vendor ID to the optional package.
Implementation- Again, the Java plug-in will compare the vendor IDs to make sure it is
Vendor-Id getting the correct optional package.
(extension)- In order for the Java plug-in to know where to get the latest version of
Implementation-URL the package, this attribute would have to be set with the URL that tells
the Java plug-in where to download the latest optional package.
685
Chapter 14: Packaging and Deploying Your Java Applications
19_777106 ch14.qxp 11/28/06 10:35 PM Page 685
Signing JAR Files
Signing JAR files is important for security-aware applications. It ensures that the JAR file has not been
tampered with and the file is from the original author. JAR files are signed using a special utility tool
called jarsigner, which can be found in your
JAVA_HOME/BIN directory. JAR files can also be signed by
using the java.security API via code. The jarsigner tool signs the JAR files by accessing a keystore that
has been created by the keytool utility that is used to create public and private keys, issue certificate
requests, import certificate replies, and determine if public keys belonging to third parties are trusted.
The private key is used to sign the JAR file by the jarsigner tool, and only people who know the private
key’s password can sign the JAR file with it.
When a JAR file is signed by the jarsigner tool, all of the entries in the
META-INF directory are signed.
Even non-signature-related files will be signed. Generally speaking, signature-related files end in the
following extensions: *.RSA, *.SF, *.DSA, and SIG-*.
You can sign the JAR file using the java.security API; however, compared to using the jarsigner tool,
there will be a lot more work for you to do. When a JAR file is successfully signed, it must contain an
updated manifest file, signature file, and signature block file. Entries for each file signed are created in
the manifest file and look like the following example:
Name: com/wrox/SampleSigned.class
SHA1-Digest: fcavHwerE23Ff4355fdsMdS=
Now that you know the high-level view of JAR signing, it is time to show you a concrete example of
how to sign a JAR and use all the wonderful tools that the Java SDK provides you with. Note that all
these tests will not be with valid certificates or keystores; rather, you will create example keystores for
testing purposes. This is great when you need to develop applications that require you to sign JAR files
but don’t have access to a certificate or keystore. The following example shows you how to use the key-
tool to generate a keystore and create a self-signed test certificate that you can use with the jar tool to
sign the
chess.jar file that you created earlier in this chapter.
The first thing you want to do is create a keystore that you can use for creating a self-signed certificate.
The following are the steps involved in generating the key:
1. Execute the keytool as shown. This will create a myKeystore file that will contain your key:
C:\>keytool -genkey -keystore myKeystore -alias myself
2. It will prompt you to enter a password for the keystore. Simply enter password:
Enter keystore password: password
3. Next, you will be asked to fill in several lines of data about yourself. Here is what you enter to
generate the key:
What is your first and last name?
[Unknown]: John Doe
What is the name of your organizational unit?
[Unknown]: IT
What is the name of your organization?
686
Part II: A Broad Understanding of Java APIs, Tools, and Techniques
19_777106 ch14.qxp 11/28/06 10:35 PM Page 686
[Unknown]: Wrox
What is the name of your City or Locality?
[Unknown]: Springfield
What is the name of your State or Province?
[Unknown]: Ohio
What is the two-letter country code for this unit?
[Unknown]: US
Is CN=John Doe, OU=IT, O=Wrox, L=Springfield, ST=Ohio, C=US correct?
[no]: Yes
4. The last step is to enter a password for the private key. Here, you’ll see the word password
entered again:
Enter key password for <myself>
(RETURN if same as keystore password): password
Your new myKeystore file should be generated. You can open it up and view it in a text editor if you
want, but the majority of the contents are encrypted. Even though you have a keystore, you still cannot
sign a JAR file until you have a certificate that you can use for signing. Fortunately, the keytool is able to
generate a self-signed certificate for you. This is simply done by issuing the following command:
C:\>keytool -selfcert -alias myself -keystore myKeystore
This command will prompt you for your keystore password. When you created the keystore, you made
it using the word password as your password so that is what you should enter. This command can some-
times take a minute or two to complete, depending on your system:
Enter keystore password: password
You now have a certificate and are ready to sign the JAR file. However, how do you know for sure that
the certificate and the keystore are okay? The easiest way is to issue a keytool command with the option
-list on the command line. This will display the contents of the keystore. Here is the output of the
command:
C:\>keytool -list -keystore myKeystore
Enter keystore password: password
Again, you have to enter your password to access the information in the keystore. The output after
entering your password is shown in the following example:
Keystore type: jks
Keystore provider: SUN
Your keystore contains 1 entry
myself, Jul 21, 2004, keyEntry,
Certificate fingerprint (MD5): 96:0B:2C:20:EA:DB:87:7A:64:DA:9F:68:21:85:B6:9A
The output shows the type of keystore you are using, the provider, and the certificate fingerprint. If you
get the preceding printout, you are ready to sign the JAR file. In order to sign the JAR file, you must now
687
Chapter 14: Packaging and Deploying Your Java Applications
19_777106 ch14.qxp 11/28/06 10:35 PM Page 687
use the jarsigner tool. Taking the keystore you generated earlier, issue the following command at a
command prompt:
C:\>jarsigner -keystore myKeystore chess.jar myself
Enter Passphrase for keystore: password
Warning: The signer certificate will expire within six months.
You have now successfully signed your first JAR file! To verify that the jarsigner tool successfully signed
the JAR file that you specified, extract the JAR file and review its contents. You should now see two new
files in the JAR file: one called
Myself.dsa and the other called Myself.sf. The .dsa (digital signature)
file is unreadable, but the
.sf file can be read. The contents of it are shown in the following example:
Signature-Version: 1.0
Created-By: 1.6.0 (Sun Microsystems Inc.)
SHA1-Digest-Manifest-Main-Attributes: XpKykodQ7e3bKKW8wqLFO8VocOU=
SHA1-Digest-Manifest: eL4xJ2eU5oyO7h4VVYW0hs1pEj0=
Name: chess/images/board.bmp
SHA1-Digest: wvxwx9Dqd+jbKoe8e7raVxSfNzI=
Name: chess/ChessGUI.java
SHA1-Digest: JlWKkQ9l5/82bHxMdf4nzrmphH0=
Name: chess/Chess.java
SHA1-Digest: Y4jUlkFH64RojRERTRBEIZRC+uc=
These three new entries show the signature for each of the files that were signed by the jarsigner. These
entries are now also shown in the
manifest.mf file:
Manifest-Version: 1.0
Created-By: 1.6.0(Sun Microsystems Inc.)
Name: chess/images/board.bmp
SHA1-Digest: 2jmj7l5rSw0yVb/vlWAYkK/YBwk=
Name: chess/ChessGUI.java
SHA1-Digest: 2jmj7l5rSw0yVb/vlWAYkK/YBwk=
Name: chess/Chess.java
SHA1-Digest: 2jmj7l5rSw0yVb/vlWAYkK/YBwk=
Another way to verify that the jarsigner signed the JAR file correctly is to run the jarsigner tool with the
-verify option on the JAR file you want to verify. So, go ahead and issue the following command on
the JAR file you just signed:
C:\>jarsigner -verbose -verify chess.jar
You should see the following output if it was successful:
289 Wed July 21 21:28:58 EDT 2004 META-INF/MANIFEST.MF
410 Wed July 21 21:28:58 EDT 2004 META-INF/MYSELF.SF
1008 Wed July 21 21:28:58 EDT 2004 META-INF/MYSELF.DSA
688
Part II: A Broad Understanding of Java APIs, Tools, and Techniques
19_777106 ch14.qxp 11/28/06 10:35 PM Page 688
0 Wed July 21 13:36:18 EDT 2004 META-INF/
0 Wed July 21 13:27:02 EDT 2004 chess/
sm 0 Wed July 21 13:26:32 EDT 2004 chess/Chess.java
sm 0 Wed July 21 13:26:42 EDT 2004 chess/ChessGUI.java
0 Wed July 21 13:27:14 EDT 2004 chess/images/
sm 0 Wed July 21 13:27:08 EDT 2004 chess/images/board.bmp
s = signature was verified
m = entry is listed in manifest
k = at least one certificate was found in keystore
i = at least one certificate was found in identity scope
jar verified.
If the validation failed, the jarsigner tool would either throw a security exception, or, if the JAR file was
not signed at all, it would send a message back stating that the JAR file is unsigned (signature missing or
not parsable).
If you have made it through all of these steps, congratulations! You now know how to sign your own
JAR files. This is critical when you need to ensure security on a JAR file. JAR files are generally signed
when using Java Web Start applications and especially applets, but signing can definitely be done for all
the JAR files you create.
JAR files can also be signed by multiple people. What will happen is the signatures for each of the people
who ran the jarsigner tool will be stored in the
META-INF directory just as is the case when one person
signs it. You can even sign the JAR file with different versions of the JDK so that there are a lot of security
options you can do using the tools that have been mentioned for signing JAR files and creating keystores.
Before moving on, take a closer look at the options that can be used with the jarsigner tool.
Option Description
keystore <url> Required when signing a JAR file and will default to the .keystore file in
your
user.home directory if you do not specify the keystore file to use.
You can specify a full path and filename of the keystore file for the URL
parameter.
storepass <password> Used to supply the password that is required to access the keystore you
plan to use when signing your JAR file.
storetype <storetype> Used to specify the keystore type to be used. The
security.properties
file has an entry called keystore.type, and the jarsigner tool will
default to that value if no storetype is provided.
keypass <password> Your password for your private key if it is different from the store pass-
word. If you don’t supply this option, you will be prompted for the
password, if necessary.
sigfile <filename> Specifies the base of the filename to use for generating the
.sf and .dsa
files. This option allows you to override the default values generated by
the jarsigner tool.
Table continued on following page
689
Chapter 14: Packaging and Deploying Your Java Applications
19_777106 ch14.qxp 11/28/06 10:35 PM Page 689
Option Description
signedjar <filename> You can specify another name for the JAR file that will be signed. If you
don’t specify a name, the JAR file you are issuing the command on is
overwritten. For example, you could use
chess_secure.jar for the
name if you want to have signed and unsigned copies of
chess.jar.
verify <jarfile> An option for verifying that the JAR file is signed properly.
verbose Tells the jarsigner tool to output more information during the signing
process to help with debugging issues.
certs Should be used with verbose and verify together. It will display certifi-
cate information for each signer of the JAR file.
tsa <url> Allows you to specify the location of the Time-Stamping Authority.
Examining the JAR Index Option
Downloading JAR files that are required by applets can be slow and painful, and searching them for
the appropriate classes they contain used to be linear. Linear searching of a JAR file for a class can result
in slow performance, wasted bandwidth, and waiting too long to initiate a download of a JAR file the
applet may be missing. With the JARIndex algorithm, all the JAR files in an applet can be stored into an
index file, which makes class loading times much faster — especially in determining what needs to be
downloaded.
The jar tool has a new option,
-i, which means index. This option will generate index information
about the classes, packages, and resources that exist inside the JAR file. This makes access times much
quicker. The information is stored in a small text file under the
META-INF directory called INDEX.LIST.
When the JAR is accessed by the class loader, it reads the
INDEX.LIST file into a hash map that will con-
tain all the files and package names in the hash map. Instead of searching linearly in the JAR file for the
class file or resource that the class loader needs, it can now query the hash map, resulting in quicker
access times. The
INDEX.LIST file is always trusted by the class loader, so manipulating it manually
is not wise. If you make a mistake and the class loader can’t locate a resource or file, it will throw an
InvalidJarIndexException so that you can capture the error and correct it. You can generate an index
of the JAR file
chess.jar that you created in previous examples by issuing the following command:
C:\>jar -iv chess.jar
The contents of the JAR file now contain an INDEX.LIST file in the META-INF directory:
C:\>jar -tf chess.jar
META-INF/INDEX.LIST
META-INF/
META-INF/MANIFEST.MF
chess/
chess/Chess.java
chess/ChessGUI.java
chess/images/
chess/images/board.bmp
690
Part II: A Broad Understanding of Java APIs, Tools, and Techniques
19_777106 ch14.qxp 11/28/06 10:35 PM Page 690
The INDEX.LIST file contains the following information:
JarIndex-Version: 1.0
chess.jar
chess
chess/images
The INDEX.LIST file is simply text and is compressed inside the JAR file, so the memory footprint of the
INDEX.LIST file is light, to say the least.
Creating an Executable JAR
Java supports the capability to make JAR files executable. If a JAR file is executable, it can be run from a
console or command prompt by typing the following:
java –jar jar-file-name
Also, if you are in Windows and your application is GUI-driven, simply double-click an executable JAR,
and it will automatically run.
Making your JAR file executable is extremely simple. Just follow these procedures when creating your
JAR file, and you will instantly be able to make it executable:
1. Compile all of your Java source code.
2. Create a manifest file, and enter in (at a bare minimum) the Manifest-Version and Main-Class
properties. The Main-Class should point to the name of the class that contains the main method
in the JAR file:
Manifest-Version: 1.0
Main-Class: Test
3. Create the JAR file using the following syntax:
jar –cmf myManifest.mf test.jar *
4. Execute the JAR using the -jar option:
java –jar test.jar
The test.jar that was created should now execute without any problem if you specified the appropriate
class in the manifest file that contains the main method for the application. It is extremely useful to make
JAR files self-executing when the JAR files are GUI-driven applications and not based upon initial user input
that would normally be supplied to the program via its ARG list in the main method of the application.
Analyzing Applets
Java applets are one of the notable features of the Java programming language. Applets are programs
that are designed to run within web browsers that are compatible with and support Java. Applets can be
691
Chapter 14: Packaging and Deploying Your Java Applications
19_777106 ch14.qxp 11/28/06 10:35 PM Page 691
embedded directly in HTML and can be used on web pages to process user input or display information
such as the current weather forecast. Applets can also exist outside of the web browser and can have a
much more robust feature set built into them like a standalone application would. The downside of mak-
ing an applet that contains the same amount of features as, say, a standalone Swing application is that,
the larger the applet, the more time it would take to download the applet for the user to use. The reason
for this is that applets are downloaded every time a user accesses the web page containing the applet.
However, this is becoming less of an issue as the caching abilities of the Java plug-in improve with each
new release of Java.
Basic Anatomy of an Applet
The basic anatomy of an applet is shown in the following class. You’ll notice that there is no main
method as is required by a standard Java application. Applets do not require such a method and only
require you to extend the class that will be run from the
Applet class. Instead of having a starting point
method, applets have methods that are event-driven. There are five basic event-driven methods that are
useful when developing a basic applet:
init, start, stop, destroy, and paint. These methods are
demonstrated in the following code:
import javax.swing.*;
import java.awt.*;
public class Welcome extends JApplet {
public void init() {
System.out.prinln(“Initializing Applet”);
repaint();
}
public void start() {
System.out.println(“Starting Applet”);
repaint();
}
public void paint(Graphics g) {
g.drawString(“Welcome to Java Applets!”, 100, 50);
}
public void stop() {
System.out.println(“Stopping Applet”);
repaint();
}
public void destroy() {
System.out.println(“Destroying Applet”);
repaint();
}
}
692
Part II: A Broad Understanding of Java APIs, Tools, and Techniques
19_777106 ch14.qxp 11/28/06 10:35 PM Page 692
693
Chapter 14: Packaging and Deploying Your Java Applications
The five methods shown in the preceding code are described in the following table.
Method Description
init Used to initialize the applet when it is either loaded for the first time or
reloaded thereafter.
start After the applet has been initialized, the start method will be called. Here,
you can fire off threads or begin execution of code.
stop If the user leaves the web page that the applet is on or exits the web browser,
this method is called. This allows you a chance to clean up code such as
threads or code that is in the middle of being executed.
destroy Your last chance to perform any final cleanup that is necessary before the
applet is unloaded.
paint Called any time the GUI needs to be updated based on users’ interaction with
the applet.
You do not have to override all of these events to get a basic applet to work. For example, you could just
override the
paint method that displays a string containing the words, “Hello World!” and the applet
would function just fine. There are also many other event methods that you can override that will allow
you to react to user actions. For example, if you need to capture the mouse-down event, you could do
this by overriding the method
mouseDown. These are standard AWT events. In more advanced applet
implementations, you would most likely use Swing to build your applet.
Packaging an Applet for Execution
Applets are not executed the same way as normal Java applications. They are generally embedded in an
HTML page and executed by a Java-compatible browser such as Internet Explorer. Internet Explorer
uses the Java plug-in to execute applet code. For development purposes, you can also execute applets
that are embedded in HTML files by using the
appletviewer command. For example:
appletviewer com/wrox/Welcome.html
The preceding example executes the applet that is embedded in the Welcome.html file. The HTML code
is shown in the following example:
<HTML>
<HEAD>
<TITLE> Welcome to Java Applet </TITLE>
</HEAD>
<BODY>
<APPLET CODE=”Welcome.class” CODEBASE=”com/wrox/” WIDTH=200 HEIGHT=50>
<PARAM NAME=”exampleParam” VALUE=”whatever”>
</APPLET>
</BODY>
</HTML>
The <APPLET> and </APPLET> tags designate the specific tags belonging to the applet that will be exe-
cuting. The
CODE attribute is used to reference the class name that contains the compiled applet class.
19_777106 ch14.qxp 11/28/06 10:35 PM Page 693