Professional Microsoft Smartphone Programming phần 4 docx
Bạn đang xem bản rút gọn của tài liệu. Xem và tải ngay bản đầy đủ của tài liệu tại đây (872.68 KB, 53 trang )
Integrated Security = SSPI; Inital Catalog=myCourses”);
dbConn.Open();
SqlCommand sqlCmd = dbConn.CreateCommand();
sqlCmd.CommandText = “SELECT studentID, lastName FROM students”;
sqlDataReader stuReader = sqlCmd.ExecuteReader();
while (stuReader.Read())
{
Console.WriteLine(“{0}\t{1}”, stuReader.GetInt32(0),
stuReader.GetString(1));
}
stuReader.Close();
dbConn.Close();
In the preceding code, a SQL connection is first created by specifying the connection string and invoking
the
Open() method of the SqlConnection class. Then a SqlCommand object is instantiated to retrieve
records in the
studentID field and the lastName field from the table students. The results of the
query are executed by the
ExecuteReader() method of the SqlCommand class and are passed to a
sqlDataReader object. By iterating the sqlDataReader object with the Read() method, data can be
retrieved row by row.
To retrieve the data in disconnected mode, a typical approach is to use a
DataAdapater object to
retrieve data from a data source and then populate the data to a
DataSet object, which can hold multi-
ple data tables in memory. The following code snippet demonstrates how to perform the same function
in disconnected mode:
using System;
using System.Data;
using System.Data.SqlClient;
SqlConnection dbConn = new SqlConnection(“Data Source=localhost; Integrated
Security = SSPI; Inital Catalog=myCourses”);
string qStr = “SELECT studentID, lastName FROM students”;
SqlDataAdapter stuAdapter = new SqlDataAdapter(qStr, dbConn);
DataSet stuSet = new DataSet();
stuAdapter.Fill(stuSet, “students”);
for (int i=0; i<=stuSet.Tables[“students”].Rows.Count-1; i++)
{
int ID = System.Convert.ToInt32(
stuSet.Tables[“students”].Rows[i][“studentID”]);
string name = stuSet.Tables[“students”].Rows[i][“lastName”].ToString();
System.Console.WriteLine(“{0}\t{1}”, ID, name);
}
In the preceding example, a SqlConnection object is first created. However, you do not need to maintain
an open connection to the database by calling the
open() method. Rather, a sqlDataApapter object is
133
Data Access with SQL Server Mobile
11_762935 ch06.qxp 11/20/06 7:56 AM Page 133
created with the same SQL query command string and the same database connection string. When the
SqlAdapater.Fill() method is executed, an implicit connection to the database is established and the
data in the table is populated to the
DataSet object. Once the Fill() operation is finished, it closes the
connection to the database. You can then access each column of the data from the in-memory data set by
stating the name of the table, the index of the row, and the name of the column.
This section only briefly introduces ADO.NET programming. For mobile devices, accessing a conven-
tional database using either connected mode or disconnected mode may not be applicable because
mobile devices do not have sufficient system memory and are not connected to the database servers all
the time. In the following sections, you will learn how to access and manipulate data in a database that
is designed for Windows Mobile devices.
Microsoft SQL Server 2005 Mobile Edition
The Microsoft SQL Server 2005 Mobile Edition (or, simply, SQL Server Mobile) is a lightweight database
designed specifically for smart devices such as Smartphones, Pocket PCs, and Tablet PCs. Like its prede-
cessor SQL Server CE, SQL Server Mobile is a trimmed-down version of Microsoft’s desktop database. It
allows faster and easier data access while disconnected, and synchronizes the data between mobile
devices and desktop SQL servers while connected. In addition to enhanced reliability and performance,
SQL Server Mobile adds a number of notable features, as summarized in Table 6-1.
Table 6-1 New Features of SQL Server Mobile
Feature SQL Server CE SQL Server Mobile
Multi-user support No (single user only) Yes
Multi-subscription No. You need to create a separate Yes
support subscriptiondatabase for each
subscription.
Column-level tracking No. The minimum synchronization Yes. With both column- and
unit is a single row. row-level tracking, the minimum
synchronization unit is a cell.
Auto reuse empty pages No Yes. The auto-shrink feature
will reuse the empty pages,
thereby saving storage space.
Integration with Visual No Yes
Studio 2005 and SQL
Server 2005
134
Chapter 6
11_762935 ch06.qxp 11/20/06 7:56 AM Page 134
Note that SQL Server Mobile changed the database file format, so if you have a database file created
with SQL Server CE, you will need to upgrade the database file from the command-line utility that SQL
Server Mobile provides. By default, this upgrade utility is located at
C:\Program Files\Microsoft
Visual Studio 8\SmartDevices\SDK\SQL Server\Mobie\v3.0\wce500\[processor]\
upgrade.exe
.
Assume the old database is
oldDB.sdf located in the oldDir folder with a password of oldPass. To
upgrade it to
newDB.sdf in the newDir folder with the password newPass, use the following command:
Upgrade.exe /s “oldDir\oldDB” /sp “oldPass” /d “newDir\newDB.sdf” /dp “newPass”
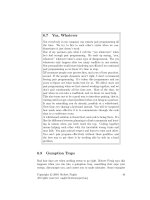
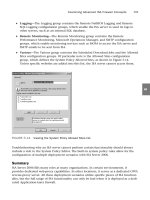
SQL Server Mobile Architecture
In a nutshell, SQL Server Mobile is a relational database that operates on a tiny runtime. As shown in
Figure 6-1, the SQL Server Mobile architecture includes a development environment, a client environ-
ment, and a server environment.
Figure 6-1
The development environment, of course, is where you develop your applications. For SQL Server Mobile
applications, only Visual Studio 2005 is supported as the development environment. The managed code
you develop relies on the ADO.NET layer in the .NET Compact Framework to call into SQL Server
Mobile. If you have to develop your application using unmanaged code, you can get access to SQL
Server through an OLE database provider.
Development
Environment
Visual Studio 2005
Managed Code
ADO.NET
SQL Server Mobile
Client
Environment
Smart Device
Application
Deploy
SQL Server Mobile
Client Agent
SQL Server Mobile
TY
56
R
4
E
3
W
2
Q
1
G
=
F
-
D
+
S
/
A
*
V
?
C
)
X
(
Z
$
NUM CAP
B
!
P
0
O
9
I
8
U
7
M
.
N
,
L
@
K
"
J
'
H
:
SYMBOL SPACE
5:14
PM
MESSAGES
DEL
Server
Environment
IIS Server
SQL Server Mobile
Client Agent
HTTP
SQL Server
ActiveSync
135
Data Access with SQL Server Mobile
11_762935 ch06.qxp 11/29/06 3:24 PM Page 135
The client environment is the smart device. Typically, SQL Server Mobile is preinstalled on a Windows
Mobile 5 device and emulator. When you deploy your application to the device, the corresponding SQL
Server Mobile databases are also copied to the mobile device as files in
.sdf format. The Smartphone
user can then simply access the local copy of the database for regular data manipulations. A connection
to the servers is required when users need to synchronize their local databases with the copies stored on
the database servers.
The
server environment includes a Microsoft Internet Information Services (IIS) server, SQL Server Mobile
Server Agent, and SQL Server. An IIS server is required in the server environment because the SQL
Server Mobile Server Agent listens to the requests from the SQL Server Mobile Client Agent via HTTP
requests. The SQL Server Mobile Client Agent can make such HTTP requests through either WiFi net-
works or by the ActiveSync connections. The desktop version of SQL Server in the server environment
enables users to replicate and synchronize data between SQL Server Mobile databases and SQL Server
databases, which in turn offers full functionality to manage and analyze data.
At the time of writing, Microsoft has announced SQL Server Everywhere Edition, which is very similar
to SQL Server Mobile but it can be deployed not only to smart devices and Tablet PCs, but also to desk-
top computers and servers.
Installing SQL Server Mobile
This subsection walks you through the procedures for installing the development environment, the
client environment, and the server environment to make SQL Server Mobile functioning correctly.
System Requirements
Before installing SQL Server Mobile, you should determine whether your system meets the hardware
and software prerequisites, as shown in Table 6-2. Note that the required components vary depending
on your SQL Server Mobile device.
Table 6-2 SQL Server Mobile System Requirements
Environment Requirements
Development Microsoft Visual Studio 2005
environment
One of the following operating systems:
Microsoft Windows Server 2003, Windows XP Media Center Edition, Win-
dows XP Professional, Windows XP Tablet PC Edition, Windows 2000
Professional SP4 or later versions, or Windows 2000 Server SP4 or later
versions
Microsoft Internet Explorer 6.0 or later to access SQL Server Mobile Books
Online
Microsoft ActiveSync 4.0 or later to debug and deploy applications
136
Chapter 6
11_762935 ch06.qxp 11/20/06 7:56 AM Page 136
Environment Requirements
Client environment Any device that runs Microsoft Windows CE 5.0, Microsoft Windows XP
Tablet PC Edition, Windows Mobile 2003 Software for Pocket PC, or
Windows Mobile 5.0
2 to 3MB storage space
Server environment Microsoft SQL Server 2000 SP3a or later
SQL Server 2005: Intel or compatible Pentium 600 megahertz (MHz) or
greater processor required (1 GHz or greater recommended), 256MB RAM
minimum (512MB RAM or more recommended), 250MB hard disk space.
IIS 5.0 or later versions: Supported on 32-bit Windows Server 2003, 32-bit
Windows XP, and Windows 2000 SP4; 120MB of available disk space on the
server.
Microsoft ActiveSync 4.0 or later versions are required to use Management
Studio to manage SQL Server Mobile databases on connected devices.
Microsoft Internet Explorer 6.0 or later
Microsoft Outlook 98 or later is required for synchronization of e-mail, cal-
endar, contacts, tasks, and notes to the desktop or portable computer (Out-
look 2003 recommended).
Installing the Development Environment
If you have already installed SQL Server 2005, you don’t have to do anything. SQL Server Mobile files
are already installed on the development computer. A number of classes in the
System.Data
.SqlServerCe
namespace are available in the development environment to enable you to create
databases and tables and to manipulate data in the databases.
If the developing tool is Visual C++ for Devices or Embedded C++, you need to include the
SsceOleDB.h, ca_mergex30.h, and Ssceerr30.h files in your projects. These header files and libraries
provide APIs to access SQL Server Mobile through OLE DB connections.
Installing the Server Environment
A typical setting for the server environment enables data exchange between SQL Server and SQL Server
Mobile. You need to install IIS, SQL Server 2005/2000 with Replication Components, and SQL Server
Mobile Server Tools. If the IIS server and SQL Server are on different computers, make sure the SQL
Server Mobile Server Tools are installed on the one that runs IIS.
137
Data Access with SQL Server Mobile
11_762935 ch06.qxp 11/20/06 7:56 AM Page 137
Installing the Client Environment
As mentioned earlier, SQL Server Mobile is well integrated with Visual Studio 2005. When you deploy a
managed application that interacts with SQL Server Mobile, Visual Studio will determine whether the
software and components needed to run applications are installed on the device. If not, those compo-
nents will be installed automatically to the smart device. By default, the installation path is
\Windows on
the device. You can use SQL Server Management Studio in SQL Server to manage the SQL Server Mobile
databases.
Things are little different if you need to deploy a native application. You need to manually copy SQL
Server Mobile to the device. You may also want to copy the SQL Server Mobile Query Analyzer, which is
a graphical management tool to manage SQL Server Mobile databases.
Setting Up the SQL Server Mobile
Server Environment
In this section you will learn how to create and synchronize a SQL Server Mobile database. The process
describes the most common scenario whereby a desktop version of SQL Server is running in the back-
ground and SQL Server Mobile is running on mobile devices. The synchronization between the two is
made available through a web interface.
To begin, you need to install SQL Server Mobile Server Tools, which include the SQL Server Mobile
Server Agent, the SQL Server Mobile Replication Provider, and the Configure Web Synchronization
Wizard. This section assumes that you have already installed SQL Server 2005.
Installing SQL Server Mobile Tools
By default, Microsoft SQL Server Mobile Server Tools is not installed in SQL Server 2005. Navigate to
C:\Program Files\Microsoft SQL Server\90\Tools\Binn\VSShell\Common7\IDE and find the
setup program
sqlce30setupen.msi.
Double-click the program to open the SQL Server 2005 Mobile Server Tools Setup Wizard. You can easily
finish installing the tool; the settings are self-explanatory. The only thing to note here is to make sure that
the Synchronize with SQL Server 2005 option is checked.
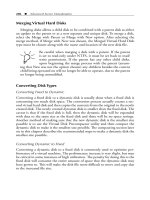
Creating a Database and Tables from SQL Server 2005
In the next step, you are going to create a database and a table from SQL Server.
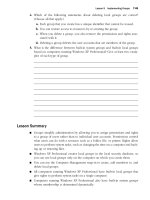
First, from the machine on which SQL Server is installed, click Start
➪Program➪Microsoft SQL Server
2005 and open SQL Server Management Studio. The Connect to Server Wizard appears, as indicated in
Figure 6-2. Choose Database Engine as the server type and fill in the appropriate server name and
authentication method of the server. When you are done, click the Connect button to connect to the SQL
Server.
138
Chapter 6
11_762935 ch06.qxp 11/20/06 7:56 AM Page 138
Figure 6-2
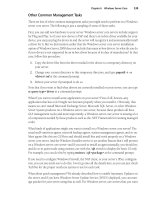
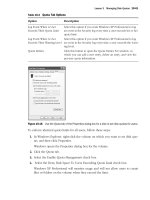
Once the SQL Server is connected, you can create a new database. Right-click the Databases icon from
Object Explorer in SQL Server Management Studio and choose New Database (see Figure 6-3). In the
resulting New Database window, shown in Figure 6-4, name the database
MyDB1.
Figure 6-3
139
Data Access with SQL Server Mobile
11_762935 ch06.qxp 11/20/06 7:56 AM Page 139
Figure 6-4
Next, create a simple StuGrades table in the MyDB1 database by right-clicking the MyDB1 icon from
Object Explorer in SQL Server Management Studio and choosing New Table. In the Table designer of
SQL Server Management Studio, add
StudentID and Grade as the Column names. The data type of
StudentID is
bigint and does not allow nulls, whereas the data type of Grade is smallint and can take
nulls, as indicated in Figure 6-5.
Once the table is created, it appears in the Object Explorer window, as shown in Figure 6-6.
The table is created, but it is currently empty. In SQL Server Management Studio, you can add rows to a
table in a SQL Server database. Right-click the table you want to edit and choose Open Table (see Figure 6-7).
140
Chapter 6
11_762935 ch06.qxp 11/20/06 7:56 AM Page 140
Figure 6-5
Figure 6-6
141
Data Access with SQL Server Mobile
11_762935 ch06.qxp 11/20/06 7:56 AM Page 141
Figure 6-7
Randomly add entries to the table, as shown in Figure 6-8.
Figure 6-8
Now you have a simple database that contains a simple table, ready for action. In reality, the SQL Server
database could be huge, and you certainly want the data stored in SQL Server to be easily replicated to a
SQL Server Mobile database. To do that, you need to create a publication in a SQL Server database and
then subscribe to this publication from the SQL Server Mobile database.
Creating a Publication
Before you create a publication, first ensure that SQL Server Agent, which appears in the bottom of the
Object Explorer (see Figure 6-9), is currently running. If not, start it.
142
Chapter 6
11_762935 ch06.qxp 11/20/06 7:56 AM Page 142
Figure 6-9
Expand the Replication folder from the Object Explorer and then launch the New Publication Wizard by
right-clicking the Local Publication icon and choosing New Publication, as shown in Figure 6-10.
Figure 6-10
143
Data Access with SQL Server Mobile
11_762935 ch06.qxp 11/20/06 7:56 AM Page 143
Four types of publications are available in SQL Server: Snapshot Publication, Transactional publication,
Transactional publication with updatable subscriptions, and Merge publication. For SQL Server Mobile,
Merge publication is the only supported way to synchronize with SQL Server. In Merge publication,
both publisher and subscribers can update data independently. Changes are merged periodically.
Choose Merge publication (see Figure 6-11) and don’t forget to include SQL Server 2005 Mobile Edition
in the Subscriber Types window (see Figure 6-12).
Figure 6-11
Figure 6-12
144
Chapter 6
11_762935 ch06.qxp 11/20/06 7:56 AM Page 144
Next you will be prompted to choose which tables to publish. Check StuGrades from the Tables object,
as shown in Figure 6-13.
Figure 6-13
Configuring Web Synchronization
As you can see from the SQL Server Mobile architecture, synchronization between a smart device and a
SQL server is handled by HTTP. That means you need to configure the web synchronization components
of a published article. To do so, right-click the MyDB1 publication in Object Explorer and choose
Configure Web Synchronization, as shown in Figure 6-14.
In the Synchronization wizard, add a new virtual directory to the default website, as shown in Figure 6-15.
SQL Server Mobile requires snapshot files to create a merge publication. By default, these snapshot files
are located in the folder
C:\Program Files\Microsoft SQL Server\MSSQL.1\MSSQL\repldata.
You should share this folder and specify its UNC path name in the Snapshot Share Access window. The
syntax for UNC naming is
\\ComputerName\ShareName. In this example, the folder has a shared name
of MyDB1 and a machine name of Spirit; therefore, the UNC path is
\\spirit\MyDB1, as shown in
Figure 6-16.
145
Data Access with SQL Server Mobile
11_762935 ch06.qxp 11/20/06 7:56 AM Page 145
Figure 6-14
Figure 6-15
146
Chapter 6
11_762935 ch06.qxp 11/20/06 7:56 AM Page 146
Figure 6-16
Creating a SQL Server Mobile Database
Now that the SQL server is set up and correctly configured, it is time to create and set up the SQL Server
Mobile database.
Creating a SQL Server Mobile database is fairly simple using SQL Server Management Studio. From the
Object Explorer, click Connect and choose SQL Server Mobile, as illustrated in Figure 6-17. When the
Connect to Server window appears, click the drop-down list of Database files and choose <New
Database>. You can then specify the name and location of the SQL Server Mobile database in the Create
New SQL Server 2005 Mobile Edition Database dialog, as shown in Figure 6-18.
147
Data Access with SQL Server Mobile
11_762935 ch06.qxp 11/20/06 7:56 AM Page 147
Figure 6-17
Figure 6-18
Creating Subscriptions in SQL Server Mobile
The last step to set up the server environment is to enable the SQL Server Mobile database to subscribe
to the publications from SQL Server. To begin, run the New Subscriptions Wizard and select Find SQL
Server Publisher, as shown in Figure 6-19 and Figure 6-20, respectively.
148
Chapter 6
11_762935 ch06.qxp 11/20/06 7:56 AM Page 148
Figure 6-19
Figure 6-20
149
Data Access with SQL Server Mobile
11_762935 ch06.qxp 11/20/06 7:56 AM Page 149
During this process, you need to provide a URL to the SQL Server Mobile virtual directory located on
the web server. The path name is typically
http://webserver_name/virutal_directoryname/
sqlcesa30.dll
. In our example, the URL is http://spirit/MyDB1/sqlcesa30.dll. If you are not
sure whether the URL is correct, simply try it in Internet Explorer. If you can read SQL Server Mobile
Server Agent 3.0, as shown in Figure 6-21, the URL is correct.
Figure 6-21
After you successfully finish the subscription, you will notice that the StuGrades table is now available
in the SQL Server Mobile database, as shown in Figure 6-22.
Figure 6-22
No graphical tools are available in Management Studio to enable you to read the rows in the SQL Server
Mobile StuGrade table, but you can always use an SQL command to populate the data from the table.
For example, the simple
Select SQL statement enables you to compare the replicated table with the one
you input manually. And, yes, they are the same, as you can tell from Figure 6-23.
150
Chapter 6
11_762935 ch06.qxp 11/20/06 7:56 AM Page 150
Figure 6-23
Writing SQL Server Mobile Applications
Programming SQL Server Mobile with Visual Studio 2005 is a relatively simple task. Indeed, you do not
even have to write a single line of code to be able to retrieve data from a table. The following sections
describe how to do just that.
A Simple Application with the DataGrid Control
A straightforward way to develop a SQL Server Mobile application is to add connections to the database
and make those tables the data source for controls such as the DataGrid.
In the following example, you will be able to navigate the MyDB1 table that is replicated in the previous
section.
151
Data Access with SQL Server Mobile
11_762935 ch06.qxp 11/20/06 7:56 AM Page 151
First, create a new connection to the database. In Visual Studio 2005, click View➪Server Explorer to
bring up the Server Explorer window. In the Server Explorer window, right-click Data Connections and
choose Add Connection, as shown in Figure 6-24.
When the Add Connection dialog window appears (as shown in Figure 6-25), change the data source to
SQL Server Mobile and specify the name of the database.
Figure 6-24
Figure 6-25
152
Chapter 6
11_762935 ch06.qxp 11/20/06 7:56 AM Page 152
Now you will be able to see the table from the Server Explorer (see Figure 6-26). You can also use those
tables or databases as the data source in your application.
The next step is to create a new Smartphone project. You can simply drag the DataGrid control to the
form and specify the data source of the DataGrid control. As shown in Figure 6-27, from the Properties
window of dataGrid1, click the DataSource drop-down list and then click Add Project Data Source to
bring up the Data Source Configuration Wizard. Choose Database, as shown in Figure 6-28, and then
specify the data connection that the application uses. In the example, the data connection is a SQL Server
Mobile database MyDB1, shown in Figure 6-29.
Figure 6-26
Figure 6-27
153
Data Access with SQL Server Mobile
11_762935 ch06.qxp 11/20/06 7:56 AM Page 153
Figure 6-28
Figure 6-29
You are then asked if you would like to copy the database file to your Smartphone project, as shown in
Figure 6-30. Because SQL Server Mobile uses the local data file, click Yes in the dialog box. As shown in
Figure 6-31, the Data Source Configuration Wizard will ask you to pick the database objects that you
wanted included in the in-memory data set.
154
Chapter 6
11_762935 ch06.qxp 11/20/06 7:56 AM Page 154
Figure 6-30
Figure 6-31
After data sources are added to the DataGrid control, the column names show up in the Form Designer.
The simple UI of this example is shown in Figure 6-32.
Now just simply compile and deploy the application. Figure 6-33 shows that all the rows in table
stuGrade are populated to the Data Grid control, and users can navigate the data with the navigation
key from the Smartphone. Although it might not be what you expected to see, the DataGrid control
works just fine even though you didn’t write a single line of code.
In the next two examples, you will learn about some classes in the
SqlServerCe namespace that enable
you to create a database and tables and synchronize data.
155
Data Access with SQL Server Mobile
11_762935 ch06.qxp 11/20/06 7:56 AM Page 155
Figure 6-32
Figure 6-33
156
Chapter 6
11_762935 ch06.qxp 11/20/06 7:56 AM Page 156
The SqlServerCe Namespace
The SqlServerCe namespace enables you to use SQL commands to manipulate data and manage the
SQL Server Mobile database. To use APIs in this namespace, don’t forget to add a reference. In Visual
studio 2005, click Project
➪Add reference and choose System.Data.SqlServerCe, as shown in Figure 6-34.
Figure 6-34
Recall from our earlier discussion that GUI tools are used to create a database and tables and to add
rows. These steps can also be performed with the help of the
SqlServerCe namespace.
To create a SQL Server Mobile database, use the
CreateDatabase() method of the SqlCeEngine class.
This operation requires a connection string to indicate the location of the database. The following code
snippet demonstrates how to create a
MyDB2.sdf database in the My Documents folder:
private string StrConn = @”Data Source=My Documents\MyDB2.sdf”;
private void addDB()
{
SqlCeEngine ceEngine = new SqlCeEngine();
ceEngine.LocalConnectionString = StrConn;
try
{
ceEngine.CreateDatabase();
}
catch (SqlCeException sqlEx)
{
MessageBox.Show(sqlEx.ToString());
}
}
Accessing relational data may cause exceptions to be raised. The best practice is to always put the
database operation in a
try catch block.
157
Data Access with SQL Server Mobile
11_762935 ch06.qxp 11/20/06 7:56 AM Page 157