Android 2.3.4 User’s Guide phần 2 pps
Bạn đang xem bản rút gọn của tài liệu. Xem và tải ngay bản đầy đủ của tài liệu tại đây (316.05 KB, 38 trang )
Android basics 40
AUG-2.3.4-105 Android User’s Guide
Paste text
1 Cut or copy the text to paste.
See “Cut or copy text” on page 39.
2 Place the cursor in the text field where you want to paste the text, or select text
you want to replace by pasting.
You can paste text that you copied from one application into a text field in any
application.
3 Touch Paste in the menu that opens.
The text is inserted at the cursor. The text that you pasted also remains in a
temporary area on the phone so you can paste that same text in another location.
Android basics 41
AUG-2.3.4-105 Android User’s Guide
Opening and switching applications
The Launcher has icons for all of the applications on your phone, including any
applications that you downloaded and installed from Android Market or other sources.
When you open an application, the other applications you’ve been using don’t stop;
they keep on running: playing music, opening webpages, and so on. You can quickly
switch among your applications, to work with several at once. The Android operating
system and applications work together to ensure that applications you aren’t using
don’t consume resources unnecessarily, stopping and starting them as needed. For
this reason, there’s no need to stop applications unless you’re certain that one you
downloaded is misbehaving. For details about how applications use memory and how
you can manage them, see “Managing how applications use memory” on page 49.
See “Market” on page 345 to learn how to discover and install additional applications
(including productivity tools, utilities, games, references, and many other kinds of
software) on your phone.
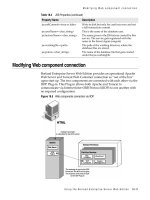
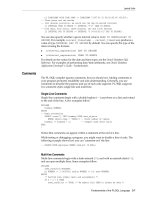
Open and close the Launcher
S On the Home screen, touch the Launcher icon to open it.
If you have more applications than can fit on the Launcher in one view, you can
slide the Launcher up or down to view more.
You can add an application icon to the Home screen by touching & holding it on
the Launcher until it vibrates and then dragging it to a location on the Home
screen.
Slide the Launcher up or down to bring
more apps into view.
Touch to close the
Launcher.
Touch an application to open it
Android basics 42
AUG-2.3.4-105 Android User’s Guide
S Touch the Home icon on the Launcher or the Home button to close the
Launcher.
The Launcher closes automatically if you touch an icon to open its application or if
you move an icon from the Launcher to the Home screen.
Open an application
S Touch an application's icon on the Launcher.
OR
S Touch an application’s icon on the Home screen.
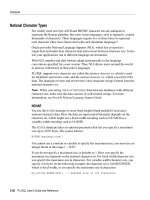
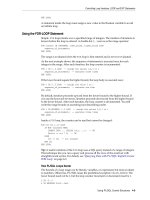
Switch to a recently used application
1 Press & hold the Home button .
A small window opens, with icons of applications that you’ve used recently.
2 Touch an icon to open its application.
Or press Back to return to the current application.
Touch an icon to open an application
you’ve used recently.
Android basics 43
AUG-2.3.4-105 Android User’s Guide
Locking your screen
You can lock your screen so that only you can unlock it to make calls, access your
data, buy applications, and so on. You may also be required to lock your screen by a
policy set by an email or other account you add to your phone.
See “Location & security settings” on page 369 for other ways to protect your phone
and privacy.
Lock your screen
1 On the Home screen, press Menu and touch Settings > Location &
security.
2 Touch Set up screen lock.
If you already have a screen lock configured, touch Change screen lock to
change how you lock your screen or to turn off screen locking.
3 Touch Pattern, PIN, or Password.
If you touch Pattern, you’re guided to create a pattern you must draw to unlock
the screen. The first time you do this, a short tutorial about creating an unlock
pattern appears. You can press Menu and touch Help at any time for a
refresher. Then you’re prompted to draw and redraw your own pattern.
If you touch PIN or Password, you’re prompted to set a numeric PIN or a password
you must enter to unlock your screen.
The next time you turn on your phone or wake up the screen, you must draw your
unlock pattern or to enter your PIN or password to unlock it.
Android basics 44
AUG-2.3.4-105 Android User’s Guide
Customizing the Home screen
You can add application icons, shortcuts, widgets, and other items to any part of any
Home screen where there’s free space. You can also change the wallpaper.
For an introduction to the Home screen, see “Getting to know the Home screen” on
page 19.
Add an item to the Home screen
1 Open the Home screen where you want to add the item.
For an introduction to working with the Home screen, including how to switch
Home screens, see “Getting to know the Home screen” on page 19.
2 Press Menu and touch Add, or just touch & hold an empty location on the
Home screen.
If there are no empty spots on the Home screen, Add is dimmed; you must delete
or move an item before you can add another item, or switch to another Home
screen.
3 In the menu that opens, touch the type of item to add.
You can add the following types of items to the Home screen.
Shortcuts Add shortcuts to applications, a bookmarked webpage, a favorite
contact, a destination in Maps, a Gmail label, a music playlist, and many other items.
The shortcuts available depend on the applications you have installed.
Widgets Add any of a variety of miniature applications (widgets) to your Home
screen, including a clock, a music player, a picture frame, the Google search bar, a
power manager, a calendar that shows upcoming appointments, and a News &
Weather widget. You can also download widgets from Android Market.
Folders Add a folder where you can organize Home screen items, or folders that
contain all your contacts, contacts with phone numbers, or starred contacts. Your
folders’ contents are kept up-to-date automatically.
Move an item on the Home screen
1 Touch & hold the item you want to move, until it vibrates. Don’t lift your finger.
2 Drag the item to a new location on the screen.
Pause at the edge of the screen to drag the item onto another Home screen pane.
3 When the item is where you want it, lift your finger.
Android basics 45
AUG-2.3.4-105 Android User’s Guide
Remove an item from the Home screen
1 Touch & hold the item you want to remove, until it vibrates. Don’t lift your finger.
The Launcher icon changes to a Trash Can icon .
2 Drag the item to the Trash Can icon.
3 When the icon turns red, lift your finger.
Change the Home screen wallpaper
1 Press Menu and touch Wallpapers.
You can also touch & hold an empty area of the Home screen and in the menu that
opens, touch Wallpapers.
2 Touch Gallery, Live wallpapers, or Wallpapers.
Touch Gallery to use a picture that you have captured using the camera or
copied to your phone. You can crop the picture before setting it as a wallpaper.
Working with pictures is described in “Gallery” on page 281.
Touch Live wallpapers to open a scrolling list of animated wallpapers installed
on your phone. Some live wallpapers change according to the time of day or in
response to touching the screen, tell the time, or offer other information. Some live
wallpapers have a Settings button.
Touch Wallpapers to open a screen where you can sample the wallpaper images
that come with the phone. Slide the miniature images left and right to view the
samples. Touch a sample to view a larger version.
3 Touch Save or Set wallpaper.
Rename a folder
1 Touch the folder to open it.
2 Touch & hold the folder window’s title bar.
3 Enter a new name in the dialog that appears.
4 Touch OK.
Android basics 46
AUG-2.3.4-105 Android User’s Guide
Connecting quickly with your contacts
As you build up your list of contacts on your phone, you can use Quick Contact for
Android in many applications to quickly start a chat, email, or text message, to place a
call, or to locate your contacts. Quick Contact for Android is a special icon that you
can touch to open a bubble with options for quickly initiating a connection to that
contact.
S Identify a Quick Contact icon by its frame.
Contacts that you can access with Quick Contact are displayed differently in
different applications, but usually with a picture frame that looks like this:
S Touch a Quick Contact icon to open a bubble with icons for all the ways you can
communicate with the contact.
If there are more icons than can fit in the bubble, drag them left and right to view
them all.
S Touch an icon to open its application, where you can start communicating with
your contact right away.
You can also touch an icon to edit the contact’s information in Contacts, to view
the contact’s address in Google Maps, and so on, depending on which applications
and accounts are configured on your phone.
You can add a shortcut for a contact to your Home screen, which you can then touch
to open Quick Contact for Android for that contact. For more information about
adding shortcuts to the Home screen, see “Customizing the Home screen” on
page 44.
Touch an icon to start communicating
with the contact in that application.
Android basics 47
AUG-2.3.4-105 Android User’s Guide
Optimizing battery life
You can extend your battery’s life between charges by turning off features that you
don’t need. You can also monitor how applications and system resources consume
battery power.
Extend the life of your battery
S Turn off radios that you aren’t using.
If you aren’t using Wi-Fi, Bluetooth, or GPS, use the Settings application to turn
them off. See “Wireless & networks” on page 359 and “Location & security
settings” on page 369. (The GPS receiver is only turned on when you’re using an
application that makes use of it.)
S Turn down screen brightness and set a shorter screen timeout.
See “Display settings” on page 368.
S If you don’t need them, turn off automatic syncing for Gmail, Calendar, Contacts,
and other applications.
See “Configuring account sync and display options” on page 131.
S Use the Power Control widget to check and control the status of radios, the display
brightness, and syncing.
Adding widgets is described in “Customizing the Home screen” on page 44.
S If you know you won’t be near a mobile or Wi-Fi network for a while, switch to
Airplane mode.
You phone uses extra power to search for mobile networks. See “Disable phone
calls (Airplane mode)” on page 81.
Check the battery charge level
S On the Home screen, press Menu and touch Settings > About phone >
Status.
The battery status (charging, discharging) and level (as a percentage of fully
charged) are displayed at the top of the screen.
Android basics 48
AUG-2.3.4-105 Android User’s Guide
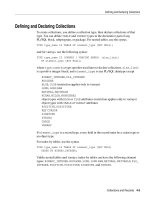
Monitor and control what uses the battery
The Battery Use screen shows which applications consume the most battery power.
You can also use it to turn off applications that you’ve downloaded if they are
consuming too much power.
S On the Home screen, press Menu and touch Settings > Applications >
Battery use.
The Battery Use screen lists the applications that have been using the battery,
from greatest to least battery use.
The discharge graph at the top of the screen shows the pace of battery discharge
since you last changed the phone (short periods of time when you were connected
to a charger are shown as thin green lines at the bottom of the chart), and how
long you’ve been running on battery power.
S Touch an application in the Battery Use screen to learn details about its power
consumption.
Different applications offer different kinds of information. Some applications
include buttons that open screens with settings to adjust power use.
S Touch the discharge graph to open a screen with details about when the phone’s
radios, screen, and other features were using the battery.
Touch the discharge graph to open a
screen with details about battery use by
the phone’s screen, radios, and other
features.
Android basics 49
AUG-2.3.4-105 Android User’s Guide
Managing how applications use memory
As described in “Opening and switching applications” on page 41, you typically don’t
need to worry about managing applications beyond installing, opening, and using
them. The operating system manages how they use memory and other resources
automatically. But there are times when you may want to know more about how
applications are using the memory and other resources in your phone.
Applications use two kinds of memory in your phone: storage memory and RAM.
Applications use storage memory for themselves and any files, settings, and other
data they use. They also use RAM (memory that is designed for temporary storage
and fast access) when they are running.
All phones have internal storage. This is the memory where most applications and
many kinds of files and data for those applications are stored. The operating system
manages and carefully guards internal storage, because it can contain your private
information; you can’t view its contents when you connect the phone to a computer
with a USB cable.
Depending on your model of phone, your phone also has either internal USB storage
or a removable SD card. This is the memory whose contents you can view and copy
files to and from when you connect your phone to a computer (as described in
“Connecting to a computer via USB” on page 67). Some applications are also
designed to be stored in this memory, rather than in internal memory, by default or as
an option.
The operating system also manages how applications use your phone’s RAM. It only
allows applications and their component processes and services to use RAM when
they need it. It may cache processes that you’ve been using recently in RAM, so they
restart more quickly when you open them again, but it will erase the cache if it needs
the RAM for new activities.
Android basics 50
AUG-2.3.4-105 Android User’s Guide
You manage how applications use storage memory directly and indirectly in many
ways as you use your phone, for example, by:
G Installing or uninstalling applications (see “Market” on page 345 and “Uninstall an
application” on page 53)
G Downloading files in Browser, Gmail, and other applications
G Creating files (for example, by taking pictures)
G Deleting downloaded files or files you created (see “Managing downloads” on
page 55 and the documentation for the applications you use)
G Using a computer to copy files to or delete files from your USB storage or SD card
(see “Connecting to a computer via USB” on page 67)
G Changing whether an application is installed in internal storage or in your phone’s
USB storage or SD card, if the application supports it (see “Change where an appli-
cation is stored” on page 53)
You rarely need to manage how applications use RAM: the operating system does this
for you. But you can monitor how applications use RAM and stop them if they
misbehave as described in “Stop a misbehaving application” on page 53.
Open the Manage applications screen
S Press Home , press Menu , and touch Manage apps.
OR
S Open the Settings application and touch Applications > Manage
applications.
Android basics 51
AUG-2.3.4-105 Android User’s Guide
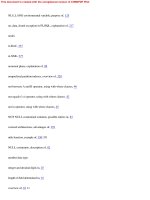
The Manage Applications screen has four tabs, with lists of applications and their
components in each. At the bottom of each tab is a graph of the memory used by
the items in the list and amount of free memory.
S Touch an application, process, or service in a list to open a screen with details
about it and, depending on the item, to change its settings, stop it, uninstall it, and
so on.
Most of these tasks are described in this section.
S Touch the Downloaded tab to view the applications you’ve downloaded from
Market or other sources.
S Touch the All tab to view all the applications installed on your phone.
The list includes applications that are bundled with your release of Android and
applications you downloaded from Market or other sources.
S Touch the USB storage or SD card tab (depending on your model of phone) to
view the applications installed there.
Checked items are installed on your USB storage or SD card. Unchecked items are
installed in your phone’s internal storage, but are designed so that you can move
them if you want. See “Change where an application is stored” on page 53.
S Touch the Running tab to view the applications and their processes and services
that are running or cached.
See “Stop a misbehaving application” on page 53.
Touch an application to open a screen
with details about it and options for
managing it.
Android basics 52
AUG-2.3.4-105 Android User’s Guide
S When viewing the Downloaded, All, USB storage, or SD card tab, press
Menu and touch Sort by size or Sort by name to switch the order of the
list.
Get details about an application
1 Open the Manage applications screen.
2 Touch an application, process, or service.
The Application Info screen for each application lists its name and version, along
with details about the application. Depending on the application and where it came
from, it may also include buttons for managing the application’s data, forcing the
application to stop, and uninstalling the application. It also lists details about the
kinds of information about your phone and data that the application has access to.
DIfferent kinds of applications have different kinds of information and controls, but
commonly include:
G Use the Force stop button to stop an application that is misbehaving (see
“Stop a misbehaving application” on page 53).
G If you installed the application from Android Market or another source, you can
use the Uninstall button to remove the application and all of its data and set-
tings from the phone. See “Market” on page 345 and “Uninstall an application”
on page 53 for more information about uninstalling and reinstalling applica-
tions.
G Storage Gives details about the amount of phone storage that an application
uses.
G You can delete an application’s settings and other data by touching the Clear
data button.
G You can use the Move to USB storage or Move to SD card (depending
on your model of phone) and the Move to phone buttons to change where
some applications are stored; see “Change where an application is stored” on
page 53.
G Cache If the application stores data in a temporary area of the phone's mem-
ory, lists how much information is stored, and includes a button for clearing it.
G Launch by default If you have configured an application to launch certain file
types by default, you can clear that setting here.
G Permissions Lists the kinds of information about your phone and data the
application has access to.
Android basics 53
AUG-2.3.4-105 Android User’s Guide
Stop a misbehaving application
You can monitor how much RAM running applications and cached processes are
using and if necessary, stop them.
1 Open the Manage applications screen.
2 Touch the Running tab.
3 Press Menu , and touch Show cached processes or Show running
services to switch back and forth.
The Running tab shows the applications, processes, and services that are
currently running or that have cached processes and how much RAM they are
using. The graph at the bottom of the screen shows the total RAM in use and the
amount free.
You can touch a misbehaving application, process, or service and in the screen
that opens touch the Stop button. You can also touch the Report button, to send
the developer information about how the application misbehaved on your phone.
Important Stopping an application or operating system processes and services disables one or
more dependant functions on your phone. You may need to restart your phone to
restore full functionality.
Uninstall an application
You can uninstall applications you downloaded from Market and other sources. (You
can also use Market to uninstall applications you downloaded from there; see
“Managing your downloads” on page 352)
1 Open the Manage applications screen.
2 Touch the Downloads tab.
3 Touch the application you want to uninstall.
4 Touch the Uninstall button.
5 Touch OK in the screen that asks you to confirm you want to uninstall the
application.
Change where an application is stored
Some applications are designed to be stored on your phone’s USB storage or SD card
(depending on your model of phone), rather than in internal storage. Others are
designed so you can change where they are stored. You may find it helpful to move
large applications off of your internal storage, to make more room for other
applications that don’t offer the option. Many large applications are designed this way
for exactly this reason.
Android basics 54
AUG-2.3.4-105 Android User’s Guide
1 Open the Manage applications screen.
2 Touch the USB storage or SD card tab.
The tab lists the applications that must be or can be stored on your phone’s USB
storage or SD card. Each application lists the amount of storage it uses on your
phone's internal storage (even when not stored there, all applications use at least a
small amount of internal storage).
Applications that are stored on your phone’s USB storage or SD card are checked.
The graph at the bottom shows the amount of memory used and free of your
phone’s USB storage or SD card: the total includes files and other data, not just the
applications in the list.
S Touch an application in the list.
The Storage section of the application’s details screen shows details about the
memory used by the application. If the application can be moved, the Move
button is active.
S Touch Move to USB storage or Move to SD card to move the bulk of the
application from the phone’s internal storage.
S Touch Move to phone to move the application back to the phone’s internal
storage.
Android basics 55
AUG-2.3.4-105 Android User’s Guide
Managing downloads
Files, applications, and other items you download in Browser, Gmail, or Email are
stored on your phone’s USB storage or SD card (depending on your model of phone).
You can use the Downloads application to view, reopen, or delete what you’ve
downloaded.
Some mobile networks place restrictions on the size of the files you can download, to
manage the demands on their networks or to help you avoid unexpected charges.
When you try to download an oversized file when connected to such networks, you’re
asked or required to delay downloading the file until you are next connected to a Wi-Fi
network, when the download will resume automatically. You can view and manage
these queued files in the Downloads application as well.
Downloaded files are stored in the download directory in your USB storage or SD
card. You can view and copy files from this directory when connected to a computer,
as described in “Connecting to a computer via USB” on page 67.
Open Downloads and manage downloaded files
S Touch the Downloads icon on the Home screen or in the Launcher.
See “Opening and switching applications” on page 41.
S Touch an item to reopen it.
S Touch headings for earlier downloads to view them.
Touch a download to reopen it.
Check items you want to delete.
Android basics 56
AUG-2.3.4-105 Android User’s Guide
S Check items you want to delete; then touch Delete.
The item is deleted from your phone’s USB storage or SD card.
S Press Menu , and touch Sort by size or Sort by time to switch back and
forth.
57
AUG-2.3.4-105 Android User’s Guide
Connecting to networks and
devices
Your phone can connect to a variety of networks and devices, including
mobile networks for voice and data transmission, Wi-Fi data networks,
and Bluetooth devices, such as headsets. You can also connect your
phone to a computer, to transfer files from your phone, and share your
phone’s mobile data connection via USB or as a portable Wi-Fi hotspot.
In this section
“Connecting to mobile networks” on page 58
“Connecting to Wi-Fi networks” on page 61
“Connecting to Bluetooth devices” on page 64
“Connecting to a computer via USB” on page 67
“Sharing your phone’s mobile data connection” on page 69
“Connecting to virtual private networks” on page 72
“Working with secure certificates” on page 74
“Configuring Internet (SIP) calling” on page 76
Connecting to networks and devices 58
AUG-2.3.4-105 Android User’s Guide
Connecting to mobile networks
When you assemble your phone with a SIM card from your wireless service provider (if
necessary—CDMA phones don’t use a SIM), your phone is configured to use your
provider’s mobile networks for voice calls and for transmitting data. (Refer to your
phone’s owner’s guide and your carrier for more information.)
Your phone is configured to work with many mobile carriers’ networks. If your phone
does not connect to a network, contact your carrier for assistance. For GSM phones,
you may need to obtain the details of its access point name (APN) or other details; see
“Edit or create a new GSM access point” on page 60.
Different locations may have different mobile networks available. You may need to
configure your phone to use the fastest (4G) networks. You can also configure your
phone to use only a slower 2G network for data to extend the life of your battery
between charges. You can even configure your phone to access a different set of
networks entirely, or to behave in special ways when roaming.
The icons in the Status bar indicate which kind of data network you’re connected to
and the voice and data network signal strength.
Network status icons turn green if you have a Google Account added to your phone
and the phone is connected to Google services, for syncing your Gmail, Calendar
events, contacts, for backing up your settings, and so on. If you don’t have a Google
Account or if, for example, you’re connected to a Wi-Fi network that is not connected
to the Internet, the network icons are white.
When you’re connected to slower networks, you may want to postpone using your
phone for data-intensive tasks until you are connected to a faster network again, or
find a Wi-Fi network to connect to. See “Connecting to Wi-Fi networks” on page 61.
Connected to a WiMAX-based 4G network
Connected to a 4G network
Connected to a 3G network (UMTS or HSDPA)
Connected to a network with speeds between 3G and 2G (EDGE)
Connected to a 2G network (GPRS)
The more bars are lit, the stronger the wireless signal
Connected to another wireless service provider’s network (roaming)
Connecting to networks and devices 59
AUG-2.3.4-105 Android User’s Guide
Connect to 4G networks
If your phone has the ability to connect to 4G networks, you may have to configure it
to connect to them.
1 Press Home , press Menu , and touch Settings to open the Settings
application.
2 Touch Wireless & networks > 4G settings.
3 Check 4G.
The 4G setting also displays the current status of the 4G connection (connecting,
connected, and so on).
You can check Network notification to receive a notification whenever your
phone connects to or disconnects from a 4G network.
You can touch a 4G network in the list to learn more about the connection.
If you’re carrier uses a WiMAX-based 4G network, the 4G Status bar icon indicates
whether you’re connected to a 4G network, the strength of the signal, and whether
your connection is idle (that is, whether you’re currently sending or receiving data).
Determine what GSM network you’re using
1 Press Home , press Menu , and touch Settings to open the Settings
application.
2 Touch Wireless & networks > Mobile networks > Access Point Names.
The name of the wireless service provider you’re currently registered with is
selected in the list.
Disable data when roaming
You can prevent your phone from transmitting data over other carriers’ mobile
networks when you leave an area that is covered by your carrier’s networks. This is
useful for controlling expenses if your cell plan doesn’t include data roaming.
Connected to a WiMAX-based 4G network with highest signal strength
Connected but not transmitting data (idle)
Currently unable to connect
Connecting to networks and devices 60
AUG-2.3.4-105 Android User’s Guide
1 Press Home , press Menu , and touch Settings, to open the Settings
application.
2 Touch Wireless & networks > Mobile networks and uncheck Data
roaming.
With Data roaming unchecked, you can still transmit data with a Wi-Fi
connection. See “Connecting to Wi-Fi networks” on page 61.
Limit your data connection to 2G networks
You can extend your battery life by limiting your data connections to 2G networks
(GPRS or EDGE). When you are connected to a 2G network, you may want to
postpone activities that transmit a lot of data, such as sending, uploading, or
downloading pictures or video, until you are connected to a faster mobile or other
wireless network.
1 Press Home , press Menu , and touch Settings to open the Settings
application.
2 Touch Wireless & networks > Mobile networks and check Use only 2G
networks.
Edit or create a new GSM access point
If you and your GSM wireless service provider determine that you need to change the
settings of your current access point name (APN) or to create a new one, you must
obtain the APN and detailed settings from your provider.
1 Press Home , press Menu , and touch Settings to open the Settings
application.
2 Touch Wireless & networks > Mobile networks > Access Point Names.
3 Touch an existing APN to edit it. Or press Menu and touch New APN.
Enter the APN settings that you obtained from your wireless service provider by
touching each setting that you need to edit.
4 When you’re finished, press Menu and touch Save.
5 If you created a new APN, touch it in the APNs screen to start using it.
Connecting to networks and devices 61
AUG-2.3.4-105 Android User’s Guide
Connecting to Wi-Fi networks
Wi-Fi is a wireless networking technology that can provide Internet access at
distances of up to 100 meters, depending on the Wi-Fi router and your surroundings.
To use Wi-Fi on your phone, you access a wireless access point, or “hotspot.” Some
hotspots are open and you can simply connect to them. Others are hidden or
implement other security features, so you must configure your phone so it can
connect to them.
There are numerous systems for securing Wi-Fi connections, including some that rely
on secure certificates or other schemes to ensure that only authorized users can
connect. For information about installing secure certificates, see “Working with secure
certificates” on page 74.
Turn off Wi-Fi when you’re not using it, to extend the life of your battery between
charges.
The Status bar displays icons that indicate Wi-Fi status.
Network status icons turn green if you have a Google Account added to your phone
and the phone is connected to Google services, for syncing your Gmail, Calendar
events, contacts, for backing up your settings, and so on. If you don’t have a Google
Account or if, for example, you’re connected to a Wi-Fi network that is not connected
to the Internet, the network icons are white.
When you connect to a Wi-Fi network, the phone obtains a network address and other
information it needs from the network, using the DHCP protocol. To configure the
phone with a fixed IP address and other advanced settings, press Menu and touch
Advanced. See “Advanced Wi-Fi settings screen” on page 360.
Connected to a Wi-Fi network (waves indicate connection strength)
Notification that an open Wi-Fi network is in range
Connecting to networks and devices 62
AUG-2.3.4-105 Android User’s Guide
Turn Wi-Fi on and connect to a Wi-Fi network
If you’re adding a Wi-Fi network when first setting up your phone, Wi-Fi is turned on
automatically, so you can skip to step 4.
1 Press Home , press Menu , and touch Settings.
2 Touch Wireless & networks > Wi-Fi settings.
3 Check Wi-Fi to turn it on.
The phone scans for available Wi-Fi networks and displays the names of those it
finds. Secured networks are indicated with a Lock icon.
If the phone finds a network that you connected to previously, it connects to it.
4 Touch a network to connect to it.
If the network is open, you are prompted to confirm that you want to connect to
that network by touching Connect.
If the network is secured, you’re prompted to enter a password or other
credentials. (Ask your network administrator for details.)
When you’re connected to a network, you can touch its name in the Wi-Fi settings
screen for details about the speed, security, address, and related settings.
Receive notifications when open networks are in range
By default, when Wi-Fi is on, you receive notifications in the Status bar when your
phone detects an open Wi-Fi network.
1 Turn on Wi-Fi if it’s not already on.
2 In the Wi-Fi settings screen, check Network notification.
You can uncheck this option to stop receiving notifications.
Connecting to networks and devices 63
AUG-2.3.4-105 Android User’s Guide
Add a Wi-Fi network
You can add a Wi-Fi network so the phone will remember it, along with any security
credentials, and connect to it automatically when it is in range. You must also add a
Wi-Fi network to connect to it, if the network does not broadcast its name (SSID), or to
add a Wi-Fi network when you are out of range of it.
To join a secured network, you need to contact the network’s administrator to learn
what security scheme is deployed on it and to obtain the password or other required
security credentials. For more information about installing secure certificates, see
“Working with secure certificates” on page 74.
1 Turn on Wi-Fi if it’s not already on.
If you’re adding a Wi-Fi network when first setting up your phone, Wi-Fi is turned
on automatically.
2 In the Wi-Fi settings screen, touch Add Wi-Fi network (at the bottom of the list
of discovered networks).
3 Enter the SSID (name) of the network. If the network is secured, touch the
Security menu and then touch the type of security deployed on the network.
4 Enter any required security credentials.
5 Touch Save.
The phone connects to the wireless network. Any credentials that you entered are
saved, so you are connected automatically the next time you come within range of
this network.
Forget a Wi-Fi network
You can make the phone forget about the details of a Wi-Fi network that you added—
for example, if you don’t want the phone to connect to it automatically or if it is a
network that you no longer use.
1 Turn on Wi-Fi if it’s not already on.
2 In the Wi-Fi settings screen, touch & hold the name of the network.
3 Touch Forget network in the dialog that opens.
Connecting to networks and devices 64
AUG-2.3.4-105 Android User’s Guide
Connecting to Bluetooth devices
Bluetooth is a short-range wireless communications technology that devices can use
to exchange information over a distance of about 8 meters. The most common
Bluetooth devices are headphones for making calls or listening to music, hands-free
kits for cars, and other portable devices, including laptops and cell phones.
There are several Bluetooth profiles that define the features and communications
standards for Bluetooth devices. For a list of the profiles supported by your phone,
refer to your phone’s owner’s guide.
To connect to a Bluetooth device, you must turn on your phone’s Bluetooth radio. The
first time you use a new device with your phone, you must “pair” them, so that they
know how to connect securely to each other. After that, you can simply connect to a
paired device.
Turn off Bluetooth when you’re not using it, to extend the life of your battery between
charges. You may also be required to turn Bluetooth off in some locations. Bluetooth is
turned off in Airplane mode.
Status bar icons indicate Bluetooth status.
Turn Bluetooth on or off
1 Press Home , press Menu , and touch Settings to open the Settings
application.
2 Touch Wireless & networks.
3 Check or uncheck Bluetooth to turn it on or off.
Bluetooth is on
Connected to a Bluetooth device