Android 2.3.4 User’s Guide phần 5 doc
Bạn đang xem bản rút gọn của tài liệu. Xem và tải ngay bản đầy đủ của tài liệu tại đây (526.6 KB, 38 trang )
Gmail 154
AUG-2.3.4-105 Android User’s Guide
Labeling a conversation
You organize conversations by labeling them. Gmail has several built-in labels. You can
add your own labels and assign them colors by using Gmail on the web (custom label
colors you create on the web are not supported in Gmail on the phone).
Viewing labeled conversations is described in “Viewing conversations by label” on
page 155.
Label a conversation
1 When reading a conversation’s messages, press Menu and touch Change
labels.
2 In the dialog that opens, check the labels to assign to the conversation.
3 Touch OK.
Label a batch of conversations at once
You can assign or change the labels of one or more conversations at once.
1 In your Inbox or other conversation list, check the conversations to label.
See “Working with conversations in batches” on page 152.
2 Touch the Labels button at the bottom of the screen.
3 In the dialog that opens, check the labels to assign to the conversation.
4 Touch OK.
Change a conversation’s labels
1 When reading a conversation’s messages, press Menu and touch Change
labels.
You can also change the labels of a batch of conversations, in the same way that
you label a batch of conversations, by touching the Labels button.
2 In the dialog that opens, check or uncheck the labels.
3 Touch OK.
Gmail 155
AUG-2.3.4-105 Android User’s Guide
Viewing conversations by label
You can view a list of the conversations that have the same label, including
conversations with starred messages.
You can control how many conversations are kept current on your phone, by label and
by time, as described in “Synchronizing your conversations by label” on page 156.
See “Labeling a conversation” on page 154 or “Starring a message” on page 153 for
information about assigning labels and stars.
1 When viewing your Inbox or another conversation list, touch the name of the
current label at the top left of the list. Or press Menu and touch Go to labels.
Your labels are presented in a scrolling list. Label colors are those Gmail assigns by
default, or those you assigned to labels by using Gmail on the web.
2 Touch a label to view a list of conversations with that label.
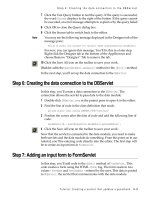
The conversation list resembles your Inbox, but the label replaces “Inbox” at the
top left of the list. You work with labeled conversation lists in the same way that
you work with your Inbox.
The number of conversations with draft
messages.
The number of conversations with this
label that have unread messages.
Gmail 156
AUG-2.3.4-105 Android User’s Guide
Synchronizing your conversations by label
The Gmail webmail service has the resources to store all the messages you’ve ever
sent or received; your phone does not. To save space, Gmail downloads only some of
your messages to your phone. You can set which conversations’ messages are kept
current on your phone, by label, and what portion of those conversations, by time.
You use the Settings application to control how and when applications synchronize
their data. See “Accounts & sync settings” on page 373.
Select which labels to synchronize
1 Open your Inbox.
2 Press Menu and touch More > Settings > Labels.
The Synchronization settings screen opens, displaying a list of your Gmail labels,
for the account listed at the top of the screen. Below each label is its current
synchronization setting: Sync all, Sync 4 days, or no label (not synchronized).
3 Touch a conversation label whose synchronization settings you want to change.
A dialog for that conversation label opens, with three options:
Sync none Don’t download any conversations that have only this label.
Sync 4 days Download the previous 4 (or number of days you set) of
conversations.
Sync all Download all conversations with this label.
Gmail 157
AUG-2.3.4-105 Android User’s Guide
Set how many days to synchronize
1 Open your Inbox.
2 Press Menu and touch More > Settings > Labels.
3 Touch Number of days to sync.
4 Enter the number of days and touch OK.
Gmail 158
AUG-2.3.4-105 Android User’s Guide
Reporting spam
The Gmail webmail service is quite effective at preventing spam (junk mail) from
reaching your Inbox. But when spam does make it through, you can help improve the
Gmail service by reporting the conversation as spam.
Report a conversation as spam
S While reading the conversation's messages, press Menu and touch More >
Report spam.
OR
S Check one or a batch of conversations in your Inbox or other conversation list,
press Menu , and touch Report spam.
See “Working with conversations in batches” on page 152.
When you report a conversation as spam, the conversation and all its messages
are removed from your Inbox. You can view the messages you’ve marked as spam
by viewing messages with the Spam label. See “Viewing conversations by label” on
page 155.
Gmail 159
AUG-2.3.4-105 Android User’s Guide
Searching for messages
You can search for messages that contain one or more words in their contents or in
their addresses, subjects, labels, and so on.
When you search for messages, all of the messages in your Gmail account on the web
are included (except those labeled Trash or Spam), not just those that you’ve
synchronized onto your phone. For this reason, you must have a data connection to
search for messages in Gmail.
You can also use the advanced search options that are described on the Gmail
website.
1 In the Inbox, press Menu and touch Search, or press the Search button .
2 Enter the word or words to search for and touch the Go button on the onscreen
keyboard or the magnifying glass icon at the right of the search box. Or touch
words you searched for previously, in the list below the search box.
A conversation list opens, displaying all of the conversations with messages that
contain the words you searched for. The words you searched for are displayed in
the title bar.
You work with the conversations in this list just as you would with the
conversations in your Inbox or any other conversation list.
When you open a conversation in a search result list, the word you searched for is
highlighted wherever it occurs in the conversation’s messages.
Words you search for are stored by the phone and suggested for later Gmail
searches. You can erase these stored words with Gmail settings; see “Changing
Gmail settings” on page 163.
Gmail 160
AUG-2.3.4-105 Android User’s Guide
Archiving conversations
You can archive conversations, to move them out of your Inbox without deleting them.
Archived conversations are assigned the All Mail label, and they retain any other labels
you’ve assigned to them. See “Viewing conversations by label” on page 155. They’re
also included in search results. If someone replies to a message that you’ve archived,
its conversation is restored to your Inbox.
S While viewing a list of conversations, touch & hold a conversation and touch
Archive in the menu that opens.
OR
S Check one or more conversations in your Inbox or other conversation list and
touch Archive.
See “Working with conversations in batches” on page 152.
OR
S When reading a message, touch Archive at the bottom of the screen.
Gmail 161
AUG-2.3.4-105 Android User’s Guide
Appending a signature to your messages
You can append one or a few lines of plain text to every message you send from your
phone, such as your name, contact information, or even “Sent by an android.” This
signature is independent of any signature you append to messages you send from
Gmail on the web.
1 Open your Inbox or another labeled list of conversations.
2 Press Menu and touch More > Settings > Signature.
3 Enter a signature.
4 Touch OK.
Enter a signature to append to your
messages; then touch OK.
Gmail 162
AUG-2.3.4-105 Android User’s Guide
Using keyboard shortcuts
If your phone has a physical keyboard, you can use the following keyboard shortcuts
to manage your conversations and messages. Additional shortcuts are available if
your phone has a Trackball or other pointing device.
Conversation list shortcuts
You can use the following keyboard shortcuts when viewing a conversation list, such
as your Inbox.
Message shortcuts
You can use the following keyboard shortcuts when reading messages.
u Refresh list
c Compose
Enter Open conversation
y Archive conversation
Alt + Trackball-roll-up Jump to top of list
Alt + Trackball-roll-down Jump to end of list
Shift + Space Page up
Space Page down
r Reply to last message in conversation
a Reply all to last message in conversation
f Forward last message in conversation
y Archive conversation
Gmail 163
AUG-2.3.4-105 Android User’s Guide
Changing Gmail settings
You can change a number of settings for Gmail. Each Gmail account has its own
settings, so your changes affect only the current account. See “Switch accounts” on
page 140.
Notification volumes and some synchronization settings are changed in the Settings
application. See “Settings” on page 357.
S To change Gmail settings, open your Inbox, press Menu , and touch More >
Settings.
General Settings
Priority Inbox Check to make Priority Inbox your default inbox, so it opens when
you start Gmail with new messages (instead of Inbox), and you only receive
notifications for new messages that are part of important conversations. This setting
is not visible unless you have configured Gmail on the web to show Priority Inbox. See
“Working with Priority Inbox” on page 149.
Signature Opens a dialog where you can enter text to append to every message
you send. See “Appending a signature to your messages” on page 161.
Confirm actions Opens a dialog where you can check which actions open a
dialog asking you to confirm that action: archiving, deleting, and sending messages.
Reply all When checked, replaces the Reply button in message headers with the
Reply all button, so you don’t need to touch the arrow to access it.
Auto-advance Opens a dialog where you can set which screen opens when you
delete or archive a conversation whose messages you are viewing: the messages in
the next conversation, the previous conversation, or the Inbox or other conversation
list you’re working with.
Message text size Opens a dialog where you can select the size of text in the
messages you read.
Batch operations When checked, adds a check box to the left of each
conversation, so you can add it to a batch. See “Working with conversations in
batches” on page 152.
Clear search history Touch to remove the history of the words you’ve searched
for previously in Gmail in any account. See “Searching for messages” on page 159.
Gmail 164
AUG-2.3.4-105 Android User’s Guide
Labels Opens the Labels screen, where you can manage which conversations are
synchronized. See “Synchronizing your conversations by label” on page 156.
Notification settings
Email notifications When checked, you receive a notification when you have new
email. See “Managing notifications” on page 30.
Select ringtone Opens a dialog where you can select the ringtone to sound when
you receive a new email notification, including the phone’s default ringtone and a
silent option.
Vibrate Opens a dialog where you can configure the phone to vibrate whenever you
receive a Gmail notification, only when the phone is in Silent mode, or never. See
“Sound settings” on page 366.
Notify once Check to receive a notification from Gmail only the first time you have
new email since you last read your messages, rather than each time a new message
arrives.
165
AUG-2.3.4-105 Android User’s Guide
Calendar
Calendar on the phone works with the web-based Google Calendar
calendaring service for creating and managing events, meetings, and
appointments. It also works with the Microsoft Exchange ActiveSync
calendaring service.
Calendar on the phone is optimized for the phone. Some Calendar
features, such as creating Calendars, are only available in Google
Calendar on the web. Visit to learn about
the features of the web version of Calendar.
In this section
“Viewing your calendar and events” on page 166
“Working in Agenda view” on page 168
“Working in Day view” on page 169
“Working in Week view” on page 171
“Working in Month view” on page 172
“Viewing event details” on page 173
“Creating an event” on page 174
“Editing an event” on page 175
“Setting an event reminder” on page 177
“Responding to an event reminder” on page 178
“Synchronizing and displaying calendars” on page 179
“Changing Calendar settings” on page 180
Calendar 166
AUG-2.3.4-105 Android User’s Guide
Viewing your calendar and events
Open Calendar to view events you’ve created or that others have invited you to.
When you first set up your phone, you configured it to use an existing Google Account,
or you created a new account. The first time you open the Calendar application on
your phone, it displays any existing calendar events from your Google Account on the
web.
You can add additional accounts with Google Calendar or Microsoft Exchange
calendars to your phone, and configure them to display in Calendar. See “Accounts” on
page 127.
When you first set up Calendar to synchronize events on your phone, it includes events
from the previous month through one year in the future. Subsequently, Calendar
keeps a year’s worth of future events synchronized between your phone and the web,
plus any later events that you add to your calendar using Calendar on your phone.
Open Calendar
S Touch the Calendar icon on the Home screen or in the Launcher.
See “Opening and switching applications” on page 41 to learn more about opening
and switching applications.
Events from each account you’ve added to your phone and configured to
synchronize calendars is displayed in Calendar. For information about adding
accounts, see “Accounts” on page 127.
Events from each calendar are displayed in a different color. For information about
which calendars are displayed on your phone, see “Synchronizing and displaying
calendars” on page 179.
Calendar shows the current time (the red marker and horizontal line in some
views) and the time for events using your local time zone by default, as provided by
the mobile network you’re connected to. If you’re traveling, you can set a home
time zone and use it in Calendar instead. See “Changing Calendar settings” on
page 180.
Calendar 167
AUG-2.3.4-105 Android User’s Guide
Change your calendar view
S Press Menu and touch Agenda, Day, Week, or Month.
Each view displays the events in your calendar for the period of time that you
specify. For details, see:
“Working in Agenda view” on page 168
“Working in Day view” on page 169
“Working in Week view” on page 171
“Working in Month view” on page 172
S To view more information about an event in Agenda view, touch the event.
S To view the events of a day in Month view, touch a day.
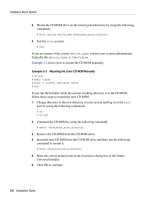
Agenda view
Week view
Day view
Month view
In Agenda, Day, or Week view, touch an
event to view its details.
Touch a day in Month view to open that day’s events.
Calendar 168
AUG-2.3.4-105 Android User’s Guide
Working in Agenda view
Agenda view is a list of your events in chronological order. All-day and multiday events
are listed at the start of each day. Days without events are not shown.
Switch to Agenda view
S Press Menu and touch Agenda.
Learn more about events in Agenda view
S Touch an event.
A screen with details about the event opens. See “Viewing event details” on
page 173.
Touch an event to view its details.
This event repeats.
Drag up or down to view earlier or later
events.
Calendar 169
AUG-2.3.4-105 Android User’s Guide
Working in Day view
Day view displays a chart of the events of one day, in a table of one-hour rows. A red
line indicates the current time. All-day and multiday events are displayed at the top.
Part of the title of each event is displayed in the rows that correspond to when it
occurs.
Switch to Day view
S Press Menu and touch Day.
S Swipe left or right to view other days.
Learn more about events in Day view
S Touch an event to view its details.
See “Viewing event details” on page 173.
S Touch & hold an event to open a menu with options for viewing, editing, or deleting
the event and for creating a new event at that time.
Swipe left or right to view earlier or later
days.
Touch an event to view its details.
Touch & hold a time slot or an event to
create a new event at that time.
Calendar 170
AUG-2.3.4-105 Android User’s Guide
Add an event in Day view
S Touch & hold an empty spot or an event in the day to open a menu with the option
for creating a new event at that time.
See “Creating an event” on page 174.
Calendar 171
AUG-2.3.4-105 Android User’s Guide
Working in Week view
Week view displays a chart of the events of one week. All-day and multiday events are
displayed at the top.
Switch to Week view
S Press Menu and touch Week.
Learn more about events in Week view
S Touch an event to view its details.
See “Viewing event details” on page 173.
S Touch & hold an event to open a menu with options for viewing, editing, or deleting
the event, and for creating a new event at that time.
Add an event in Week view
S Touch & hold an empty spot or an event in the week to open a menu with the
option for creating a new event at that time.
See “Creating an event” on page 174.
Drag left or right to view earlier or later
days.
Touch an event to view its details.
Touch & hold a time slot or an event to
create a new event at that time.
An all-day event.
Calendar 172
AUG-2.3.4-105 Android User’s Guide
Working in Month view
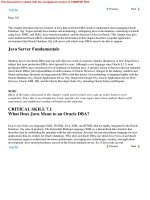
Month view displays a chart of the events of the month. Segments of each day with
scheduled events are blue in the day’s vertical bar.
Switch to Month view
S Press Menu and touch Month.
View more information about events in Month view
S Touch a day to view its events in Day view.
See “Working in Day view” on page 169.
Drag up or down to view earlier or later
months.
Touch a day to view the events of that
day.
Calendar 173
AUG-2.3.4-105 Android User’s Guide
Viewing event details
You can view more information about an event in a number of ways, depending on the
current view.
View information about an event
S In Agenda, Day, or Week view, touch an event to view its details.
S In Month view, touch a day to switch to Day view. Then touch an event to view its
details.
You can set or change whether you will attend the event by using the Attending?
menu.
Other attendees’ status is displayed below your own.
Event times are shown in the time zone set by your local mobile carrier, unless you
configure Calendar to work in your home time zone; see “Changing Calendar settings”
on page 180.
You change any event reminders or touch the plus button to add one. See “Setting
an event reminder” on page 177.
If you have permission to change events, you can press Menu to edit or delete the
event, as described in “Editing an event” on page 175.
Touch to set whether you’ll attend this
event.
Touch to delete this reminder.
Touch to add another reminder for this
event.
Touch to change when you want to be
reminded about this event.
Other attendees’ status is shown below
yours.
Other attendees’ status is shown below
yours.
Calendar 174
AUG-2.3.4-105 Android User’s Guide
Creating an event
You can use Calendar on your phone to create events that appear on your phone and
in Google Calendar on the web.
Create an event
1 In any Calendar view, press Menu and touch New event to open an Event
details screen for a new event.
You can also touch & hold a spot in Day, Week, or Month view. In the menu that
opens, touch New event to open the Event details screen with that day and time
already entered.
2 Add details about the event.
Enter a name, time, and optional additional details about the event.
When setting a date or time, you can use the plus and minus buttons in the dialog
or touch the date or time and enter it, using the onscreen keyboard.
You can use the default time zone or set a different one for this event. The default
time zone for your events is the one set by your local mobile carrier, unless you
configure Calendar to work in your home time zone; see “Changing Calendar
settings” on page 180.
If you have more than one calendar, you can choose the calendar to which to add
the event.
Touch the plus button to add more reminders. See “Setting an event reminder”
on page 177.)
3 Invite guests to the event.
In the Guests field, enter the email addresses of everyone you want to invite to the
event. Separate multiple addresses with commas ( , ). If the people to whom you
send invitations use Google Calendar, they’ll receive an invitation in Calendar and
by email.
4 Press Menu and touch Show extra options to add details about the event.
5 Scroll to the bottom of the Event details screen and touch Done.
The event is added to your calendar.
Calendar 175
AUG-2.3.4-105 Android User’s Guide
Editing an event
You can an edit an event that you created on the phone or on the web. You can also
edit events created by others, if they have given you permission.
Edit an event
1 Open the summary of the event.
See “Viewing event details” on page 173.
2 Press Menu and touch Edit event.
The Event Details screen opens. This is the same screen described in “Creating an
event” on page 174.
Press Menu and touch Show extra options to add or edit event details.
3 Make your changes to the event.
4 Scroll to the bottom of the screen and touch Done.
Calendar 176
AUG-2.3.4-105 Android User’s Guide
Deleting an event
You can delete an event that you created on the phone or on the web. You can also
delete events created by others, if they have given you permission.
Delete an event
1 Open the summary of the event.
See “Viewing event details” on page 173.
2 Press Menu and touch Delete event.
3 In the dialog that opens, touch OK.
Calendar 177
AUG-2.3.4-105 Android User’s Guide
Setting an event reminder
You can set one or more reminders for an event, whether or not you created the event
or have permission to edit its other details.
Set an event reminder
1 Open the event summary.
See “Viewing event details” on page 173.
2 If you already have a reminder set, touch the Plus button to add a reminder.
A new reminder is added, for 10 minutes before the event.
3 Touch the reminder time, and in the dialog that opens touch the length of time
before the event that you want to be reminded of it.
When the time comes, you receive a notification about the event. See “Responding
to an event reminder” on page 178.
You can use Google Calendar on the web to configure additional reminder
settings.
Delete an event reminder
1 Open the event summary.
2 Touch the reminder’s Minus button .
Calendar 178
AUG-2.3.4-105 Android User’s Guide
Responding to an event reminder
If you set a reminder for an event, the Upcoming Event icon appears in the
Notifications area of the Status bar when the reminder time arrives. See “Managing
notifications” on page 30.
Respond to an event reminder
S If you receive notifications in the Status bar, drag the Status bar down to open the
Notifications panel. Then touch the event notification to open the list of Calendar
notifications.
S If you receive notifications with alerts, the Calendar notifications list opens, listing
all notifications awaiting your response.
S Touch an event in the Calendar Notifications list to view more information about
that event.
S Touch Snooze all in the Calendar Notifications list to turn off all event reminders
for 5 minutes.
S Touch Dismiss all in the Calendar Notifications list to delete all reminders in the
list.
S Press Back when viewing the Calendar Notifications list to keep the reminders
pending. The icon remains in the Status bar and the reminders remain in the
Notifications panel.