Intro to Java Programming phần 6 potx
Bạn đang xem bản rút gọn của tài liệu. Xem và tải ngay bản đầy đủ của tài liệu tại đây (1.69 MB, 15 trang )
protected static final int collapsedWidth = 9;
//Declare data members
//Insert "Controller data members"
protected Image image;
protected Frame frame;
protected BackwardButton backwardButton1;
protected PlayPauseButton playPauseButton1;
protected ForwardButton forwardButton1;
protected CloseBoxButton closeBoxButton1;
protected DumbContainer container;
protected ActionListener actionListener = null;
In order to understand what all of these data members are for, let’s take a few moments to examine the
taxonomy of this Controller class.
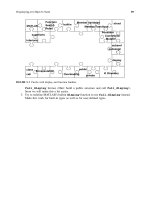
The controller is a window that is owned by a parent frame (the SlideShow class). The controller window has
a container with a layout manager that encloses the three buttons—the forward button, the backward button, and
the play/pause button. We also have a close button in the upper left-hand corner. This is not enclosed by the
dumb container object.
Looking at the data members, we can see variables that store references to these objects. First, we have an
image object that stores a reference to our background image.
Next, we have a reference to the frame that acts as our supervisor, followed by the four buttons on our
controller. Finally, we have a dumb container object that arranges our buttons, and an action listener object that
receives action events from the buttons in response to user actions. What is a DumbContainer? Well, if you
scan down to the very end of the source file, you will see the following:
//Inner class so we can instantiate a simple lightweight container
//for use in laying out the controller properly.
class DumbContainer extends Container { }
You might think that this looks a bit strange. Why bother to override a class if we are not overriding any
methods? Good question. The answer is that since Container is an abstract class, we cannot directly
instantiate it. Therefore, we must subclass it if we want to instantiate it.
Now let’s look at the constructor for our controller.
Back to top
Step 3 - Specifying the Controllers Parent Frame
The constructor for our Controller class takes a single parameter—the parent frame of our window.
/**
* Creates a Controller object with the specified parent Frame.
* @param the parent frame to associate the controller with.
*/
public Controller(Frame parent)
{
Implementing the Controller
(4 of 19) [1/28/2000 1:26:37 PM]
//Setup parent info for this window
//Insert "Controller parent info"
Locate the Controller parent info clipping in the Controller folder and drag it directly below the last line of
code shown above. Your code should now look like this:
* Creates a Controller object with the specified parent Frame.
* @param the parent frame to associate the controller with.
*/
Public Controller(Frame parent)
{
//Setup parent info for this window
//Insert "Controller parent info"
super(parent);
frame = parent;
The first step in our constructor is to call the constructor of our superclass (java.awt.Window) and pass the
Frame. This step performs common window initialization that we are inheriting from our base (Window)
class. After initializing our superclass, we store the parent in our local data member for later use.
Our next step is to create and initialize the controls within our controller.
Back to top
Step 4 - Initializing Controls
We now have to create instances of the various objects hosted by our controller and initialize them.
super(parent);
frame = parent;
//INIT_CONTROLS
//Setup and layout objects in the controller
//Insert "Controller init controls"
Locate the Controller init controls clipping in the Controller folder and drag it directly below the last line of
code shown above. Your code should now look like this:
super(parent);
frame = parent;
//INIT_CONTROLS
//Setup and layout objects in the controller
//Insert "Controller init controls"
Implementing the Controller
(5 of 19) [1/28/2000 1:26:38 PM]
setVisible(false);
setLayout(null);
setSize(90,30);
closeBoxButton1 = new CloseBoxButton( );
closeBoxButton1.setLocation(1,1);
closeBoxButton1.setSize(closeBoxButton1.getPreferredSize( ));
add(closeBoxButton1);
container = new DumbContainer( );
container.setLayout(new FlowLayout(FlowLayout.LEFT,0,0));
container.setBounds(9, 1, 81, 28);
backwardButton1 = new BackwardButton( );
backwardButton1.setBounds(10,1,20,40);
container.add(backwardButton1);
playPauseButton1 = new PlayPauseButton( );
playPauseButton1.setBounds(0,0,20,40);
container.add(playPauseButton1);
forwardButton1 = new ForwardButton( );
forwardButton1.setBounds(0,0,20,40);
container.add(forwardButton1);
add(container);
There’s a lot of code here, so let’s break it down into smaller groups to aid our discussion.
setVisible(false);
setLayout(null);
setSize(90,30);
First, we make the controller non-visible. This is so the user doesn’t see the buttons being added one at a time to
the form. This would be sloppy. We want them only to see the end result. Next, we set the window layout to
null. This is OK, because we want to use pixel positioning for the items in the form. The container will have
its own layout that will nicely position the buttons. We set the size of the controller to 90 pixels wide and 30
pixels tall.
closeBoxButton1 = new CloseBoxButton( );
closeBoxButton1.setLocation(1,1); closeBoxButton1.setSize(
closeBoxButton1.getPreferredSize( ));
add(closeBoxButton1);
Now we create the close box and position it at 1, which is one pixel from the top left corner of the screen. We
change the size of the box based on the preferred size (which we defined in ImageButton to be the size of
the image used by the button). Once we size and position the close box, we add it to the window.
Before we add the buttons to the form, we create our instance of the DumbContainer class.
container = new DumbContainer( );
Implementing the Controller
(6 of 19) [1/28/2000 1:26:38 PM]
container.setLayout(new FlowLayout(FlowLayout.LEFT,0,0));
container.setBounds(9, 1, 81, 28);
We create the DumbContainer, and set the layout manager to FlowLayout. The flow layout manager positions
its contained objects by placing them in a row, sized at their preferred size. If the horizontal space in the
container is too small to put all the components in one row, FlowLayout uses multiple rows. Within each
row, components are centered (the default), left-aligned, or right-aligned as specified when the FlowLayout
is created. Here, we are specifying that the components are left-aligned. You can get more information on
FlowLayout on JavaSoft’s web site. Lastly, we position the container 9 pixels from the left edge of our window,
1 pixel from the top, and make it 81 pixels wide and 28 high.
Now that we have our dumb container in place, we can start adding buttons to it.
backwardButton1 = new BackwardButton( );
backwardButton1.setBounds(10,1,20,40);
container.add(backwardButton1);
We create a new backwards button instance and add it to our dumb container. Since our container is using left
alignment, this item will be the leftmost object.
The forward button and play/pause button are made the same way.
playPauseButton1 = new PlayPauseButton( );
playPauseButton1.setBounds(0,0,20,40);
container.add(playPauseButton1);
forwardButton1 = new ForwardButton( );
forwardButton1.setBounds(0,0,20,40);
container.add(forwardButton1)
We create them, and add them to the container.
add(container);
Last, but not least, we add our dumb container to the window. Now we are going to skip down a bit and define
our inner classes for handling action events.
Back to top
Step 5 - Handling Controller Actions
Skip down to nearly the bottom of the source file. You should see the following:
public Dimension getPreferredSize( )
{
//If the current image is not null, then return the size of
//the image. If it is null, defer to the super class.
//Insert "Controller getPreferredSize"
}
//Inner class so we can instantiate a simple lightweight
//container for use in laying out the controller properly.
Class DumbContainer extends Container { }
//Inner class to handle action events
//Insert "Controller Action"
Implementing the Controller
(7 of 19) [1/28/2000 1:26:38 PM]
The controller needs to listen for action events from the buttons so that it can rebroadcast these messages. You
may be thinking that this sounds a little inefficient. If a button sends a message to the controller saying,
"Someone clicked the forward button. Pass it on," and then the controller sends a message "Yo, someone
pressed my forward button," that extra step may seem redundant. Why can’t a class listen directly to the
individual buttons and skip the controller? Good question. What we are doing here is called object-oriented
programming. We have created a widget called a controller that an object can listen to. The object doesn’t need
to know what kind of objects the controller contains and listen to those objects separately. The object can
simply listen to the controller directly. Thus, if the interface between the controller and the buttons change,
classes dependent on the controller still work correctly. This is one of the fundamentals that makes
object-oriented languages like Java very nice.
Now let’s implement the action handler for the controller. Locate the Controller Action clipping in the
Controller folder and drag it directly below the last line of code shown above. Your code should now look like
this:
public Dimension getPreferredSize( )
{
//If the current image is not null, then return the size of
//the image. If it is null, defer to the super class.
//Insert "Controller getPreferredSize"
}
//Inner class so we can instantiate a simple lightweight
//container for use in laying out the controller properly.
Class DumbContainer extends Container { }
//Inner class to handle action events
//Insert "Controller Action"
class Action implements ActionListener
{
public void actionPerformed(ActionEvent event)
{
Object object = event.getSource( );
if (object == backwardButton1)
backwardButton1_ActionPerformed(event);
else if (object == forwardButton1)
forwardButton1_ActionPerformed(event);
else if (object == playPauseButton1)
playPauseButton1_ActionPerformed(event);
else if (object == closeBoxButton1)
closeBoxButton1_ActionPerformed(event);
}
}
Our inner class implements the ActionListener interface. This interface defines a single
actionPerformed method which we implement in our class. By implementing this method, we can respond
to events of type ActionEvent.
In our first line of this method, we create a temporary object reference and assign it to the source of the event
Implementing the Controller
(8 of 19) [1/28/2000 1:26:38 PM]
(the object that broadcast the action event). We do this so that we can determine which specific button the
message came from.
Next, we have a series of if statements that call specific methods based on the event source object. We respond
to these messages in external methods instead of doing the work inline in this class to make the code more
flexible. If we call a method, we could override the behavior in the future. If the code is placed inline, it is
difficult to change the behavior of a single object without overriding the entire class. We will look at the
implementation of these methods in our next step.
Back to top
Step 6 - Handling Button Actions
We define a single method to respond to ActionEvent messages for each of the four buttons.
else if (object == playPauseButton1)
playPauseButton1_ActionPerformed(event);
else if (object == closeBoxButton1)
closeBoxButton1_ActionPerformed(event);
}
}
//Routines to handle action events from the different buttons
//Insert "Controller button actions"
Locate the Controller button actions clipping in the Controller folder and drag it directly below the last line of
code shown above. Your code should now look like this:
else if (object == playPauseButton1)
playPauseButton1_ActionPerformed(event);
else if (object == closeBoxButton1)
closeBoxButton1_ActionPerformed(event);
}
}
//Routines to handle action events from the different buttons
//Insert "Controller button actions"
void backwardButton1_ActionPerformed(ActionEvent event)
{
fireActionEvent(BACKWARD_COMMAND);
}
void forwardButton1_ActionPerformed(ActionEvent event)
{
fireActionEvent(FORWARD_COMMAND);
}
void playPauseButton1_ActionPerformed(ActionEvent event)
{
String command = event.getActionCommand( );
try
{
int state = Integer.valueOf(command).intValue( );
Implementing the Controller
(9 of 19) [1/28/2000 1:26:38 PM]
switch (state)
{
case PlayPauseButton.PLAY_STATE:
fireActionEvent(PLAY_COMMAND);
playPauseButton1.setState(PlayPauseButton.PAUSE_STATE);
break;
case PlayPauseButton.PAUSE_STATE:
fireActionEvent(PAUSE_COMMAND);
playPauseButton1.setState(PlayPauseButton.PLAY_STATE);
break;
}
}
catch(NumberFormatException exc) { }
}
void closeBoxButton1_ActionPerformed(ActionEvent event)
{
setVisible(false);
dispose( );
}
The first two methods are very simple.
void backwardButton1_ActionPerformed(ActionEvent event)
{
fireActionEvent(BACKWARD_COMMAND);
}
void forwardButton1_ActionPerformed(ActionEvent event)
{
fireActionEvent(FORWARD_COMMAND);
}
For the backward button, we call our fireActionEvent( ) method (implemented in Step 11) with the
BACKWARD_COMMAND message. For the forward button, we call fireActionEvent( ) with the
FORWARD_COMMAND message.
The code for the play/pause button is more complex since it is a toggle button with two different functional
modes.
void playPauseButton1_ActionPerformed(ActionEvent event)
{
String command = event.getActionCommand( );
First, we get the action command string from the button so we can tell whether we are in the play state, or the
pause state.
try
{
int state = Integer.valueOf(command).intValue( );
Here we use the try keyword to start an exception handling block. We want to handle any
NumberFormatExceptions that may be thrown by any of the following lines of code.
Implementing the Controller
(10 of 19) [1/28/2000 1:26:38 PM]
Next, we convert the action command into an integer so that we can use it in our switch statement. In Java, only
integral types such as an int, or long can be used in a switch statement.
switch (state)
{
case PlayPauseButton.PLAY_STATE:
fireActionEvent(PLAY_COMMAND);
playPauseButton1.setState(PlayPauseButton.PAUSE_STATE);
break;
case PlayPauseButton.PAUSE_STATE:
fireActionEvent(PAUSE_COMMAND);
playPauseButton1.setState(PlayPauseButton.PLAY_STATE);
break;
}
}
If the state is for the play button, we fire an action event with the play command and toggle the button state by
calling PlayPauseButton.setState( ) with Pause as the argument. If the state is for the pause
button, we do the converse and fire a pause command and toggle the button to the play state.
catch(NumberFormatException exc) { }
}
Lastly, we catch and ignore any NumberFormatExceptions which might have occurred.
Our close box action performed method is responsible for closing the controller.
void closeBoxButton1_ActionPerformed(ActionEvent event)
{
setVisible(false);
dispose( );
}
First, we hide the controller, and then we dispose of it. We hide it first so the user does not see the individual
pieces of the window being destroyed.
Now that we have a class to handle action events, we need to return to our constructor and register our listeners.
Back to top
Step 7 - Registering our Event Listeners
Go up to the top of the file to our controller constructor.
forwardButton1 = new ForwardButton( );
forwardButton1.setBounds(0,0,20,40);
container.add(forwardButton1);
add(container);
//REGISTER_LISTENERS
//Register our action listener with our buttons
//Insert "Controller register listeners"
This is where we will register our listeners. Locate the Controller register listeners clipping in the Controller
folder and drag it directly below the last line of code shown above. Your code should now look like this:
Implementing the Controller
(11 of 19) [1/28/2000 1:26:38 PM]
forwardButton1 = new ForwardButton( );
forwardButton1.setBounds(0,0,20,40);
container.add(forwardButton1);
add(container);
//REGISTER_LISTENERS
//Register our action listener with our buttons
//Insert "Controller register listeners"
Action aAction = new Action( );
backwardButton1.addActionListener(aAction);
forwardButton1.addActionListener(aAction);
playPauseButton1.addActionListener(aAction);
closeBoxButton1.addActionListener(aAction);
We will now register a listener for each of our buttons. You must register a listener with every object that you
wish to receive events from. Since we want to know when each of our four buttons is pressed, we need to
register a listener with each button.
Our first step is to create an instance of our inner class that is the listener. We then add this class as a listener to
each control.
Now it is time to wrap up our constructor.
Back to top
Step 8 - Completing our Controller Constructor
We have added our buttons to the form, sized our controller, and registered listeners with each button. The only
thing left is loading and positioning our background image.
forwardButton1.addActionListener(aAction);
playPauseButton1.addActionListener(aAction);
closeBoxButton1.addActionListener(aAction);
//Initialize state information.
//Insert "Controller init state"
Locate the Controller init state clipping in the Controller folder and drag it directly below the last line of code
shown above. Your code should now look like this:
forwardButton1.addActionListener(aAction);
playPauseButton1.addActionListener(aAction);
closeBoxButton1.addActionListener(aAction);
//Initialize state information.
//Insert "Controller init state"
image = Misc.loadImage(imagePath, parent, true);
setSize(getPreferredSize( ));
//Work around a MRJ Bug.
setLocation(-5,-21);
}
Implementing the Controller
(12 of 19) [1/28/2000 1:26:39 PM]
We use an external routine, loadImage( ) to retrieve the background image from disk and store it to our
image data member. As we previously mentioned, this routine mainly performs error checking and is provided
to add code robustness. Its implementation is beyond the scope of this tutorial. Suffice it to say that it loads the
background image.
Next, we set the size of the background image variable to the preferred size which is the physical dimensions of
the picture. We then set the location to be 5 pixels to the left of our window and 21 pixels above. We do this, as
the comment mentions, to avoid a placement bug in the MRJ that assumes that all windows have frames.
The image on the right illustrates this problem. Our window has no border whatsoever, as
compared with the standard Macintosh window that has a 5 pixel left border and a 21
pixel top border. Unfortunately, the MRJ expects all windows to have this border. In our
case, we need to compensate by drawing at -5, -21 which is the upper left corner of our
borderless window.
Now it is time to implement the rest of the methods in our class. The first is an accessor for our playState data
member, setPlayState( ).
Back to top
Step 9 - Implementing setPlayState( )
There is a standard data accessor routine style in the Java Beans specification. For routines that set the value of
a data member, they must follow the format set DataMember( ) where DataMember is the name of the
member variable. We don’t really have a data member called playState since the state information is
contained in the play/pause button, but we have chosen to follow this specification as if we had a playState
property. Thus, we have named our accessor setPlayState( ).
/**
* Set the state of the Play/Pause button
* @param if true, the button will be in the Play state;
* If false it will be in the Pause state.
* @see #isPlayState
*/
public void setPlayState(Boolean isPlay)
{
//Handle setup for the appropriate state
//Insert "Controller setPlayState"
Note that we have decided to use a Boolean for the play state. True means that we are in play mode and
false means that we are in pause mode. Locate the Controller setPlayState clipping in the Controller folder
and drag it directly below the last line of code shown above. Your code should now look like this:
Implementing the Controller
(13 of 19) [1/28/2000 1:26:39 PM]
/**
* Set the state of the Play/Pause button
* @param if true, the button will be in the Play state;
* If false it will be in the Pause state.
* @See #isPlayState
*/
public void setPlayState(Boolean isPlay)
{
//Handle setup for the appropriate state
//Insert "Controller setPlayState"
if (isPlay)
playPauseButton1.setState(PlayPauseButton.PLAY_STATE);
else
playPauseButton1.setState(PlayPauseButton.PAUSE_STATE);
}
If the Boolean that is passed to our method is passed in as true, we want to switch to the play state which we do
by calling setState( ) from the playPauseButton with PLAY_STATE as the parameter. Conversely, if
we get passed in a false, setState( ) with PAUSE_STATE as the argument. Pretty straightforward.
Now we will write the routine that returns the current play state.
Back to top
Step 10 - Implementing isPlayState( )
Now we are going to implement the routine that is used to retrieve the current play state.
/**
* Get the current state of the Play/Pause button
* @return true if the button is in the Play state,
* false if it is in the Pause state.
* @See #setPlayState
*/
public Boolean isPlayState( )
{
//Return the current state
//Insert "Controller isPlayState"
The first thing that you will notice about this routine is that it is called isPlayState( ) instead of
getPlayState( ) as you may have expected. That is because this accessor routine is a special case in that
it returns a Boolean value. Naming conventions dictate that all accessors that return Boolean values should use a
isDataMember( ) naming style, while non-Boolean methods use setDataMember( ) naming style.
Locate the Controller isPlayState clipping in the Controller folder and drag it directly below the last line of
code shown above. Your code should now look like this:
Implementing the Controller
(14 of 19) [1/28/2000 1:26:39 PM]
/**
* Get the current state of the Play/Pause button
* @return true if the button is in the Play state,
* false if it is in the Pause state.
* @See #setPlayState
*/
public Boolean isPlayState( )
{
//Return the current state
//Insert "Controller isPlayState"
return playPauseButton1.getState( ) ==
PlayPauseButton.PLAY_STATE;
}
The implementation of this method is pretty basic. We get the state of the play/pause button and return true if
the state of the button is the same as PLAY_STATE, otherwise, we return false. Now it’s time to implement
addActionListener( ).
Back to top
Step 11 - Implementing Action Event Management Routines
Now it’s time for the step we have all been waiting for- implementing addActionListener( ). This is
very similar to what we did in the ImageButton source. The concepts are the same.
Public Boolean isPlayState( )
{
//Return the current state
//Insert "Controller isPlayState"
return playPauseButton1.getState( ) ==
PlayPauseButton.PLAY_STATE;
}
//Routines for handling ActionListener management.
//Insert "Controller Action Management"
Locate the Controller Action Management clipping in the Controller folder and drag it directly below the last
line of code shown above. Your code should now look like this:
public Boolean isPlayState( )
{
//Return the current state
//Insert "Controller isPlayState"
return playPauseButton1.getState( ) ==
PlayPauseButton.PLAY_STATE;
}
//Routines for handling ActionListener management.
//Insert "Controller Action Management"
Implementing the Controller
(15 of 19) [1/28/2000 1:26:39 PM]
/**
* Adds the specified action listener to receive action events.
* @param l the action listener
*/
public void addActionListener(ActionListener l)
{
actionListener = AWTEventMulticaster.add(actionListener, l);
}
/**
* Removes the specified action listener so it no longer receives
* action events from this component.
* @param l the action listener
*/
public void removeActionListener(ActionListener l)
{
actionListener = AWTEventMulticaster.remove(actionListener, l);
}
/**
* Fire an action event to the listeners.
* @param command, the command String to send with the ActionEvent
*/
protected void fireActionEvent(String command)
{
if (actionListener != null)
actionListener.actionPerformed(new ActionEvent(this,
ActionEvent.ACTION_PERFORMED, command));
}
We have added code for three separate routines. Let’s examine each separately.
Public void addActionListener(ActionListener l)
{
actionListener = AWTEventMulticaster.add(actionListener, l);
}
The addActionListener( ) is provided for the use of external classes that want to be able to listen to the
controller and receive action events from it (in this case, it will be called by SlideShow). The
AWTEventMulticaster is a convenience class which maintains a list of objects that want to receive notification
from that object.
AWTEventMulticasters are somewhat tricky beasts. The add( ) method takes the current multicaster
and the listener to be added and returns a new AWTEventMulticaster with the listener added to its internal
list. Thus, for the implementation of this routine, we call add( ) with our current multicaster object that we
have stored in our actionListener data member, and the listener to be added. We store the result in our
actionListener data member (replacing the old one). Remove functions the same way:
public void removeActionListener(ActionListener l)
{
actionListener = AWTEventMulticaster.remove(actionListener, l);
Implementing the Controller
(16 of 19) [1/28/2000 1:26:39 PM]
}
Thus, we use the same technique as addActionListener( ) but we call the multicaster’s remove( )
method instead. The last item, fireActionEvent:
protected void fireActionEvent(String command)
{
if (actionListener != null)
actionListener.actionPerformed(new ActionEvent( this,
ActionEvent.ACTION_PERFORMED, command));
}
The first step is the check the actionListener to make sure that it is not null. If this is null, we have no
registered action listeners and, therefore, return from the function. Otherwise, we need to tell the multicaster to
broadcast an action event to each of its registered listeners. To do so, we call the actionPerformed( )
method of our AWTEventMulticaster and pass a new action event as the parameter. This action event
takes three parameters: the originator of the action event (this), the type of event (ACTION_PERFORMED), and
the string command. It is the responsibility of the multicaster to insure that this event is propagated correctly to
each listener.
Now that we have our action handling routines in order, it’s time to implement our paint( ) method.
Back to top
Step 12 - Implementing paint( )
Our paint routine needs to draw the background as well as our buttons and close box.
Public void paint(Graphics g)
{
//Handle painting the border image, and let the super class
//paint the rest.
//Insert "Controller paint"
Locate the Controller controller paint clipping in the Controller folder and drag it directly below the last line
of code shown above. Your code should now look like this:
public void paint(Graphics g)
{
//Handle painting the border image, and let the super class
//paint the rest.
//Insert "Controller paint"
if (image != null)
g.drawImage(image, 0, 0, this);
super.paint(g);
}
As our comments indicate, we paint the background image ourselves by calling drawImage( ) if the image
is non-null. Then we call our superclass and let it do its painting which draws the buttons and window.
Next is the similar update method.
Back to top
Implementing the Controller
(17 of 19) [1/28/2000 1:26:39 PM]
Step 13 - Implementing update( )
The update method is called when a window or a portion of the screen needs to be refreshed.
Public void update(Graphics g)
{
//Override update to simply call paint to reduce flicker.
//Insert "Controller update"
Locate the Controller controller update clipping in the Controller folder and drag it directly below the last line
of code shown above. Your code should now look like this:
public void update(Graphics g)
{
//Override update to simply call paint to reduce flicker.
//Insert "Controller update"
paint(g);
}
As the comment suggests, we call paint( ) from our update method. This reduces flicker because the default
behavior of the update method of heavyweight components (such as a window) erases the content area before
calling paint. We override this functionality to avoid erasing the window background. Since we have a
background image, we can simply draw the background to clear the window.
Back to top
Step 14 - Implementing getPreferredSize( )
The getPreferredSize( ) method returns the dimensions of the controller based on the size of the
background image.
/**
* Gets the size the controller should be to look its best
* @return the dimensions the controller renders its self the best.
*/
Public Dimension getPreferredSize( )
{
//If the current image is not null, then return the size
//of the image. If it is null, defer to the super class.
//Insert "Controller getPreferredSize"
Locate the Controller update clipping in the Controller folder and drag it directly below the last line of code
shown above. Your code should now look like this:
Implementing the Controller
(18 of 19) [1/28/2000 1:26:40 PM]