Ubuntu The Complete Reference phần 2 pdf
Bạn đang xem bản rút gọn của tài liệu. Xem và tải ngay bản đầy đủ của tài liệu tại đây (13.04 MB, 75 trang )
46
Part I: Getting Started
such as NFS and FTP servers. This menu has a CD/DVD Creator entry for using
Nautilus to burn data CD/DVD-ROMs. A Recent Documents submenu lists all
recently accessed files.
• System This menu includes Preferences and Administration submenus. The
Preferences submenu is used for configuring your GNOME settings, such as the
theme you want to use and the behavior of your mouse. The Administration
submenu holds all the Ubuntu system configuration tools used to perform
administrative tasks such as adding users, setting up printers, configuring network
connections, and managing network services such as a web server or Samba
Windows access. The System menu also holds entries for locking the screen (Lock)
and logging out of the system (Logout).
Next to the menus are application icons for commonly used applications, including
Firefox, the mail utility, and help. Click one to start that application. Of course, you can also
start these applications from the Applications menu.
You can access your home directory from its entry in the Places menu. A file manager
window opens, showing your home directory with default directories created for commonly
used files, including Pictures, Documents, Music, and Videos. Your office applications will
automatically save files to the Documents directory by default. Image and photo applications
will place image files in the Pictures directory. The Desktop folder will hold all files and
directories saved to your desktop.
The file manager window displays several components, including a browser toolbar, a
location bar, and a side pane listing places, which resembles similar areas commonly found on
most traditional file managers. When you open a new directory, the same window is used to
display it, and you can use the forward and back arrows to move through previously opened
directories. In the location bar in text-based mode, a box is displayed where you can enter the
pathname for a directory to move directly to it. Figure 3-3 shows the file manager window.
FIGURE 3-3 File manager for home folder
Chapter 3: Interface Basics: Login, Desktop, and Help
47
PART I
NOTE
NOTE For both GNOME and KDE, the file manager is Internet-aware. You can use it to access
remote FTP directories and to display or download their files, though in KDE the file manager is
also a fully functional Web browser.
To quit the GNOME desktop, either click the Quit button on the right side of the top
panel or choose System | Quit. This displays a dialog with buttons for Log Out, Switch
User, Restart, and Shut Down. Click the Shut Down button to shut down the system. Click
Log Out to return to the login screen, where you can log in as a different user. Switch User
will keep you logged in while you log in as another user. Your active programs will
continue to run in the background. Clicking the Restart button will shut down and the
restart the system.
NOTE
NOTE Ubuntu provides several tools for configuring your GNOME desktop, which you can access
by choosing System | Preferences. These tools are discussed in detail in Chapter 8. Click the
Help button on each preference window to display detailed descriptions and examples. Some of
the commonly used tools are discussed in the “Desktop Operations” section later in this chapter.
On the far right side of the GNOME desktop’s top panel are the user switcher icon, the
sound volume control icon, the date and time, and the Quit button.
The bottom panel, shown next, is used for interactive tasks such as selecting workspaces
and docking applications. If your desktop becomes too cluttered with open windows and
you want to clear it by minimizing all the windows, you can click the Show Desktop button
at the left side of the bottom panel. The workspace switcher for virtual desktops appears as
two squares on the right side of the panel. Clicking a square moves you to that area of the
workspace. On the right of the workspace switcher is the trash icon that you can click to see
what items are in your trash.
Moving and Copying Windows and Files
To move a window, click and drag its title bar. Each window sports maximize, minimize,
and close buttons, or you can double-click the title bar to maximize the window. Each
window has a corresponding minimize and restore button on the bottom panel. The
desktop supports full drag-and-drop capabilities and combinations of keypresses and
mouse clicks, as shown in the following table. You can drag folders, icons, and applications
to the desktop or other file manager windows open to other folders. The move operation
is the default drag operation (you can also press the shift key while dragging). To copy
files, press the ctrl key and then click and drag before releasing the mouse button. To
create a link, hold down both the ctrl and shift keys while dragging the icon to where
you want the link to appear, such as the desktop.
SHIFT-click Move a file or directory, default
CTRL-click Copy a file or directory
CTRL-SHIFT-click Create a link for a file or directory
48
Part I: Getting Started
GNOME Applets
GNOME applets are small programs that you can access from icons on the top panel. It is
easy to add applets to the panel: Simply right-click a vacant space on the panel and choose
Add To Panel to see all available applets in a dialog (Figure 3-4). You may find some applets
to be particularly helpful, such as Dictionary Lookup; the current weather; the system
monitor, which shows your CPU usage; the CPU Frequency Scaling Monitor for Cool’n’Quiet
processors; and Search For Files. You will need to perform basic configuration for most
applets before they can be run. To do this, right-click the applet and choose Preferences to
open the Preferences window for that applet, where you can change settings.
The following illustration shows some common applet icons that appear to the right of
the Web browser, Email, and Help icons: from left to right, Dictionary Lookup, System
Monitor, Tomboy note taker, eyes that follow your mouse around, a fish, DeskBar desktop
search, User Switcher, Network Connection Monitor, volume control, weather, date and
time (International Clock), and the Quit button.
NOTE
NOTE The KDE desktop displays a panel at the bottom of the screen that looks similar to the panel
displayed on the top of the GNOME desktop. The file manager for KDE appears slightly different
but operates much the same way as the GNOME file manager. See Chapter 9 for details on KDE.
Desktop Operations
There are several desktop operations that you may want to take advantage of when first
setting up your desktop. These include setting up your personal information, burning CD/
DVD disks, searching your desktop for files, and using removable media like USB drives,
along with access to remote host.
FIGURE 3-4
GNOME Add To
Panel dialog
Chapter 3: Interface Basics: Login, Desktop, and Help
49
PART I
TIP
TIP With very large monitors and their high resolutions becoming more common, one feature users
find helpful is the ability to increase the desktop font sizes. To increase the font size, open the Font
panel on the Appearance preferences located in System | Preferences | Appearance menu. There
you can change the font sizes used on your desktop. See Chapter 8 for more information on fonts.
International Clock: Time, Date, and Weather
The International Clock applet displays the current time and date for your region, but you
can modify it to display the local weather, as well as the time, date, and weather of any
location in the world.
To add a location, right-click the time and choose Preferences. The Clock Preferences
dialog displays three tabs: General, Locations, and Weather. To add a new location, click the
Add button on the Locations tab. This opens another dialog where you can enter the name,
time zone, and coordinates of the location. Click the Find button and open a expandable
tree of locations, starting with continent, then region, country, and city (Figure 3-5).
On the Weather tab, you can specify the temperature and wind measures to use. On the
General tab, you can set the clock’s display options for particular locations and decide
whether to show weather, temperature, date, and seconds.
Once you set your location, a weather icon will appear next to the time on the top panel,
showing current weather information:
To see the locations you have selected, click the time displayed on the top panel. This
opens a calendar, with a Locations area with an expandable arrow at the bottom. Click this
arrow to display all your locales, their times, and weather, as shown next. A house icon
appears next to your home location. A world map shows your world locations as red dots,
FIGURE 3-5 Selecting a location from the Clock Preferences dialog
50
Part I: Getting Started
with a blue house icon showing your current home location. When you click a location
entry, its corresponding dot will blink for a few seconds. Each location also shows a small
globe weather icon that indicates the general weather, such as sun or clouds. To see weather
details, move your mouse over the weather icon, and a pop-up dialog will display the
current weather, temperature, wind speed, and times for sunrise and sunset. The clock icons
for each location appear dark, gray, or bright depending on the time of day at that location.
Each location has a Set button that is hidden until you move your mouse over it, on the
right side of the clock display.
You can easily change your home location by clicking the Set button to the right the
location you want to make your home. The home icon will shift to the new location on the
world map. This can be helpful when you’re traveling.
To make changes, click the Edit button to open the Clock Preferences dialog, where you
can configure the display or add and remove locations.
The calendar shows the current date, but you can move to different months and years
using the month and year scroll arrows at the top.
To set the time manually, right-click the time and choose Adjust Date & Time (or, from
the General panel of the Clock Preferences window, click the Time Settings button). This
opens a Time Settings dialog, where you can enter the time and set the date, as shown next.
Use the month and year arrows on the calendar to change the month and year. To set the
time for the entire system, click the Set System Time button.
Chapter 3: Interface Basics: Login, Desktop, and Help
51
PART I
Configuring Personal Information
To set up personal information, including the icon to be used for your graphical login, you
use the About Me preferences tool. On the Ubuntu GNOME desktop, choose System |
Preferences | About Me. The About Me dialog (Figure 3-6) lets you set up personal
information to be used with your desktop applications, as well as change your password.
Each user can set up his or her own personal information, including the icon or image to
use to represent themselves.
Clicking the image icon in the top-left corner opens a browser window, where you can
select a personal image. The Faces directory is selected by default and displays several
images. The selected image displays at the right on the browser window. You can even use
FIGURE 3-6 About Me information: System | Preferences | About Me
52
Part I: Getting Started
a personal photograph: select the folder on your home directory where you store images
and choose a photograph or image you want to use for your personal image in the login
screen when showing your user entry.
To change your password, click the Change Password button at the top right on the
About Me dialog.
Three tabs, Contact, Address, and Personal Info, let you change more preferences. On
the Contact tab, you can enter e-mail (home and work) addresses, telephone numbers, and
instant messaging addresses; on the Address tab, you can enter your home and work
addresses; and on the Personal Info tab, you can list your Web addresses and work
information. Click Close when you’re done making changes.
Desktop Background
You use the Background tab on the Appearance Preferences tool to select or customize your
desktop background image (Figure 3-7). You can access this tool in two ways: right-click
anywhere on the desktop background and choose Change Desktop Background from the
context menu, or choose System | Preferences | Appearance and then select the Background
tab. Installed backgrounds are listed here, with the current background selected. To add your
own image, either drag-and-drop the image file to the Background window or click the Add
button to locate and select the image file. To remove an image, select it and click the Remove
button.
From the Style drop-down menu, you can choose display options such as Zoom, Centered,
Scaled, Tiled, or Fill Screen. A centered or scaled image will preserve the image proportions. Fill
Screen may distort it. Any space not filled, such as with a centered or scaled images, will be
filled in with the desktop color. You can change the color if you want, as well as make it a
FIGURE 3-7 Choosing a desktop background: System | Preferences | Appearance
Chapter 3: Interface Basics: Login, Desktop, and Help
53
PART I
horizontal or vertical gradient via the Colors drop-down menu. You select colors from a color
wheel that provides an extensive selection.
Initially, only the Ubuntu backgrounds are listed, but you can install the gnome-
background package to add a collection of GNOME backgrounds. You can download more
GNOME backgrounds from and .
TIP
TIP You can set your screen resolution as well as screen orientation using the Monitor Resolution
Settings utility accessible from System | Preferences | Screen Resolution. The utility supports
RandR screen management features such as screen rotation, resolution, and refresh rate.
Using Removable Devices and Media
Removable media such as CDs and DVDs, USB storage disks, digital cameras, and floppy
disks will be displayed as icons on your desktop. These icons will not appear until you
place the media into their appropriate devices. To open a disk, double-click its icon to
display a file manager window and the files on it.
Ubuntu now supports removable devices and media such as digital cameras, PDAs,
card readers, and even USB printers. These devices are handled automatically with an
appropriate device interface set up on the fly when needed. Such hotplugged devices are
identified, and where appropriate, their icons will appear in the file manager window. For
example, when you connect a USB drive to your system, it will be detected and displayed
as a storage device with its own file system.
CAUTION
CAUTION If you copy files to a disk, CD, or DVD, be sure to unmount it first before removing it
from the drive (right-click the icon and choose Unmount Volume).
Accessing File Systems, Devices, and Remote Hosts
The GNOME desktop also displays a Computer folder. Open this folder to see a list of
removable devices along with icons for file system and network connections (Figure 3-8).
Click the Filesystem icon to access the entire file system on your computer, starting from the
root directory. Regular users will have only read access to many of these directories,
whereas the root user will have full read and write access.
Opening the Network folder shows a list of hosts on your system with shared directories,
such as Windows systems accessible with Samba. GNOME uses Domain Name Service
(DNS)–based service discovery to detect these hosts automatically. Clicking a host’s icon will
list the shared directories available on that system. When opening a shared directory, you
will be asked for a user and password, like the user and password required for a directory
owned by a Windows user. The first time you access a shared directory, you will also be
asked to save this user and password in a keyring, which itself can be password-protected.
This allows repeated access without your having to enter the password every time.
Burning DVDs and CDs
With GNOME, burning data to a DVD or CD is a simple matter of dragging files to an open
blank CD or DVD window and clicking the Write To Disk button. When you insert a blank
disc, a CD/DVD Creator window will open. To burn files to the disc, just drag them into
that window. All read/write discs, even if they are not blank, are also recognized as
writable discs and are opened in a CD/DVD Creator window. Click Write To Disk when
54
Part I: Getting Started
you’re ready to burn to disc. A dialog will open, as shown in Figure 3-9. You can specify
Write Speed, the DVD/CD writer to use (if you have more than one), and the disc label.
GNOME also support burning ISO images. Double-click the ISO image file or right-click
the file and choose Open With CD/DVD Creator. This opens the CD/DVD Creator dialog,
which prompts you to burn the image. Be sure you insert a blank CD or DVD into your
CD/DVD drive first. You can also burn DVD-Video discs.
For more complex DVD/CD burning, you can use the Brasero DVD/CD burner
(Figure 3-10) that is included with Ubuntu and is a GNOME project (Ubuntu main
repository). Brasero supports drag-and-drop operations for creating audio CDs. In
particular, it can handle CD/DVD read/write discs and can erase discs. It also supports
multisession burns, adding data to a DVD/CD disc. Initially, Brasero displays a dialog
with buttons for the types of project you want to create. You can create a data or audio
project, copy a DVD/CD, or burn a DVD/CD image file.
FIGURE 3-8 Removable devices, Computer folder, and shared network folders
FIGURE 3-9
Writing to a DVD/
CD with GNOME
Nautilus File
Manager
Chapter 3: Interface Basics: Login, Desktop, and Help
55
PART I
Search Tools
Two primary search tools are available for your Ubuntu desktop: Search For Files and Tracker.
Search For Files is installed by default and is accessible by choosing Places | Search For Files.
The Tracker search and desktop indexer is accessible from Applications | Accessories |
Tracker search tool. When you start using Tracker, a Tracker icon will appear in the top panel.
Tracker will actually index your files, making access more efficient. The GNOME file manager
also provides its own search tool for quickly finding files. As an alternative, you can use the
DeskBar search applet, which also makes use of Tracker indexing.
Tracker: Indexed Search
Tracker is a GNOME desktop indexing search tool (www.gnome.org/projects/tracker/) that’s
technically named Meta-Tracker. Tracker is turned off by default as its indexing function can
be resource intensive. You can enable Tracker by choosing System | Preferences | Search
And Indexing and checking both the Enable Indexing and Enable Watching check boxes on
the General tab. If you find that indexing is consuming too many resources, you can turn it
off by unchecking the Enable Indexing check box. You can still use Tracker to perform searches
if you have Enable Watching checked.
Once enabled, the Tracker applet appears on the right side of the top panel. You can
right-click the icon to display a menu for selecting preferences as well as to start Tracker or
pausing indexing. Tracker indexes not just by name or location, but also by metadata and
content of files and directories. Indexing is performed by the trackerd daemon.
To use Tracker, click its icon to open a search window, where you can enter your search
and display the results (see Figure 3-11). You can also open this window directly by right-
clicking the Tracker icon and choosing Search. Search results are organized into Categories
in the side pane. The results for a selected category are shown in the top-right pane.
Information about a selected result appears in the lower-right pane.
FIGURE 3-10 Burning a DVD/CD with Brasero
56
Part I: Getting Started
Tracker also has an indexer that can be configured using the Tracker Preferences window
(Figure 3-12). Right-click the Tracker icon and choose Preferences, or choose System |
Preferences | Search And Indexing. You’ll see tabs for General, Files, Ignored Files, Email,
and Performance. On the General tab, you can enable or disable indexing. On the Files tab,
you can specify what directories to index. Your home directory is already specified. You can
FIGURE 3-11 Search results with Tracker
FIGURE 3-12 Tracker confi guration
Chapter 3: Interface Basics: Login, Desktop, and Help
57
PART I
also choose to index the contents of files. The Ignored Files tab lets you exclude directories
from indexing, as well as files with certain patterns in their names. On the Email tab, you can
index e-mail clients such as Evolution or Thunderbirds, as well as specify particular mbox
files. The Performance tab lets you control the amount of resources indexing will use.
Search for Files
The Search For Files tool performs basic file searching (see Figure 3-13). It uses a GNOME
front end for the Linux grep, find, and locate tools (see Chapter 10). Choose Places | Search
For Files and enter the pattern for which you want to search. File-matching characters
(wildcards) will help, such as an ampersand (*) for filename completion or brackets ([]) to
specify a range of possible characters or numbers.
Enter the pattern of the search in the Name Contains text box, and then select the folder
or file system in which to search from the Look In Folder drop-down menu. The user’s
home folder is selected by default. You can then elect to specify advanced options such as
the Contains The Text text box for searching the contents of text files (grep), or additional
file characteristics such as the file date, size, or owner type (find). You can also use a regular
expression to search filenames.
GNOME File Manager Search
The GNOME file manager uses another search tool with similar features. You enter a
pattern on which to search, but you can also specify file types. The search begins from the
folder opened, but you can specify another folder to search (Location option). Click the plus
(+) button to add location and file type search parameters. In the browser mode, you can
click the Search button on the toolbar to make the URL box a Search box. Pop-up menus for
Location and File Type will appear in the folder window, with + and – buttons for adding or
removing location and file type search parameters.
FIGURE 3-13 Search For Files tool
58
Part I: Getting Started
GNOME Power Management
Ubuntu uses the GNOME Power Manager, gnome-power-manager, which makes use of
Advanced Configuration and Power Interface (ACPI) support provided by a computer
to manage power use. The GNOME Power Manager is configured with the Power
Management Preferences window (gnome-power-preferences), accessible by choosing
System | Preferences | Power Management. Power Manager can be used to configure
both a desktop and a laptop.
On a laptop, the battery icon displayed on the top panel will show how much power is
available on the battery, as well as when the battery level becomes critical. It will also
indicate an AC connection as well as when the battery has been recharged.
TIP
TIP Using the GNOME Screensaver Preferences, you can control when the computer is considered
idle and what screen saver to use, if any. You can also control whether to lock the screen when
idle. Access the Screensaver Preferences from System | Preferences | Screensaver. To turn off the
Screensaver, uncheck the Activate Screensaver When Computer Is Idle check box.
For a desktop, two tabs appear in the Power Management Preferences window: On AC
Power and General. The On AC Power tab offers two sleep options—one for the computer
and one for the display screen. You can put each to sleep after a specified interval of
inactivity. On the General tab, you set desktop features such as actions to take when you
press the power button or whether to display the power icon (see Figure 3-14). The AC
Power icon in the top panel will show a plug image for desktops and a battery for laptops.
To see how your laptop or desktop is performing with power, you can use Power
Statistics. Right-click the Power Manager icon and choose Power History. This runs the
gnome-power-statistics tool. You may first have to choose to display the Power Manager
icon in its General preferences.
To keep a measure of how much time you have left, you can use the Battery Charge
Monitor applet. An icon will appear on the top panel showing you how much time remains
FIGURE 3-14 Power Management Preferences
Chapter 3: Interface Basics: Login, Desktop, and Help
59
PART I
on the battery. The preferences let you specify features such as show time or percentage and
when to notify of a low charge (see Figure 3-15).
Using the Command Line Interface
The command line interface provides a simple command prompt at which you type in a
command. Even when you’re using a GUI, you sometimes need to execute commands on
a command line. You can do so in a terminal window, which is accessed by choosing
Applications | Accessories | Terminal. You can add the terminal window icon to the
desktop by right-clicking the Terminal menu entry and selecting Add Launcher To The
Desktop.
Linux commands make extensive use of options and arguments. Be careful to place your
arguments and options in their correct order on the command line. The syntax for a Linux
command is the command name, followed by options, and then arguments, as shown here:
$ command-name options arguments
An option is a one-letter code preceded by one or two hyphens, which modifies the type
of action the command takes. Options and arguments may or may not be optional,
depending on the command. For example, the
ls command can take a -s option. The ls
command displays a listing of files in your directory, and the
-s option adds the size of
each file in blocks. You enter the command and its option on the command line as follows:
$ ls -s
An argument is data the command might need to execute its task. In many cases, this is a
filename. An argument is entered as a word on the command line that appears after any
options. For example, to display the contents of a file, you can use the
more command with
the filename as its argument. The
less or more command used with the filename mydata
would be entered on the command line as follows:
$ less mydata
FIGURE 3-15
Battery Charge
Monitor
60
Part I: Getting Started
The command line is actually a buffer of text you can edit. Before you press enter to
execute the command, you can edit the command on the command line. The editing
capabilities provide a way to correct mistakes you may make when typing a command and
its options. The backspace key lets you erase the character you just typed in (the one to the
left of the cursor) and the del key lets you erase one character to the right of the cursor. With
this character-erasing capability, you can backspace over the entire line if you want, erasing
what you entered. ctrl-u erases the whole command line and lets you start over again at the
prompt.
TIP
TIP You can use the UP ARROW key to redisplay your last-executed command. You can then re-execute
that command, or you can edit it and execute the modified command. This is helpful when you
have to repeat certain operations over and over, such as editing the same file. This is also helpful
when you’ve already executed a command you entered incorrectly.
Help Resources
A great deal of support documentation is already installed on your system and is also
accessible from online sources. Both the GNOME and KDE desktops feature help systems
that use a browser-like interface to display help files. To start the GNOME or KDE Help
browser, select the Help entry in the main menu or click the Help icon on the top panel. The
Help browsers now support the Ubuntu Help Center, which provides Ubuntu-specific help,
as well as the GNOME desktop and system man page support.
If you need to ask a question, you can choose Help | Get Online Help to access the
Ubuntu help support at . Here you can submit your question
and check answered questions about Ubuntu.
Ubuntu Help Center
Click the Help icon on the top panel (the ? icon) to start the GNOME help browser (Yelp),
which presents the Ubuntu Help Center (see Figure 3-16). The GNOME help browser
supports bookmarks for pages you want to access directly. Clicking the Help Topics button
on the Ubuntu Help Center will return you to the start page. For detailed documentation
and a tutorial on the GNOME help browser, choose Help | Contents, or press f1.
The Ubuntu Help Center displays topics about Ubuntu. Links range from adding
software, to managing files and folders, to printing and scanning. A help page will display
detailed information on the left and a sidebar of links for more information on the right.
These will include any associated links as well. Figure 3-17 shows the Add/Remove
Applications help page.
As you progress through a document collection, its bookmarks appear at the top of the
page. Figure 3-18 shows the Import Photos From A Digital Camera help page, with bookmarks
for Music, Video And Photos, and Photos And Cameras. The sidebar links expand as you
progress through the document collection.
The GNOME help browser contents will also show a sidebar listing direct links to all the
major help topics (Help | Contents), rather than the Ubuntu-specific links on the Ubuntu
Help Center page. These topics include Introduction To The Desktop, Basic Skills, Desktop
Overview, Using The Panels, Tools And Utilities, and Configuring Your Desktop. The
Introduction To The Desktop topic provides a comprehensive set of links to desktop pages
Chapter 3: Interface Basics: Login, Desktop, and Help
61
PART I
(see Figure 3-19). Many of these topics will also appear as links in pages you access through
the Ubuntu Help Center.
You can easily view documentation and user manuals for an application by performing
a search on the application name. So, for example, a search on archive will show a link to the
Archive Manager manual, and a search on system monitor will show a link to the System
Monitor manual.
Click the Advanced Topics link on the Ubuntu Help Center main page to display links
for accessing man pages and info pages.
Context-Sensitive Help
Both GNOME and KDE, along with applications, provide context-sensitive help. Each KDE
and GNOME application features detailed manuals that are displayed using their respective
help browsers. In addition, system administrative tools feature detailed explanations for
each task.
FIGURE 3-16 Ubuntu Help Center
62
Part I: Getting Started
FIGURE 3-17 Help Center page
FIGURE 3-18 Help Center bookmarks and sidebar
Chapter 3: Interface Basics: Login, Desktop, and Help
63
PART I
Application Documentation
On your system, the /usr/share/doc directory contains documentation files installed by each
application. Within each directory, you can usually find HOW-TO, README, and
INSTALL documents for that application.
Man Pages
You can also access the man pages, which are manuals for Linux commands available from
the command line interface, using the man command. Enter man along with the command
on which you want information. The following example asks for information on the ls
command:
$ man ls
Pressing the spacebar advances you to the next page. Pressing the b key moves you back
a page. When you finish, press the q key to quit the man utility and return to the command
line. You activate a search by pressing either the slash (/) key or question mark (?) key. The
/ key searches forward, and the ? key searches backward. When you press the / key, a line
opens at the bottom of your screen, where you can enter a word to search for. Press enter to
activate the search. You can repeat the same search by pressing the n key. You needn’t re-enter
the pattern.
Info Pages
Online documentation for GNU applications, such as the gcc compiler and the Emacs
editor, also exist as info pages accessible from the GNOME and KDE help centers. You can
FIGURE 3-19 Introduction to the Desktop
64
Part I: Getting Started
also access this documentation by entering the command info. This brings up a special
screen listing different GNU applications. The info interface has its own set of commands.
You can learn more about it by entering
info info at the command prompt. Typing m
opens a line at the bottom of the screen where you can enter the first few letters of the
application. Pressing enter brings up the info file on that application.
TIP
TIP You can use either the GNOME or KDE help system to display man pages and info pages.
Running Windows Software on Linux: Wine
Wine is a Windows compatibility layer that allows you to run many Windows applications
natively on Linux. Though you could run the Windows OS on Wine, the actual Windows
OS is not required. Windows applications will run as if they were Linux applications, able
to access the entire Linux file system and use Linux-connected devices. Applications that are
heavily driver-dependent, such as graphics-intensive games, may not run. Others that do
not rely on any specialized drivers may run very well, including Photoshop, Microsoft
Office, and newsreaders such as NewsBin. For some applications, you may also need to
copy over specific Windows dynamic link libraries (DLLs) from a working Windows system
to your Wine Windows system32 or system directory.
To install Wine on your system, search for wine on the Synaptic Package Manager (see
Chapter 6). You will see a wine package listed, described as the Windows Compatibility Layer.
Once installed, a Wine submenu will appear on the Applications menu. The Wine submenu
holds subentries for Wine configuration, the Wine software uninstaller, and Wine file
browser, as well as a regedit registry editor, notepad, and a Wine help tool.
To set up Wine, start the Wine Configuration tool. This opens a window with tabs for
Applications, Libraries (DLL selection), Audio (sound drivers), Drives, Desktop Integration,
and Graphics. On the Applications tab, you can select for which version of Windows an
application is designed. The Drives tab lists your detected partitions, as well as your Windows-
emulated drives, such as drive C:. (The C: drive is actually just a directory, .wine/drive_c, not a
partition of a fixed size. Your actual Linux file system will be listed as the Z: drive.)
Once configured, Wine will set up a .wine directory on the user’s home directory. (The
directory is hidden, but you can choose View | Show Hidden Files in the file manager to
display it.) Within that directory will be the drive_c directory, which functions as the C: drive
that holds your Windows system files and program files in the Windows and Program File
subdirectories. The System and System32 directories are located in the Windows directory.
This is where you would place any needed DLL files. The Program Files directory holds
your installed Windows programs, just as they would be installed in a Windows Program
Files directory.
To install a Windows application with Wine, you can open a terminal window and run
the
wine command with the Windows application as an argument. The following example
installs the popular NewsBin program:
$ wine newsbin.exe
Or, instead of using the terminal window, you can right-click the application icon on the
desktop and choose Open With | Wine.
Chapter 3: Interface Basics: Login, Desktop, and Help
65
PART I
Icons for installed Windows software will appear on your desktop. Double-click an icon
to start up the application. It will run normally within a Linux window as would any Linux
application.
Installing Windows fonts on Wine is a simple matter of copying fonts from a Windows
font directory to your Wine .wine/drive_c/Windows/fonts directory. You can copy any
Windows .ttf file to this directory to install a font.
TIP
TIP You can use the commercial Windows emulation framework called CrossOver Office on your
Linux system to run certain applications, such as Microsoft Office. Check www.codeweavers
.com for more details. CrossOver Office is based on Wine, which CodeWeavers supports directly.
To install applications that have .msi extension, you use the msiexec command with /a
option. The following installs the Mobipocket Ebook Reader:
msiexec /a mobireadersetup.msi
To add books to the Mobipocket reader library, just drag the book to the open
Mobipocket window.
This page intentionally left blank
II
Confi guration
CHAPTER 4
Administration Tasks
CHAPTER 5
Network Connections
CHAPTER 6
Software Installation
CHAPTER 7
Software Management
with DEB, APT, and dkpg
PART
Copyright © 2009 by The McGraw-Hill Companies. Click here for terms of use.
This page intentionally left blank
4
Administration Tasks
T
his chapter reviews a few administrative task and tools you may normally use. Most
administrative configurations tasks are performed for you automatically in Ubuntu:
For example, devices such as printers, hard drive partitions, and graphics cards are
detected and set up automatically by the OS. In some cases, you may need to perform tasks
manually—such as adding new users or troubleshooting your display. Administrative
operations can be performed with user-friendly system tools.
This chapter discusses a few system administration operations and describes how to
perform common tasks such as adding new users and configuring remote printers. Software
management is handled in detail in Chapter 6.
TIP
TIP If you have difficulties with your system configuration, check the
site for solutions. The site offers helpful forums ranging from desktop and installation problems
to games, browsers, and multimedia solutions, Also check the support link at www.ubuntu.com
for documentation, live chat, and mailing lists.
Ubuntu Administrative Tools
On Ubuntu, administration is handled by a set of separate specialized administrative tools,
such as those for user management and printer configuration (see Table 4-1). To access the
GUI-based administrative tools, you log in as a user who has administrative access—this is
the user you created when you first installed Ubuntu.
On the GNOME desktop, system administrative tools are accessed by choosing System
| Administration. Here you will find tools to set the time and date, manage users, configure
printers, and install software. Users and Groups lets you create and modify users and
groups. Printing lets you install and reconfigure printers. All tools provide easy-to-use and
intuitive graphical user interfaces (GUIs). In the Administration menu, tools are identified
by simple descriptive terms, whereas their actual names normally begin with terms such as
admin or system-config. For example, the printer configuration tool is listed as Printing, but
its actual name is system-config-printer, whereas Users and Groups is admin-users. You
can separately invoke any tool by entering its name in a terminal window.
69
CHAPTER
Copyright © 2009 by The McGraw-Hill Companies. Click here for terms of use.
70
Part II: Configuration
Ubuntu uses the GNOME administrative tools with KDE counterparts, administrative
tools adapted from the Fedora distribution supported by Red Hat Linux, and independent
tools such as Firestarter for your firewall; PolicyKit for device authorizations; and the
Synaptic Package Manager for software installation. The GNOME administrative tools are
suffixed with admin, and the Fedora tools have the prefix system-config. With Ubuntu 7.10,
the Printing administrative tool is Fedora’s system-config-printer, replacing the GNOME
printer-admin tool used in previous Ubuntu releases. A Samba GUI tool is now available
for Ubuntu, which is the Fedora system-config-samba tool.
Some tools will work on Ubuntu but are not yet supported. The Fedora system-config-lvm
tool provides a simple and effective way to manage LVM file systems, but it is not yet
supported directly by Ubuntu. You can, however, download, convert, and install the software
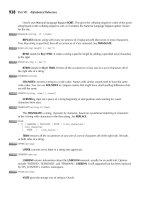
TABLE 4-1 Ubuntu System Administration Tools and Related Applications
Ubuntu Administration Tools Description
Synaptic Package Manager Apt software management using online repositories
Install and Remove
Applications
Apt software management using online repositories, add/
remove applications
Update Manager Update tool using apt repositories
system-config-kickstart Configures automatic install scripts (Fedora/Red Hat)
network-admin Configures your network interfaces (GNOME)
services-admin Services tool, manages system and network services such
as starting and stopping servers (GNOME)
shares-admin Configures general open shared directories or files for Linux
systems
time-admin Changes system time and date (GNOME)
users-admin User and group configuration tool
system-config-cluster Global File System (GFS) management (Fedora/Red Hat)
system-config-printer Printer configuration tool (Fedora/Red Hat)
system-config-samba Configures the Samba server (Fedora/Red Hat), user-level
authentication support
gnome-language-selector Selects a language to use
displayconfig-gtk Ubuntu display configuration tool, video card and monitor
(GNOME)
Firestarter Configures your network firewall
polkit-gnome-authorization Sets authentication settings for devices and administration
tasks, PolicyKit
system-config-lvm Configures Logical Volume Manager (LVM) file system
volumes (Fedora/Red Hat, unsupported)
ClamAV Virus protection application