How to Survive in Anaesthesia - Part 2 doc
Bạn đang xem bản rút gọn của tài liệu. Xem và tải ngay bản đầy đủ của tài liệu tại đây (228.01 KB, 21 trang )
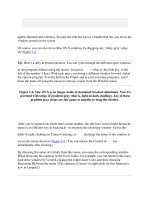
It is based upon the visibility of the pharyngeal structures with the
mouth open as wide as possible (Figure 1.1). Patients are classified
as follows:
• Grade 1: faucial pillars, soft palate and uvula visible
• Grade 2: faucial pillars, soft palate visible, but uvula masked by the
base of the tongue
• Grade 3: soft palate only visible
• Grade 4: soft palate not visible.
Patients in Grades 3 and 4 are considered difficult to intubate and
those in Grades 1 and 2 are considered feasible intubations. It is
important to realise that this system is not infallible and patients in
Grade 2 sometimes cannot be intubated.
Wilson risk factor scoring system (Table 1.1)
Five anatomical features are assessed and a total risk score of > 2 is said
to predict 75% of difficult intubations.
Thyromental distance
The thyromental distance (Patil test) is the distance from the thyroid
cartilage to the mental prominence when the neck is extended fully
Evaluation of the airway
5
Figure 1.1 Structures seen on opening of mouth for Mallampati Grades 1–4.
emedicina
(Figure 1.2). In the absence of other anatomical factors, if the
distance is > 6·5 cm, problems should not occur with intubation.
A distance of < 6 cm suggests laryngoscopy will be impossible and
for distances between 6–6·5 cm, laryngoscopy is considered difficult,
How to Survive in Anaesthesia
6
Table 1.1 Wilson risk factor scoring system for difficult intubation
Risk factor Score Criteria
Weight 0 < 90 kg
1 90–110 kg
2 > 110 kg
Head and neck movement 0 > 90°
1 about 90°
2 < 90°
Jaw movement 0 incisor gap > 5 cm or subluxation > 0
1 incisor gap < 5 cm and subluxation = 0
2 incisor gap < 5 cm and subluxation < 0
Receding mandible 0 normal
1 moderate
2 severe
Buck teeth 0 normal
1 moderate
2 severe
Figure 1.2 Line shows the thyromental distance from the thyroid cartilage
to the tip of the chin.
emedicina
but possible. This measurement may predict up to 75% of difficult
intubations.
Sternomental distance
This test is claimed to predict up to 90% of difficult intubations. The
distance from the upper border of the manubrium sterni to the tip of
the chin, with the mouth closed and the head fully extended, is
measured. A distance < 12·5 cm indicates a difficult intubation.
Other tests
Indirect laryngoscopy and various x-ray procedures are occasionally
used. With x-ray photographs the effective mandibular length
has been compared with the posterior depth of the mandible; a ratio
of > 3·6 may be associated with a difficult intubation. A decreased
distance between the occiput and the spinous process of Cl is also
reported as associated with difficulties with laryngoscopy. We have
found these tests to be of limited value.
Conclusion
The airway must be assessed before any anaesthetic procedure is
embarked upon. Airway control and endotracheal intubation is
occasionally difficult, or even impossible, in anatomically normal
people. An assessment from the patient’s history, symptoms and
medical conditions, combined with careful clinical examination, will
help avoid most, but not all, unexpectedly difficult intubations.
Evaluation of the airway
7
emedicina
8
2: Control of the airway
The novice anaesthetist must learn rapidly the skills of airway control.
Position
The patient must be correctly positioned. This is achieved by
elevating the head by about the height of a pillow to flex the neck.
The head is extended on the cervical spine and the mandible lifted
forward to stop obstruction from the tongue and other pharyngeal
structures that lose their tone under anaesthesia. This position is
commonly referred to as “sniffing the early morning air,” a practice
not to be recommended in a modern urban environment.
Methods
There are four methods of airway control that are used for the purpose
of ensuring unobstructed gas exchange (Box 2.1).
Face mask
The mask is designed to fit snugly over the patient’s nose and mouth.
However, gas often leaks round the side of the mask in edentulous
patients. An obstructed airway may be relieved by the insertion of an
oropharyngeal airway (Guedel airway) or by a nasopharyngeal airway.
Guedel airways are sized from 0 to 4, with a size 3 used for adult
females and 4 for adult males. Nasopharyngeal airways can cause
haemorrhage, unless they are inserted very gently, which may further
threaten the airway.
Box 2.1 Methods of airway control
• Facemask and Guedel airway
• Laryngeal mask
• Endotracheal tube
• Tracheostomy
emedicina
Control of the airway
9
Laryngeal mask
This was developed from the concept that the anaesthetic face mask
could, instead of being applied to the face, be altered and positioned
over the laryngeal opening (Figure 2.1). It is inserted using a blind
technique and provides a patent airway for spontaneous breathing; it
is used occasionally for ventilation and management of difficult
intubation. The experienced anaesthetist can pass a 6·0 mm cuffed
endotracheal tube, gum elastic bougie or fibre-optic laryngoscope
through the laryngeal mask. A black line is present on the tube that
ensures correct orientation of the mask. The sizes are 2 and 2½ for
children, 3 for adult females and 4 or 5 for adult males.
The main advantage of this technique is that the anaesthetist has
both hands free to undertake other tasks. The laryngeal mask permits
the measurement of the oxygen, carbon dioxide and volatile
anaesthetic concentration in the expired gas.
The mask does not prevent gastric aspiration occurring, is not suitable
for emergency anaesthesia, and incorrect positioning can occur which
may lead to airway obstruction. This is often due to folding back of
the epiglottis as it is pushed down by the mask during insertion and
occurs in about 10% of patients. An obstructed mask must be
removed and repositioned.
Figure 2.1 Laryngeal mask correctly positioned before inflation, with the tip of
the mask in the base of the hypopharynx.
emedicina
How to Survive in Anaesthesia
10
Endotracheal tube
A cuffed endotracheal tube, once inserted into the trachea, maintains
airway patency and minimises gastric aspiration into the lungs.
All endotracheal tubes have information written upon the tube
(Figure 2.2).
A novice anaesthetist is expected to be able to provide a detailed
description of the information on an endotracheal tube: it is a basic
tool of the trade! The tube is inserted by holding the laryngoscope in
the left hand and passing the blade into the right side of the mouth.
The tongue is then pushed to the left as the blade is passed down the
tongue and inserted anterior to the epiglottis in the vallecula.
Elevation of the whole laryngoscope will facilitate a clear view of the
glottic opening (Figure 2.3).
Pilot balloon
One-way valve
Radio-opaque line
Murphy’s eye
Cuff
Internal diameter
(mm)
External diameter
(mm)
Length of tube
(cm)
Z97-IT – implanted
material in rabbit
muscle for tissue
compatibility according
to American Standards
Committee Z79
8
.
0
O
R
A
L
1
0
.
9
U
S
E
O
N
C
E
Z
7
9
-
I
T
2
1
2
3
2
5
Figure 2.2 Typical endotracheal tube.
emedicina
Tips to aid insertion of the endotracheal tube include:
• the use of a gum elastic bougie inserted through the larynx with
the tube passed over it
• the application of pressure externally over the larynx to bring it
into view
• a “helping finger” from an assistant to pull the cheek out to allow
better vision in the mouth.
The timely use of a gum elastic bougie can make endotracheal
intubation easier and less traumatic. Occasionally, the tracheal tube
impinges on the posterior rim of the larynx and will not pass
smoothly over the bougie into the larynx. Rotating the tube 90°
anticlockwise prevents this obstruction and facilitates intubation
when using a bougie. The general principle of “a big cannula over
a small guidewire” is widely used in medicine. A size 8·0 mm
endotracheal tube is used for adult females and 9·0 mm for adult
males. This size refers to the internal diameter of the tube. Tubes are
normally cut to a length of 21–23 cm.
Tracheostomy
Tracheostomy is used for airway control in the following
circumstances:
• to bypass upper respiratory tract obstruction
• for long term ventilation
• to facilitate suction of chest secretions
• for prevention of aspiration of gastric contents (for example, in
bulbar palsy).
Control of the airway
11
Glottic opening
Cuneiform cartilage
Corniculate cartilage
Vocal cord
Aryepiglottic fold
Vestibular fold
Vallecula
Epiglottic tubercle
Figure 2.3 View of the larynx obtained before intubation.
emedicina
Percutaneous cricothyroidotomy is occasionally necessary in acute,
upper airway obstruction.
Conclusion
Obstruction of the airway must be prevented at all times – a patent
airway is a happy airway. Take care of the airway, and inquests will
take care of themselves! (BJA 1925).
How to Survive in Anaesthesia
12
emedicina
13
3: Tracheal intubation
Tracheal intubation is an acquired skill. Hypoxia as a result of
unrecognised oesophageal intubation can cause death. Intubation can
be performed with the patient awake (local anaesthesia) or under
general anaesthesia. Intubation can be achieved using the techniques
shown in Box 3.1.
Laryngoscopic views
The laryngoscopic views seen on intubation are often recorded by the
anaesthetist and have been graded by Cormack and Lehane.
• Grade I full view of glottis
• Grade II only posterior commissure visible
• Grade III only tip of epiglottis visible
• Grade IV no glottic structure visible.
Displacement
Tracheal tubes can be displaced after correct insertion. This is
particularly likely when the patient is moved or the position changed.
Flexion or extension of the head, or lateral neck movement, has been
shown to cause movement of the tube of up to 5 cm within the
Box 3.1 Intubation techniques
• Above the cords
• blind intubation
• nasal
• using laryngeal mask
• larynx visualisation
• oral (± gum elastic bougie)
• laryngeal mask with fibre-optic laryngoscopy
• fibre-optic laryngoscopy
• Below the cords
• cricothyroid puncture
• retrograde intubation
• cricothyroidotomy
• transtracheal ventilation
• tracheostomy
emedicina
trachea. Tracheal tubes should be fixed securely to minimise
accidental extubation and the correct positioning should be checked
regularly.
Confirmation of tracheal intubation
Confirmation is by clinical signs and technical tests. In the operating
theatre both methods are used; however, elsewhere only clinical signs
can be used.
Clinical signs
These are listed in Box 3.2.
Direct visualisation of the tracheal tube passing through the vocal
cords is the best clinical method of confirming tracheal intubation.
This is normally achieved easily, but is not always possible in
technically difficult intubations. All anaesthetists can recount
situations where they think they have seen the tracheal tube pass
through the vocal cords but subsequently found it in the oesophagus.
Belief that the trachea is intubated can lead to a false sense of airway
security if cyanosis occurs, and often other causes are sought for the
hypoxaemia. The position of the tracheal tube must always be
checked in these circumstances.
The other listed signs are helpful, but unreliable, in confirming correct
placement of the tracheal tube.
Whilst an assistant applying cricoid pressure may “feel” the tube
passing down the trachea, the same sensation can also occur with an
oesophageal intubation. Observation of chest wall movement is no
guarantee of correct tracheal tube placement. Movement is difficult to
observe in some patients (obesity) and may also be seen in cases of
oesophageal intubation.
How to Survive in Anaesthesia
14
Box 3.2 Clinical signs used to confirm tracheal intubation
• Direct visualisation of tracheal tube through vocal cords
• Palpation of tube movement within the trachea
• Chest movements
• Breath sounds
• Reservoir bag compliance and refill
• Condensation of water vapour on clear tracheal tubes
emedicina
Auscultation can be misleading: gas movement in the oesophagus can
be transmitted to the lungs and so oesophageal sounds may be
mistaken for lung sounds. Epigastric auscultation can be undertaken,
but breath sounds again may be heard in the epigastrium, and so can
cause confusion.
There is a characteristic “feel” to the breathing circuit reservoir bag,
which is often different when the oesophagus is intubated. Reservoir
bag refilling will occur in tracheal intubation, but has been described
after stomach distension with oesophageal intubation. A “rumbling”
noise is often heard in oesophageal intubation, which is distinct from
that heard in tracheal intubation.
Condensation of water vapour is more likely to be seen with tracheal
intubation, but can be present in gas emanating from the stomach
and so is considered unreliable. If in doubt, and if at all possible, it is
worth confirming correct tracheal tube placement by viewing again
the tube passing through the larynx.
Technical tests
The commonly used tests are shown in Box 3.3.
Negative pressure tests rely on the fact that there are differences in the
rigidity of the tracheal and oesophageal walls. Following intubation,
a negative pressure is applied to the tube. Oesophageal walls are
muscular and collapse upon application of a negative pressure and
aspiration is prevented. Tracheal walls are rigid and, when a negative
pressure is applied to the tube, tracheal gas can be aspirated.
A negative pressure can be applied by using Wee’s oesophageal
detector device (Figure 3.1) which is a catheter mount attached to a
60 ml syringe.
An emptied, modified Ellick’s evacuator bulb can also be attached to
the tube and it will re-inflate if in the trachea. False-positive results
have been reported. It has been found to be impossible to aspirate a
Tracheal intubation
15
Box 3.3 Technical tests to confirm intubation
• Negative pressure tests
• End-tidal CO
2
monitoring – 6 breaths
• Fenum disposable CO
2
monitors
• Fibre-optic observations of the trachea
emedicina
tracheal tube because of endobronchial intubation, or obstruction by
the wall of the mucosa or by a mucous plug. The end-tidal CO
2
concentration can be measured using a capnograph. If pulmonary
perfusion is adequate, end-tidal CO
2
concentration is about 5%. No
CO
2
is excreted from the stomach, so any CO
2
present must be from
the lungs. Six breaths of CO
2
must be seen to confirm tracheal
intubation. This is because alveolar CO
2
may have been ventilated
into the upper gastrointestinal tract before intubation and it will
take six breaths to excrete it from the stomach. Carbonated drinks
may be present occasionally in the stomach and can cause some
confusion. Fenum CO
2
analysers of disposable plastic contain a
chemical indicator which changes colour on exposure to CO
2
. These
last several hours.
A fibre-optic laryngoscope placed through the endotracheal tube will
show if tracheal placement is correct.
Although there are many tests to confirm tracheal intubation, the
“gold standard” is six breaths of end-tidal CO
2
with visual
confirmation of laryngeal placement of the tube.
Complications of tracheal intubation
(1) Laryngoscopy
• trauma to mouth, teeth, pharynx and larynx
• increased arterial pressure
• arrhythmias
• laryngospasm
• bronchospasm
How to Survive in Anaesthesia
16
Figure 3.1 An oesophageal detector.
emedicina
(2) Immediate
• oesophageal placement
• pulmonary aspiration
• displacement of tube from trachea
• endobronchial intubation
• airway obstruction: tube kinked, mucous plug, tracheal
cuff herniation over lower end of tube
(3) Long term
• cord ulceration
• tracheal stenosis
• recurrent and superior laryngeal nerve damage.
The trainee needs to take special care to avoid the immediate
complications. Tracheal tubes can easily kink, or be placed too far into
the trachea and, either sit on the carina, or pass into the right main
bronchus. High airway pressures may be seen when a patient is
ventilated with these complications. Auscultation of the chest
bilaterally may reveal a different intensity of breath sounds in
endobronchial intubation. The tube is then pulled back and
positioned correctly. Although almost invariably the tracheal tube
passes into the right main bronchus, we have managed on rare
occasions to intubate the left main bronchus.
Conclusion
The tracheal tube must be correctly sited and secured. Confirmation
by direct observation of tracheal placement and six breaths of
end-tidal CO
2
with continuous monitoring can avoid the potentially
fatal consequences resulting from hypoxia. An anaesthetic maxim to
remember when unsure of tracheal tube placement is:
IF IN DOUBT, TAKE IT OUT!
Patients do not die from failure to intubate but from failure to
oxygenate.
Tracheal intubation
17
emedicina
18
4: Failed intubation drill
It is essential to ask for assistance before anaesthetising patients who
have been assessed as having potentially difficult airways. Failed
tracheal intubation can occur in both elective and emergency
anaesthesia. It is important to prepare a plan of management should
intubation be impossible during the induction of general anaesthesia.
We recommend that “failed intubation drills” be practised when
juniors are accompanied by senior colleagues.
Initial strategy
The strategy for each case should be similar to that shown below
(Box 4.1). Calling for senior help, preventing hypoxia and not giving
further doses of muscle relaxants when you are confronted by an
impossible intubation are key points.
The airway must be patent and oxygenation of the patient is mandatory.
Suxamethonium is the muscle relaxant with the fastest onset and is
always used for emergency surgery, in patients with full stomachs,
and in those who are at risk of regurgitation (for example, hiatus
hernia). Experienced anaesthetists often use muscle relaxants of
slower onset for elective surgical patients in whom they can be
confident of airway control. Muscle relaxants should not be given
inappropriately, for example in cases of upper airway obstruction. If a
patient is paralysed, and tracheal intubation, patency of the upper
airway, and oxygenation are impossible, then hypoxaemia and death
will occur.
Box 4.1 Initial course of action for failed intubation
(1)
Plan
a course of management before starting anaesthesia.
(2) Call for
HELP
.
(3) Maintain airway.
(4) Ventilate with 100% oxygen.
(5) Maintain cricoid pressure (if part of anaesthetic technique).
(6) Avoid persistent attempts to intubate if patient is hypoxic.
(7) Avoid fur ther doses of muscle relaxants unless you are absolutely sure
of airway control and ventilation.
emedicina
Secondary decisions
Once failed intubation has occurred, further decisions have to be
made (Box 4.2).
The safest decision is to awaken the patient, although this may be
modified by consideration of the elective or emergency nature of the
surgery. Patients are not usually pleased to be woken up without
undergoing surgery, but at least they are alive to complain! If airway
control and ventilation are easy, or the patient reverts spontaneously
to breathing in an unobstructed fashion and help is nearby, the
anaesthetic may be continued. A laryngeal mask can secure airway
patency when other methods have failed. Sometimes it is possible to
continue the anaesthetic with the patient breathing spontaneously
unintubated, but intubation may be mandatory.
Intubation can be achieved through a laryngeal mask airway, by blind
nasal intubation techniques or via a fibre-optic laryngoscope. Rarely,
retrograde intubation can be used. This technique involves
cricothyroid membrane puncture and a guide catheter being pushed
up through the larynx and out of the mouth. A tracheal tube can then
be passed over the guiding catheter (the same principle as described
in Chapter 3). Equipment for achieving airway control includes
cricothyroid puncture devices that can be connected to a breathing
circuit and transtracheal jet ventilation devices.
Formal tracheostomy may have to be considered. Abandonment of a
general anaesthetic technique and implementation of surgery under a
regional analgesia is a sensible alternative.
After failed intubation, both the patient and other anaesthetists need
to be informed of the difficulty in case of surgery at a later date.
Failed intubation drill
19
Box 4.2 Subsequent decisions for consideration after
failed intubation
(1) Awaken patient or continue anaesthetic until senior help arrives.
(2) Summon experienced help – intubate under general or local
anaesthesia: laryngeal mask (intubation through mask), fibre-optic
intubation, blind nasal intubation.
(3) Last resorts include retrograde intubation, transtracheal jet ventilation,
cricothyroidotomy.
(4) Make elective tracheostomy.
(5) Perform surgery under regional anaesthesia.
emedicina
(1) Note grade of intubation.
(2) Mark patient’s notes boldly.
(3) Inform patient verbally and by letter.
The patient’s folder containing the clinical records should be marked
stating the anaesthetic problem.
Conclusion
Failed intubation should be prepared for and the priority initially
should be on airway control and ventilation of the lungs. It is usually
safer to awaken a patient and then consider the alternatives after
consultation with a more experienced colleague.
A “failed intubation drill” should be committed to memory very early
in the training programme and be practised at regular intervals.
Sooner or later it will be needed.
Remember, the objective after failed intubation is oxygenation,
oxygenation, followed by OXYGENATION.
How to Survive in Anaesthesia
20
emedicina
21
5: Vascular access
Vascular access may be divided into venous (peripheral, central) and
arterial. The novice anaesthetist will rapidly gain expertise in
peripheral venous cannulation. We also think it important to become
proficient in central venous cannulation and insertion of arterial
cannulae, within the first few months of training. We have not
included practical descriptions on how to undertake these procedures;
these skills are best learnt by careful instruction from a senior
anaesthetist.
Peripheral venous access
No general or regional anaesthetic procedure should start without
intravenous access. A large bore cannula (14 or 16 gauge) or
occasionally a small cannula (21 or 23 gauge) may be used, depending
on the type of surgery. Flows through peripherally placed cannulae
can be surprisingly high (Table 5.1).
For any surgical procedure in which rapid blood loss may occur,
nothing smaller than a 16 gauge cannula should be used. For major
surgery at least one 14 gauge cannula is essential. The major
determinant of the flow rate achieved through a cannula is the
fourth power of the internal radius. All large bore intravenous
cannulae, that are inserted before induction of anaesthesia, should
be placed after the intradermal infiltration of lignocaine using a
Table 5.1 Flow rates through typical venous cannulae
Peripheral Central
Gauge Flow Gauge Flow
(ml/min) (ml/min)
23 16
21 21
18·5 48
16 121 16 110
14 251 14 230
emedicina
How to Survive in Anaesthesia
22
25 gauge needle. The “sting” of the local anaesthetic is trivial
compared with the pain of a large intravenous cannula pushed
through the skin – we speak from bitter personal experience. Be kind
to your patients.
Central venous access
Central venous cannulation is undertaken to provide venous access
when the peripheral route is unavailable, to measure central venous
pressure, to administer drugs, and to provide parenteral nutrition.
There are two main routes by which anaesthetists acquire central
venous access. Firstly, a long venous catheter may be inserted via the
basilic vein in the antecubital fossa, which will pass, one hopes, into
the superior vena cava. The final position of the catheter needs
confirmation by x-ray films, as the catheter can pass up into the
internal jugular vein and even down the other arm. There are few
complications with this technique, although “damped” pressure
recordings are often seen with long catheters, and enthusiastic
insertion occasionally results in the measurement of right ventricular
pressures!
Secondly, a technique involving cannulation of the internal jugular
vein is used. The internal jugular vein arises as a continuation of the
sigmoid sinus as it passes through the jugular foramen. It lies within
the carotid sheath, lateral to the carotid artery and the vagus nerve,
and runs beneath the sternal and clavicular heads of the
sternomastoid muscle where it can be “palpated”. It finally passes
under the medial border of the clavicle to join the subclavian vein.
The right internal jugular vein is normally used as the veins are
relatively straight on the right side of the neck and the thoracic duct
is avoided. A strict aseptic technique with the patient in a head-down
position is used. This fills the veins and avoids the risk of air
embolism. A “high-neck” approach lessens the complications and the
cannula can be inserted after ballotting the vein, or lateral to the
carotid arterial pulsation. Some anaesthetists find it difficult to
palpate the internal jugular vein, but it is often felt as the boggiest
part of the neck lateral to the carotid artery. If the patient is
hypovolaemic it can be impossible to ballotte the vein.
Although internal jugular vein cannulation is relatively safe in skilful
hands, problems can occur (Box 5.1).
emedicina
Haematomas are the most common, and we have been impressed by
the lack of problems following inadvertent carotid artery puncture.
Pneumothorax should not occur with the “high-neck” approach. If
you have more than 4 cm of the cannula inserted and still have not
found the vein, stop and try a different site.
Central venous pressure is measured from the midaxillary line via a
pressure transducer or a water manometer. There is no normal central
venous pressure. It is the response to an intravenous fluid load that
determines whether the patient is hypovolaemic or not. The causes of
variants in central venous pressure are shown in Box 5.2.
Arterial access
This is commonly performed via the radial artery with a 20 or 22
gauge cannula. An Allen’s test may be done to assess the relative
contributions of the radial and ulnar arteries to blood flow of the
Vascular access
23
Box 5.1 Complications of internal jugular vein catheterisation
• Immediate
• venous haematoma
• carotid ar tery puncture haematoma
• pneumothorax
• haemothorax
• nerve trauma (brachial plexus, vagus, phrenic)
• air embolism
• Delayed
• infection
Box 5.2 Variants in central venous pressure
• Low pressure
• hypovolaemia
• respirator y phase variation
• High pressure
• hypervolaemia
• right ventricular dysfunction
• increased right ventricular afterload
• pulmonary hypertension
• parenchymal pulmonary disease
• pneumothorax
• haemothorax
• left heart failure
• atrial arrhythmias
• tricuspid valve disease
emedicina
hand. This is done by occluding both the radial and ulnar arteries and
then watching for “palmar flushing” when the ulnar artery is released.
If flushing occurs, then it implies that, in the event of radial artery
trauma or occlusion, the ulnar artery will supply the hand. In practice
we never bother with Allen’s test as its value is not proven.
Complications of arterial cannulation include thrombosis, infection,
fistula, aneurysm, and distal ischaemia. These are rare but, in the
event of clinical ischaemia, the cannula should be removed and
expert help sought urgently. Colour coding of arterial cannulae and
their dedicated infusion tubing with red tags and red three-way taps
should be undertaken if possible. This reduces the risk of inadvertent
injection of drugs into arteries. We have seen the results of such
accidents – gangrenous fingers are most unpleasant.
Conclusion
Intravenous access is mandatory before starting any form of
anaesthesia, local or general. If there is any possibility of rapid blood
loss, insert a large bore intravenous cannula. Lack of vascular access is
a major contributor to anaesthetic disasters.
How to Survive in Anaesthesia
24
emedicina
25
6: Intravenous fluids
Intravenous fluids and electrolytes are administered, often empirically,
to replace or maintain the body’s own requirements. Patients are
starved pre-operatively to ensure an empty stomach. There is much
debate about how long a patient should be without fluids or food
before elective surgery: 4–6 hours is often taken as the minimum
requirement for food and 2–4 hours for clear fluids, but many patients
starve overnight for at least 12 hours before anaesthesia.
Once you have inserted an intravenous cannula, it is necessary to give
an appropriate fluid. The main choice is between crystalloid or colloid
solutions. There are also glucose-containing solutions but it is difficult
to make a case for continued use of such solutions. There is
considerable debate about the relative merits of crystalloid or colloid
solutions. In practice most anaesthetists start with 1–2 litres
crystalloid and follow this with a similar volume of colloid solution in
major surgery. Fluids are given intraoperatively to:
• replace existing deficits
• maintain fluid balance
• replace surgical loss.
The existing fluid deficit can be high, particularly in bowel surgery
where enemas are used and with prolonged starvation in a warm
environment; 1 litre of crystalloid given intravenously at the start of
anaesthesia often only replaces an existing deficit. The rate of fluid
administration is determined by assessing the adequacy of the
circulating blood volume using the following indices:
• arterial pressure
• heart rate
• central venous pressure (if available)
• urine output
• peripheral temperature (if available).
Crystalloids
Crystalloids are isotonic solutions that have a similar fluid and
electrolyte composition to the extracellular fluid. These solutions are
emedicina