Beginning ASP.NET 1.1 with Visual C# .NET 2003 phần 2 potx
Bạn đang xem bản rút gọn của tài liệu. Xem và tải ngay bản đầy đủ của tài liệu tại đây (1.25 MB, 90 trang )
HTTP is known as a stateless protocol. This is because it doesn't know whether the request that has been
made is part of an ongoing correspondence or just a single message (just the same way your postman
won't know whether a letter is the first from your friend or the fifteenth). HTTP is stateless because it
was only intended for the simple task of retrieving pages for display.
The Internet would be very slow and might even collapse if permanent connections (states) needed to be
maintained between clients and servers, as people moved from one page to another. Statelessness makes
the Internet faster, but the downside is that HTTP by itself can't distinguish between different users. A
Web server based on pure HTML will treat all requests with the same status, that of an unknown user.
Obviously, the modern needs of the Internet require that you can identify users and track their moves
through the various pages needed for accomplishing a task on a Web site. As seen later in the book,
ASP.NET creates a state that can be used by programmers.
Where ASP.NET Fits in with the .NET Framework
ASP.NET adds a step to the request-response mechanism; after the server receives the request, it reads
the page from the hard drive. But rather then containing just text and HTML tags, an ASP.NET page also
contains script that is interpreted to build features into the page.
Figure 3-2
The process is illustrated in Figure 3-2 and can be explained as follows:
1. The client requests a Web page by typing an URL into the browser and clicking GO.
2. Web server locates on its hard drive the page that was requested.
63
Server Controls and Variables
3. If the name of the Web page has an .aspx extension, the server processes the page – it runs the
script code. If the ASP.NET code hasn't been compiled before, it is compiled now. The code is
executed to create a pure HTML stream.
4. The HTML stream is returned to the client.
5. The client browser interprets (converts) the HTML code and text into a displayed Web page.
The addition of ASP.NET implies that the HTML is created dynamically. This has many advantages: you
can return information to the user based on their responses in a form, customize Web pages for a
particular browser; or even personalize information for each user. All of this is possible because the code
you write is converted into an HTML page when it is requested.
Now that you have a basic understanding of how ASP.NET pages compare to plain HTML pages, it's
time to start studying forms. Mastery of the concepts of forms allows us to obtain information from
users. The subsequent chapters will discuss manipulation of this information and saving it to databases.
The <form> Tag in ASP.NET
ASP.NET has a set of form controls that are similar to HTML form controls. The main difference is that
ASP.NET controls are actually constructed dynamically on the server at the time of request, and then
sent out. The ASP.NET version requires only a few characters of coding:
<form ID="MyForm" runat="server">
ASP.NET form
</form>
It takes only one attribute (runat="server") to tell the Web server that it should process the form itself,
rather than just sending it out to the browser. If you have worked with HTML forms you may wonder
about which
METHOD is used. All ASP.NET forms are sent by the POST method.
The
<form> tag allows you to process form controls (such as checkboxes and dropdown lists) on the
server. ASP.NET introduces its own customized versions of these controls.
There are several advantages to using the ASP.NET form controls:
❑ .NET automatically creates and handles a sense of state for us. This allows us to know if the
person requesting the form is the same person that requested another page.
❑ ASP.NET offers some very sophisticated controls including calendars and grids for the display
of data.
❑ The content of the controls can be generated from databases or business logic.
❑ The information entered by users into controls can be validated to avoid data entry mistakes.
Using ASP.NET Server Controls
This section demonstrates how some of the ASP.NET server controls work and compares the way in
which they are used to the way in which information is passed in their equivalent HTML form control. It
64
Chapter 3
also shows the separation of the presentation code (HTML) from the code that provides the content
(ASP.NET).
All Web controls have two required attributes. The first is
runat="server", which instructs ASP.NET to
handle the control at the server and thus, implement all of the ASP.NET features for the control
including the creation of state. The second is the
id="MyControlName", which manipulates the control
in code.
Before going into the details, let's take a look at the most commonly used ASP.NET server controls.
We've included a comparison to the HTML form tags that you have used in the past.
<asp:Label>
Let's start with a small but very useful control, the <asp:Label> control. This control provides an
effective way of displaying text on your Web page in ASP.NET, similar to the HTML
<span> tag. By
having a control for text, you can manipulate its contents and visibility from your ASP.NET code.
<asp:Label> Attributes
The <asp:Label> control is just like any normal HTML form control, in that, it has a collection of
attributes you can set; the
runat="server" and id attributes are used in every ASP.NET control. Other
attributes are optional including:
ASP.NET Web Control Similar HTML Form Tag Purpose
<asp:Label> <Span>, <Div>, simple text Display text
<asp:ListBox> <Select> Offer the user a list of items
from which to select.
<asp:DropDownList> <Select> Offer the user a list of items
from which to select in a
compact format
<asp:TextBox> <Input Type="Text"> Accept typed input from user
<asp:RadioButton> and
<asp:RadioButtonList>
<Input Type="Radio"> Allow user to make one
selection from a list of options.
<asp:CheckBox> and
<asp:CheckBoxList>
<Input Type="CheckBox"> Allow user to turn a feature on
or off
<asp:Button> <Input Type="submit"> Send the user's input to the
server
ASP.NET server controls are also called Web Controls, a term that we'll be regularly
using throughout this book.
65
Server Controls and Variables
❑ Text: Sets the text that you want the label to display
❑
Visible: Sets the visibility of the label on the page (true or false)
❑
BackColor: Sets the background color of the label
❑
ForeColor: Sets the foreground color of the label
❑
Height: Sets the height in pixels of the label
❑
Width: Sets the width of the label
You can use the class browser mentioned in Chapter 2 to see all the properties of any control.
<asp:Label> Examples
The basic syntax of <asp:Label> is simple:
<asp:Label id="lblMyLabel" runat="server">Sale Ends May 2nd</asp:Label>
The <asp:> prefix indicates that this control is part of the set of built-in ASP.NET controls. It is possible
to create custom controls that have prefixes of the developer's choice. We will look at this in Chapter 13.
In the context of a Web page, the
<asp:Label> control looks like the following (refer to the file
Ch03
\Demo-Label01.aspx in the code download):
<html>
<head>
<title>ASP.NET Controls Demo</title>
</head>
<body>
Demo of the asp:Label control<br />
<form id="frmDemo" runat="server">
<asp:Label id="lblGreeting1" runat="server">Text of asp:Label</asp:Label>
</form>
</body>
</html>
The id attribute is used to uniquely identify this control so that you can refer to it in your ASP.NET
code. The
runat="server" attribute tells the server to process the control and generate HTML code to
be sent to the client. The text between the opening and closing labels provides the characters to show up
in the label.
Alternatively, you can specify the text in an attribute. This way, everything can be contained within the
opening tag, in which case, you need to close the tag in the following way:
<asp:Label id="lblGreeting3" runat="server" text="Internal Greeting" />
Here, the closing tag is omitted, and instead a closing / is supplied within the tag itself to indicate that
the tag is closed. Throughout the book we will use this latter notation in preference to having a closing
tag. Let's look at an example to set the color of a text message to red as follows (download file
Ch03\Demo-Label02.aspx):
66
Chapter 3
<asp:Label id="lblGreeting2" forecolor="red" text="Red Text" runat="server"
/>
Let's now look at an example of how you can use the <asp:Label> control to display some text for a
tourism company. In this example, it's assumed that the values of the user's name and desired
destination have already been passed to the server, and that all you need to do is display a message that
confirms that you have received the user's details.
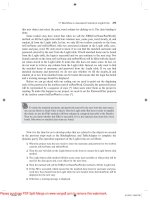
Try It Out Using the <asp:Label> Control
1.
Open ASP.NET Web Matrix and create a new folder named Ch03 within C:\BegASPNET11.
Within that folder, create a new item of the type ASP.NET page named TIO-Label.aspx. Enter
code as needed to create the following page. Some lines are pre-typed for you by Web ASP.NET
Web Matrix. (You can learn basic techniques for working with ASP.NET Web Matrix in
Appendix B.)
<html>
<head>
<title>Label Control page</title>
</head>
<body>
<h1>Feiertag Holidays
</h1>
<form runat="server">
<asp:Label id="Message1" runat="server" text="Chris"></asp:Label>,
you have selected to receive information about
<asp:Label id="Message2" runat="server" text="Oslo"></asp:Label>.
The information package will be sent to you.
</form>
</body>
</html>
2. View it from your browser, the page should be displayed as shown in Figure 3-3:
Figure 3-3
How It Works
The text of your <asp:Label> that appears on the page is the same as that obtained as a result of typing
it in a standard HTML
<span> tag. More interestingly, take a look at the source code by selecting View |
67
Server Controls and Variables
Source from your browser and notice two things. First, the ASP.DLL has processed your <asp:Label>
controls into <span> tags. Second, ASP.NET has added an extra tag of name="_VIEWSTATE" to your
form with its value set to a long string of characters. The
VIEWSTATE tag will be discussed shortly.
Modifying ASP.NET Controls
Although this exercise works, it still does not give us the ability to modify the text in code. Recall from
Chapter 2 where you used code in a
Page_Load() event that affected controls. You can do the same here
(you might want to save this file as
TIO-Label2.aspx). First delete the Text attribute (shown in bold in
the following code listing) at the end of both
<asp:Label> controls:
<asp:Label id="Message1" runat="server" text="Chris"></asp:Label>
, you have selected to receive information about
<asp:Label id="Message2" runat="server" text="Oslo"></asp:Label>
. The information package will be sent to you.
Now add the following ASP.NET script block before your HTML code:
<script runat="server" Language="C#">
void Page_Load()
{
Message1.Text = "Vervain";
Message2.Text = "Madrid";
}
</script>
If you run the example again, you'll see that the output has changed to that shown in Figure 3-4:
Figure 3-4
The
Page_Load() section is executed whenever the page is requested or refreshed; we will discuss this
in more detail in Chapter 6. Let's ignore this statement for now, it's the code it contains that's important.
The following line refers to the text contained by your first
<asp:Label> control. Here we're changing
the
Text attribute of Message1 to Vervain.
Message1.Text = "Vervain"
68
Chapter 3
This example allowed you to change the contents of an <asp:Label> control by modifying code. Future
chapters will discuss how to modify the values in more sophisticated ways, including changing the text
to be values read from a database. All of the ASP.NET control attributes (properties) can be changed in
the code in the same way. For example:
Message1.Text = "Vervain"
Message1.backcolor = Drawing.color.red
Message1.font.italic=true
Message1.font.size = FontUnit.large
<asp:DropDownList>
Before moving onto the <asp:DropDownList> control, let's pause to look at its HTML form control
equivalent. Dropdown listboxes are a series of
<option> tags within a pair of <select> tags as shown:
<select name="lstCities">
<option>Madrid</option>
<option>Oslo</option>
<option>Lisbon</option>
</select>
The <asp:DropDownList> control will produce the same output when coded in the following way:
<asp:DropDownList id="lstCities" runat="server">
<asp:ListItem>Madrid</asp:ListItem >
<asp:ListItem >Oslo</asp:ListItem >
<asp:ListItem >Lisbon</asp:ListItem >
</asp:DropDownList >
The three important differences between the ASP.NET control and the HTML form control are:
❑ The
<asp:DropDownList> tag directly replaces the <select> tag
❑ The
<asp:ListItem> tag replaces the <option> tag
❑ The
id attribute replaces the name attribute
Visually, the
<asp:DropDownList> control is identical to the HTML dropdown list control; it's what
goes on behind the scene that is different. The best way to explain this is to look at an example. Let's
create a form that asks the user to select the particular holiday destination they wish to know more
about.
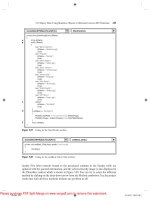
Try It Out Using the <asp:DropDownList> Control
1.
Create a new ASP.NET page called TIO-DropDownList.aspx in Web Matrix and type in the
following. As always with ASP.NET Web Matrix, some lines are pre-typed for you.
<script runat="server" Language="C#">
void Page_Load()
{
if (Page.IsPostBack)
69
Server Controls and Variables
lblMessage.Text = "You have selected " + list1.SelectedItem.Value;
}
</script>
<html>
<head>
<title>Drop Down List Example</title>
</head>
<body>
<asp:Label id="lblMessage" runat="server"/><br/>
<form runat="server">
Which city interests you?<br />
<asp:DropDownList id="list1" runat="server">
<asp:ListItem>Madrid</asp:ListItem>
<asp:ListItem>Oslo</asp:ListItem>
<asp:ListItem>Lisbon</asp:ListItem>
</asp:DropDownList>
<input type="Submit">
</form>
</body>
</html>
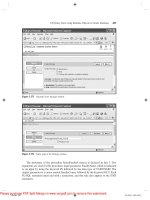
2. Run this file in your browser and the page should be displayed as shown in Figure 3-5:
Figure 3-5
3. Select Oslo and click on Submit Query.
4. Now click on View | Source. You should see something like the following; don't worry if your
version isn't exactly the same – the code is tailored to your personal browser:
<html>
<head><title>Drop Down List Example</title></head>
<body>
<span id="lblMessage">You have selected Oslo</span><br/>
<form name="_ctl0" method="post" action="TIO-DropDownList.aspx" id="_ctl0">
<input type="hidden" name="__VIEWSTATE"
value="dDwtMTMyNTU5Mzc0Njt0PDtsPGk8MT47PjtsPHQ8cDxwPGw8VGV4dDs+O2w8WW91IGhhdmU
70
Chapter 3
gc2VsZWN0ZWQgT3Nsbzs+Pjs+Ozs+Oz4+Oz4qihTIIzJYjhyzz+oJsyJ1gevEaQ==" />
Which city interests you?<br />
<select name="list1" id="list1">
<option value="Madrid">Madrid</option>
<option selected="selected" value="Oslo">Oslo</option>
<option value="Lisbon">Lisbon</option>
</select>
<input type="Submit">
</form>
</body>
</html>
How It Works
As you can see, everything that has been sent to the browser is HTML code and text; there are no
proprietary tags or script to run on the browser. Also note that this is a one-page solution, in contrast to
the old two-page approach with HTML forms. This form page submits to itself. To explain how it works,
we're going to reference the source code that we can view in our browser, and compare it to our original
ASPX code.
Let's start from the
<form> section of the script. The <form runat="server"> attribute is set that tells
ASP.NET to execute the form on the server. If you compare this line to what has been returned to the
browser, you can see a large difference:
<form name="ctrl0" method="post" action="listpage.aspx" id="ctrl0">
ASP.NET has generated four new attributes. The name and id attributes serve a similar purpose - to
uniquely identify the form. However, it's the other two that are of interest. HTML forms require a page
to receive the form data and a method of transmission. We didn't specify either of these in our ASPX
code, so ASP.NET specified them for us by default to be the same page. It also specifies the
POST method
by default.
The main item on the form is the
<asp:DropDownList> control:
Which city interests you? <br />
<asp:DropDownList id="list1" runat="server">
<asp:ListItem>Madrid</asp:ListItem>
<asp:ListItem>Oslo</asp:ListItem>
<asp:ListItem>Lisbon</asp:ListItem>
</asp:DropDownList>
It's crucial to note how this is rendered. If you view the source code that's sent back to the browser, you
should see the following:
<input type="hidden" name="__VIEWSTATE"
value="dDwtMTMyNTU5Mzc0Njt0PDtsPGk8MT47PjtsPHQ8cDxwPGw8VGV4dDs+O2w8WW91IGhhdm
Ugc2VsZWN0ZWQgT3Nsbzs+Pjs+Ozs+Oz4+Oz4qihTIIzJYjhyzz+oJsyJ1gevEaQ==" />
Which city interests you?<br />
<select name="list1" id="list1">
<option value="Madrid">Madrid</option>
71
Server Controls and Variables
<option selected="selected" value="Oslo">Oslo</option>
<option value="Lisbon">Lisbon</option>
</select>
It's the first line that is of particular note. It contains a hidden control called VIEWSTATE, which contains
an encoded representation of the overall state of the form when last submitted. This is used by ASP.NET
to keep track of all the server control settings from one page refresh to another. Without this record of the
state of the page controls, the dropdownlist would revert to its default setting every time you submitted
a value.
It may not be immediately obvious how useful this can be – consider a non-ASP.NET registration form
in which you have to enter a full set of personal details. If you forget to fill in a required field, and then
submit the form, you may well be prompted with the same empty form again. ASP.NET solves this
problem for us with the
VIEWSTATE; all that data is automatically persisted through to the refreshed
page, and you have barely raised a finger to code this functionality!
The string of characters contained in the
value attribute is a condensed and encoded depiction of each
control on the page as it was when the submit button was clicked. When this information is sent back to
IIS on a subsequent submit, it is decoded and ASP.NET can work with the values.
The second half is just a
<select> HTML form control; this is the HTML output of a <dropdownlist>.
Note that it had one of the
<option> tags altered to reflect the selection you made before submitting the
form.
How ASP.NET Code Works
We've seen that the ASP.NET server control passes form values to the ASP.NET code. Now let's see how
you can use a control's values in your code. Assume that we have a label named
lblMessage and a
dropdown list named
DropList1 (you can download this code in the file Demo-
HowAspNetCodeWorks.aspx
):
<script runat="server" language="C#">
void Page_Load()
{
if(Page.IsPostBack)
lblMessage.Text = "You have selected " + DropList1.SelectedItem.Value;
}
</script>
There are three lines of code here inside Page_Load(). The first line of code (the if(Page.IsPostBack
condition) checks whether the page has been returned by the user before. This check involves using the
Page object, which keeps a record of whether this is the first time a form is shown or it is being
displayed after a submit.
If the form has been submitted,
IsPostBack returns true, otherwise false. The code inside if() will
only be run if the form has been posted back by the user. So, if this is the first time the user has seen the
form (
Page.IsPostBack would equal false), then ASP.NET will jump over to the second line and, in
this case, end. The page would not show any text in the message control. However, if the user has
submitted the page, then the following line will be run first:
72
Chapter 3
This line lblMessage.Text = "You have selected " +
DropList1.SelectedItem.Value
This code has two parts: the right side of the equals sign picks up the option that the user clicked in the
dropdown list and the left side identifies where to put that text, namely the
<asp:Label> control. Note
that the
SelectedItem.Value keeps a record of the items that the user selects. On both sides we refer
to the server control by its
id value.
<asp:ListBox>
The <asp:ListBox> server control resembles the dropdown list control, except that it doesn't drop
down and is capable of multiple selections. The
<asp:ListBox> has the following syntax:
<asp:ListBox id="list1" runat="server" selection mode = "multiple">
<asp:ListItem>Madrid</asp:ListItem>
<asp:ListItem>Oslo</asp:ListItem>
<asp:ListItem>Lisbon</asp:ListItem>
</asp:ListBox>
The selectionmode attribute is used to determine whether you can select multiple or only select single
items from the listbox. By default it is set to single. Let's alter our previous example to use a listbox that
allows multiple selections.
Try It Out Using the <asp:ListBox> Control
1.
Create the TIO-ListBox.aspx file in the Ch03 folder, and enter the following code:
<%@ Page Language="C#" %>
<script runat="server">
void Page_Load()
{
string msgCitiesList = "";
if (Page.IsPostBack == true)
if (list1.Items[0].Selected == true)
{
msgCitiesList = msgCitiesList + list1.Items[0].Text + "<br />";
}
if (list1.Items[1].Selected)
{
msgCitiesList = msgCitiesList + list1.Items[1].Text + "<br/>";
}
if (list1.Items[2].Selected)
{
msgCitiesList = msgCitiesList + list1.Items[2].Text + "<br />";
}
if (msgCitiesList != "")
{
Message.Text = "You have selected: <br />" + msgCitiesList;
}
else
{
Message.Text = "";
73
Server Controls and Variables
}
}
</script>
<html>
<head>
<title>ListBox Example</title>
</head>
<body>
<asp:Label id="Message" runat="server"/><br/>
Which city do you wish to look at hotels for?<br/>
<form runat="server">
<asp:ListBox id="list1" runat="server" selectionmode="multiple">
<asp:ListItem>Madrid</asp:ListItem>
<asp:ListItem>Oslo</asp:ListItem>
<asp:ListItem>Lisbon</asp:ListItem>
</asp:ListBox><br/>
<input type="Submit">
</form>
</body>
</html>
2. Run this page in your browser, use the Ctrl or Shift key to select multiple choices, and then click
on
Submit Query to see the page as depicted in Figure 3-6:
Figure 3-6
How It Works
The controls in this example have hardly changed from the previous listpage.aspx example. All
we've done is switched from
DropDownList to a ListBox and set the selectionmode attribute to
allow multiple selections:
<asp:ListBox id="list1" runat="server" selectionmode="multiple">
However, we've had to completely overhaul the ASP.NET code to accommodate the possibility of
several cities selected. We will build the list to be displayed in a variable named
msgCitiesList:
string msgCitiesList = "";
74
Chapter 3
Then for each possible city choice, we check if it was selected; if yes, we add the city name to the
msgCitiesList variable. The trick here is to understand that the choices are numbered (indexed) in the
listbox, and if they are selected, the
selected property is switched to true. Finally, we assign the value
of the variable
msgCitiesList (a string of text and HTML) to the Text attribute of the Message label so
that it can be seen on the page. This is slightly more complicated than handling the results of single
selections.
<asp:TextBox>
This control is ASP.NET's version of the HTML <textbox> and <textarea> controls. In fact, textareas
are simply textboxes that feature multiple lines, thus allowing you to input larger quantities of text. The
TextBox control also provides the functionality of an HTML form password control. To enable these
variations the
<asp:TextBox> control needs some extra attributes:
❑
textmode: Specifies whether you want the control to have one line (not set), many lines (set to
multiline), or have a single line of masked content (set to password)
❑
rows: Specifies the number of rows you want the textbox to have and will only work if
textmode is set to multiple
❑ columns: Specifies the number of columns you want the textbox to have and will only work if
textmode is set to multiple
If you wish to provide any default text that appears in the control, you can either place it between the
opening and closing tags or set it in the
text attribute of the control:
<asp:TextBox id="text1" runat="server">Default text here </asp:TextBox>
<asp:TextBox id="text1" runat="server" text="Default text here "/>
Let's look at an example that uses the TextBox control to ask for the name and address of the user, and a
password as well. Previously in HTML, this would require three different types of controls; here we
shall only use the
<asp:TextBox> control.
Try It Out Using the <asp:TextBox> Control
1.
In the Ch03 folder, create TIO-TextBox.aspx and type in the following code:
<script runat="server" language="C#">
void Page_Load()
{
if (Page.IsPostBack)
{
lblName.Text = "";
lblAddress.Text = "";
lblPassword.Text = "";
}
if (txtName.Text !="")
lblName.Text = "You have entered the following name: " + txtName.Text;
if (txtAddress.Text !="")
lblAddress.Text = "You have entered the following address: " +
txtAddress.Text;
75
Server Controls and Variables
if (txtPassword.Text !="")
lblPassword.Text = "You have entered the following password: " +
txtPassword.Text;
}
</script>
<html>
<head>
<title>Textbox Example</title>
</head>
<body>
<asp:Label id="lblName" runat="server" /><br />
<asp:Label id="lblAddress" runat="server" /><br />
<asp:Label id="lblPassword" runat="server" /><br />
<form runat="server">
Please enter your name:
<asp:TextBox id="txtName" runat="server" />
<br /><br />
Please enter your address:
<asp:TextBox id="txtAddress" runat="server" textmode="multiline" rows=5
/>
<br/><br />
Please enter your password:
<asp:TextBox id="txtPassword" runat="server" textmode="password" />
<br /><br />
<input type="Submit">
</form>
</body>
</html>
2. Open TIO-TextBox.aspx in your browser, type in some details, and then click on Submit Query
to see the results as shown in Figure 3-7:
Figure 3-7
76
Chapter 3
How It Works
Within the form, we have created three types of TextBox controls:
<asp:TextBox id="txtName" runat="server" />
<asp:TextBox id="txtAddress" runat="server" textmode="multiline" rows=5 />
<asp:TextBox id="txtPassword" runat="server" textmode="password" />
The first is identified as txtName, and requires no attributes other than id and runat. This is displayed
as a single text field. The second control,
txtAddress, is a multiline textbox, and requires the textmode
attribute to be set to multiline so that we can set the number of rows we wish this textbox to have.
Here, we have set it to
5 for the address. Lastly, we create a third control, txtPassword, in which the
textmode attribute is set to password. This, again, will display a single line text field, but any text typed
into will be masked by asterisks.
To display the results from the three controls, we have used three separate
<asp:Label> controls:
<asp:Label id="lblName" runat="server" /><br />
<asp:Label id="lblAddress" runat="server" /><br />
<asp:Label id="lblPassword" runat="server" /><br />
Each one is identified with a different id attribute so that we can refer to them individually in other lines
of our code. The job of assigning text values to these three label controls falls to the ASP.NET code
contained within
<script> tags at the top of the page.
lblName.Text = "";
lblAddress.Text = "";
lblPassword.Text = "";}
First we make sure that blank values are assigned to each of the <asp:Label> controls in the first three
lines. This is because once the page has been posted back, it will display the old messages, unless we
clear them.
Then we check if
txtName is not empty (that is if its text value is something other than "") and display
the contents in
lblName along with some hard coded text. This is repeated for the other labels.
<asp:RadioButtonList> and <asp:RadioButton>
The <asp:RadioButtonList> control works in the same way as its HTML forms equivalent or the
Windows interface. Choice of one button excludes the selection of another button within the group. Note
that the identifier for the whole group is set only once in the
id attribute of the
<asp:RadioButtonList> control:
<asp:RadioButtonList id="radSample" runat="server">
<asp:ListItem id="option1" runat="server" value="Option A" />
<asp:ListItem id="option2" runat="server" value="Option B" />
<asp:ListItem id="option3" runat="server" value="Option C" />
</asp:RadioButtonList>
You can programmatically find out the option that was selected by the user by using
radSample.SelectedItem.Value; if Option A is selected, the value returned will be "Option A".
77
Server Controls and Variables
The following example uses a group of radio buttons to find out the destination selected by a user on an
HTML form, and relays that information back to the user.
Try It Out Using the <asp:RadioButtonList> Control
1.
Create TIO-RadioButtonList.aspx within the Ch03 folder and enter the following code:
<%@ Page Language="C#" %>
<script runat="server">
void Page_Load()
{
if (Page.IsPostBack)
Message.Text = "You have selected " + radCity.SelectedItem.Value;
}
</script>
<html>
<head>
<title>Radio Button List Example</title>
</head>
<body>
<asp:Label id="Message" runat="server" />
<br /><br />
Which city interests you? <br /><br />
<form runat="server">
<asp:RadioButtonList id="radCity" runat="server">
<asp:ListItem id="optMadrid" runat="server" value="Madrid" />
<asp:ListItem id="optOslo" runat="server" value="Oslo" />
<asp:ListItem id="optLisbon" runat="server" value="Lisbon" />
</asp:RadioButtonList><br />
<input type="Submit">
</form>
</body>
</html>
2. View it in your browser as shown in Figure 3-8, select a city, and click on Submit Query:
Figure 3-8
78
Chapter 3
How It Works
The TIO-RadioButtonList.aspx page has a form with three radio buttons in a single group with the
ID
radCity. Note that we use a different ID and value for each option:
<form runat="server">
<asp:RadioButtonList id="radCity" runat="server">
<asp:ListItem id="optMadrid" runat="server" value="Madrid" />
<asp:ListItem id="optOslo" runat="server" value="Oslo" />
<asp:ListItem id="optLisbon" runat="server" value="Lisbon" />
</asp:RadioButtonList><br />
<input type="Submit">
</form>
In the Page_Load() section, we have used the three familiar lines to return information from the user to
the form. We can get the selected option by reading the
SelectedItem.Value property, which is similar
to reading the selected value in a listbox:
if (Page.IsPostBack)
Message.Text = "You have selected " + radCity.SelectedItem.Value;
If a radio button is selected, then the label named Message will have its text set to "You have selected"
followed by the user's choice returned by
SelectedItem.Value.
<asp:CheckBox> and <asp:CheckBoxList>
Checkboxes are similar to radio buttons in that they present multiple choices from a group of buttons.
However,
<asp:CheckBox> is for a single option (say, for the answer to, "Do you want to pay $5 more
for quick shipping?") whereas with the
<asp:CheckBoxList> control, a user can select more than one
option (for the answer to, "Which free catalogs can we send you: Sports, Clothing, or Shoes?"). Most of
the same principles that you followed in the
<asp:RadioButtonList> example apply to checkboxes.
The main difference is the syntax – radio buttons use
<options> whereas checkboxes use
<ListItems>.A solo <asp:CheckBox> has a single ID:
<asp:CheckBox id="chkQuickShipping" runat="server" />
An array of checkboxes can be contained inside an <asp:CheckBoxList> control. You need to set an id
attribute for the <asp:CheckBoxList> control itself, and create a <asp:ListItem> control for each
option inside the control as shown here:
<asp:CheckBoxList id="chkCatalogs" runat="server">
<asp:ListItem id="itmSports" runat="server" value="Sports" />
<asp:ListItem id="itmClothes" runat="server" value="Clothes" />
<asp:ListItem id="itmShoes" runat="server" value="Shoes" />
</asp:CheckBoxList>
The next example is a tweaked version of the previous Try-It-Out, where the user is now allowed to
select more than one holiday destination option.
79
Server Controls and Variables
Try It Out Using the <asp:CheckBox> Control
1.
Open up the TIO-RadioButtonList.aspx and save it in the Ch03 folder as
TIO-CheckBoxList.aspx and change the highlighted code as follows:
<script runat="server" language="C#">
void Page_Load()
{
string msg = "You have selected the following items:<br />";
if (chkCities.Items[0].Selected)
msg += chkCities.Items[0].Text + "<br />";
if (chkCities.Items[1].Selected)
msg += chkCities.Items[1].Text + "<br />";
if (chkCities.Items[2].Selected)
msg += chkCities.Items[2].Text + "<br />";
lblCities.Text = msg;
}
</script>
<html>
<head>
<title>Checkbox List Example</title>
</head>
<body>
<asp:Label id="lblCities" runat="server" /><br /><br />
Which city do you wish to look at hotels for?<br /><br />
<form runat="server">
<asp:CheckBoxList id="chkCities" runat="server">
<asp:ListItem id="optMadrid" runat="server" value="Madrid" />
<asp:ListItem id="optOslo" runat="server" value="Oslo" />
<asp:ListItem id="optLisbon" runat="server" value="Lisbon" />
</asp:CheckBoxList><br /><br />
<input type="Submit">
</form>
</body>
</html>
2. Open TIO-CheckBoxList.aspx in your browser and select several options as shown in Figure
3-9; click on
Submit Query:
80
Chapter 3
Figure 3-9
How It Works
Very little has changed with your page – all you've done is changed an HTML control to an
<asp:CheckBoxList> and changed its ID. Notice that within checkbox groups the choices are labeled
as
<ListItem> rather than <options>.
Our ASP.NET code is the same as that used for the
TIO ListBox example except that here it refers to a
checkbox rather than a listbox. The syntax has also been modified to join the city name onto the end of
the value in
msg. Note that we can use the syntax msg+= to get the same result as the syntax msg=msg+.
void Page_Load()
{
string msg = "You have selected the following items:<br />";
if (chkCities.Items[0].Selected)
msg += chkCities.Items[0].Text + "<br />";
if (chkCities.Items[1].Selected)
msg += chkCities.Items[1].Text + "<br />";
if (chkCities.Items[2].Selected)
msg += chkCities.Items[2].Text + "<br />";
lblCities.Text = msg;
}
With this section, we have covered a set of basic ASP.NET server controls. You have seen how to use
them to gather information from the user and then use that information in your code. In a number of
pages you have used variables; for example,
msg in the radio button and checkbox pages. You have also
used control structures such as
if ().
All ASP.NET controls start with <asp: >, contain the attribute runat="server",
and each control has an
id attribute.
81
Server Controls and Variables
Before going on to chapters with other ASP.NET features, let's pause to look more closely at how to use
variables in ASP.NET pages. Then we will take a closer look at the control structures in the logic being
used.
Storing Information in C# Variables
Variables are fundamental to programming – they let you store information in memory. Once the
information is stored, you can perform mathematical functions, calculate new dates, manipulate text,
count the length of sentences, and perform many such functions. This book discusses the techniques of
using variables in C#. The syntax would be different if you work in VB.NET or another language, but the
theory is very similar.
A variable is a space in memory that is allocated a name and given a datatype by the programmer. These
spaces in memory can be used to store pieces of information that will be used in the program. Think of
variables as you might think of boxes or repositories for information. Different datatypes require
different sizes and shapes of boxes – with different amounts of memory. Any variable is empty until you
put information into it (although the memory space is reserved while the code runs). You can then view
the information inside the variable, get the information out, or replace the information with new data.
Variables have four parts: a name, a space in memory, a datatype, and the value that they hold.
C# is a strongly typed language, which means that every variable has a datatype associated with it, such
as string, integer, or date. Typing tells C# how to deal with the data so that, for example, dates can be
seen as proper dates and not a long 'division' operation such as 5/10/2003.
Declaring Value Type Variables
Good programming practice requires that you explicitly create or declare variables before you use them.
In C#, the simplest type of variable declaration for value types is made with the datatype followed by
the name of the variable. In the following case
int implies that we want a variable of the datatype
integer. We will talk at length about the different datatypes later in this chapter.
int NumberOfStates;
This statement performs three tasks. First, the name of the variable is established, second the datatype is
noted, and third a space is allocated in the memory. Until the variable is assigned a value, it contains
nothing (bear in mind that 0 is a value, so it won't contain zero or even a blank space).You can check if a
string variable contains a value by using the following conditional check (
MyVariable == null), which
returns true if the variable is empty and false if the variable has a value.
While naming a variable, you have to remember the following rules:
❑ All variable names must begin with a letter (not a number or symbol)
❑ They may not contain an embedded period (full-stop) or a space
❑ They cannot be the same as C# reserved words (keywords) such as
if and void
82
Chapter 3
In C#, variable names are case sensitive. In the following example, the first line declares a variable as a
string type with the name strCarType; the second line assigns a string value to that variable:
string strCarType;
strCarType = "Buick";
It's also possible to declare a variable and assign a value to it on a single line:
string strCarType = "Buick";
If you have several variables of the same type, you can set them up with one line of code (see Demo-
VariableDeclare.aspx
in the code download):
string strCarType1, strCarType2, strCarType3;
strCarType1 = "Buick";
strCarType2 = "Cadillac";
strCarType3 = "Pontiac";
You can also initialize and assign values to them on one line as follows:
string strCarType1 = "Buick", strCarType2="Cadillac", strCarType3="Pontiac";
However, you can not mix datatypes in one line of initialization or filling. The following line will not
work:
string strCarType1, int strCarType2, date strCarType3;
Now let's use our knowledge of variable declaration and assignment in an example. We'll take the code
above and combine it with ASP.NET server controls.
Try It Out Using Variables
1.
Create a file called TIO-Variable1.aspx and type in the following:
<%@ Page Language="C#" debug="true"%>
<script runat="server">
void Page_Load()
{
string CapitalCityOfUK;
int NumberOfStates;
DateTime IndependenceDay;
CapitalCityOfUK = "London";
NumberOfStates = 50;
IndependenceDay = Convert.ToDateTime("7/4/1776");
lblCapital.Text = CapitalCityOfUK;
lblNumStates.Text = Convert.ToString(NumberOfStates);
lblDateIndependence.Text = Convert.ToString(IndependenceDay);
}
</script>
83
Server Controls and Variables
<html>
<head>
<title>Creating Variables Example</title>
</head>
<body>
The contents of CapitalCityOfUk is:
<asp:Label id="lblCapital" runat="server" />
<br>The contents of NumberOfStates is:
<asp:Label id="lblNumStates" runat="server" />
<br>The contents of IndependenceDay is:
<asp:Label id="lblDateIndependence" runat="server" />
</body>
</html>
2. Open TIO-Variable1.aspx in your browser as shown in Figure 3-10:
Figure 3-10
3. Add to the following line to the code, which uses a variable (NumberofDaysInJuly) that we
have not declared:
CapitalCityOfUK = "London";
NumberOfStates = 50;
IndependenceDay = Convert.ToDateTime("7/4/1776");
NumberOfDaysInJuly = 31;
4. Save this file as TIO-Variable2.aspx and run the example. What you get is an error message
as shown in Figure 3-11:
84
Chapter 3
Figure 3-11
How It Works
The first section of code declares each of the variables we wish to use in the example. Note the difference
in type to match the data we will store:
string CapitalCityOfUK;
int NumberOfStates;
DateTime IndependenceDay;
Having declared the variables, you can assign values to each. We will cover the details of the syntax
(especially for
DateTime) when we look at each datatype later in this chapter.
CapitalCityOfUK = "London";
NumberOfStates = 50;
IndependenceDay = Convert.ToDateTime("7/4/1776");
The value for a string datatype must be enclosed within double quotes while
numbers should not be enclosed at all. Dates must be typed as a string within
double quotes, and then that 'string' must be converted to the C# format used to
store dates.
85
Server Controls and Variables
In the last section, we've created three <asp:Label> controls. We then set the Text values of these labels
to the contents of our variables. Note below that only a string type can go directly into a
Text property.
Both numbers and dates must be converted using the
ToString() function of the Convert class.
lblCapital.Text = CapitalCityOfUK;
lblNumStates.Text = Convert.ToString(NumberOfStates);
lblDateIndependence.Text = Convert.ToString(IndependenceDay);
Your Web form duly displays the contents of your variables. You might be wondering what stops a
control from displaying the literal text
CapitalCityOfUK. The answer is the absence of quotation
marks. Anything inside quotation marks is interpreted as literal text. Anything not contained in quotes is
treated as a variable, numeric value, or object. You then amended your example to add another line:
NumberOfDaysInJuly = 31;
This line looks perfectly okay, but this causes an error – because you haven't declared the variable prior
to using it. Variables cannot simply appear within your script or code – they must be explicitly declared
and assigned. An error is generated because the
NumberOfDaysInJuly variable used in the script is not
declared.
You've seen how important datatypes are in your ASP.NET Web forms. Let's discuss the C# datatypes
and when you should use them.
Datatypes
C# supports about two-dozen data types. These datatypes can be roughly divided into three groups:
numeric, text, and miscellaneous datatypes.
Numeric
Numeric datatypes represent eleven of the C# datatypes. They are divided into three groups: integers,
floating-point, and decimals.
Integers
Integers are whole numbers (numbers without a decimal component). Examples of integers are 3, -12,
and 0. The various storage formats for integers vary with the size of integer that needs to be stored. You
can use these types as per your requirements to make optimal use of memory resources:
❑
int: The integer datatype is referred to as int in code; can store whole numbers up to about 2
billion (
2,147,483,648), both positive and negative.
❑
uint: Stores integers from 0 to 4 billion, but this range can consist of only positive numbers.
❑
byte: Can be used to store integers between the range 0 to 255, but negative values are not
allowed. It's a useful type because a variable can easily be stored by the computer within a
single byte – a computer's basic storage unit – and any processing or arithmetic done with them
is therefore faster.
86
Chapter 3