Practical Database Programming With Visual C#.NET- P6
Bạn đang xem bản rút gọn của tài liệu. Xem và tải ngay bản đầy đủ của tài liệu tại đây (831.61 KB, 50 trang )
5.7 Bind Data to Associated Controls in LogIn Form
273
this new object and select the pass_word column by clicking on it. The data binding is
done.
Some readers may have noted that when we call the FillByUserNamePassWord()
method, we fi ll the LogIn form with four columns; user_name, pass_word, faculty_id, and
student_id from the LogIn table. In fact, we only fi ll two textbox controls on the form,
txtUserName and txtPassWord, with two associated columns in the LogIn table, user_
name and pass_word. We only need to know if we can fi nd the matched username and
password entered by the user from the LogIn table. If both matched items can be found
from the LogIn table, the login is successful and we can continue to the next step. Two
bound controls on the form, txtUserName and txtPassWord, will be fi lled with the identi-
cal values stored in the LogIn table. It looks like this does not make sense. In fact, we
do not want to retrieve any column from the LogIn table. Instead, we only want to fi nd
the matched items of username and password from the LogIn table. If we can fi nd
matched username and password, we do not care whether we fi ll the faculty_id and
student_id or not. If no matched items can be found, this means that the login has failed
and a warning message should be displayed.
Before we can go ahead with our coding, one we need to point out the displaying
style of the password in the textbox control txtPassWord. Generally, the password letters
will be represented by a sequence of stars ( * ) when users enter them as the project is
running. To make this happen in our project, we need to set the PasswordChar property
of the textbox control txtPassWord to a star ( * ).
To check the matched username and password entered by the user from the data source,
one can use Return a Single Value to Query Data for LogIn table. But here in order to simplify
this check, we use the Fill() method to fi ll four columns in a mapped data table in the DataSet.
Then we can check whether this Fill() is successful. If it is, the matched data items have been
found. Otherwise no matched data items are found.
Now it is the time for us to develop codes that are related to the objects we created
in the previous steps such as the BindingSource and TableAdapter to complete the
dynamic query. The operation sequences of the LogIn form are as follows:
1. When the project runs, the user needs to enter the username and password to two textbox
controls, txtUserName and txtPassWord.
2. Then the user will click on the LogIn button on the form to execute the LogIn button click
method.
3. The LogIn button click method will fi rst create some local variables or objects that will be
used for the data query and a new object for the next form.
4. Then the method will call the FillByUserNamePassWord() method to fi ll the LogIn form.
5. If this Fill is successful, which means that the matched data items for username and pass-
word have been found from the LogIn table, the next window form, SelectionForm, will be
displayed for the next step.
6. Otherwise, a warning message is displayed.
c05.indd 273c05.indd 273 2/11/2010 2:58:07 PM2/11/2010 2:58:07 PM
Please purchase PDF Split-Merge on www.verypdf.com to remove this watermark.
274
Chapter 5 Data Selection Query with Visual C#.NET
As we discussed in Section 5.5.1 , these new created design tools, cSE_DEPTDataSet,
logInTableAdapter, and logInBindingSource, are not the classes but the instances of
design tools. Therefore we can directly use these instances to develop our code. Keeping
this in mind, now let ’ s begin to develop the codes for the LogIn form.
5.8 DEVELOP CODES TO QUERY DATA USING FILL() METHOD
Select the LogIn.cs from the Solution Explorer window and click on the View Designer
button to open its graphical user interface. Double click on the LogIn button to open its
Click method.
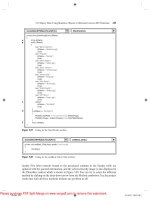
First, we need to create a local object selForm, which is an instance of the
SelectionForm class and then enter the codes shown in Figure 5.38 into this method.
Let ’ s take a closer look at this piece of code to see how it works.
A. A new namespace is created by the Visual C#, and the name of this namespace is equal
to the name of our project, SelectWizard. By using the namespace technology, it is much
easier to distinguish the different variables, methods, delegates, and events that have the
same name but are located at different spaces.
B. This line indicates that our LogIn form class is derived from the system class Form.
C. The constructor of our LogIn form class contains a built - in method, InitializeComponent().
This method is used to initialize all new created instances and variables in this form.
Starting Visual C# 2008, this method is moved to the LogIn.Designer.cs fi le.
namespace SelectWizard
{
public partial class LogInForm : Form
{
public LogInForm()
{
InitializeComponent();
}
private void cmdLogIn_Click(object sender, EventArgs e)
{
SelectionForm selForm = new SelectionForm();
logInTableAdapter.ClearBeforeFill = true;
logInTableAdapter.FillByUserNamePassWord(cSE_DEPTDataSet.LogIn, txtUserName.Text, txtPassWord.Text);
if (cSE_DEPTDataSet.LogIn.Count == 0)
{
MessageBox.Show("No matched username/password found!");
txtUserName.Clear();
txtUserName.Focus();
txtPassWord.Clear();
}
else
{
selForm.Show();
this.Hide();
}
}
A
B
C
D
E
F
G
H
I
SelectWizard.LogInForm
cmdLogIn_Click
Figure 5.38
Coding of the LogIn button Click method.
c05.indd 274c05.indd 274 2/11/2010 2:58:07 PM2/11/2010 2:58:07 PM
Please purchase PDF Split-Merge on www.verypdf.com to remove this watermark.
5.8 Develop Codes to Query Data Using Fill() Method
275
D. Our LogIn button ’ s Click method contains two arguments: The sender indicates the
current object that triggers this method, and the second argument e contains the additional
information for this event.
E. As this method is triggered and executed, fi rst we need to create an instance of our next
form window, SelectionForm.
F. Before fi lling the LogIn data table, clean up that table in the DataSet. As we mentioned
in Section 5.2.1.1 , the DataSet is a table holder and it contains multiple data tables. But
these data tables are only mappings to those real data tables in the database. All data can
be loaded into these tables in the DataSet by using the TableAdapter when the project
runs. Here a property ClearBeforeFill , which belongs to the TableAdapter, is set to True
to perform this cleaning job for that mapped LogIn data table in the DataSet.
G. Now we need to call the Fill() method we created in Section 5.6 , exactly the
FillByUserNamePassWord(), to fi ll the LogIn data table in the DataSet. Because we have
already bound two textbox controls on the LogIn form, txtUserName and txtPassWord,
with two columns in the LogIn data table in the DataSet, user_name and pass_word ,
by using the logInBindingSource, so these two fi lled columns in the LogIn data table will
also be refl ected in those two bound textbox controls, txtUserName and txtPassWord,
when this Fill() method is executed.
This Fill() method has three arguments; the fi rst one is the data table, in this case it
is the LogIn table that is held by the DataSet, CSE_DEPTDataSet. The following two
parameters are dynamic parameters that were temporarily replaced by two question marks
when we modifi ed this Fill() method in Section 5.6 . Now we can use two real parameters,
txtUserName.Text and txtPassWord.Text, to replace those two question marks to com-
plete this dynamic query.
H. If no matched username and password can be found from the LogIn table in the database,
the Fill() method cannot be executed to fi ll the LogIn table in the DataSet. This situation
can be detected by checking the Count property of the LogIn table in the DataSet. This
Count property represents the number of rows that have been successfully fi lled to the
LogIn table in the DataSet. A zero value means that no matched username and password
has been found and this fi ll has failed. A warning message is displayed if this happens and
some cleaning jobs are performed for two textboxes in the LogIn form. By checking this
property, we will know if this Fill is successful or not, or if a matched username and pass-
word has been found from the database.
I. Otherwise if a matched username and password is found from the LogIn table in the
database and the login process is successful, the next window form, SelectionForm,
will be displayed to allow users to continue to the next step. After displaying the next
form, the current form, LogIn form, should be hidden by calling the Hide() method. The
keyword this represents the current form.
The coding for the Cancel button Click method is very simple. The Application.Exit()
method should be called to terminate our project if this button is clicked by the user.
Before we can test this piece of code by running the project, make sure that the LogIn
form has been selected as the Startup form. To confi rm this, double click on the Program.
cs folder from the Solution Explorer window to open the Main() method. Make sure that
the argument of the Application.Run() method is new LogInForm(). This means that a
new instance of LogInForm class is created and displayed as this Run() method is
executed.
Another important issue is that in order to run this login process properly, make sure
to remove the LogInForm_Load() method and its content since a default Fill() method
c05.indd 275c05.indd 275 2/11/2010 2:58:08 PM2/11/2010 2:58:08 PM
Please purchase PDF Split-Merge on www.verypdf.com to remove this watermark.
276
Chapter 5 Data Selection Query with Visual C#.NET
is included in this method, and both username and password textboxes will have been
already fi lled before the LogIn button is clicked on by the user when the project runs;
this method is executed fi rst when the project runs.
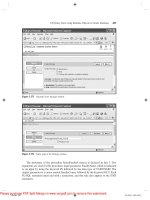
Click on the Start button to run the project, and the running LogIn form should
match the one shown in Figure 5.39 .
Enter a valid username such as “ jhenry ” to the User Name textbox and a valid pass-
word such as “ test ” to the Pass Word textbox, then click on the LogIn button. The
FillByUserNamePassWord() method will be called to fi ll the LogIn table in the data
source. Because we entered correct username and password, this fi ll will be successful
and the next form, SelectionForm, will be shown up.
Now try to enter a wrong username or password; then click on the LogIn button and
a Messagebox will be displayed, which is shown in Figure 5.40 , to ask the user to handle
this situation.
In this section, we used the LogIn form and LogIn table to show readers how to
perform a dynamic data query and fi ll a mapped data table in the DataSet by using the
Visual Studio 2008 design tools and wizards. The coding is relatively simple and easy to
follow. In the next section, we will show the readers how to use another method provided
by the TableAdapter to pick up a single value from the database.
5.9 USE RETURN A SINGLE VALUE TO QUERY
DATA FOR LOGIN FORM
Many people have experienced forgetting either their username or their password when
they try to logon to a specifi c website to get some information, to order some merchan-
dises, or pay bills for their monthly utilities or cell phones. In this section, we show users
how to retrieve a single data value from the database. This method belongs to the
TableAdapter class.
Figure 5.39
Running status of the project.
Figure 5.40
Warning message.
c05.indd 276c05.indd 276 2/11/2010 2:58:08 PM2/11/2010 2:58:08 PM
Please purchase PDF Split-Merge on www.verypdf.com to remove this watermark.
5.9 Use Return a Single Value to Query Data for LogIn Form
277
We still use the LogIn form and LogIn table as an example. Suppose you forget your
password, but you want to login to this project by using the LogIn form with your user-
name. By using this example, you can retrieve your password by using your username.
The DataSet Designer allows us to edit the structure of the DataSet. As we discussed
in Section 5.6 , by using this Designer, you can confi gure an existing query, add a new
query, and add a new column and even a new key to a database. The Add Query method
allows us to add a new data query with a SQL SELECT statement, which returns a single
value.
Open the LogIn form window from the Solution Explorer window and open the Data
Source window by clicking on the Data menu item from the menu bar. Right - click on
any place inside that window and select the Edit DataSet with Designer, then locate the
LogIn table and right - click on the last line of that table, which contains our modifi ed
method FillByUserNamePassWord() we did in the last section. Then select Add Query
to open the TableAdapter Query Confi guration Wizard.
On the opened wizard, keep the default selection Use SQL Statements, which means
that we want to build a query with SQL Statements, then click on the Next button and
choose SELECT, which returns a single value radio button. Click on Next to go to the
next window and click on the Query Builder button to build our query.
On the opened Query Builder dialog, perform the following operations to create this
single data query:
• Click on the fi rst row from the second pane to select it.
• Then right - click on this row and select Delete from the pop - up menu to delete this row.
• Go to the top pane and select the pass_word and user_name columns from the LogIn table
by checking two checkboxes related to those two columns.
• Go to the second pane and uncheck the checkbox for the user_name column from the
Output column since we do not want to use it as the output, but instead we need to use it
as a criterion to fi lter this query.
• Still in the second pane, right - click on the Group By column and select Delete from the
pop - up menu to remove this Group By choice.
• Type a question mark on the Filter fi eld in the user_name column, and press the Enter key
on your keyboard. Your fi nished Query Builder should match the one shown in Figure 5.41 .
The SQL statement
SELECT pass_word FROM LogIn WHERE (user_name = @Param1)
indicates that we want to select a password from the LogIn table based on the username,
which is a dynamic parameter, and this parameter will be entered by the user when the
project runs. Click on the OK button to go to the next window.
The next window is used to confi rm your terminal SQL statement. Click on Next to
go to the next window. This window allows you to choose a function name for this query.
Change the default name to a meaningful name such as PassWordQuery, then click on
the Next button. A successful Wizard Result will be displayed if everything is fi ne. Click
on the Finish button to complete this confi guration.
Now let ’ s do our coding for the LogIn form. For testing purposes, we need to add a
temporary button with the name = cmdPW and the Text = Password to the LogIn form.
Then select and open the LogIn form from the Solution Explorer window, double - click
c05.indd 277c05.indd 277 2/11/2010 2:58:08 PM2/11/2010 2:58:08 PM
Please purchase PDF Split-Merge on www.verypdf.com to remove this watermark.
278
Chapter 5 Data Selection Query with Visual C#.NET
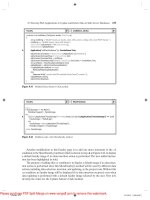
on the Password button to open its method, and enter the codes shown in Figure 5.42
into this method.
Let ’ s have a little closer look at this piece of code.
A. A local string variable passWord is created, and it is used to hold the returned queried
single value of the pass_word.
B. The query method we just built in this section, PassWordQuery(), with a dynamic param-
eter username that is entered by the user is called to retrieve back the matched
pass_word.
C. If this query found a valid password from the LogIn table based on the username entered
by the user, that password will be returned and displayed in a MessageBox.
D. If this query cannot fi nd any matched pass_word, a blank string will be returned and
assigned to the variable passWord. A Messagebox with a warning message will be dis-
played if this situation happens.
Figure 5.41
Finished Query Builder.
private void cmdPW_Click(object sender, EventArgs e)
{
string passWord;
logInTableAdapter.ClearBeforeFill = true;
passWord = logInTableAdapter.PassWordQuery(txtUserName.Text);
if (passWord != String.Empty)
MessageBox.Show("The Password is: " + passWord);
else
MessageBox.Show("No matched password found!");
}
A
B
C
D
kcilC_WPdmCmroFnIgoL.draziWtceleS
Figure 5.42
Codes for the cmdPW button method.
c05.indd 278c05.indd 278 2/11/2010 2:58:08 PM2/11/2010 2:58:08 PM
Please purchase PDF Split-Merge on www.verypdf.com to remove this watermark.
5.9 Use Return a Single Value to Query Data for LogIn Form
279
Now let ’ s run the project to test this query. Click on the Start button to run the
project, and your running project should match the one shown in Figure 5.43 .
Enter a username such as “ ybai ” to the User Name box and click on the PassWord
button. The returned password is displayed in a message box, which is shown in Figure
5.44 . Well, it looks like a fun! Does it not?
Now you can remove the temporary PassWord button and its method from this LogIn
form if you like since we do not need it any more for this project.
Before we can move to the next section, we need to do one more thing, which is to
add an accessing method for the LogInForm to allow other methods in the project to
access the LogInForm easily when they need to perform some actions on it. For example,
to close the LogInForm from other form windows, you need to call this method to access
the LogInForm and call its Close() method.
Open the Code Window of the LogInForm and add a new method named getLog-
InForm() with the code shown in Figure 5.45 into the LogInForm class.
When this method is called, a reference, this , is returned to the calling method.
Generally, the reference this represents the current form object.
In the following sections, we will show the readers how to develop more professional
data - driven projects by using more controls and methods. We still use the SelectWizard
example project and continue with the SelectionForm.
Figure 5.43
Running status of the LogIn form.
Figure 5.44
Returned password.
public LogInForm getLogInForm()
{
return this;
}
SelectWizard.LogInForm getLogInForm()
Figure 5.45
Coding for the getLogInForm method.
c05.indd 279c05.indd 279 2/11/2010 2:58:11 PM2/11/2010 2:58:11 PM
Please purchase PDF Split-Merge on www.verypdf.com to remove this watermark.
280
Chapter 5 Data Selection Query with Visual C#.NET
5.10 CODING FOR SELECTION FORM
As we discussed in Section 5.8 , if the login process is successful, the SelectionForm
window should be displayed to allow users to continue to the next step. Figure 5.46 shows
an opened SelectionForm window.
All information in the ComboBox control is associated with a form window.
Furthermore it is associated with a group of data stored in a data table in the database.
The operation steps for this form are summarized as follows:
1. When this form is opened, three pieces of information will be displayed in a ComboBox
control to allow users to make a selection to browse the information related to that
selection.
2. When the user clicks the OK button, the selected form should be displayed to enable the
user to browse the related information.
Based on the operation step 1, the codes for displaying three pieces of information
should be located in the constructor of the SelectionForm since this constructor should
be called fi rst as an instance of the SelectiionForm is created.
Open the SelectionForm window and click on the View Code button to open its code
window. Enter the following codes, which are shown in Figure 5.47 , into the constructor
of the SelectionForm.
Let ’ s see how this piece of code works.
A. Three instances are created fi rst, and each one is associated with a Form class.
B. The Add() method of the ComboBox class is used to attach all three pieces of information
to this ComboBox. The reference this represents the current form object, an instance of
the SelectionForm class, and the property SelectedIndex is set to zero to select the fi rst
information as the default one.
According to operation step 2 above, when users click on the OK button, the related
form selected by the user should be displayed to allow users to browse information from
that form. Click the View Designer button to open the graphical user interface of the
SelectionForm object. Then double - click on the OK button to open its cmdOK_Click
method and enter following codes shown in Figure 5.48 into this method.
Let ’ s see how this piece of code works. The function for this piece of coding is
straightforward and easy to be understood, which is explained as follows:
Figure 5.46
Selection Form.
c05.indd 280c05.indd 280 2/11/2010 2:58:12 PM2/11/2010 2:58:12 PM
Please purchase PDF Split-Merge on www.verypdf.com to remove this watermark.
5.10 Coding for Selection Form
281
A. Open the FacultyForm window if the user selected Faculty Information.
B. Open the StudentForm window if the user selected Student Information.
C. Open the CourseForm window if the user selected Course Information.
D. An error message is displayed if no information is selected.
The last coding for this form is the Exit button. Open the graphical user interface of
the SelectionForm, double - click on the Exit button to open its cmdExit_Click() method.
Enter the codes into this method as shown in Figure 5.49 .
This piece of code looks a little complicated. Let ’ s see how it works.
A. First of all, we must create a new instance of the LogInForm class since we need to close
all opened form windows if they are still open before we can exit this project. The point
to be noted is that this instance is not one we created and applied in our LogInForm
window, but it is a new instance and has no relationship with the one we used before in
the LogInForm.
namespace SelectWizard
{
public partial class SelectionForm : Form
{
FacultyForm facultyForm = new FacultyForm();
CourseForm courseForm = new CourseForm();
StudentForm studentForm = new StudentForm();
public SelectionForm()
{
InitializeComponent();
this.ComboSelection.Items.Add("Faculty Information");
this.ComboSelection.Items.Add("Course Information");
this.ComboSelection.Items.Add("Student Information");
this.ComboSelection.SelectedIndex = 0;
}
}
}
A
B
SelectWizard.SelectionForm SelectionForm
Figure 5.47
Coding for the Selection Form.
private void cmdOK_Click(object sender, EventArgs e)
{
if (this.ComboSelection.Text == "Faculty Information")
facultyForm.Show();
else if (this.ComboSelection.Text == "Course Information")
courseForm.Show();
else if (this.ComboSelection.Text == "Student Information")
studentForm.Show();
else
MessageBox.Show("Invalid Selection!");
}
A
B
C
D
SelectWizard.SelectionForm CmdOK_Click()
Figure 5.48
Coding for the OK button Click method.
c05.indd 281c05.indd 281 2/11/2010 2:58:12 PM2/11/2010 2:58:12 PM
Please purchase PDF Split-Merge on www.verypdf.com to remove this watermark.
282
Chapter 5 Data Selection Query with Visual C#.NET
B. In order to access and use our original LogInForm object, we need to call the getLogIn-
Form() method we built in the LogInForm class in the last section, and assign this returned
object to our new instance. In this way, we make our new created instance of the LogInForm
have the same reference as the original instance of the LogInForm had. Now we can use
this instance to access any method attached to the original LogInForm object.
C. To close the LogInForm window, the Close() method is called.
D. Similarly, the Close() methods attached to other classes, such as FacultyForm, CourseForm,
and StudentForm, are executed to close the associated form object. The point is that you
do not need to create any new instance for each of those classes since those instances are
created in this SelectionForm as the class variables or called fi elds in Visual C# 2008.
E. Finally the system method Exit() is called to terminate the whole project.
Suppose the user selected the fi rst information — Faculty Information. A Faculty form
window will be displayed, and it is supposed to be connected to a Faculty data table in
the database. If the user selected a faculty name from the ComboBox control and clicked
the Select button on that form (refer to Figure 5.21 ), all information related to that faculty
should be displayed on that form, exactly on fi ve labels and a picturebox.
Now let ’ s fi rst see how to perform the data binding to bind controls on the Faculty
form to the associated columns in the database.
private void cmdExit_Click(object sender, EventArgs e)
{
LogInForm logForm = new LogInForm();
logForm = logForm.getLogInForm();
logForm.Close();
courseForm.Close();
facultyForm.Close();
studentForm.Close();
Application.Exit();
}
SelectWizard.SelectionForm cmdExit.Click()
A
B
C
D
E
Figure 5.49
Coding for the Exit button Click method.
One of important issues in Object - Oriented Programming is how to access an instance
of a class, which has been previously created and used by some other fi les or classes, by any
other class or object. A good solution is to set up a common reference or point inside the class
that will be instanced and used in multiple times later in the project. A retrieving or get method
is created in that class, too. By using this get method, any other class or object can access this
instance.
5.11 BIND DATA TO ASSOCIATED CONTROLS IN
FACULTY FORM
Open the Faculty form window from the Solution Explorer window and perform the
following data bindings:
c05.indd 282c05.indd 282 2/11/2010 2:58:12 PM2/11/2010 2:58:12 PM
Please purchase PDF Split-Merge on www.verypdf.com to remove this watermark.
5.11 Bind Data to Associated Controls in Faculty Form
283
1. Select the TitleLabel by clicking on it; then go to the DataBindings property, select the
Text item, and click on the drop - down arrow. Expand the following items:
• Other Data Sources
• Project Data Sources
• CSE_DEPTDataSet
• Faculty
Then select the title column from the Faculty table by clicking on it. In this way, we fi nish
the binding between the label control TitleLabel on the Faculty form and the title column
in the Faculty table. As soon as this data binding is fi nished, immediately you can fi nd that
three instances are created and displayed under the form: cSE_DEPTDataSet, facultyBind-
ingSource, and facultyTableAdapter.
2. Continue to select the next label from the Faculty Information GroupBox, which is the
Offi ceLabel, go to the DataBindings property and then select the Text item, and click on
the drop - down arrow. This time you will fi nd that a new object facuktyBindingSource is
created. As we discussed in Section 5.7 , as soon as you fi nish one data binding, a new object
of the data - binding source will be created and served for the form in which the binding
source is located. Now we need to use this data - binding source to bind our Offi ceLabel
control. Expand this binding source until you fi nd the Faculty table, then click the offi ce
column to fi nish this binding. An example of this expansion is shown in Figure 5.50 .
3. In the similar way, you can fi nish the data binding for the rest of the three label controls:
PhoneLabel, CollegeLabel, and EmailLabel. The binding relationship is PhoneLabel →
phone column, CollegeLabel → college column, and EmailLabel → email column in the
Faculty table.
Next, we need to use the DataSet Designer to build our data query with the SQL
SELECT statement involved and modify the name of the FillBy() method for the
facultyTableAdapter.
Open the Data Source window by clicking on the Data|Show Data Sources menu
item from the menu bar. Right - click on any place inside that window and select Edit
DataSet with the Designer item to open the DataSet Designer Wizard. Locate the Faculty
table, then right - click on the last line of the Faculty table, and select the Add|Query item
from the pop - up menu to open the TableAdapter Confi guration Wizard.
On the opened Wizard, click on Next to keep the default command type. Use SQL
statements and click on another Next to keep the default query type SELECT, which
returns rows for the next dialog. Then click on the Query Builder button to open the
Figure 5.50
Expansion for data binding.
c05.indd 283c05.indd 283 2/11/2010 2:58:12 PM2/11/2010 2:58:12 PM
Please purchase PDF Split-Merge on www.verypdf.com to remove this watermark.
284
Chapter 5 Data Selection Query with Visual C#.NET
Query Builder dialog. In the middle graphical pane, move your cursor to the Filter
column along the faculty_name line, then type a question mark and press the Enter key
on your keyboard. In this way, we add a WHERE clause with a dynamic parameter that
is represented by LIKE @Param1 in the SQL Server database. Note that the keyword
LIKE is similar to an equals symbol used in the assignment operator in Microsoft Access
query. In SQL Server data query, the LIKE is used instead of the equals symbol. Your
fi nished Query Builder should match the one shown in Figure 5.51 .
Click on the OK and the Next buttons to modify the name of the FillBy() method.
Attach FacultyName to the end of the FillBy, so the modifi ed name for this FillBy()
method is FillByFacultyName(). Uncheck the Return a DataTable checkbox since we do
not want to return any table. Click on the Next and then the Finish buttons to complete
this confi guration.
Now let ’ s develop the code for querying the faculty information using this Faculty
form with the Faculty data table in the database.
5.12 DEVELOP CODES TO QUERY DATA FROM
FACULTY TABLE
In this section, we divide the coding job into two parts. Querying data from the Faculty
table using the SQL Select method is discussed in part 1, and retrieving data using the
LINQ method is provided in part 2. Furthermore, we only take care of the coding for
Figure 5.51
Example of the Query Builder.
c05.indd 284c05.indd 284 2/11/2010 2:58:14 PM2/11/2010 2:58:14 PM
Please purchase PDF Split-Merge on www.verypdf.com to remove this watermark.
5.12 Develop Codes to Query Data from Faculty Table
285
the Select and the Back buttons ’ click methods, and the coding for all other buttons will
be discussed and coded in the following sections.
5.12.1 Develop Codes to Query Data Using SQL
SELECT Method
As we mentioned above, the pseudocode or the operation sequence of this data query
can be described as follows:
• After the project runs, the user has completed the login process and selected the Faculty
Information item from the Selection Form.
• The Faculty form will be displayed to allow users to select the desired faculty name from
the Faculty Name ComboBox control.
• Then the user can click on the Select button to make a query to the Faculty data table to
get all the information related to that desired faculty member.
The main coding job is performed within the Select button click method. But before
we can do that coding, we need to add all faculty names into the Faculty Name ComboBox
control. In this way, as the project runs, the user can select a desired faculty from that
box. Since these faculty names should be displayed fi rst as the project runs, we need to
do this coding in the Form_Load method.
In the opened Solution Explorer window, choose the FacultyForm.cs and click on
the View Code button to open the code window. On the opened code window, scroll
down to fi nd the FacultyForm_Load method. Enter the codes shown in Figure 5.52 into
this method.
Let ’ s see how this piece of code works.
A. First, we need to use the Add method to add all faculty names into the Faculty Name
ComboBox control.
300
private void FacultyForm_Load(object sender, EventArgs e)
{
ComboName.Items.Add("Ying Bai");
ComboName.Items.Add("Satish Bhalla");
ComboName.Items.Add("Black Anderson");
ComboName.Items.Add("Steve Johnson");
ComboName.Items.Add("Jenney King");
ComboName.Items.Add("Alice Brown");
ComboName.Items.Add("Debby Angles");
ComboName.Items.Add("Jeff Henry");
ComboName.SelectedIndex = 0;
this.cmdSelect_Click(this.cmdSelect, null);
ComboMethod.Items.Add("TableAdapter Method");
ComboMethod.Items.Add("LINQ & DataSet Method");
this.ComboMethod.SelectedIndex = 0;
}
SelectWizard.FacultyForm FacultyForm_Load
A
B
C
D
Figure 5.52
Coding for the FacultyForm_Load method.
c05.indd 285c05.indd 285 2/11/2010 2:58:16 PM2/11/2010 2:58:16 PM
Please purchase PDF Split-Merge on www.verypdf.com to remove this watermark.
286
Chapter 5 Data Selection Query with Visual C#.NET
B. Then we set the SelectedIndex value to 0, which means that the fi rst faculty name that has
an index value 0 has been selected as a default name as the project runs.
C. This instruction is very important, and the purpose of this coding is to call the Select but-
ton ’ s Click method to perform an SQL SELECT command, which is equivalent to clicking
on the Select button by the user as the project runs. The reason we add this code is: The
FillByFacultyName() method will not be called and the related faculty information cannot
be refl ected in fi ve labels in the FacultyForm window when this Select button is clicked
on the fi rst time as the FacultyForm is loaded and opened without this instruction. In other
words, in the fi rst time the FacultyForm runs, you have to run this instruction to trigger
the Select button to perform an SQL SELECT command to retrieve back the information
and display it for the default selected faculty in this form.
D. Two methods, TableAdapter and LINQ, are added into the ComboMethod Combobox
to allow users to select either one to perform the data query. Similarly, the fi rst method,
TableAdapter, is selected as the default method by setting up the SelectedIndex property
of the ComboMethod to zero.
Another point to note is that we do not need to load and fi ll the Faculty table by
using the default coding that is created and added by the system as this method is added
into this project; therefore we have already deleted that code.
Now we need to do the coding for the Select button Click method to perform the
data query using the SQL SELECT method.
Click on the View Designer button to open the Faculty graphical user interface. On
the opened Faculty form, double - click on the Select button to open this method, then
enter the codes shown in Figure 5.53 into this method.
Let ’ s see how this piece of code works.
A. First, we need to clean up the Faculty table in the DataSet before it can be fi lled by setting
the ClearBeforeFill property to True.
B. Next, we need to call a user - defi ned method FindName(), which will be developed in
Section 5.13 , to identify and display the selected faculty image in the faculty PictureBox
control.
private void cmdSelect_Click(object sender, EventArgs e)
{
this.facultyTableAdapter.ClearBeforeFill = true;
string strName = FindName(ComboName.Text);
if (strName == "No Match")
MessageBox.Show("No Matched Faculty Image Found!");
else
{
if (this.ComboMethod.Text == "LINQ & DataSet Method")
LINQtoDataSet();
else
{
this.facultyTableAdapter.FillByFacultyName(cSE_DEPTDataSet.Faculty, ComboName.Text);
if (cSE_DEPTDataSet.Faculty.Count == 0)
MessageBox.Show("No Matched Faculty Found!");
}
}
}
A
B
C
D
E
F
G
SelectWizard.FacultyForm cmdSelect_Click
Figure 5.53
Coding for the Select button Click method.
c05.indd 286c05.indd 286 2/11/2010 2:58:16 PM2/11/2010 2:58:16 PM
Please purchase PDF Split-Merge on www.verypdf.com to remove this watermark.
5.12 Develop Codes to Query Data from Faculty Table
287
C. A warning message will be displayed if no matched faculty image can be found.
D. Otherwise, the FindName() method is executed successfully, and a matched faculty image
is displayed in the faculty PhotoBox.
E. Before we can continue to perform this data query, we need to check which method has
been selected. If the LINQ method is selected, a user - defi ned method LINQtoDataSet()
that will be developed below is called to retrieve back the faculty information in LINQ
method.
F. Otherwise, the TableAdapter method is selected and the method FillByFacultyName()
we built in Section 5.11 is called to fi ll the Faculty table with a dynamic parameter, which
is selected by the user from the Faculty Name ComboBox control as the project runs.
G. By checking the Count property of the Faculty table that is in our DataSet, we will know
whether this fi ll is successful or not. If this property is equal to 0, which means that no
matched record has been found from the Faculty table in the database, and therefore no
record or data has been fi lled into the Faculty table in our DataSet, a warning message is
given for this situation to require users to handle this problem. The user can either con-
tinue to select correct faculty name or exit the project. If this property is nonzero, which
indicates that this fi ll is successful and a matched faculty name is found, the Faculty table
in our DataSet has been fi lled. All information related to the matched faculty will be
displayed in the fi ve labels and a picturebox.
The coding for the Back button Click method is very simple. The Faculty form will
be hidden when this button is clicked. A Hide() method is used for this purpose, which
is shown in Figure 5.54 .
5.12.2 Develop Codes to Query Data Using LINQ Method
The LINQ query technique is new in Visual Studio 2008. The query process can be sig-
nifi cantly integrated and improved by using this technology. We have already provided
a very detailed discussion about this technology in Chapter 4 . Refer to Chapter 4 to get
a clear picture of this issue. In this chapter, we will concentrate on the coding for this
method.
Open the Code Window of the FacultyForm if it is not opened, create a user - defi ned
method, and enter the code shown in Figure 5.55 into this method.
Let ’ s see how this piece of code works.
A. First, the default Fill() method of the facultyTableAdapter is executed to load data from
the Faculty table in the database into the Faculty table in our DataSet. This step is neces-
sary since the LINQ technique is applied with the DataSet, and the DataSet must contain
the valid data in all tables before this technique can be implemented.
private void cmdBack_Click(object sender, EventArgs e)
{
this.Hide();
}
SelectWizard.FacultyForm cmdBack_Click
Figure 5.54
Coding for the Back button.
c05.indd 287c05.indd 287 2/11/2010 2:58:16 PM2/11/2010 2:58:16 PM
Please purchase PDF Split-Merge on www.verypdf.com to remove this watermark.
288
Chapter 5 Data Selection Query with Visual C#.NET
B. A typical LINQ query structure is created and executed to retrieve back all related infor-
mation for the selected faculty member. The facultyinfo is a C# 2008 implicitly typed local
variable with a data type var. The C# 2008 will be able to automatically convert this var
to any suitable data type; in this case, it is a DataSet, when it sees it. An iteration variable
fi is used to iterate over the result of this query from the Faculty table. Then a similar SQL
SELECT statement is executed with the WHERE clause.
C. The foreach loop is utilized to pick up each column from the selected data row fRow,
which is obtained from the facultyinfo we get from the LINQ query.
D. Assign each column to the associated label to display them in the FacultyForm
window.
At this point, we have almost completed the coding for this form. Before we can test
our project, we need one more step.
5.13 DISPLAY PICTURES FOR FACULTY FORM
To store images in the database is not an easy job. In this section, to simplify this process;
we just save the faculty images in a special folder in our computer. We can load a picture
into our project to show it as our project runs.
To display the correct faculty photo from the correct location, we need to perform
the following steps to confi gure this operation:
• In order to make this project portable, which means that the project can be executed as an
integrated body without any other additional confi gurations, the best place to save these
faculty images is a folder in which your Visual C# 2008 executable fi le is stored. The exact
folder is dependent on your output fi le type. The folder should be your_project_folder\bin\
Debug if your output fi le is a debug fi le, otherwise you should save those faculty images in
the folder your_project_folder\bin\Release if your output fi le is a release fi le. In this appli-
cation, our output fi le is a debug fi le; therefore, save those faculty images into the folder
SelectWizard\bin\Debug. You do not need to specify the full path for those images ’ location
if you save images in this way when you load them as the project runs.
A
B
C
D
private void LINQtoDataSet()
{
this.facultyTableAdapter.Fill(cSE_DEPTDataSet.Faculty);
var facultyinfo = (from fi in cSE_DEPTDataSet.Faculty
where fi.Field<string>("faculty_name").Equals(ComboName.Text)
select fi);
foreach (var fRow in facultyinfo)
{
this.TitleLabel.Text = fRow.title;
this.OfficeLabel.Text = fRow.office;
this.PhoneLabel.Text = fRow.phone;
this.CollegeLabel.Text = fRow.college;
this.EmailLabel.Text = fRow.email;
}
}
SelectWizard.FacultyForm LINQtoDataSet()
Figure 5.55
Coding for the LINQ method.
c05.indd 288c05.indd 288 2/11/2010 2:58:16 PM2/11/2010 2:58:16 PM
Please purchase PDF Split-Merge on www.verypdf.com to remove this watermark.
5.13 Display Pictures for Faculty Form
289
• Go to the Images folder at the accompanying ftp site (See Chapter 1 ) to get all faculty and
student images used for this project. You can copy all of those images and paste them into
your local folder, such as SelectWizard\bin\Debug.
• In order to select the correct faculty image based on the faculty selected by the user, a func-
tion should be developed to complete this function.
• To display the image, a system method, System.Drawing.Image.FromFile(), is used.
Now let ’ s develop a method to select the matched image for the faculty selected by
the user and display it. The input parameter should be a faculty name and the output
should be a name of the matched faculty image.
Keep the FacultyForm window selected, click on the View Code button from the
Solution Explorer window to open its code window. Create a new method FindName()
by entering the code shown in Figure 5.56 into this method.
private string FindName(string fName)
{
string strName;
switch (fName)
{
case "Black Anderson":
strName = "Anderson.jpg";
break;
case "Ying Bai":
strName = "Bai.jpg";
break;
case "Satish Bhalla":
strName = "Satish.jpg";
break;
case "Steve Johnson":
strName = "Johnson.jpg";
break;
case "Jenney King":
strName = "King.jpg";
break;
case "Alice Brown":
strName = "Brown.jpg";
break;
case "Debby Angles":
strName = "Angles.jpg";
break;
case "Jeff Henry":
strName = "Henry.jpg";
break;
default:
strName = "No Match";
break;
}
if (strName != "No Match")
{
PhotoBox.SizeMode = PictureBoxSizeMode.StretchImage;
PhotoBox.Image = System.Drawing.Image.FromFile(strName);
}
return strName;
}
SelectWizard.FacultyForm FindName()
A
B
C
D
Figure 5.56
Codes for the method FindName.
c05.indd 289c05.indd 289 2/11/2010 2:58:16 PM2/11/2010 2:58:16 PM
Please purchase PDF Split-Merge on www.verypdf.com to remove this watermark.
290
Chapter 5 Data Selection Query with Visual C#.NET
In this example, we saved our faculty image fi le in the folder in which the project ’ s execut-
able fi le is stored. If you do not want to save your image fi le in this folder, you must provide the
full name for your image fi le, including the full path for the folder in which you saved your image
fi le and the image fi le name. For instance, one image fi le Bai.jpg is saved in the folder C:\
FacultyImage. You must give the full name as the returned string as C:\FacultyImage\Bai.jpg.
Let ’ s see how this piece of code works.
A. A local String variable strName is created to hold the selected image fi le name.
B. The Switch Case structure is used to choose the matched faculty image fi le. A string “ No
Match ” is returned if no matched faculty image is found.
C. If the content of the variable strName is not equal to “ No Match ” , which means that a
valid faculty image is found, then the system drawing method, FromFill(), is executed to
display that faculty image in the Faculty picturebox control.
D. Finally, the strName variable is returned to the calling function.
Now we are ready to test our project. Click the Build|Build Solution menu item to
build and link our project, and click on the Start button to run the project. Enter ybai as
the username and reback as the password on the LogIn form. Click on the LogIn button
to open the Selection Form window, select the Faculty Information item, and then click
on the OK button to open the Faculty form. Select Ying Bai from the Faculty Name
ComboBox, and click on the Select button. All information related to this faculty with a
faculty picture will be displayed, as shown in Figure 5.57 .
Remember that you must save all faculty image fi les into the folder in which your
projects executable fi le is located in order to make your project work properly. In this
application, this folder is C:\SelectWizard\SelectWizard\bin\Debug.
At this point, we complete the designing and building of our Faculty form. Next we
will take care of our Course form.
Figure 5.57
Running status of the Faculty form window.
c05.indd 290c05.indd 290 2/11/2010 2:58:16 PM2/11/2010 2:58:16 PM
Please purchase PDF Split-Merge on www.verypdf.com to remove this watermark.
5.14 Binding Data to Associated Controls in Course Form
291
5.14 BINDING DATA TO ASSOCIATED CONTROLS IN
COURSE FORM
The functions of this form are illustrated in the following steps:
1. This form allows users to fi nd the course taught by the selected faculty from the Faculty
Name ComboBox control when users click on the Select button. The courses (basically all
course_id) are displayed in the Course ListBox.
2. The detailed information for each course such as the course title, course schedule, class-
room, credits, and enrollment can be obtained by clicking the desired course_id from the
Course ListBox, and displayed in fi ve TextBox controls.
3. The Back button allows users to return to the Selection form to make other selections to
obtain desired information related to that selection.
In this section, we only take care of two buttons, the Select and the Back buttons,
and the coding for the Insert button will be discussed in the following chapters.
For step 1, in order to fi nd the courses taught by the selected faculty from the Course
table, we need fi rst to obtain the selected faculty ID associated with the selected faculty
from the Faculty Name Combobox control when users click on the Select button because
no faculty name is available from the Course table. The only available information in the
Course table is the faculty_id. So we need fi rst to create a query that returns a single
value (faculty_id) from the Faculty table, and then we will create another query in the
Course table to fi nd the courses taught by the selected faculty based on the faculty_id we
obtained from the Faculty table.
Now let ’ s do the fi rst job, to create a query to obtain the associated faculty_id from
the Faculty table based on the selected faculty from the Faculty Name Combobox in the
Course form.
Open the DataSet Designer Wizard and right - click on the last line of the Faculty
table and select Add|Query to open the TableAdapter Query Confi guration Wizard
window, keep the default selection Use SQL statements, and click on the Next button to
go to the next window. Check the radio button in front of SELECT, which returns a
single value to choose this query type, and click on the Next button to go the next dialog.
Click the Query Builder to build our query.
Perform the following operations to complete this query building:
• Click on the fi rst row from the second pane to select it.
• Then right - click on this row and select Delete from the pop - up menu to delete this row.
• Go to the top pane and select the faculty_id and faculty_name columns from the Faculty
table by checking two checkboxes related to those two columns.
• Go to the second pane and uncheck the checkbox for the faculty_name column from the
Output column since we do not want to use it as the output, but instead we need to use it
as a criterion to fi lter this query.
• Still in the second pane, right - click on the Group By column and select Delete from the
pop - up menu to remove this Group By choice.
• Type a question mark on the Filter fi eld in the faculty_name column, and press the Enter
key on your keyboard. Your fi nished Query Builder should match the one shown in Figure
5.58 .
c05.indd 291c05.indd 291 2/11/2010 2:58:19 PM2/11/2010 2:58:19 PM
Please purchase PDF Split-Merge on www.verypdf.com to remove this watermark.
292
Chapter 5 Data Selection Query with Visual C#.NET
The SQL statement shown in the text pane or the third pane is:
SELECT faculty_id FROM Faculty WHERE (faculty_name LIKE @
Param1)
Click on the OK and the Next buttons to continue to the next window. Enter the
FindFacultyIDByName into the box as our function name and then click on the Next
and the Finish buttons to complete this query building.
Now let ’ s continue to build our query to fi nd the courses taught by the selected faculty
from the Course table. Open the DataSet Designer to create our desired query and
modify the Fill() method for the CourseTableAdapter.
Open the Data Source window by clicking the Data|Show Data Sources menu item
from the menu bar. Then right - click on any place inside this window and select the Edit
DataSet with Designer item to open the DataSet Designer Wizard. Right - click on the
last line of the Course table and choose the Add Query item to open the TableAdapter
Query Confi guration Wizard. Then click the Query Builder to open the Query Builder
window, which is shown in Figure 5.59 .
Keep the default selections for the top graphical pane even we only need the course_
id column, and we will show you why we need to keep this default item later. Go to the
Filer column along the faculty_id row, and type a question mark and press the Enter key
on your keyboard. This is equivalent to setting a dynamic parameter for this SQL
SELECT statement. The completed SQL statement is displayed in the text pane and the
content of this statement is:
SELECT course_id, course, credit, classroom, schedule,
enrollment, faculty_id
FROM Course
WHERE (faculty_id = @Param1)
Figure 5.58
Finished query for the faculty_id.
c05.indd 292c05.indd 292 2/11/2010 2:58:19 PM2/11/2010 2:58:19 PM
Please purchase PDF Split-Merge on www.verypdf.com to remove this watermark.