Beginning ASP.NET 1.1 with Visual C# .NET 2003 phần 3 pot
Bạn đang xem bản rút gọn của tài liệu. Xem và tải ngay bản đầy đủ của tài liệu tại đây (1.29 MB, 90 trang )
<html>
<head>
<title>Do While Loop Example</title>
</head>
<body>
<asp:label id="message1" runat="server"/>
</body>
</html>
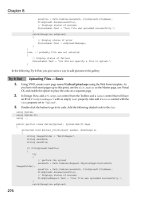
2. View this page in your browser as shown in Figure 4-10 and click the Refresh button several
times:
Figure 4-10
How It Works
We started by declaring a variable that will hold the result of the diceRoll. Then we put some text into
Message1.text. This line mainly demonstrates a line before a loop – it will only be executed once.
When you start building complex pages you will need to keep a clear idea of what is inside and outside
of the loop:
<script runat="server">
void Page_load()
{
Random r = new Random();
int diceRoll;
message1.Text = "Lets get started. <br>";
Then we run the loop. If the last dice roll was anything other than a 6, we want to roll again, so we use
the inequality operator to tell C# to keep running the loop, so long as the dice roll is not equal to six. We
do this because we want the loop to stop once we have a six. We finish with a demonstration of a line
after the loop
do
{
153
Control Structures and Procedural Programming
diceRoll = Convert.ToInt32(r.Next(6)) + 1;
message1.Text = message1.Text + "Rolled a: " + diceRoll + "<br
/>";
} while (diceRoll != 6);
}
message1.Text += "There is our six.";
</script>
When diceRoll equals six, it will stop and not execute the contents of the loop, instead jumping to the
next statement beyond the loop.
Modulo example
You came across the modulo (%) operator in the last chapter, and early on in this chapter. Recall that
modulo returns the remainder of a division. You can refer to these sections to jog your memory about
what modulo can do. Here we will apply this operator to our dice example. Open
TIO-
WhileLoop.aspx
, change the code as shown and save as Demo-Modulo.aspx. This modification will
give the user an encouragement message with every third roll:
<%@ Page Language="C#" debug="true"%>
<script runat="server">
void Page_Load()
{
// demo of modulo where every third try displays an encouraging message
Random objRandom = new Random();
int DiceRoll = 0;
byte bytRollCounter = 0;
Message1.Text = "Lets begin. We'll keep trying until we get a six.<br/>";
while (DiceRoll != 6)
{
// check if we need to show the 'keep trying' message
if(bytRollCounter%3 == 0 && !(bytRollCounter==0))
{
Message1.Text += " Keep trying! <br>";
} // End If
bytRollCounter +=1;
DiceRoll = Convert.ToInt32(objRandom.Next(6)) + 1;
Message1.Text += "Rolled a: " + DiceRoll + "<br />";
} // end Loop
Message1.Text += "Got it. Press page refresh to try again.";
} //end void Page_Load()
</script>
Use do while when actions within the loop absolutely have to occur at least
once no matter what the result of the expression. Use
while when there are actions
within the loop that should not execute if the expression is
false.
154
Chapter 4
<html>
<head>
<title>Modulo example (using a While Loop)</title>
</head>
<body>
<asp:label id="Message1" runat="server"></asp:label>
</body>
</html>
Test it with several refreshes until a try takes at least three rolls. In this code, we start by creating a
variable that will count our rolls. We can use byte data type with the assumption that we will roll a six in
less then 255 tries. Then in each loop, we increase the value in
bytRollCounter. Then we check if
bytRollCounter is evenly divisible by 5, in other words the remainder is zero. If true, we concatenate
the encouragement message as shown in Figure 4-11:
Figure 4-11
The foreach in Loop
C# has a cousin of the for statement named foreach. It works in a similar way to for, except that it's
only used for elements inside an array or a collection. It is a lot like w
hile, since we don't have to know
the number of members in the collection. We've met several collections in the last chapter:
Arrays,
ArrayLists, Hashtables, and SortedLists. For example, we could read all elements of a simple array
into a label as follows (see the download file named
Demo-forEach.aspx)
void page_Load()
{
string[] arrCities = new string[3];
arrCities[0]=("London");
arrCities[1]=("Paris");
arrCities[2]=("Munich");
foreach (string item in arrCities)
{
155
Control Structures and Procedural Programming
lblOut.Text += item + "<BR>";
} //end foreach
} //end page_Load()
It looks almost identical to the for structure. The only difference is that you don't have to specify the
number of items you want to loop through; C# will simply start with the first item in the array and then
repeat the loop until it reaches the last item.
Summary
This chapter introduced C# control structures, the tools used to determine the order of execution of lines
of code. Sometimes we use a branching control to choose only one of several alternatives of lines to
execute. At other times, we use a looping structure to consecutively repeat lines of code. We may also
use jumping structures, which are covered in the next chapter.
We started with operators. The equal sign (
=) assigns a value into a variable or object property. We can
also use
+= to make an addition to the existing value in a variable or property. We also covered the
concatenation operator,
+, which appends a string of text onto an existing string of text.
We then covered the basic math operators for addition, subtraction, etc. Always keep in mind the
precedence of execution if you have many terms: start in the parentheses, work left to right with
multiplication and division, then left to right with addition and subtraction. Then C# moves to the next
higher level of parentheses. Using parentheses often makes the calculation easier to write and maintain.
Modulo provides the remainder value from a division.
There are three commonly used logical operators.
&& means AND, which uses two complete expressions
and requires both to be true in order to return a value of true. || means
OR, which also uses two
complete expressions but only one has to be true in order to get an overall answer of true.
! means NOT
which reverses the logical value of whatever follows it (if the expression is complicated, it is best to put
it in parenthesis).
if allows us to execute just one of two sets of code. The simplest form only takes one line, but can only
execute one statement for the
true case. Adding the braces allows multiple lines to be executed in the
case of the expression being
true. If you also use else then you can execute lines in the case where the
expression resolves to
false. When you have many possible values for a variable then you can use the
switch structure rather than heavily nested if structures.
When looping you must decide on (if you know, at the time the loop starts) the number of loops you
intend to execute. If you can determine the number of loops needed to be performed, use the
for loop
structure. Be careful about the lines that go in the loop and the ones that should be before or after the
loop. If you do not know the number of iterations required, you use the
while or do loops that perform
a test at each cycle and either loop again, or stop. It never executes a loop if the expression is
false. The
d
o while looping structure always executes at least once because the test is not performed until the
end of the first loop. If you need to loop through code that affects each member of a collection
(
arraylist, hashtable, etc.) then use foreach in looping structure. C# will automatically perform
the loop once on each member of the collection.
This chapter covered branching and looping structures. The next chapter will cover jumping structures
156
Chapter 4
Exercises
1. For each of the following Boolean expressions, say for what integer values of A each of them will
evaluate to
true and when they will evaluate to false:
❑ NOT A=0
❑ A>0ORA<5
❑ NOTA>0ORA<5
❑ A>1ANDA<5ORA>7ANDA<10
❑ A<10ORA>12ANDNOTA>20
2. Suggest a loop structure that would be appropriate for each of the following scenarios and
justify your choice:
❑ Displaying a set of items from a shopping list stored in an array
❑ Displaying a calendar for the current month
❑ Looking through an array to find the location of a specific entry
❑ Drawing a chessboard using an HTML table
3. Write a page that generates ten random numbers between two integers provided by the user in
text boxes.
157
Control Structures and Procedural Programming
5
Functions
In the last chapter, we mentioned three ways to sequence the execution of C# code within your
ASP.NET page: branching, looping, and jumping. We have already discussed branching and
looping and will now discuss jumping structures. Jumping is used when we want to leave the
execution of our main code midway and jump over to execute another block of code. After
executing the block, we return to our main code.
Jumping makes it easier to create and maintain code for many reasons, and is therefore, an
important skill for programmers. This chapter will cover the following topics:
❑ Defining and using simple functions
❑ Passing parameters to functions
❑ Using the return value from a function
❑ Passing parameters by value and by reference
❑ Good practices
Overview
Jumping structures allow the programmer to halt the execution of the main code and jump to
another block of code. This block of code is called a function. ("Later, when we look at classes in
Chapter 7, we will also refer to it as a method.") After the function has run, execution returns to the
main code again. Functions will come in handy as you write more and more ASP.NET code, and
begin to find that you need to use the same code in more than one place. Then you just write a
function containing that particular code, and execute it as many times as you like.
For example, you may have written a function called
ShowOrder() that displays the goods that a
customer has ordered. For C# to display this output, you don't have to rewrite or copy all of that
code into the body of code. Instead, just have C# jump out of your current code, execute the
ShowOrder() function, and then come back and continue executing the original code.
Modularization
The process of dividing one large program into several smaller, interlocking parts is called
modularization. This term can be applied to several instances; for example, we already modularize our
page into an HTML section and a script section. Within the script section, we can further modularize our
code by creating functions as described in this chapter. Later, we will discuss moving code to its own
page (covered in Chapter 12). An additional level of modularization is to move code out into objects that
exist completely independently of the page, something that we will cover in Chapter 7. Let's take a
moment to discuss the advantages of modularization.
❑
Easier to write: Instead of trying to organize an entire project in your mind, you can focus on just
code that performs a specific job in a module. Then, you can move on to the specific job of
another module. Many studies show that this type of programming, if properly planned, results
in better code with development done sooner and cheaper.
❑
Easier to read and maintain: A programmer looking at the code for the first time can quickly
grasp the objectives of each section if sections are independent. Not only is each module clearer,
but a reader also has an easier time tracing the flow of a program from section to section.
❑
Facilitates testing and troubleshooting: You can test modules independently without worrying
about errors introduced by the rest of the code. If you know a particular module works without
error and then plug it into an untested module, you can narrow down the causes of any errors
to the untested module or to the interface between the two.
❑
Multiple programmers can work together: Each group of programmers can focus on one
objective that will be self-contained within a module. The important management issue is to
have each module clearly defined in terms of its purpose, input, and output. In more advanced
forms of modularization (particularly objects), different teams can even work in different
languages. .NET provides for a common interface for modules to interchange information.
❑
Code reuse: Many tasks (such as the display of a shopping cart's current value) must be repeated
at many points on a page or on a Web site. If you put 100 lines of code in one module and call it
ten times in your code, that's 890 lines of code you've saved.
❑
Good stepping stone: Ultimately, you will want to use the more sophisticated techniques of
code-behind and objects, but before you get there, it is a good practice to think and act modular
within your simple script tags.
Programmers must keep their designs straight especially if their code calls functions. These calls can be
several layers deep and are easy to conceptualize with a diagram such as Figure 5-1:
160
Chapter 5
Figure 5-1
Defining and Using Functions
Functions are easy to write; let's look at a simple example where we write a function in our Web page
and call it. We'll start with a basic function that doesn't exchange any information with the rest of the
page and then move on to more complex code.
Try It Out Defining and Using a Simple Function
1.
Create a new ASP.NET page called SimpleFunction.aspx and save it in your Ch05 folder.
2. Add the following code to the file in the All view:
<%@ Page Language="C#" Debug="true" %>
<script runat="server">
void Page_Load()
{
lblMessage.Text = "First Line";
InsertLinebreak();
lblMessage.Text += "Second Line";
InsertLinebreak();
lblMessage.Text += "Third Line";
InsertLinebreak();
}
void InsertLinebreak()
{
lblMessage.Text += "<br><hr>";
}
</script>
<html>
<head>
<title>Simple Function Example</title>
</head>
161
Functions
<body>
<form runat="server">
<asp:Label id="lblMessage" runat="server"></asp:Label>
</form>
</body>
</html>
3. Save the code and see the page in your browser (Figure 5-2):
Figure 5-2
How It Works
The layout of SimpleFunction.aspx is very straightforward. It is a blank page containing only a
Label control called lblMessage.
<body>
<form runat="server">
<asp:Label id="lblMessage" runat="server"></asp:Label>
</form>
</body>
In the <script> block, we define a function called InsertLinebreak() to insert a horizontal line and a
line break at the end of the text string displayed in
lblMessage.
void InsertLinebreak()
{
lblMessage.Text += "<br><hr>";
}
When the page is loaded, ASP.NET calls Page_Load() and the first line of the code is executed. When
the second line of code is executed,
Page_Load() calls (or invokes) our function InsertLinebreak().
Call is the term for one line of code running another block of code, after which execution returns to the
calling code.
void Page_Load()
{
lblMessage.Text = "First Line";
162
Chapter 5
InsertLinebreak();
lblMessage.Text += "Second Line";
InsertLinebreak();
lblMessage.Text += "Third Line";
InsertLinebreak();
}
The line of code in InsertLinebreak() is executed, and then control returns to the next line in
Page_Load(). This switching of execution continues until the end of Page_Load(), and then control is
handed back to ASP.NET.
InsertLinebreak() will be called three times every time Page_Load()
executes.
Now if we want to change the style of the line break in
SimpleFunction.aspx, we only need to change
the code in
InsertLinebreak(). If we had not used a function, we would have had to rewrite the line
creation code three times in the main code. Even in such a simple example, we can see the advantages of
using functions.
You would have noticed that
Page_Load() looks remarkably similar to InsertLinebreak() in terms
of its structure:
void InsertLineBreak()
{
}
void Page_Load()
{
}
This is because Page_Load() is, in fact, a function, although of a special type because ASP.NET already
knows about it without any help from us. Inside ASP.NET, there are several functions that can be
executed at times without a call from your code.
Page_Load(), for example, is automatically called
whenever a page is loaded from the server. These pre-defined functions are associated with events and
will be discussed in the next chapter.
Before moving on, there are a few more basics to be aware of while using functions:
❑ All function definitions have the same basic structure as
Page_Load() and
InsertLinebreak(), although they are usually a little more complicated. The following
snippet shows the general structure of a function in C#:
<accessType> <returnType> FunctionName (<parameter1, parameter2, ,
parameterX>)
{
}
You'll learn more about return types and parameters later on in this chapter. The top line of a
function's definition is called the function's signature.
163
Functions
❑ You can give functions any name you like provided it begins with a letter and only contains
letters, numbers, and underscore characters. So
InsertLinebreak(), tequila(), and
z12_y32() are fine, but _hello(), and 28DaysLater() are not. Also, try to give them sensible
and easy to remember names pertinent to the code functionality. Note also that C# is case-
sensitive. This means that calling
HELLOMUM() will execute only if the function called is
HELLOMUM(), and not HelloMum() or hellomum()!
❑ Parentheses are used both in the function definition and when we call the function. Their
presence is mandatory. If you don't use them, the page won't run.
The ( ) characters are referred to as parentheses in American English and as brackets in European
English. In American English, brackets imply [ ]. However, we will use the term parentheses in this
chapter to refer to ( ), which are the characters of interest for writing functions.
❑ If you have more than one function in a
<script>, include a line of documentation in your
code so that it is apparent what they do and how they do it. C# uses two slashes (
//) to
delineate a single line of documentation and
/* */ to denote multiple lines. For example:
// InsertLineBreak adds a line break and horizontal rule to the text
void InsertLineBreak()
{
}
/* Page_Load is a special type of function. It is associated with a
pre-defined event. In this case it writes some text to a Label control
*/
void Page_Load()
{
}
❑ You cannot nest function definitions within one another. Therefore, they go inside our script
tags at the same level as our
Page_Load() code.
Right then! On to slightly more complex functions. Our
SimpleFunction.aspx example above has a
weakness in that it is inflexible. We can't use it to insert two lines at once or reuse it to change the
contents of any other label. Also, the code will work only when we have a
Label control named
lblMessage. Our InsertLinebreak() function is of no use if we want lines added to the text of
another
Label control, say lblMessageTwo. Passing parameters can solve this problem.
Passing Parameters to Functions
You can make functions more versatile by including parameters. A parameter (also called an argument) is
a piece of data that is passed to the function. This allows the behavior of the function to be varied from
one execution to the next. The result of calling the function will depend on data sent from the code when
you make the call.
164
Chapter 5
The basic syntax is not too difficult. When creating a function that uses a parameter, we simply declare
the name of the parameter and its type inside the parentheses following the function's name. For
example, you could define a function that takes an integer parameter called
MyInteger. The value of
this parameter is then available for use within the function:
void SomeFunction(int MyInteger)
{
code that uses the value held in MyInteger
}
When you call a function that expects an argument, place the value of the argument in the parentheses
after its name. For example, you could pass the integer 1050 to a function, say,
SomeFunction() as
follows:
SomeFunction(1050);
1050 will be stored in the block variable named MyInteger. Functions can receive more than one
argument as long as a comma separates each parameter – a combination of both name and datatype. In
the following example, the code at the bottom calls
MyFunction() and passes two values – the first, a
string (in quotes) and the second, a number:
void MyFunction(string MyParameter1, int MyParameter2)
{
code that uses the values held in MyParameter1 and myParameter2
}
MyFunction("myText", myNumber);
As you can see, variables or strings can both be used as parameters for functions – in fact, you can use
anything that can be evaluated to a value – mathematical or logical expressions, numbers, or an object's
property (like the
Text property of a TextBox Web control).
Let's try this out with an example. We're going to expand on our previous example here by giving
InsertLinebreak() two parameters to work with. These will determine the number and width of
horizontal rules to generate between lines.
Try It Out Functions with Parameters
1.
Create a new ASP.NET page called FuncWithParameters.aspx and save it in your Ch05
folder.
2. Add the following code to your page in the All view:
<%@ Page Language="C#" Debug="true" %>
<script runat="server">
void Page_Load()
{
if (IsPostBack)
{
lblMessage.Text = "First Line";
InsertLinebreak(Convert.ToInt32(NumberOptions.SelectedItem.Value),
165
Functions
Convert.ToInt32(WidthOptions.SelectedItem.Value));
lblMessage.Text += "Second Line";
InsertLinebreak(Convert.ToInt32(NumberOptions.SelectedItem.Value),
Convert.ToInt32(WidthOptions.SelectedItem.Value));
}
}
void InsertLinebreak(int NumLines, int Width)
{
for (int i=1; i<=NumLines; i++)
{
lblMessage.Text += "<br><hr width='" + Width.ToString() +
"' align='left'>";
}
}
</script>
<html>
<head>
<title>Using Functions with Parameters</title>
</head>
<body>
Choose the number and width of the linebreaks and then press submit
<form runat="server">
<asp:RadioButtonList id="WidthOptions" runat="server">
<asp:ListItem value="100">100 pixels wide</asp:ListItem>
<asp:ListItem value="300">300 pixels wide</asp:ListItem>
<asp:ListItem value="600">600 pixels wide</asp:ListItem>
</asp:RadioButtonList>
<asp:DropDownList id="NumberOptions" runat="server">
<asp:ListItem value="1">1 Line</asp:ListItem>
<asp:ListItem value="2">2 Lines</asp:ListItem>
<asp:ListItem value="3">3 Lines</asp:ListItem>
</asp:DropDownList>
<asp:Button id="Button1" runat="server" text="Submit"></asp:Button>
<br />
<br />
<asp:Label id="lblMessage" runat="server"></asp:Label>
</form>
</body>
</html>
3. Save the code and open the page in your browser. It should appear as in Figure 5-3:
166
Chapter 5
Figure 5-3
How It Works
This example builds on the SimpleFunction.aspx page you saw in the previous Try-It-Out section. It
has the same
Label control, lblMessage, but more sophisticated input controls have been added to get
the user's preference for how to format the horizontal rules. (Later these will be passed to the function
that creates the rules.) The radio button group offers a choice of widths and the drop down list provides
a choice of the number of lines to produce:
<form runat="server">
<asp:RadioButtonList id="WidthOptions" runat="server">
<asp:ListItem value="100">100 pixels wide</asp:ListItem>
<asp:ListItem value="300">300 pixels wide</asp:ListItem>
<asp:ListItem value="600">600 pixels wide</asp:ListItem>
</asp:RadioButtonList>
<asp:DropDownList id="NumberOptions" runat="server">
<asp:ListItem value="1">1 Line</asp:ListItem>
<asp:ListItem value="2">2 Lines</asp:ListItem>
<asp:ListItem value="3">3 Lines</asp:ListItem>
</asp:DropDownList>
There's also a button that needs to be clicked to indicate that the choices have been made:
<asp:Button id="Button1" runat="server" text="Submit"></asp:Button>
<br />
<br />
<asp:Label id="lblMessage" runat="server"></asp:Label>
</form>
167
Functions
Now let's take a look at the function in the page. Note that it is within the <script> tags but not inside
any other functions. Furthermore, it has the correct structure as noted earlier. The first line is of interest
because this is where our parameters are set up. The first parameter sets the number of lines to create
and the second sets the line widths. Both parameters are marked as integers. Within the function we do a
simple loop that appends text to the end of
lblMessage.Text.
Note how the value from the
Width parameter is first cast from an integer into text, and then appended
directly to the string so that it becomes a valid HTML attribute of the
<hr> tag:
void InsertLinebreak(int NumLines, int Width)
{
for (int i=1; i<=NumLines; i++)
{
lblMessage.Text += "<br><hr width='" + Width.ToString() +
"' align='left'>";
}
}
Now that we have input and output controls on the form and a function to do the work, we are ready to
call the function from our main code. We do this from
Page_Load() since we know that it will execute
automatically.
Page_Load() first checks if we are in postback mode, which implies that the choice of the
number and width of lines has been made. We then write
First Line into lblMessage.Text and call
InsertLinebreak() to add our lines, remembering to pass the two parameters that it requires.
The first parameter for the number of lines to display is the value of the item selected in the drop down list.
The second parameter for the width of the lines is the value of the selection in the Radio button group. Note
that both values are initially strings and must be converted to integers before they are passed to the
function:
void Page_Load()
{
if (IsPostBack)
{
lblMessage.Text = "First Line";
InsertLinebreak(Convert.ToInt32(NumberOptions.SelectedItem.Value),
Convert.ToInt32(WidthOptions.SelectedItem.Value));
We then write Second Line into lblMessage.Text and call InsertLinebreak() again.
lblMessage.Text += "Second Line";
InsertLinebreak(Convert.ToInt32(NumberOptions.SelectedItem.Value),
Convert.ToInt32(WidthOptions.SelectedItem.Value));
}
}
This example demonstrated several points. First, we looked at the syntax of a function that uses
parameters. We also looked at a couple of Web controls (a radio button group and a dropdown list) that
can be used to get information and pass it as a parameter. Within the function, we practiced how to use
this data in code.
168
Chapter 5
Finally, we saw that the values we gave our parameters had to be of the same type as we defined in the
function's signature. In fact, when we call a function, the parameters must exactly match the definitions
specified in the function signature. This means matching the parameter types, the number of
parameters, and the order of the parameters. Thus the following call to
InsertLinebreak() is valid:
InsertLinebreak (5, 120);
However, the following calls to InsertLinebreak() are not valid:
InsertLinebreak("five", 120);
InsertLinebreak(5, 120, now!);
There is a technique known as overloading functions that can get around this problem (discussed in
Chapter 7). Likewise, the problem of not knowing how many parameters a function will be sent can be
resolved by using a parameter array in your function definition, but that is outside the scope of this
book.
For more information on function overloading and parameter arrays, take a look at Beginning Visual C#
by Karli Watson, Wrox Press, ISBN 0-7645-4382-2.
Web Controls as Parameters
It's worth noting that when you want to pass the name of a Web control object to a function as a
parameter, you need to be on your toes. Let's say you want to write a generic function that will change
the font size of a
Label control and that this function will accept one parameter, the name of the control.
At first, you might think that you need to pass a string containing the name of the
Label control to the
function. No. All the function will get is the literal text
lblMyLabel. Rather, you want the reference to be
to the
Label control object itself.
When passing a Web control reference, you must declare its type as one of the Web controls:
void MyFunction(TextBox target)
void MyFunction(Label target)
void MyFunction(Button target)
void MyFunction(CheckBox target)
Within the function, after we declare a Web control type we can refer to the Web control by the name we
gave it within parentheses. In the following case, this name would be
target:
void MakeFancy(Label target)
{
target.BackColor = Drawing.Color.Red;
target.Font.Size = FontUnit.Large;
}
Let's try this out in an example. In this example, we're going to create a simple page containing three
Label controls that already contain text. The text of any of these controls can be changed to italics
according to the state of a checkbox. The process of changing a label's style to italic should be coded once
in a function. This single function can then be used to change any of the three labels to italics:
169
Functions
Try It Out Using Web Controls as Parameters
1.
Create a new ASP.NET page called ParameterWebControl.aspx and save it in your Ch05
folder.
2. Add the following code to this page:
<%@ Page Language="C#" Debug="true" %>
<script runat="server">
void Page_Load()
{
MakeItalic(Label1, CheckBox1.Checked);
MakeItalic(Label2, CheckBox2.Checked);
MakeItalic(Label3, CheckBox3.Checked);
}
void MakeItalic(Label TargetLabel, bool ItalicYN)
{
TargetLabel.Font.Italic = ItalicYN;
}
</script>
<html>
<head>
<title>Chapter 5 : Parameter Web Controls</title>
</head>
<body>
<form runat="server">
<table>
<tbody>
<tr>
<td>
<asp:CheckBox id="CheckBox1"
runat="server"></asp:CheckBox>
</td>
<td>
<asp:CheckBox id="CheckBox2"
runat="server"></asp:CheckBox>
</td>
<td>
<asp:CheckBox id="CheckBox3"
runat="server"></asp:CheckBox>
</td>
</tr>
<tr>
<td>
<asp:Label id="Label1" runat="server"
text="apple"></asp:Label></td>
<td>
<asp:Label id="Label2" runat="server"
text="banana"></asp:Label></td>
<td>
170
Chapter 5
<asp:Label id="Label3" runat="server"
text="carrot"></asp:Label></td>
</tr>
</tbody>
</table>
<asp:Button id="Button1" runat="server"
Text="Change Font Style"></asp:Button>
</form>
</body>
</html>
3. Save the code and open the page in your browser (see Figure 5-4):
Figure 5-4
How It Works
In this example, we've used a table to align the checkboxes with their corresponding labels. The first row
consists of checkboxes:
<form runat="server">
<table>
<tbody>
<tr>
<td>
<asp:CheckBox id="CheckBox1"
runat="server"></asp:CheckBox>
</td>
<td>
<asp:CheckBox id="CheckBox2"
runat="server"></asp:CheckBox>
</td>
<td>
<asp:CheckBox id="CheckBox3"
runat="server"></asp:CheckBox>
</td>
</tr>
171
Functions
The second row contains labels displaying the names of fruits. Make a mental note of their IDs – these
are used to refer to the controls in your code:
<tr>
<td>
<asp:Label id="Label1" runat="server"
text="apple"></asp:Label></td>
<td>
<asp:Label id="Label2" runat="server"
text="banana"></asp:Label></td>
<td>
<asp:Label id="Label3" runat="server"
text="carrot"></asp:Label></td>
</tr>
</tbody>
</table>
Also notice that underneath the table is a button to notify ASP.NET that you've made your choice of
labels to change:
<asp:Button id="Button1" runat="server"
Text="Change Font Style"></asp:Button>
</form>
Our MakeItalic() function receives two parameters and can be found inside the <script> tags. The
first parameter is a reference to an ASP.NET
Label Web control; therefore it must be of the datatype
Label. The second parameter is a Boolean value that will be used to toggle the italicization of the text:
void MakeItalic(Label TargetLabel, bool ItalicYN)
Inside the function, we can refer to the label by using the name assigned to it in the function signature,
in this case,
TargetLabel. Observe that we must use the C# object model syntax to refer to the label's
properties. Therefore, we use
TargetLabel.Font.Italic to set the style of the label's text rather than
HTML attribute syntax such as
<p style="font-style: italic;">.
Lastly, notice how the second parameter has been used. The
ItalicYN property has only two settings,
true or false. Since a Boolean variable comes in as true or false, we can directly use that as the value
for a Web control property:
{
TargetLabel.Font.Italic = ItalicYN;
}
Now it is time to actually call the function. As we've seen, we need to pass two variables to
MakeItalic(). The first is the name of the Label control that it should modify. The second is a Boolean
value that conveys whether we want the italicization turned on or off. Conveniently, the
CheckBox Web
control's
Checked property contains a true if the check is on and a false if the check is off, so we do
not need to do any testing or transformation; we just need to type the
object.property reference into
the parameter and its value is passed to the function:
172
Chapter 5
void Page_Load()
{
MakeItalic(Label1, CheckBox1.Checked);
MakeItalic(Label2, CheckBox2.Checked);
MakeItalic(Label3, CheckBox3.Checked);
}
A good question arises when you study this code. In the form, instead of three independent CheckBox
controls, why not use a asp:CheckBoxList and then have the three calls made to MakeItalic() in a
loop with the counter equal to
CheckBoxList.Item()? The problem is that we want to present the
page in a table, and table tags like
<td> do not co-exist well with code to add items to a CheckBoxList.
An alternate solution would be to use a
DataGrid bound to an array. (See Chapter 8 and 9 for more on a
DataGrid.)
Return Values
So far in this chapter, we've only looked at functions that perform a job without returning a value. Now
it's time to look at those that perform a job and then send a piece of information back to the calling code.
If you'll recall, the generic structure of a function looks like this:
<accessType> <returnType> FunctionName (<parameter1, parameter2, ,
parameterX>)
{
}
So then, in order to define a function that returns a value to the calling code, you need to replace
<returnType> with the type of the value the calling code will receive. Previously, we've used void to
indicate there is no return value. We'll also now need to include the
return keyword to end the function
and send the return value back to the calling code. As an example, here is a function that adds two
integer parameters together and returns the result:
int Add(int IntegerOne, int IntegerTwo)
{
return IntegerOne + IntegerTwo;
}
Note that functions return only a single piece of data. A common error that a beginning programmer
makes is attempting to write a function that returns multiple values, which isn't possible. It is possible,
however, to return a single custom object that has multiple properties and, consequently, multiple
values. We'll look at this further in Chapter 7.
Using Return Values in Your Code
You can call a function that returns a value by typing its name followed by a pair of parentheses, just like
any other function:
MyFunction();
173
Functions
However, unless you handle the returned value, by assigning it to a variable for example, your code will
not compile and return an error:
MyVariable = MyFunction();
Another mistake, frequently seen with beginners developing functions, is that they fail to handle the
returned value. A function call cannot exist by itself on a line if it returns a value; the returned value
must go into something. The most common receivers of a function's return value are:
❑ A variable
❑ A property of an object
❑ An argument for another function
❑ An expression in a control structure
Let's look at an example of each of the four ways to use a function's return value in pseudo code, and
then we will try them out in an exercise. To cut down on space we won't present the forms below. You
can assume that we have various labels and text boxes in a form as needed by the code. In addition, the
lower portion of each example would be within
Page_Load(). Of course the functions would be outside
Page_Load() because we cannot nest one function inside another. However, all the functions would be
within the
<script> tags.
The following example demonstrates allocating the return value of a function to a variable named
WholesalePrice:
decimal WholesaleCostLookUp(int CatalogNumber)
{
code that takes a catalog number and looks up the price in the database
code that will RETURN the price
}
decimal WholesalePrice = WholesaleCostLookUp(txtCatalogNumber.Text);
In the following example, we assign the return value of a function to the value of an object's property,
namely the
Text property of lblItemName. Notice that the function expects an integer in the parameter,
but the
TextBox.Text property is a string. It must be converted to an integer prior to using it as an
argument for our custom-built function
NameLookUp():
string NameLookUp(int CatalogNumber)
{
code that takes a catalog number and looks up the item's name in the
database
code that will RETURN the name
}
lblItemName.Text = NameLookUp( Convert.ToInt32(txtCatNumber.Text) );
The following example demonstrates how the return value of a function can be used as an expression in a
control structure. Note that the value returned is Boolean and can be used as a whole expression; there's
no need for an additional
value=true expression:
bool IsMember(int maybeNumber)
{
174
Chapter 5
code that looks up a number and sees if it is a true member number or not.
code that will RETURN a Boolean
}
if (IsMember(SomeNumber))
{
lblMember.Text = "You are a member";
}
else
{
lblMember.Text = "You are not a member";
}
Our last example demonstrates how the return value of a function can be used as an argument for
another function. In this case, the function retrieves a user's password (because he has forgotten it). In
the latter half of the code, the result of the function (the password) is used as an argument for the
function named
EmailPassword() that sends the password to the user through email.
EmailPassword(), in turn, returns a Boolean value to say whether it has completed its task or not and
so must have a receiver for its output, which in this case is the Boolean
EmailOnItsWay variable:
string GetPassword(string UserName)
{
code which retrieves the users password
code that will RETURN a string
}
bool EmailOnItsWay = EmailPassword( GetPassword(user), EmailAddress );
Having seen the pseudo code of several function examples, let's move on to a working exercise. Our
objective in this exercise is to write and use functions that will demonstrate different ways of handling
the results of a function, as explained earlier: assigning the results to a variable, allocating the results to
an object's property, using the result as the argument for another function, and using the result as an
expression in a control structure.
Try It Out Handling Function Return Types
Note that the entire exercise is run on four parallel tracks: four functions, four output labels, and four
sections of code that call the functions. For input, we have just two text boxes and a
Submit button.
1. Create a new ASP.NET page called Functions.aspx and save it in your Ch05 folder.
2. Add the four functions to your page. The first function is named Disguise(), and its return
value will be put into a variable.
Disguise() performs a simple encoding on a string of
characters by moving each character one up in turn. So for example, a becomes b, b becomes c,
and so on. The input parameters and output are of the
string datatype. The results will be
displayed in the
lblDisguised control:
<%@ Page Language="C#" Debug="true" %>
<script runat="server">
// 'Disguises' a string by adding one to each characters ASCII value
string Disguise(string String1)
175
Functions
{
string DisguisedString;
Byte[] myBytes = System.Text.Encoding.ASCII.GetBytes(String1);
for (int i=0;i<myBytes.Length;i++)
{
myBytes[i] += 1;
}
char[] myChars=System.Text.Encoding.ASCII.GetChars(myBytes);
DisguisedString = new string(myChars);
return DisguisedString;
}
3. The second function is named JoinWithDash(), and its return value will be put into an object's
property.
JoinWithDash() takes two text strings and concatenates them with a dash in the
middle. Input parameters and the output are of type string. We use
JoinWithDash() to join the
two strings in the textboxes and then we display the results using
lblJoinedText:
// Returns a concatenation of two texts with a separating hyphen
string JoinWithDash(string String1, string String2)
{
return String1 + " - " + String2;
}
4. The third function is named Blank(), and its return value will be used as an the argument of
another function.
Blank() returns a string of asterisks that is the same length as the string it
receives as a parameter. Both input and output parameters are of type
string. We use
JoinWithDash() to join the two strings in the textboxes and then use that long string as the
argument for
Blank(). The result is displayed using lblJoinedAndBlanked:
// Returns the string, replacing all characters with asterisks
string Blank(string String1)
{
string BlankString = "";
for (int i=1; i <= String1.Length; i++)
{
BlankString += "*";
}
return BlankString;
}
5. The fourth and final function is named IsString1Longer(), and its return value will be put
into an expression used within a control structure.
IsString1Longer() returns a true or
false – true if the first string parameter is longer then the second string parameter, and false
if the first string is smaller or equal in length to the second parameter.
IsString1Longer() has
two input parameters of type
string and it returns a Boolean value:
// Checks if string1 is longer than string2. Returns true if this is so.
bool IsString1Longer(string String1, string String2)
{
return (String1.Length > String2.Length);
}
176
Chapter 5