The definitive guide to grails second edition - phần 3 potx
Bạn đang xem bản rút gọn của tài liệu. Xem và tải ngay bản đầy đủ của tài liệu tại đây (558.6 KB, 58 trang )
CHAPTER 4 ■ UNDERSTANDING CONTROLLERS
95
The next step is to consider how to enable users to register, log in, and log out. Before you
can do that, you need to define the notion of a user within the gTunes application. Let’s do that
in the next section.
Adding the User Domain Class
To model users, you’ll need to create a User domain class that contains personal information
such as first name and last name, as well as the login and password for each user. To do so, you
can use the create-domain-class command:
grails create-domain-class com.g2one.gtunes.User
This will create a new domain class at the location grails-app/domain/com/g2one/gtunes/
User.groovy. With that done, you need to populate the User domain class with a few properties,
as shown in Listing 4-47.
Listing 4-47. The User Domain Class
package com.g2one.gtunes
class User {
String login
String password
String firstName
String lastName
static hasMany = [purchasedSongs:Song]
}
As you can see, the code in Listing 4-47 captures only the basics about users, but you could
easily expand this information to include an address, contact number, and so on. One property
to note is the purchasedSongs association, which will hold references to all the Songs a User buys
once you have implemented music purchasing.
However, before we get too far ahead of ourselves, let’s add a few constraints to ensure
domain instances stay in a valid state (see Listing 4-48).
Listing 4-48. Applying Constraints to the User Class
class User {
static constraints = {
login blank:false, size:5 15,matches:/[\S]+/, unique:true
password blank:false, size:5 15,matches:/[\S]+/
firstName blank:false
lastName blank:false
}
}
With these constraints in place, you can ensure that a user cannot enter blank values or
values that don’t fall within the necessary size constraints. Also, note the usage of the unique
96
CHAPTER 4
■ UNDERSTANDING CONTROLLERS
constraint, which ensures that the login property is unique to each User. We’ll revisit this in
more detail later; for now, let’s focus on login and registration.
Adding a Login Form
Because you already have a home page, it might make sense to add the login form there. But fur-
ther down the line, you’ll want to allow users to browse the gTunes music catalog anonymously,
so users should be able to log in from anywhere. With this in mind, you need to add a login form
to the grails-app/views/layouts/main.gsp layout so that it’s available on every page.
Listing 4-49 shows the GSP code to do so. Note how you can check whether a User already
exists in the session object and display a welcome box or login form, accordingly.
Listing 4-49. Adding the Login Form Everywhere
<div id="loginBox" class="loginBox">
<g:if test="${session?.user}">
<div style="margin-top:20px">
<div style="float:right;">
<a href="#">Profile</a> |
<g:link controller="user" action="logout">Logout</g:link><br>
</div>
Welcome back
<span id="userFirstName">${session?.user?.firstName}!</span>
<br><br>
You have purchased (${session.user.purchasedSongs?.size() ?: 0}) songs.<br>
</div>
</g:if>
<g:else>
<g:form
name="loginForm"
url="[controller:'user',action:'login']">
<div>Username:</div>
<g:textField name="login" ></g:textField>
<div>Password:</div>
<g:passwordField name="password" />
<input type="submit" value="Login" />
</g:form>
<g:renderErrors bean="${loginCmd}"></g:renderErrors>
</g:else>
</div>
In addition to providing a login box, you need to provide a link that allows a User to regis-
ter. Once logged in, the user will be able to click through the store to browse and click a “My
Music” link to view music already purchased. These links won’t display when the user isn’t
logged in, so instead you can use the screen real estate for a prominent link to the registration
page. Listing 4-50 shows the registration link added to the main.gsp layout.
CHAPTER 4 ■ UNDERSTANDING CONTROLLERS
97
Listing 4-50. Adding a Link to the Registration Page
<div id="navPane">
<g:if test="${session.user}">
<ul>
<li><g:link controller="user" action="music">My Music</g:link></li>
<li><g:link controller="store" action="shop">The Store</g:link></a></li>
</ul>
</g:if>
<g:else>
<div id="registerPane">
Need an account?
<g:link controller="user" action="register">Signup now</g:link>
to start your own personal Music collection!
</div>
</g:else>
</div>
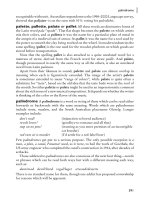
After getting the web designers involved and making a few Cascading Style Sheets (CSS)
tweaks, the home page has gone from zero to something a little more respectable (see Figure 4-3).
Figure 4-3. The gTunes home page
Implementing Registration
Before users can actually log in, they need to register with the site. You’ll need to run the
create-controller command to create a controller that will handle the site’s login and regis-
tration logic:
grails create-controller com.g2one.gtunes.User
Once complete, the command will create a controller at the location grails-app/
controllers/com/g2one/gtunes/UserController.groovy. Open up this controller and
add a register action, as shown in Listing 4-51.
98
CHAPTER 4
■ UNDERSTANDING CONTROLLERS
Listing 4-51. Adding a register Action
class UserController {
def register = {}
}
As you can see from the example, the register action currently does nothing beyond
delegating to a view. Nevertheless, it gives you the opportunity to craft a registration form.
Listing 4-52 shows the shortened code from the grails-app/views/user/register.gsp view
that will render the form.
Listing 4-52. The register View
<body id="body">
<h1>Registration</h1>
<p>Complete the form below to create an account!</p>
<g:hasErrors bean="${user}">
<div class="errors">
<g:renderErrors bean="${user}"></g:renderErrors>
</div>
</g:hasErrors>
<g:form action="register" name="registerForm">
<div class="formField">
<label for="login">Login:</label>
<g:textField name="login" value="${user?.login}" />
</div>
<div class="formField">
<label for="password">Password:</label>
<g:passwordField name="password"
value="${user?.password}"/>
</div>
<g:submitButton class="formButton"
name="register"
value="Register" />
</g:form>
</body>
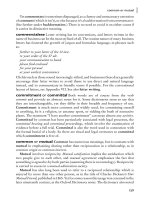
The rendered registration form will look like the screenshot in Figure 4-4.
As you can see from Figure 4-4, you can also provide a confirm-password field to prevent
users from entering their passwords incorrectly. With that done, let’s consider the controller
logic. To implement registration, you can take advantage of Grails’ data-binding capabilities to
bind incoming request parameters to a new User instance. At this point, validation takes over
and the rest comes down to a little branching logic. Listing 4-53 shows the completed register
action.
CHAPTER 4 ■ UNDERSTANDING CONTROLLERS
99
Figure 4-4. The Registration screen
Listing 4-53. Implementing the register Action
1 def register = {
2 if(request.method == 'POST') {
3 def u = new User(params)
4 if(u.password != params.confirm) {
5 u.errors.rejectValue("password", "user.password.dontmatch")
6 return [user:u]
7 }
8 else if(u.save()) {
9 session.user = u
10 redirect(controller:"store")
11 }
12 else {
13 return [user:u]
14 }
15 }
16 }
Many of the key concepts you’ve learned throughout the course of this chapter have been
put to use in Listing 4-53, including a few new ones. Let’s step through the code to see what’s
going on. First, on line 2, the code checks that the incoming request is a POST request because
doing all this processing is pointless unless a form is submitted:
2 if(request.method == 'POST') {
Then on line 3, data binding takes over as it binds the incoming request parameters to the
User instance:
3 def u = new User(params)
100
CHAPTER 4
■ UNDERSTANDING CONTROLLERS
On lines 4 though 7, the code confirms whether the user has entered the correct password
twice. If not, the password is rejected altogether:
4 if(u.password != params.confirm) {
5 u.errors.rejectValue("password", "user.password.dontmatch")
6 return [user:u]
7 }
Note how calling the rejectValue method of the org.springframework.validation.
Errors interface accomplishes this. The rejectValue method accepts two arguments: the
name of the field to reject and an error code to use. The code in Listing 4-53 uses the String
user.password.dontmatch as the error code, which will appear when the <g:renderErrors>
tag kicks in to display the errors. If you want to provide a better error message, you can open
up the grails-app/i18n/messages.properties file and add a message like this:
user.password.dontmatch=The passwords specified don't match
Here’s one final thing to note: directly after the call to rejectValue, a model from the
controller action is returned, which triggers the rendering register.gsp so it can display
the error.
Moving on to lines 8 through 11, you’ll notice that the code attempts to persist the User
by calling the save() method. If the attempt is successful, the User is redirected back to the
StoreController:
8 else if(u.save()) {
9 session.user = u
10 redirect(controller:"store")
11 }
Finally, if a validation error does occur as a result of calling save(), then on line 13 a simple
model is returned from the register action so that the register view can render the errors:
13 return [user:u]
Testing the Registration Code
Now let’s consider how to test the action using the ControllerUnitTestCase class you
learned about earlier. When you ran the create-controller command, a new unit test for
the UserController was created for you in the test/unit directory.
You’ll notice that the UserControllerTests class extends from a super class called
ControllerUnitTestCase:
class UserControllerTests extends grails.test.ControllerUnitTestCase {
Now write a test for the case in which a user enters passwords that don’t match.
Listing 4-54 shows the testPasswordsDontMatch case that checks whether a password mis-
match triggers a validation error.
CHAPTER 4 ■ UNDERSTANDING CONTROLLERS
101
Listing 4-54. The testPasswordsMatch Test Case
void testPasswordsMatch() {
mockRequest.method = 'POST'
mockDomain(User)
mockParams.login = "joebloggs"
mockParams.password = "password"
mockParams.confirm = "different"
mockParams.firstName = "Joe"
mockParams.lastName = "Blogs"
def model = controller.register()
assert model?.user
def user = model.user
assert user.hasErrors()
assertEquals "user.password.dontmatch", user.errors.password
}
Notice how the testPasswordsMatch test case populates the mockParams object with two
passwords that differ. Then you have a call to the register action, which should reject the new
User instance with a user.password.dontmatch error code. The last line of the test asserts that
this is the case by inspecting the errors object on the User instance:
assertEquals "user.password.dontmatch", user.errors.password
The next scenario to consider is when a user enters invalid data into the registration form.
You might need multiple tests that check for different kinds of data entered. Remember, you
can never write too many tests! As an example of one potential scenario, Listing 4-55 shows a
test that checks whether the user enters blank data or no data.
Listing 4-55. The testRegistrationFailed Test
void testRegistrationFailed() {
mockRequest.method = 'POST'
mockDomain(User)
mockParams.login = ""
def model = controller.register()
102
CHAPTER 4
■ UNDERSTANDING CONTROLLERS
assertNull mockSession.user
assert model
def user = model.user
assert user.hasErrors()
assertEquals "blank", user.errors.login
assertEquals "nullable", user.errors.password
assertEquals "nullable",
user.errors.firstName
assertEquals "nullable", user.errors.firstName
}
Once again, you can see the use of the errors object to inspect that the appropriate
constraints have been violated. Finally, you need to ensure two things to test a successful
registration:
•The User instance has been placed in the session object.
• The request has been redirected appropriately.
Listing 4-56 shows an example of a test case that tests a successful user registration.
Listing 4-56. Testing Successful Registration
void testRegistrationSuccess() {
mockRequest.method = 'POST'
mockDomain(User)
mockParams.login = "joebloggs"
mockParams.password = "password"
mockParams.confirm = "password"
mockParams.firstName = "Joe"
mockParams.lastName = "Blogs"
def model = controller.register()
assertEquals 'store',redirectArgs.controller
assertNotNull mockSession.user
}
With the tests written, let’s now consider how to allow users to log in to the gTunes
application.
Allowing Users to Log In
Since you’ve already added the login form, all you need to do is implement the controller logic.
A login process is a good candidate for a command object because it involves capturing infor-
mation—the login and password—without needing to actually persist the data.
In this example you’re going to create a LoginCommand that encapsulates the login logic, leav-
ing the controller action to do the simple stuff. Listing 4-57 shows the code for the LoginCommand
class, which is defined in the same file as the UserController class.
CHAPTER 4 ■ UNDERSTANDING CONTROLLERS
103
Listing 4-57. The LoginCommand
class LoginCommand {
String login
String password
private u
User getUser() {
if(!u && login)
u = User.findByLogin(login, [fetch:[purchasedSongs:'join']])
return u
}
static constraints = {
login blank:false, validator:{ val, cmd ->
if(!cmd.user)
return "user.not.found"
}
password blank:false, validator:{ val, cmd ->
if(cmd.user && cmd.user.password != val)
return "user.password.invalid"
}
}
}
The LoginCommand defines two properties that capture request parameters called login and
password. The main logic of the code, however, is in the constraints definition. First, the blank
constraint ensures that the login and/or password cannot be left blank. Second, a custom val-
idator on the login parameter checks whether the user exists:
login blank:false, validator:{ val, cmd ->
if(!cmd.user)
return "user.not.found"
}
The custom validator constraint takes a closure that receives two arguments: the value
and the LoginCommand instance. The code within the closure calls the getUser() method of
the LoginCommand to check if the User exists. If the User doesn’t exist, the code returns an error
code—“user.not.found”—that signifies an error has occurred.
On the password parameter, another custom validator constraint checks whether the User
has specified the correct password:
password blank:false, validator:{ val, cmd ->
if(cmd.user && cmd.user.password != val)
return "user.password.invalid"
}
Here the validator again uses the getUser() method of the LoginCommand to compare
the password of the actual User instance with the value of the password property held by the
LoginCommand. If the password is not correct, an error code is returned, triggering an error. You
104
CHAPTER 4
■ UNDERSTANDING CONTROLLERS
can add appropriate messages for each of the custom errors returned by the LoginCommand by
adding them to the grails-app/i18n/messages.properties file:
user.not.found=User not found
user.password.invalid=Incorrect password
With that done, it’s time to put the LoginCommand to use by implementing the login action
in the UserController. Listing 4-58 shows the code for the login action.
Listing 4-58. The login Action
def login = { LoginCommand cmd ->
if(request.method == 'POST') {
if(!cmd.hasErrors()) {
session.user = cmd.getUser()
redirect(controller:'store')
}
else {
render(view:'/store/index', model:[loginCmd:cmd])
}
}
else {
render(view:'/store/index')
}
}
With the command object in place, the controller simply needs to do is what it does best:
issue redirects and render views. Again, like the register action, login processing kicks in only
when a POST request is received. Then if the command object has no errors, the user is placed
into the session and the request is redirected to the StoreController.
Testing the Login Process
Testing the login action differs slightly from testing the register action due to the involvement
of the command object. Let’s look at a few scenarios that need to be tested. First, you need to
test the case when a user is not found (see Listing 4-59).
Listing 4-59. The testLoginUserNotFound Test Case
void testLoginUserNotFound() {
mockRequest.method = 'POST'
mockDomain(User)
MockUtils.prepareForConstraintsTests(LoginCommand)
def cmd = new LoginCommand(login:"fred", password:"letmein")
cmd.validate()
controller.login(cmd)
CHAPTER 4 ■ UNDERSTANDING CONTROLLERS
105
assertTrue cmd.hasErrors()
assertEquals "user.not.found", cmd.errors.login
assertEquals "/store/index", renderArgs.view
}
As you can see from Listing 4-59, when testing command objects you have to explicitly
create the command and call the validate() method on it. Notice also how you can use the
prepareForConstraintsTests method of the grails.test.MockUtils class to mock the valida-
tion behavior of a command object:
MockUtils.prepareForConstraintsTests(LoginCommand)
You can the inspect the command for errors as demonstrated by the following two lines
from Listing 4-59:
assertTrue cmd.hasErrors()
assertEquals "user.not.found", cmd.errors.login
The next scenario to test is when a user enters an incorrect password. Listing 4-60 shows
the testLoginPasswordInvalid test case that demonstrates how to do this.
Listing 4-60. The testLoginPasswordInvalid Test Case
void testLoginPasswordInvalid() {
mockRequest.method = 'POST'
mockDomain(User, [new User(login:"fred", password:"realpassword")])
MockUtils.prepareForConstraintsTests(LoginCommand)
def cmd = new LoginCommand(login:"fred", password:"letmein")
cmd.validate()
controller.login(cmd)
assertTrue cmd.hasErrors()
assertEquals "user.password.invalid", cmd.errors.password
assertEquals "/store/index", renderArgs.view
}
Unlike the example in Listing 4-59, the testLoginPasswordInvalid test case actually pro-
vides mock data using the mockDomain method:
mockDomain(User, [new User(login:"fred", password:"realpassword")])
The second argument of the mockDomain method provides the data that all the query
methods should operate on. In this case, the code specifies a mock User instance that has a
password with the value of “realpassword.” Then you can use the LoginCommand to simulate
the entry of an incorrect password:
def cmd = new LoginCommand(login:"fred", password:"letmein")
The remainder of the test is largely similar to Listing 4-59.
The last test to write is one that tests a successful login. Listing 4-61 shows how to do this.
106
CHAPTER 4
■ UNDERSTANDING CONTROLLERS
Listing 4-61. The testLoginSuccess Test Case
void testLoginSuccess() {
mockRequest.method = 'POST'
mockDomain(User, [new User(login:"fred", password:"letmein")])
MockUtils.prepareForConstraintsTests(LoginCommand)
def cmd = new LoginCommand(login:"fred", password:"letmein")
cmd.validate()
controller.login(cmd)
assertFalse cmd.hasErrors()
assertNotNull mockSession.user
assertEquals "store", redirectArgs.controller
}
The testLoginSuccess test case again uses the mockDomain method to set up the domain
model, and then uses an appropriate LoginCommand to simulate a valid login. As you can see
from the last two assertions, you can use the mockSession object to check whether the User
instance has been placed in the session and inspect redirectArgs to ensure that an appropriate
redirect has occurred.
Summary
And with that, you’ve implemented the login and registration process for the gTunes applica-
tion. We’ll present throughout the book many more examples of using controllers, but in this
chapter you’ve obtained a strong grounding in the core concepts that apply to controllers.
From data binding and validation to command objects, Grails’ controller mechanism
offers you a lot of tools. To fully see how everything fits together, you’ll need a strong under-
standing of Grails’ view technology—Groovy Server Pages (GSP). In the next chapter, we’ll take
a much closer look at GSP and what it has to offer, with its dynamic tag libraries and templating
mechanisms.
107
■ ■ ■
CHAPTER 5
Understanding Views
View technologies for web applications in the open source world appear to be a rather popular
topic with the seemingly endless number of them available for Java. There always appears to be
a newer, better one to learn if you grow tired of the incumbent JSP. JSP, however, remains the
most popular view technology; produced by Sun to compete with Microsoft’s Active Server Pages
(ASP), JSP has become the industry standard, and there is a high level of developer knowledge
surrounding JSP.
JSP allows developers to mix traditional markup languages such as HTML with Java code
(called scriptlets) to produce dynamic output. On the downside, this facility is extremely open
to abuse; therefore, there are custom tag libraries that add the ability to abstract logic from a
JSP page via tags. JSP has been augmented with two missing ingredients, the JSP Standard Tag
Library (JSTL) and an expression language (EL), to bring it up to speed with some of its open
source competitors.
So, given JSP’s maturity, robustness, and familiarity within the industry, why on Earth
would you need yet another view technology for Grails with Groovy Server Pages (GSP)? The
answer lies with the Groovy runtime environment:
• To fully take advantage of Grails, the view technology requires knowledge of Groovy’s
runtime environment and associated dynamic method dispatching.
• Groovy provides a far more powerful expression language, including GPath expres-
sions, Groovy bean notation, and overridable operators.
• Other Groovy features such as regular expression support, GStrings, and an expressive
syntax for maps and lists make it perfect for a view technology.
Of course, for any new view technology, it is important not to fall into the same traps that
JSP fell into in its early iterations. Mixing scriptlets and markup code is most definitely recog-
nized as a bad thing, and to this end, GSP provides a mechanism for creating custom tags just
as JSP does but without sacrificing any agility.
The Basics
You’ve already been exposed to GSP at various points throughout the book, and we’re sure you
are verging on the expert level already. Regardless, it will no doubt prove invaluable to discuss
the basics of GSP to help you fully grasp all the concepts within it.
It is important to note that GSP is actually remarkably similar to JSP, and you will know
from experience that with JSP, by default, a number of objects are simply available. These
108
CHAPTER 5
■ UNDERSTANDING VIEWS
include the request, response, and session objects—the same ones you saw in Chapter 4,
which discussed controllers. If you recall, that particular discussion mentioned that a few
additional objects are available to controllers, including the flash object. Well, you’ll be
pleased to know these can also be accessed from GSP views, as can an additional out attribute,
which is a java.io.Writer instance representing the response output. Table 5-1 describes the
GSP attributes available.
You already know how to get to these from controllers, but what about in views? Well,
unsurprisingly, GSP supports the same constructs available in JSP as well as a few additional
ones. This may start to look a little like a JSP 101 tutorial in the next few examples, but don’t be
confused; you’re definitely dealing with Groovy, not Java.
Understanding the Model
One of the fundamental activities in any MVC pattern, such as that which Grails employs, is to
pass information (the model) to the view for rendering. In Chapter 4 you saw this in action, but
just to recap, Listing 5-1 shows an example of how you can achieve this in Grails.
Listing 5-1. Creating the Model
package com.g2one.gtunes
class StoreController {
def shop = {
def genreList = Album.withCriteria {
projections {
distinct "genre"
}
}
[genres:genreList.sort()]
}
}
Table 5-1. GSP Attributes
Attribute Description
application The ServletContext instance
flash The flash object for working with flash scope, as discussed in Chapter 7
out The response Writer instance
params A map of request parameters
request The HttpServletRequest instance
response The HttpServletResponse instance
session The HttpSession instance
CHAPTER 5 ■ UNDERSTANDING VIEWS
109
In the previous listing (the shop action of the StoreController), the result is a map with one
element, the key for which is a string with the value genres. This key (and its value) is then
placed in a GSP’s model (or binding for those more familiar with Groovy lingo), which means it
is accessible as a variable in the same way as the page attributes you saw earlier in Table 5-1.
In the following sections, you will see examples of a genres variable being referenced. Just
remember that this variable didn’t appear by magic. It is passed to the view via the controller
in code like in the previous listing.
Page Directives
GSP supports a limited subset of the page directives available in JSP. A page directive is an
instruction that appears at the top of a GSP that performs an action that the page relies on.
As an example, it could set the content type, perform an import, or set a page property, which
could even be container-specific.
One of the more useful of these is the contentType directive, which allows you to set the
content type of the response. This is useful in that it allows you to use GSP to output formats
other than HTML markup, such as XML or plain text. Using the directive is identical to JSP,
with the directive appearing at the top of the page and starting with <%@.
Listing 5-2 sets the content type to text/xml, which allows you to output XML; this can be
useful when working with technologies such as Ajax.
Listing 5-2. The contentType Page Directive
<%@ page contentType="text/xml; charset=UTF-8" %>
Another page directive available is the import directive, which is analogous to the import
statement in a Java or Groovy class. However, because Groovy imports many classes by default
and Grails encourages an MVC architecture, where much of the logic should be placed in a
controller and not the view, the usage of import is not too common. Nevertheless, Listing 5-3
shows an example of importing the Time class from the java.sql.* package.
Listing 5-3. The import Page Directive
<%@ page import="java.sql.Time" %>
■Note Groovy imports the java.lang, java.util, java.io, java.net, groovy.lang, and
groovy.util packages by default.
Groovy Scriptlets
GSP tries to stay as true to JSP as possible, and therefore it supports traditional JSP scriptlet
blocks using the <% %> syntax. Essentially, as soon as you type the opening <% declaration,
you have entered the world of Groovy and can type whatever Groovy code you so choose up
until the closing %> declaration.
110
CHAPTER 5
■ UNDERSTANDING VIEWS
What this means is that you can use scriptlets to perform loops and logical if statements
merely by combining scriptlet declarations, as shown in Listing 5-4.
Listing 5-4. Scriptlets in Action
<html>
<body>
<% 3.times { %>
<p>I'm printed three times!</p>
<% } %>
</body>
</html>
This type of syntax will be familiar to users of Rails, because it bears a striking resemblance
to Rails’ view technology RHTML (and indeed many other view technologies). However, you
should note that scriptlets are available more to align the syntax with JSP and, in practice, are
discouraged in favor of GSP tags, which you will see in the section “Built-in Grails Tags.”
Although the previous syntax allows arbitrary code to be inserted between the opening
and closing declarations, it doesn’t actually explicitly output anything when inside the scriptlet
block. In other words, as with the previous example, you have to use a closing %> bracket to
close the scriptlet expression in order to define what you want repeated three times. You can,
however, use the out attribute mentioned earlier to output to the response:
<% out << "print me!" %>
The previous code will print the text “print me!” to the response using the out attribute.
As you can imagine, having all these out << statements all over the place can get a little tedious,
so GSP supports another syntax inherited from JSP through the <%= %> statement (note the
equal sign directly after the opening declaration). Essentially, the following example is equiva-
lent to what you saw in the previous code:
<%= "print me!" %>
Here the = sign after the opening scriptlet bracket ensures that the result of whatever
follows is printed to the response. The response in general is a mix of markup and code that
results in some text being sent to the browser or client. Now that you’ve seen GSP’s similarities
with JSP, let’s look at a feature you won’t find in JSP: embedded GStrings.
GSP as GStrings
In recent times, since the introduction of JSTL, using scriptlets and declarations such as those
shown in the previous section has been looked down on a bit. Instead, there is an expression
language in JSP that you can use in combination with the <c:out> standard tag to output val-
ues, as shown in Listing 5-5.
Listing 5-5. JSP c:out Tag
<% Output the album title %>
<p><c:out value="${album.title}" /></p>
CHAPTER 5 ■ UNDERSTANDING VIEWS
111
■Tip The previous JSP example uses the syntax <% %> for comments that should not be present in
the rendered response. These comments are also supported in GSP using the same syntax.
In addition to the previous rather verbose tag, you would also need to import the tag
library, which contains the <c:out> tag using a page directive at the top of the JSP. All this
amounts to a lot of effort just to use a tag that lets you render values to the response. Luckily,
with GSP it is a little bit simpler, because of its support for embedded GString values:
<p>${album.title}</p>
A GSP, if you think about it, is essentially one big GString, thus allowing the same ${ }
expressions nested within it as found in JSP. The expressions allowed within the GStrings are
not, thankfully, limited to simply referencing properties. The full capability Groovy offers in
terms of navigating object graphs is at your fingertips, which often becomes useful when iter-
ating, as you will see in the next section.
Built-in Grails Tags
GSP has a number of built-in tags for performing basic operations such as looping, switching,
and using logical if statements. In general, tags are preferable to embedding scriptlets because
they promote a cleaner separation of concerns and allow you to create well-formed markup.
Each GSP tag requires the prefix g: before the tag name so that it is recognized as being a
GSP tag. Unlike JSP, which requires directives to import tag libraries, no additional page direc-
tive is needed.
■Note GSP also supports JSP custom tag libraries that can be imported with the standard JSP taglib
directive.
In the next few sections, you’ll see the tags that are built in to Grails. These tags are there
by default and require no extra work by the developer.
Setting Variables with Tags
Occasionally, it is useful to set the value of a variable or define a new variable within the scope
(commonly referred to as the page context) of a GSP. Both use cases can be achieved via the
<g:set> tag, which will set or define a variable in the page context regardless of whether it
already exists. The <g:set> tag takes two attributes: the var attribute, which defines the name
of the variable to set, and a value attribute, which is generally an expression:
<g:set var="albumTitle" value="${album.title}" />
112
CHAPTER 5
■ UNDERSTANDING VIEWS
By default, variables set with <g:set> are assumed to be within the page scope. Having said
that, you can set a variable in the session scope simply by using the scope attribute:
<g:set scope="session" var="user" value="${user}" />
In addition to the session scope, a number of other scopes are available:
• application: Stores variables for the scope of the whole application
• session: Stores variables for the scope of the user session
• flash: Stores variables for the current request and the next request only
• request: Stores variables for the scope of the current request
• page: Stores variables for the scope of the rendering page
Another fairly basic requirement, along with setting variables, is the ability to condition-
ally display information. In the next section, you’ll see how you can achieve this.
Logical Tags
As previously mentioned, it is often useful to display information based on a condition. At the
most basic level, it is useful to have basic programming constructs in the view such as if and
else to facilitate this. GSP has the aptly named <g:if>, <g:elseif>, and <g:else> tags that, as
with any regular programming construct, are used in conjunction with one another to condi-
tionally display output.
The <g:if> and <g:elseif> tags take an attribute called test whose value can be in expres-
sion language (that is, statements surrounded by ${ }), as shown in Listing 5-6.
Listing 5-6. Usage of Logical Blocks
<g:if test="${album?.year < 1980 && album?.genre == 'Rock'}">
Classic rock
</g:if>
<g:elseif test="${album?.year >= 1980 && album?.genre == 'Rock'}">
Modern Rock
</g:elseif>
<g:else>
Other
</g:else>
An interesting aspect of the previous code is the usage of Groovy’s safe dereference oper-
ator, ? The operator really comes into its own when used in views, because it is often useful to
navigate an object graph and display information only if all elements navigated through don’t
evaluate to null. If you look at the views generated during scaffolding, you will observe a lot of
this in action. Yet another useful feature of the method is that it allows the optional execution
of methods. For example, you may for some reason want the title of the album in uppercase, in
which case you would use an expression like the following:
${album.title.toUpperCase()}
CHAPTER 5 ■ UNDERSTANDING VIEWS
113
Unfortunately, if either the album or title of the album in the previous code is null, a horrid
NullPointerException will be thrown. To circumvent this, the safe dereference operator comes
to the rescue:
${album?.title?.toUpperCase()}
Here the toUpperCase method is executed only if it can be reached; otherwise, the entire
expression evaluates to null. This is useful because null in GSP results in an empty string being
printed to the response.
That’s it for now on logical tags, although you will see their usage popping up throughout
the book.
Iterative Tags
Iterating over collections of objects is one of the more common tasks when working with any
view technology, GSP being no exception. Again, scriptlets could be used to achieve iteration,
but why would you? You have GSP tags, which allow for a much cleaner transition between
code and markup.
The first tag we’ll cover is the <g:each> tag, which is essentially the tag equivalent of the Groovy
each method and in fact simply delegates to this method internally, as shown in Listing 5-7.
Listing 5-7. Iterating with <g:each>
<g:each in="${album.songs?}">
<span class="tag">${it.title}</span>
</g:each>
■Tip You can also use the safe dereference operator at the end of expressions as in the previous example,
which will not iterate if the songs property is null.
Like its closely related JSTL cousin, the <g:each> tag allows you to optionally specify
the name of the object within the current iteration. The name of the object, as with closures,
defaults to an argument called it, as shown in Listing 5-7. When using nested tags, however,
it is good practice to name the variable being iterated over, which you can do with the var
attribute, as shown in Listing 5-8.
Listing 5-8. Iterating with <g:each> and a Named Variable
<g:each var="song" in="${album.songs?}">
<span class="song">${song.title}</span>
</g:each>
GSP tags are, at their roots, just closures, and in Groovy the variable it refers to the default
argument of the innermost closure. If you use the <g:each> tag without declaring a var attribute
and try to reference the default it variable within a nested GSP tag, this will result in evaluating
it to the current innermost tag and not the surrounding <g:each> tag. By naming the variable
114
CHAPTER 5
■ UNDERSTANDING VIEWS
used by <g:each> using the var attribute, you circumvent any conflicts such as this. If you
remember that GSP tags are closures, you will have no issue at all adapting to the mind-set.
The next iterative tag GSP provides is the <g:while> tag that behaves like the traditional
while loop by waiting for the expression specified within the test attribute to evaluate to false.
As with any while loop, the condition should always end up evaluating to false at some point;
otherwise, you will end up in a never-ending loop. Listing 5-9 shows an example that loops
while the variable i is greater than zero.
Listing 5-9. The <g:while> Tag
<g:set var="i" expr="${album.songs?.size()}" />
<g:while test="${i > 0}">
<g:set var="i" expr="${i-1}" />
</g:while>
Here you get the total number of songs from the album and store them in the variable i. You
then start a <g:while> loop that will decrement the i variable on each iteration. The loop will
continue until i reaches zero. The loop is equivalent to the following Groovy code:
while(i > 0) i=i-1
Using <g:each> and <g:while> are not the only way to loop over a collection. In the next
section, you’ll see constructs that provide the powerful combination of filtering and iteration.
Filtering and Iteration
With some of the new methods that accept closures in Groovy that provide the powerful ability
to filter and search collections (such as collect, findAll, and grep), it would seem a shame if
that power were not extended into GSP tags. Fear not—there are tag equivalents of these three
that allow some pretty powerful filtering capabilities.
The collect Tag
The <g:collect> tag allows you to iterate over and collect properties of objects within a col-
lection. Say, for example, you want the titles of all albums; you can achieve this simply with
<g:collect>, as shown in Listing 5-10.
Listing 5-10. Using <g:collect> to Collect Values
<ol>
<g:collect in="${albums}" expr="${it.title}">
<li>${it}</li>
</g:collect>
</ol>
In the previous example, an HTML list of album titles is created by passing a collection
of albums to the in attribute via the ${ } syntax. The second attribute, the expr attribute,
contains an expression that is used to specify what should be collected (in this case the title
property). Again, you use the default it argument within the expression the same way as you
would in a closure. In fact, the previous code is equivalent to the scriptlet code in Listing 5-11.
CHAPTER 5 ■ UNDERSTANDING VIEWS
115
Listing 5-11. Equivalent Scriptlet Using a Closure
<ol>
<% albums.collect{ it.title }.each { %>
<li>${it}</li>
<%}%>
</ol>
As you can see, the expression equates to what is found within the curly braces of the
collect closure. Whatever you can place in there can also be placed inside the expr attribute.
Of course, you could also do this with a GPath expression. If you recall what you learned
about GPath so far, if you reference the title property and use the dereference operator on a
list of albums, it will produce a list of titles, as shown in Listing 5-12.
Listing 5-12. Using GPath to Iterate Over Album Titles
<ol>
<g:each in="${albums.title}" >
<li>${it}</li>
</g:each>
</ol>
The <g:collect> tag does, however, give you another option and allows the logic within
the expr attribute to be in your control.
The findAll Tag
Collecting properties from a collection via the object graph is handy, but sometimes you want
to iterate over only those values that meet a certain criteria. This is often achieved by iterating
over all elements and having nested if statements. However, using <g:findAll>, as shown in
Listing 5-13, is far more elegant.
Listing 5-13. Using <g:findAll> to Locate Specific Elements
<g:findAll in="${albums}" expr="${it.songs?.title.contains('Love')}">
<li>
${it.title}
</li>
</g:findAll>
This is an interesting example because it is another demonstration of the power of GPath,
Groovy’s expression language. The expression in bold references the default argument it,
which is the current Album instance being iterated over, and then uses GPath to retrieve a col-
lection of all the names of the songs.
The songs property itself is in fact a collection too (a java.util.Set to be specific) and does
not have a title property, but GPath recognizes that the reference to the title property is an
attempt to retrieve a collection of name properties from the contained elements within the
songs property.
116
CHAPTER 5
■ UNDERSTANDING VIEWS
Since the result is a collection, you can invoke the regular JDK contains method to look up
all albums that have the world Love in their title. The result is far more readable than a bunch
of nested if statements and is another case where you can see how a Groovy view technology
like GSP just makes a remarkable amount of sense.
You’ve seen quite a few options to perform different kinds of logical statements and itera-
tion. Controlling the logical flow of a view is not, however, the only task you have when writing
the view. One common activity is linking between controllers and actions, which you will look
at next; but before that, there is something important to note. This marks the end of the built-
in tags. The tags you’ve seen so far are internally handled and optimized by GSP. The next sec-
tion shifts focus to Grails dynamic tags and how they differ from the built-in tags.
Grails Dynamic Tags
Dynamic tags in Grails are those provided through classes called tag libraries, which can be
found within the grails-app/taglib directory of any Grails project. Grails provides a number
of tag libraries out of the box that you will see in the next few sections; then you will explore
how to create your own tag libraries.
First you need to understand what makes dynamic tags different from other tags besides
the fact that they are provided by these libraries. Fundamentally, they can be used the same
way as any other tag. For example, you can use the <g:link> tag like the built-in tags you saw
previously without requiring any import directive.
More interestingly, dynamic tags can also be invoked as methods from scriptlets and
GString expressions. Why is this useful? To maintain a clean syntax and valid XML, it is best
to avoid nesting tags within tag attributes. In JSP you often see code like in Listing 5-14 that
becomes difficult to read and is not well-formed markup.
Listing 5-14. Unattractive JSP Example
<a href="<c:out value="${application.contextPath}" />/show.jsp">A dynamic link</a>
Clearly, because of GSP’s rather JSP-like nature, this problem could have been inherited if
it were not for the dynamic nature of Groovy. So, how would you invoke a GSP tag as a method
call? Observe the example in Listing 5-15.
Listing 5-15. An Example of a GSP Tag as a Method Call
<! With a regular tag >
<a href="<g:createLink action="list" />">A dynamic link</a>
<! As a method call >
<a href="${createLink(action:'list')}">A dynamic link</a>
The two previous examples produce the same result. They call a tag called createLink,
which creates a link to the list action. The second example is notably cleaner and produces
well-formed markup. In addition, the body of the tag can be provided as the last argument to
the method call.
You can see an example of this in action in the create and edit views generated by scaffolding.
As part of form validation, these views highlight the problematic field by surrounding the offender
CHAPTER 5 ■ UNDERSTANDING VIEWS
117
with a red box. You achieve this through the hasErrors tags, which will evaluate if a particular bean
field has any validation errors and will set a CSS class, the name of which is the last argument on the
surrounding div element if the field does contain errors, as shown in Listing 5-16.
Listing 5-16. Field Validation Example
<div class="${hasErrors(bean:album,field:'title','errors')}">
</div>
These are just a few examples; as you’ll see in a moment, you can create your own tags that
can be invoked in the same manner. First, however, let’s take a tour through the tags that are
already available to you, starting with linking.
Linking Tags
With all these controllers and actions that end up being created, it may become a bit chal-
lenging to remember the URL patterns to link to them. Also, the context path of your
application could change depending which environment you deploy to. So, how can you
make sure you are always linking to the right place in a consistent manner? Well, luckily
Grails provides a number of tags to handle linking in an elegant way, the first of which is
the aptly named <g:link>.
The Link Tag
The <g:link> tag will essentially create a simple HTML anchor tag based on the supplied
attributes, which include the following:
• controller: The controller name to link to
• action: The action name to link to
• id: The identifier to append to the end of the URI
• params: Any parameters to pass as a map
One of either the controller attribute or the action attribute is required. If the controller
attribute is specified but no action attribute is specified, the tag will link to the default action of
the controller. If, on the other hand, an action attribute is specified but no controller attribute
is specified, the currently executing controller will be linked to.
Beyond the previous attributes, the <g:link> tag also supports all attributes that the regu-
lar HTML anchor tag supports, which can be added as required.
It’s time for some examples. Using <g:link> is pretty trivial and intuitive, and of course the
values of the attributes could just as well be expressions of the ${ } kind if dynamic linking is
required, as shown in Listing 5-17.
Listing 5-17. Basic Linking with <g:link>
<g:link controller="album" action="list">List Albums</g:link>
<g:link action="show" id="1">Show album with id 1</g:link>
118
CHAPTER 5
■ UNDERSTANDING VIEWS
Of interest may be the params attribute, which takes a map of request parameters to pass
via the link. In fact, the current request parameters can even be passed from one action to the
other by using this attribute in combination with the params object, which if you recall is an
instance of java.util.Map, as shown in Listing 5-18.
Listing 5-18. Using Parameters with <g:link>
<g:link controller="album"
action="list"
params="[max:10,order:'title']">Show first ten ordered by Title</g:link>
<g:link action="create"
params="${params}">Pass parameters from this action to next</g:link>
The first example uses the params attribute in conjunction with a map of parameters and
provides your first exposure to another feature of GSP tags: attributes can be specified as maps
with the [key:value] syntax. This allows for composite attribute values and minimizes the
need for messy nested tags.
Finally, the second example demonstrates what was mentioned previously. Instead of
specifying a map explicitly, you provide a reference to the params object via the ${ } expres-
sion syntax, which then allows passing parameters from the current page to the linked page.
Next you’ll see how to create links to other resources.
■Note Grails’ linking tags automatically rewrite the links based on the URL mappings you have defined.
URL mappings will be covered in more detail in Chapter 6.
The createLink and createLinkTo Tags
The <g:createLink> tag has already been seen in action and probably needs less of an intro-
duction. Simply put, if it’s not clear from the examples, <g:createLink> takes the same
arguments as the <g:link> tag except it produces just the textual link and not an HTML
anchor tag. In fact, the <g:link> tag actually delegates to <g:createLink> when creating its
href attribute.
So, what is this useful for? You could use it within a regular anchor tag or possibly as a
value for a JavaScript variable, as shown in Listing 5-19.
Listing 5-19. Examples of createLink
<a href="${createLink(action:'list')}">List Albums</a>
<script type="text/javascript">
var listAlbumsLink = "${createLink(action:'list')}";
</script>
Another tag, similar in both name and usage to <g:createLink>, is the <g:createLinkTo>
tag, which allows convenient linking to resources within the web application’s context path.
CHAPTER 5 ■ UNDERSTANDING VIEWS
119
This tag is most commonly used for linking to images and style sheets and again can be seen in
action in the views generated by scaffolding:
<link rel="stylesheet" href="${createLinkTo(dir:'css',file:'main.css')}"></link>
As is apparent from the previous examples and in Listing 5-19, both tags tend to be used
via method calls as opposed to markup, because the values produced by them are usually
nested within attributes of other tags.
Now that we’ve covered linking, another common activity is to create forms so that users
can enter data to be captured by server-side code. In the following section, you’ll see how
Grails makes this easier.
Creating Forms and Fields
A form is most commonly a collection of fields that a user populates with data, although
occasionally you find forms that consist entirely of hidden fields and no user interaction
whatsoever. Nevertheless, how this is achieved depends on the type of field; in other words,
the user interacts differently depending on whether it is a text field, a drop-down select, or a
radio button.
Clearly, certain fields map nicely onto existing Java (and hence Groovy) types. Check boxes
are great for Boolean values, text fields are good for strings, and selects are good when you have
strings that can be contained only within a certain list of values (such as enums in Java 5).
To this end, most Java web frameworks provide some mechanism to make form elements
(or fields) interoperate smoothly with Java types, Grails being no different. Before you get too
deeply involved in looking at the different kinds of fields, let’s take care of the basics by looking
at how Grails helps in defining forms.
The form Tag
Building on what you have seen in linking, the first tag you are going to look at is the <g:form>
tag, which is equivalent to the standard HTML <form> tag, except it allows the same arguments
as those shown with the <g:link> tag to allow easy submission to a specific controller and/or
action, as shown in Listing 5-20.
Listing 5-20. An Example Form Tag from grails-app/views/user/register.gsp
<g:form action="register" name="registerForm">
</g:form>
By default, the <g:form> tag uses the POST method for form submissions, meaning the pre-
vious example is roughly equivalent to the HTML definition (minus the closing tag):
<form action="/gTunes/user/register" method="POST" name="registerForm">
</form>